Medium hair is a sweet spot for wedding styling. It gives you enough length to twist, braid, and pin, but it does not drag the whole look down the way very long hair sometimes can. Add layers, and a layered half up half down for wedding medium hair suddenly gets movement at the ends, softness around the face, and a little lift at the crown without looking stiff.
The catch is that layers can also be fussy. Shorter face-framing pieces slip out, the ends can flip in different directions, and a style that looked calm in the mirror can loosen once you hug people, sit through dinner, and spend time under warm lights. More hairspray is not the answer. Better sectioning is.
What usually works best is a shape that controls the top half and lets the lower half move. A few well-placed pins, a braid that follows the head instead of fighting it, and a wave pattern that feels intentional but not overworked can do more for medium hair than a heavy stack of curls ever will.
The styles below lean into that balance. Some are romantic, some are polished, some are a little modern. All of them suit medium-length layered hair in a wedding setting, and all of them keep the same goal in mind: hold up through the day, look good from every angle, and still feel like you.
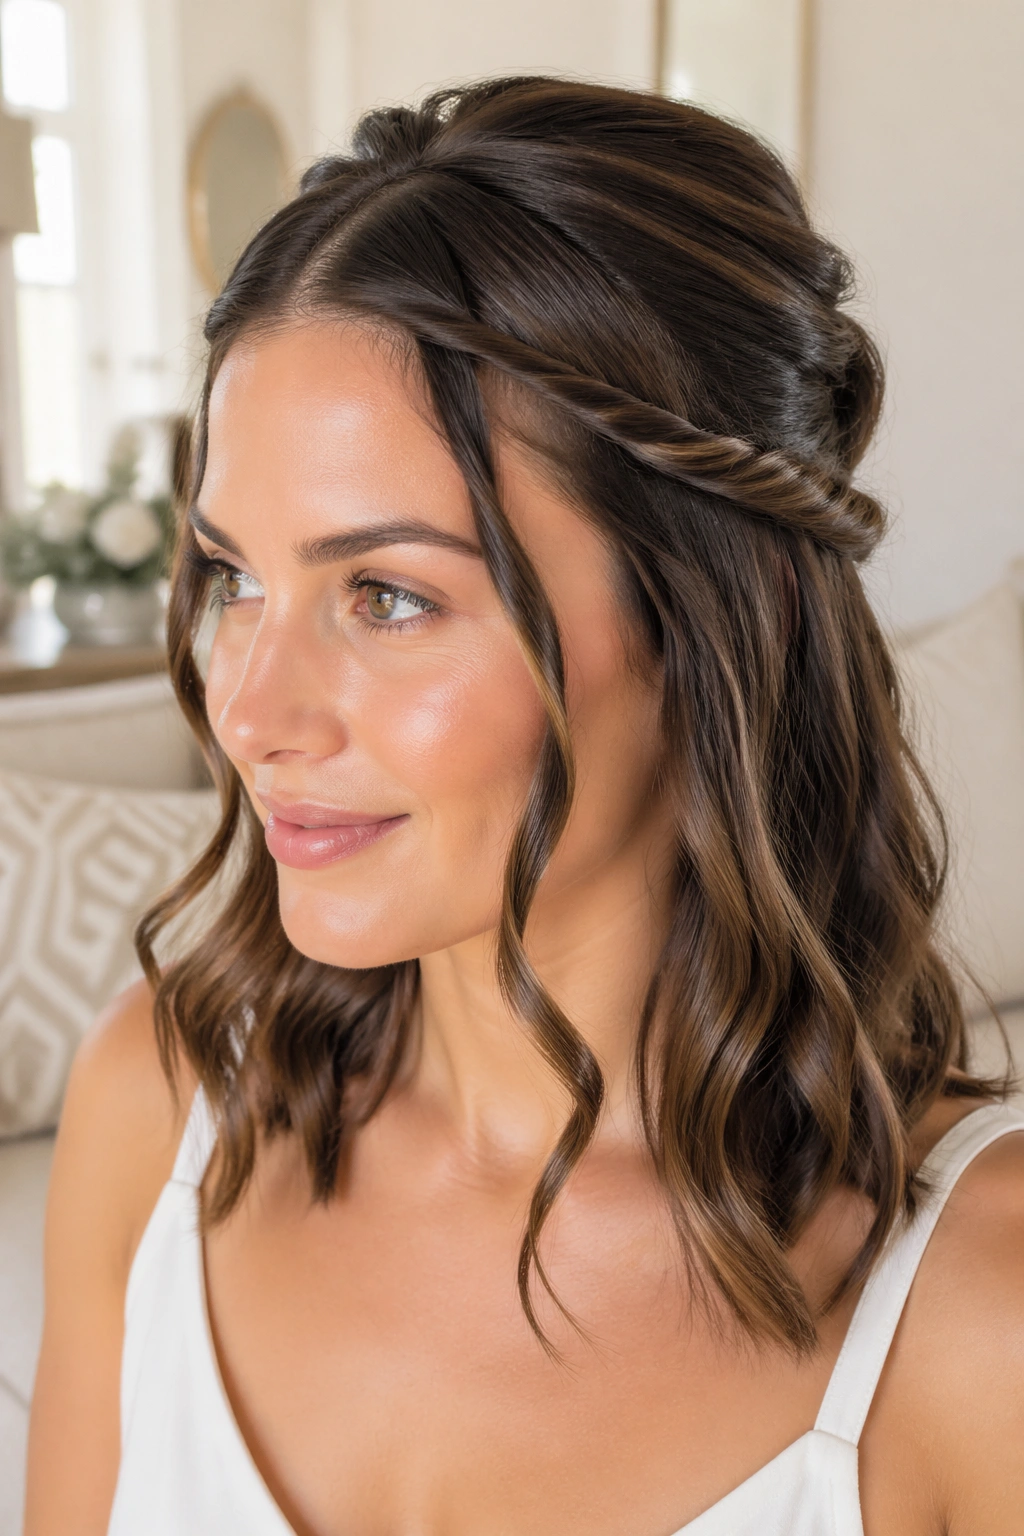
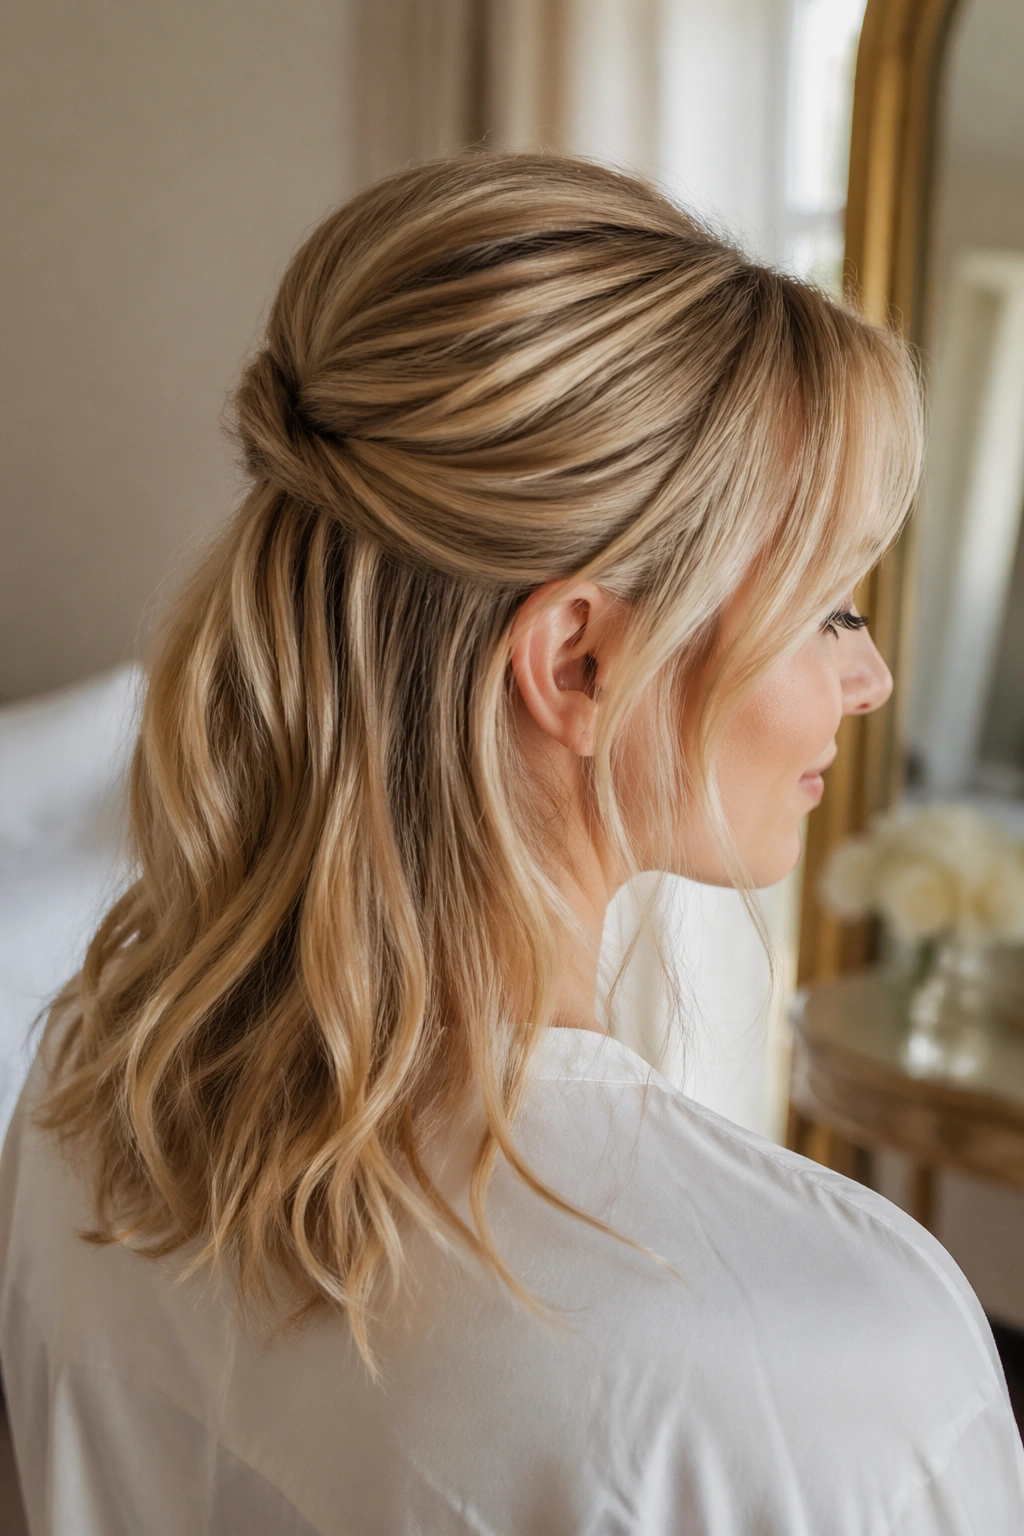
1. Soft Twists That Lift the Crown
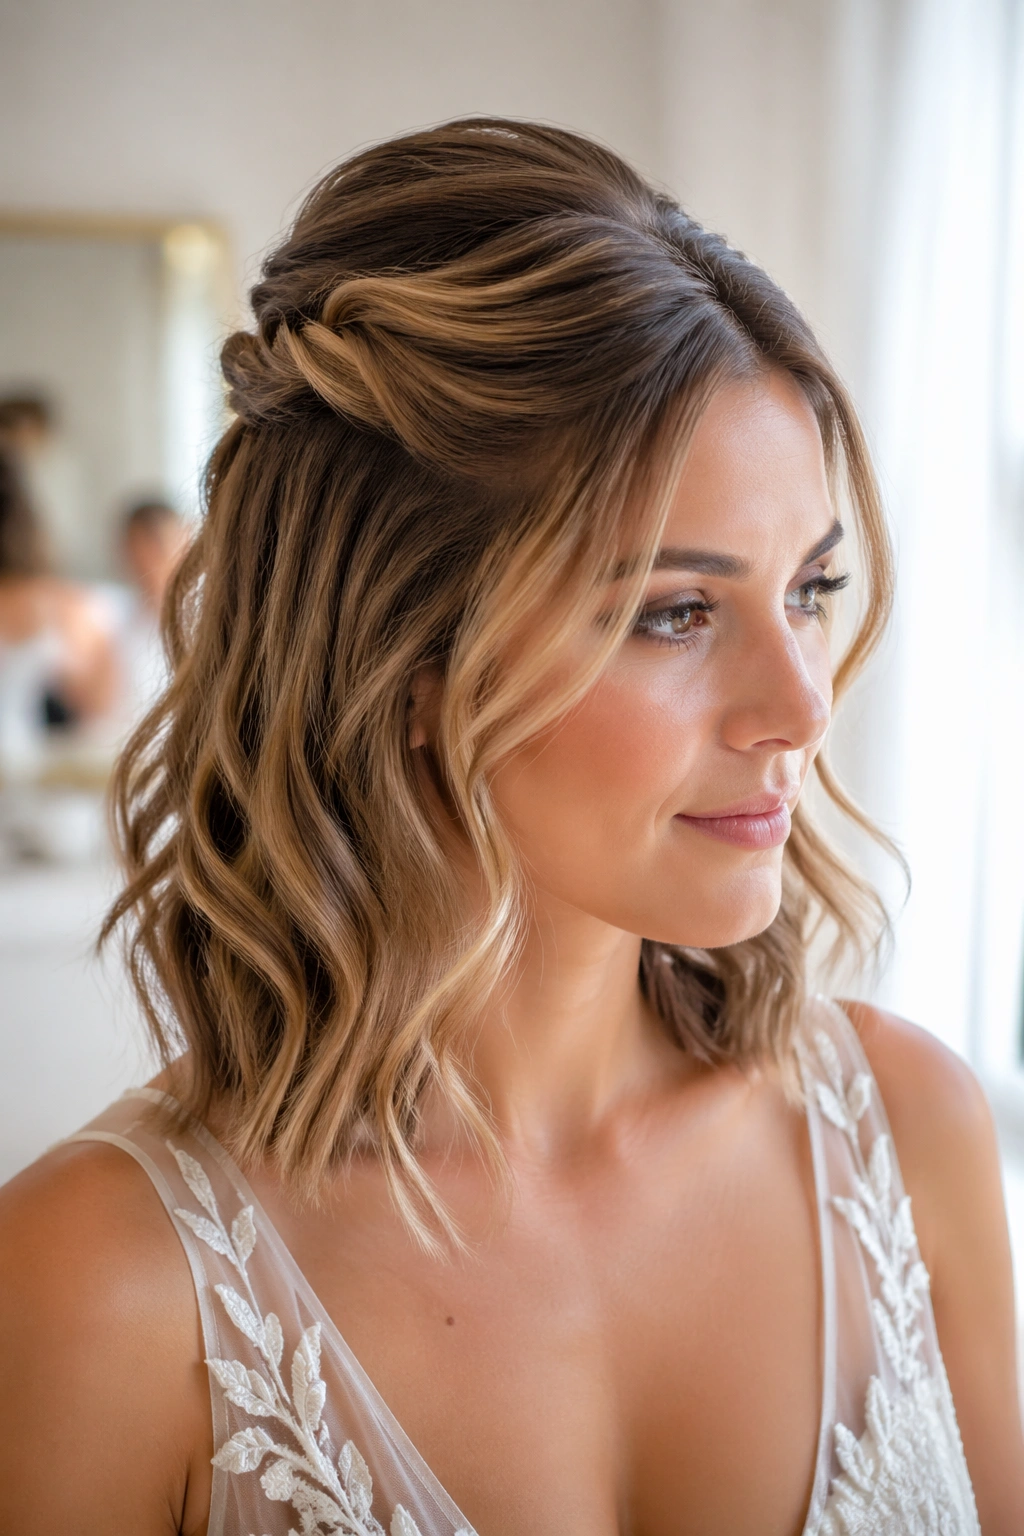
This is the safest place to start, and I mean that in the best way. Soft twists give layered medium hair enough shape to look dressed up, but they do not force every strand into place. The result feels airy around the temples and a little lifted at the crown, which is exactly where many wedding styles either shine or fall flat.
Why it flatters layered medium hair
The twists catch the longer top layers and leave the shorter pieces near the face to fall naturally. That matters. When you try to slick layered medium hair straight back, the little pieces around the hairline tend to pop loose anyway, so it makes more sense to work with them.
A 1-inch curling iron on the lower half helps the ends sit in a soft bend instead of a tight curl. Keep the twist point about 2 inches above the back of the ears, then pin with two crossed bobby pins on each side. That little cross makes a bigger difference than most people expect.
- Best for brides who want movement without mess
- Works well with a veil comb placed underneath the twist
- Looks good on collarbone-length cuts and shoulder-length cuts
- Needs only light teasing at the crown, not a full backcombing session
Tip: Pin the twist slightly higher than feels natural. It gives the face a longer line and keeps the style from sinking once the pins settle.
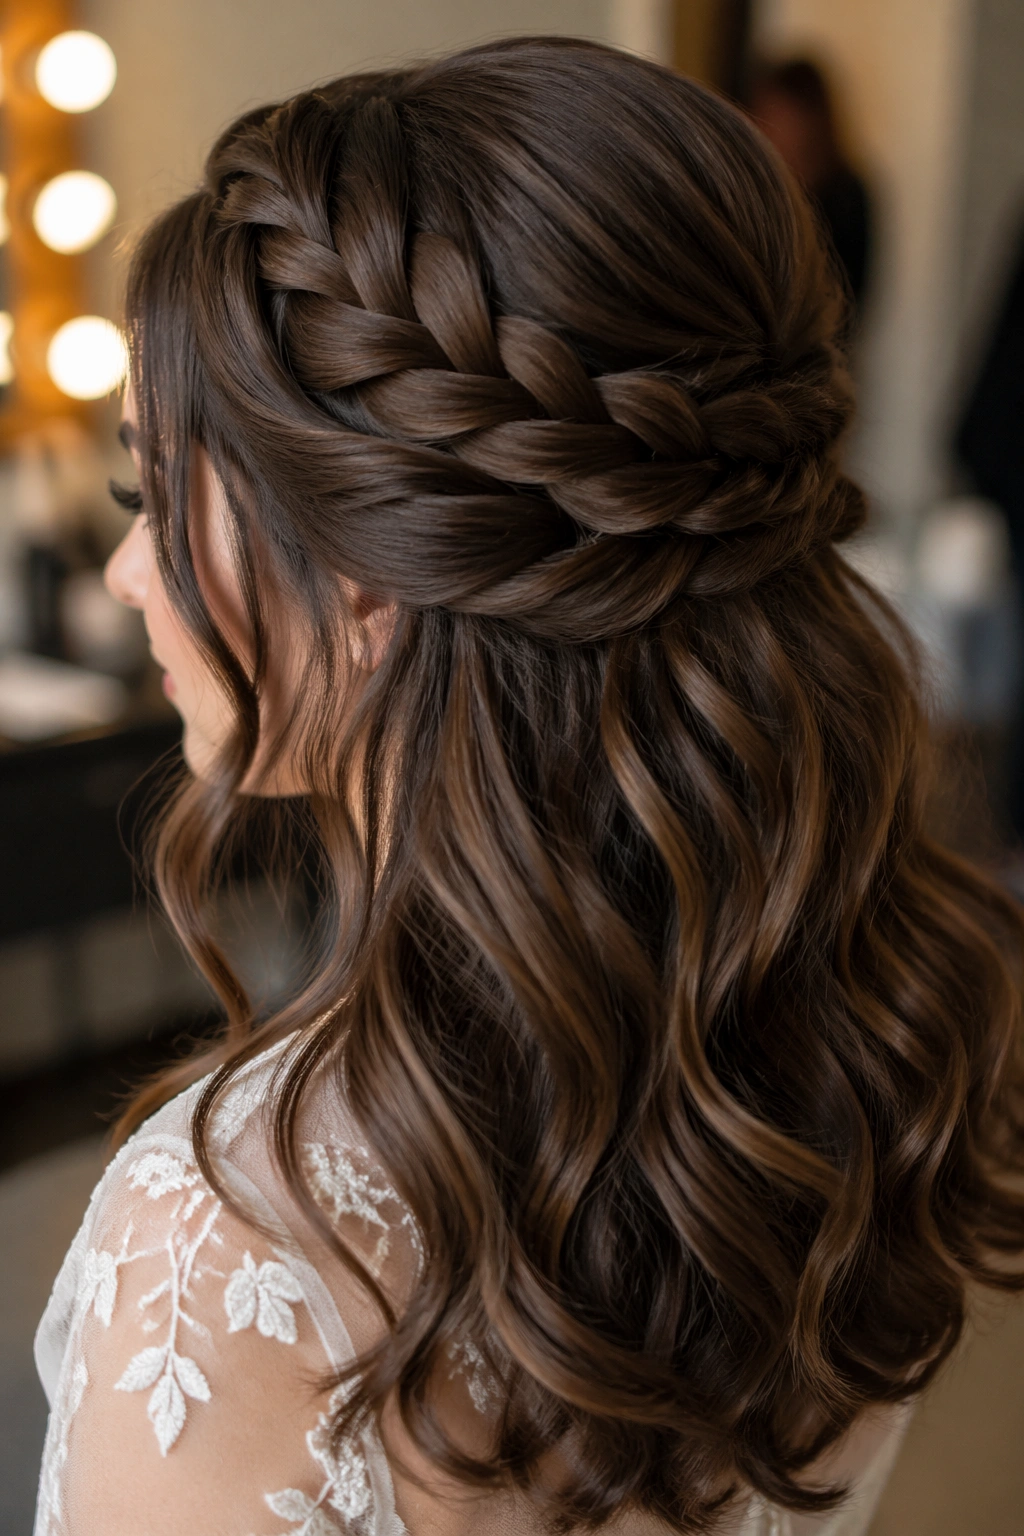
2. A Loose Halo Braid Over Waves
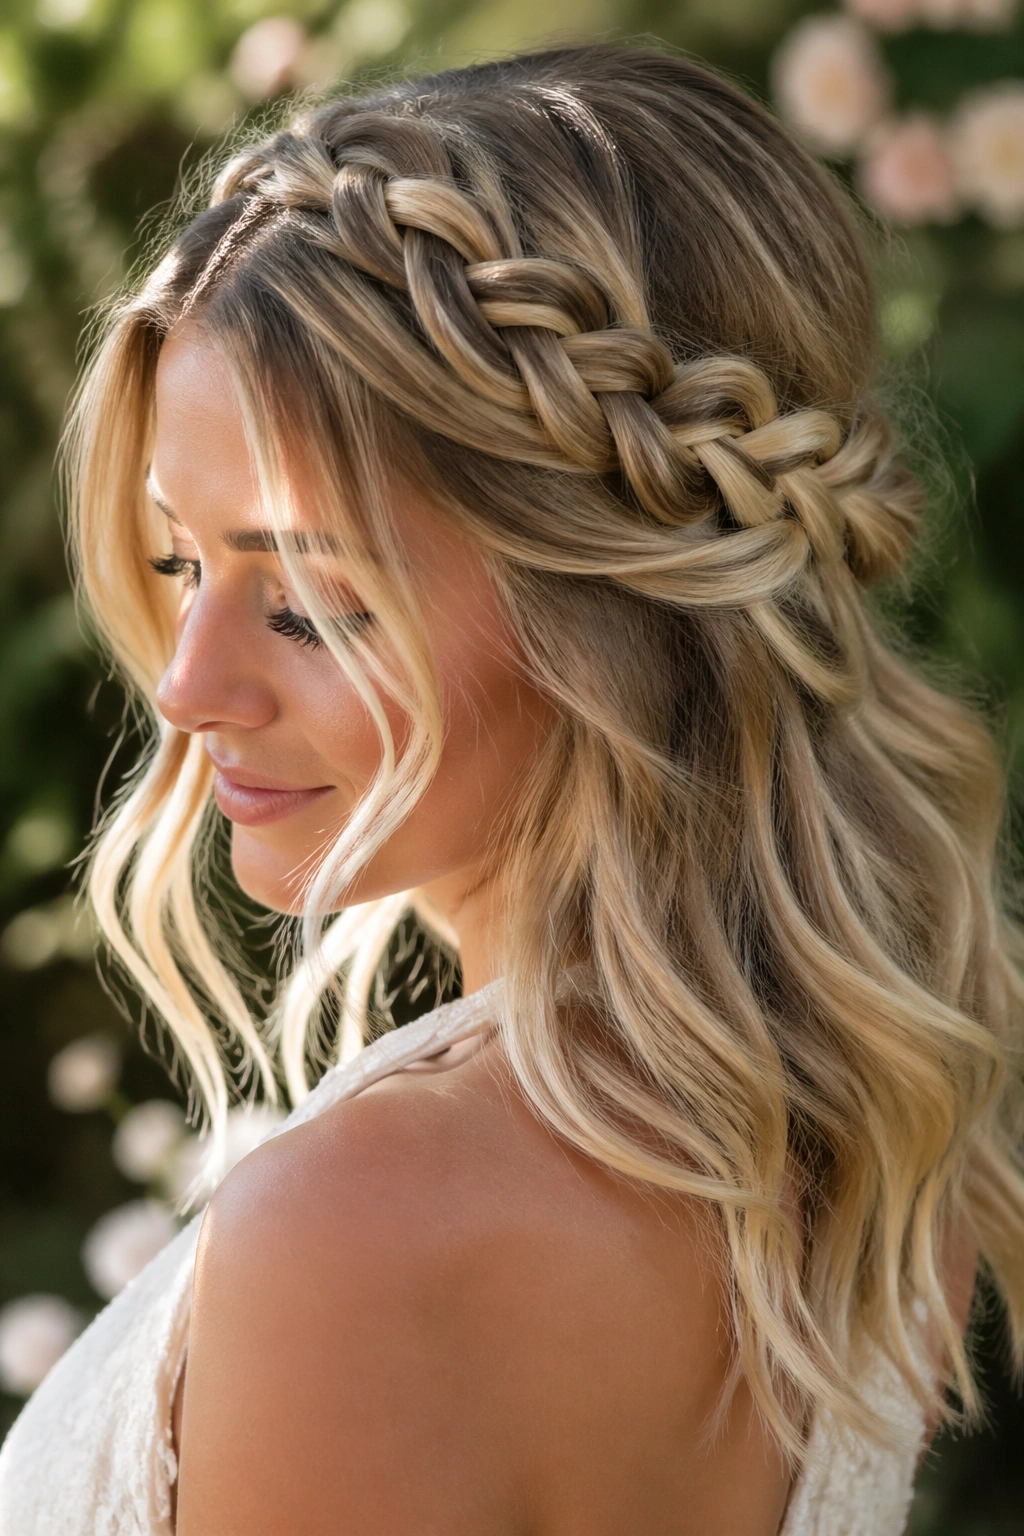
A halo braid sounds more complicated than it is. On layered medium hair, a loose braid that wraps from one side toward the back can be one of the easiest ways to make the top section look finished without hiding the length below it.
The braid should stay soft. Pull it apart with your fingers after it’s secured, especially if the layers are fine or slippery. You want the braid to look woven, not tight and flat like school-day hair. Leave the lower half in loose waves so the braid reads as a frame, not a helmet.
What I like here is the contrast. The top has structure. The bottom moves. That mix looks especially good on wedding dresses with lace, because the braid echoes the texture without competing with it.
If your hair is medium and layered, start the braid just behind one ear, then sweep it across the back and pin it discreetly on the other side. The braid does not need to be huge. It just needs enough width to hold its shape in photos.
3. Center-Parted Pins and Pearl Details
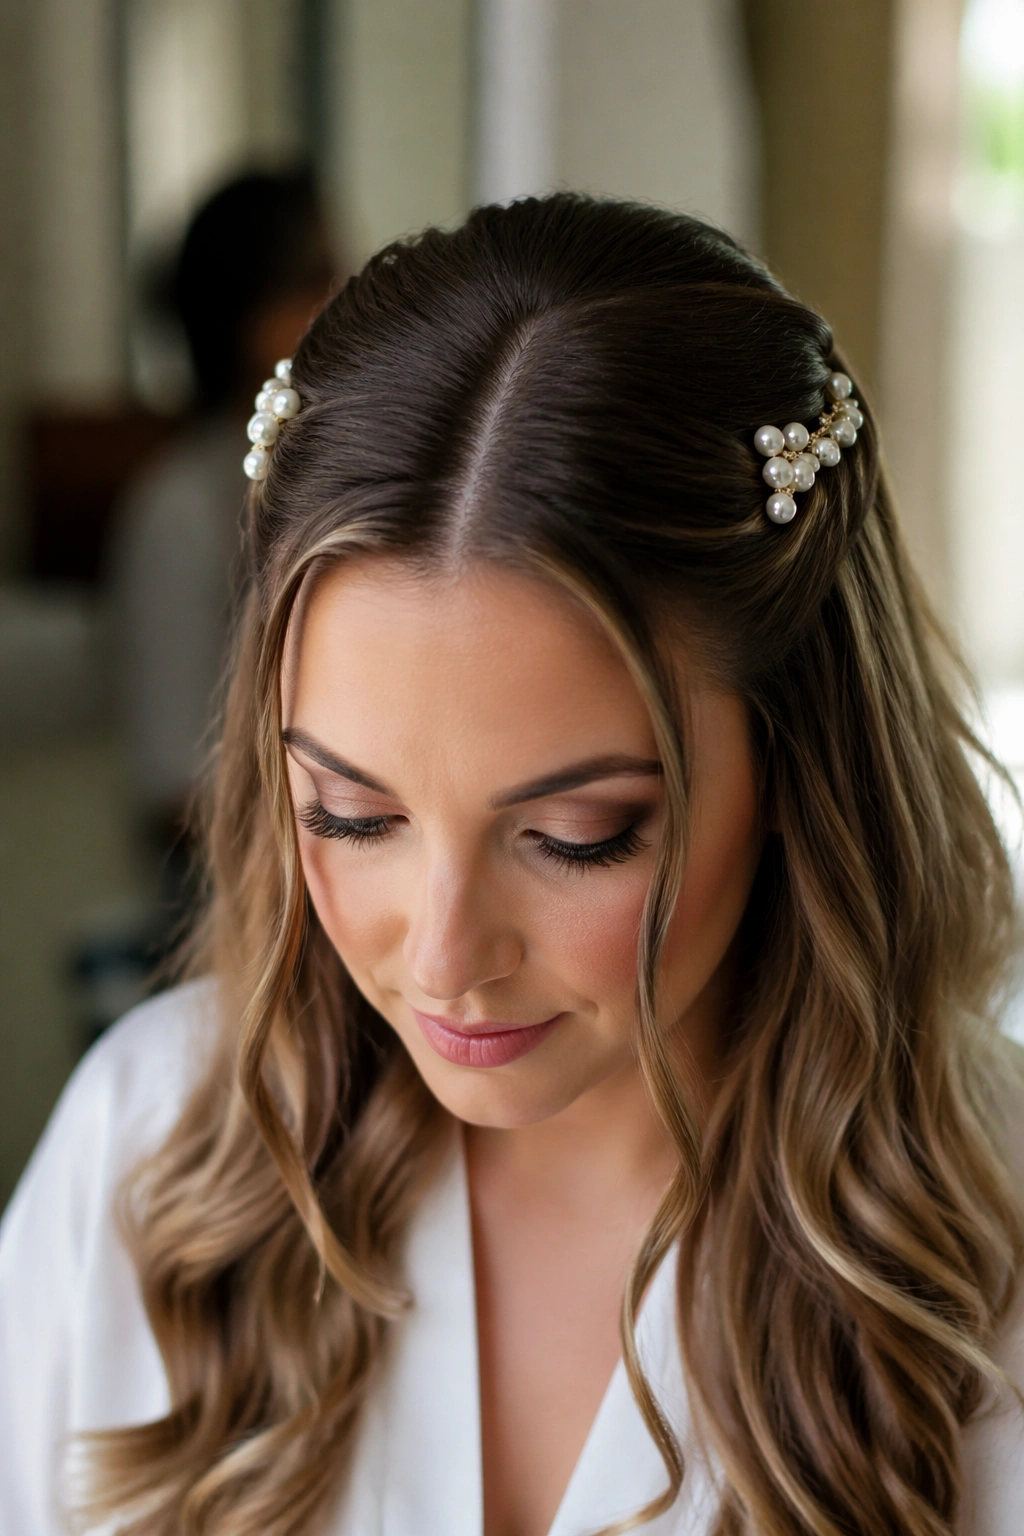
Clean center parts and pearl pins are a strong pairing for layered medium hair. The center part gives the face symmetry, while the pins keep the upper section from feeling too plain. If your dress has a simple neckline, this style gives you a polished finish without stealing attention from the rest of the look.
The trick is to keep the pinned sections low and narrow. You are not building a dramatic pouf here. You are making the top half look neat, then letting the lower half do the soft, moving work. A few pearl pins on each side, placed about an inch behind the temple, usually do more than a big accessory clipped in the center.
This look suits brides who want something refined and modern, but not severe. It also works well if your layers start around the cheekbones, because those shorter pieces fall naturally around the face and keep the center part from looking too flat.
Keep the waves in the bottom half loose and brushed out. If they are too polished, the style starts to feel formal in a tired way. A little texture keeps it alive.
4. A Textured Half-Bun with Tucked Ends
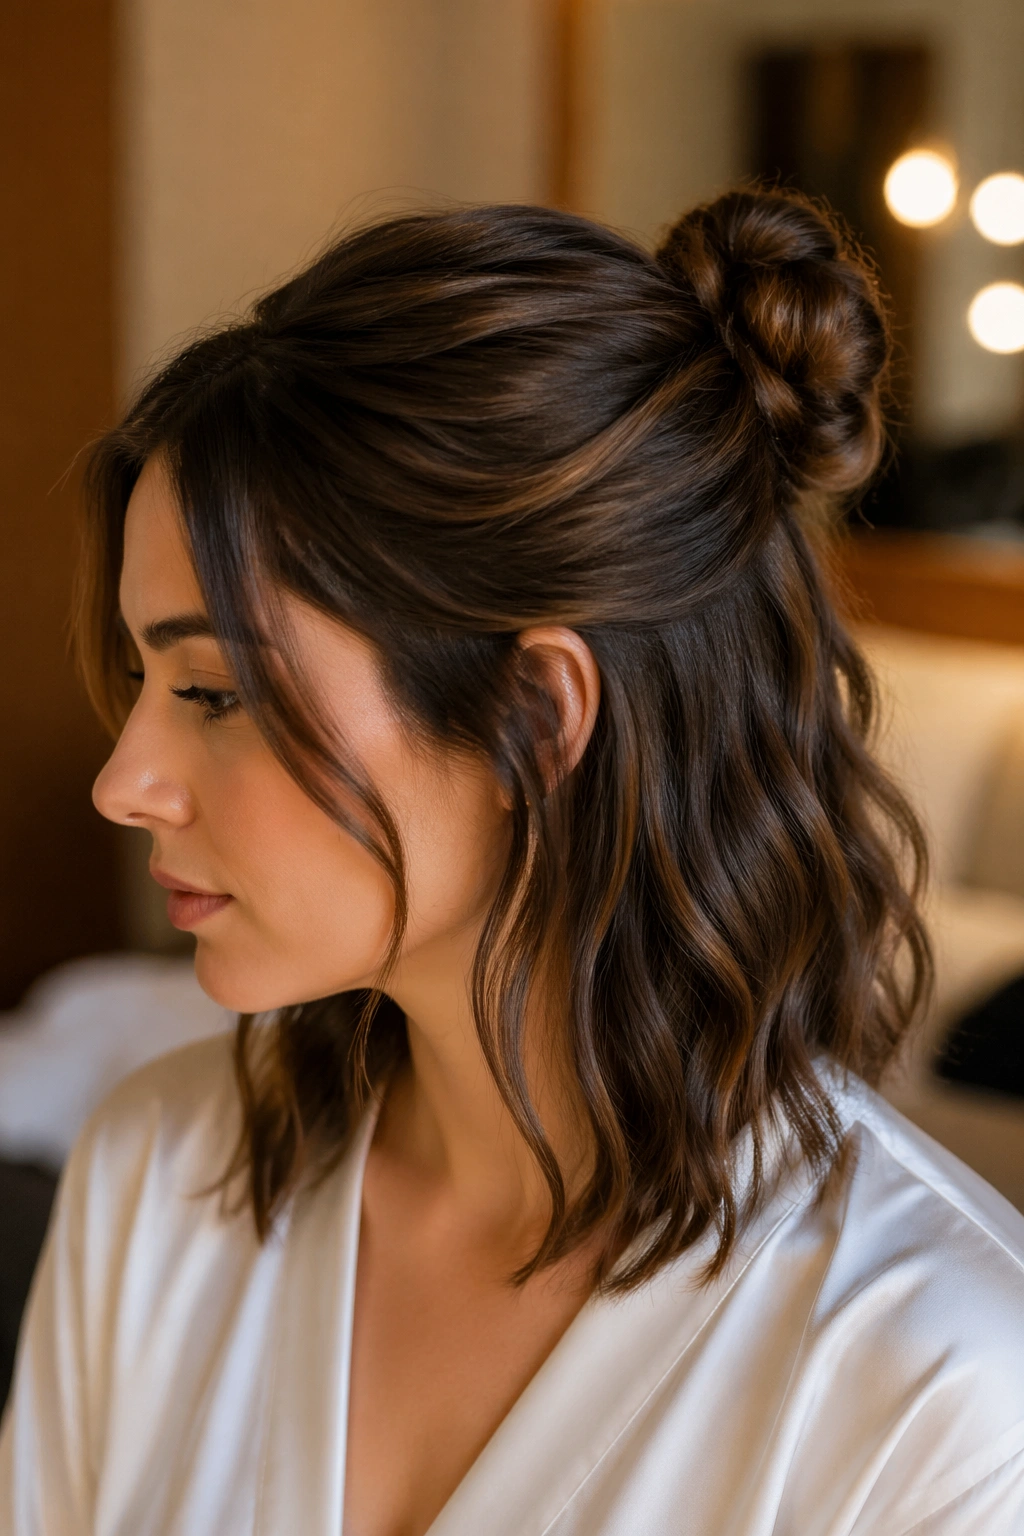
I keep coming back to this one for brides who want polish but do not want to look overly styled. A textured half-bun sits at the right height, holds layers in place, and still leaves enough hair loose to feel soft at the shoulders.
The key is where you place it. Too high, and the bun starts to look playful in the wrong way. Too low, and it can flatten the crown. The sweet spot is just above the point where the back of the head starts to slope. That gives the style a bit of lift and keeps the lower half balanced.
What makes it hold
- Use a small elastic first, then wrap a few strands around it
- Pin the bun from underneath so the pins disappear
- Leave 1 to 2 face-framing pieces loose on each side
- Spray the loose ends lightly after curling, not before
A half-bun can look casual if it’s done carelessly. Done well, it has shape, comfort, and a little edge. On medium hair, that mix is hard to beat.
5. Rope Twists That Stay Clean Around the Face
Why do rope twists work so well on layered wedding hair? Because they keep the sides smooth without needing the length a braid usually asks for. Two twisted sections take up less space than full braids, which makes them ideal for medium hair that sits around the shoulders.
The style starts by dividing the top half into two small sections on each side. Twist each one away from the face, then pin them together at the back. You can stop there, or feed them into a tiny bun-like anchor if you want more security. Either way, the look stays tidy around the cheekbones and still leaves the lower half open.
How to wear it
If your layers are short in front, keep those pieces slightly curled and let them fall around the jaw. That softens the twist and keeps the hairstyle from feeling too strict. A rope twist also works well with earrings, since the sides stay clear and the hair does not crowd the neckline.
It is one of those styles that looks simple from the front and more detailed from the side. That’s a good thing. Wedding hair should do that.
6. A Waterfall Braid That Lets the Layers Move
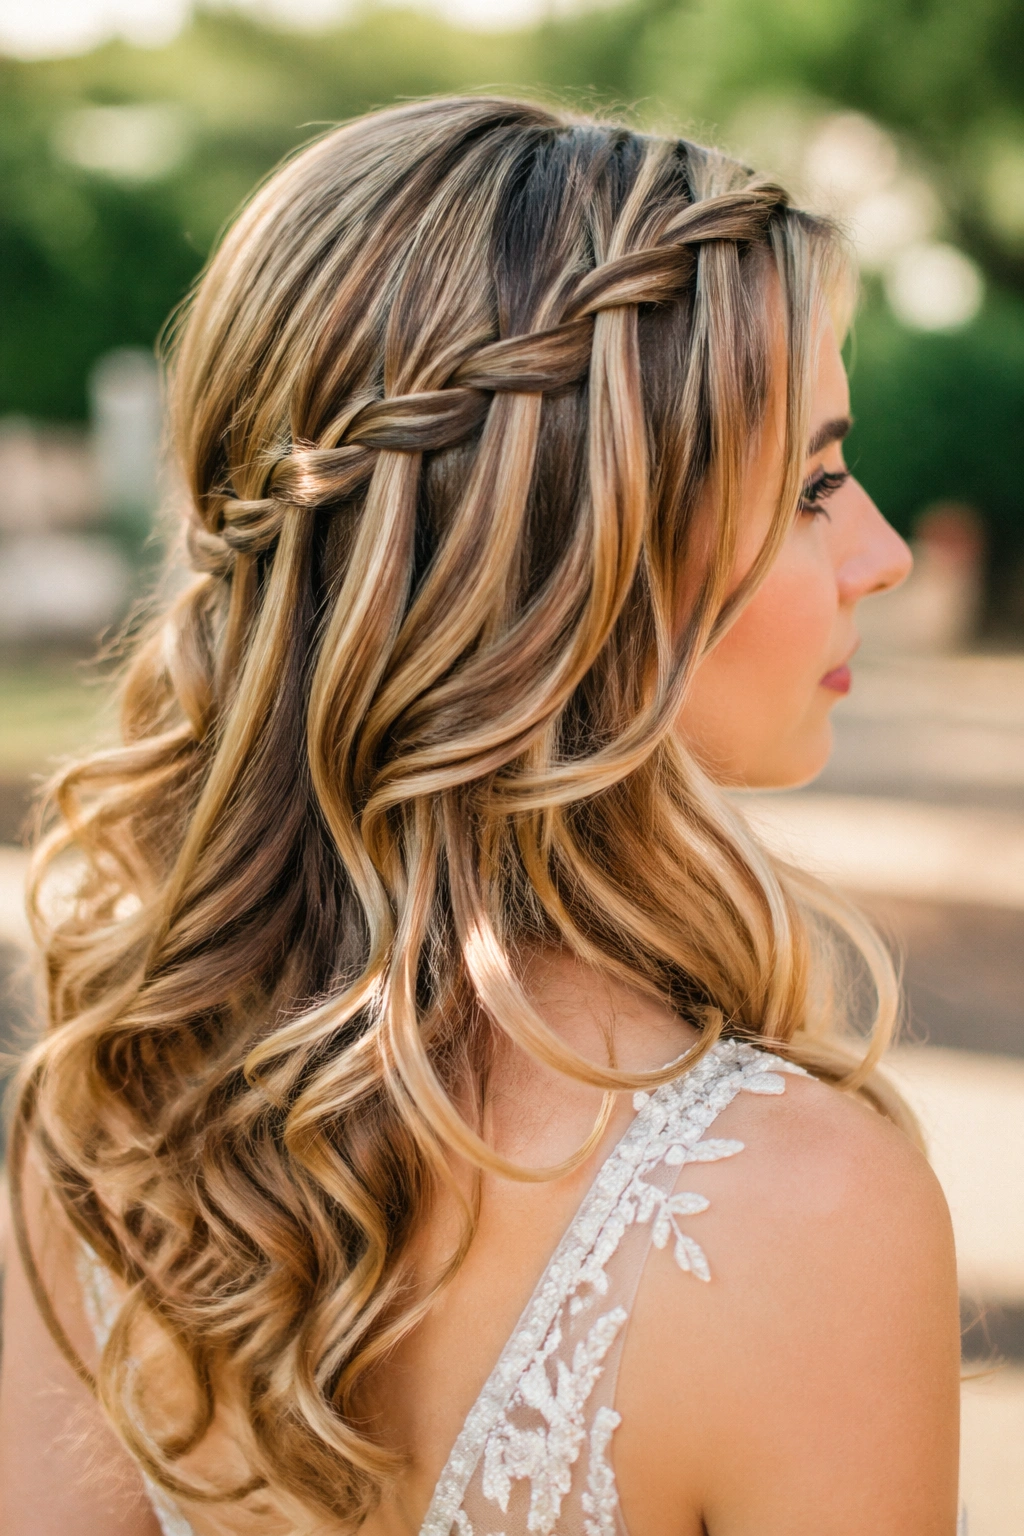
A full braid can swallow medium hair. A waterfall braid does the opposite. It releases strands as it goes, which makes it one of the best choices when layers are part of the haircut rather than something you are trying to hide.
This style is especially nice if the lower half of the hair is left in soft curls. The braid gives the upper section a clear shape, then the curls drop underneath like a second layer of texture. That movement looks better in photos than a style that freezes the whole head in place.
The braid itself should stay loose enough that the spaces between the woven pieces are visible. If you pull it too tight, the waterfall effect disappears and the layers end up looking chopped instead of soft. A little slack is the whole point.
This is one of the better choices for a romantic venue, a garden ceremony, or anything with natural light. The braid catches the eye without turning the hairstyle into the main event.
7. Bubble Sections Tied with Satin Ribbon

This one has a little more personality, and I like that for brides who do not want a generic wedding look. Bubble sections add a soft, rounded shape to the top half, and satin ribbon can make the whole thing feel more intentional and less sweet-shop than it sounds on paper.
Start with a small half-up ponytail, then place tiny clear elastics every 1 to 1.5 inches down the gathered section. Gently tug each segment outward so it forms a bubble, not a stiff cylinder. If the hair is layered, keep the bubbles smaller and closer together so the shorter strands do not pop free.
Satin ribbon works best when it matches one of the dress tones. Ivory, blush, soft gold, or even muted sage can work without looking fussy. Skip a huge bow unless the dress is very plain. A narrow tie or loop is enough.
This style is good when you want the back of the hair to look interesting from a distance. It has shape. It also has a little charm, which is not a bad thing at a wedding.
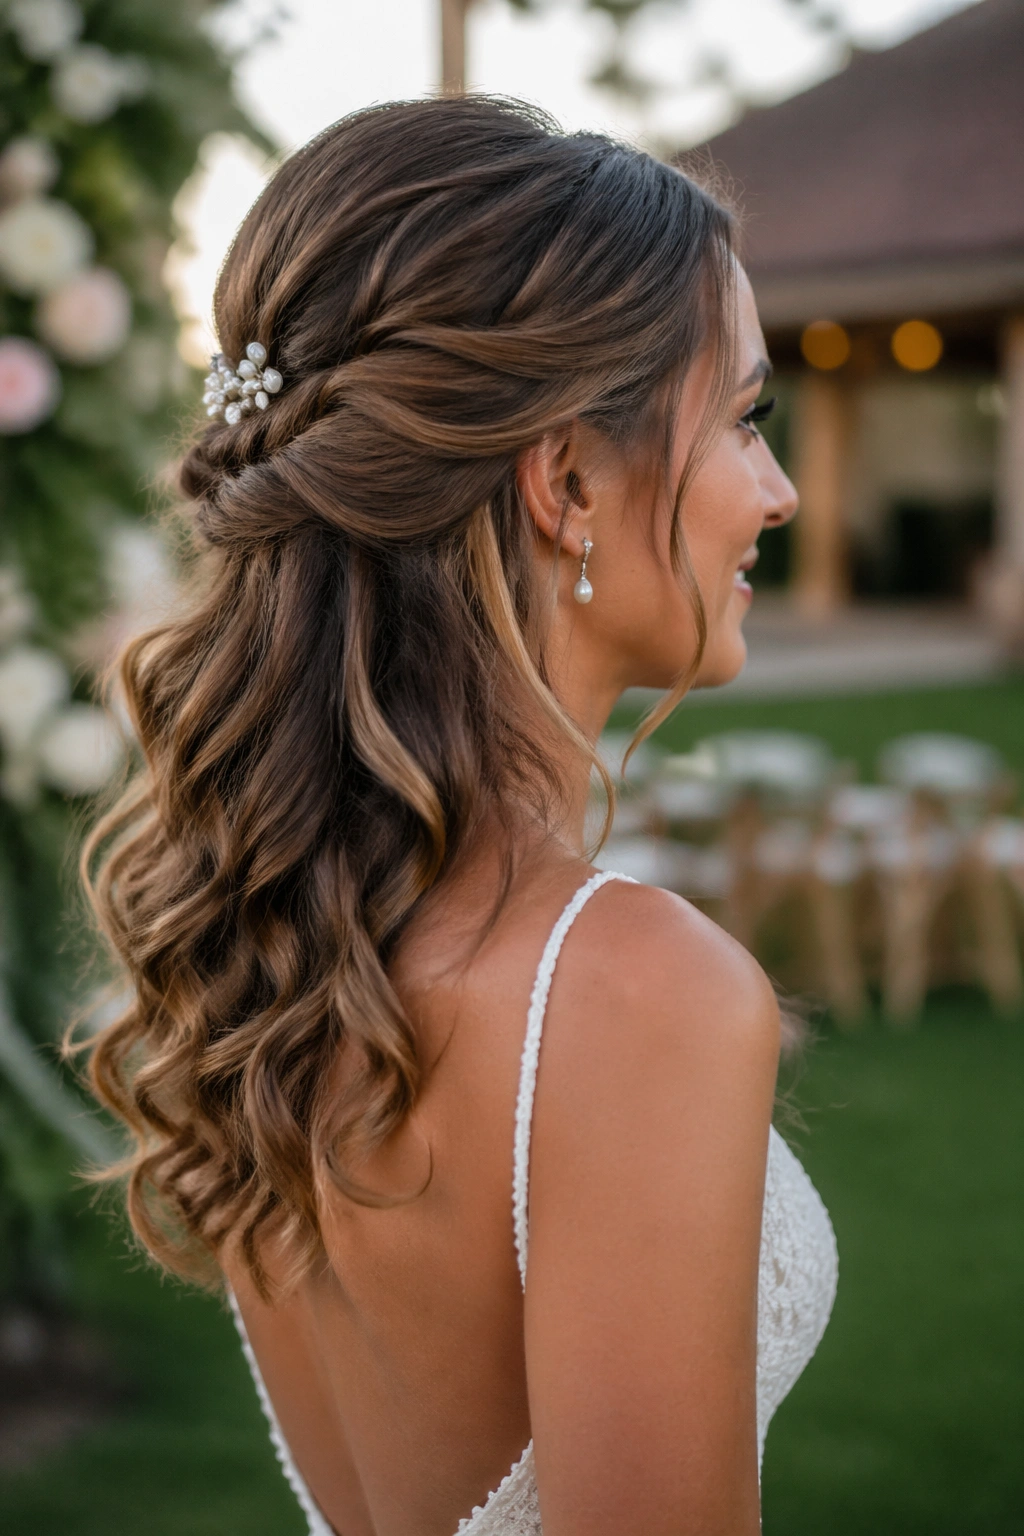
8. Knotted Half-Up with Glossy Waves
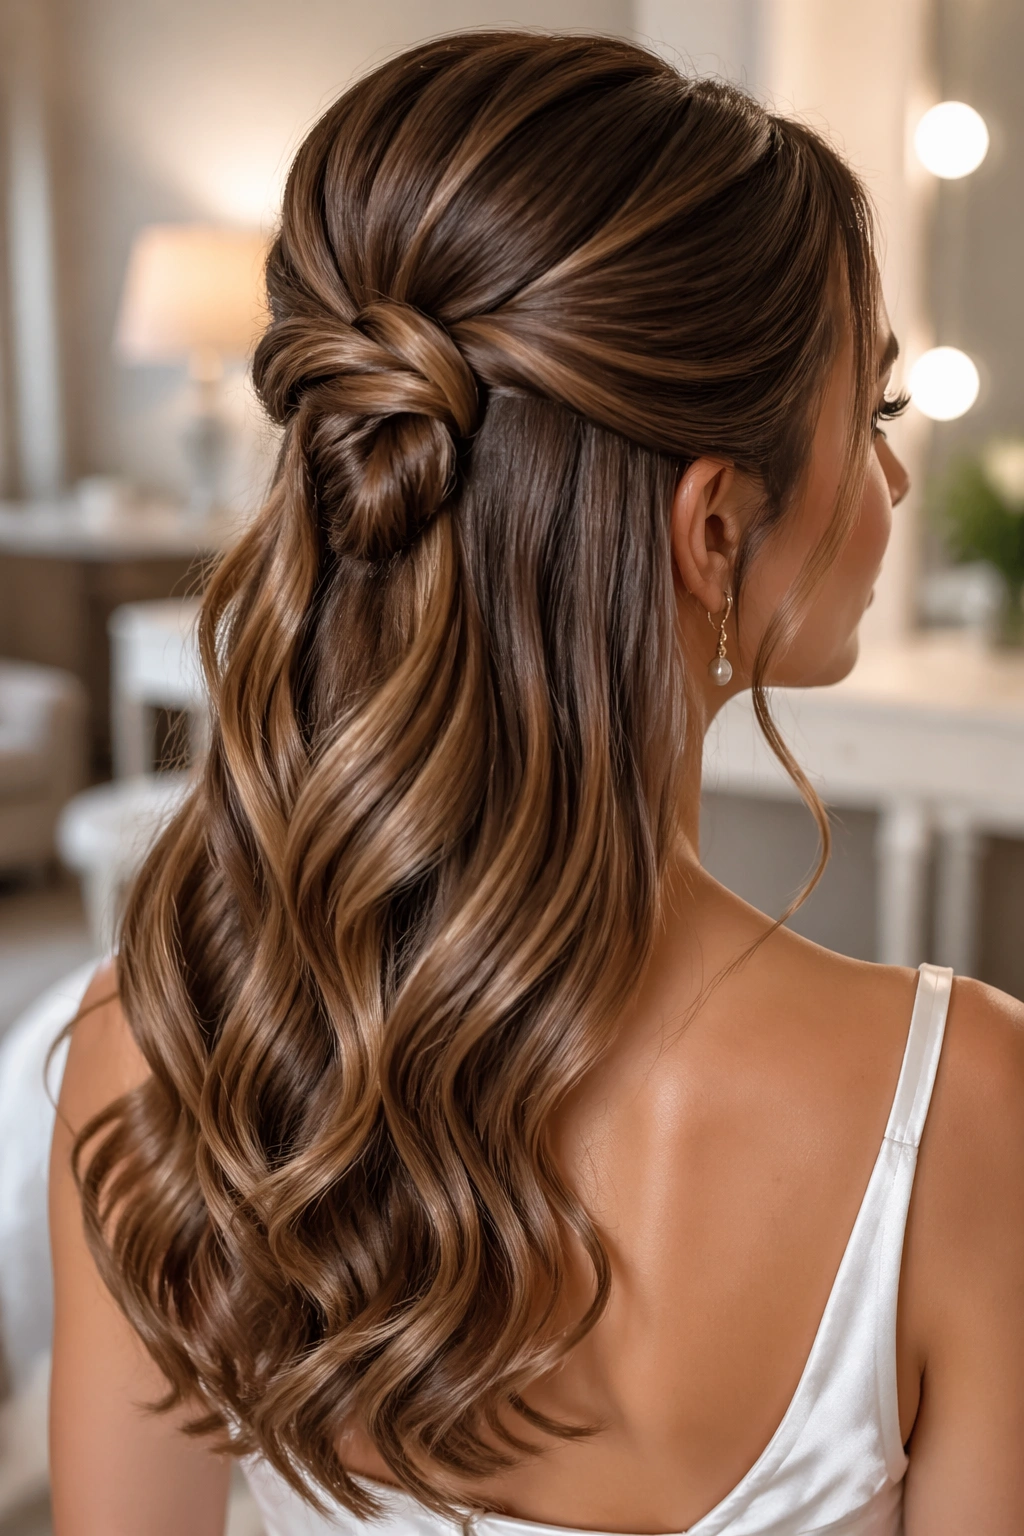
A knotted half-up style looks more intricate than it really is. That’s part of its appeal. Two sections are tied into a loose knot at the back, secured with hidden pins, and left to sit over the lower waves like a soft anchor.
Where the knot should sit
Place the knot low enough that it does not fight the crown volume. If it sits too high, it can flatten the top and make the lower half look disconnected. The best spot is usually right above the upper third of the head, where the eye reads it as part of the overall shape instead of a separate ornament.
This style loves glossy waves, not crunchy ones. The hair should bend, move, and reflect light in a soft way. A medium-barrel iron, around 1 to 1.25 inches, usually gives the right amount of curve for layered medium hair.
The knot itself can be smooth or slightly textured. Smooth reads more polished. Textured reads more relaxed. Both can work for a wedding, but the rest of the outfit should help decide. A sleek satin dress can carry the cleaner version. A lace dress usually pairs better with the softer one.
9. Side-Swept Half-Up for One-Shoulder Dresses
A one-shoulder dress asks for asymmetry, and the hair should listen. A side-swept half-up style does that beautifully by shifting the top section to one side and leaving the lower half to fall in a diagonal line across the back.
This is one of the most flattering options if you want the neckline to stay visible. The hair adds shape without covering the dress, and the layers around the face can be tucked more on one side while the other side stays a little looser. That contrast looks deliberate, not accidental.
The style works especially well when the waves are brushed only halfway through. Leave some definition in the ends, then soften the top so it does not look too crisp. If you want a little drama, choose an earring on the open side and let the hair sweep away from it.
It is a good reminder that wedding hair does not need to be centered to be balanced. Sometimes the most elegant move is simply letting the neckline lead.
10. A Double Braid Crown for Boho Ceremonies
Two thin braids can do more than one big one. A double braid crown has a looser, airier feel, which makes it a solid fit for boho weddings, outdoor vows, or any setting where the hair should feel a little less formal.
The braids begin at the temples, move back just enough to frame the crown, and meet at the back where they are pinned over the loose length. The rest of the hair can stay softly waved or lightly curled. The layers around the face should be left out or pulled free in tiny pieces so the style does not start to look boxed in.
How to keep it soft
Pull the braid edges apart once they’re secured. Not aggressively. Just enough to widen them by a few millimeters and soften the line. That tiny bit of widening makes the braid read fuller and keeps layered medium hair from looking too thin at the top.
This style pairs well with dried flowers, tiny combs, or nothing at all. It can stand on its own, which is part of the reason it keeps coming back in bridal styling.
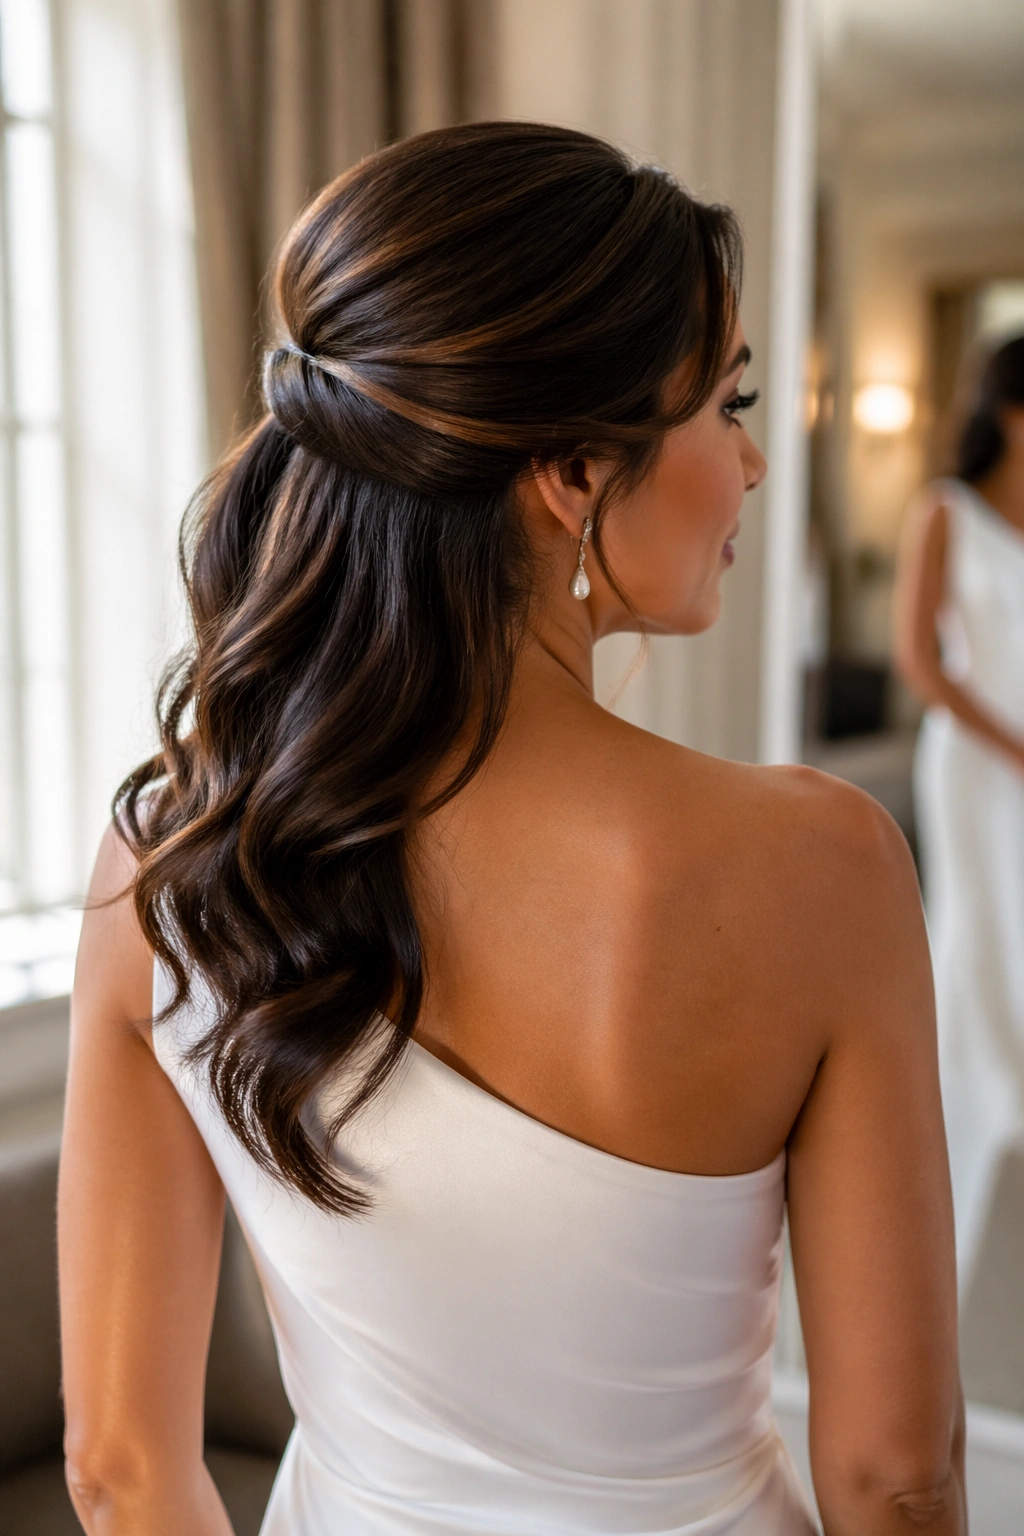
11. A Wrapped Half-Up Ponytail With a Clean Base
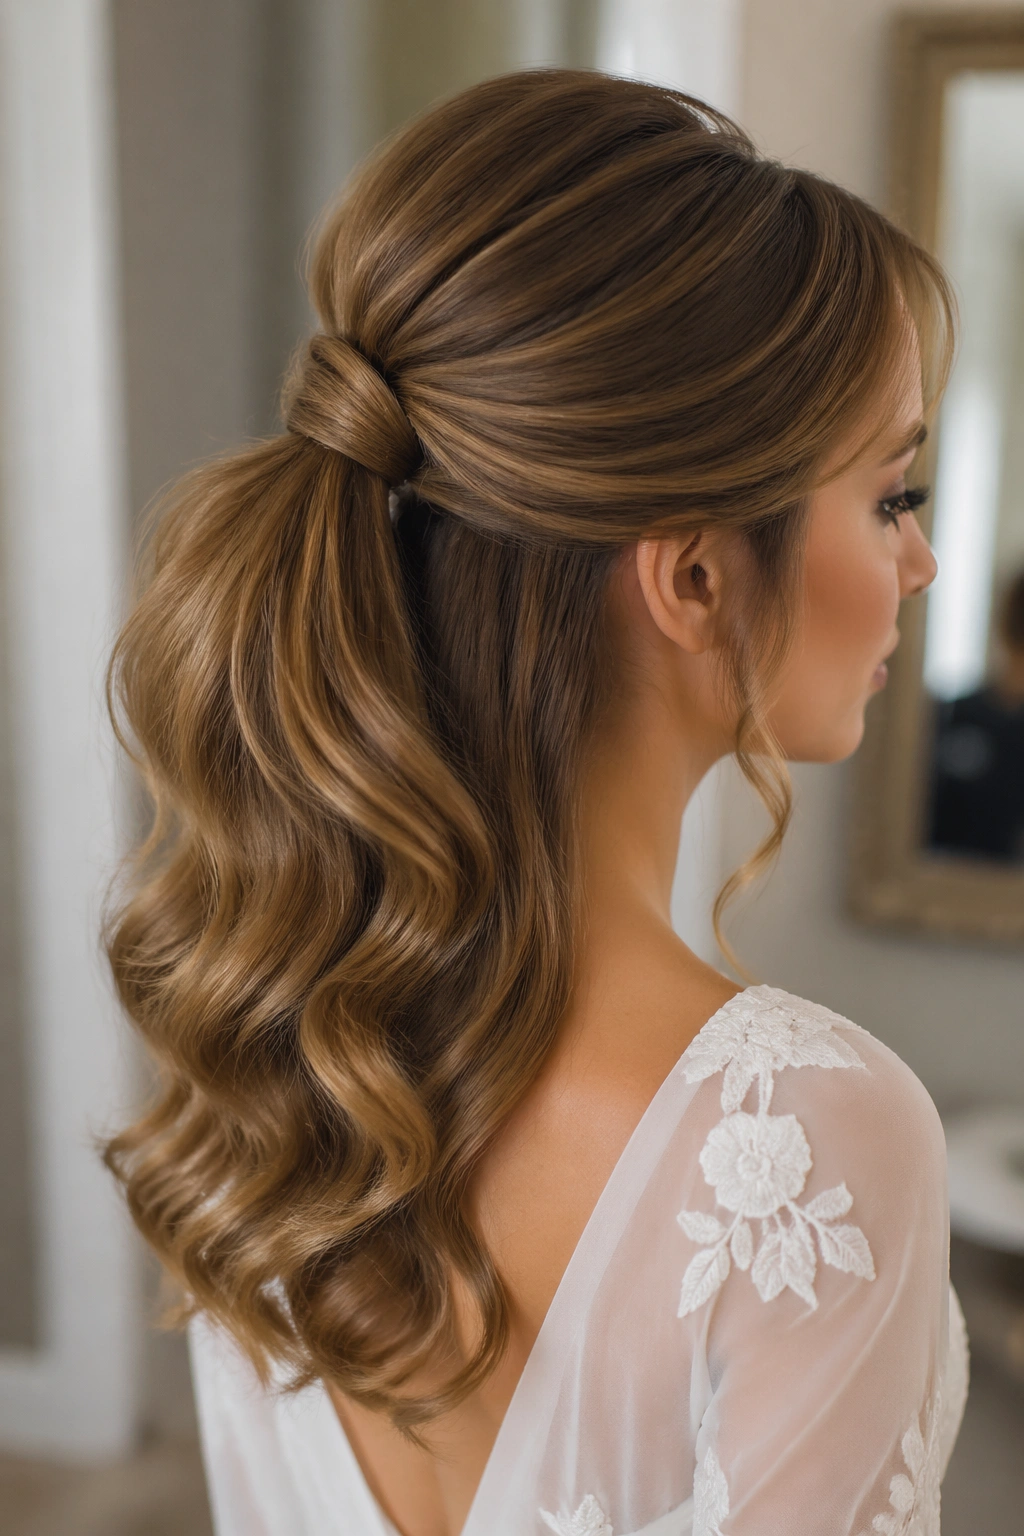
A wrapped half-up ponytail is the polished cousin of the casual half-up style. It still gives you the lift and control at the crown, but the wrapped base makes it feel finished enough for a wedding. On layered medium hair, that matters because a plain elastic can look too everyday once the rest of the outfit gets formal.
The ponytail should sit at mid-crown, not high like a gym style. Wrap a small strand around the elastic and pin it under the ponytail so the base disappears. Then curl the lower half in large, soft bends. If the layers are short, leave the front pieces slightly curved toward the cheekbones so they do not sit out in awkward little flips.
- Best with satin dresses or clean necklines
- Good for brides who want comfort through a long day
- Easy to pair with veils, combs, or a narrow barrette
- Looks stronger on hair that has some root texture
This is not a fussy style. That is why it works. It looks tidy, not stiff, and medium-length layers have enough movement to keep it from feeling overbuilt.
12. Floral Sprigs Hidden in Soft Waves
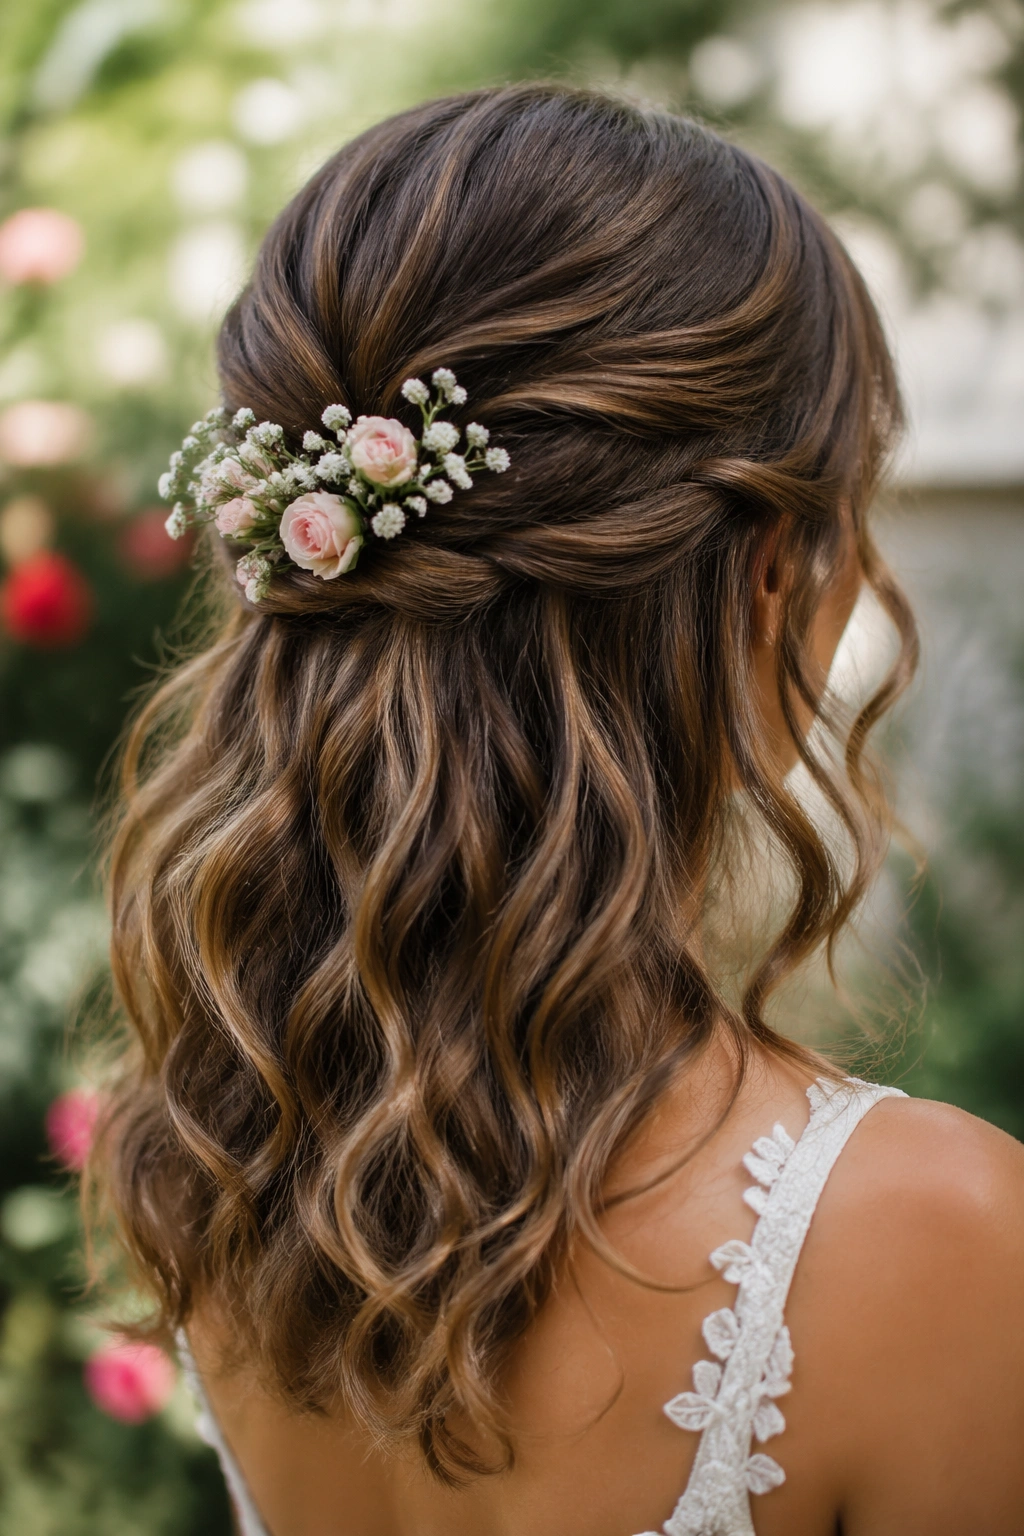
Flowers in the hair can go wrong fast. Too many, and the style looks crowded. Too few, and they disappear. The sweet spot is somewhere in the middle, where the flowers are tucked into the half-up anchor and let the waves carry the rest of the design.
Small blooms work best here. Baby’s breath, tiny spray roses, preserved greens, or a single sprig of waxflower can sit beside the twist without taking over the hairstyle. If your bouquet has one or two signature flowers, echo those instead of trying to copy the whole thing. That tends to look calmer.
The lower half should stay soft and touchable, not sprayed into helmet territory. Layered medium hair gives the flowers a nice landing place because the short pieces around the face break up the shape and stop it from looking too formal.
This style has one simple rule: keep the flower placement clustered. A few deliberate spots look intentional. Random scattering does not.
13. A Vintage Roll With Curved Ends
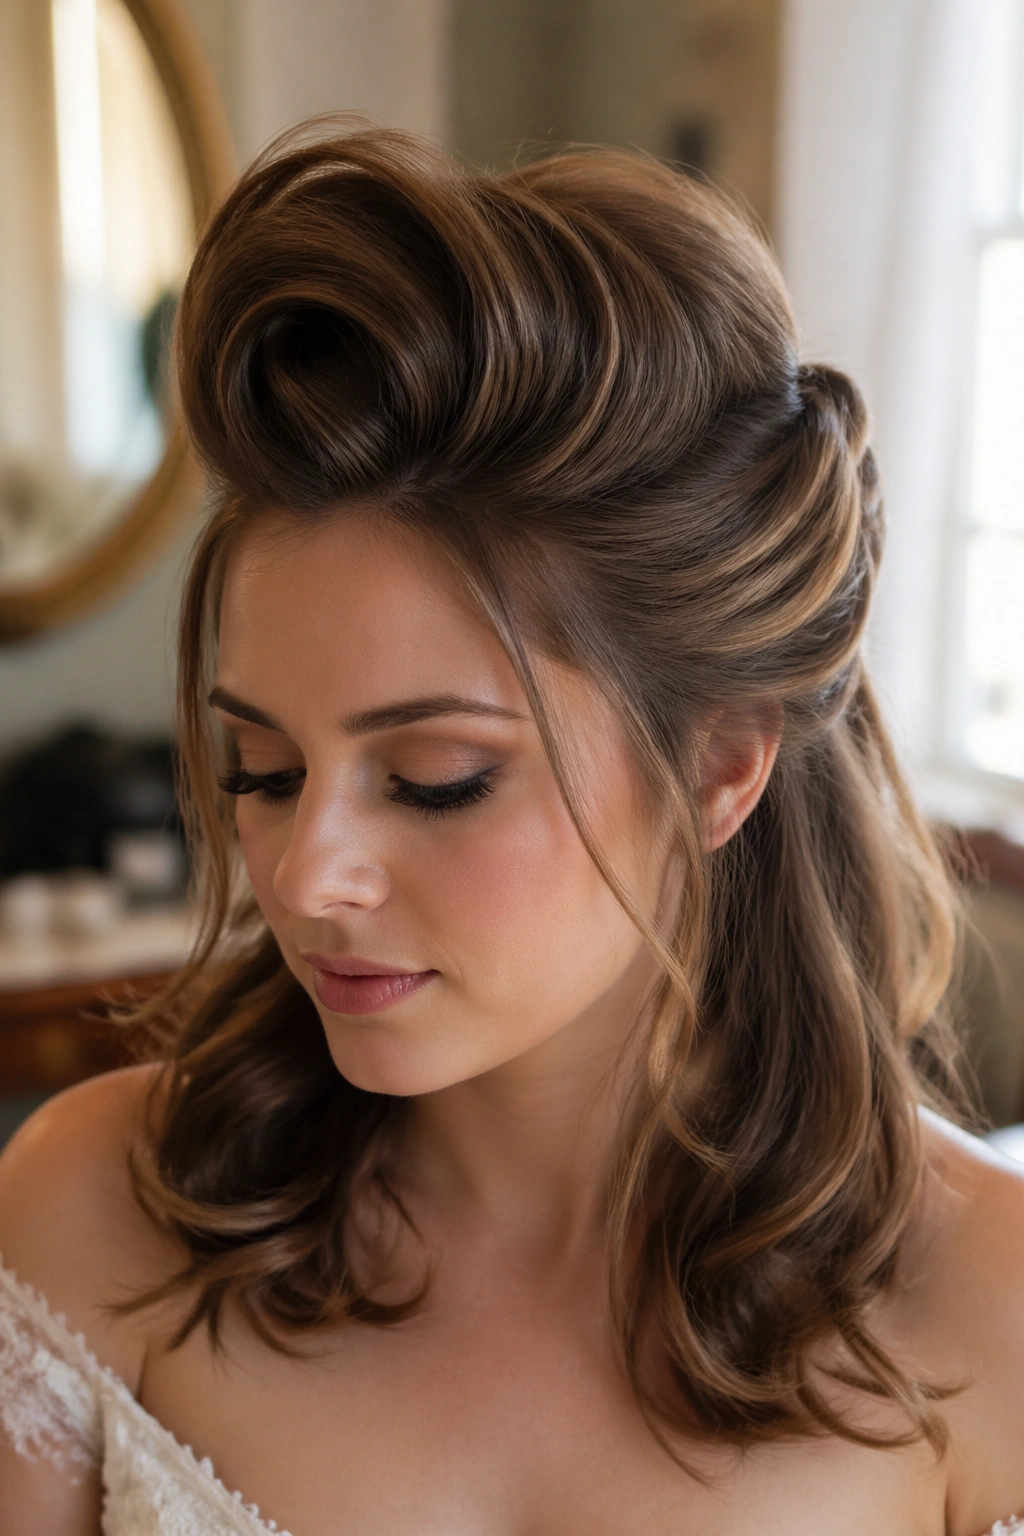
Vintage rolls are not everyone’s taste. Fair enough. But when they’re done on medium hair with layers, they can look striking in a way that loose romantic styles sometimes do not.
The top section is rolled back toward the crown, pinned cleanly, and supported with enough teasing underneath to keep the shape from sinking. The lower half is curled under or outward, depending on whether you want a softer retro shape or a sharper one. The ends should have a curved, groomed finish. Not stiff. Groomed.
This style works best if the dress has a little structure. A satin bodice, a square neckline, or a gown with clean seams can handle the old-school feel. It also looks especially good with a strong lip or bold earrings, because the hair itself already has a clear shape.
The biggest mistake is making the roll too small. On medium hair, a tiny roll can disappear. You need enough width for it to read from more than one angle.
14. The Fine-Hair Version of Layered Half Up Half Down
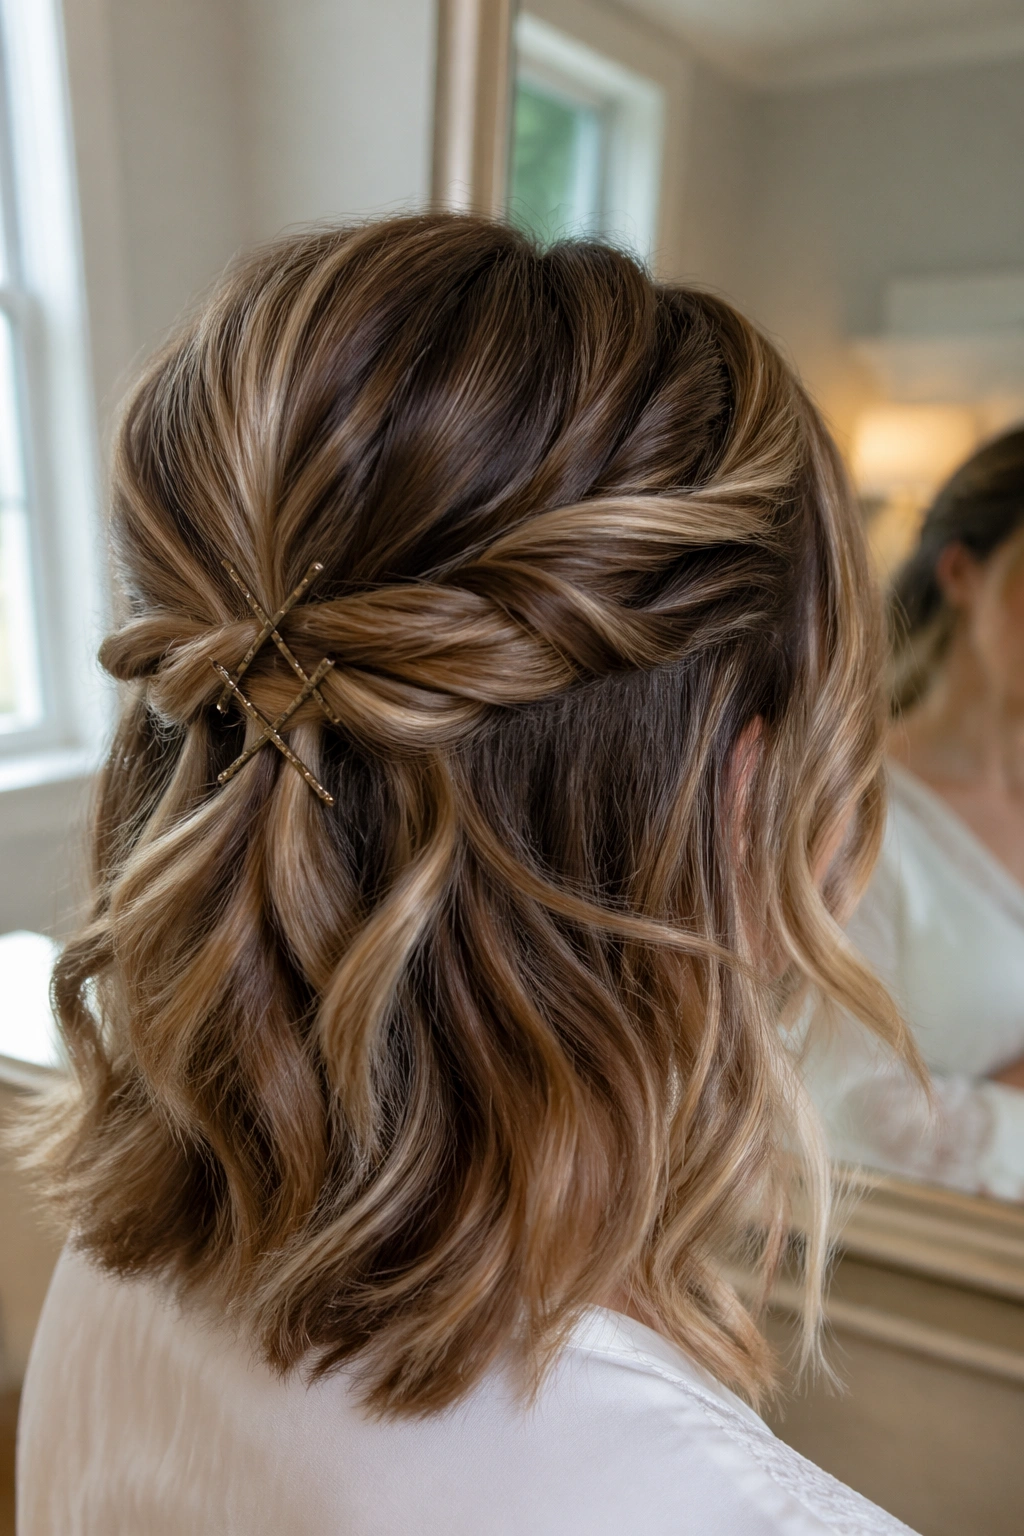
Fine hair needs a different approach. Not more hair. Better support. If your medium-length layers tend to collapse by the end of the day, the answer is to build a style that gives the root area some structure without loading the head with products.
What adds lift
A light mousse on damp roots, dried in with a round brush, usually works better than trying to fix everything later with spray. Then take the top half into a soft twist or a small half-pony and anchor it with pins that cross underneath. The crossing keeps the hair from sliding when the weight of the lower half pulls on it.
- Use small sections, not wide ones
- Keep the bottom curls brushed out a little
- Avoid very heavy clips that drag the crown down
- Choose accessories with thin prongs or small combs
Fine hair can look elegant fast when the top is controlled and the ends stay soft. The danger is overdoing the tease. A little volume is enough. Too much and the style starts to look dry, which is not the mood anyone wants on purpose.
15. The Thick-Hair Version That Keeps Its Shape
Thick layered medium hair is a gift and a headache. It gives you volume, body, and a nice natural hold, but it can also make a half-up section feel heavy if you try to gather too much at once.
The solution is to work in smaller sections and keep the top half distributed across the head instead of stacked in one lump. A double twist or wide braid often handles thick hair better than a tiny knot because the weight spreads out. That keeps the style from sinking at the back of the head three hours later.
How to keep it from sagging
Use two hidden anchors instead of one visible pin cluster. One on each side of the back section usually steadies the style better. Also, do not overcurl the lower half. Thick hair already has body; too much curl can make it feel bulky and hard to move.
Accessories should stay light. A giant comb can feel crowded fast on thick hair. Small pearl pins, narrow vines, or a single side piece usually look better because the hair already carries enough visual weight.
16. The Curly-Hair Version That Protects Texture
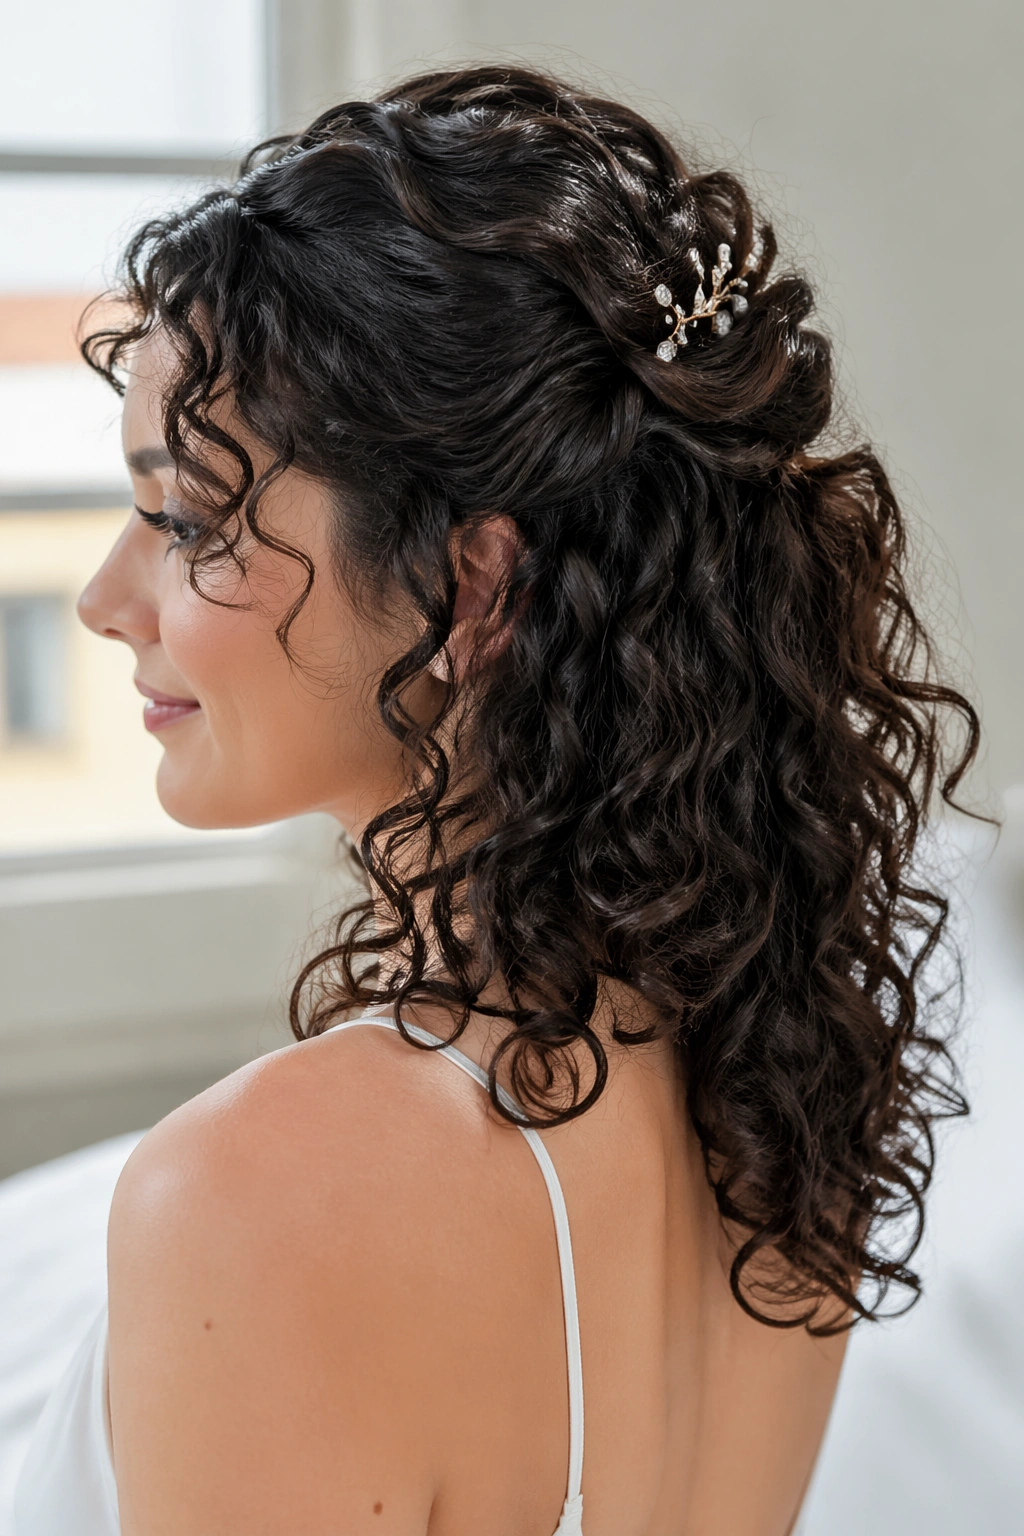
Curly layered medium hair should not be forced into a style that fights the curl pattern. That is the fastest way to end up with flat roots and frizz at the ends. A good half-up style for curls keeps the top secure while letting the lower half stay itself.
The crown section can be smoothed only as much as needed to pin it back. Leave the curl clumps below untouched, or refresh them with a bit of water and styling cream before the event. If the curls are stretched out, the whole hairstyle loses its life. Better to define them than to flatten them.
A small twist, a puffed half-up, or a pinned-back crown works especially well here. The layers around the face will naturally spring free, which is useful. Do not fight that. Curly hair usually looks better when there is a little controlled softness near the front.
This is one of those cases where less styling often gives more beauty. The texture already does half the work.
17. The Straight-Hair Version With Bend and Shine

Straight layered medium hair can look sleek, but it can also fall flat in wedding photos if there is no bend in it at all. The answer is not a full curl pattern. It is a soft bend through the ends and a bit of lift at the roots.
A flat iron can create that bend quickly. Turn the wrist just slightly as you move through the bottom third of each section so the ends curve inward or outward in a gentle line. Then pull a few face-framing pieces loose around the cheeks. Those pieces keep the top from looking too severe.
Shine matters here. A small amount of smoothing serum on the mid-lengths and ends gives the hair a finished look, but keep it away from the crown or the style may slip. Straight hair tends to show every pin mark and every crease, so place the pins where the top layer can hide them.
The result should feel clean, not flat. There is a difference.
18. Veil-Friendly Placement That Won’t Fight the Hair
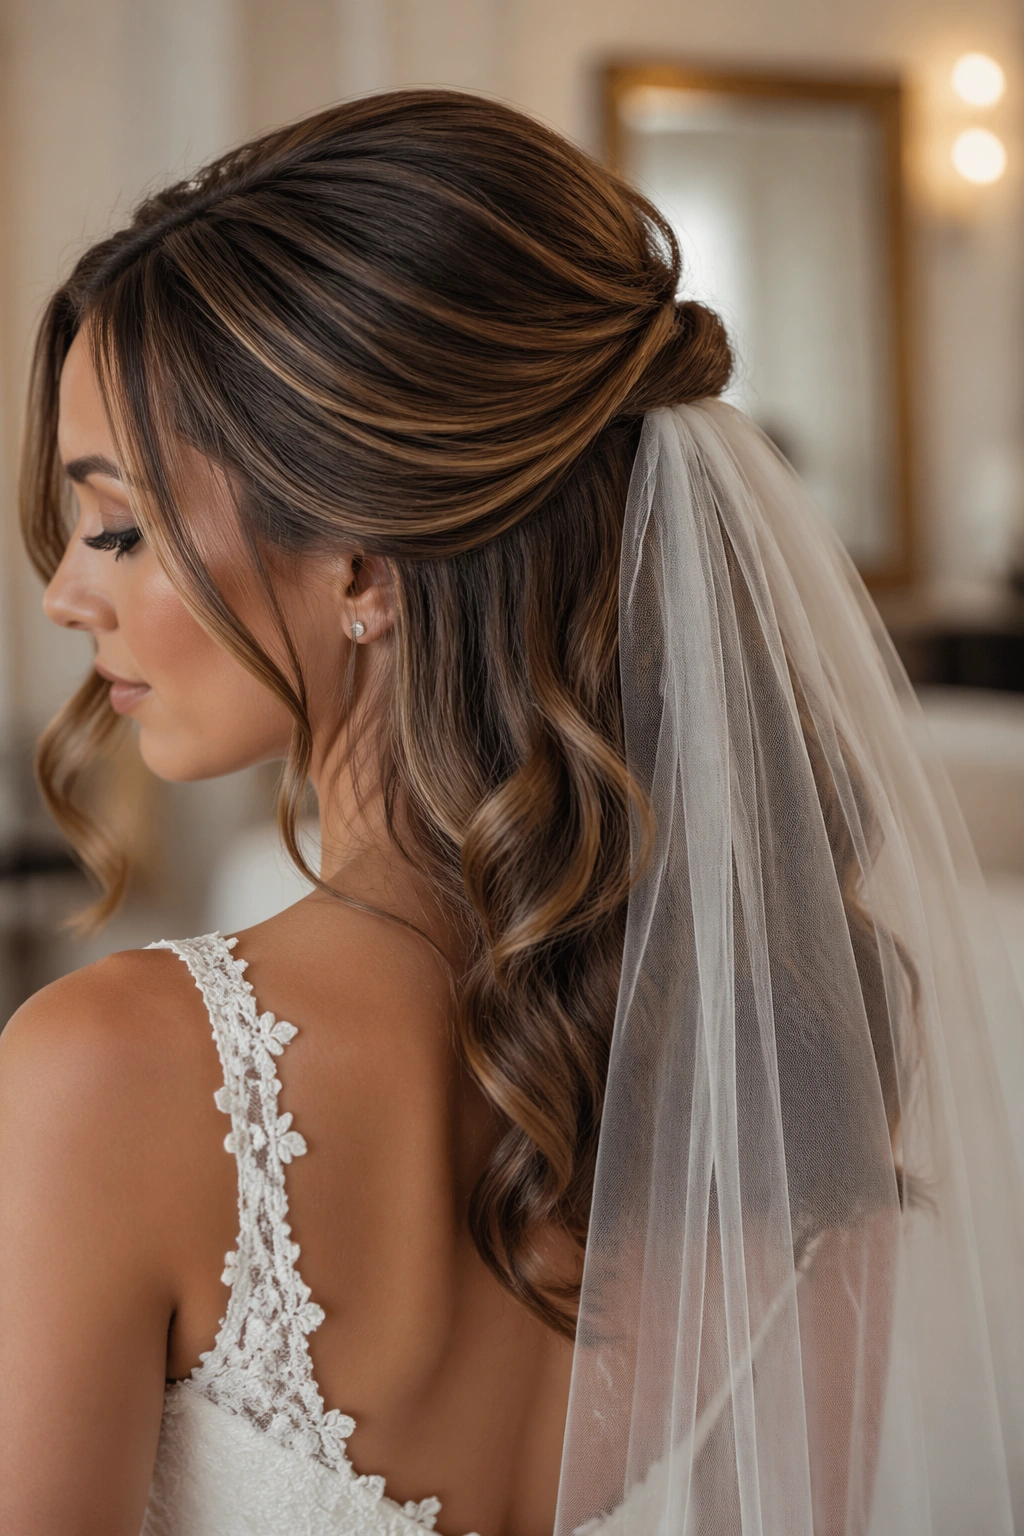
A veil can make or break a half-up style. If the anchor point is wrong, the veil pulls the hair down, and the whole thing starts to sag before the ceremony even ends. That is annoying, and avoidable.
The best setup usually places the veil comb underneath the half-up section, close enough to the crown that the veil has something solid to grip but low enough that it does not crush the twist or braid. If the hairstyle has a high knot or puff, the veil can sit lower, tucked under the main shape. If the style is soft and low, the veil should anchor higher so the comb does not show through the lower waves.
- Use a strong hidden pin base before adding the veil
- Test the veil with movement, not just while standing still
- Skip extra-heavy accessories near the comb
- Ask for a quick check after the veil is clipped in
A veil should feel integrated, not parked on top like an afterthought. That is the real goal.
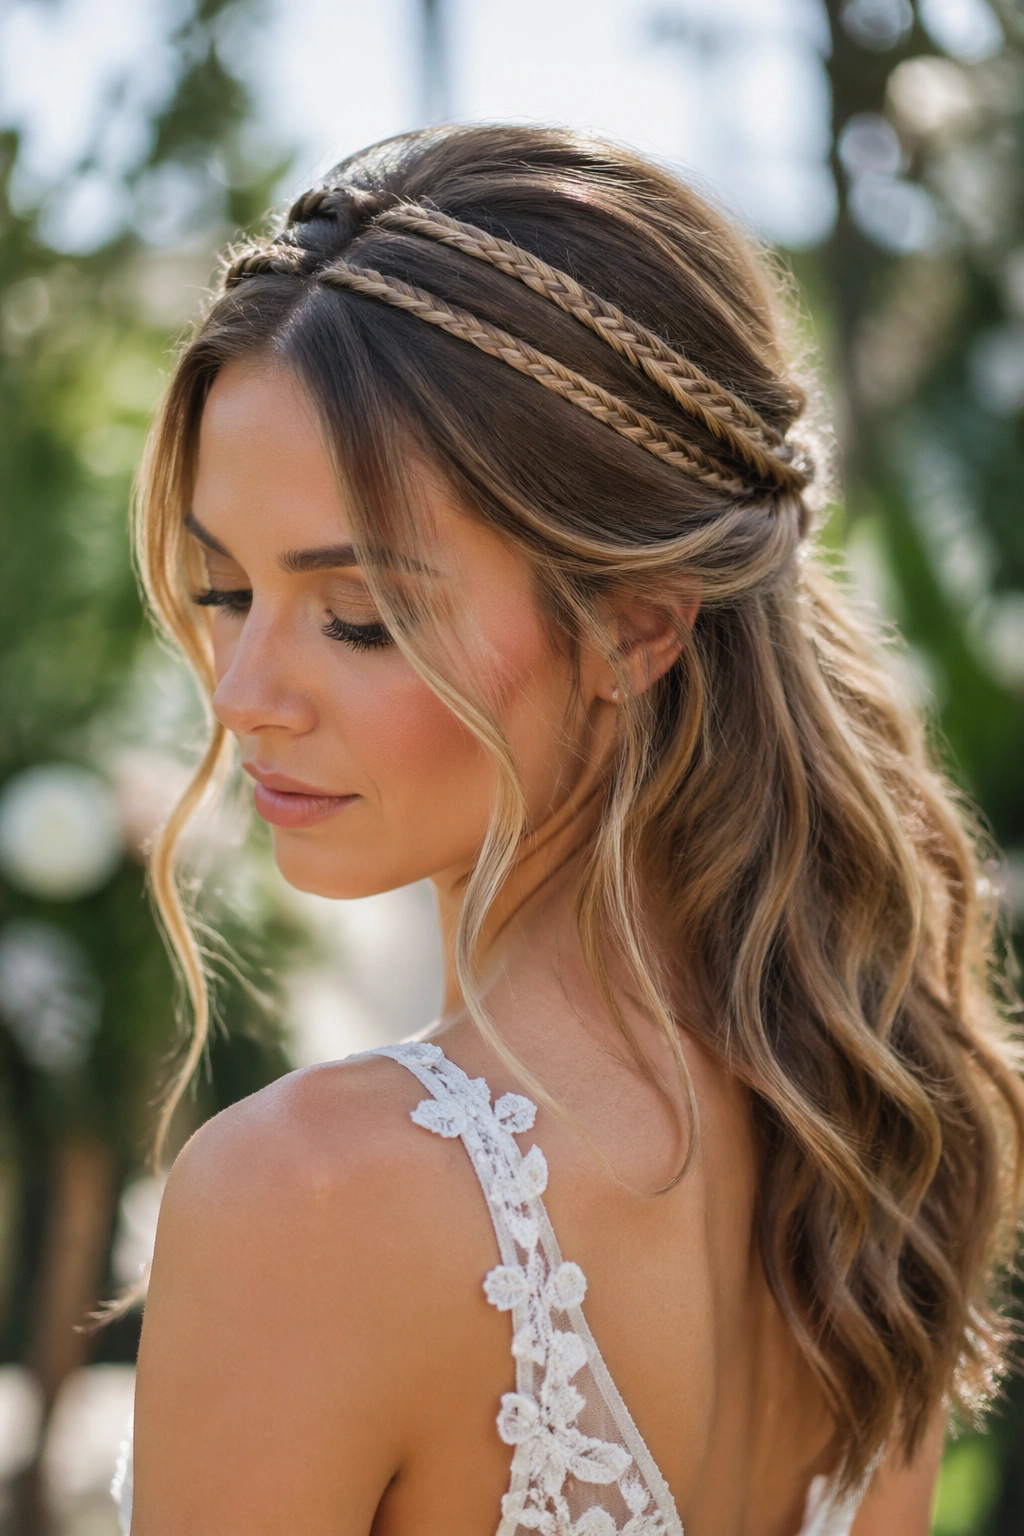
19. A Headband or Comb That Looks Built In
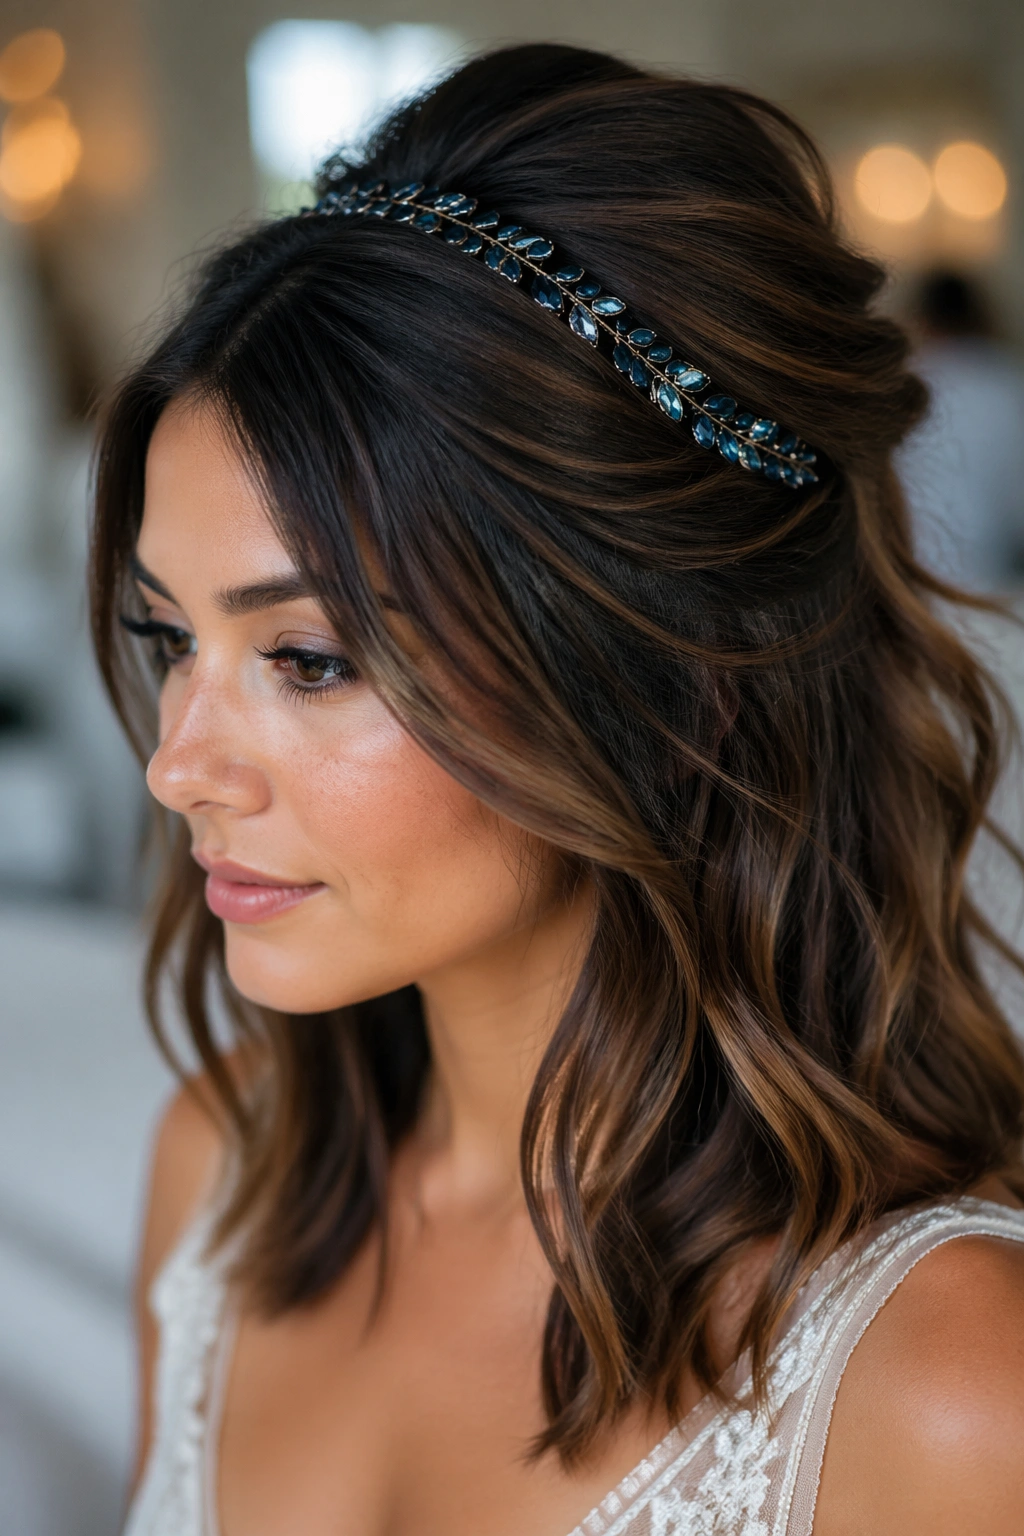
A pretty comb or headband can solve a lot of problems for layered medium hair. It gives the eye a focal point, helps the top half stay together, and makes even a simple style feel intentional. The trick is picking one that works with the hair instead of sitting on it like a separate object.
Headbands look best when the top is slightly lifted and the lower half has loose bends. That way the band has room to breathe. Combs work well when tucked into a twist or a pinned-back side section, where the prongs can disappear into the hair. Heavy metal pieces can drag fine layers down, so slimmer designs are easier to wear for a long day.
If the dress is already detailed, keep the accessory small. If the dress is plain, the accessory can carry more of the visual weight. That balance matters more than whether the piece is pearl, crystal, or gold-toned.
The best-looking accessory is usually the one that looks like it belongs there from the start.
20. A Humidity-Smart Style for Outdoor Weddings
What happens when the air feels damp and the hair wants to frizz? You stop asking the style to stay perfectly smooth and choose one that can handle movement. For layered medium hair, that usually means a style with a little more structure up top and a little less reliance on perfectly separated curls below.
Braids, twists, and wrapped anchors tend to survive humidity better than loose, over-curled half-up looks. Use a flexible mousse or cream before drying, then set the lower half with waves that have enough shape to survive a little expansion. Avoid too much oil near the roots. It can flatten the crown fast.
A few strategic pins matter more than one heavy spray session. That’s the honest version. You want the style to hold in sections, not depend on one giant shell of hairspray.
If the wedding is outdoors, I would lean toward a style that gets better when it softens a bit. Loose twists, braided crowns, and low wrapped half-ups all do that. They don’t fall apart when the air shifts. They just look a little more relaxed, which is often the right call anyway.
21. Bridesmaid Styles That Match Without Looking Identical
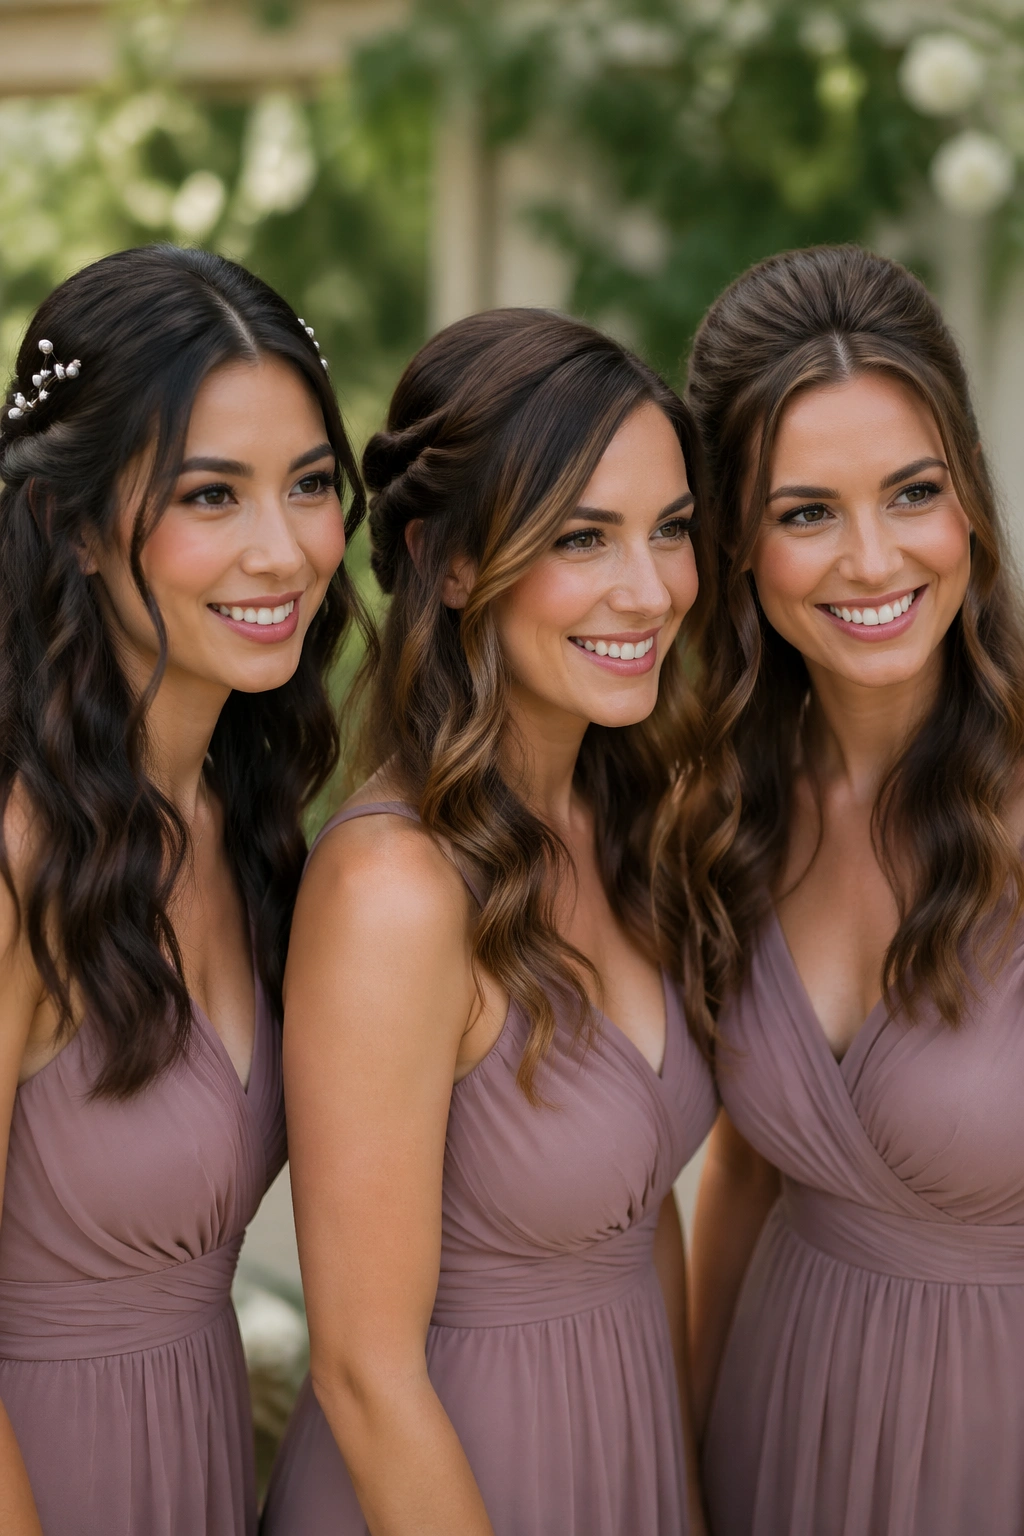
Matching bridesmaid hair does not have to mean identical hair. In fact, identical styles can look strange if everyone has slightly different layers, density, or face shape. A better approach is to pick one half-up half-down idea and change the details from person to person.
One bridesmaid can wear a center part with pearl pins. Another can have a side part and a soft twist. Someone with fuller hair might get a braid that needs less teasing, while someone with finer hair gets a pinned-back crown with a little extra lift. The family resemblance stays, but each head still looks like itself.
This matters even more with medium hair, because the length can vary by a few inches from one person to the next and still count as “medium.” Shared accessories help tie the look together. So does using the same curl pattern across the group, even if the pin placement changes.
That kind of coordination looks better in photos and feels less forced in person. Which is a nice bonus.
22. The Clean, Minimal Finish That Lets the Dress Lead
There is a reason simple half-up styles keep showing up in wedding styling. They do not fight the dress. They do not crowd the neckline. They let the person wearing them breathe a little, which matters more than people admit.
A clean finish works especially well when the gown already has lace, beading, or a strong silhouette. In that case, the hair should support the look, not compete with it. A small twist at the back, a smooth crown, and soft layers falling through the shoulders can feel more elegant than a style loaded with ornaments.
Medium layered hair is good at this kind of restraint. The layers give the ends motion, the half-up section gives the crown shape, and the loose pieces around the face stop the style from feeling too exact. That is the sweet spot. Not overdone. Not plain. Just sure of itself.
If I had to pick one last practical rule, it would be this: let one part of the look do the talking. If the dress is busy, keep the hair calm. If the dress is simple, the hair can carry a little more detail. That tradeoff solves more wedding-hair problems than most people expect.
A layered half up half down style on medium hair works because it leaves room for change. The hair can soften during the day and still look intentional. That is what makes it such a reliable choice for a wedding, especially when you want the back of the head to feel finished and the front to still feel like you.