1920s glam hairstyles for curly hair have one unfair advantage: the texture already brings the soft lift, movement, and shine that those old Hollywood-inspired shapes were chasing.
People tend to picture a flat bob and a stiff wave when they think about the decade. That image is only half right. The real magic of the era was in the silhouette — close-to-the-head waves, deep side parts, polished crowns, tucked ends, and a deliberate sense of shape that made even simple hair look dressed up.
Curly hair can do this beautifully, but it likes a little strategy. If you try to force every curl into the same molded shape, the result gets fuzzy fast. If you work with the bend you already have — smoothing the root, setting the front, pinning the nape, adding shine at the end — the look suddenly makes sense.
A rattail comb, a few long bobby pins, strong-hold gel or setting lotion, and a soft brush go a lot farther than people expect. So do patience and a light hand. Start with the style that fits your length, then pick the one that gives your curls the right amount of structure without smothering them.
1. Sculpted Finger Waves for Curly Hair
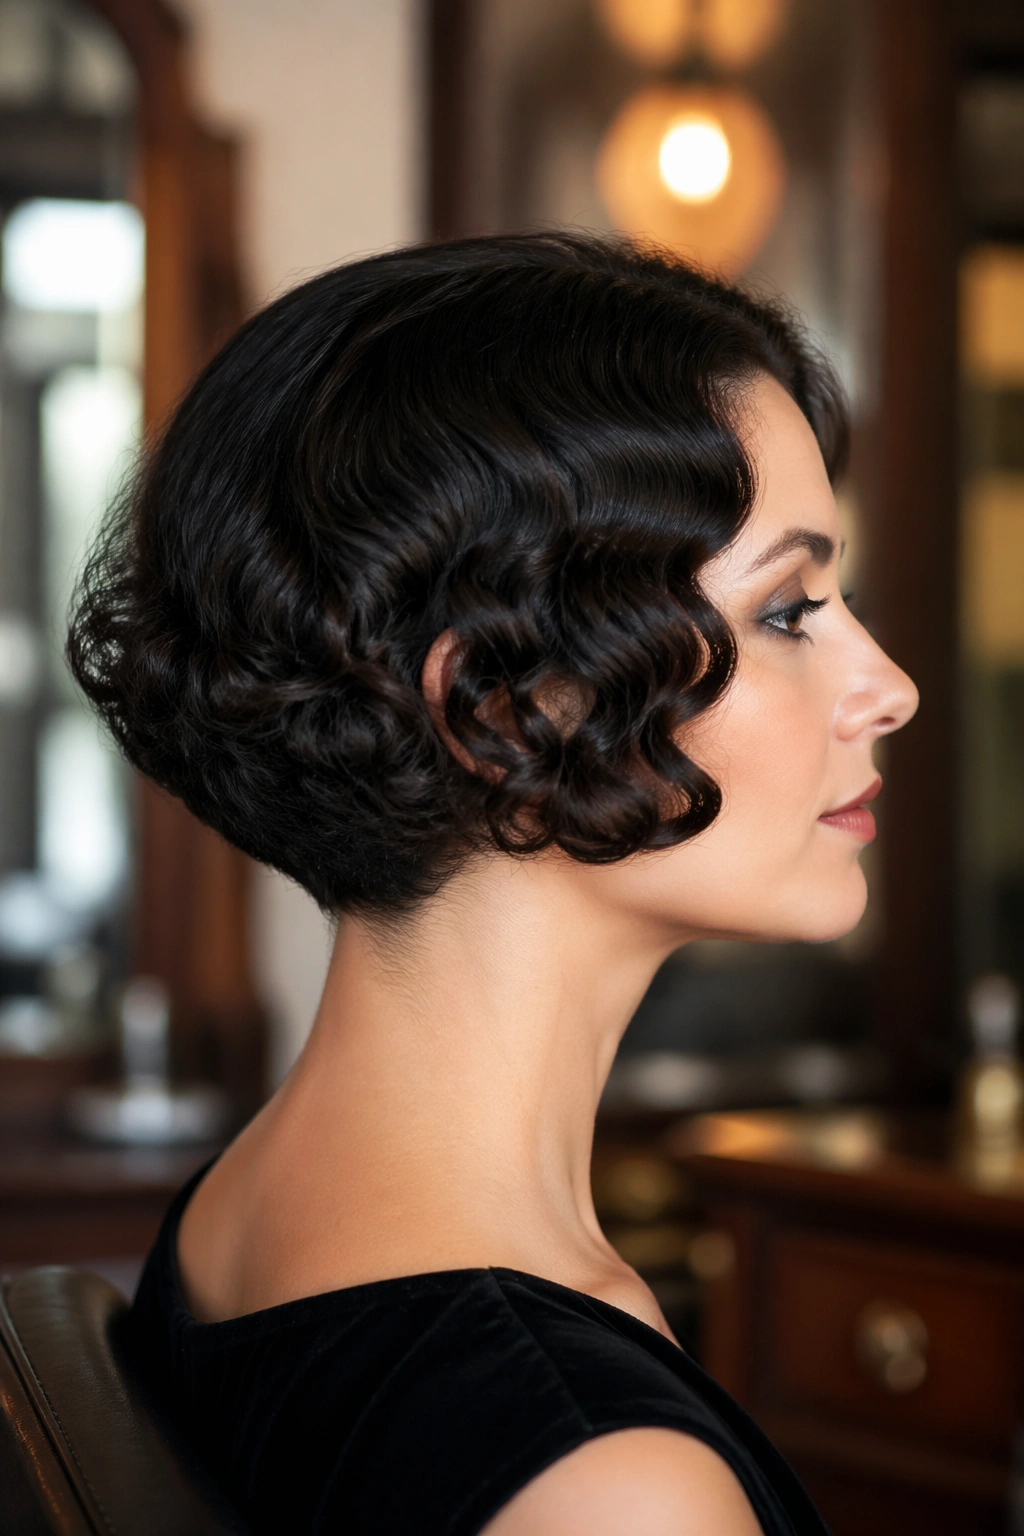
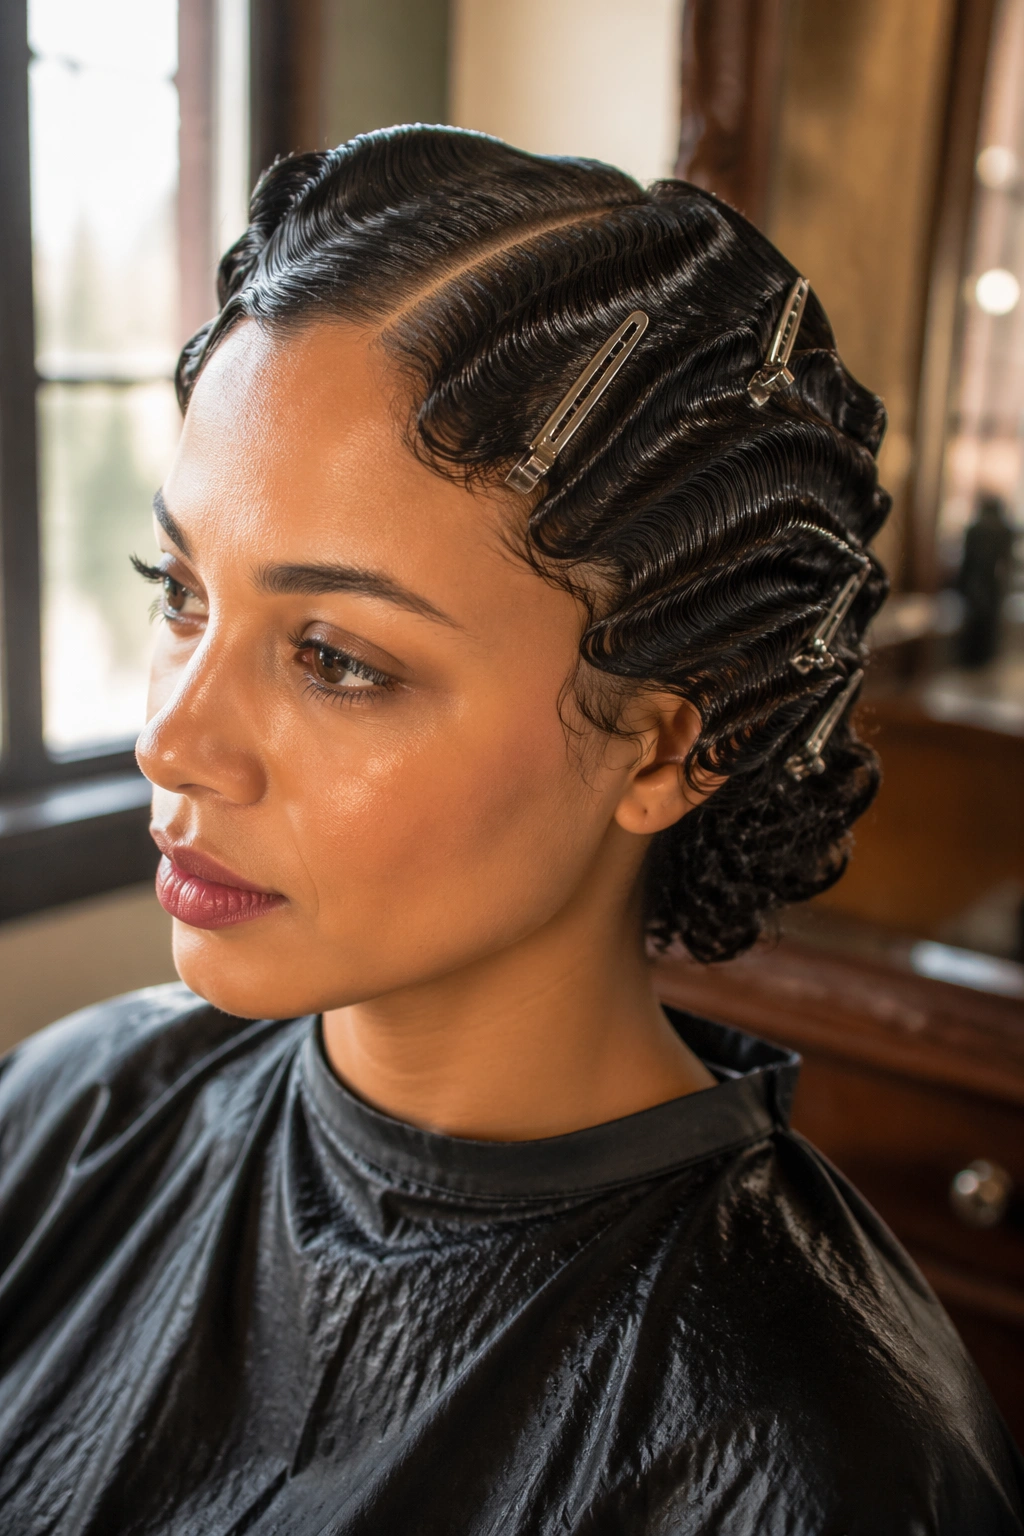
Finger waves are the closest thing the 1920s had to wearable sculpture. On curly hair, they look especially rich because the texture behind the wave adds depth instead of fighting the shape.
The trick is to work on damp, not dripping-wet hair. Saturate the front and crown with a firm gel or setting lotion, then create a deep side part and press the hair into S-shaped ridges with a rattail comb and your fingers. Clip each ridge where it bends, and don’t rush the dry time. If the waves are still soft when you remove the clips, they will loosen into frizz instead of staying carved.
Why This Works on Curls
Curly hair already wants to bend. Finger waves simply redirect that bend so it lies flatter at the root and curves in a cleaner rhythm near the scalp. That gives you the polished 1920s line without making the style feel stiff or helmet-like.
Quick Styling Notes
- Use 1-inch sections at the front so the wave line stays crisp.
- Keep the back looser if your curls are dense; you do not need to wave every inch.
- Set each ridge with a duckbill clip for 15 to 20 minutes before drying.
- Finish with a light mist of shine spray, not a heavy lacquer.
If the front looks sleek and the wave edges are clean, stop fussing.
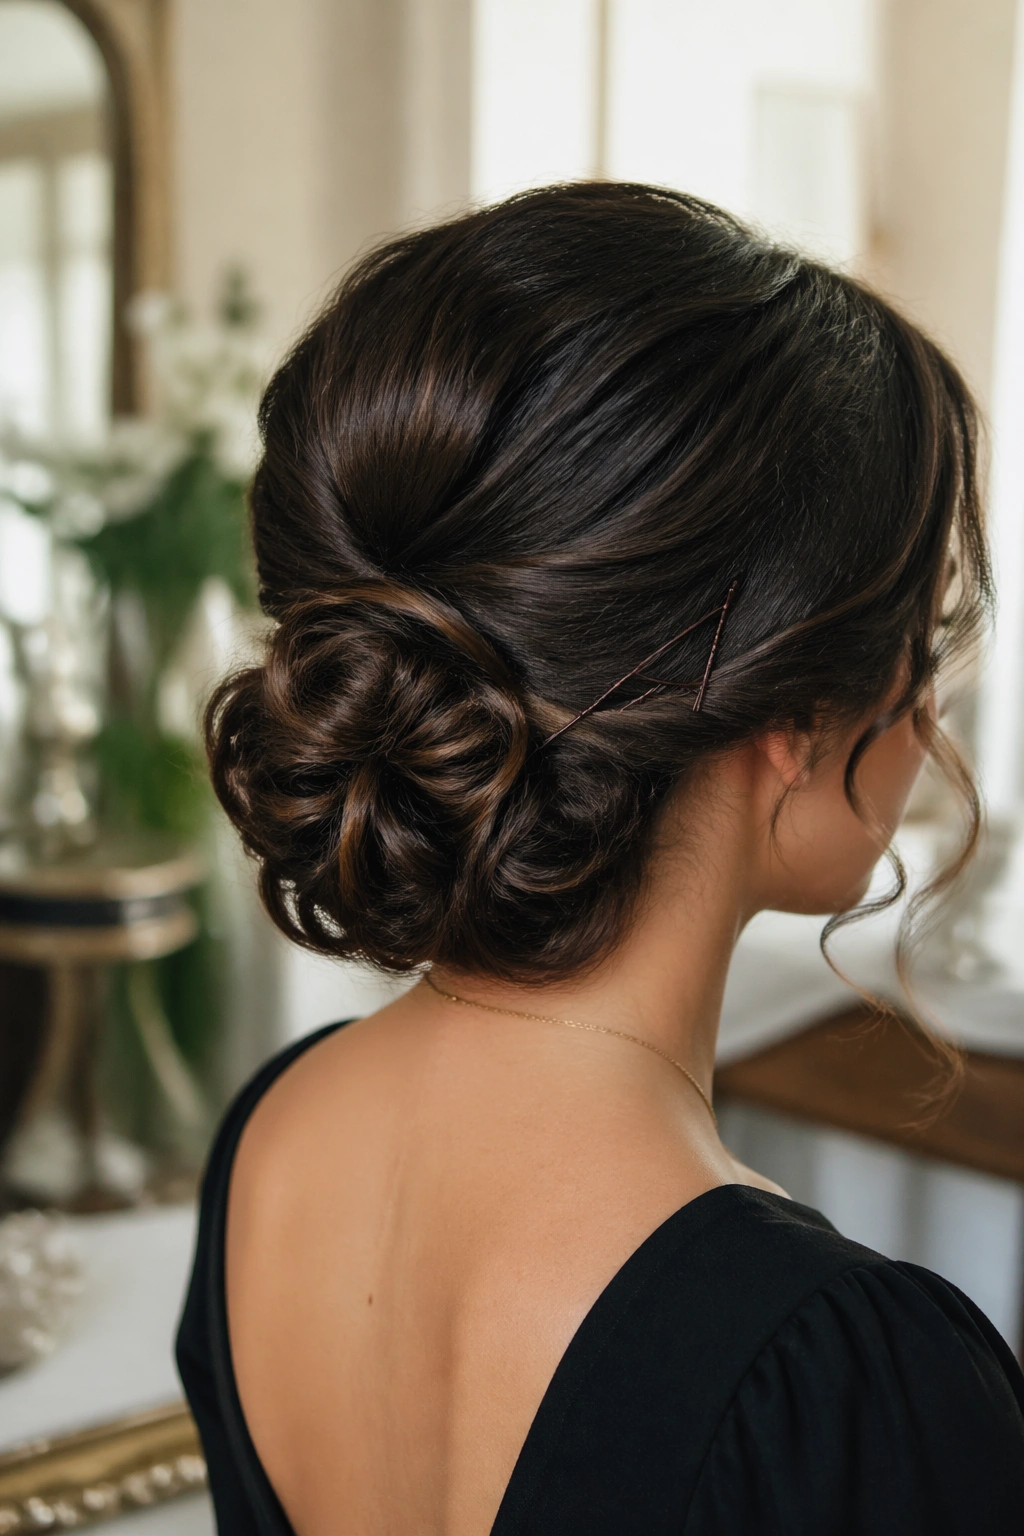
2. The Faux Bob That Tucks Long Curls at the Nape
What if your hair is too long for a real bob? Good. That gives you more room to fake one properly.
A faux bob is one of those styles that looks complicated until you see the structure underneath. The front and top stay smooth, the length is folded under at the nape, and the ends disappear into a hidden tuck. On curly hair, that tucked shape looks especially convincing because the curls add natural bulk, which helps the bob read as full instead of floppy.
How to Make the Tuck Disappear
Start by smoothing the top section with a cream or mousse, then lightly stretch the mid-lengths with a blow-dryer and paddle brush or a diffuser on low stretch. Leave the ends a little soft. Pull the hair into a low loop at the nape, fold the tail upward, and secure it with long bobby pins in an X pattern. If the tail is thick, split it into two smaller folds. That makes the tuck flatter and keeps the back from puffing out.
A few face-framing curls make this look better, not worse. Too much perfection and it starts to feel rigid. Too many loose pieces and the bob loses its shape. The sweet spot is one curl at the temple and one near the jawline.
How to Use It
This is the style for shoulder-length and longer curls when you want the bob silhouette without cutting anything. It works for dinner, a party, or any event where you want the neck and jawline to stay open.
3. Soft Marcel Waves With a Glossy Finish
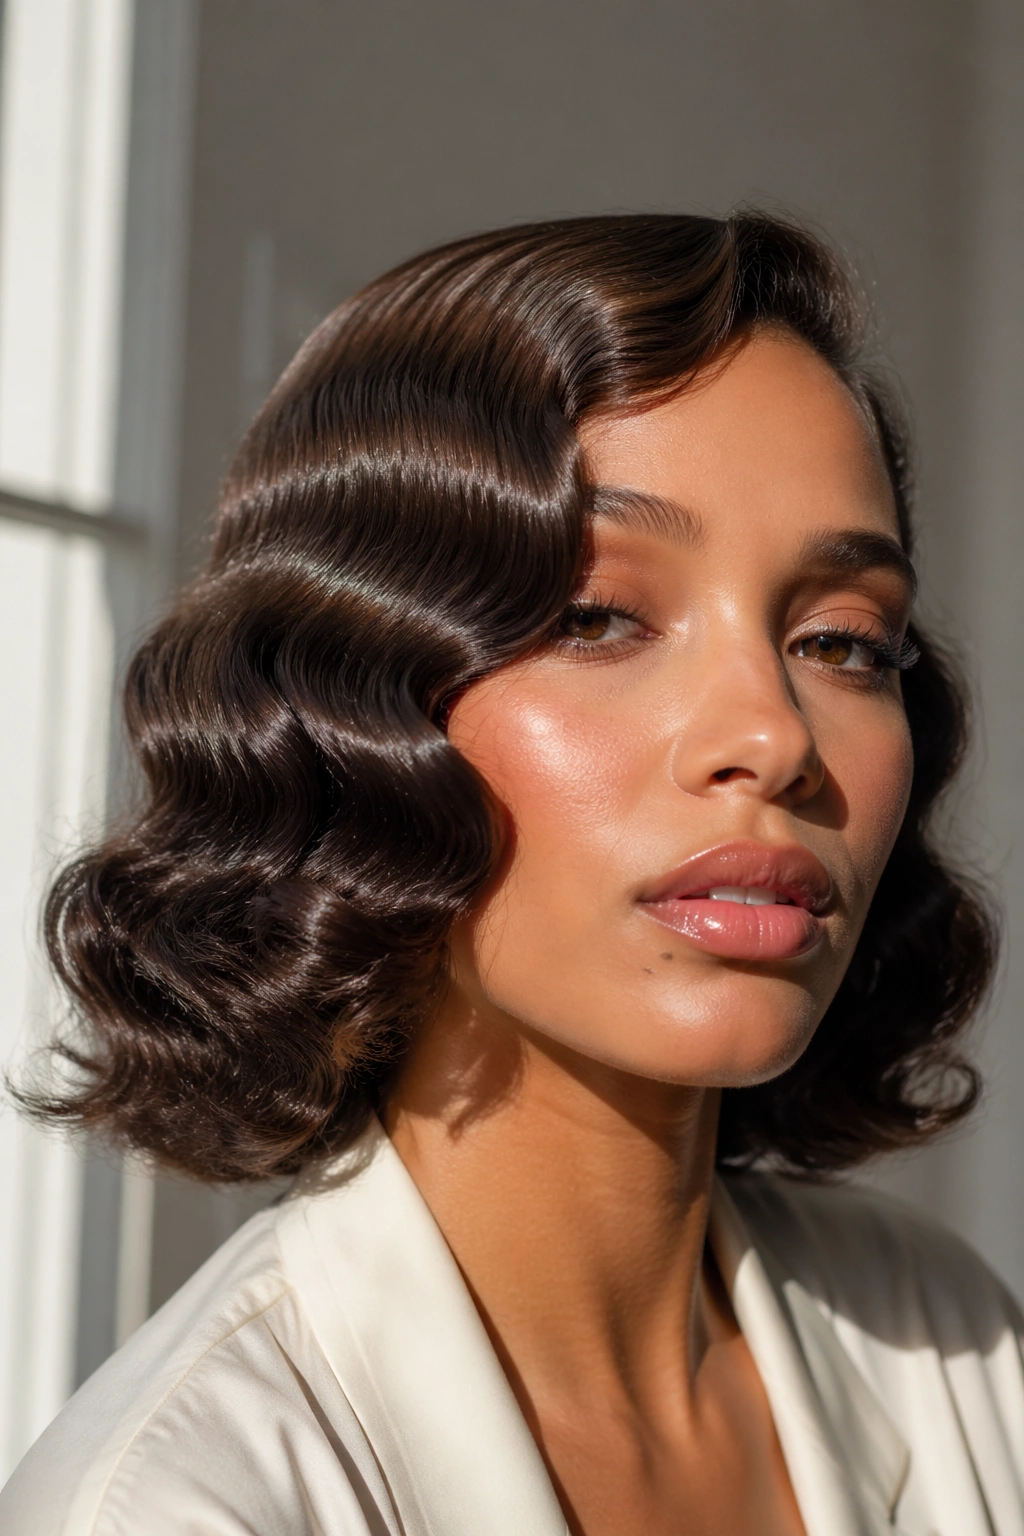
Marcel waves are the sleeker cousin of finger waves. They have a wider curve, a little more swing, and a softer look around the face, which makes them a smart choice if your curls are looser or your hair is medium length.
The key is not to fight your texture into pin-straight submission. Stretch it first, yes, but leave enough body so the wave line still has life. A 1-inch curling iron or a set of large hot rollers can create the foundation, then a soft brush or boar-bristle brush blends the curls into a smooth, flowing wave. The result should look polished, not painted on.
There is also a small but important detail people miss: direction matters. Alternate the curl direction in sections so the wave pattern moves instead of stacking in one thick hump. That is what gives Marcel waves their graceful curve. If every piece curls the same way, the style turns blocky.
A little shine cream on the palms helps a lot. Not much. Just enough to calm flyaways and make the wave edges catch the light without looking greasy. And yes, the front should be flatter than the back. That contrast is part of the charm.
The style suits longer bobs, collarbone-length curls, and anyone who wants a 1920s look that feels a bit softer than finger waves. It is also forgiving if your curls are uneven, which is more common than people admit.
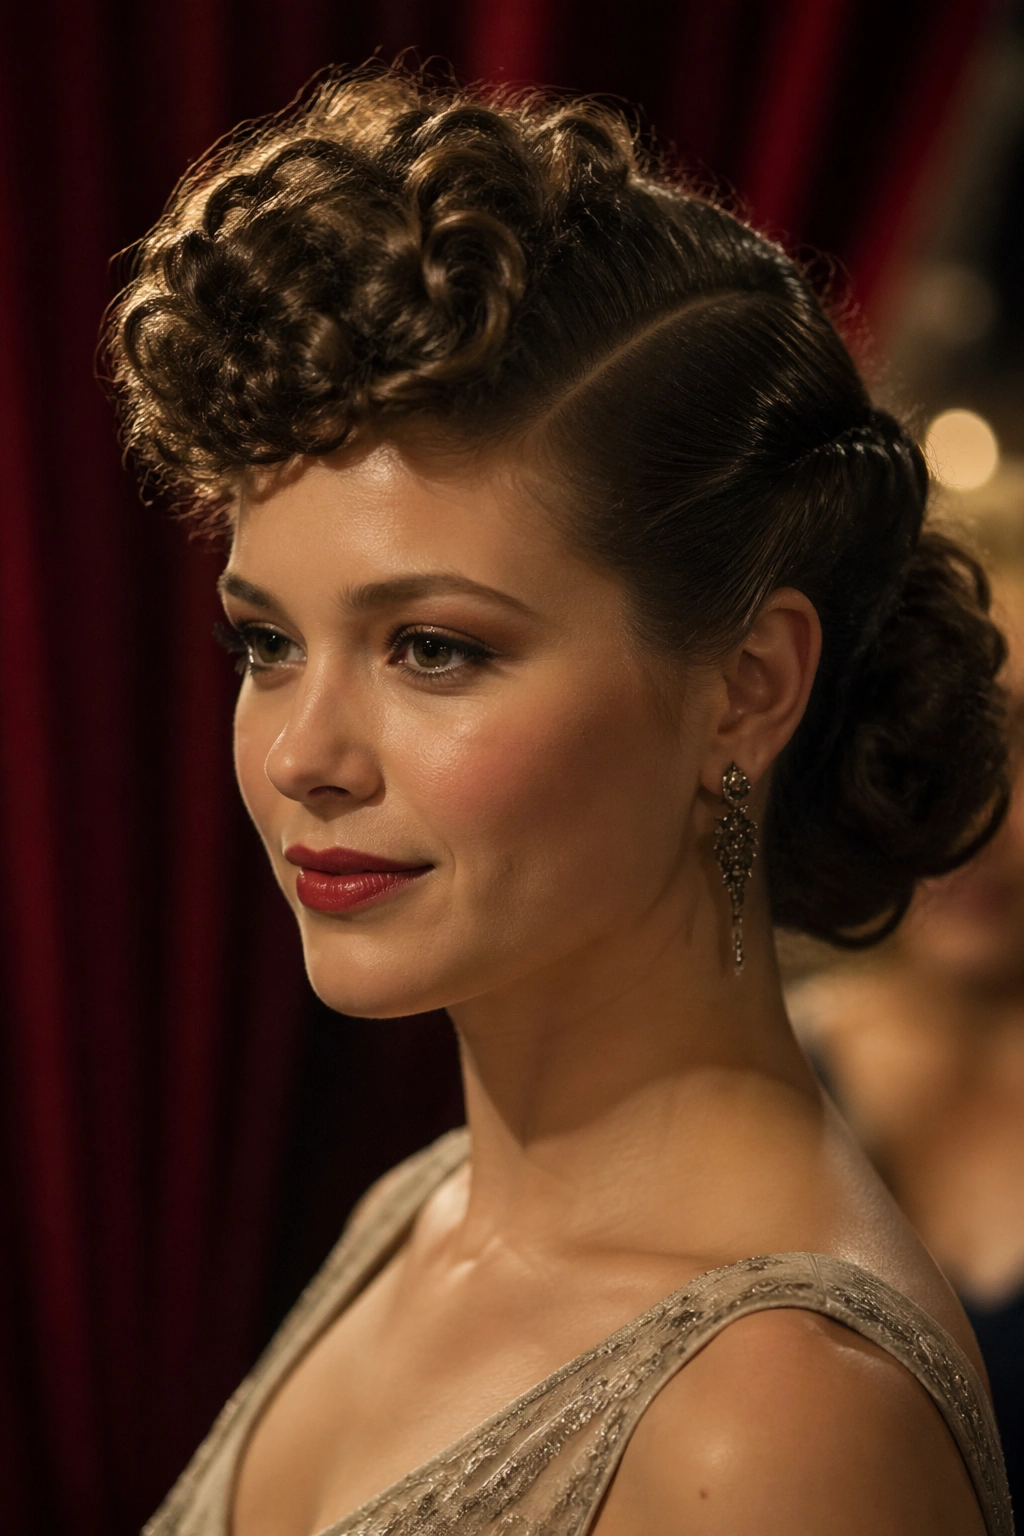
4. Pin-Curled Halo Updo With a 1920s Frame
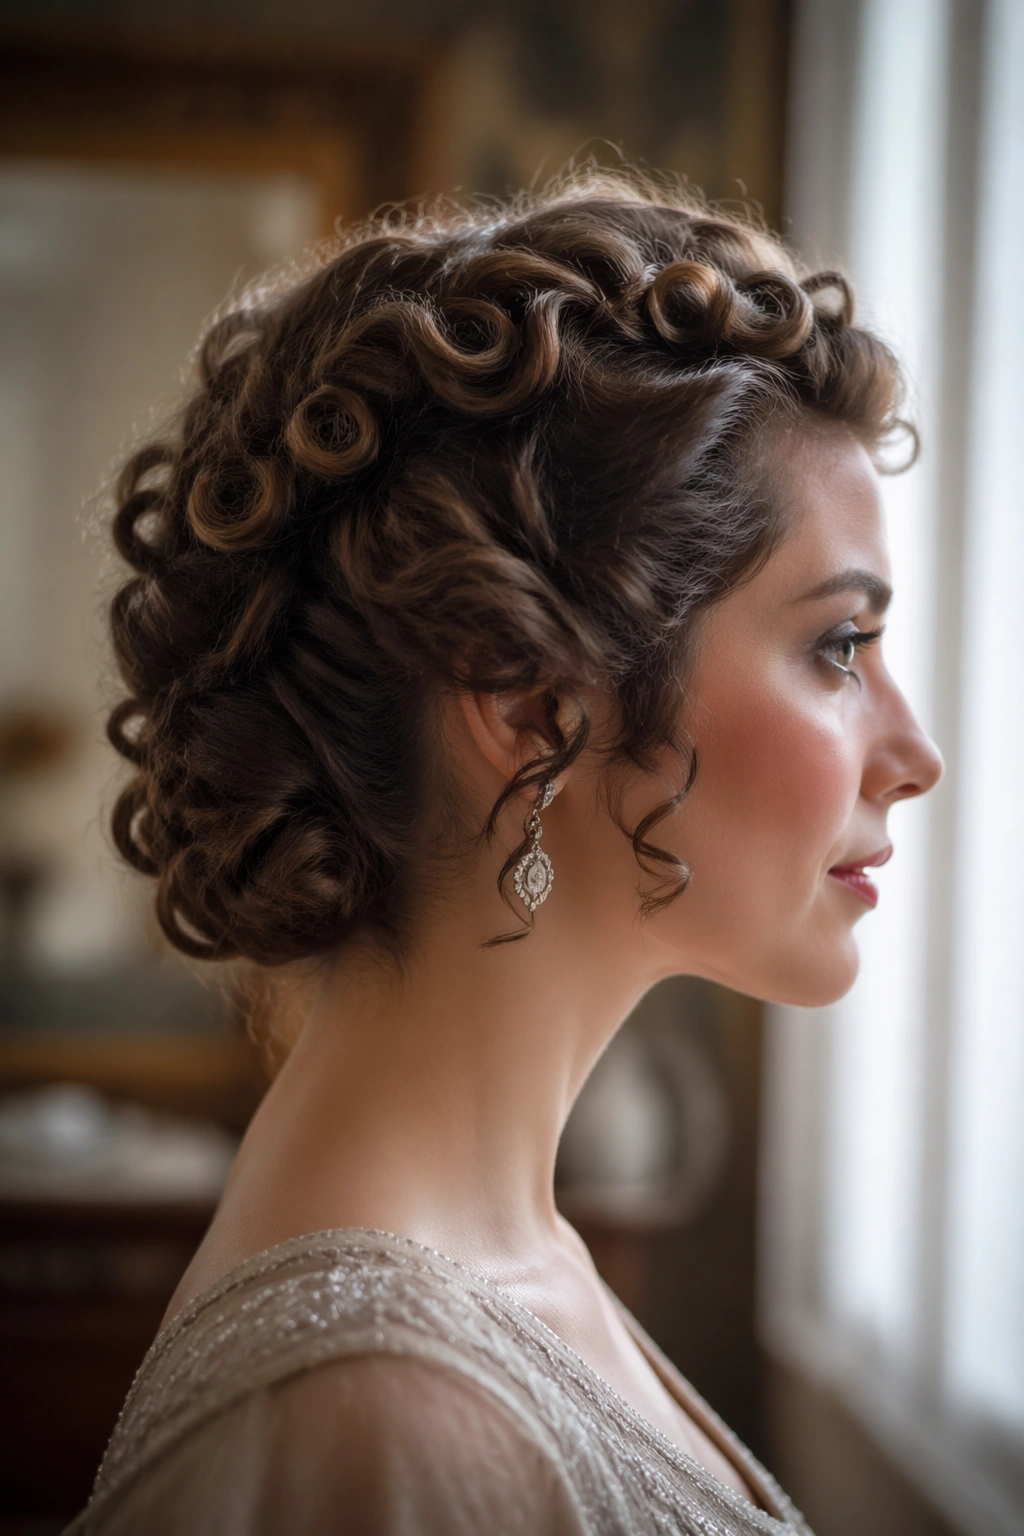
Picture the hair arranged in a soft halo of pin curls, with the bulk gathered low and the outline kept close to the head. That is the whole idea, and it looks lovely on curly hair because the texture makes the pins seem intentional instead of fussy.
This style usually begins with small, neatly formed pin curls across the top and sides. Each curl is rolled flat against the scalp and pinned so it sits like a tiny shell. The remaining length can be gathered into a low roll, a small bun, or a tucked cluster at the back. The important thing is keeping the crown smooth and the sides clean enough that the shape reads from the front.
Key Details That Matter
- Make the pin curls about 1 to 1.5 inches wide so they stay defined.
- Pin each curl flat before it dries fully.
- Use U-pins or long bobby pins for the back section.
- Add a comb or small feather clip only after the shape is set.
This is the look I reach for when I want something formal but not severe. It photographs well from the side, and it keeps the neck open in a way that feels period-correct without looking like costume hair.
The best part? You can be a little imperfect with it. A few soft coils at the back give the style movement, and movement is what keeps it from feeling like a museum display.
5. The Sharp Eton Crop for Tight Curls
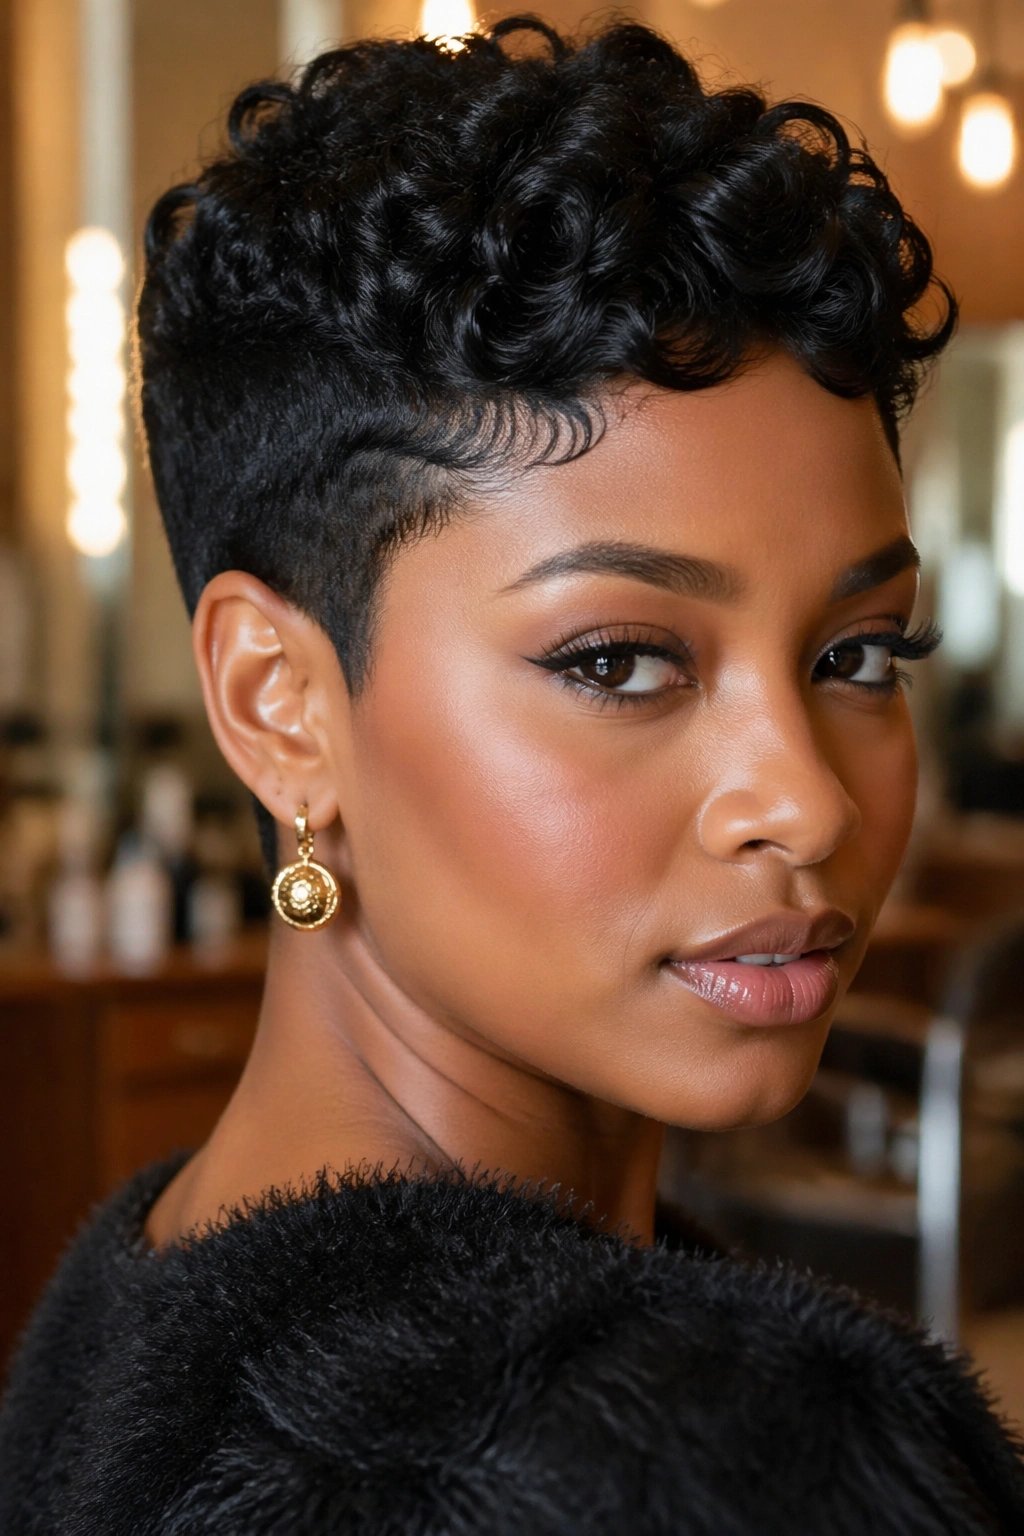
The Eton crop is the boldest cut on this list. Short, sleek, and close at the sides, it leaves just enough length on top to shape a wave or a soft curl crest.
This is not the style for someone who wants to hide their texture. It works because it celebrates a compact, graphic outline. On tight curls, the shape can look incredible when the sides and nape are smoothed down with a light pomade or styling cream and the top is finger-styled into a small wave or a neat curl set. The contrast between the short edges and the softer crown gives the whole look its bite.
What Makes It Different
Unlike a bob, the Eton crop removes almost all extra length from the back and sides. That means the profile becomes the main event. It looks strongest when the hairline is clean, the crown has a little lift, and the finish is glossy rather than fluffy.
Who It Suits Best
This one is ideal if your hair is already short or if you like sharp, structured shapes. It also works well for curls that shrink up after drying, because the crop is designed to sit close to the head anyway.
Use a fine-tooth comb, not a wide one. Brush the product through in small amounts and stop before the hair gets slick enough to collapse. A neat Eton crop should look controlled, not drenched.
6. Side-Swept Wave Bob With a Rhinestone Comb
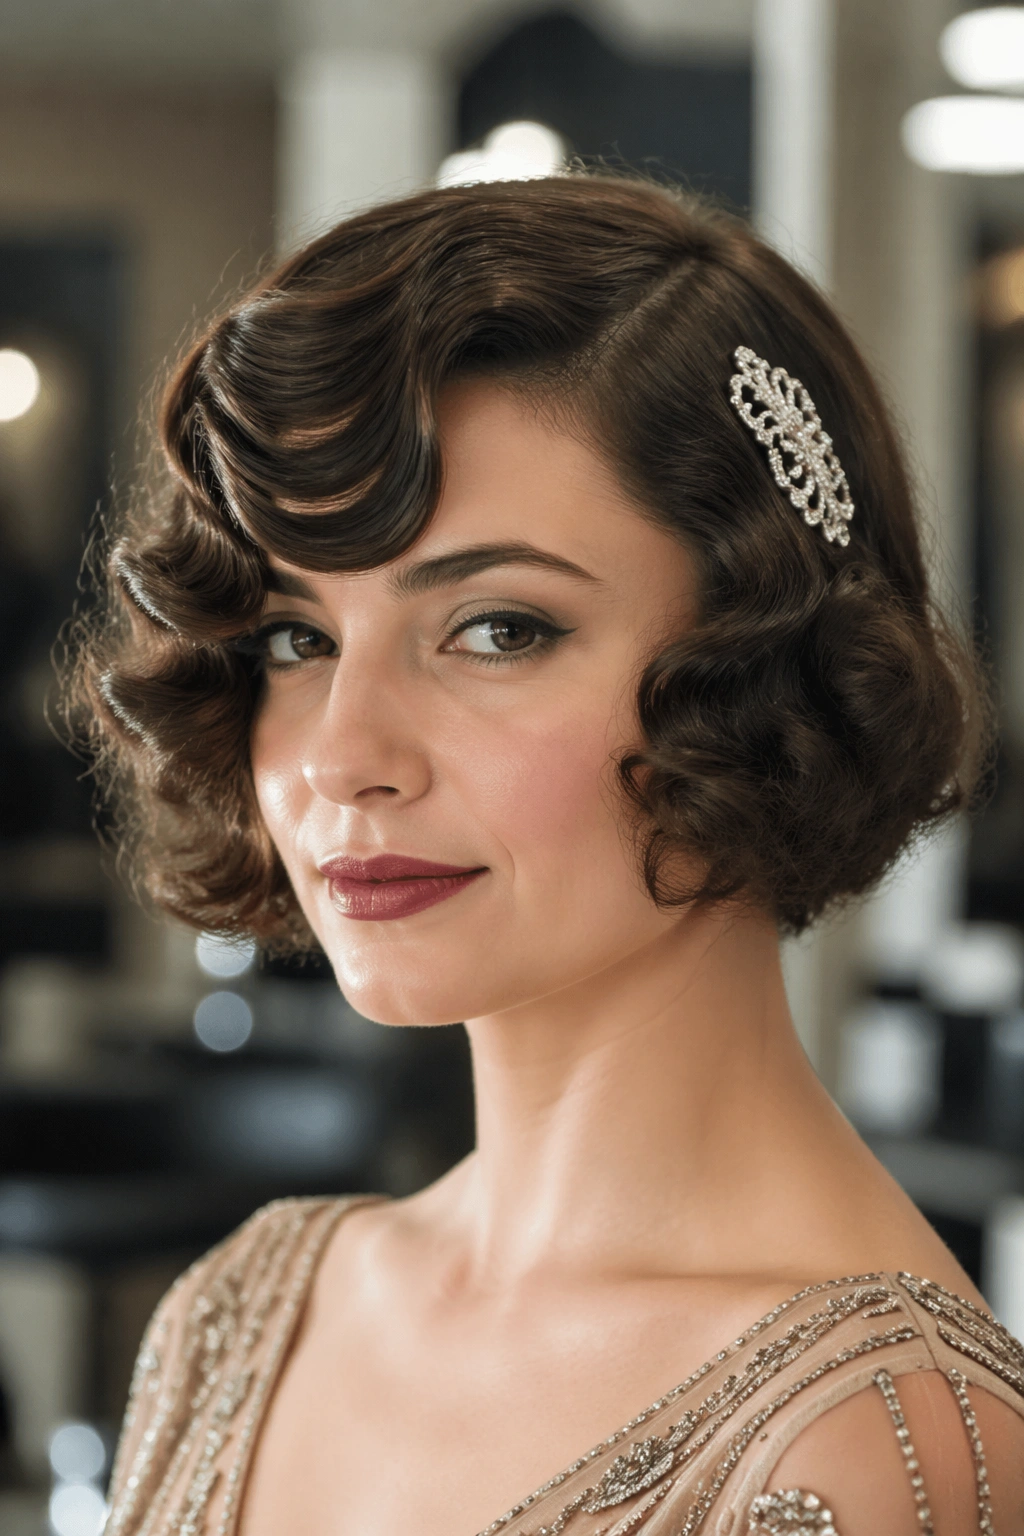
A deep side part changes everything. So does a single sparkling comb.
This style takes the familiar bob shape and gives it a more dramatic line by sweeping the front across the forehead and pinning one side back. On curly hair, that asymmetry feels especially flattering because the volume can live where you want it instead of spreading everywhere at once. The curls near the face stay soft, the crown stays sleek, and the pinned side gives the whole look a clean edge.
The comb should go where the hair naturally wants to sit. If you force it too high, it looks perched. If you set it too far back, the side sweep loses its shape. I like to place it just above the temple, about 1 inch behind the hairline, where it can catch the wave without fighting it.
The bob itself can be chin length or just below. Brush the top section smooth, then let the ends keep a little bend. That bend matters. Straight ends can make the style feel too modern and a little severe, while soft curls at the bottom keep the look in the right decade.
This is the one to choose for evening events, portrait photos, or any time you want your curly hair to look deliberate without looking overworked. It is polished. It is easy to wear. And it knows exactly where to stop.
7. A Rolled Nape Chignon With Curled Ends
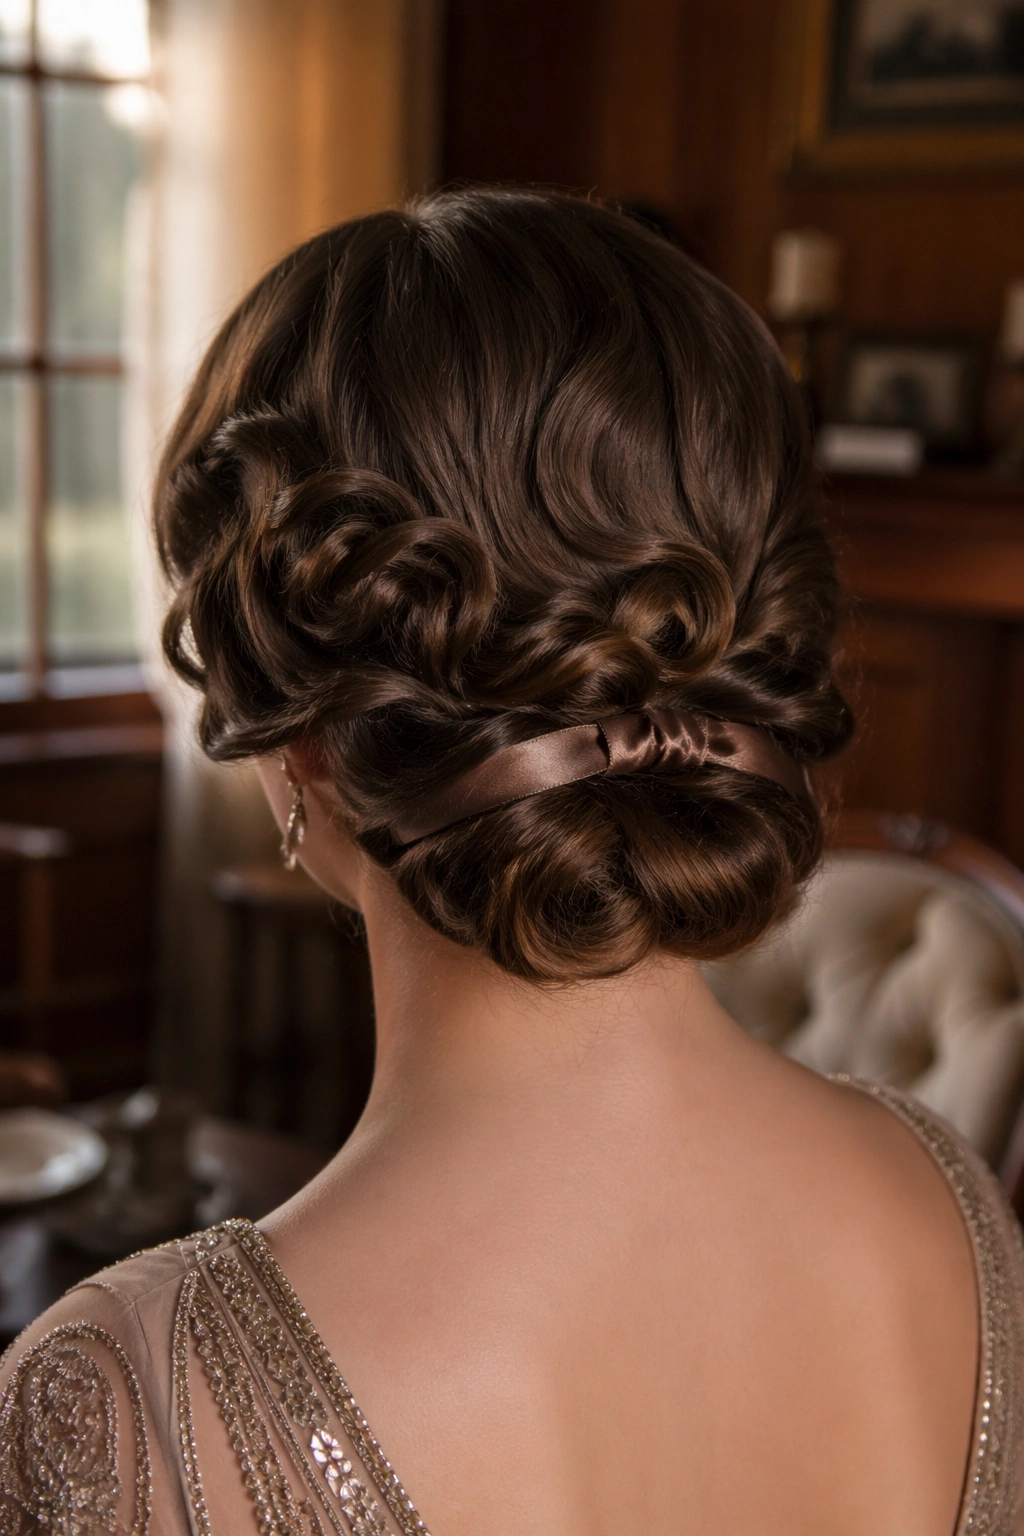
Need a style that shows off your neck and still feels like a proper 1920s set piece? A rolled nape chignon does that job nicely.
The shape starts with smooth sides and a gentle wave or side part at the front. The length is then rolled inward at the nape, almost like you are tucking the ends into a small shell or cushion. Curly hair gives the roll some body, which helps the shape look full even when the actual bundle is fairly compact.
How to Keep the Nape from Bulking Up
The mistake people make here is gathering all the hair in one thick fist and hoping pins will save it. They usually do not. Split the hair into two sections, roll each one toward the center, and anchor the shape with pins that slide upward into the base rather than straight across the surface. That keeps the chignon flat and the back neat.
A little smoothing cream around the hairline makes a big difference. So does leaving a few softly waved pieces in front of the ears. Those details stop the style from looking too strict.
- Use 4 to 6 long pins for a medium-length roll.
- Cross the pins in an X if the hair is thick.
- Leave the ends slightly curled under, not shoved in hard.
- Finish with a satin ribbon or small jeweled clip if you want more sparkle.
This one feels especially good with long earrings and bare shoulders. It has a quiet kind of drama, which is often the best kind.
8. Kiss Curls and Sculpted Baby Hairs
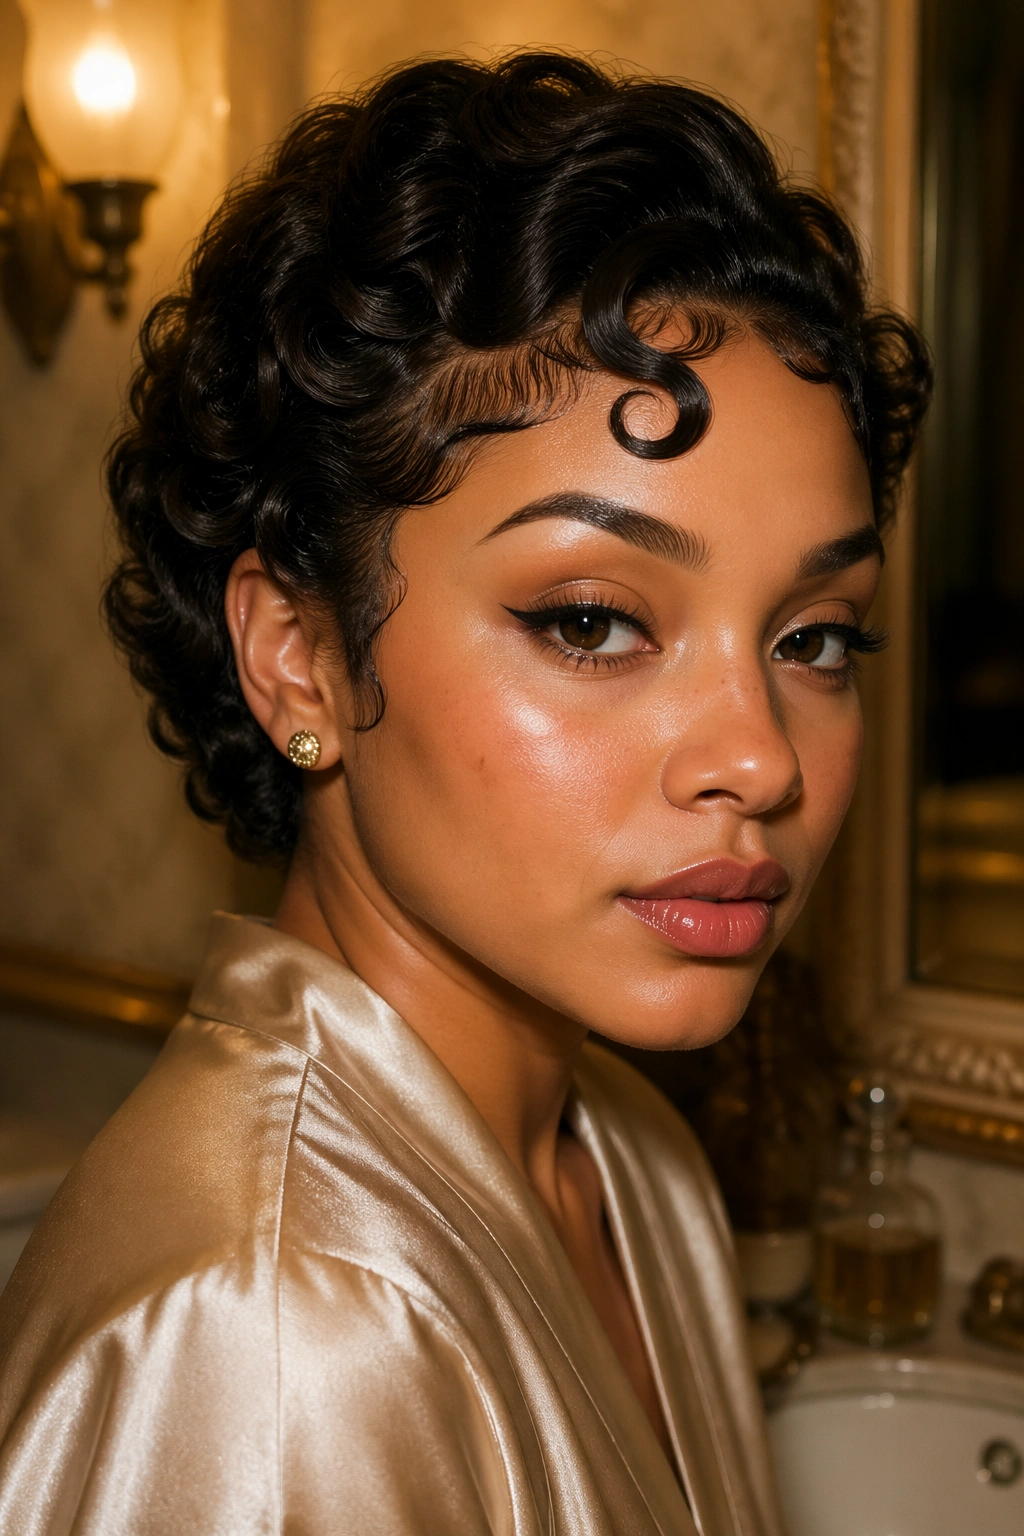
A single kiss curl can change the whole mood of a hairstyle. Two of them, placed well, can make even a simple bob feel fully dressed.
Kiss curls are those little sculpted spirals or swoops that sit near the forehead, temple, or cheek. They were a playful detail in the 1920s, and they still work because they give the face a frame without stealing the show. On curly hair, they are easy to adapt. Take one small section, smooth it with gel, and coax it into a tiny spiral with your finger or the tip of a comb. Pin it until it sets, then release it only when it holds its shape.
The rest of the hairstyle can be simple. That is the point. A kiss curl works best when the surrounding hair is calm — a neat bob, a low roll, or a tucked-up set. If everything is busy, the detail gets lost.
A lot of people overdo baby hairs here. Resist that urge. You want a small, deliberate curve at the edges, not a cloud of wisps. A clean line at the forehead with one sculpted curl near the temple is enough.
This style is a nice pick when you want a hint of vintage glamour rather than a full historical look. It also holds up well on short curls that refuse to stay in a formal updo. Sometimes the smallest touch is the smartest one.
9. Flapper Headband Waves for Shoulder-Length Curls
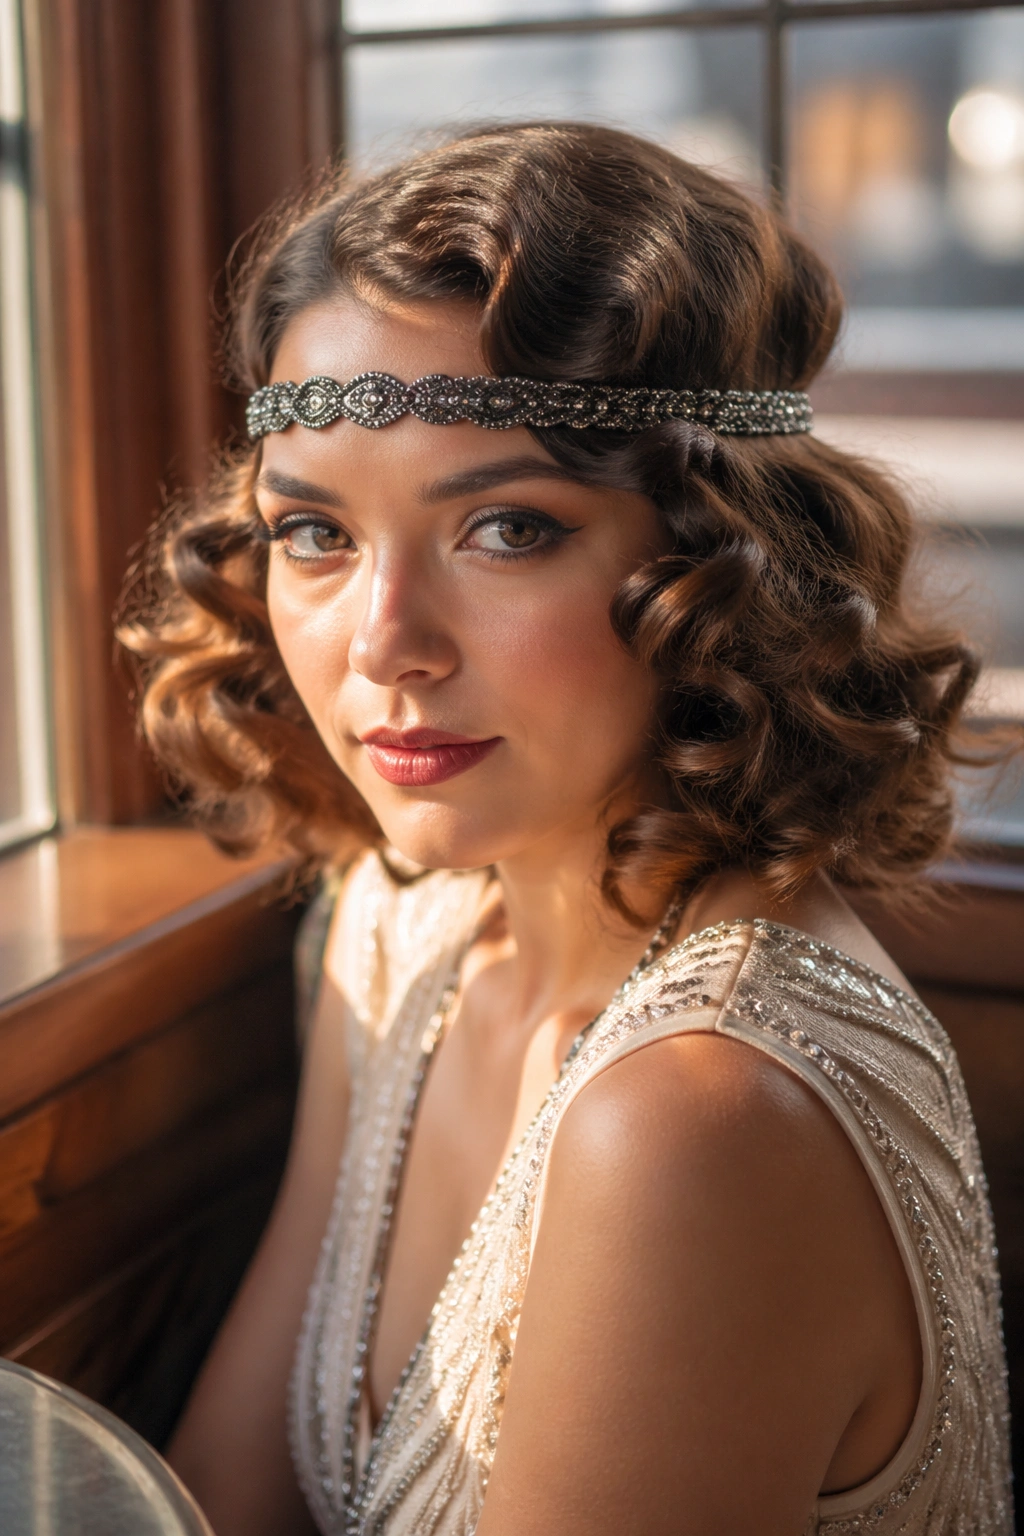
If your curls sit around the shoulders and you do not want to pin them into submission, a headband style gives you a fast route into the 1920s mood.
The headband should sit low on the forehead, about 1 inch back from the hairline, with the rest of the hair softly waved or loosely curled behind it. A beaded band, ribbon, or narrow metallic piece works best when it feels like part of the hairstyle rather than an afterthought. The band gives the look its period reference; the curls keep it from feeling rigid.
How to Keep the Band from Slipping
The secret is texture at the root. If the hair is too silky, the band will slide all night. A little dry shampoo or root spray gives it grip. Pin the band behind each ear if needed, but hide the pins under a front wave or a tucked curl. That way the support stays invisible.
This style can be as neat or as loose as you like. A few tucked sides make it more formal. Leaving the length open gives it a softer, party-ready feel. Either way, the headband does most of the work.
- Best on shoulder-length curls and long bobs.
- Works with deep side parts or soft center parts.
- Pairs well with smoky eye makeup and a brushed-out wave.
- Looks better when the crown stays smooth.
I like this one because it is forgiving. If one curl misbehaves, the band gives the eye somewhere else to go.
10. The Tapered Shingle Bob With Finger-Waved Ends
The shingle bob is all about the back view. It narrows at the nape, hugs the neck, and keeps the silhouette clean in a way that a blunt cut never quite does.
This style was a sharp move in the 1920s because it made short hair feel sleek instead of chopped. On curly hair, the tapered shape matters even more. The neck area needs to stay close to the head, while the crown can keep a little soft movement. That contrast gives the style its shape. If the back flares out too much, the whole thing turns round and loses its edge.
The front usually wears a deep side part, with finger waves or narrow bends framing the face. The ends are curled inward just enough to avoid a hard line. I prefer a small barrel or roller set for the bottom section, followed by a soft brush and a little pomade at the nape. Heavy product is the enemy here. It makes the cut look greasy instead of polished.
A shingle bob suits shorter curls that have a natural spring and enough control to stay close at the sides. It also looks excellent with a bare neck, a straight collar, or a slim hairpin tucked near the ear.
This one is not flashy. It is sharper than that. And sometimes sharp is the point.
11. Side-Parted Curly Pompadour With a Sleek Crown
A little height at the front changes the whole read of a 1920s look. Not a big, airy lift. Just enough to make the crown look deliberate.
A side-parted curly pompadour takes the front section and rolls or smooths it upward before sweeping it back. The sides stay flatter, and the back keeps the body of the curls. That contrast gives the style a strong profile, which is exactly why it feels glamorous. On curly hair, the trick is to control the roots without flattening the life out of the lengths.
What to Use at the Roots
Mousse or a light-setting cream gives the hair enough grip to rise without slipping. A fine comb helps shape the front section, but do not chase perfect smoothness. A slight softness at the ridge keeps the style from looking severe. Pin the lifted section from underneath, then mist the roots lightly so the shape does not sag.
This works especially well when you want a look that feels a bit bolder than a standard bob. It has more attitude than a flat wave style and more height than a tucked roll. That makes it a good fit for evening outfits, dramatic earrings, or a dress with a simple neckline.
The best part is the movement at the back. Let those curls stay a little fuller. The contrast between slick front and textured back is where the style comes alive.
12. Curled-Under Pageboy With a Soft Bell Shape
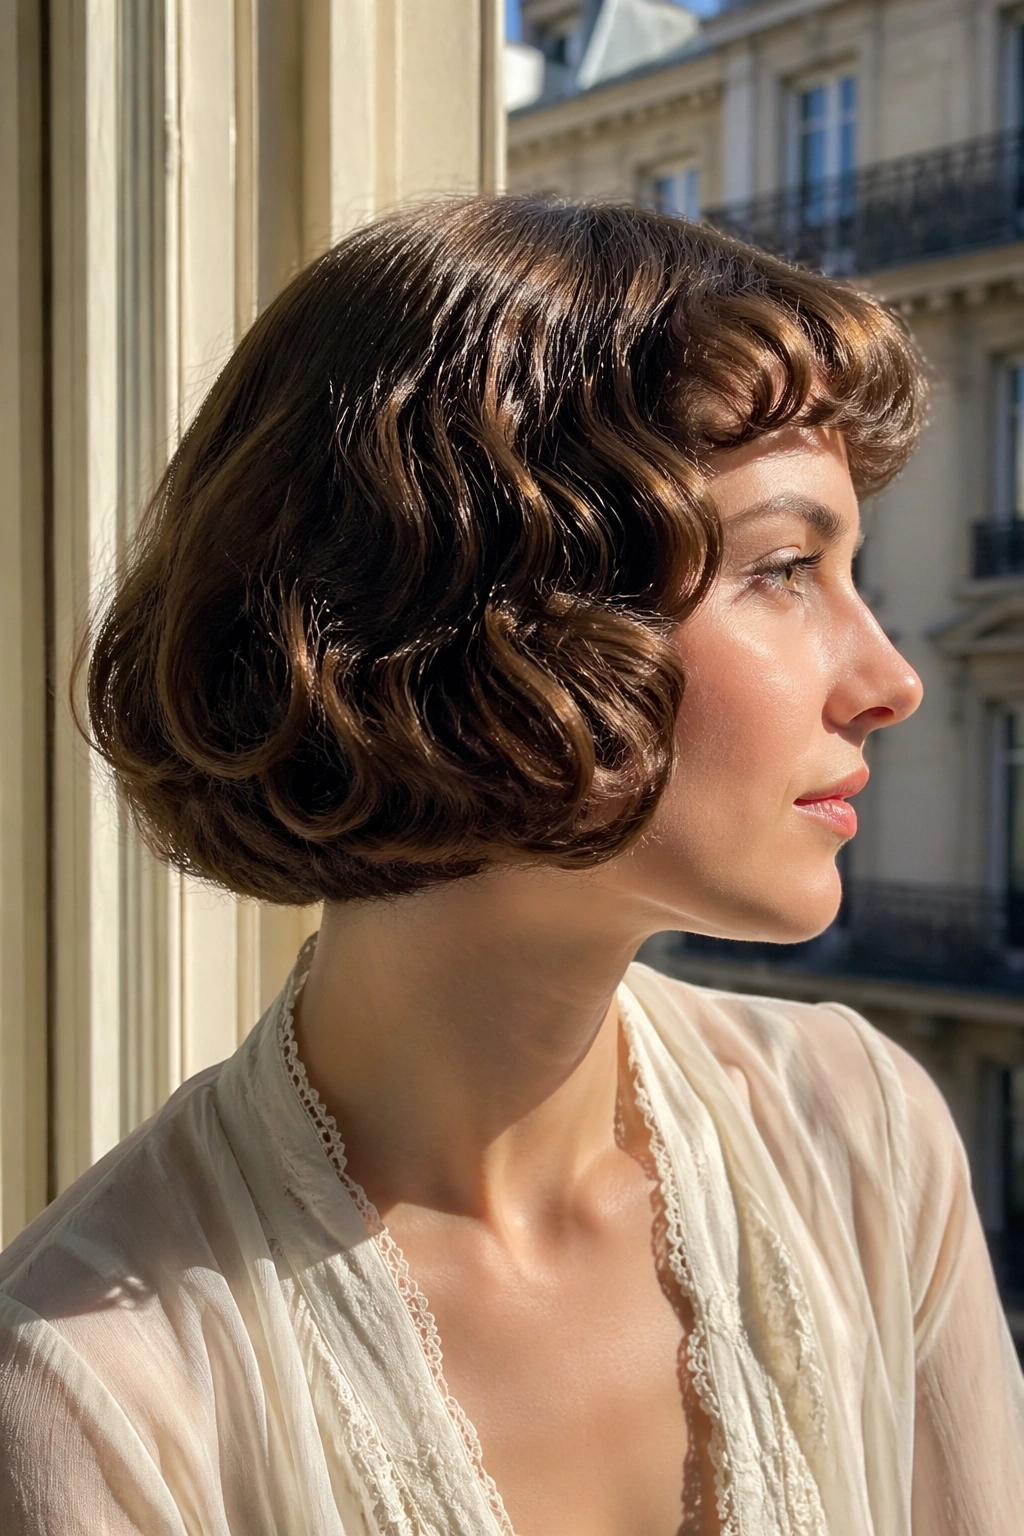
Why does the pageboy look so good on curly hair? Because the shape already follows the hair’s natural bend.
A curled-under pageboy creates a rounded outline that brushes the jaw or sits just below it. The ends turn inward, the crown stays smooth, and the whole look has a soft bell-like curve. It is one of the most wearable 1920s-inspired shapes for curls because it does not demand a hard, flat finish. It asks for control, not punishment.
The styling starts with a clean side or slightly off-center part. From there, the top is smoothed and the lengths are guided under with rollers, a curling iron, or a careful blow-dry using a round brush. Curly hair often wants to puff outward at the bottom, so the last few inches matter a lot. Tuck them in on purpose. That is what creates the pageboy line.
The Finishing Touches
- Keep the crown close to the head.
- Curl the ends inward in small, even sections.
- Add one clip or comb near the temple if the style needs dressing up.
- Use shine spray sparingly so the rounded edge stays visible.
This is the style I would hand to someone who wants the 1920s mood without a harsh or overly theatrical result. It feels neat, but not stiff. Familiar, but still dressed up. And when the ends curl under cleanly, the whole shape makes sense at a glance.
Final Thoughts
The best 1920s glam hairstyles for curly hair do not try to erase texture. They shape it. That is the real difference between a look that feels alive and one that spends the night fighting itself.
If your curls are short, finger waves, the Eton crop, and the shingle bob will give you the cleanest vintage lines. If your hair is longer, faux bobs, rolled nape styles, and pageboy shapes do the same job without forcing a cut you do not want.
A fine comb, a few hidden pins, and a little shine usually matter more than a drawer full of tools. Keep the root smooth, let the silhouette lead, and stop before the style looks overworked. The 1920s loved polish, but they loved shape even more.