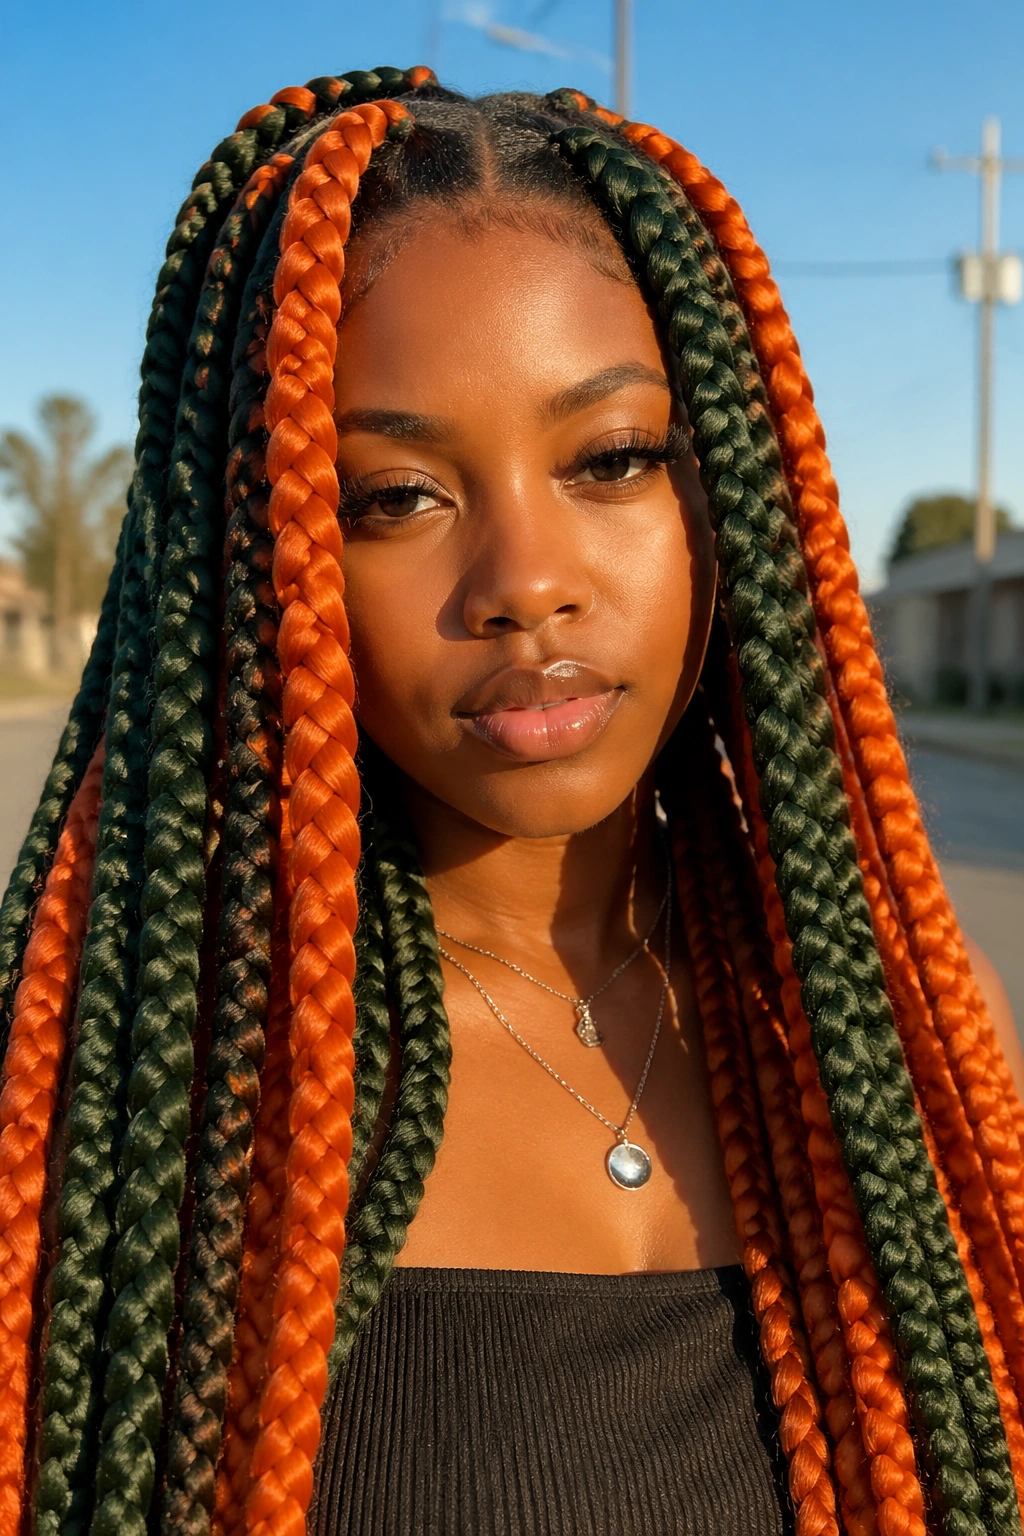
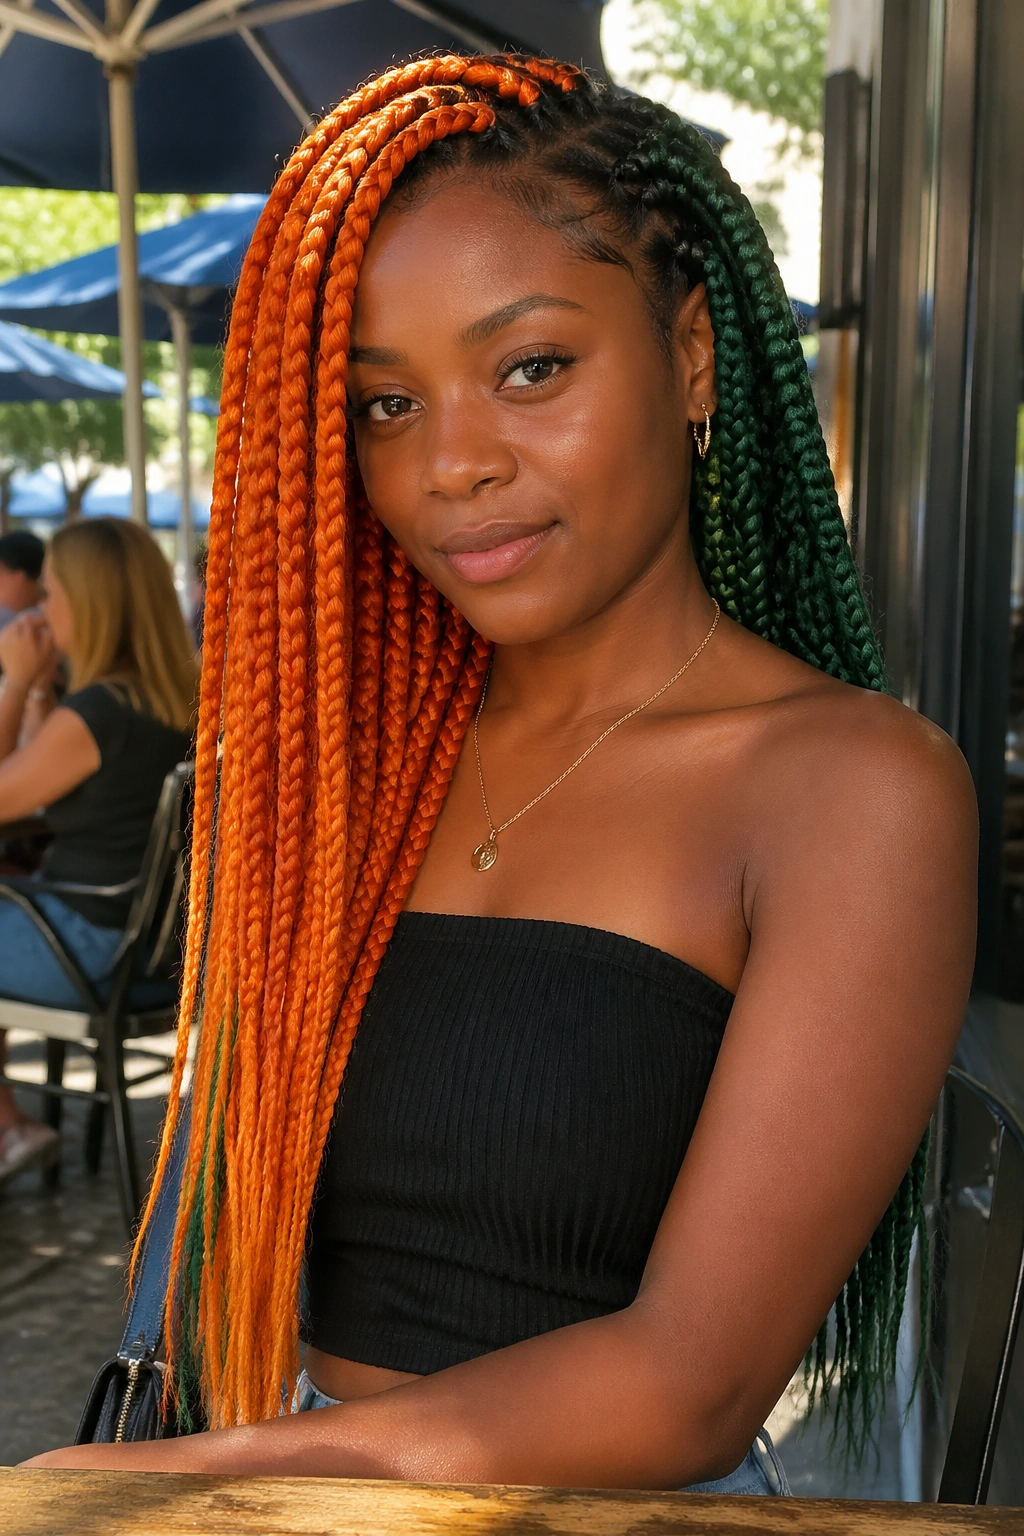
Green and orange box braids do not whisper.
They can look sharp, playful, expensive, chaotic, or flat-out theatrical, and the difference usually comes down to placement more than the colors themselves. Deep forest green next to burnt orange feels rich. Neon green next to bright tangerine can feel loud in a good way, but only if the parts are neat and the braid size makes sense for the shape of your head.
The easiest mistake is treating the colors like paint instead of hair. Braids move. They swing at the ends, sit flat at the root, and change in daylight and indoor light. If you want the look to feel intentional, the parting pattern, the braid thickness, and the way the shades are distributed matter just as much as the shade names you bring to the chair.
I’d also say this: bring reference photos that show the placement of the green and orange, not just the colors. A good braider can work with almost any palette, but the style gets better when you know whether you want a hard split, a fade, hidden color, or full-on contrast from root to tip. Start with the version that fits your patience level, then lean harder if you like what you see.
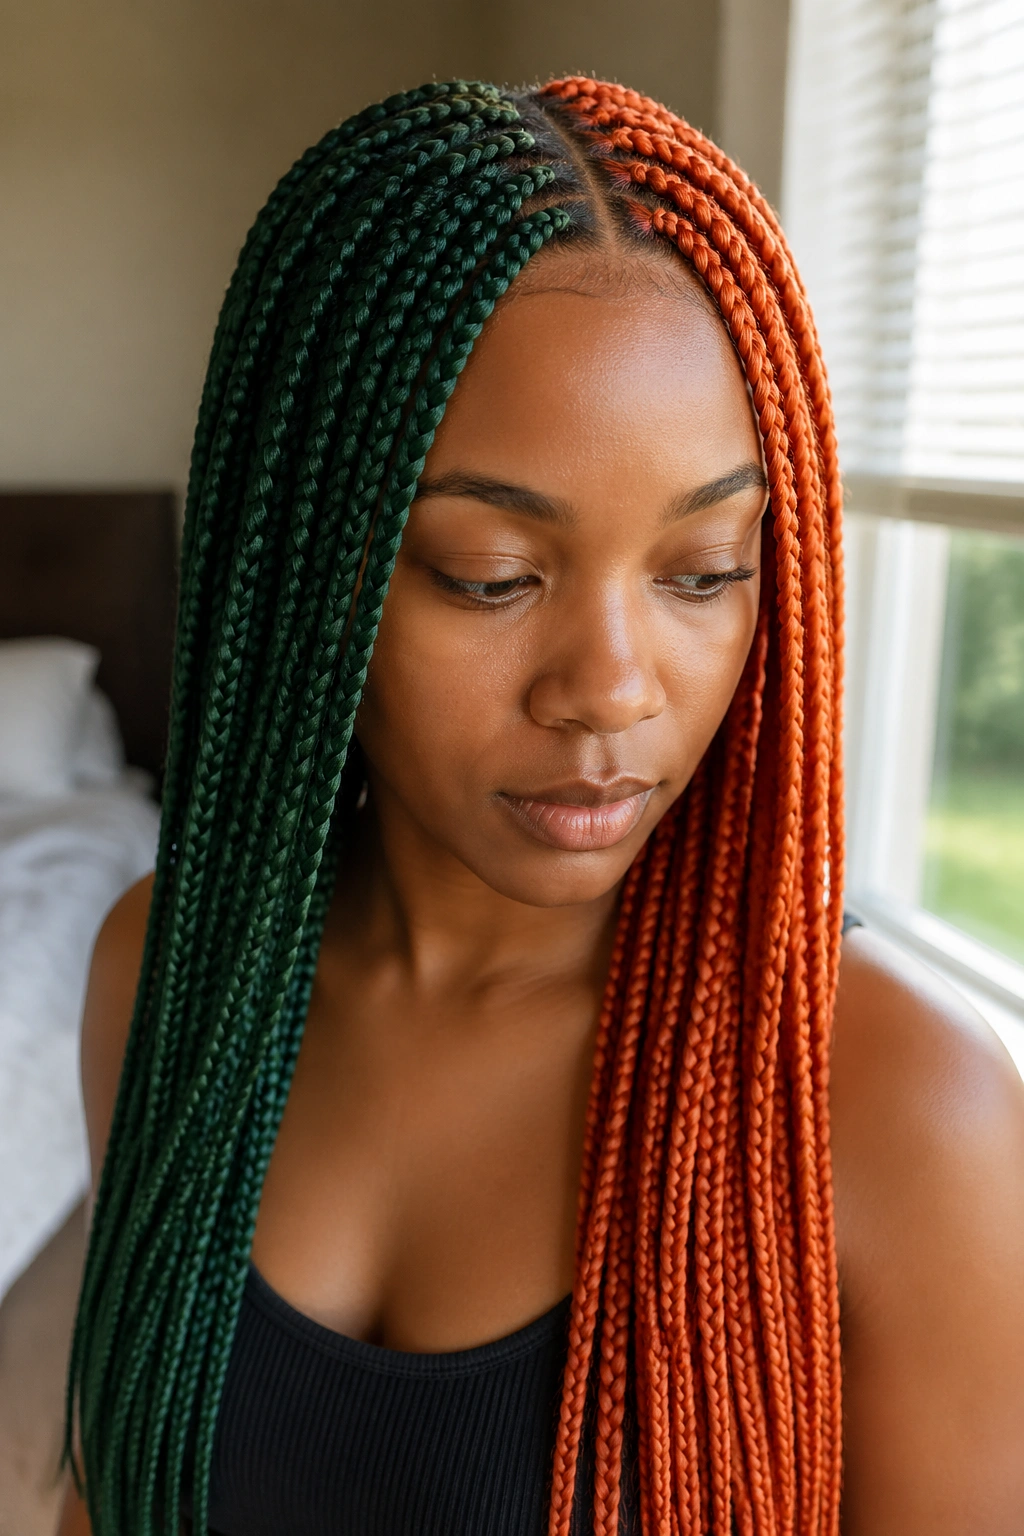
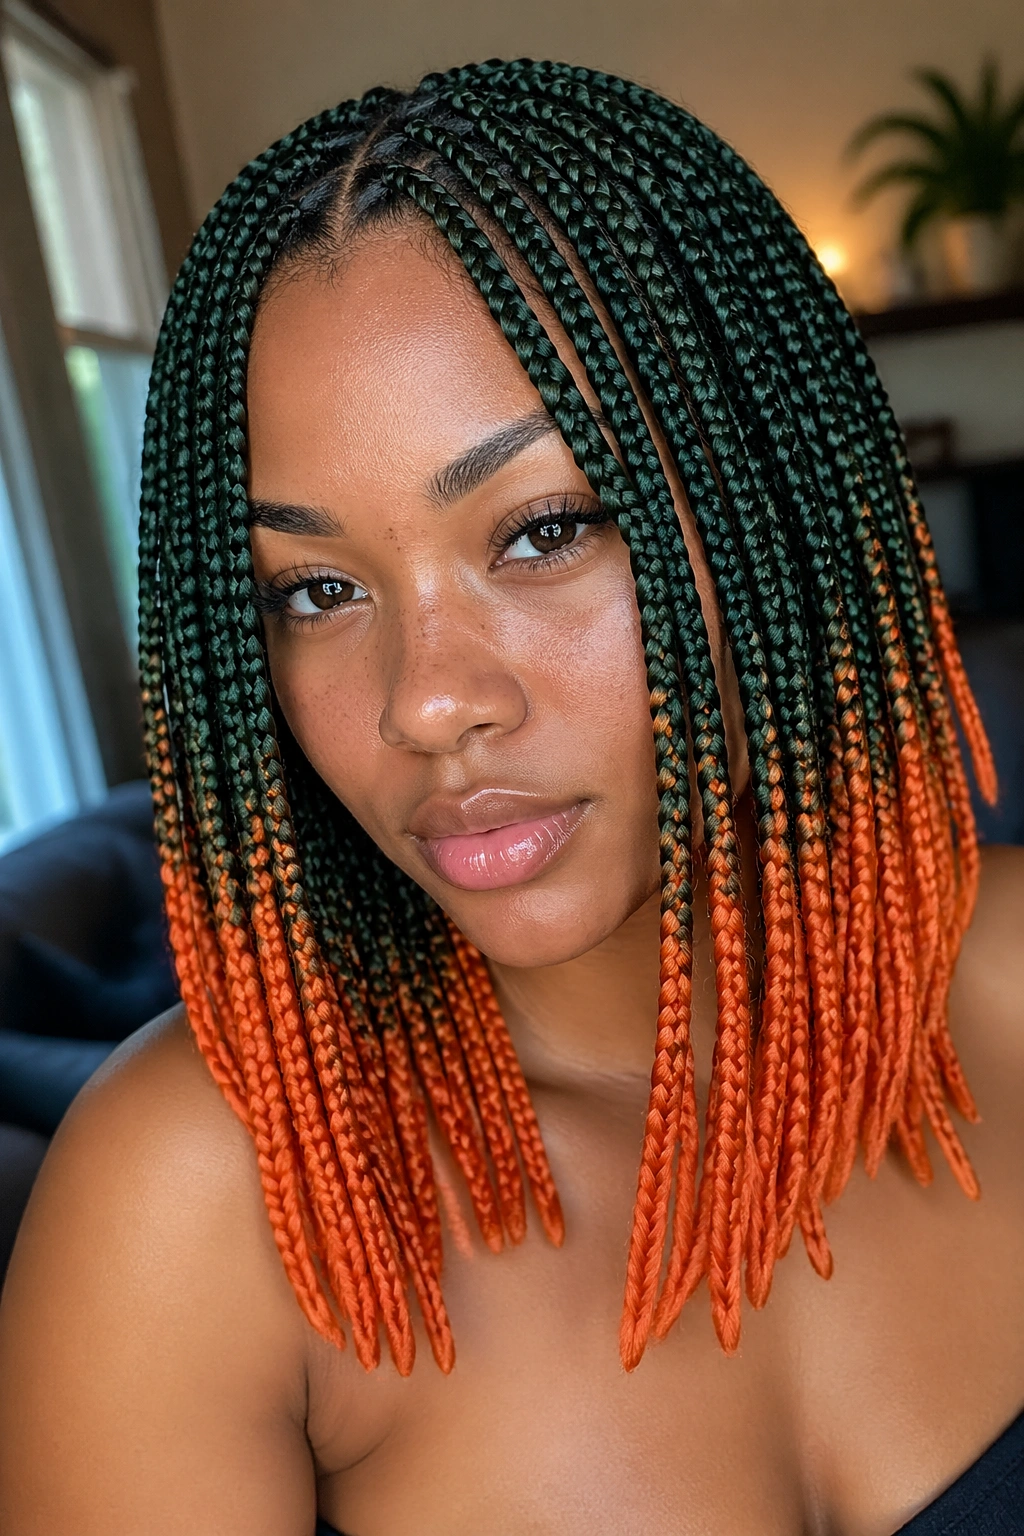
1. Deep Green Roots with Tangerine Ends
Deep green at the roots with tangerine ends is the easiest way to make green and orange box braids look deliberate instead of random. The darker base gives the style weight, and the orange at the bottom brings the movement. When the braids swing, the ends catch the eye first. That little shift matters.
Why the fade works
The strongest part of this look is the contrast between a calm top and a bright finish. Green near the scalp anchors everything, so the orange does not take over too fast. If you want the braids to read polished rather than costume-like, this is the safest place to start.
I like this version best on medium-width braids. Thin braids can make the fade look busy, and very jumbo ones can turn the color transition into a blunt stripe. A medium braid gives the fade room to breathe.
- Best with pre-blended ombre braiding hair or two hair colors layered carefully.
- Works well if you keep the first 1 to 2 inches darker.
- Looks clean on shoulder-length, mid-back, or waist-length braids.
- Use burnt orange or copper orange if you want warmth instead of neon.
My tip: Ask for one test braid first. One. That single sample tells you more than any bundle photo ever will.
2. A Split-Part Style with Green on One Side and Orange on the Other
Why split the color down the middle when you can make the whole style read from across the room? A clean half-and-half layout is bold without needing extra decoration. One side green, one side orange. That’s it. No tricks.
The real work is in the part line. If the middle part is crooked, the whole style starts to feel off balance, even when the braid work is solid. A sharp center part or a clean side part gives the colors a frame, and a frame is what keeps a high-contrast style from looking messy.
This version works best when the braid count is even on both sides. It sounds obvious, but uneven parting shows up fast with split color. I’d keep the braids either medium or small here. Jumbo sizes can make the divide feel too heavy on one side.
If you want a slightly softer version, tuck a few braids from each side across the part near the crown. That tiny crossover breaks the hard line and keeps the style from reading like a barber pole.
3. Orange Top Layers with Hidden Green Braids
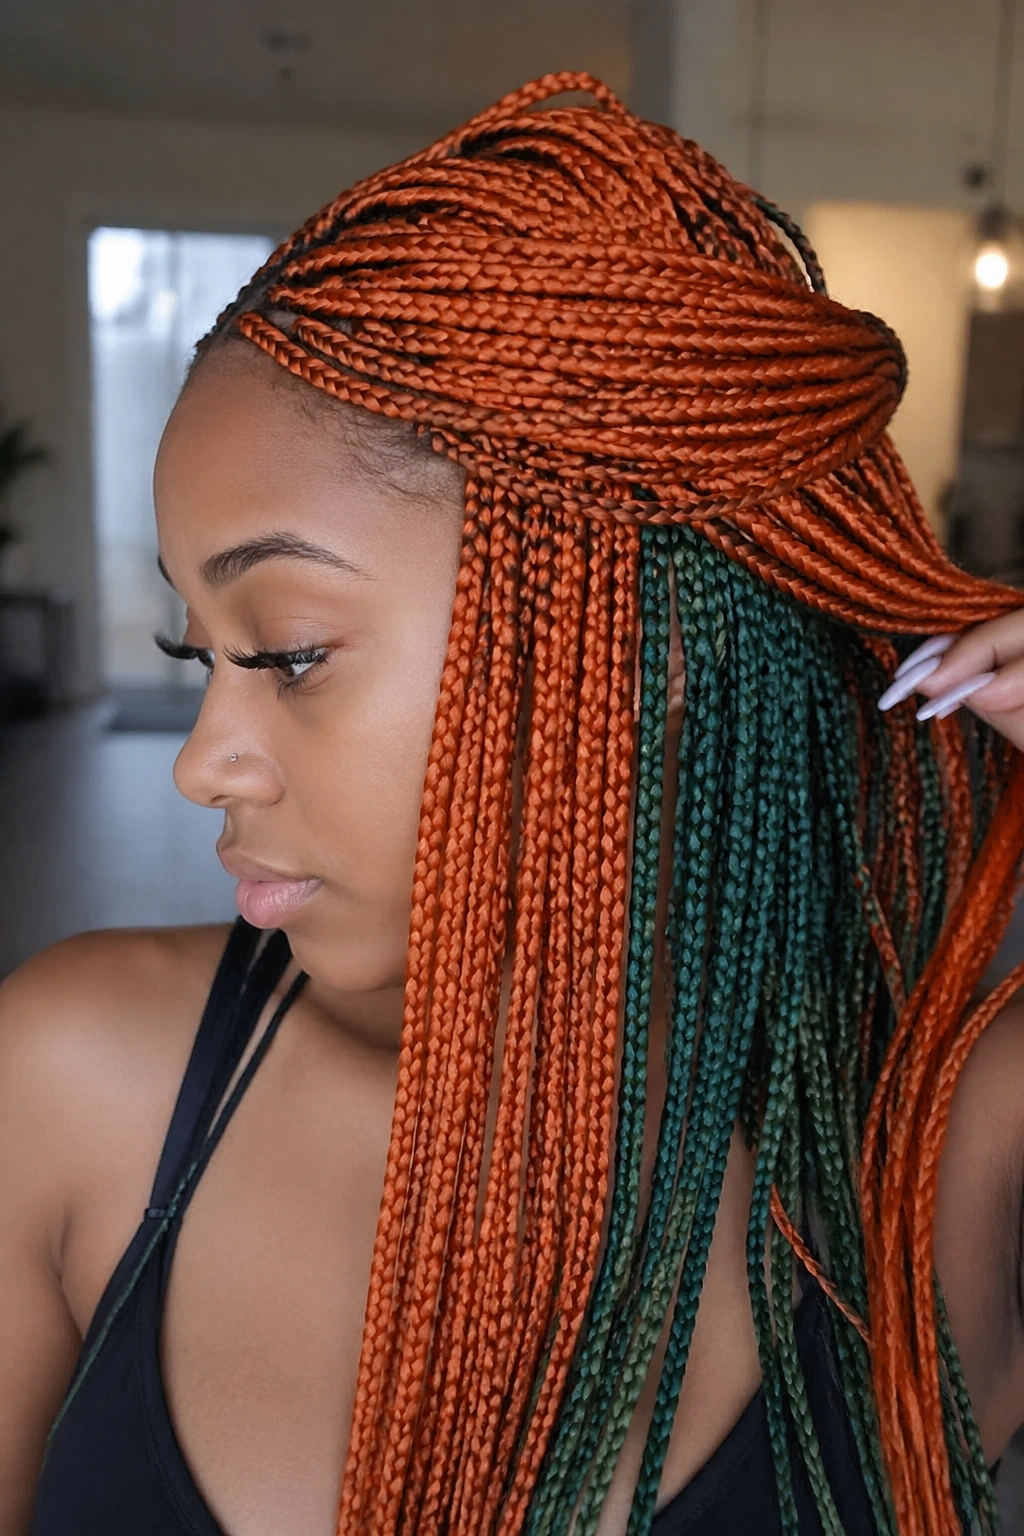
A flash of green under a sheet of orange is the kind of detail people notice when you turn your head. It’s also one of the smartest ways to wear bright color without feeling like every braid has to shout. The top layer does the talking in daylight, and the hidden rows give you the surprise.
This layout works especially well if you wear your braids half-up, in a clip, or pulled into a loose ponytail. The green shows up when the hair shifts. You get movement without committing the whole head to a two-tone split, and that makes the style easier to wear with plain clothes.
Where to place the hidden rows
Put the green in the middle and lower layers, not just at the very back. That way the color shows when the braids move, not only when you twist your neck. If all the green sits too low, it disappears under jackets and scarves. Cute in theory. Annoying in real life.
- Use 2 to 4 hidden rows of green for a subtle reveal.
- Keep the top layer orange for the loudest first impression.
- Add small gold cuffs to a few top braids if you want the color to look finished.
- Best for people who like a surprise detail more than a full-color statement.
Worth doing: This is the version I’d point to if someone said, “I want color, but I still need to look like I tried.”
4. A Soft Ombre Fade from Forest Green to Copper Orange
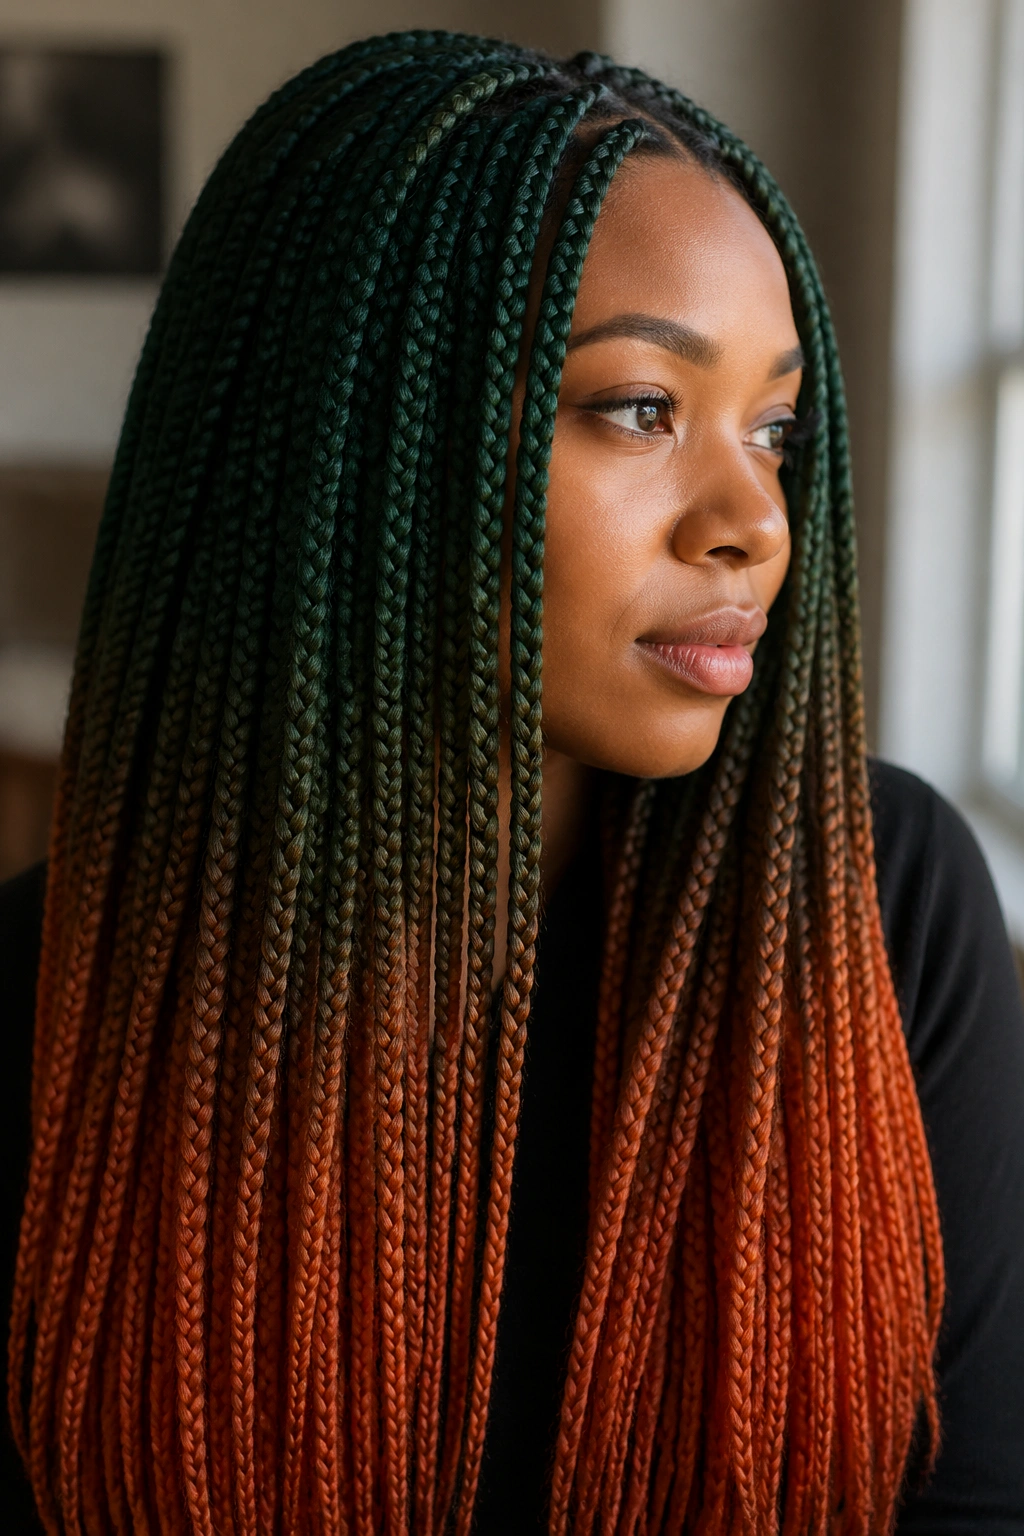
The softest version is also the hardest to mess up. A gradual fade from forest green into copper orange gives green and orange box braids a smoother read, and it’s the one I’d suggest if you hate obvious lines. Nothing looks chopped up. Nothing feels harsh.
How to ask for the fade
Ask for the green to melt into a warm orange over the mid-lengths, not all at once at the bottom. The braid hair should move through the change in a way that feels gradual, almost smoky. If the colors switch too early, the fade loses its point and starts to look like two separate styles sharing space.
Knotless braids suit this look especially well because the root starts slimmer and the color transition feels softer. Classic box braids can still work, but the knot at the root makes the fade read a little more obvious.
I prefer this version in medium or long lengths. Short braids do not give the fade enough room. You want at least a few inches of visible transition so the eye can catch the shift.
If your green is very cool and your orange is very hot, the style can turn muddy. That’s why a forest or olive green paired with copper, rust, or burnt orange usually works better than two neon shades fighting each other.
5. Alternating Green and Orange Braids for a Checkerboard Look
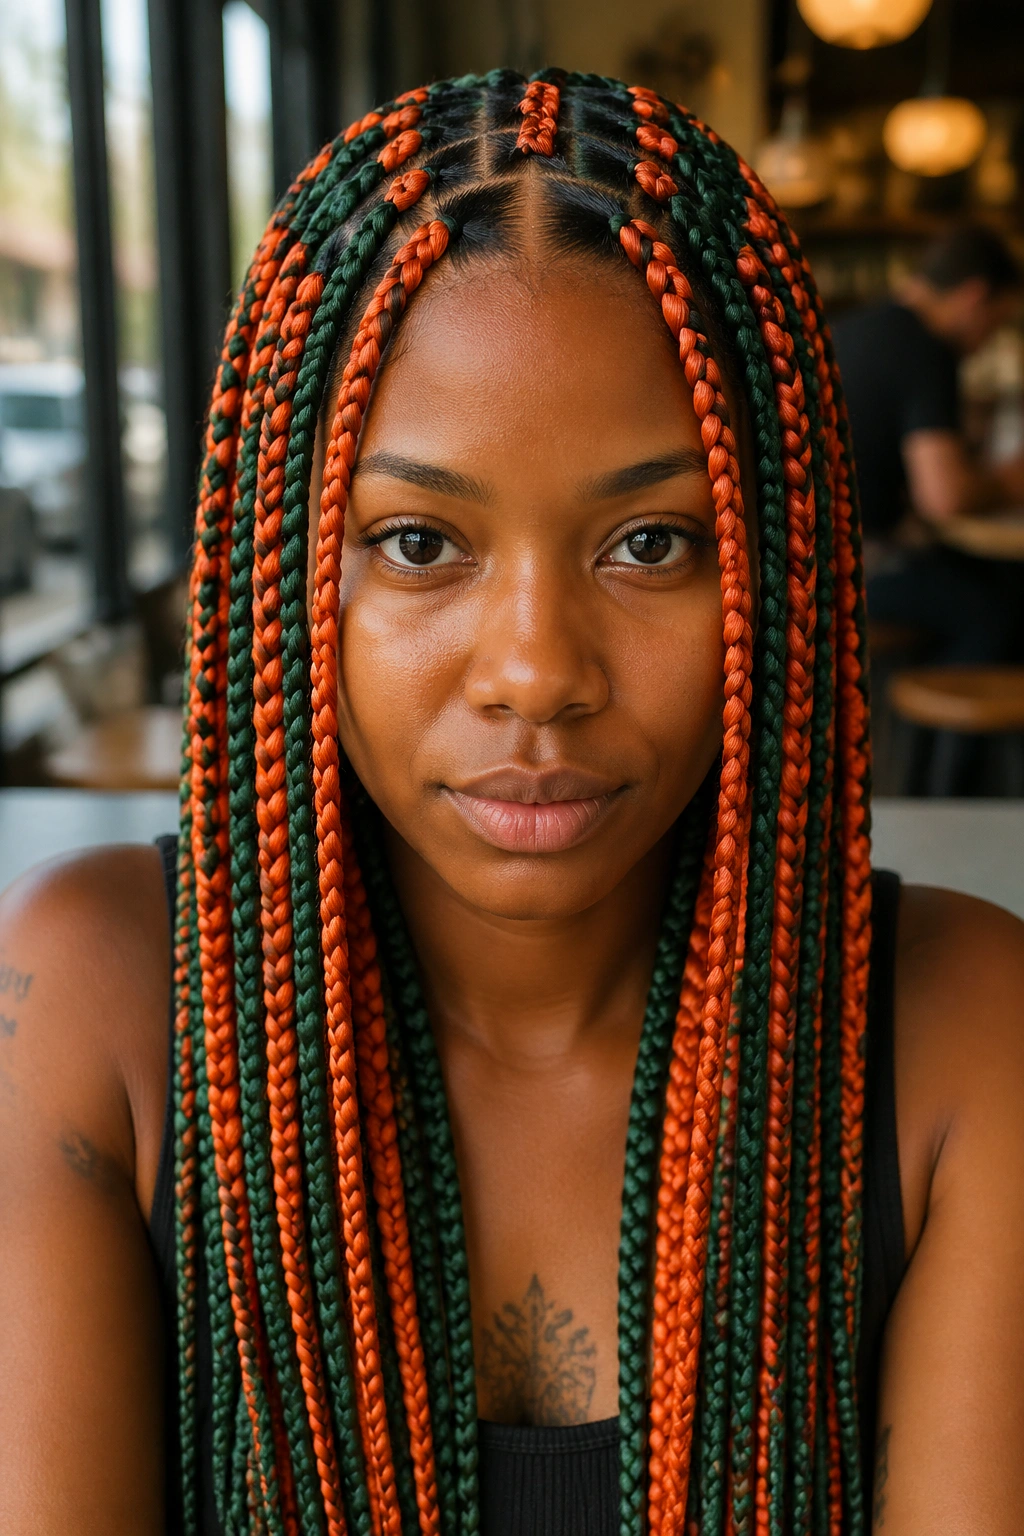
No fade. No blending. Just alternating braids.
That’s the whole appeal here. One braid green, the next orange, and so on until the pattern settles into a clean rhythm. It has a sharper, more graphic feel than a mixed fade, and it looks especially good when the parting grid is square and even.
This style needs consistency. If the braid widths keep changing, the pattern starts to wobble. I’d keep the sections tidy and the braid size matched as closely as possible. The colors are doing enough work already; there’s no need to add visual noise.
Quick style notes
- Works best on medium box braids with an even braid count.
- Looks strongest when the parting grid is very straight.
- Pulls beautifully into a half-up style because the color rhythm becomes visible in layers.
- Use one shade that’s a little deeper than the other if you want the contrast to stay readable.
A checkerboard layout is the one I’d choose if I wanted the braids to feel playful but still neat. It has energy. It also has order, which is the part people miss when they only think about bold color.
6. Jumbo Box Braids with Chunky Blocks of Color
If you want the color to be seen from the back of a crowded room, jumbo braids do the job.
The bigger braid size turns green and orange into solid blocks, not tiny strands of color, and that gives the look a much heavier visual punch. You do not need a complicated parting pattern here. In fact, too much detail gets lost once the braids get thick.
Jumbo braids also cut down the number of individual pieces you have to think about, which can make the style feel easier to wear. That said, they sit heavier on the head. If your scalp is sensitive, your braider should keep the roots flat and comfortable, not pulled taut just because the style looks dramatic.
The color placement can go two ways. You can keep a few braids fully green and a few fully orange, or you can split each large braid into color blocks. I like the second option when the braid count is low, because it keeps the style from looking too patchy.
This is the look for someone who wants drama without tiny braid labor. It reads big. It reads fast. It also works well with oversized hoops, a clean lip, and a plain shirt, which is usually how the best loud hair shows up anyway.
7. Knotless Green and Orange Box Braids with a Seamless Start

Want the color change to look almost seamless at the scalp? Knotless braids make that easier.
Because knotless box braids start with your natural hair and build weight gradually, the root looks flatter and the whole style feels lighter. That matters when you’re wearing two bold colors. A smoother start keeps the eye on the color, not on a bulky knot at the base.
What knotless changes
The first thing you notice is the feel. Knotless braids usually sit more comfortably around the hairline, and they tend to move more naturally when you turn your head. The second thing is the finish. The braid just looks cleaner. Less lump at the root, more flow through the length.
This is a good choice if you want green and orange to melt into each other, especially with a soft fade or a mixed end. The style can still be bright, but it loses some of the stiffness that classic box braids sometimes carry.
I would not pick this version if you want a very blunt, graphic look. Knotless gives you softness. That’s the point.
Best braid size
Medium knotless braids are the sweet spot here. Tiny knotless braids can get time-consuming, and very jumbo knotless braids can lose the smooth effect. If you want the colors to stay clean and easy on the eyes, medium size keeps the balance right.
8. Triangle Parts That Make the Colors Look Sharper
The parting can matter more than the color.
Triangle parts change the whole attitude of green and orange box braids. Instead of a square grid that feels familiar and tidy, you get sharp angles that make the colors look a little more modern and a little less predictable. It’s a small switch, but it has real impact.
The trick is precision. Triangle parts show off clean scalp lines, so the sections need to be even and deliberate. If the triangles are sloppy, the style loses the point fast. On the other hand, crisp parts make the color placement feel almost architectural.
- Best for medium or small braids where the part pattern is visible.
- Works well if you want the scalp design to matter as much as the color.
- Pair it with alternating colors or a fade for extra depth.
- Not ideal if you hate seeing part lines in photos.
I like this choice for people who already wear braids often and want the next version to feel fresher without changing everything. Same protective style. Different shape. That’s usually enough.
9. Waist-Length Braids Finished with Beads and Gold Cuffs
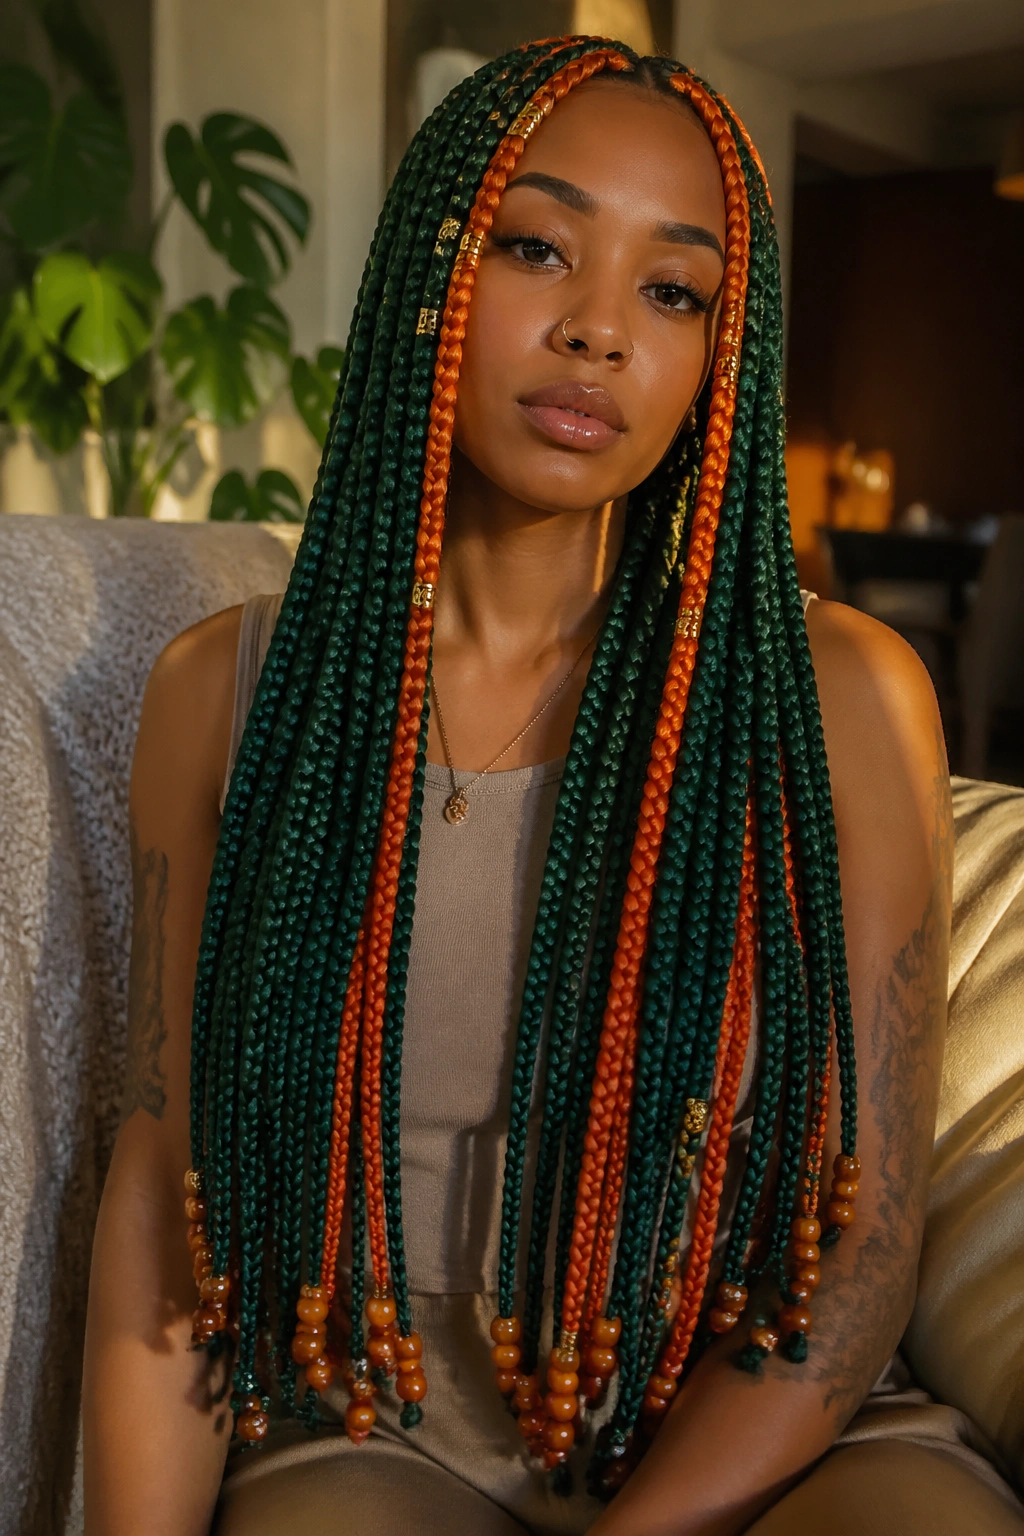
Beads tapping against your collarbone make a two-tone braid style feel alive.
Waist-length green and orange box braids give you room for decoration, and beads or gold cuffs bring out the contrast in a way plain braids can’t. The metal reflects light, the beads add movement, and suddenly the color story feels complete instead of just installed.
The best accessory setup is usually restrained. A few gold cuffs near the front, maybe some clear or amber beads at the ends, and that’s enough. If you cover every braid with hardware, the color gets buried under the extras. Less is better here. More starts to feel noisy.
I especially like this look when the orange is warm and the green leans deep or jewel-toned. Gold plays nicely with both. If you want a cooler finish, silver cuffs can work, but they change the mood fast. The style goes from rich to sharp.
Long braids do need a little care at night. A silk scarf or satin bonnet helps keep the ends from snagging, and it keeps the beads from grinding into each other while you sleep. Tiny detail. Big difference.
10. A Chin-Grazing Box Braids Bob with Clean Color Contrast
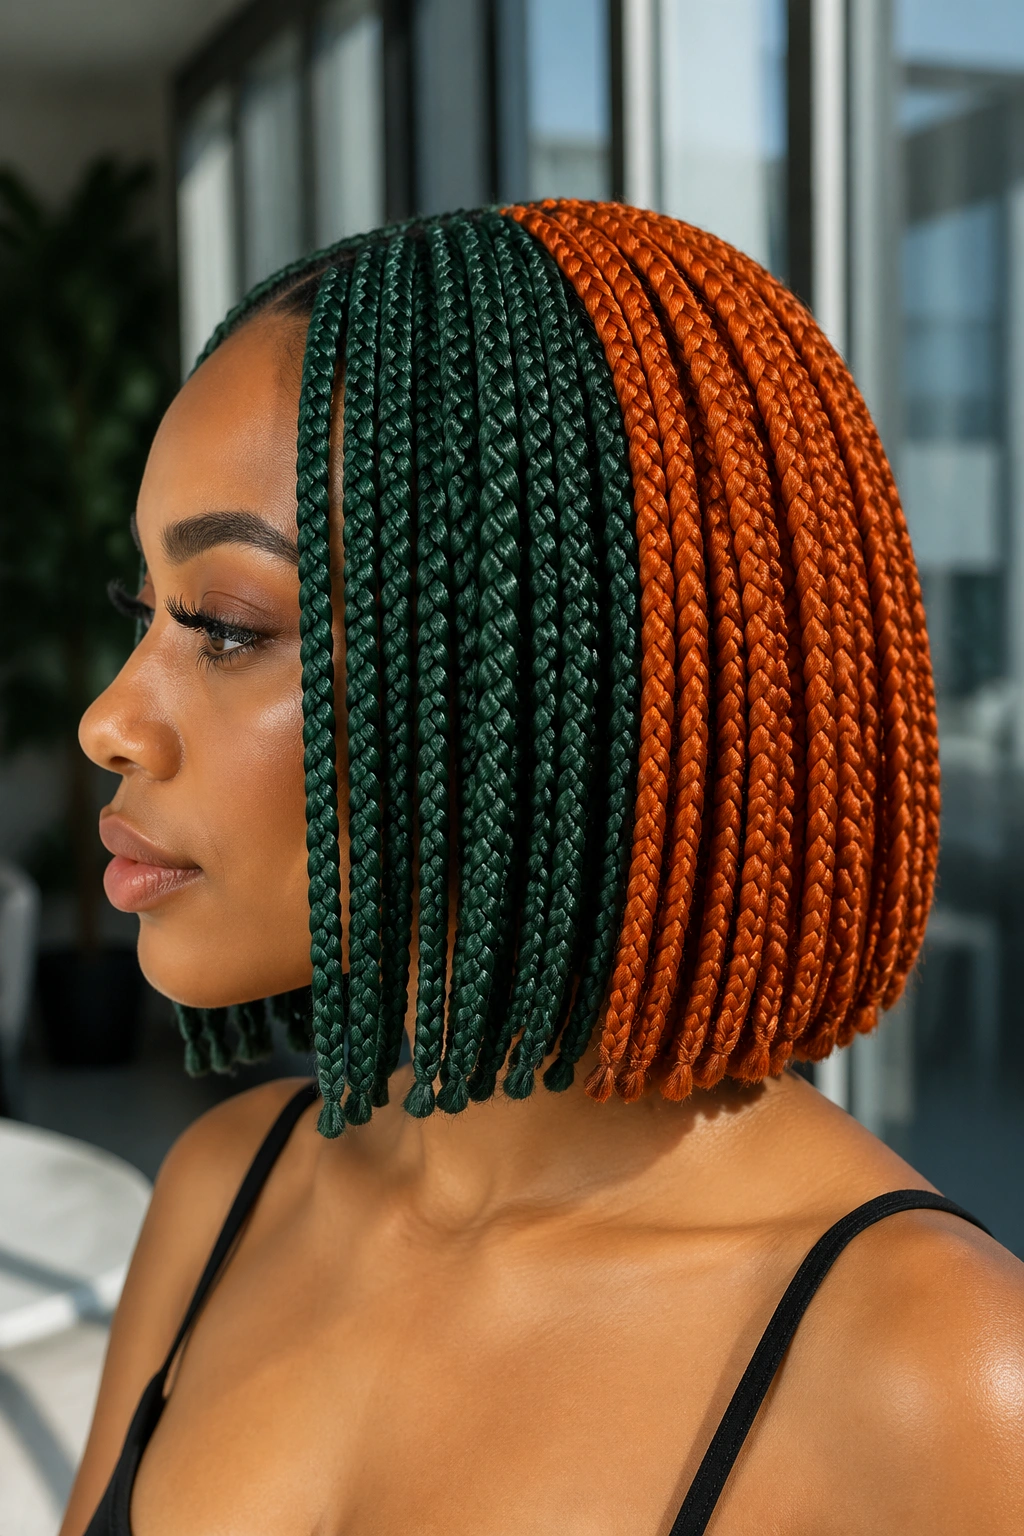
A chin-grazing bob makes green and orange box braids look crisp instead of heavy.
Shorter braids put the color closer to the face, which means the contrast shows up fast even when the rest of your outfit is plain. They also cut down on weight. If long braids have ever made your neck feel tired by the end of the day, this is the version that gives you the look without the drag.
Why the shorter length matters
The bob shape keeps the eye moving around the jawline and cheekbones. That’s useful when the colors are bold, because the style already has enough going on. You do not need extra length to prove a point.
I’d keep the ends blunt or only slightly angled. A severe shape can make the style feel boxy in a bad way. A soft bob with green at the bottom or orange near the face feels cleaner. It also photographs in a much simpler way, which matters more than people admit.
This is one of the easiest versions to live with day to day. It’s faster to dry after washing. It’s easier to tuck behind the ear. And it gives you a clear view of the color, which is really the whole reason to wear it.
If you want a style that feels bold without being heavy, this is the one to bookmark.
11. Side-Swept Braids with Orange at the Front and Green at the Back
What happens if you push the orange forward and let the green sit behind it?
You get a side-swept look that frames the face first and saves the cooler shade for movement in the back. It’s flattering, but not in a bland way. The front color does the work around the cheekbones, and the back color keeps the style interesting when you turn around.
This style works best with a deep side part and braids long enough to stay put when swept across one shoulder. A light mousse at the roots helps the front lie flat without turning stiff. I’d also keep the front rows a little neater than the back. The eye goes there first.
- Best if you want the orange to brighten the face.
- Good for long braids that can be pinned or tucked.
- Use a few green accent braids near the part so the back doesn’t disappear.
- Looks strong with one statement earring on the open side.
Side-swept braids can save a style that feels too symmetrical. Sometimes that’s all a look needs: one change in direction.
12. High Ponytail Box Braids Wrapped at the Base
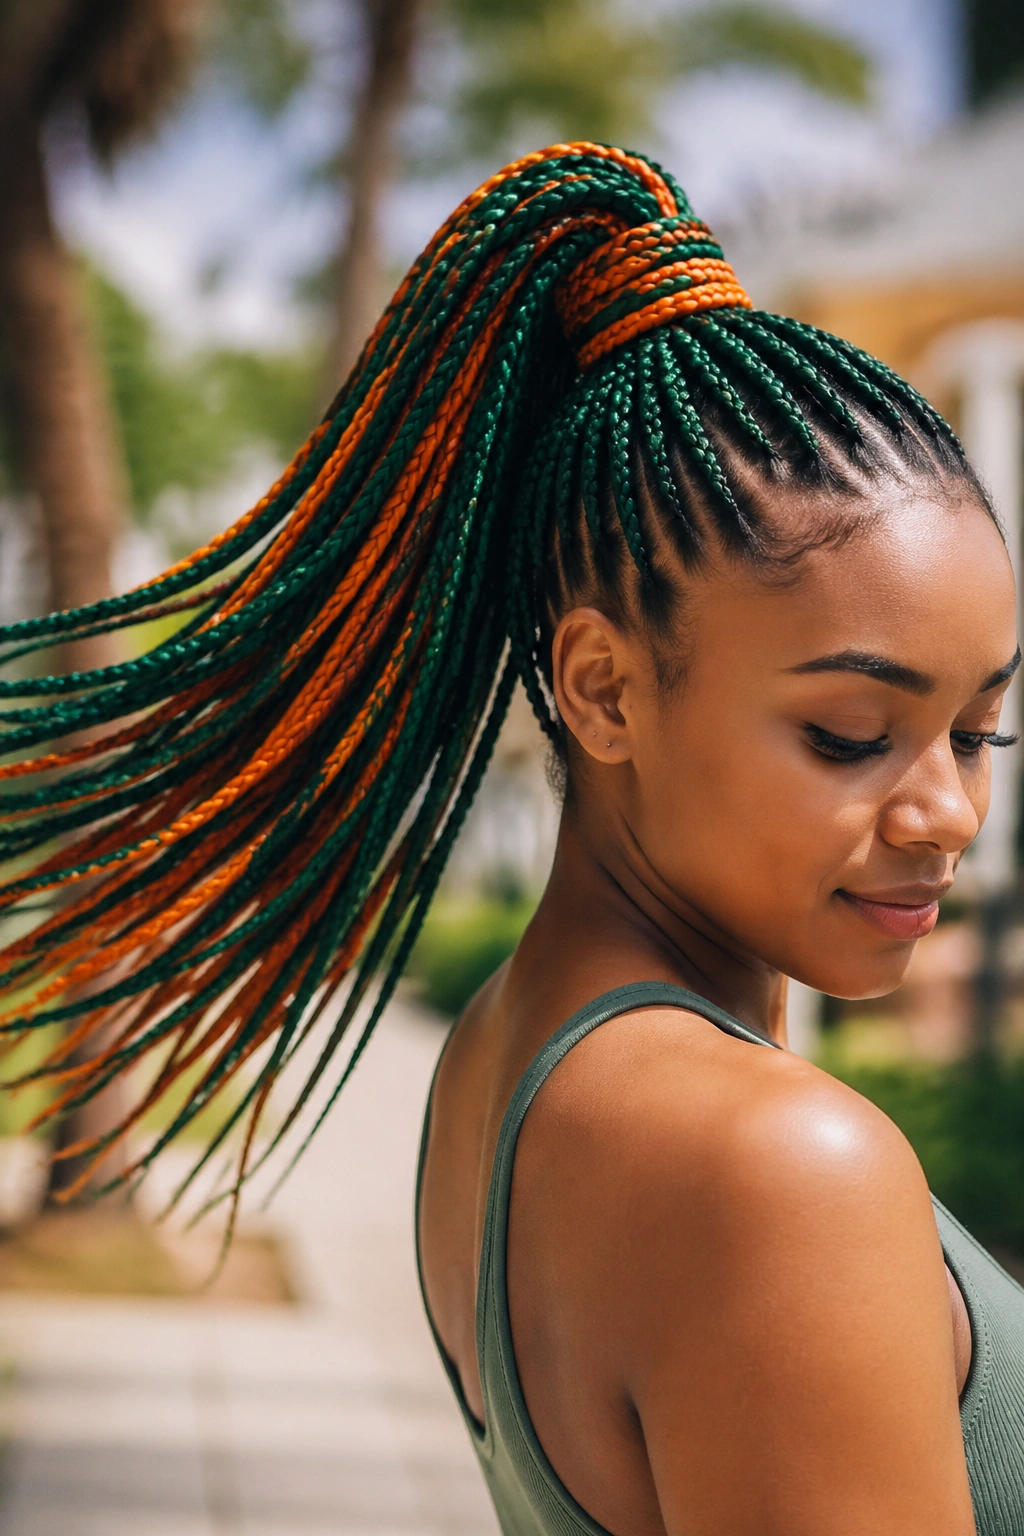
A high ponytail turns the color into motion.
When green and orange box braids are pulled up high, the shades move together instead of sitting flat against the shoulders. That gives the style a different energy. Less static. More swing. And if the base is wrapped neatly with a few braids or a matching strip of hair, the whole thing reads finished rather than thrown up.
This is one of the better choices if you like to wear your braids out of your face. A high ponytail shows the roots, the length, and the color at once. It also makes mixed-color sections easier to see because the braids fan out when the ponytail moves.
Your hairline should not pay for the style. Keep the ponytail secure, yes, but not so tight that your edges take a hit by the end of the day. A strong scrunchie or a fabric tie works better than a thin elastic that bites into the base.
I like this look with a mix of full green braids and full orange braids in the ponytail, then a few blended pieces near the crown. That mix keeps the top from looking flat while the tail does the dramatic work.
13. Double Space Buns with Bright Color-Blocked Braids
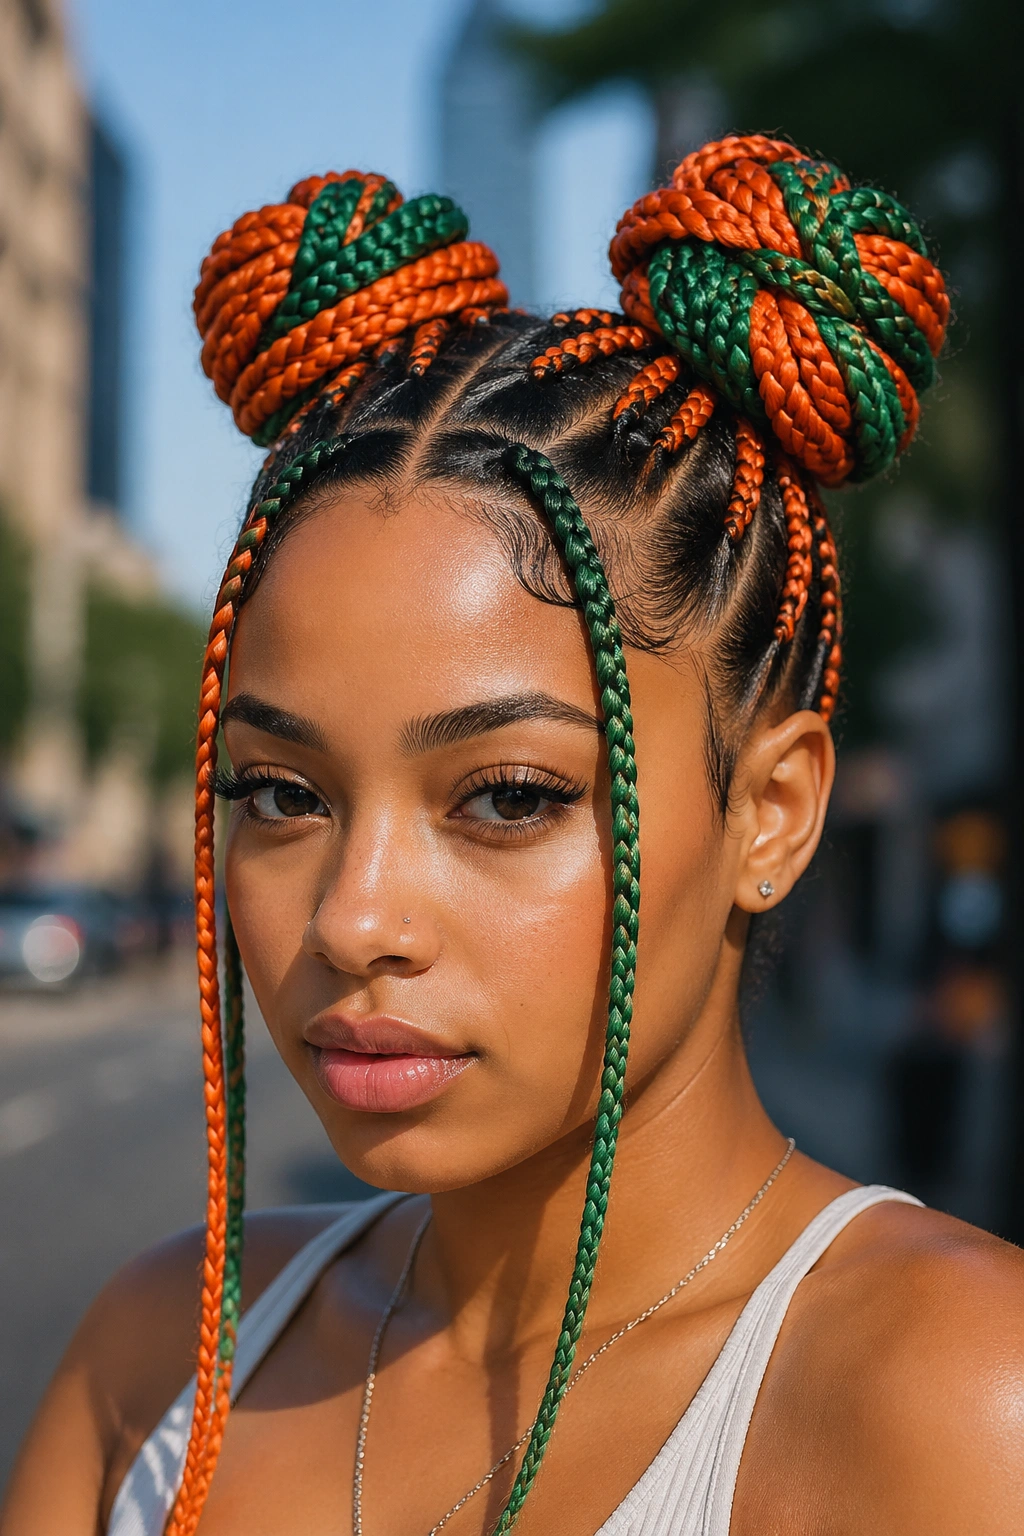
Two buns. Two colors. Zero subtlety.
Space buns with green and orange box braids are the kind of style that makes sense when you want the hair to feel fun on purpose. The shapes are playful, but the braid work can still be neat and controlled, which is the part people forget. Messy buns are easy. Clean space buns take more care.
How to keep both buns balanced
The key is symmetry at the part line and control at the base. If one bun sits too high or too loose, the color starts to look accidental instead of styled. I’d keep the braids smooth at the roots, then let the ends stick out in a way that feels full but not sloppy.
This style is strongest when the colors are blocky rather than heavily blended. A green bun on one side and an orange bun on the other gives the look a clear shape. You can also split each bun with both colors, but that version works better if the braids are medium size.
A few loose braids around the face help soften the whole thing. Otherwise the buns can look too severe. Funny how that works. Add one or two soft pieces, and the entire style relaxes.
If you want a photo-ready version of green and orange box braids, this is one of the most fun shapes to try.
14. Face-Framing Money Pieces in the Brighter Shade
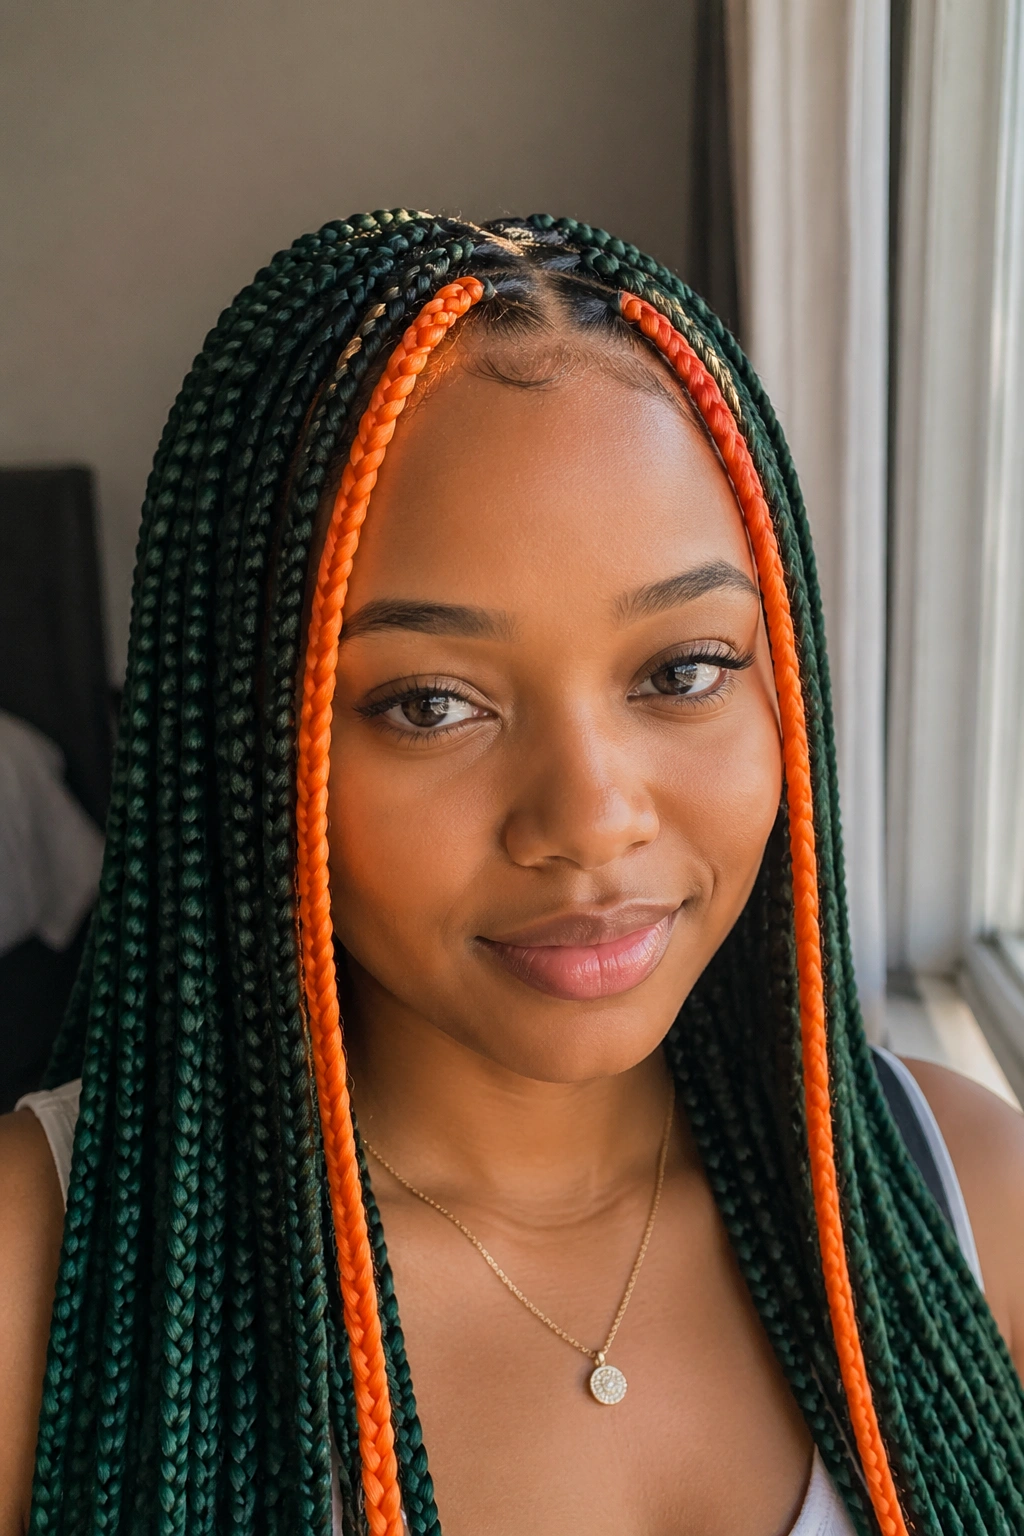
Want the color without covering every braid?
Face-framing money pieces are the easiest way to test green and orange box braids without going full head. Put the brighter shade where the eye lands first—around the temples, cheekbones, and front hairline—then let the rest stay darker or more neutral. The result feels lighter, but it still has personality.
I’d use orange near the face if you want warmth and energy, or green if you want a cooler edge. You can even split the front pieces, with orange on one side and green on the other, if you like a little drama without committing to a full pattern. That version looks especially good when the rest of the braids are mostly one dominant shade.
Best way to place the pieces
- Keep the front accents to 2 to 6 braids so the face is framed, not crowded.
- Make the front pieces slightly thinner than the rest if you want them to sit softly.
- Add the brighter shade near the part, not just at the ends.
- Use this layout if you want a style that grows out gracefully.
This is the version I’d suggest to someone who likes bold hair but needs it to be easy to wear with everything from hoodies to button-down shirts. It’s a low-drama way to try a loud color story.
15. Mixed-Length Accent Braids for a Softer Everyday Finish
Uneven does not mean sloppy.
Mixed-length green and orange box braids can look more natural than people expect, especially when the color placement is smart. Some braids can fall at the shoulders, some mid-back, and a few longer ones can sit underneath to keep the silhouette full. The variation breaks up the hard line that a single length sometimes creates.
I like this approach when the goal is wearability. A full head of bright braids can feel intense if every strand is the same length and the same shade pattern. Mixed lengths soften that. They also make the style easier to tuck, pin, and fold into half-up looks without the whole head feeling heavy.
The color can stay subtle here or lean bold. You might put orange on the shorter pieces so they pop near the face, then let green sit lower and deeper in the length. Or you can alternate the accents in a looser way and let the braid sizes do some of the balancing for you.
This is the version that tends to age well over the life of the style. As the braids loosen a little, the uneven lengths can actually look better, not worse. A fresh mousse set, a clean scalp part, and a satin scarf at night will carry it farther than extra accessories ever could.