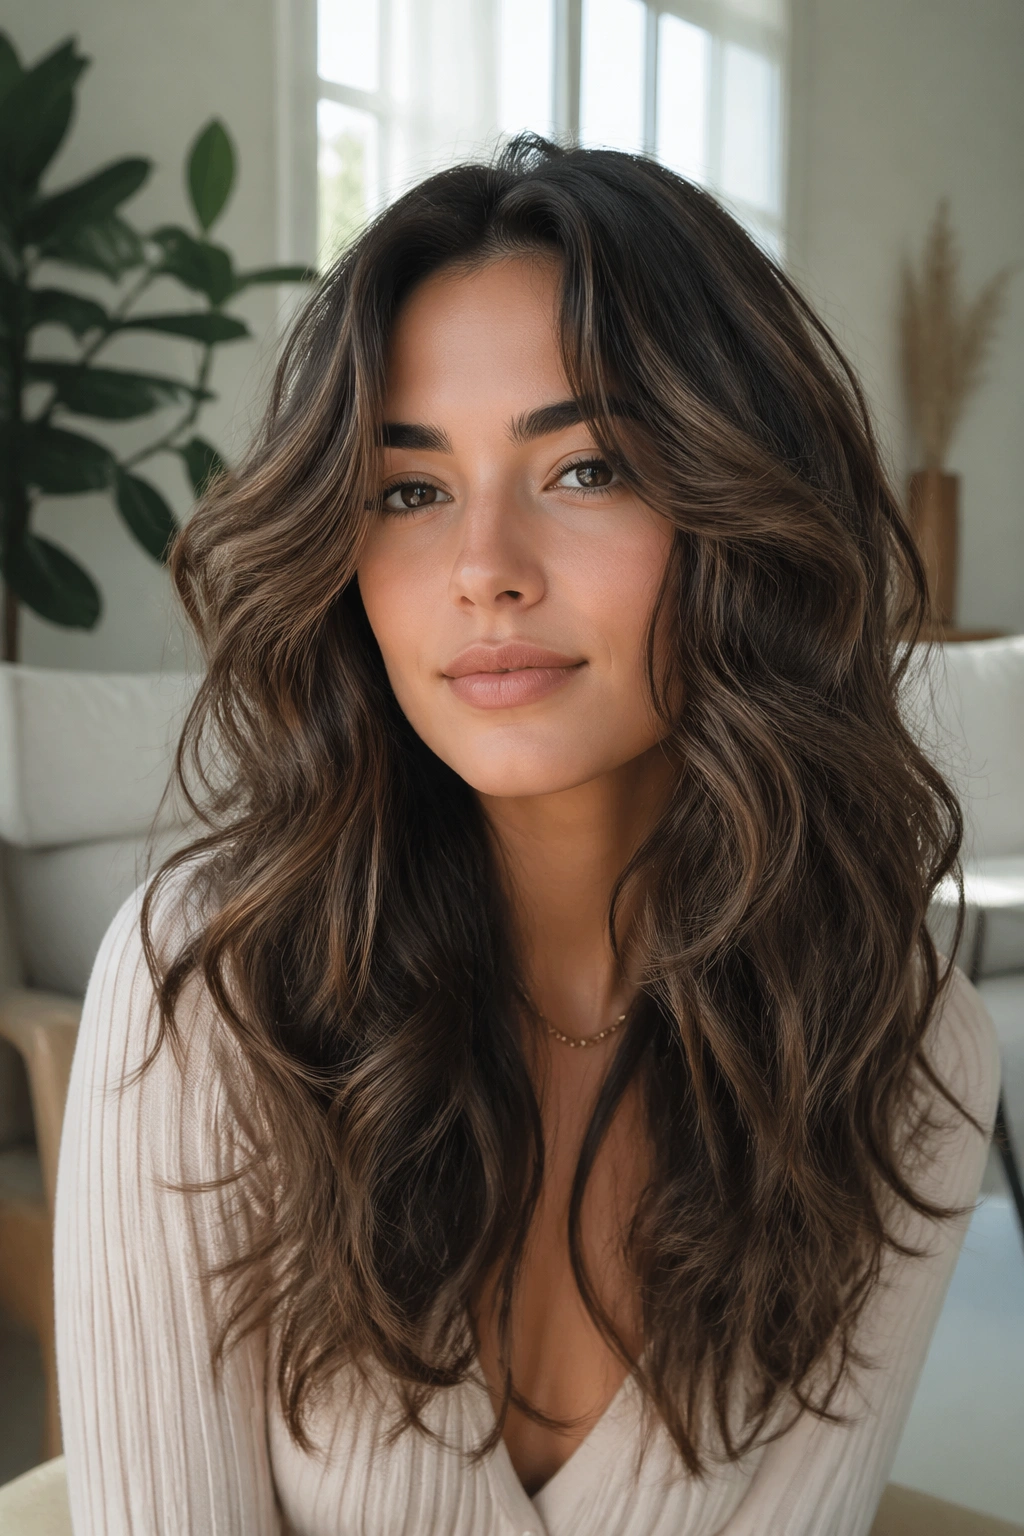
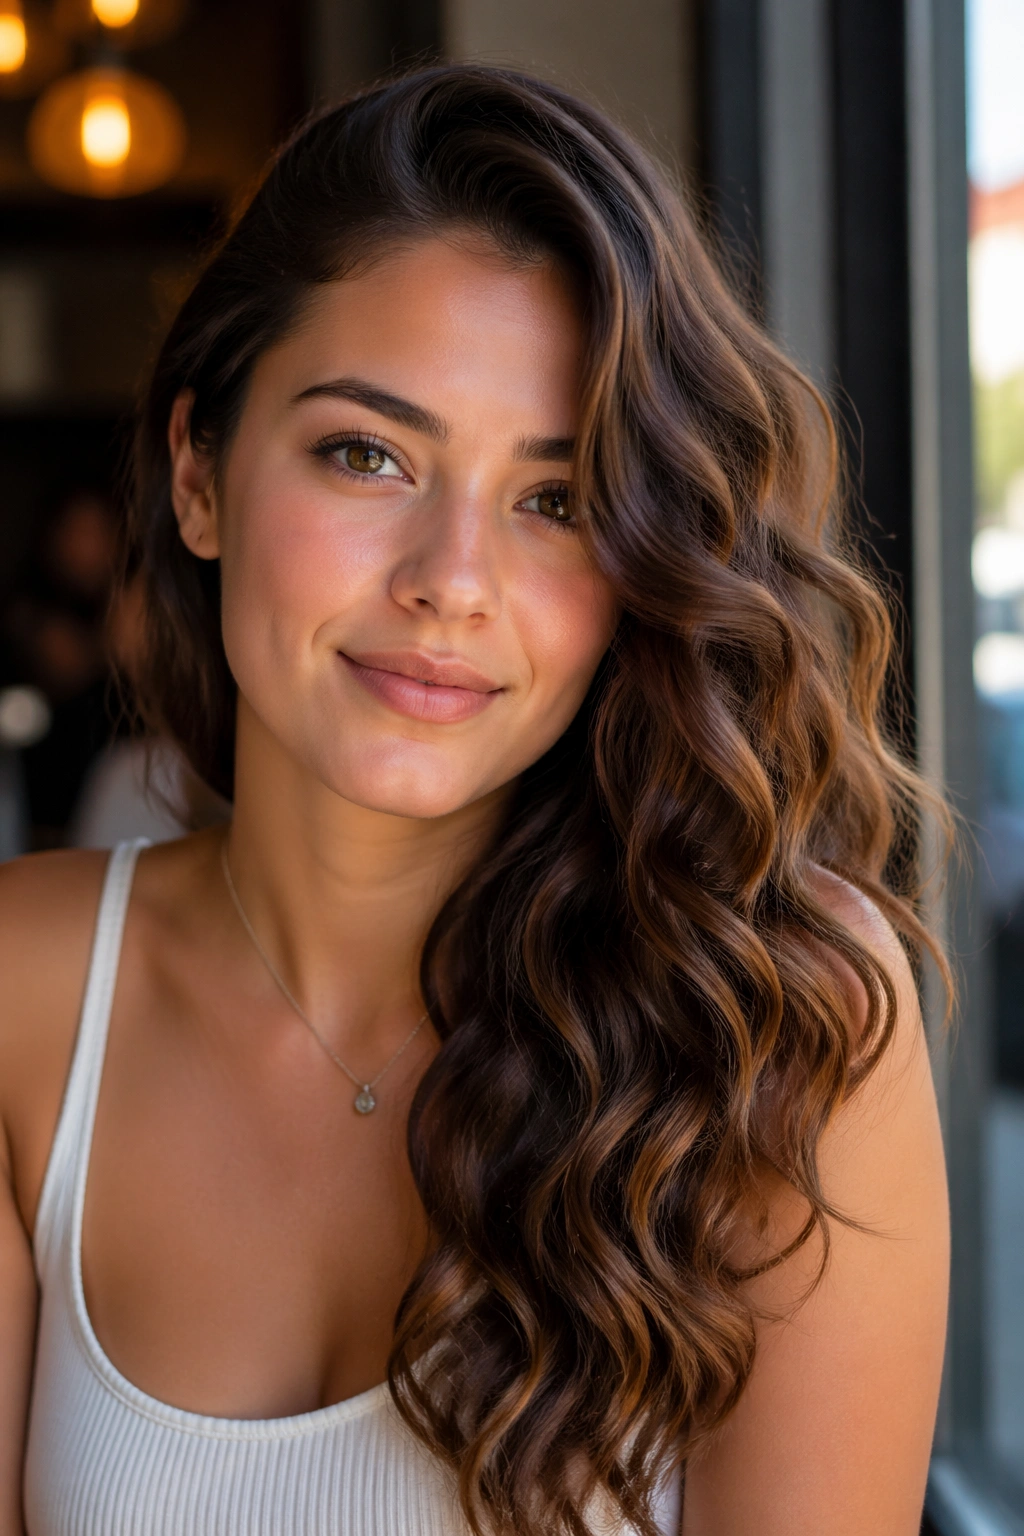
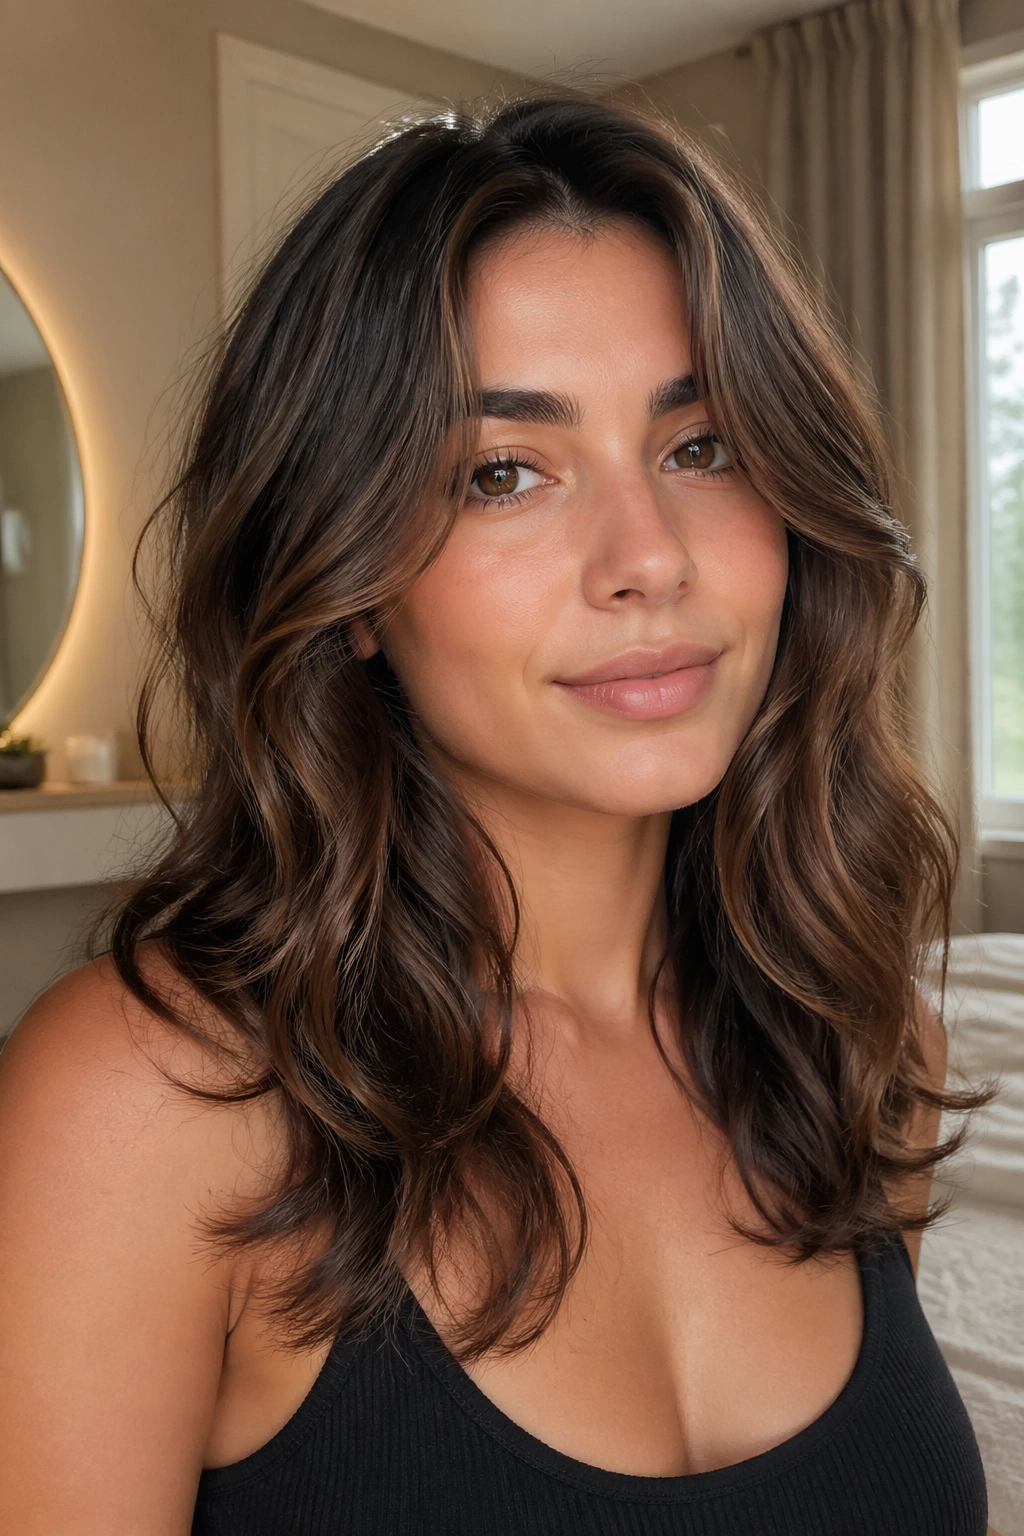
Long hairstyles for 2b wavy curly hair can look lush, but the wrong cut makes the wave pattern sag at the roots and fray at the ends.
2b hair sits in a funny spot. It has enough bend to look soft and lived-in, but not enough curl memory to hold every shape you throw at it. Brush it dry and it can puff. Layer it too high and the ends go thin. Leave it one length and it can swing heavy, almost rope-like, especially once it gets past the shoulders.
So the sweet spot is shape, not drama.
The styles below lean into that: cuts that keep the perimeter full, updos that let loose texture do the work, braids that look better with a little imperfection, and parts that wake up flat roots without a gallon of product. Some are quick. Some need a mirror and five extra pins. All of them make long 2b hair look like it meant to behave that way.
1. Long U-Cut With Soft Face-Framing Layers
If your ends tend to look see-through by the time they reach your chest, a long U-cut is one of the smartest moves you can make. It keeps the length you worked for, but the rounded hemline makes the whole head look softer and fuller than a blunt slash across the back.
Why It Flatters 2b Waves
The U-shape gives 2b hair a little room to move. That matters, because this texture rarely falls in one neat curtain. It bends in the middle, puffs at the sides, and then collapses if the cut is too heavy.
Ask for face-framing layers that start around the cheekbone or just below the jaw, then blend into longer pieces around the collarbone. That keeps the front from feeling blocky. The back can stay longer and more solid, which is the part that helps this style hold up when the hair air-dries.
- Best for: medium to thick 2b hair that loses shape at the ends.
- Style it with: a light mousse at the roots and a pea-sized curl cream through the mids.
- Ask your stylist for: a dry finish check, because 2b hair shrinks in odd places and a wet cut can fool everyone.
- Skip heavy texturizing on the bottom: it can make the perimeter look ragged fast.
My favorite part: it looks styled even on a lazy day, which is rarer than people think.
2. Butterfly Layers That Keep the Ends Full
Butterfly layers are the sneaky answer when you want movement up top without sacrificing the length that makes long hair feel luxurious. The short face-framing pieces do the lifting, while the longer underlayer keeps the silhouette heavy enough to look intentional.
The trick with 2b waves is to keep the shortest layer long enough to blend. If those layers get chopped too high, they can spring out like little wings in a way that feels more chaotic than flattering. A good butterfly cut usually starts around the cheekbones or the top of the collarbone, then opens up as it falls.
This cut is especially good if your hair gets flat at the crown. Those upper layers catch a little air, so the top half looks lighter and more awake. The bottom section still has enough weight to keep the wave from scattering all over the place.
I like this style on hair that’s in the medium-to-thick range. Fine 2b hair can wear it too, but the layers need to stay long and soft. If you want a little extra polish, bend the front pieces with a 1.25-inch curling iron and leave the rest alone. Two or three curls around the face are usually enough. The whole point is to make the cut do the work.
3. Curtain Bangs and Loose Waves
Can 2b hair wear bangs without turning into a puffball? Yes. Curtain bangs are the least fussy version, and they suit long hair because they split the face instead of boxing it in.
The length matters. Short curtain bangs on 2b hair can spring up too much and lose their shape by noon. I prefer a bang that hits somewhere between the lip and the chin when it’s dry. That gives you room for shrinkage and makes the sweep feel soft instead of choppy.
2b waves already have movement, so curtain bangs slide into the pattern faster than blunt fringe. They also help the rest of the hair look longer because your eye travels down the center part and out to the sides. That little trick makes the whole style feel open.
How to Wear It
- Dry the bangs first with a round brush or a large velcro roller.
- Bend each side away from the face while the hair is still warm.
- Clip the center flat for a few minutes if it tends to split too much.
- Use a tiny bit of styling cream, not a heavy paste. Too much product makes the fringe sticky and flat.
The best part is how forgiving it is. If one side sits higher than the other, nobody notices. It just looks like movement.
4. Long Blunt Cut With Clean Ends
A blunt cut looks a little suspicious on paper for wavy hair, I know. People assume it will fight the texture. On 2b hair, though, that hard line can make the ends look denser and the whole head look fuller, especially if your natural wave is loose and your strands are fine.
The key is restraint. You are not trying to create a severe curtain of hair. You want a clean, even edge that stops the bottom from looking scraggly. Keep the perimeter one length, or nearly one length, and let the wave pattern bring in the softness.
This works best when the hair has enough density to hold the line. If your ends are already thin, a blunt shape can be a gift. It makes the tail of the hair look thicker without asking for much styling at all. If the roots need help, a quick lift with clips at the crown while the hair dries usually does the trick.
- Best for: fine to medium 2b hair that looks stringy at the bottom.
- Maintenance: trims every 8 to 10 weeks keep the edge from fraying.
- Styling note: a 1.25-inch iron on just the front pieces can smooth the look without flattening the whole head.
- Watch out for: heavy face-framing layers that steal the fullness you came here for.
It’s a blunt cut, yes. But it doesn’t have to feel strict.
5. Deep Side Part With Root Lift
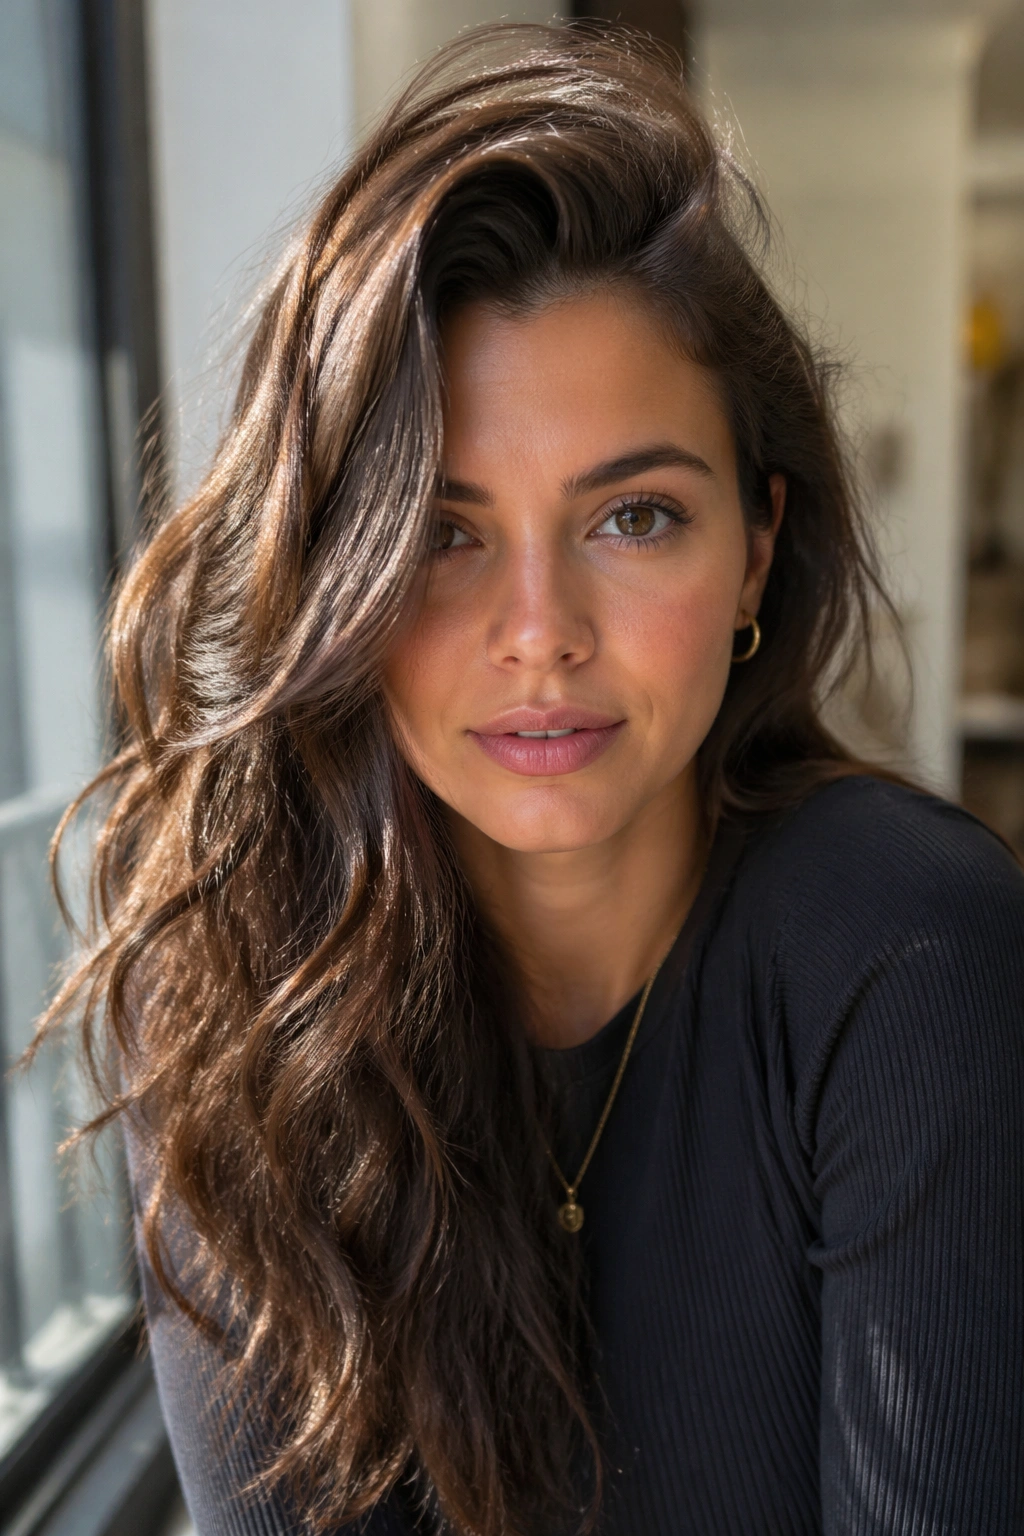
The deep side part is underrated, and I think that’s because people treat it like an old-school trick instead of a real styling move. On 2b hair, it can change the whole mood of the cut in ten seconds.
A center part can make soft waves fall evenly, which is fine, but a deep side part gives the crown immediate height. That extra lift matters because 2b roots often sit flatter than the rest of the hair. You do not need much. A rat-tail comb, a damp head, and a little clip at the heavier side are enough to set the shape.
The side part also changes how the waves land around the face. One side gets a little sweep, the other side gets a little tuck, and suddenly the hair looks styled instead of merely air-dried. I like this especially with long layers or a blunt cut, because the part does the visual work the cut can’t always do by itself.
One-sentence truth: a deep side part can rescue a mediocre hair day.
If you want extra hold, place two small clips at the root on the heavy side while the hair dries. Pull them out once the scalp is fully dry, not halfway there. That little pause is what keeps the lift from collapsing five minutes later.
6. Half-Up Claw Clip Twist
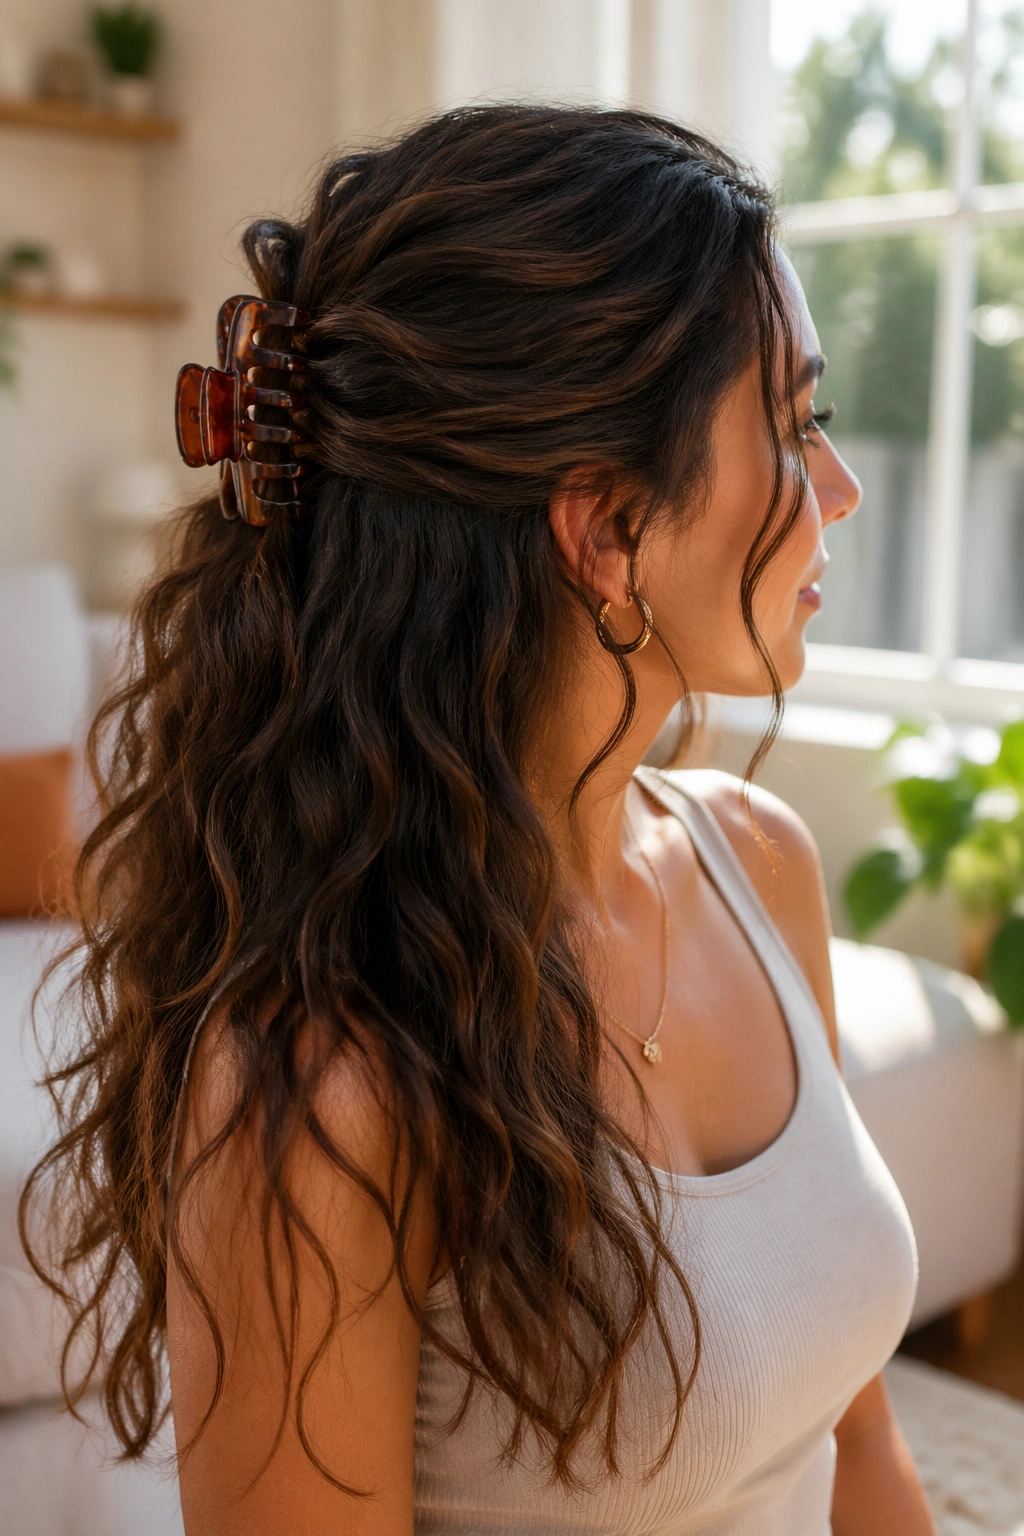
A half-up claw clip twist is one of those styles that looks casual until you notice how much better it makes long 2b hair behave. The top section gets pulled off the face, the bottom section stays loose, and the wave pattern still gets to show off.
Unlike a tight ponytail, this keeps the texture soft. You twist the crown section once or twice, pin it with a medium claw clip, and leave the ends to spill out. That’s the whole point. It gives you the feeling of an updo without the flattened crown that usually comes with one.
I reach for this on second-day hair because the waves already have a little memory. A drop of leave-in or a mist of water at the front pieces is enough to wake them up. If the sides are too puffy, smooth only the outer layer with your palms. Don’t overbrush. That’s where the frizz gets invited in.
It also works well when you want your hair out of the way but still want the length to look deliberate. A clip with a strong spring holds better than a flimsy decorative one. The cheap clips slide. The better ones stay put for hours, which is the unglamorous part of styling nobody posts about.
7. Long Shag With Airy Internal Layers
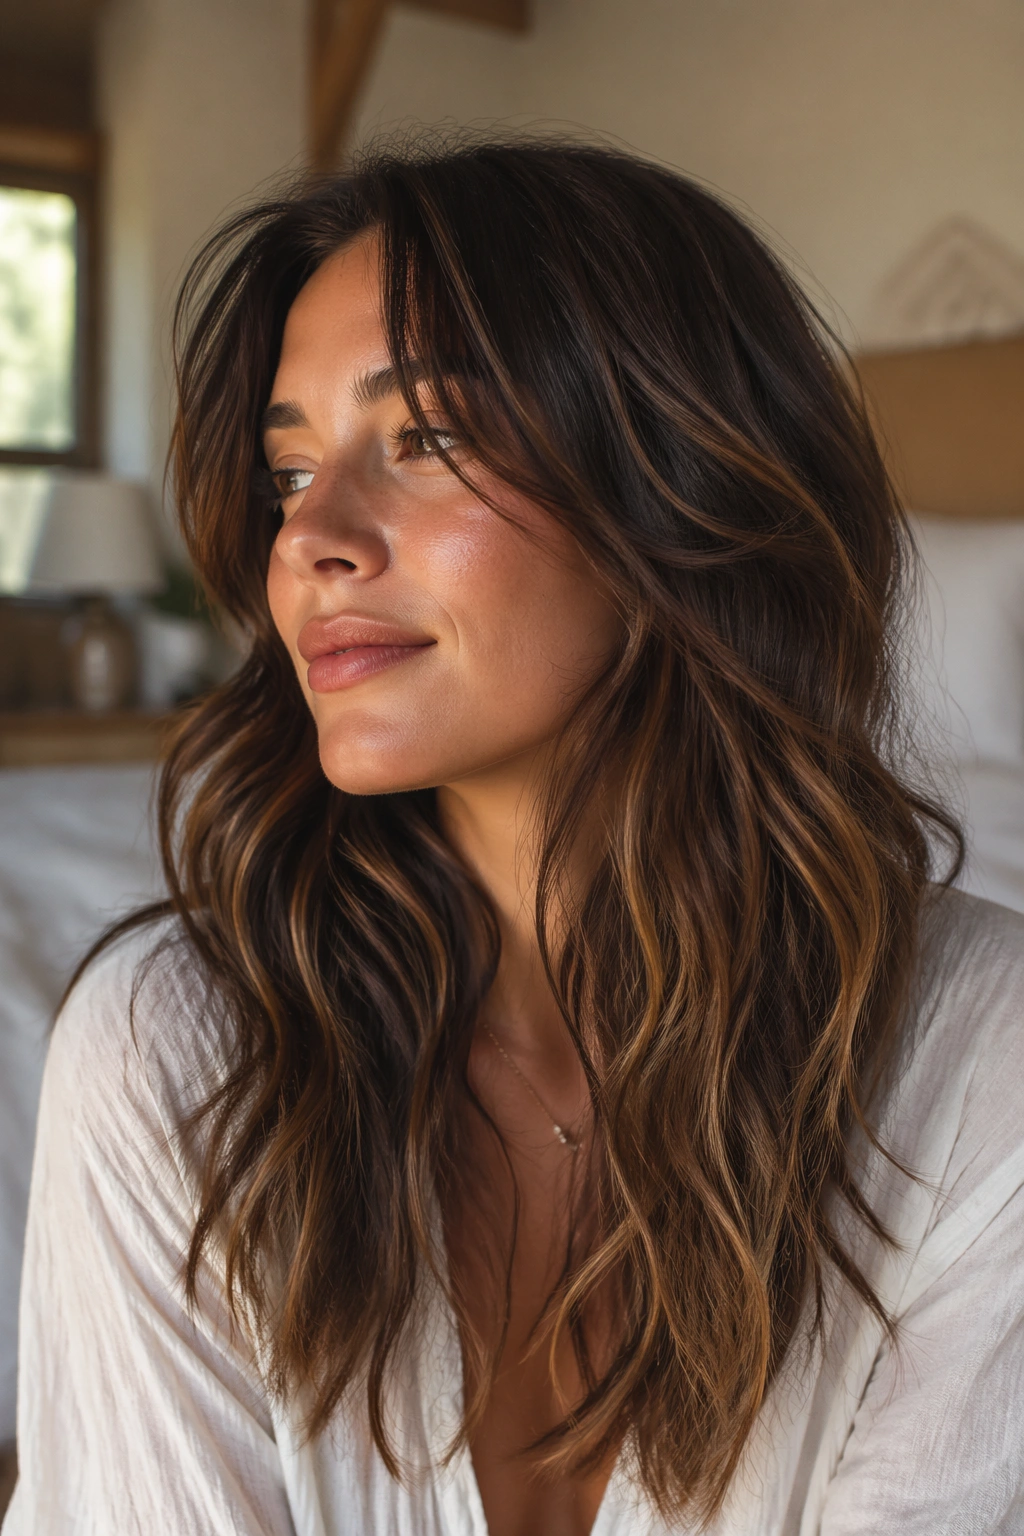
A long shag is for the person who wants movement without spending half the morning wrestling with a brush. It’s a haircut with a little attitude, but on 2b hair it can be surprisingly wearable because the wave pattern fills in the shape for you.
Where the Layers Should Land
The shortest layers should usually sit around the cheekbone or just under it. That gives the top enough lift to avoid a flat helmet shape. The longer layers can trail down to the chest or lower, so the hair still feels long and swishy rather than chopped into pieces.
For 2b hair, the danger is over-layering the ends. If the bottom gets thinned too much, the wave starts to break apart and the whole style can look wispy. I’d rather see soft internal layers than aggressive razoring through the perimeter.
What Makes It Easy to Live With
- It air-dries fast because the layers keep air moving through it.
- It likes a diffuser only at the crown and front pieces.
- It looks good with a middle part, a soft side part, or pushed back with clips.
- It can handle a little texture spray on day two, but don’t drown it in product.
The best long shags on 2b hair never look overstyled. They look like the hair decided to fall a certain way and everyone else just cooperated.
8. Loose Side Braid Over One Shoulder
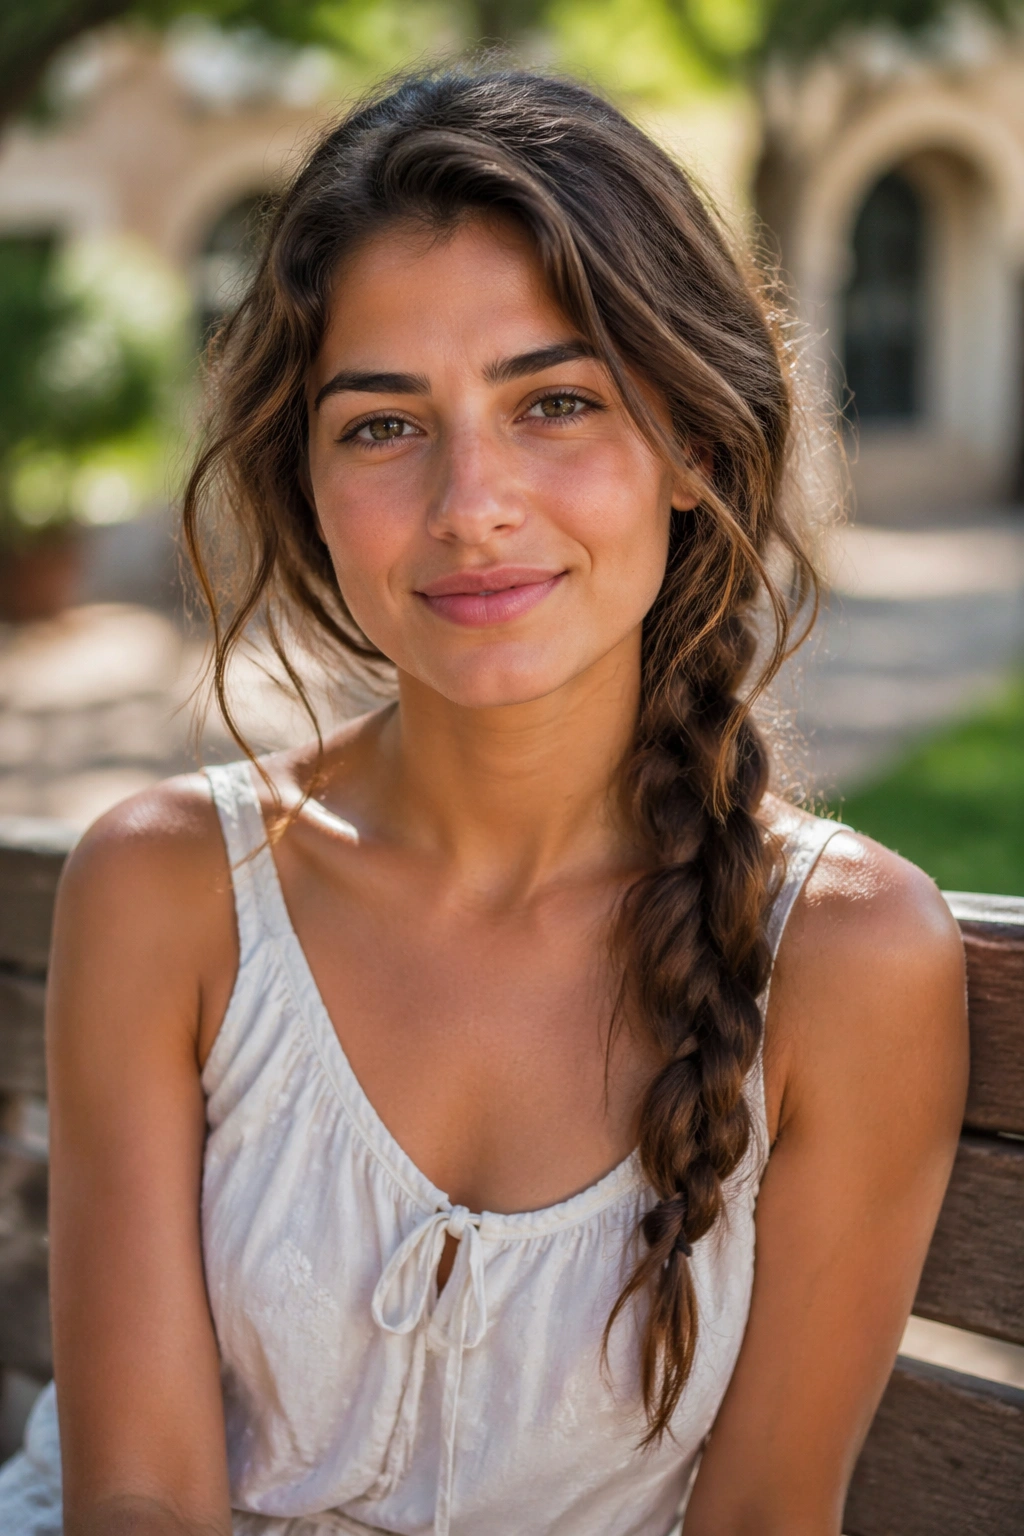
A loose side braid is one of the easiest ways to make 2b waves look intentional on a day they want to wander off and do their own thing. It gathers the texture, but it doesn’t erase it. That’s the charm.
The braid should start low, near the nape, and drift over one shoulder rather than being pulled tight against the head. If you braid too firmly, the wave gets squeezed out and the whole thing starts looking stiff. Leave a little give at the crown, then tug a few millimeters of volume around the hairline after the braid is tied off.
This style is a good match for long hair because the braid has enough length to feel full. A short braid can look skinny and awkward. A long braid, especially on 2b texture, gets a thick rope-like look that feels deliberate even when it’s slightly undone.
I like this for windy days, long car rides, and any situation where the ends are already getting on your nerves. A tiny bit of mousse or a quick mist of texture spray before braiding helps the pieces hold together. If your ends are very soft, wrap a clear elastic around the bottom first, then braid above it. It sounds fussy. It isn’t.
9. Bubble Ponytail With Soft Pull-Outs
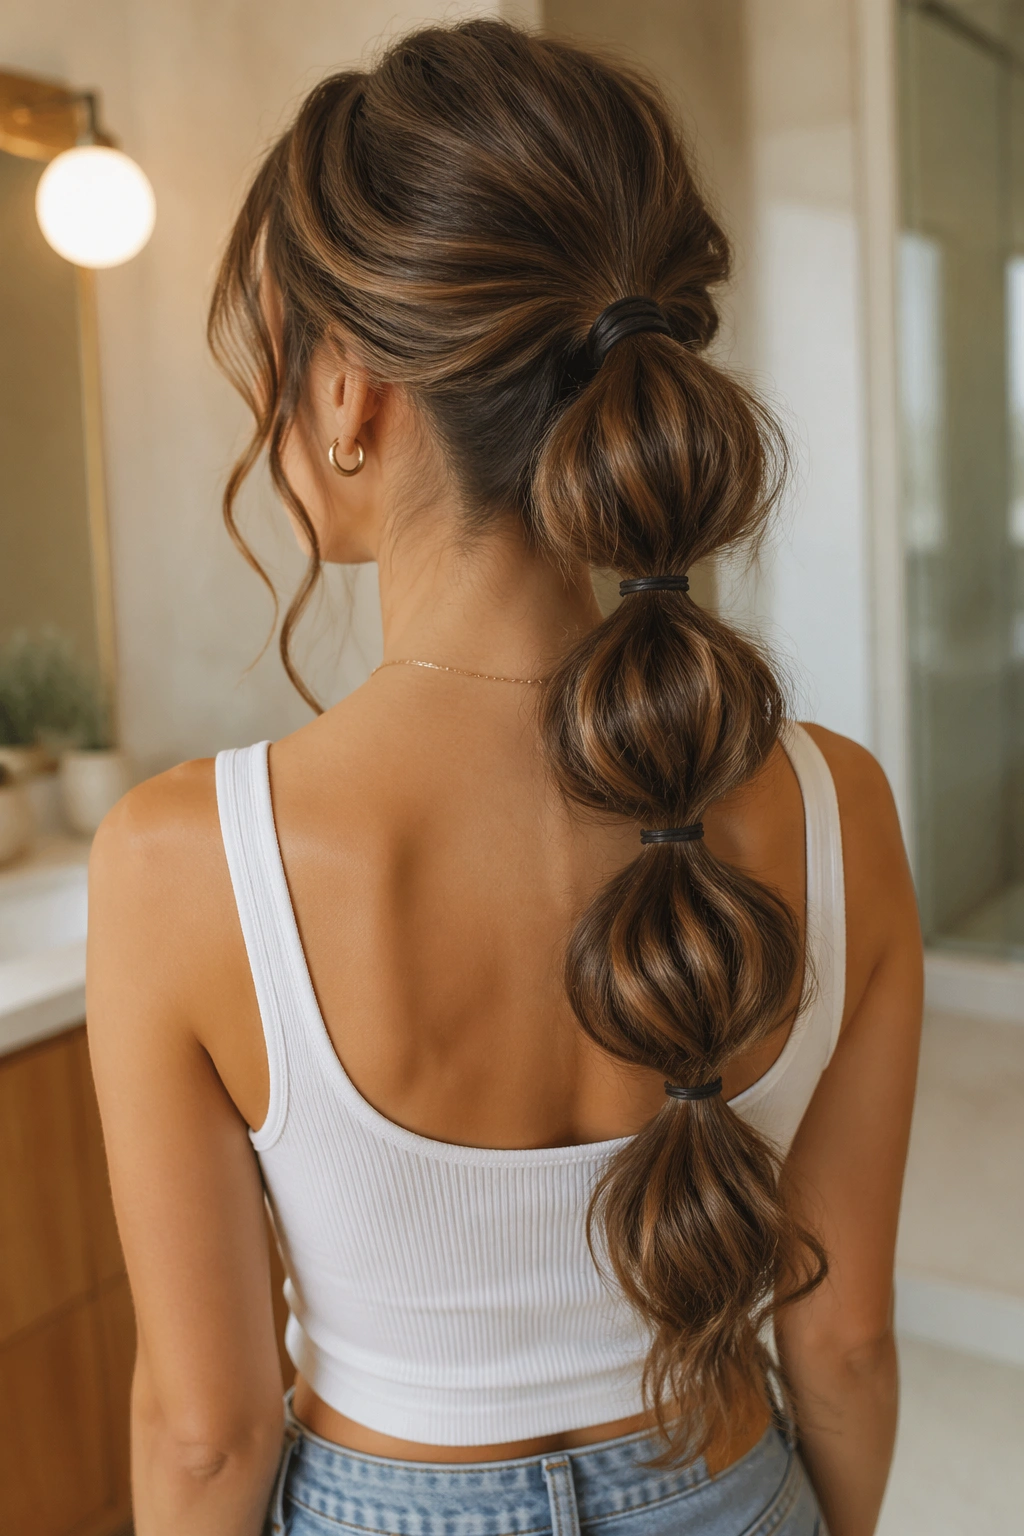
Why does a bubble ponytail work so well on 2b hair? Because it turns inconsistency into shape. Instead of asking every strand to behave the same way, you let each section puff a little between elastics and call that the style.
How to Wear It
Start with a low or mid-height ponytail and secure it with a soft elastic. Then add another elastic every 2 to 3 inches down the length, depending on how much hair you have. Gently tug each section between the elastics until it rounds out into a bubble. Not a giant one. Just enough to make the shape read from across the room.
This style looks better when it is not too neat. A few pulled-out pieces around the temples keep it from feeling severe, and 2b texture gives those bits a nice soft bend. If you smooth the crown too hard, the whole thing can turn flat in an unhelpful way. Use your hands instead of a brush for the top layer. That keeps the volume alive.
It’s one of my favorite long styles for busy days because it stays put without looking boring. The bubbles keep the ponytail from collapsing, and the natural wave gives the sections a little body. If your hair is extra long, use four or five elastics. If it’s only just past the shoulders, three is usually enough.
10. Side-Swept Glam Waves
Side-swept waves can look a little dressed up, but they’re not as fussy as people think. On 2b hair, the trick is to work with the wave instead of flattening it into a smooth ribbon.
If the back tends to go limp, side-sweeping the front and top layers creates the illusion of fuller hair. A 1.25-inch curling iron is usually enough for the front sections if they need help. Wrap only the first few inches of hair around the barrel, leave the ends out, and let them cool before brushing. That keeps the finish soft instead of pageant-curl polished.
Key Details That Matter
- Part the hair deeply on the heavier side.
- Curl only the top layer and face frame, not every strand.
- Brush through once with a boar-bristle brush after the curls cool.
- Pin the lighter side behind the ear with one hidden bobby pin if you want the face to open up.
The result is nicer than a flat blowout because the wave pattern still shows through. It also photographs well in real life, which sounds silly until you try styles that look good in motion but collapse when you stand still. This one holds its shape from the side, which is the whole point.
11. Half-Up Braid Crown

A half-up braid crown gives long 2b hair structure without hiding the length. I like it because it solves the “my roots are flat but my ends are good” problem in one move.
Take two small sections from just above each temple and braid them back toward the crown. They do not need to be perfect. In fact, a slightly loose braid looks better here because it blends with the natural bend of 2b hair. Pin the braids across the back of the head, then tuck the ends under the top layer.
The style sits nicely when the braids begin above the ears rather than right at the hairline. That placement gives you a little lift, and it avoids dragging the front pieces back too tightly. If the hair has layers, let a few shorter pieces fall free near the face. Those bits soften the outline and keep the style from feeling severe.
I also like this for hair that is a few days past wash day. The texture helps the braid grip, and the hair usually has a little more body. A mist of dry shampoo at the roots can help, but don’t overdo it. Too much and the braid starts looking dusty instead of airy.
The braid crown is the kind of style that makes long hair feel intentional without asking for a ton of time. That’s a win.
12. Sleek Low Ponytail With Wavy Length
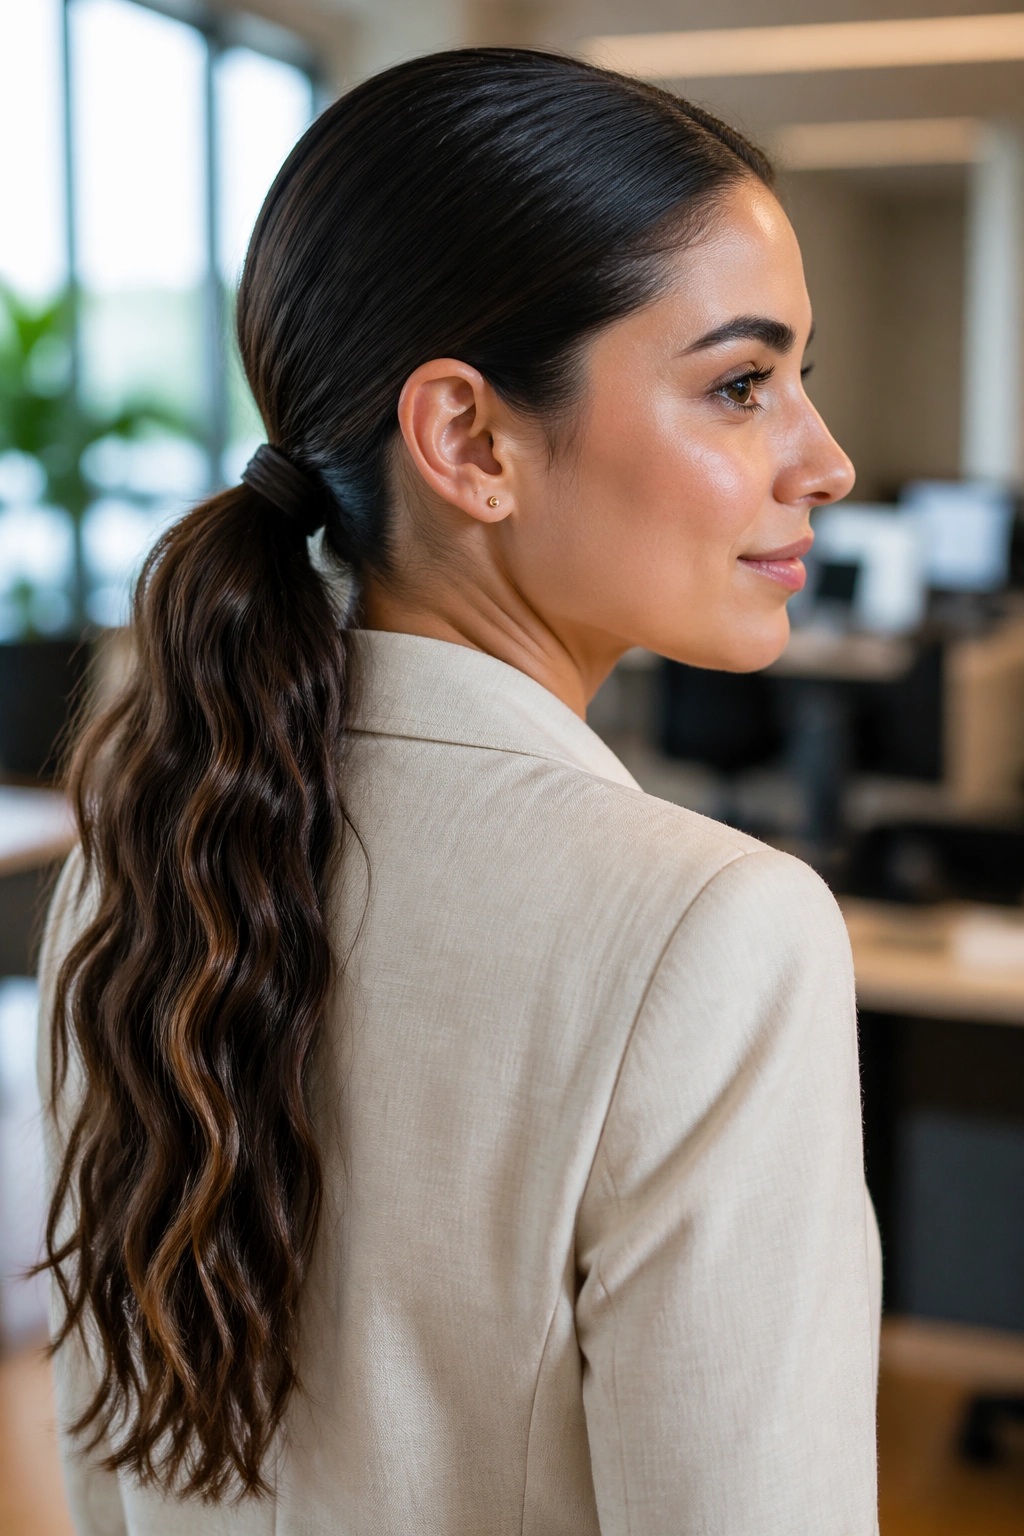
Unlike a high ponytail, a low ponytail lets the wave pattern stay visible and keeps tension off the crown. That sounds small, but on 2b hair it changes the whole look. A high tie can flatten the top and make the loose lengths feel random. A low tie gives the hair a cleaner line.
Start by smoothing only the top inch or two with a brush or your palms. Leave the mids and ends alone if they already have soft wave. Tie the ponytail low at the nape with a flat elastic, then wrap a small strand around the base if you want it to look finished. That little wrap takes less than a minute and makes the style look more deliberate.
This is one of the easiest long hairstyles for 2b wavy curly hair when you need something neat without losing all the texture. It works for work, dinner, or a day when humidity has made the hair a bit grumpy. The ends can stay loose and bendy while the top looks controlled.
I like a satin scrunchie here too, especially if the hair is prone to dents. The softer tie keeps the ponytail from kinking in a bad way. If you need more polish, mist the tail lightly with water and smooth just the outer layer with your hands. Not the whole thing. Only the outer layer.
13. Twisted Low Bun With Face-Framing Strands

A low bun can look strict. A twisted low bun with face-framing strands does not have that problem. It keeps the hair up and out of the way, but the loose pieces around the face keep the style from feeling severe.
The Loose Pieces Matter
Pull out two front sections about half an inch to an inch wide before you twist the rest back. Those pieces should sit around the cheekbones or jaw, depending on where your layers fall. If they’re too short, leave them alone and let a few wisps do the job. For 2b hair, those little bits often move better than planned face-framing strands anyway.
Twist the remaining hair into a low bun at the nape, secure it with two bobby pins crossed in an X, and tuck the ends under. A hairnet sounds old-fashioned, but it can be a useful backup if your hair is extra long or slippery. I would not use one every day. For a smooth event-style bun, though, it’s handy.
- Best for: humid days, formal dinners, and long hair that won’t stay put.
- Shape tip: keep the bun slightly wide, not tiny and tight.
- Texture tip: leave the bun surface a little imperfect so it matches the natural wave.
- Fixing note: if the sides puff too much, smooth only the top with a drop of serum.
The style has enough control to feel polished, but it still lets 2b texture breathe.
14. Scarf-Tied Low Ponytail
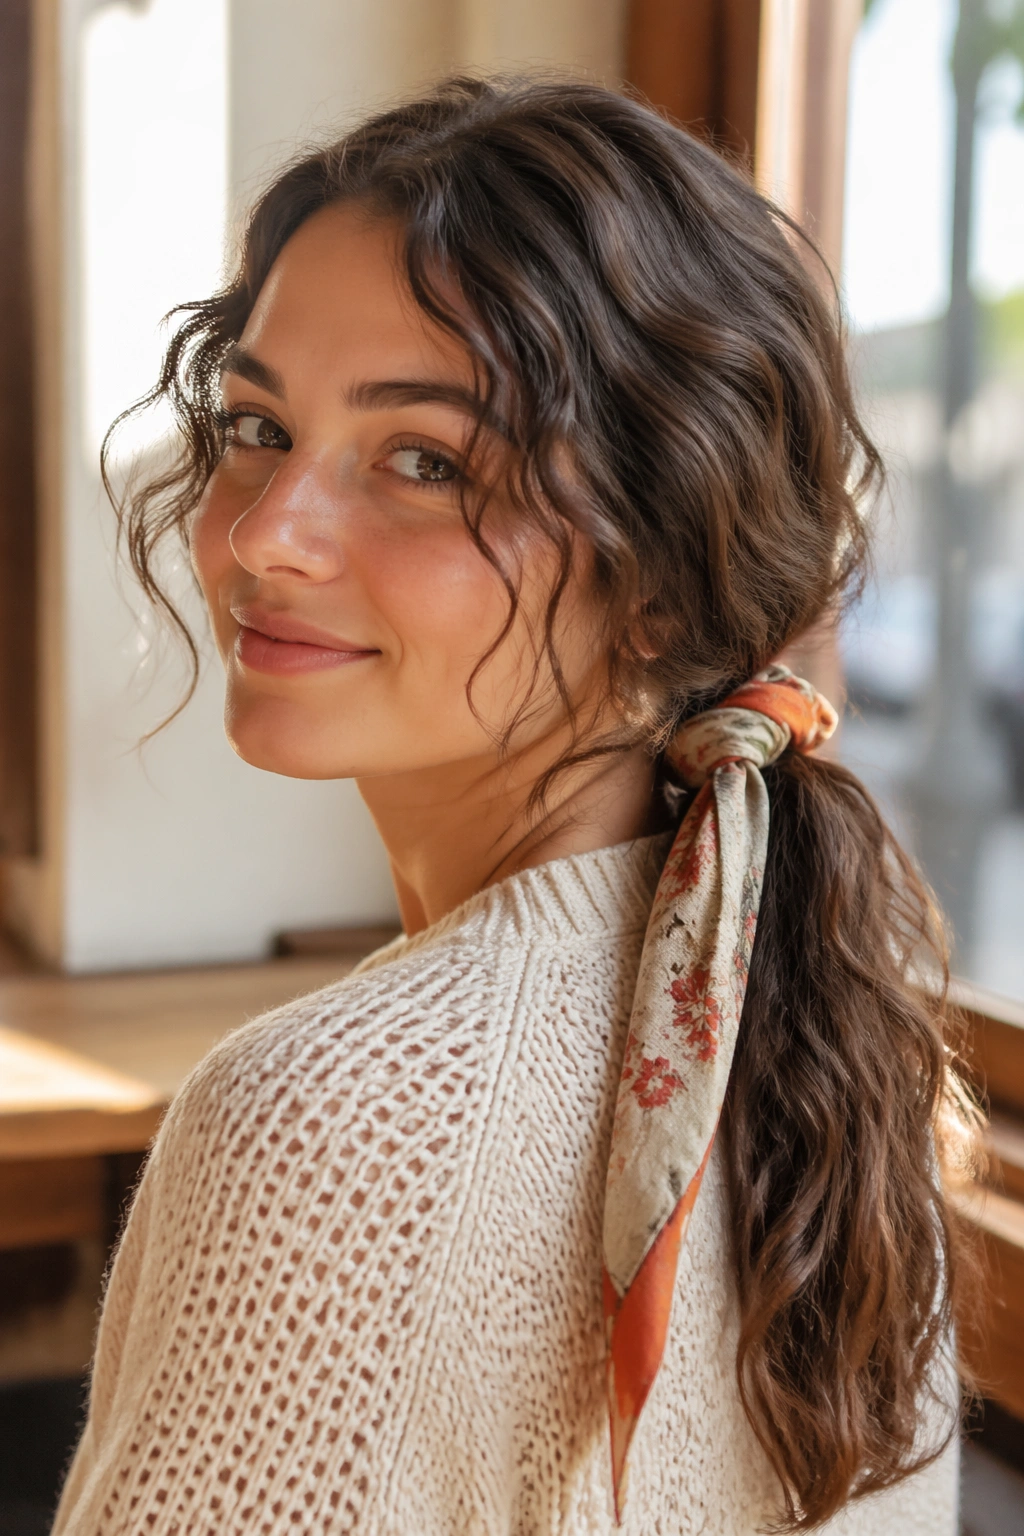
When 2b hair starts to puff at the roots and frizz at the ends, a scarf can do more than another round of cream ever will. A scarf-tied low ponytail gives the hair a finished shape and hides the elastic at the same time.
Choose a scarf that is soft enough to knot without sliding, about 2 to 3 inches wide if it’s a narrow wrap, or a small square folded into a band. Tie the hair low, then wrap the scarf around the base once or twice and let the tails hang. The visual effect is simple, but it gives the ponytail a little personality without making the hair look overdone.
This style works because it uses the scarf as part of the silhouette. The fabric adds a clean line at the nape, and the loose lengths below still show off the wave. It also saves you from piling on more product to tame the roots, which is a mistake I see constantly with 2b hair. Too much product weighs the whole thing down before the day even starts.
If your scarf is slippery, tuck a bobby pin through the knot from underneath. Hidden. Easy. Done. That small bit of security keeps the whole style from drifting down your neck halfway through the day. And yes, the tails can stay a little crooked. That’s part of the charm.
15. Chunky Mermaid Braid Down the Back
What makes a mermaid braid better than a standard plait for 2b hair? It gives the waves room to peek through instead of trapping everything in a tight rope. That matters on long hair, where the texture can get lost if the braid is too neat.
A mermaid braid is basically a loose, chunky braid that sits down the back and looks thicker than a regular three-strand plait. Start with hair that has a little grip — day-two hair is perfect — and divide it into three sections near the crown. Braid gently, keeping the tension soft, then tug the edges of each section after you tie it off. Not a huge tug. Just enough to widen the braid and let the wave pattern show.
How to Keep It From Collapsing
- Use a texturizing spray or dry shampoo at the roots before braiding.
- Tie the braid with a small clear elastic first, then a ribbon or larger tie if you want a softer finish.
- Leave the top section slightly loose so the braid does not sit flat against the skull.
- If the ends are slippery, mist them with water and twist before tucking them in.
I like this style because it looks rich on long hair without asking for precision everywhere. The braid can be a little uneven and still look right. That’s the whole appeal, honestly. Long 2b hair looks best when the texture is visible, not sanded down into sameness, and this braid lets it stay itself while still looking put together.