Protective styles for 3b curly hair work best when they leave the curl pattern alone instead of fighting it.
That sounds obvious, but plenty of styles miss the point. 3b curls have enough spring to puff, enough bend to tangle, and enough density to look full even when they’re handled gently. If you pull them too tight, they complain. If you leave the ends loose, they frizz. And if you pile on too much product, the style feels sticky before lunch.
The sweet spot is a style that holds the hair close enough to reduce daily manipulation, while still letting the scalp breathe and the curls keep some movement. That means clean parting, moderate tension, and ends that are tucked, folded, or wrapped away from the weather. It also means choosing styles that fit the length you actually have, not the length you wish you had.
A good protective style should make your life easier for a few days, not turn your head into a project. Some of the styles below are soft and low-key. Others are sleeker and more sculpted. Pick the one that matches your patience, your schedule, and how much hair you want to keep off your neck.
1. Loose Two-Strand Twists for 3b Curly Hair
Loose two-strand twists are the style I reach for when someone wants protection without looking overworked. On 3b curls, they keep the ends tucked and the curl pattern intact, but they still let the hair move a little instead of locking everything into a stiff block.
The trick is section size. Go with sections around 1/2 inch to 3/4 inch if your hair is medium density, a touch larger if your hair is very thick. Smaller sections give more definition and last longer. Bigger sections take less time and feel lighter on the scalp. Both can work.
Why They Hold So Well
A 3b curl already has enough bend to help the twist stay together, which is why this style looks better on curly hair than on straightened hair. I like to start on hair that is damp, not soaking, with a leave-in and a small amount of cream. If the ends keep unraveling, a tiny bit of gel on the last inch helps.
- Best for: medium to long 3b hair
- How long it takes: about 30 to 60 minutes, depending on density
- How long it lasts: several days with a satin bonnet at night
- What it becomes later: an easy twist-out if you want extra volume
Tip: Stop twisting the second the section feels snug. If you keep winding after that point, the twist gets ropey and fuzzy at the same time.
2. Flat Twists Pinned Back

Need a style that looks neat fast and does not sit heavy on your head? Flat twists are the answer more often than people admit. They lie close to the scalp, so they cut down on daily handling, and they usually feel lighter than braids when your hair is full and springy.
For 3b curls, I like flat twists when the front pieces get annoying or the crown starts puffing up before the rest of the hair does. A little foam or light gel on the part line keeps the sections clean. After that, you just twist downward along the scalp and pin the ends behind the ear or at the nape.
Where Flat Twists Shine
They’re good for workdays, travel days, and any morning when you want your hair off your face without flattening it into submission. They also sit well under a scarf, which is underrated. A scarf can save a whole style.
What to Watch For
If you make the twists too wide, they can loosen near the roots by the end of the day. Too narrow, and the style starts to feel fussy. I prefer two thick flat twists or four medium ones, not ten tiny lines that take forever and pull more than they should.
3. French Braid Into a Low Bun
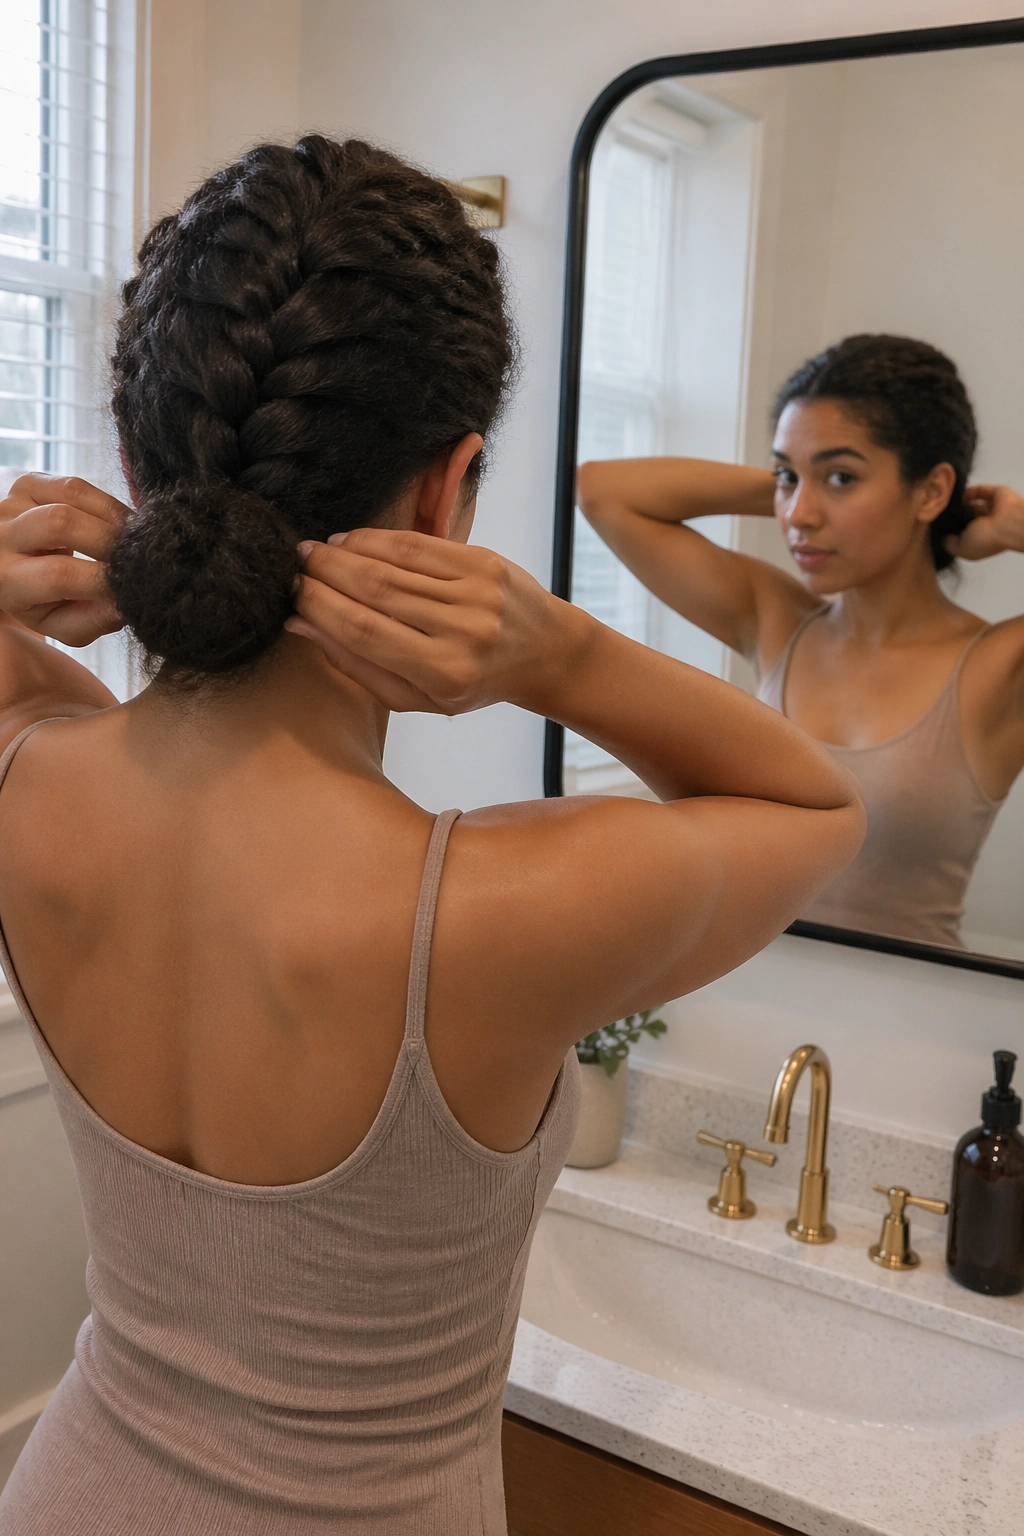
Picture this: the hair is halfway dry, you have somewhere to be, and your arms are already tired. A single French braid down the center solves a lot of that problem in one shot. It keeps the top smooth, keeps the mid-lengths contained, and lets the ends disappear into a low bun instead of swinging loose.
This works especially well on 3b hair that has been stretched a little first. You do not need a full blowout. Even a light banding session or a low-heat stretch the night before makes the braid easier to control. Start at the crown, braid toward the nape, then coil the remaining length into a bun and secure it with U-pins.
It holds.
What I like most is that this style looks more polished than it feels. You can wear it with hoops, a button-down, or a hoodie, and it still reads as deliberate instead of rushed. If the braid starts to collapse near the scalp, your sections are too big or your grip is too loose. Tightening that first inch changes everything.
One small detail matters here: smooth the front with your fingers, not a hard brush. 3b curls can go flat in a bad way if you overdo the tension. Soft is better.
4. Halo Braid With Tucked Ends
Not every protective style needs tiny parts or a complicated map. The halo braid is proof. One braid moving around the head keeps the perimeter controlled and pushes the ends out of the way, which is a big deal when the weather is humid or your curls frizz the second you step outside.
This style suits longer 3b hair best, especially if the ends can be tucked under the braid instead of hanging free. If your hair is shorter, you can fake the same shape with two side braids that meet behind the ear. That version is easier to build and often holds better on layered cuts.
Quick Things That Make It Work
- Keep the braid close to the head, but not tight enough to pinch.
- Pin every 2 to 3 inches so the shape does not slide.
- Use a lighter cream near the hairline; heavy butter tends to make the front look greasy.
- Leave the braid slightly loose at the crown if your hair has a lot of volume.
I’m a fan of this style when I want my hair to feel calm. It sits flat under a hat, which is useful in real life, not just in photos. And it usually looks better on day two, not worse.
5. Mini Twists for 3b Curly Hair
Mini twists for 3b curly hair are the marathon version of protective styling. They take longer upfront, but they usually buy you more days of easy maintenance than a larger style does. That trade is fair if you hate restyling every morning.
Mini twists work best when the sections are neat and even. Think 1/2 inch squares if your hair is dense, slightly bigger if your hair is fine or short. The whole point is to keep the twist small enough that it stays put, but not so tiny that you spend three hours twisting and another three taking it down.
How to Keep Them Looking Good
Use a leave-in, then a cream or light custard. I would not drench the hair in heavy butter here. Mini twists already hold shape; too much product just makes them sticky and dull. Start at the roots, twist firmly through the length, and stop once the ends coil into themselves.
What Usually Goes Wrong
- Uneven parts make the style look messy before it’s even finished.
- Wet hair can stretch too much and puff later.
- Heavy styling products build up fast.
- Pulling the front too tight makes the style look sharp in a bad way.
A satin bonnet matters here. So does restraint. If one or two twists get fuzzy, leave them alone unless they’re hanging loose. Chasing every little curl makes the whole style tired.
6. Bantu Knots
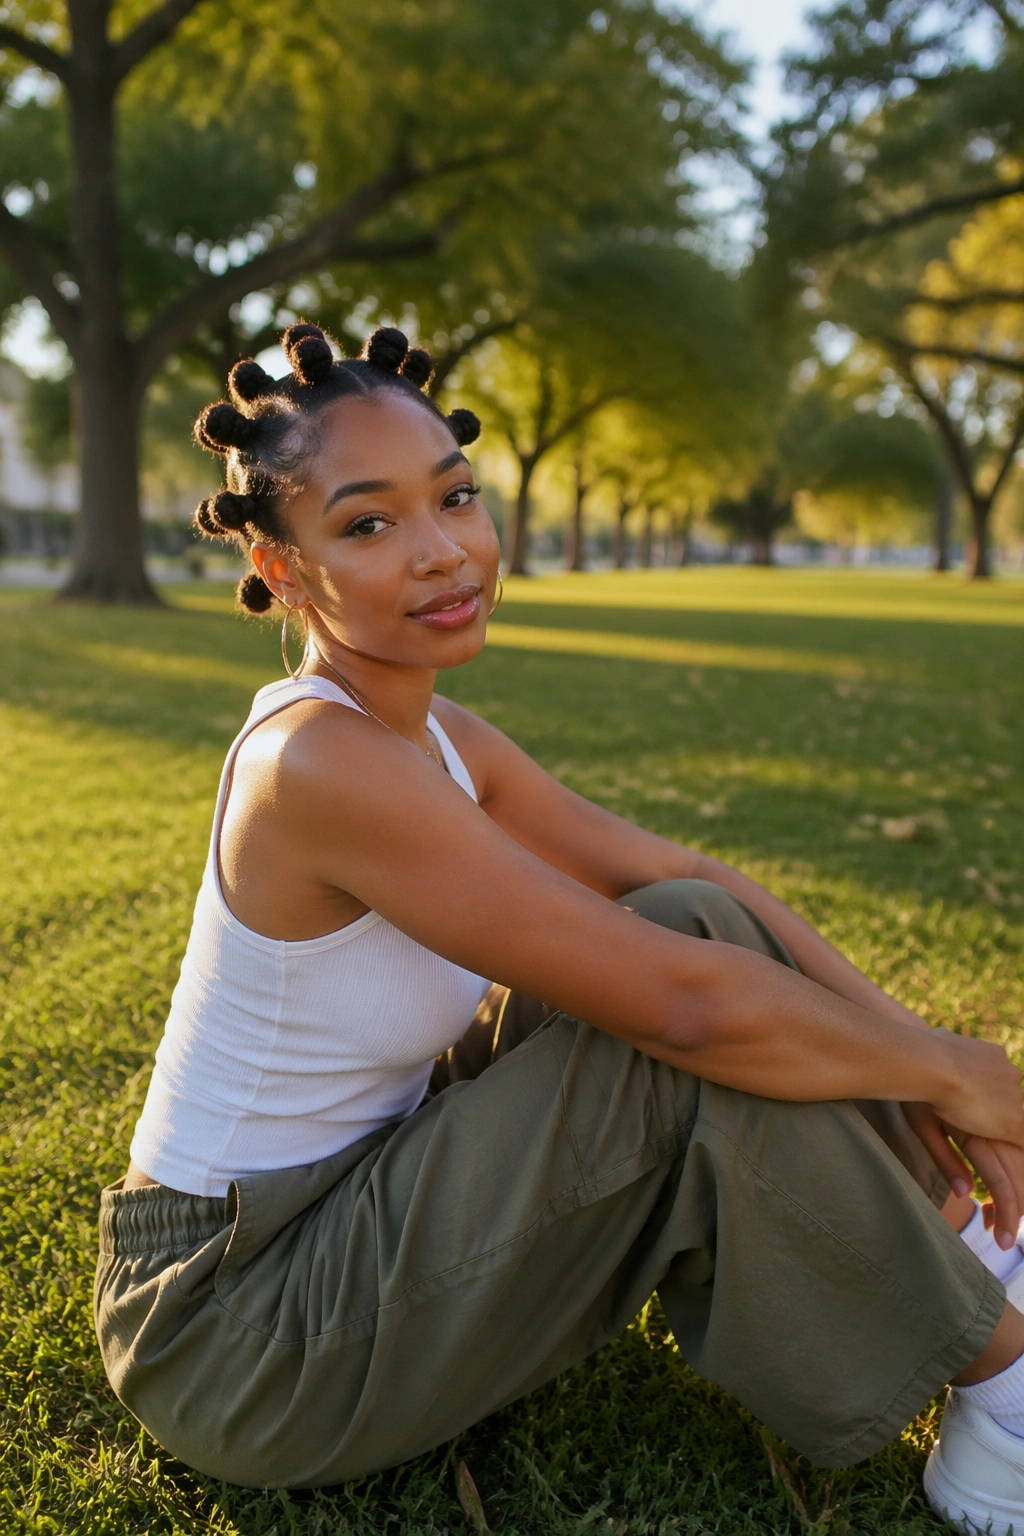
Bantu knots look sculptural, but they’re practical first. On 3b hair, they tuck the ends away cleanly and give the hair a controlled shape that feels different from braids or twists. I like them when I want something a little more deliberate than “hair out of the way,” but not as formal as a bun.
Start on damp hair with slip. Separate each section, twist it until it starts to rope, then wrap it around itself at the base until it forms a knot. The ends should disappear into the center, not stick out like little flags. If they keep escaping, the section is too large or the hair is too dry.
A medium head of hair might take 8 to 12 knots. Fewer knots look bigger and bolder. More knots sit flatter and dry more evenly. There’s no magic number, but there is a practical one: the knot should feel secure without making the scalp feel tense.
Best Part About Them
They can be worn as a style on their own, then unraveled later into a soft curl pattern. That makes them useful twice, which is more than most styles can say. And yes, they can be slept on if you wrap them with a satin scarf first. Don’t skip that part. They flatten fast on a cotton pillowcase.
7. Cornrows Into a Low Bun
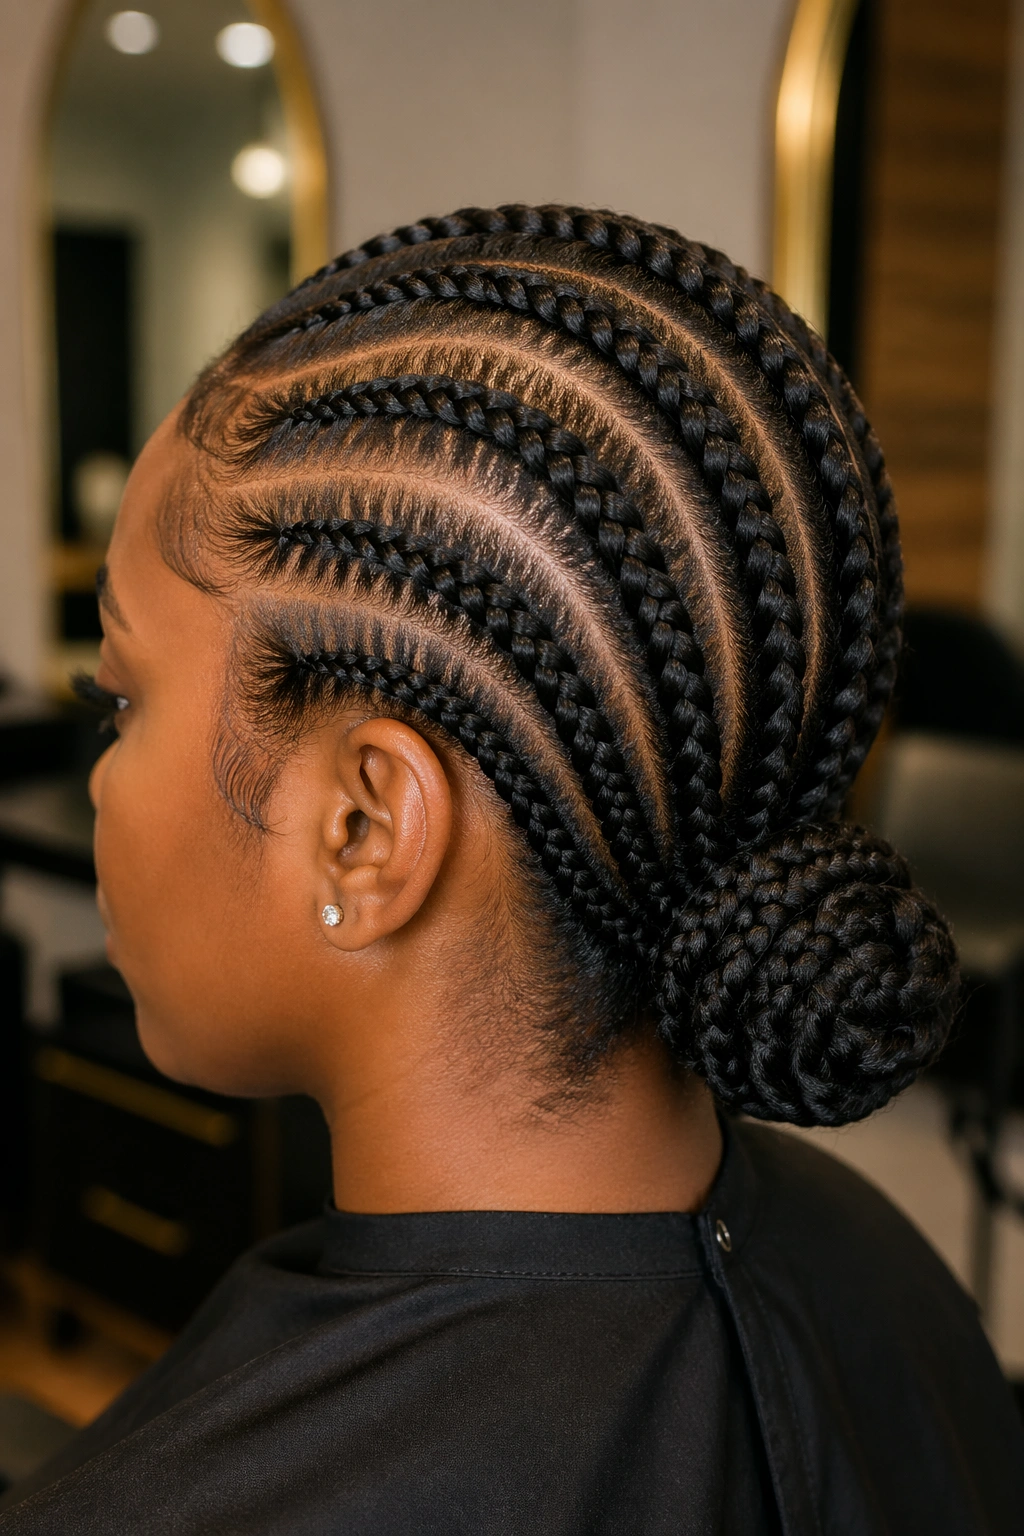
Cornrows are not a style to rush. Done well, they’re one of the most useful protective styles for 3b curly hair because they keep the hair close to the scalp and reduce daily friction. Done too tight, they become the kind of style you can feel in your temples every time you blink.
If you’re going this route, ask for larger, even rows instead of a pile of tiny braids. 3b hair often has enough volume that wider cornrows look cleaner and last better. Once the rows reach the nape, gather the ends into a low bun and pin them flat. The bun should sit neatly, not balloon out.
What to Ask For
- A comfortable hairline with no sharp pulling
- Even tension from root to end
- A bun that sits at the nape or slightly above it
- Clean parting that follows the head shape instead of cutting across it awkwardly
There’s a big difference between secure and too tight. You should be able to move your face normally. If your scalp feels hot or sore during the install, that is your warning, not a cute inconvenience. Braids should protect the hair, not punish the scalp.
This style is especially useful for active days, travel, and humid weather. It also pairs well with a silk scarf at night. Keep it calm.
8. Rope Twists Into a Chignon
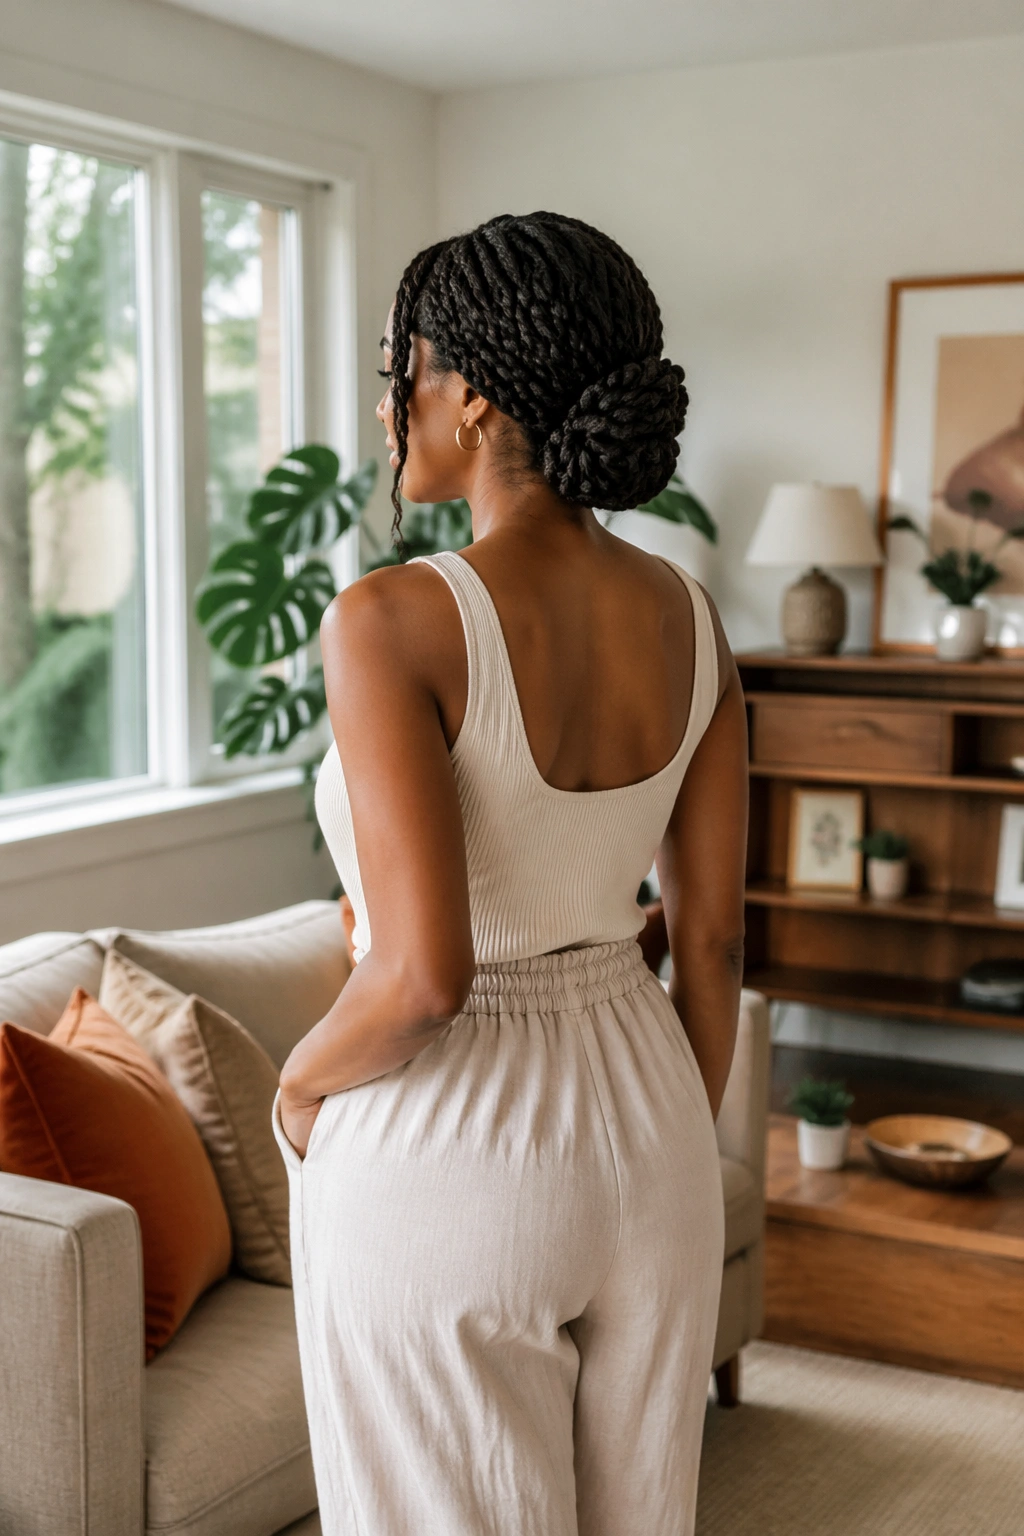
Rope twists sit between braids and loose twists, and that middle ground is exactly why I like them on 3b curls. They look cleaner than a casual two-strand twist, but they do not create as much bulk as a full braid set. If your hair is shoulder length or a little longer, they can be gathered into a low chignon that feels polished without looking stiff.
The technique matters. Twist each section in the same direction first, usually clockwise, then wrap the two strands around each other in the opposite direction. That opposing motion is what helps the twist hold. Skip that, and the whole thing starts to unwind before you’ve finished the second side.
A chignon at the nape keeps the style compact. I like it when the twisted lengths fold under themselves and the pins disappear into the base. If you can see every pin from across the room, the bun is probably too loose.
This is one of those styles that feels better than it sounds. It keeps the edges quiet, the ends hidden, and the overall shape controlled. If your 3b curls tend to expand when you go outside, rope twists give you a little more discipline without making the hair look flat.
9. Side-Swept Braid Crown
A side part, one braid, and half a dozen pins can rescue a messy morning. The side-swept braid crown is basically a soft headband made from your own hair, which is a nice way to keep curls out of your face without dragging the whole head into a tight updo.
Start near one temple, braid across the front hairline, and carry the braid around toward the opposite ear. The rest of the hair can stay tucked into a low twist, a bun, or even loose stretched curls if you want a softer finish. The important thing is that the braid holds the front in place.
Why I Like It
It hides frizz at the hairline better than a center-part style does, and it keeps the front from puffing out first, which 3b curls love to do. A small amount of mousse on the front section helps the braid stay neat without making it crunchy.
- Works well on medium-length hair
- Good for face-framing layers that keep escaping
- Easier to refresh than a full braided head
- Looks softer than a full halo braid
The shape matters more than the polish. It should feel like a braid that belongs there, not a stiff band you strapped on.
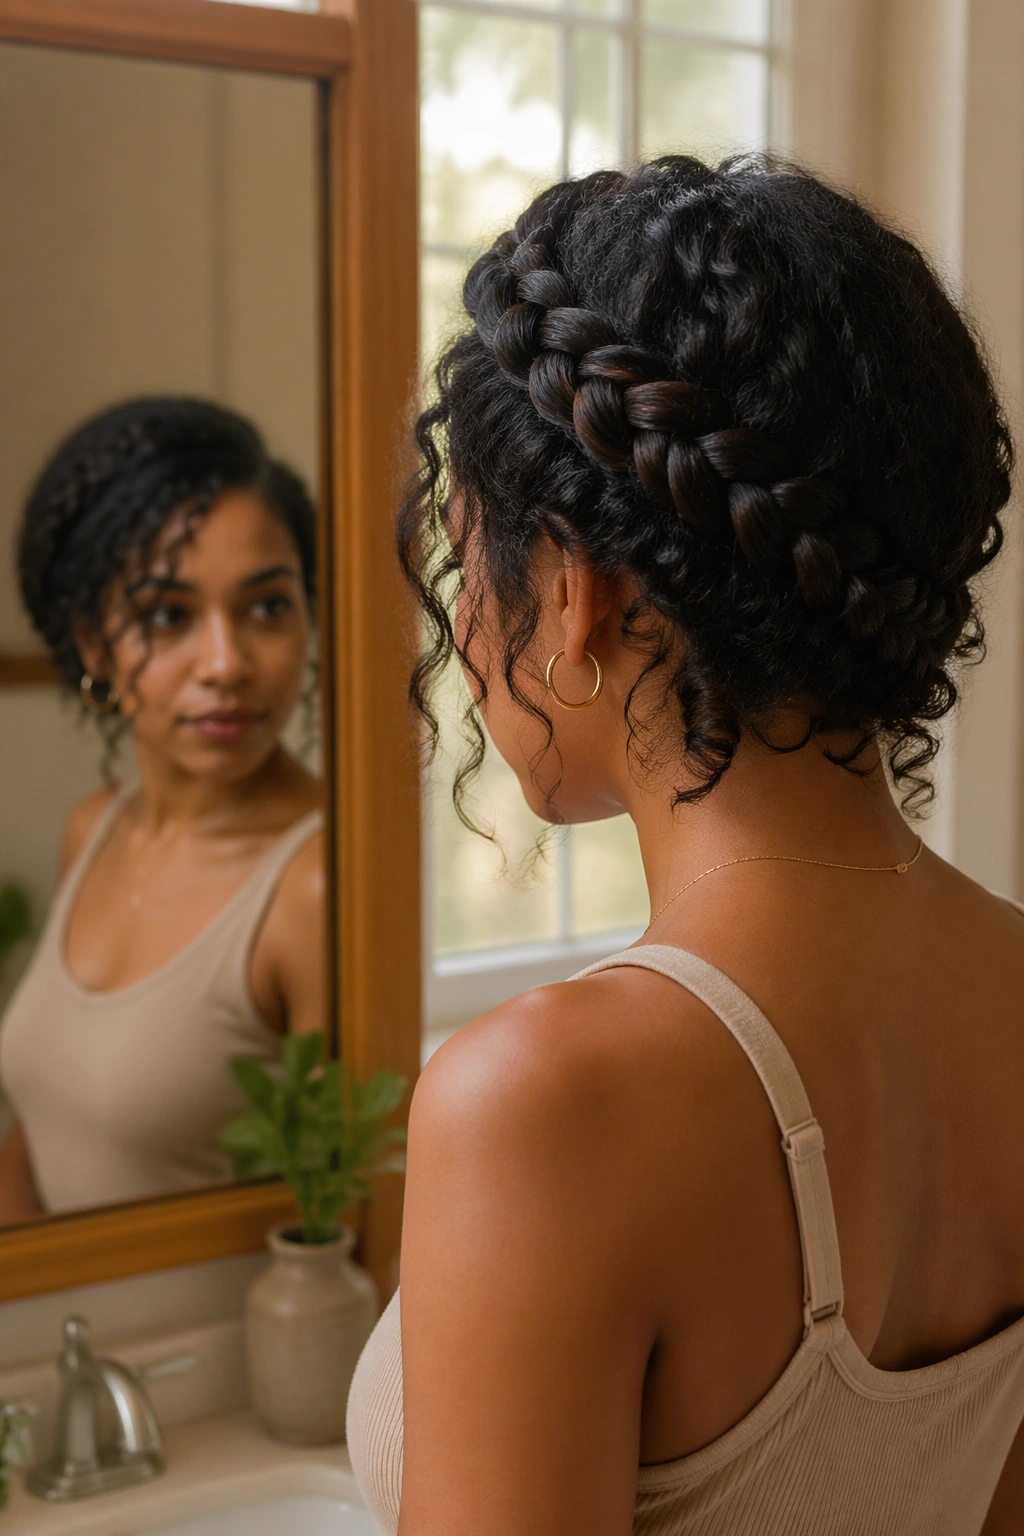
10. Four-Section Twist Crown for 3b Curly Hair
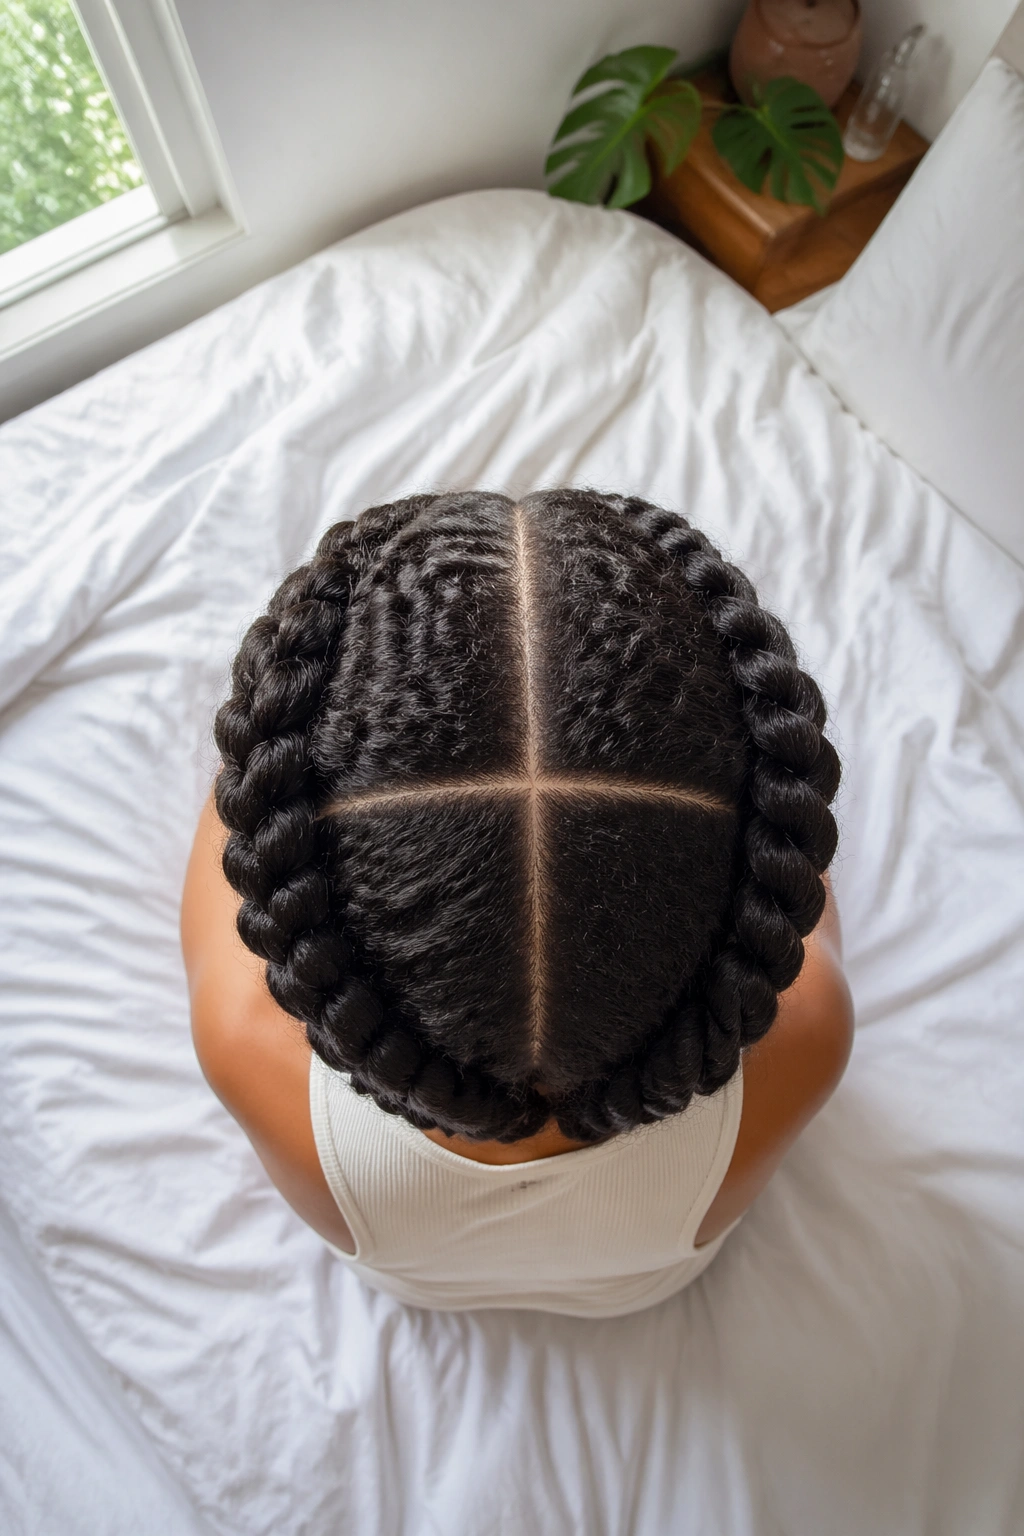
The four-section twist crown is one of the better protective styles for 3b curly hair when you want structure without tons of tiny parts. Divide the head into four large quadrants, then work each section into a flat or rope-style twist that moves around the crown and ends at the nape. It sounds fussy. It isn’t, once the parts are mapped.
Section Map
Use a rat-tail comb to create a clean middle part and a horizontal part from ear to ear. Clip each quadrant out of the way. That parting grid matters because it keeps the weight even. If one section is much bigger than the others, the crown starts leaning to one side by the afternoon.
Pinning the Shape
Each twist should wrap toward the back and tuck under the next section. I like to pin the overlaps in an X pattern so the crown doesn’t shift when you move your head. Use enough pins to hold, but not so many that the bun starts feeling like hardware.
This style is especially good for medium to thick 3b curls because the twist thickness can match the natural volume of the hair. It does not try to flatten anything. It just organizes it. That’s the whole point, really.
11. Space Buns With Tucked Ends
Yes, space buns can be protective. But only if the ends are tucked and the buns are not yanked up into a painful little arch. If the style leaves half the hair hanging out, that’s not protection. That’s a costume.
For 3b hair, I like space buns when I want the hair off my neck and still want some shape on the head. Part the hair down the middle, then form two low-ish buns above the ears, not way up at the crown. Twist or braid the lengths first if your hair is long enough, then coil them into buns and pin the ends underneath.
The safest version uses scrunchies instead of tight elastics. Elastic bands can dig in and break the curl where the bun starts. Scrunchies spread the pressure better. Little detail. Big difference.
When They Make Sense
- Weekend errands
- Casual events
- Days when you want movement but no loose ends
- Hair that’s been stretched a bit and can hold shape
The style works best when the buns are balanced and the part is clean. If one bun sits higher than the other, the whole look turns lopsided fast. I like a little softness around the front, but the bulk should still be tucked away.
12. Faux Hawk Updo
If you want a style with some edge but no loose curls brushing your neck, the faux hawk earns its keep. It protects the sides and nape while letting the center section carry the visual weight. On 3b hair, that center ridge gets nice body without much effort, which is half the appeal.
The sides are usually flat-twisted, cornrowed, or slicked back into pinned sections. The center is then twisted upward and pinned into a ridge or series of soft loops. Don’t make the middle too tight. A faux hawk should have shape, not tension headaches.
A lot of people overbuild this style. They add too many sections, too many pins, too much gel, and the result looks busy. One strong center line is enough. If your hair has enough length, twist the middle section into two ropey coils before pinning. That gives the ridge more structure and keeps the ends hidden.
This is one of the few protective styles that can look sporty and dressed up at the same time. It depends on the finish. Smooth sides feel sharper. Softer sides feel more relaxed. Either way, the neck stays free. That matters more than people admit when the day runs long.
13. Double Dutch Braids With Tucked Tails

Double Dutch braids are a strong option when you want the braid pattern to show. Unlike French braids, which sink into the hair, Dutch braids sit on top and give more visible structure. On 3b curls, that extra definition helps a lot when the hair is thick or layered.
I like them when the goal is containment. The braids keep the crown flat, the lengths organized, and the ends easier to hide later. Once the braids reach the back, fold the tails under and pin them close to the nape. That tucked finish is what turns a sporty braid into an actual protective style.
Small Tweaks That Help
- Use a clean center part if you want a tidy finish
- Keep the first few passes snug, then relax the tension slightly
- Add a pea-size amount of gel at the roots if flyaways are a problem
- Fold the tails under instead of leaving them hanging free
This style is useful when you need your hair to stay put for a long day. Helmets, scarves, busy mornings, wind — it handles those things better than looser styles do. I’d pick it over a simple ponytail any day.
14. Rolled Tuck-Under Bun

The rolled tuck-under bun is one of the easiest ways to get the ends away from your shoulders without making the head look too dressed up. I trust it more than a sloppy top knot on 3b hair, mostly because it keeps the nape calmer and spreads the shape out instead of stacking all the weight in one spot.
Start with stretched hair if you can. Gather it low at the back of the head, twist the length upward, then roll it under itself and pin it in place with U-pins or a few strong bobby pins. The goal is a smooth roll, not a giant lump.
Why It’s Worth Knowing
- It works under hats
- It sits flat against coats and collars
- It hides frizz at the ends
- It takes less time than a full braided updo
If the hair is thick, split it into two rolls and cross them at the nape. That keeps the bun from getting bulky. If the hair is very layered, twist the ends first so they don’t poke out from the roll an hour later. Little fixes like that save a style.
This is the kind of look that reads clean even when it isn’t perfect. That’s a good thing.
15. Twist-and-Pin Updo With Scarf Wrap

This is the style I pick when I want order, not drama. Chunky twists pinned into an updo give 3b curls a controlled shape, and the scarf wrap finishes the job by smoothing the perimeter and hiding the little flyaways that always show up at the worst moment.
Split the hair into six to eight large sections, depending on thickness. Twist each section loosely enough to stay flexible, then wrap or pin it into a low nest, crown, or side-swept shape. Once the pins are in, tie a silk or satin scarf around the edges for a few minutes to press everything into place. The scarf does not need to choke the head. It needs to sit snugly and do its job.
What I like here is the margin for error. If one twist loosens, the scarf hides it. If the crown looks a little fuzzy, the scarf makes it look deliberate. If the day gets long and you end up retying it once, the style still holds together.
This is probably the most forgiving style on the list for people who are busy, tired, or not in the mood to battle their hair. Pick the version that fits your length, keep the tension calm, and tuck the ends away where they belong. Protective styling only pays off when it feels livable — and for 3b curls, that usually means less force, more tuck, and a little room for the hair to be itself.