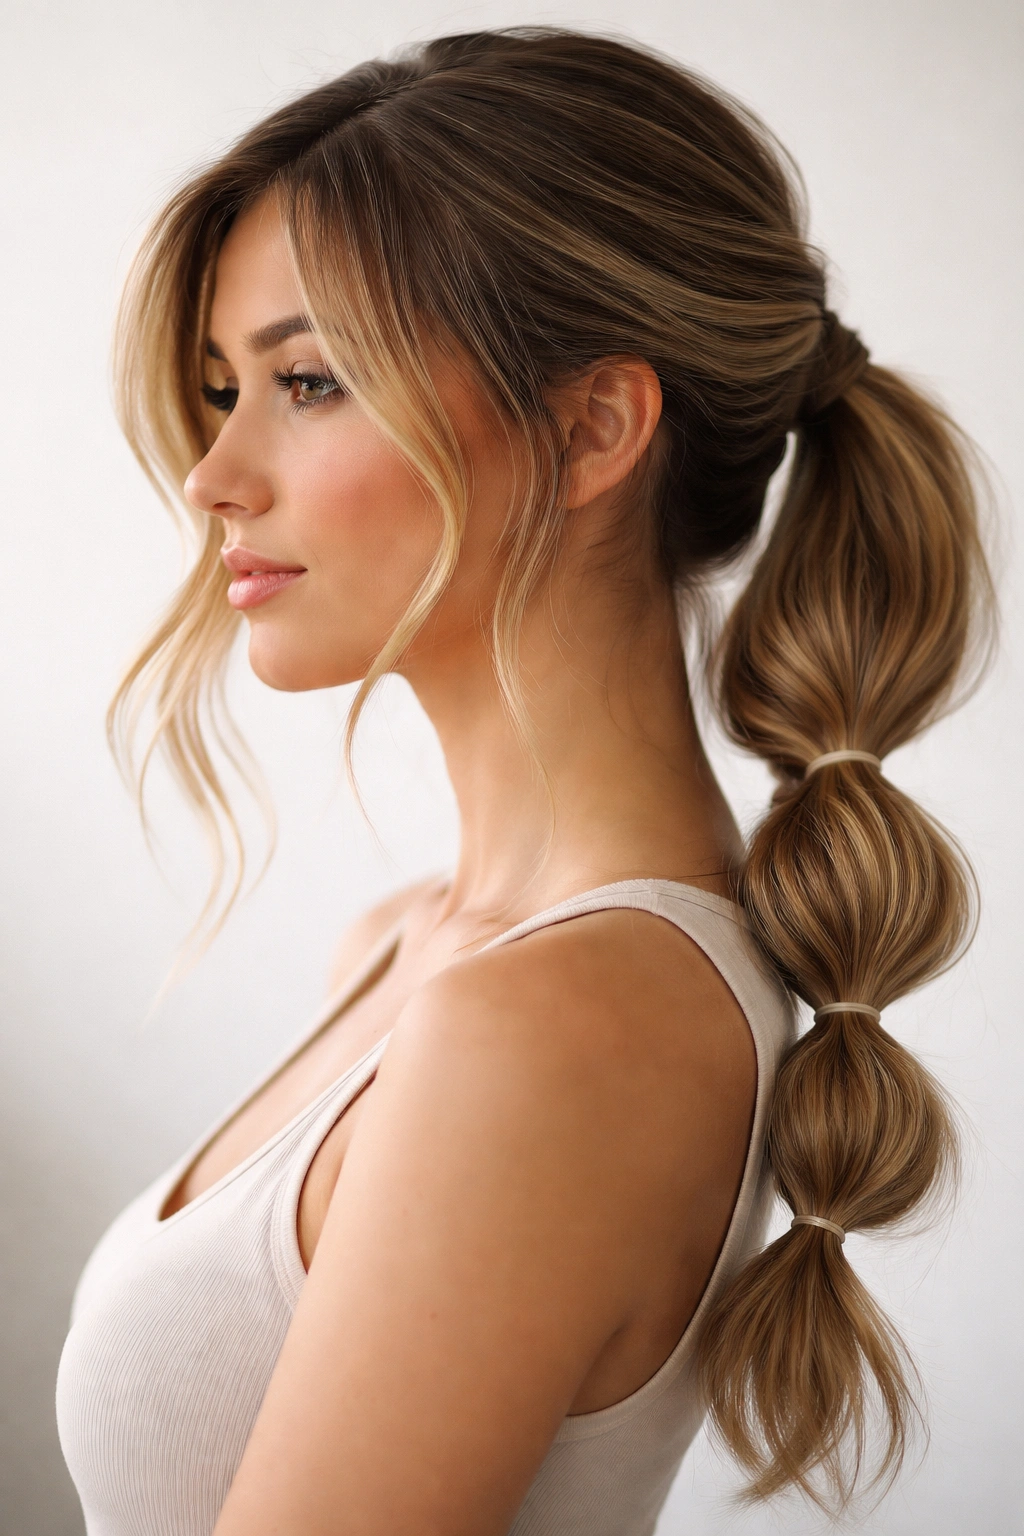
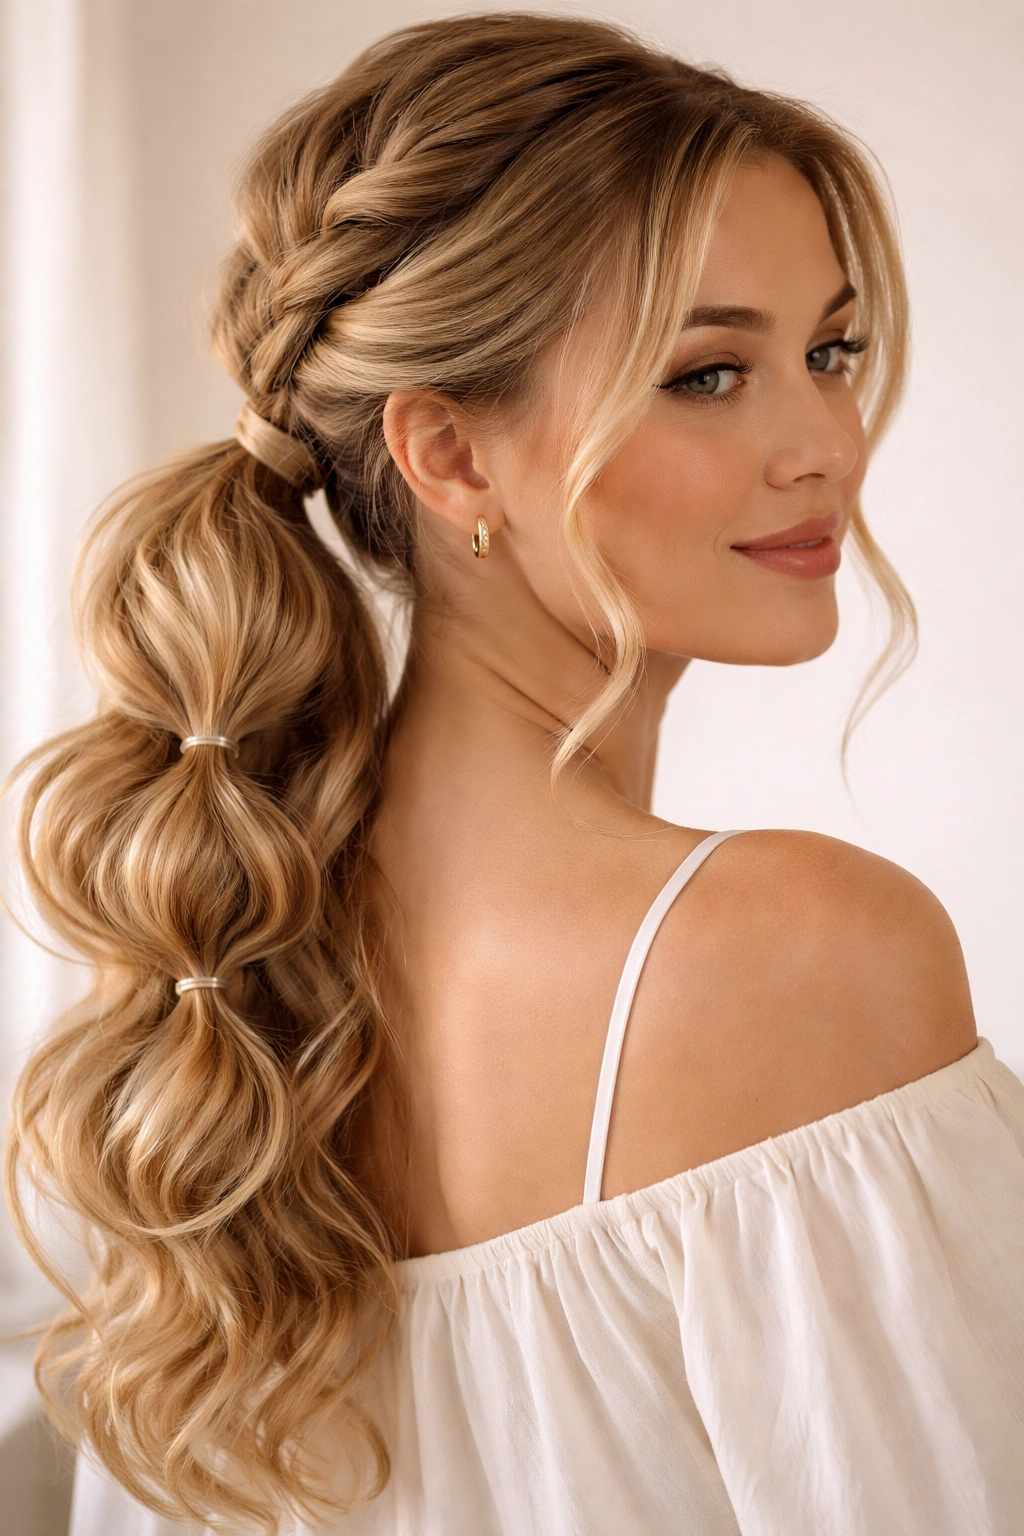
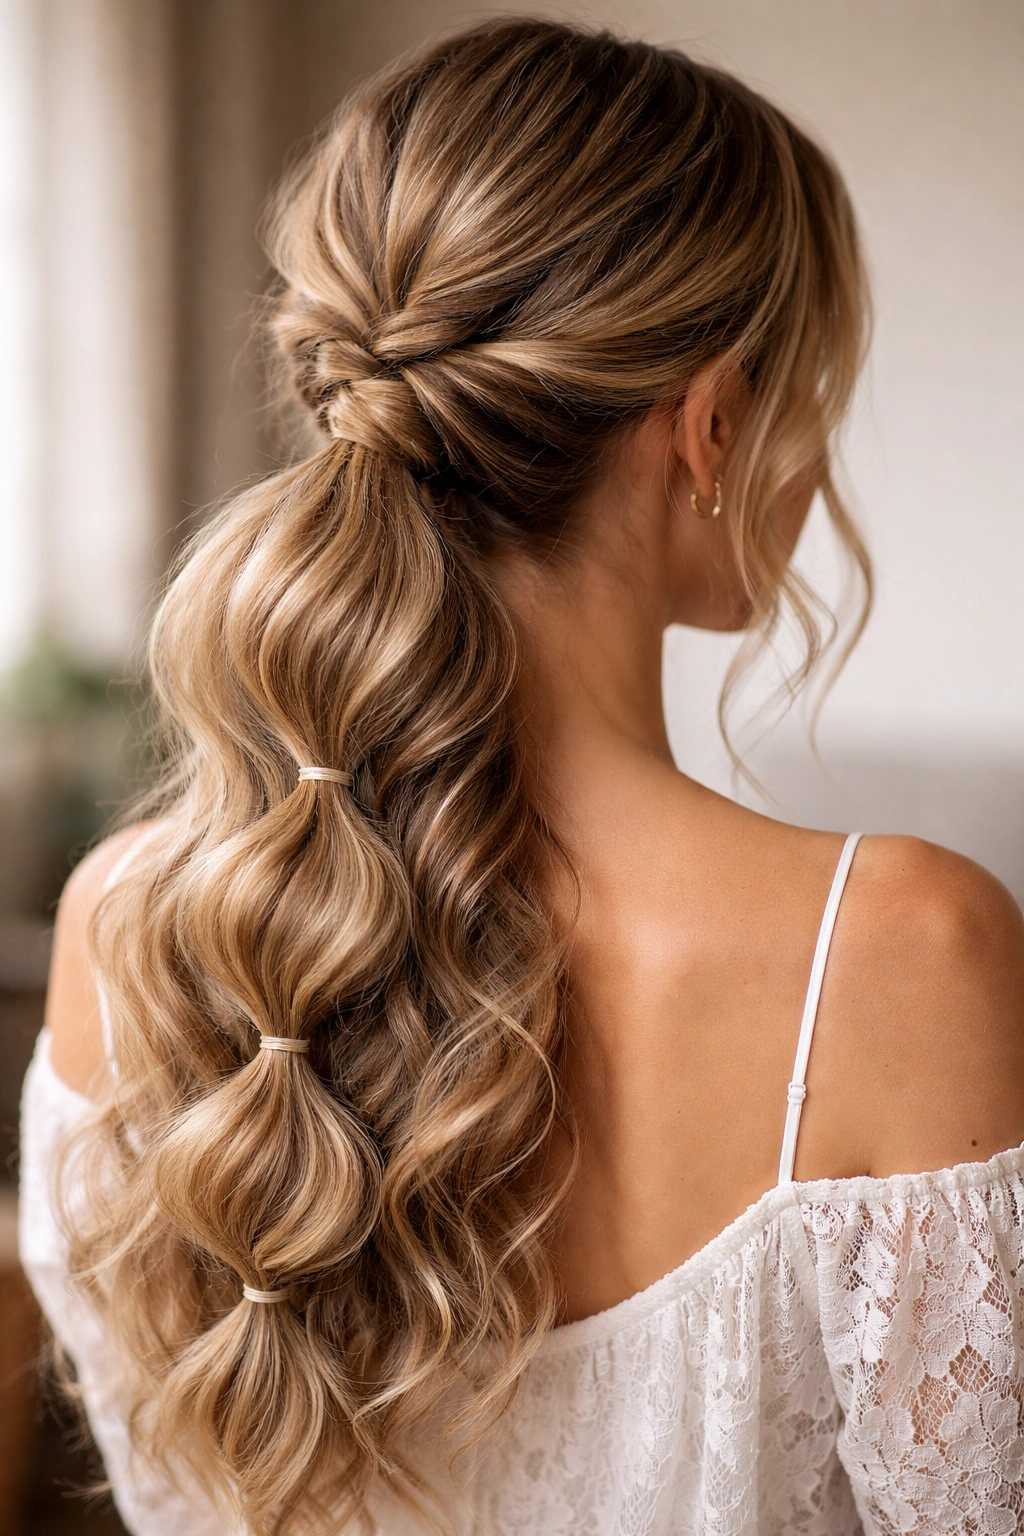
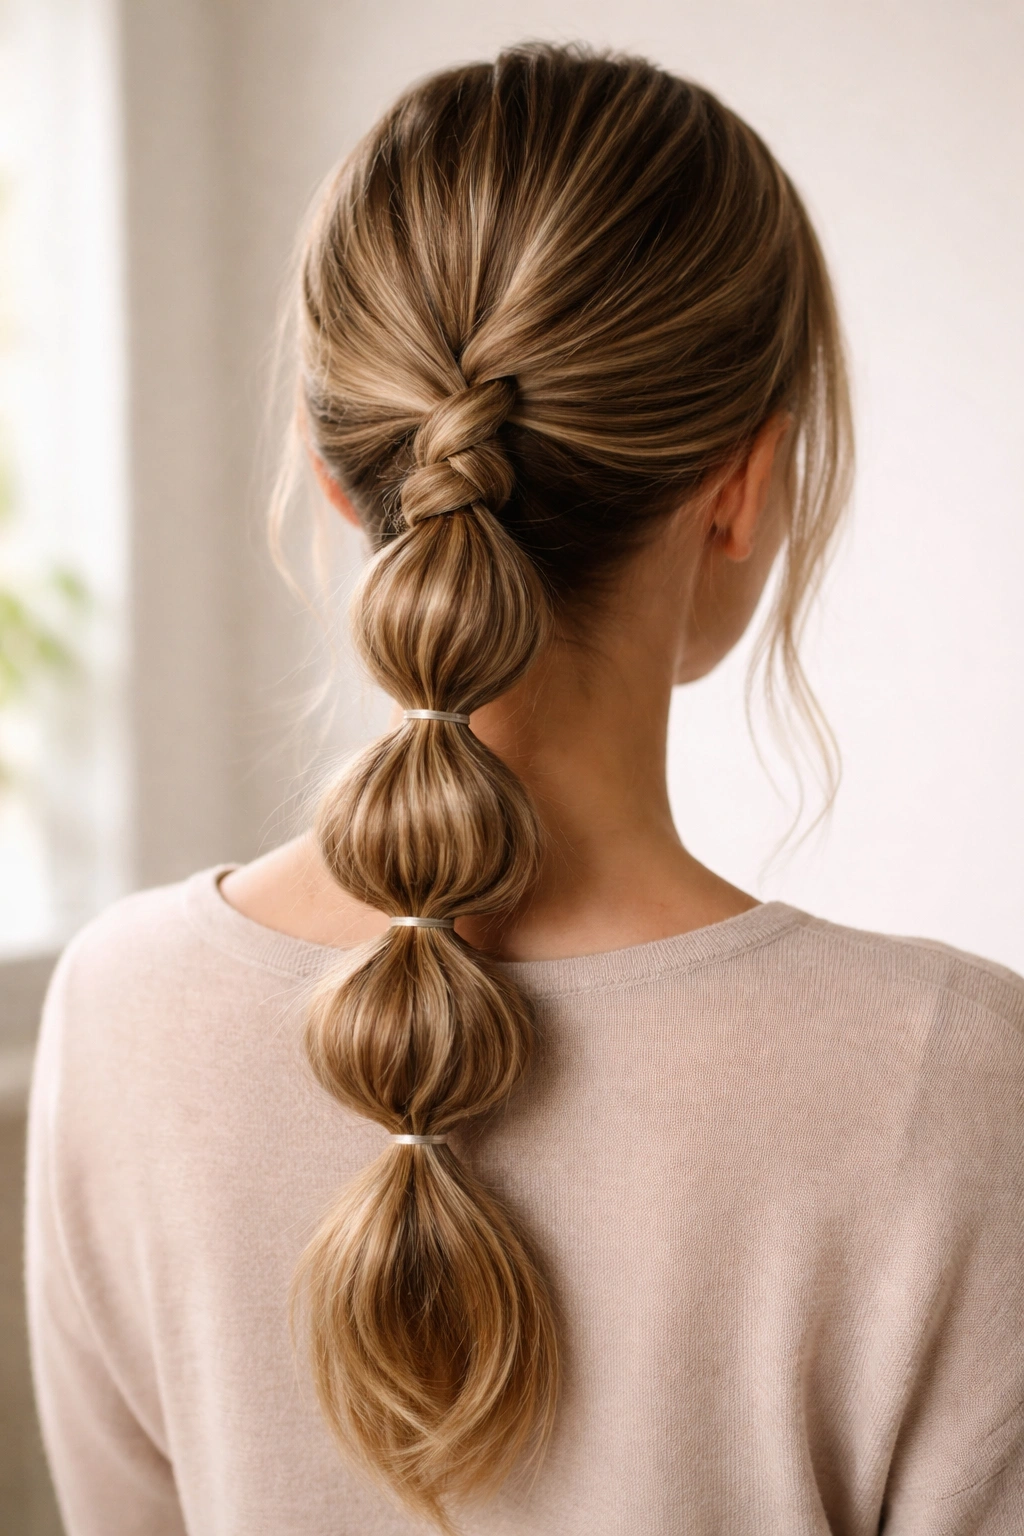
A low bubble braid ponytail can look polished enough for a dinner reservation and playful enough for a school run. That range is the whole trick.
The style works because it gives you two things at once: the braid at the top adds grip and shape, while the bubble sections add movement and a little bit of attitude. If you’ve ever tried to make a ponytail feel more finished without turning it into a full updo, this is the sweet spot. A tail comb, a few snag-free elastics, and a bit of smoothing cream can take you a long way.
What people sometimes miss is that the mood changes fast with tiny adjustments. Shift the part by an inch, space the elastics closer together, wrap one section with ribbon, or leave a few face pieces out, and the whole look goes from neat to relaxed. That’s why the low bubble braid ponytail keeps showing up in so many different forms. It’s a simple shape with a lot of range.
And honestly, that’s the appeal. You can keep it spare and sleek, or make it soft and dressed up, or go all in with pearls and metallic bands. The same basic idea just keeps on giving.
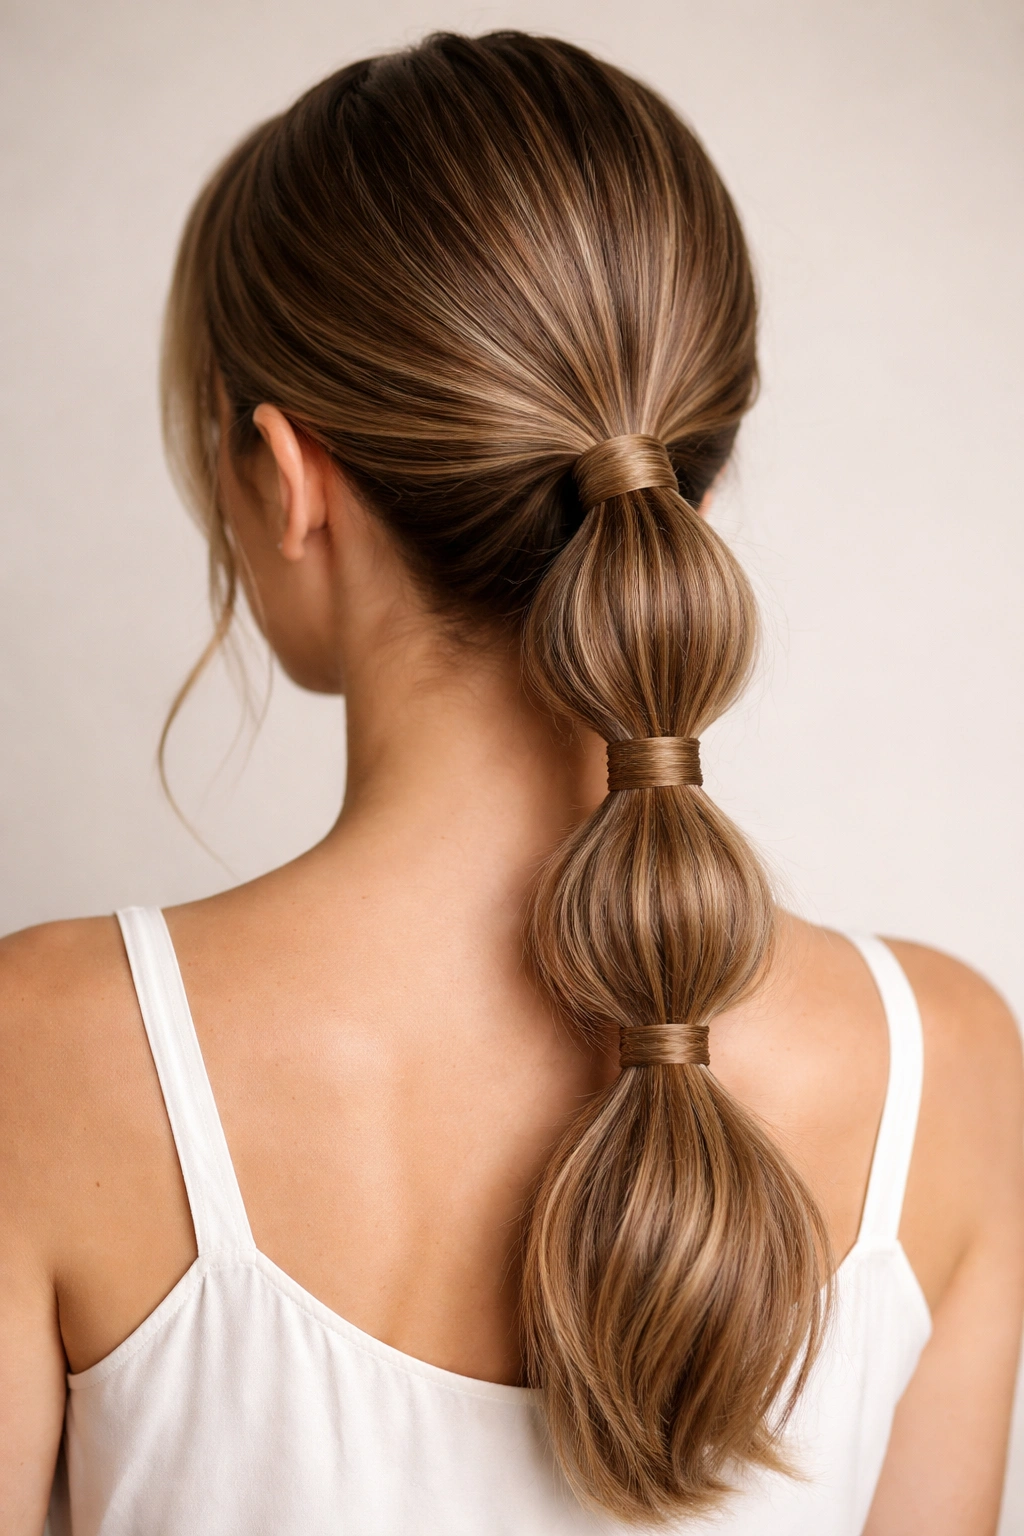
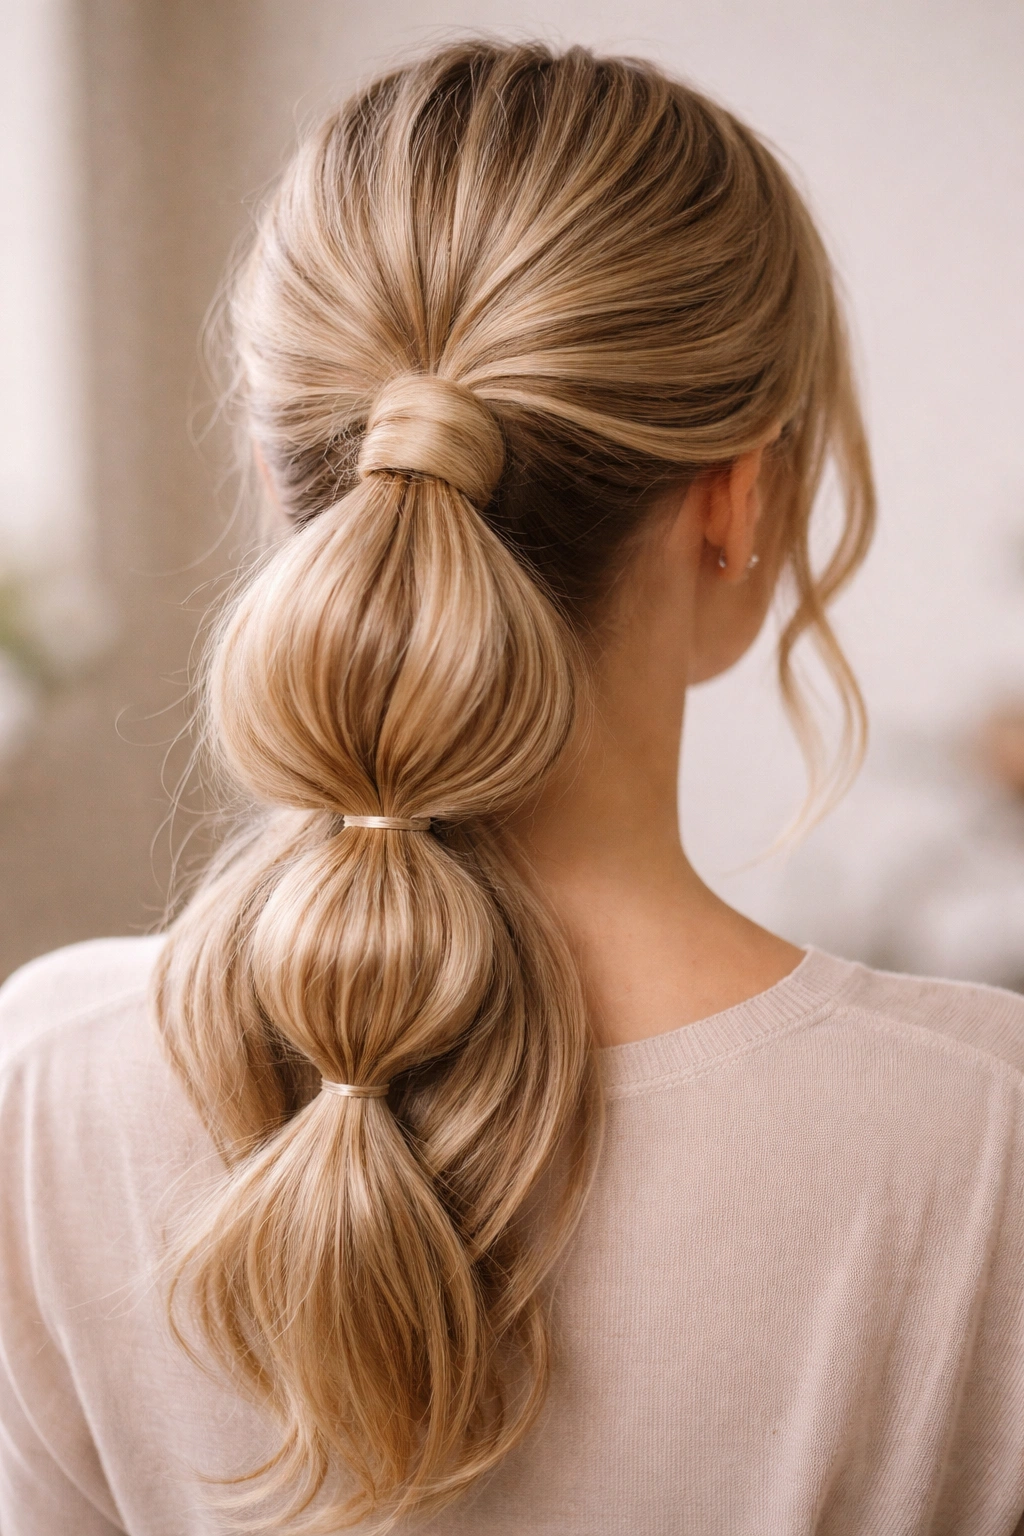
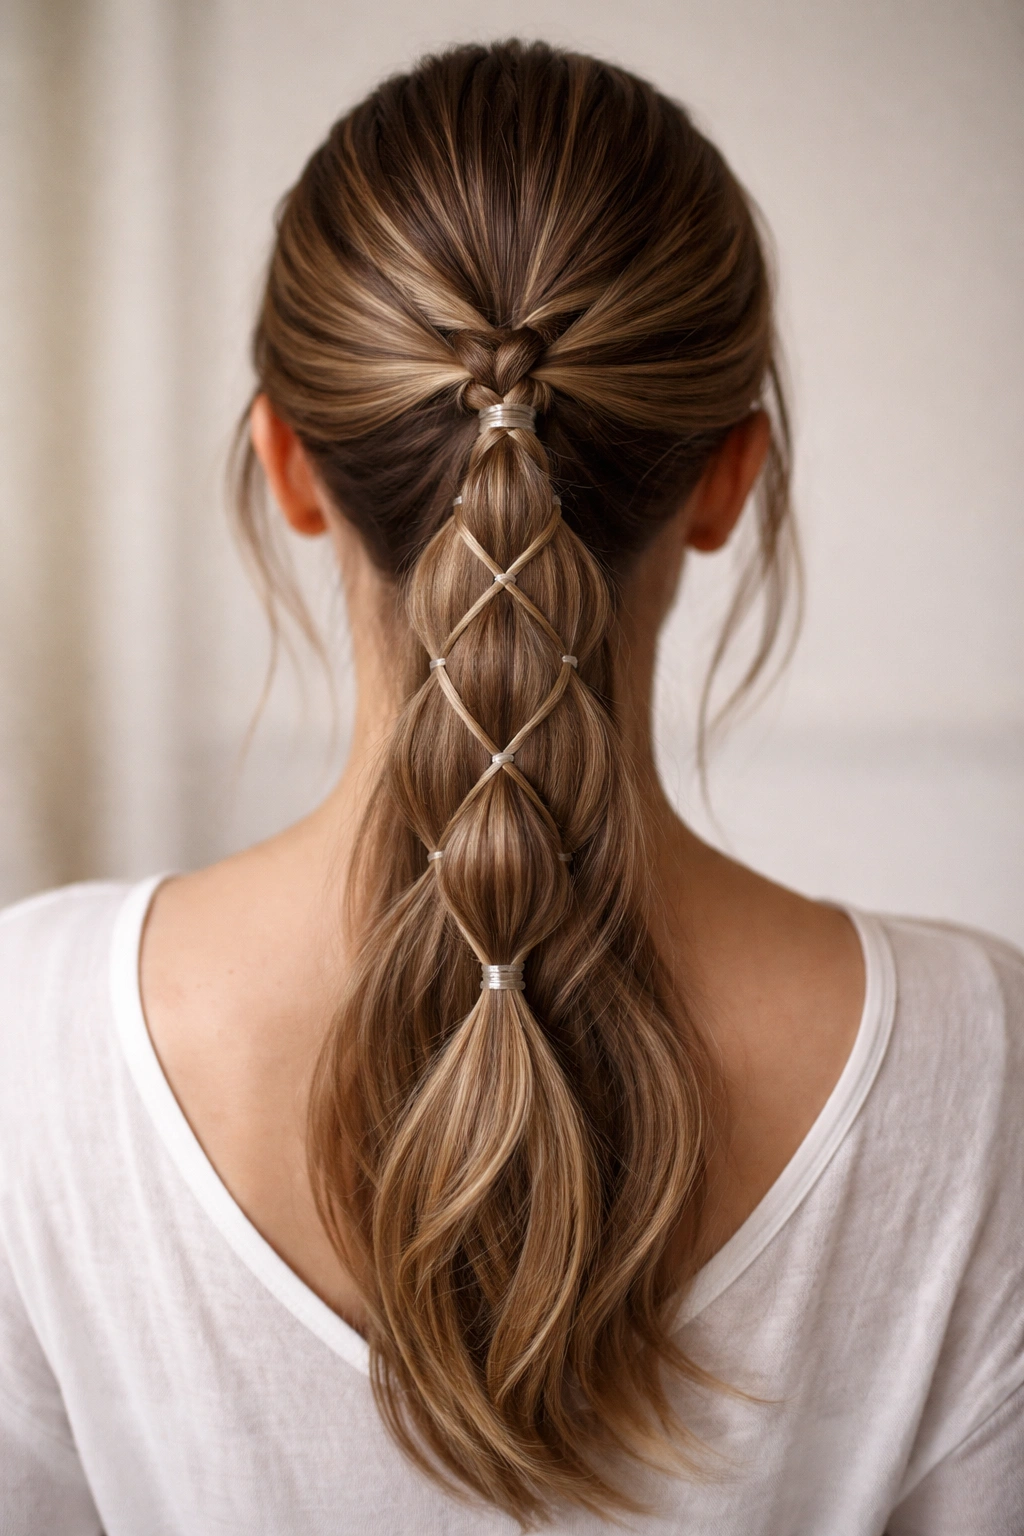
1. Sleek Middle-Part Low Bubble Braid Ponytail
This is the cleanest version of the style, and it works because nothing is fighting for attention. The middle part gives the ponytail a straight, balanced line, and the bubbles look sharper when the hair at the crown is smooth.
Start with a brush or comb and a small amount of smoothing cream through the top layer. If your hair has flyaways, a light mist of hairspray on the brush does more than spraying the whole head and hoping for the best. I like the first bubble to sit low and close to the nape, then the rest spaced about 1½ to 2 inches apart.
How to Keep It Polished
- Brush the hair flat from the center part down to the nape before you tie the first elastic.
- Use clear elastics that match your hair color as closely as possible.
- Tug the hair between each elastic gently until the bubble looks rounded, not lumpy.
- Finish with a pea-sized amount of serum on the ends only.
One good rule: if the top looks slick, the bubbles can be a little bigger. That contrast keeps the style from looking flat.
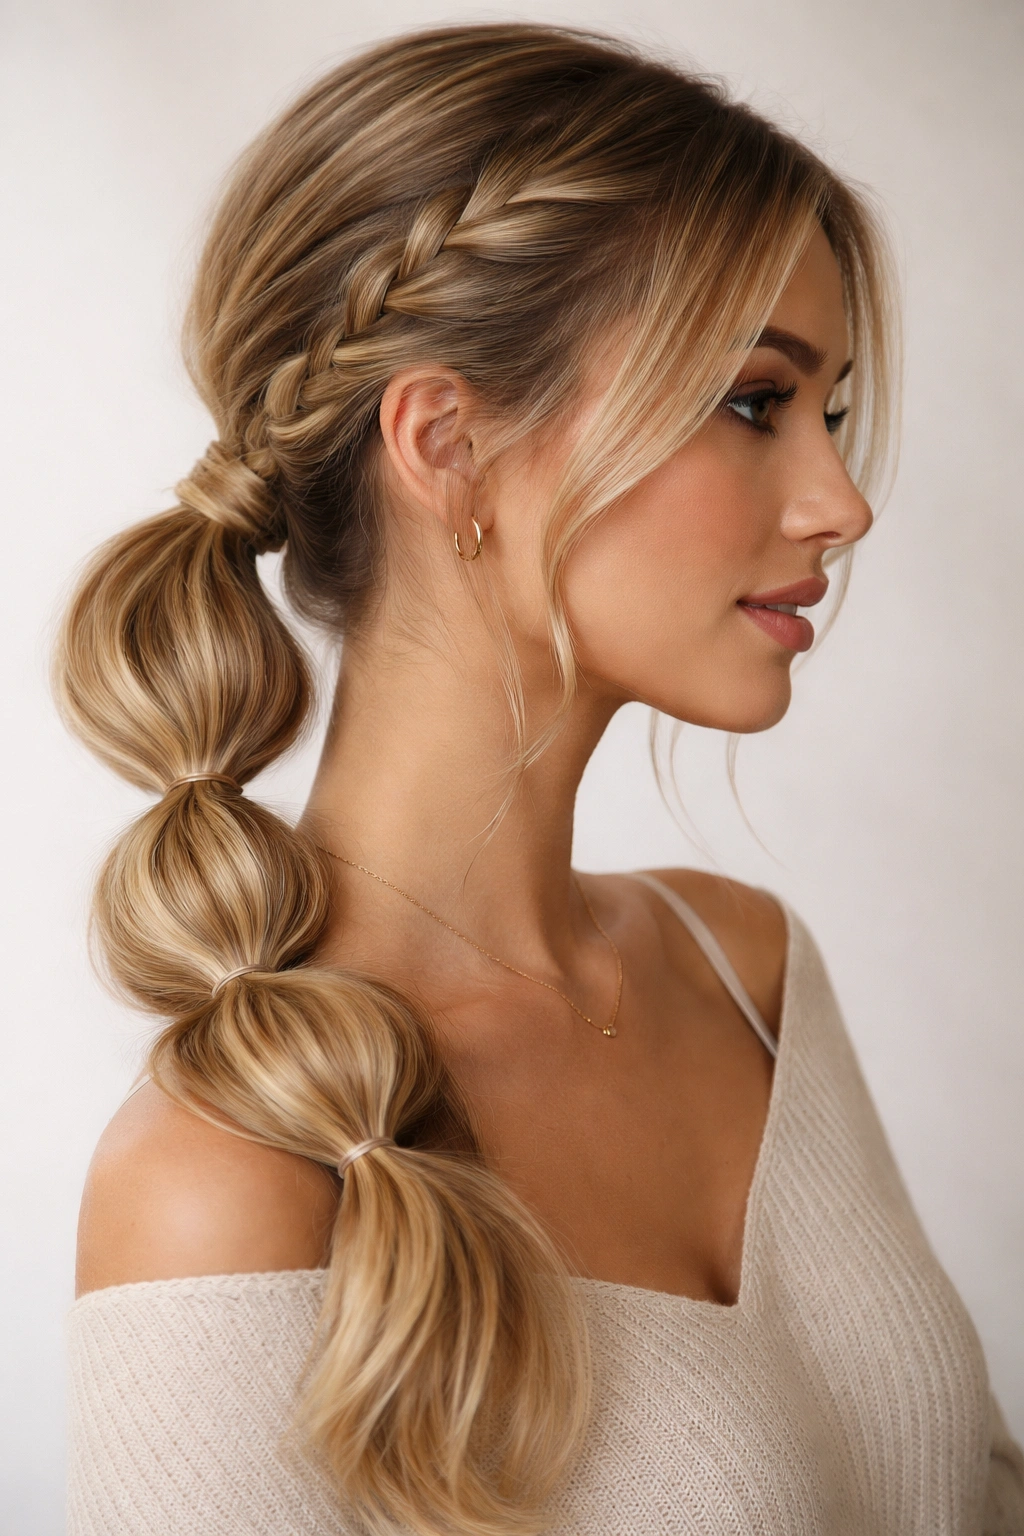
2. Side-Swept Low Bubble Braid Ponytail With Loose Face Pieces
Why does a side part change the whole mood? Because it softens the line at the top before the braid even begins.
A side-swept version feels less strict than a center-part style, especially if your hair naturally wants to fall one way anyway. The braid can start on the heavier side and travel down into the low ponytail, which gives the style a little more movement without making it messy. Keep the face pieces thin and a bit airy, not heavy enough to fall in your eyes every ten seconds.
This version is the one I reach for when I want the style to look intentional but not fussy. The bubbles should stay medium-sized here, with a slight stretch at the bottom so the ponytail doesn’t feel cramped. If your hair is layered, let a few ends slip loose near the last bubble; that softens the look fast.
3. Ribbon-Tied Low Bubble Braid Ponytail
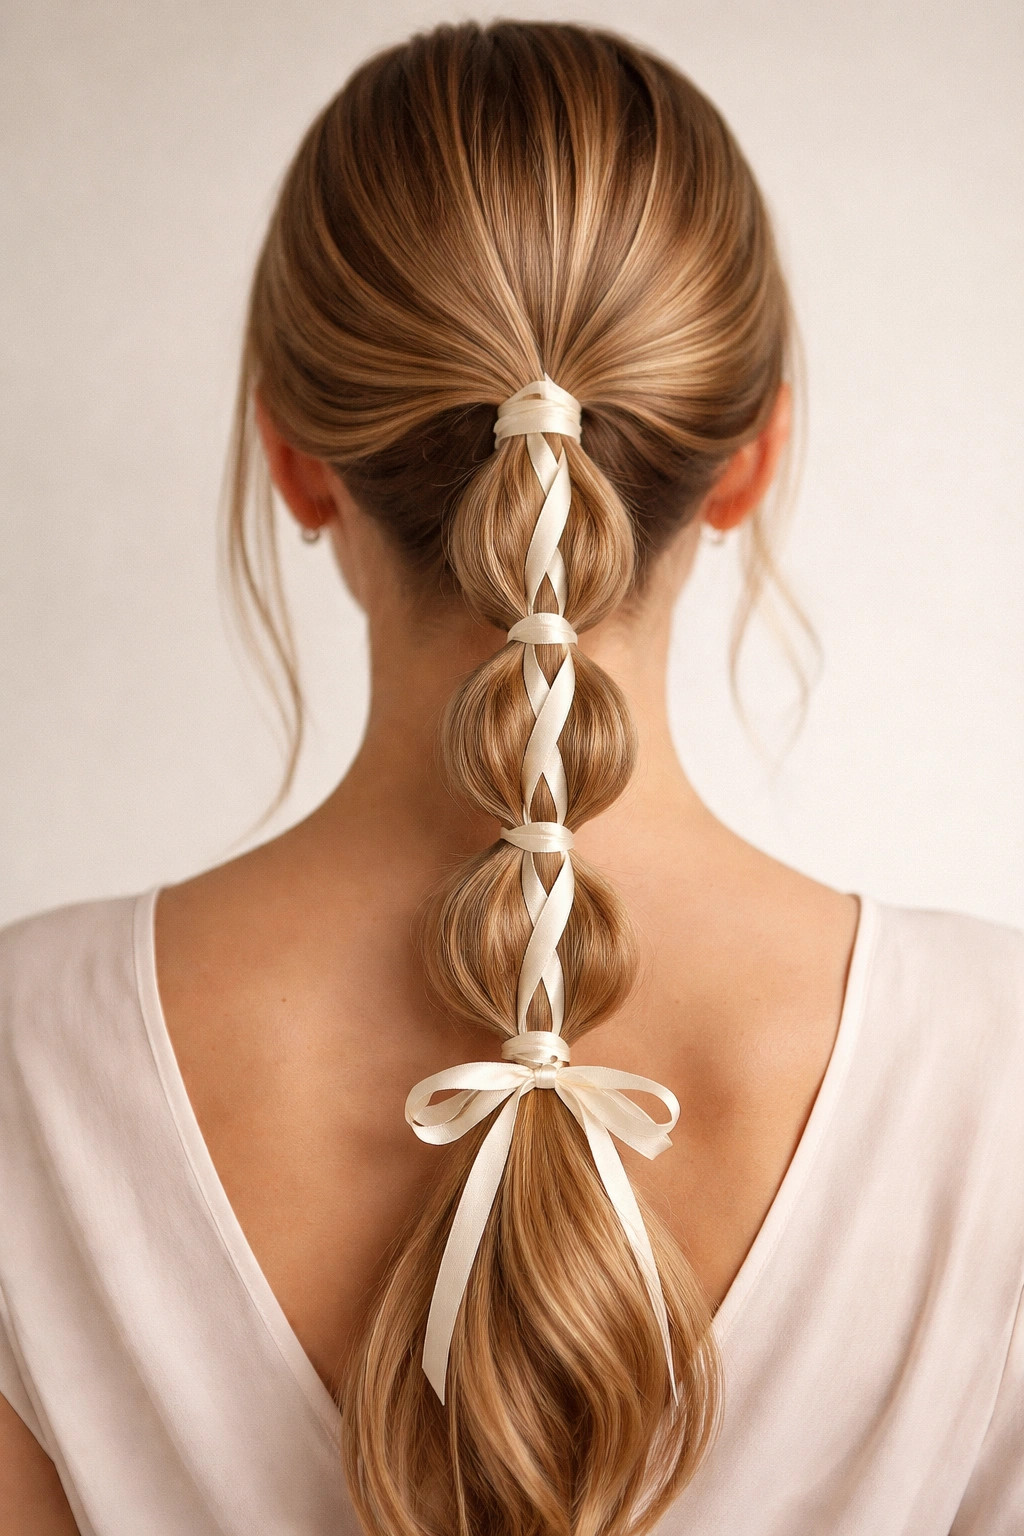
Picture a low bubble braid ponytail with a narrow ribbon peeking through the spaces between the elastics. It’s a small change. It makes a big difference.
A ribbon works best when it’s thin enough to move with the braid instead of sitting on top of it like a separate thing. Satin is smooth, but grosgrain has more grip if your hair is slippery. I like to anchor the ribbon under the first elastic, then weave it along the braid or wrap it around each section once before the next bubble.
Ribbon Details That Matter
- Use a ribbon that’s about ¼ to ½ inch wide for most hair types.
- Match the ribbon color to your outfit, not your hair, if you want the braid to stand out.
- Trim the ends on a diagonal so they don’t fray as fast.
- Secure the final tail with a tiny knot or a hidden bobby pin underneath the ponytail.
A ribbon can make the style feel finished without making it precious. That balance is the point.
4. Sporty Low Bubble Braid Ponytail With Micro-Bubbles

Small bubbles are the fastest way to make the style feel active and youthful. They sit close together, which keeps the ponytail compact and controlled.
This version is especially good when you need your hair out of your way but still want a little personality. Use five to seven small elastics between the nape and the ends, depending on length. The braid at the top should stay tight, almost like a secure lane leading into the bubbles.
If you work out in it, keep the crown smooth and skip heavy oils near the roots. Dry shampoo or a little texturizing spray gives the hair enough grip so the sections don’t slip apart halfway through the day. It’s not the softest version of the style, and that’s fine. It’s meant to stay put.
5. Soft Curled Low Bubble Braid Ponytail
Soft curls make this style feel fuller before you even start tying the elastics. That matters more than people think.
When the hair is curled first, each bubble has more body to work with, so the sections look round instead of flat. A 1-inch curling iron or wand usually gives the best balance. You do not want tight ringlets here. You want bends and shape, the kind that still move when you turn your head.
Brush the curls lightly through the ponytail before you section it so the ends don’t stay too piecey. The result should feel airy, not stiff. A little shine spray on the mid-lengths can help, but keep it light. Too much product and the bubbles go soft in the wrong way.
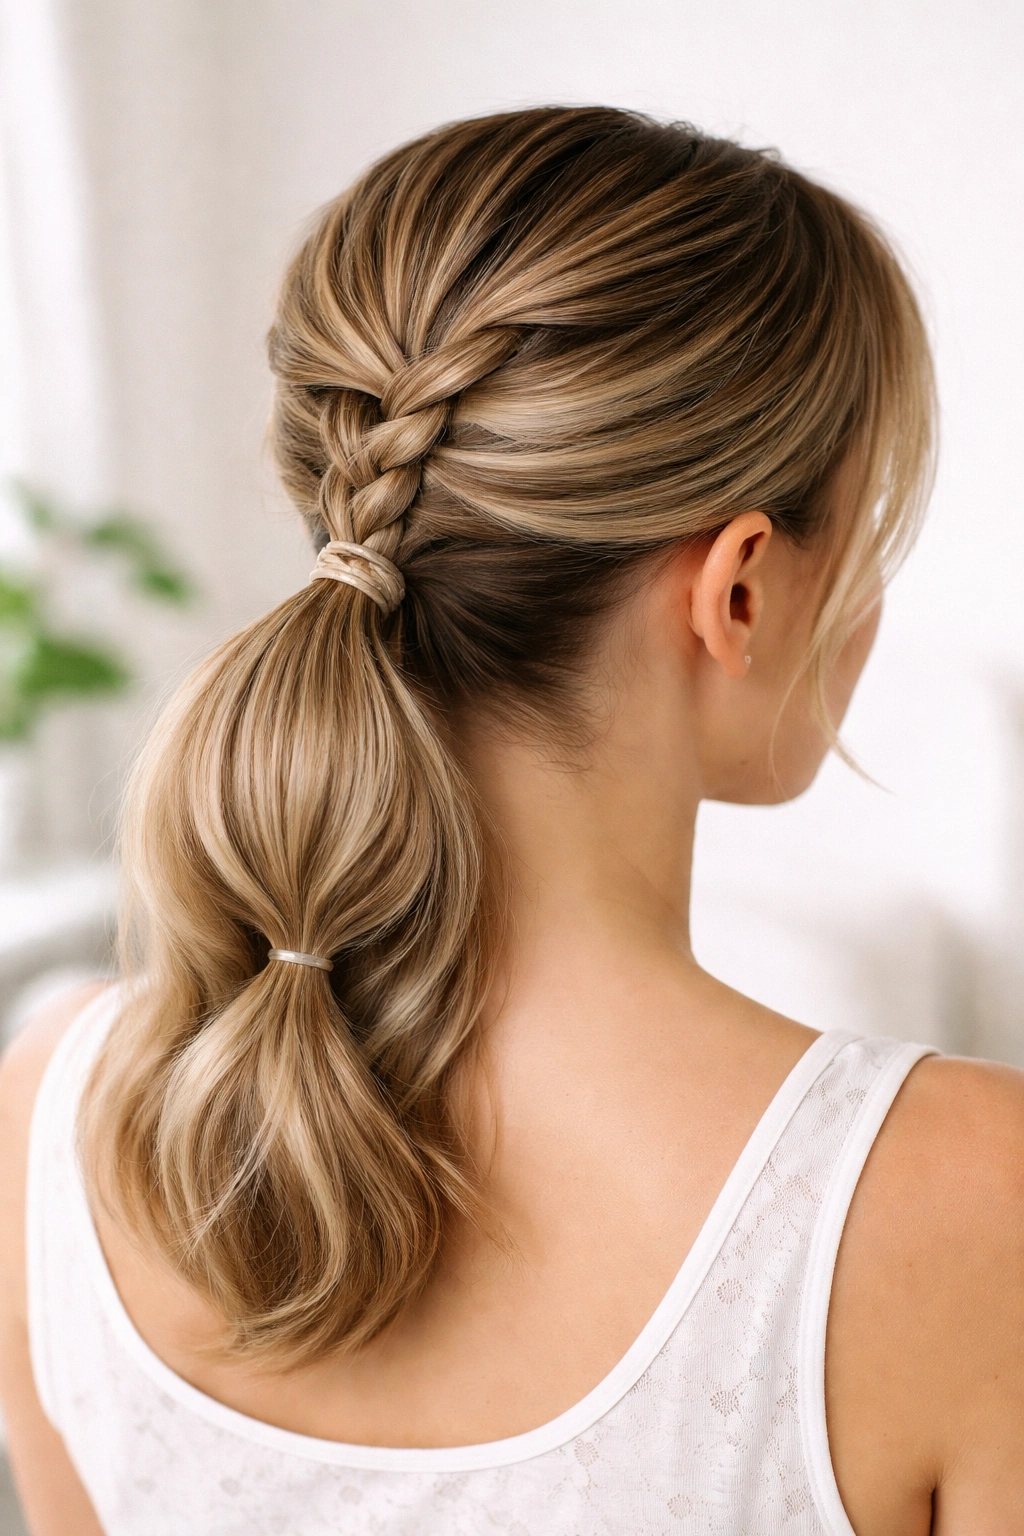
6. Dutch Braid Crown Into a Low Bubble Ponytail
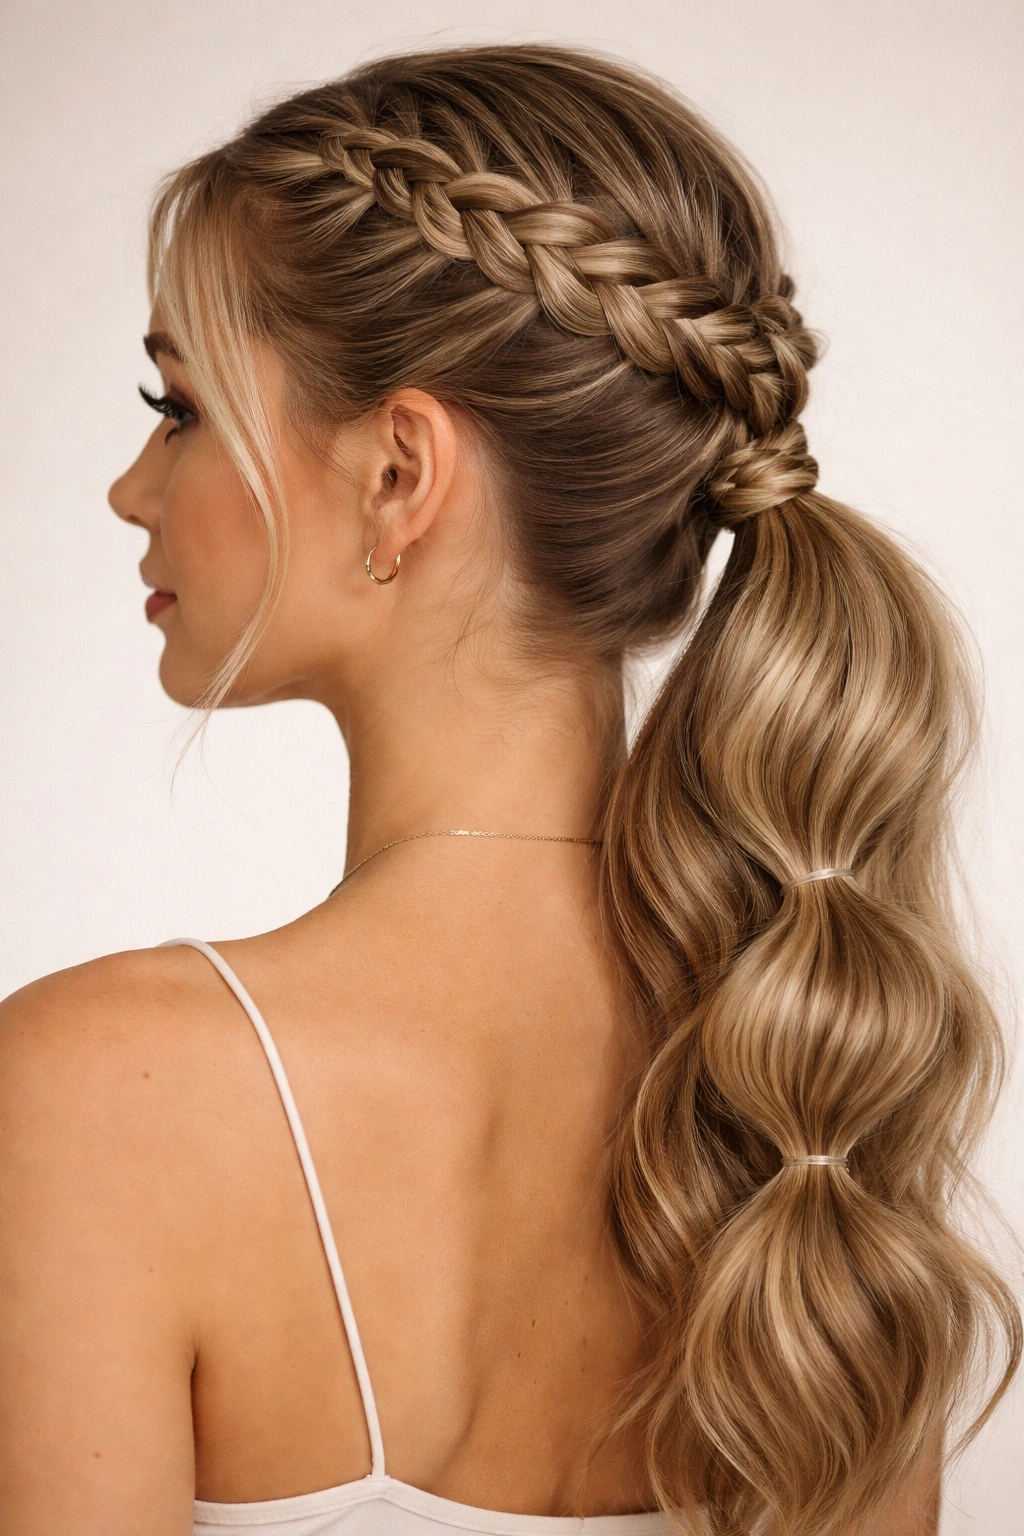
A Dutch braid gives the style a built-in backbone. It lifts the top section off the scalp and makes the low ponytail look more structured from the start.
This version is especially good for thicker hair or layered cuts that like to slip loose. The braid begins near the hairline, runs toward the back, and feeds directly into the ponytail at the nape. From there, the bubble sections can stay simple because the braid already carries enough detail.
Where to Start the Braid
- Begin the Dutch braid a little off-center if your part is deep.
- Keep the braid snug for the first 3 to 4 crossings so it doesn’t puff out too early.
- Stop braiding once you reach the nape; don’t force the pattern farther than it wants to go.
- Tie the remaining hair into the ponytail before adding the bubbles.
Unlike a plain low ponytail, this one has shape from the root down. That’s why it looks more built-in and less like an afterthought.
7. Wrapped-Elastic Low Bubble Braid Ponytail
Can a tiny hair wrap change the whole look? Absolutely.
Wrapping a small strand of hair around each elastic hides the practical part of the style and makes the bubbles look more polished. It’s a good choice when you want the ponytail to read as deliberate, not rushed. The trick is to keep the wraps thin. A ½-inch strand is usually enough. Anything thicker starts looking bulky.
Secure each wrap with a bobby pin tucked underneath the ponytail, not sticking out the back where it can scratch. If your hair is very smooth, mist the wrap strand with a little hairspray before you twist it. That extra grip saves you from redoing the same section three times. Which nobody enjoys.
8. Low Bubble Braid Ponytail With Airy Tendrils
Why does this version feel softer? Because the loose pieces around the face break up the shape before the bubbles even begin.
Leave two slim tendrils out near the temples and curl them once or twice around a small wand. Not a full spiral. Just a bend. The low braid can stay neat, but the front pieces should look like they were intentionally forgotten in the best way. That small contrast gives the style some air.
The bubbles themselves can be a touch looser here, pulled out a little more than in the sporty version. If you’re wearing this to something casual but you still want to look like you made an effort, this is a nice middle ground. It feels relaxed without sliding into sloppy.
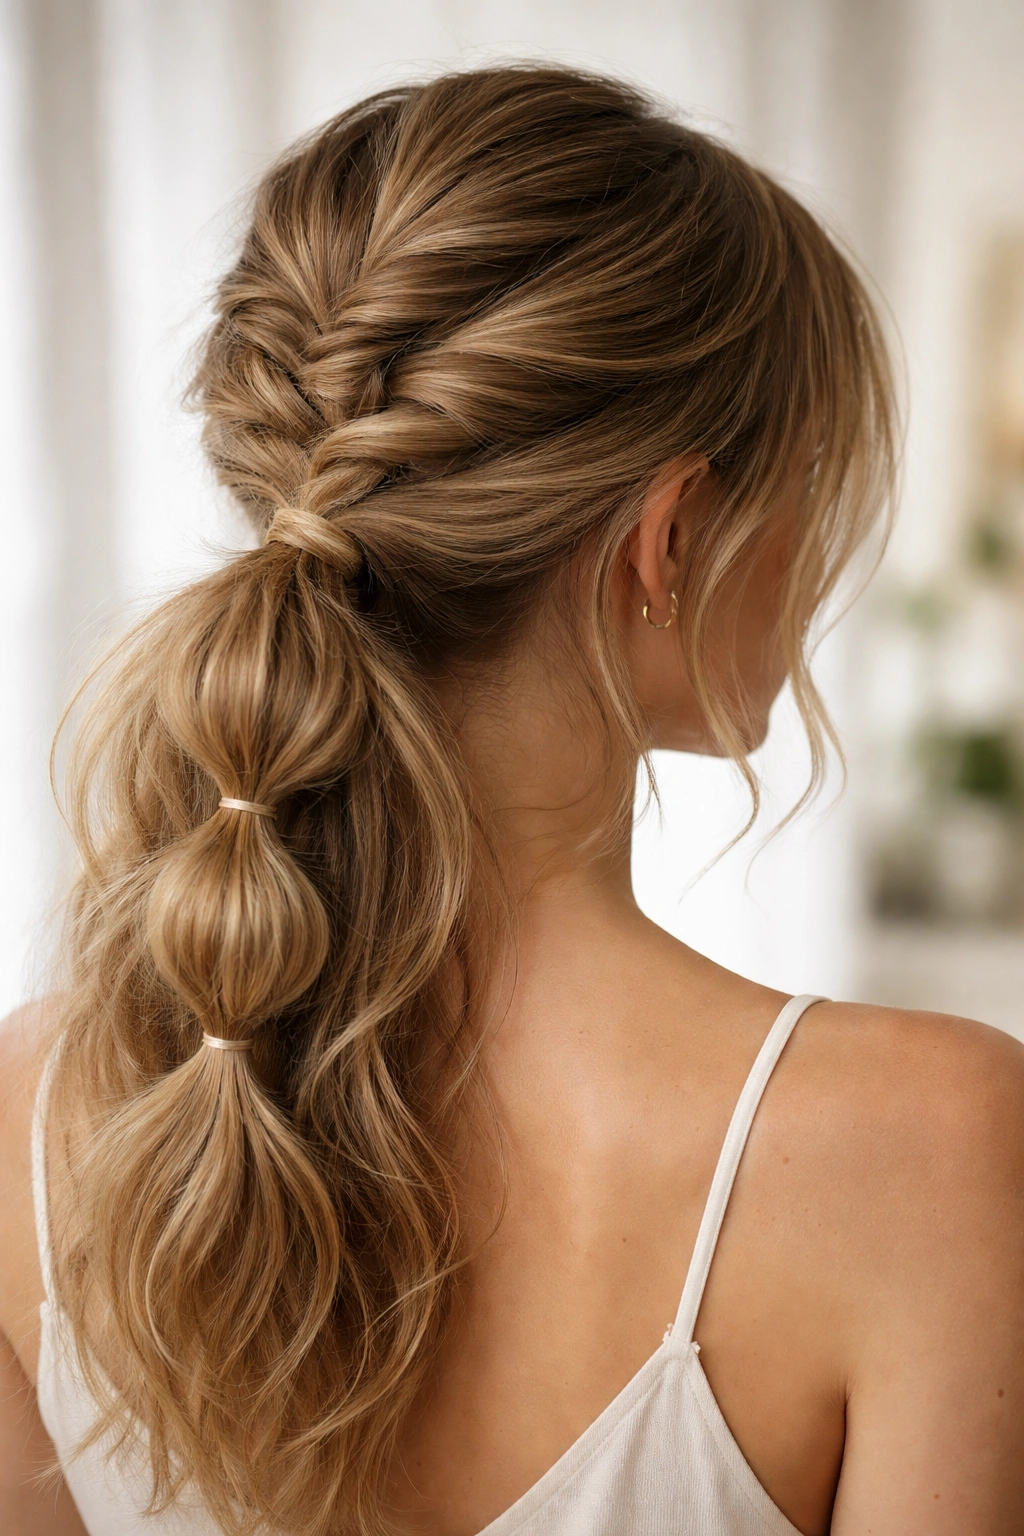
9. Fishtail Crown Low Bubble Braid Ponytail
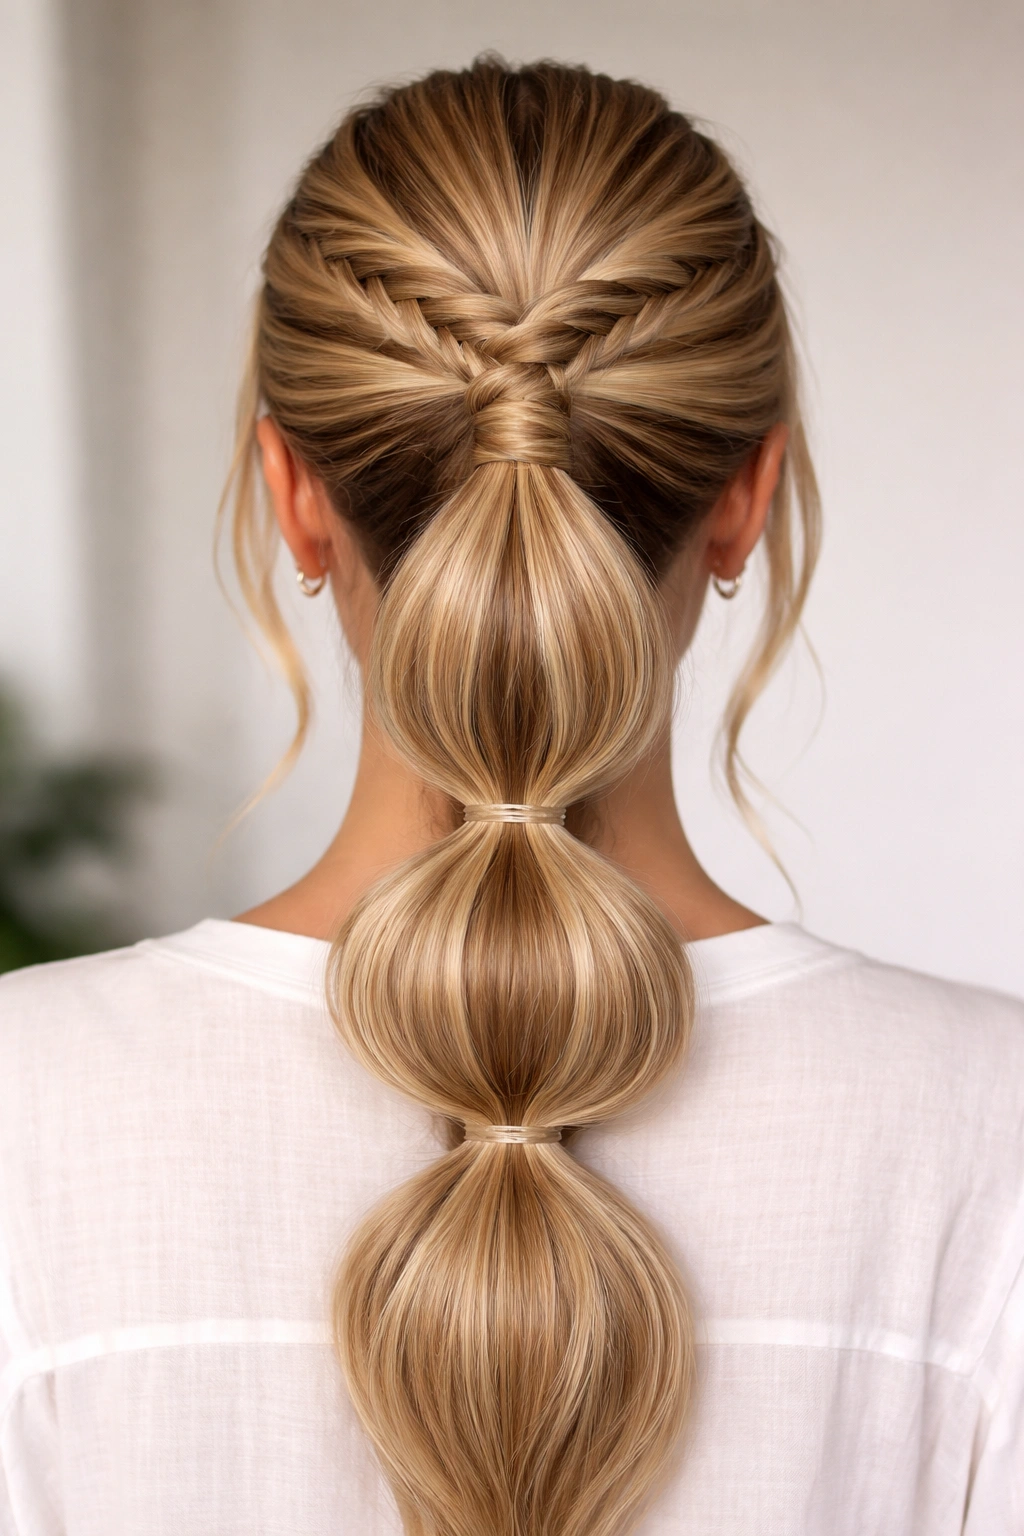
A fishtail braid changes the texture right away. It’s tighter, finer, and a little more detailed than a regular three-strand braid, which makes the ponytail feel richer before the bubbles even start.
This version works best when the top section of hair is long enough to hold the fishtail neatly for several inches. You do not need to braid the whole head. Even a short fishtail at the crown gives the style a different edge. From there, the bubbles can stay medium-sized so the braid and the ponytail don’t compete.
I like this look when the outfit is simple and the hair needs to do more of the talking. The braid reads as intricate up close, but from a few feet away it just looks polished and a little unexpected. That’s a good place to be.
10. Knotted Low Bubble Braid Ponytail
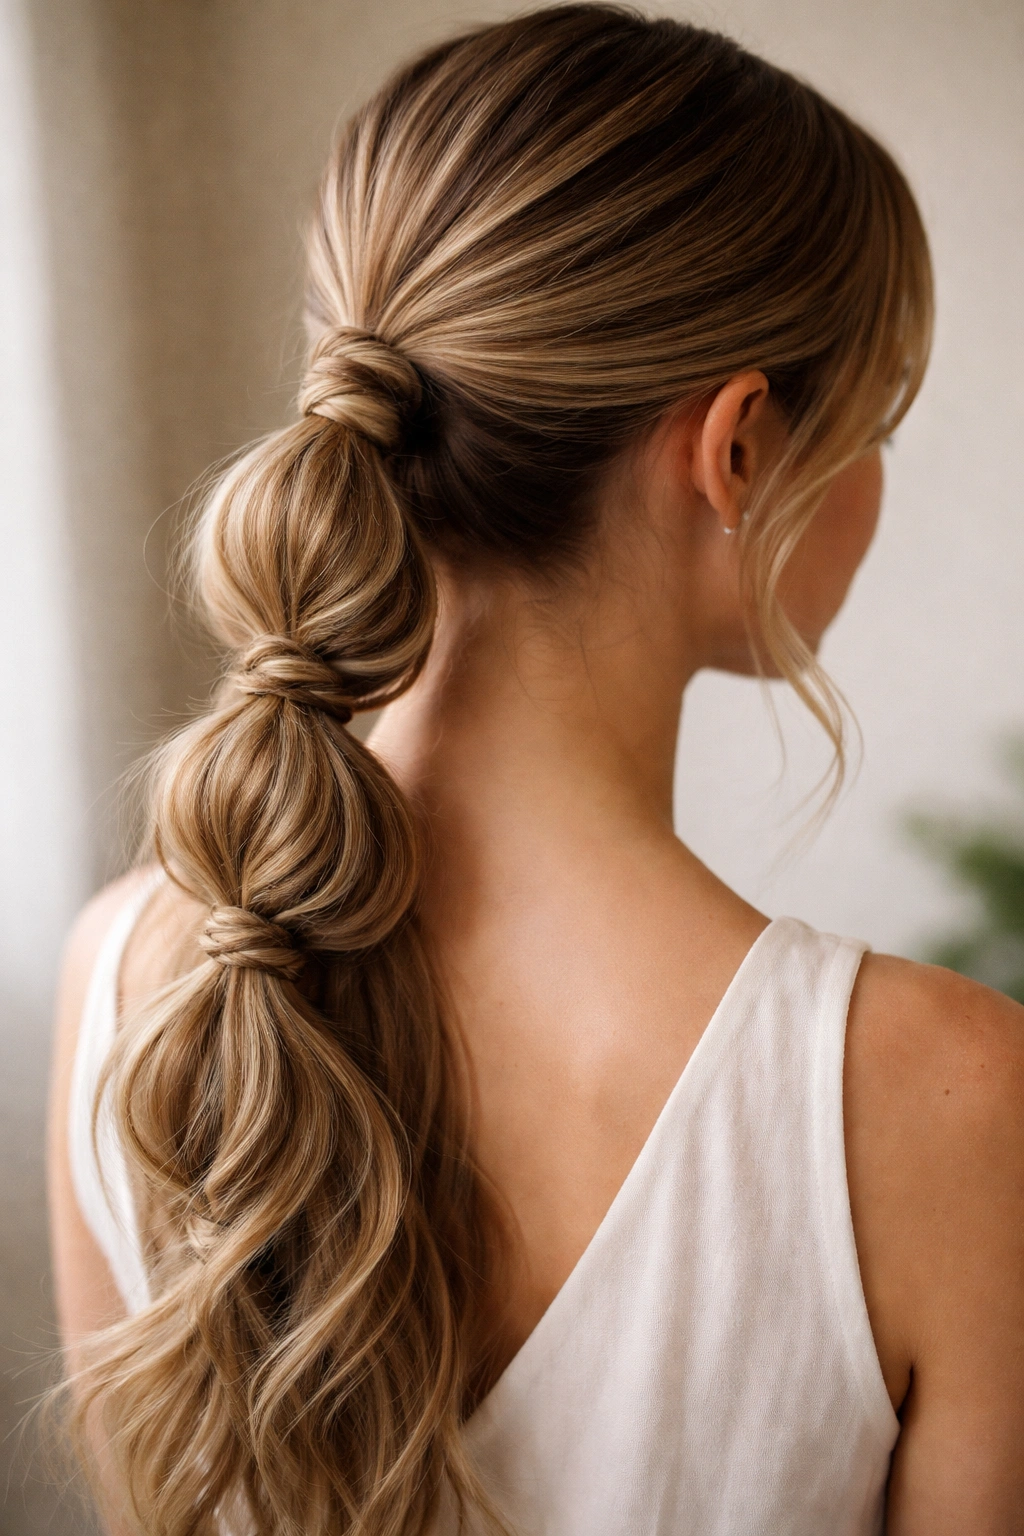
This version has a little more structure than the usual bubble braid. Instead of only relying on elastics, the sections are twisted or looped so the ponytail almost looks knotted as it moves downward.
The effect is subtle, but it changes the texture in a noticeable way. It’s especially nice on medium-length hair that needs extra shape. The top braid can stay compact, then each bubble section gets a slight twist before the next elastic goes in. That creates more visual rhythm, which is what keeps the style from looking too plain.
If your hair tends to slip out of basic bubbles, this is a useful workaround. The knots and twists give the ponytail a bit more hold. Not a miracle. Just enough to matter.
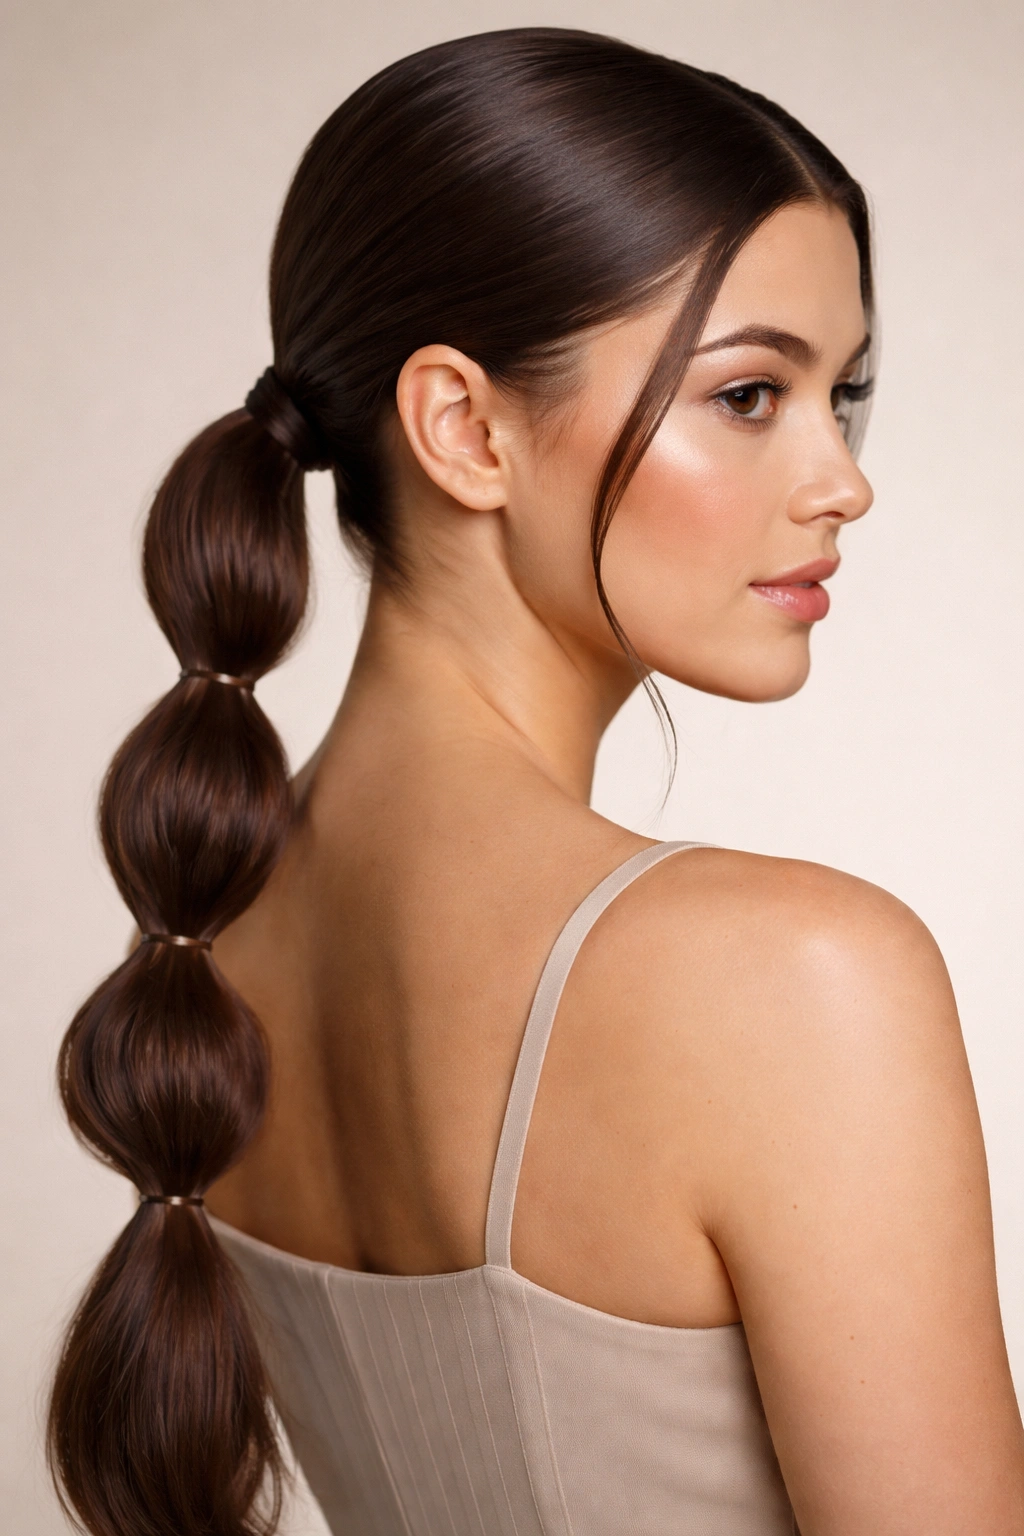
11. Minimalist Center-Part Bubble Braid Ponytail

Three bubbles. That’s enough.
A minimalist version is all about restraint. The center part stays sharp, the braid at the top stays narrow, and the ponytail only needs a few wide sections to feel complete. This works best when the hair is medium to long and already has a smooth shape on its own. Don’t pile on extra texture. Let the simplicity do the job.
What Makes It Different
The absence of extras is the point. No ribbon. No pearls. No loose tendrils. If the hair is healthy and shiny, this style looks almost architectural, which sounds fussy but really isn’t. It just means the lines are clean and the bubbles are spaced with purpose.
Use a fine-tooth comb and a light hand here. The more precise the base, the better the style reads.
12. Romantic Wavy Low Bubble Braid Ponytail
Is this the prettiest version? Maybe. At least, it’s the one that leans hardest into softness.
Waves make the bubble sections look fuller and a little undone, but in a flattering way. Start with loose bends through the lengths, then braid the top lightly so the crown stays tidy while the ponytail keeps its texture. A little wave spray can help, though it’s not mandatory if your hair already holds shape.
The bubbles should be gently stretched, not pulled into perfect circles. That small imperfection gives the ponytail a softer finish. I like this version for dressier outfits because it doesn’t feel too formal. It has a softer edge than a sleek ponytail, which makes it easier to wear for hours without feeling overdone.
13. Scarf-Woven Low Bubble Braid Ponytail
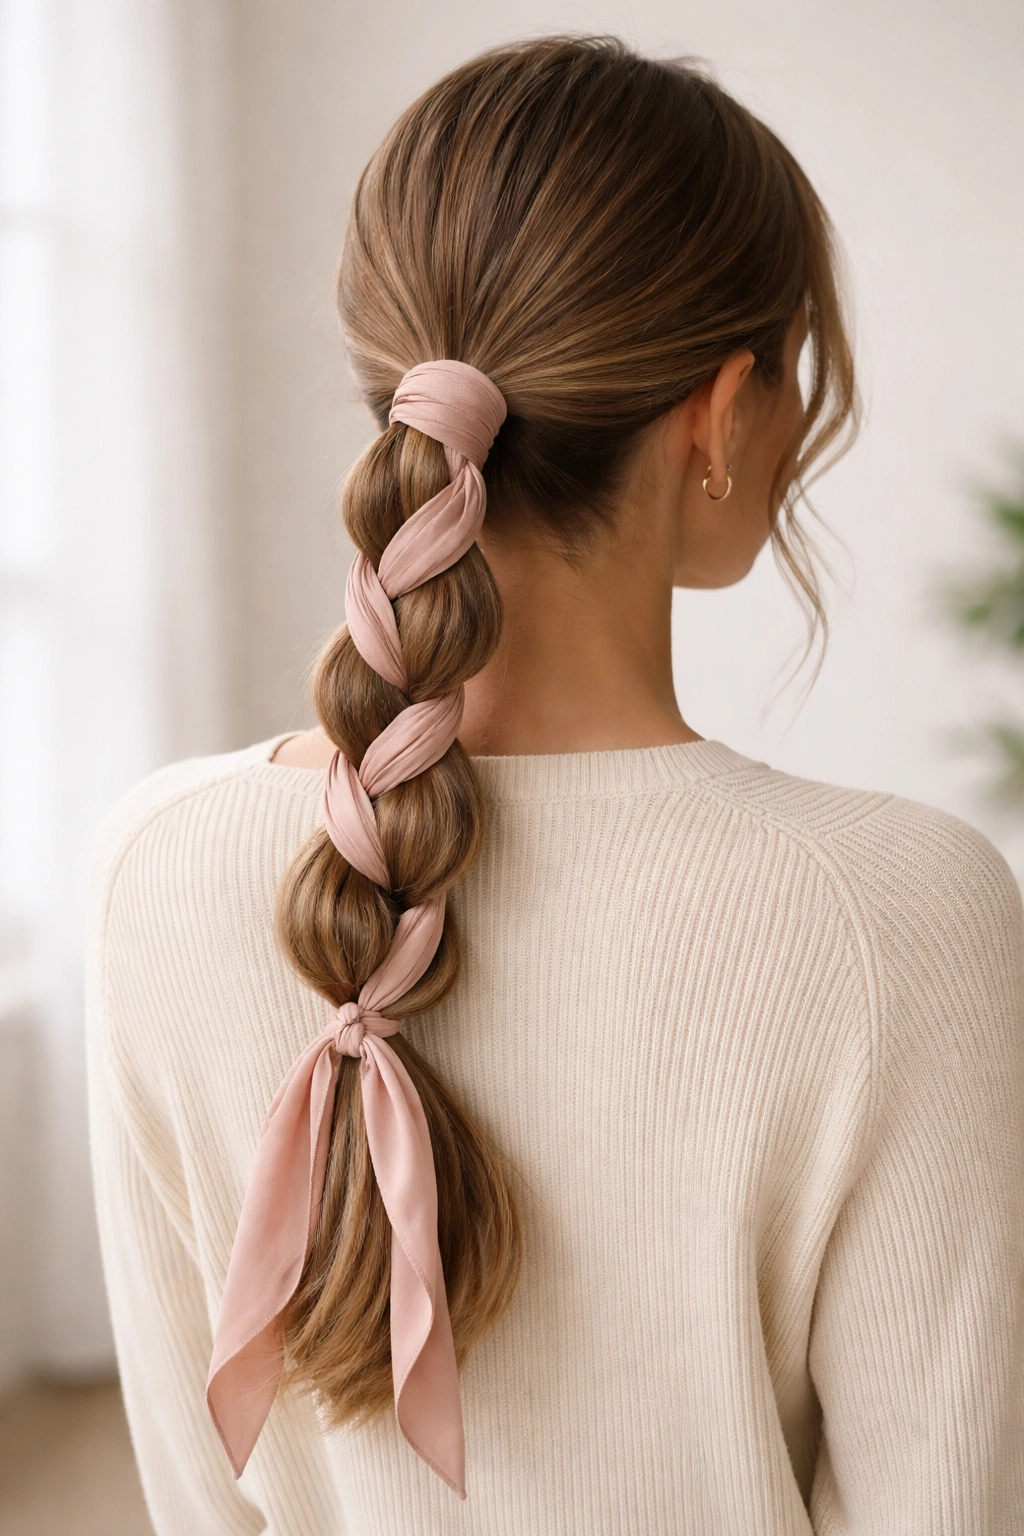
A scarf gives the style instant color, and you barely need much of it.
The easiest way to wear it is to fold the scarf into a long strip and tie it around the base of the braid, then let it travel with the ponytail through the first few bubble sections. Lightweight cotton or silk-blend fabric works best because it drapes better and doesn’t fight the hair. Thick fabric can puff out in awkward ways.
Good Ways to Use a Scarf
- Tie the knot under the first elastic so it stays hidden.
- Match the scarf to one accent color in your clothes, not the whole outfit.
- Keep the pattern simple if the braid itself is detailed.
- Let the ends hang unevenly if you want a looser finish.
A scarf is one of those details that can look fancy or playful depending on how you handle it. That flexibility is useful.
14. Low Bubble Braid Ponytail for Shorter Hair
Shorter hair can do this style. You just have to cheat a little smarter.
A clip-in ponytail piece or a small wraparound extension can give you enough length for two or three bubbles without making the style look fake. The key is to keep the braid at the top neat and avoid over-stretching the sections. If you try to force too many bubbles onto hair that’s barely long enough, the whole thing gets cramped fast.
Use a little teasing at the crown for grip, then tie the ponytail slightly lower than you think you need to. That extra inch matters. It gives the bubbles more room to sit without popping upward. And if the ends are blunt, let them hide inside the last bubble instead of pretending they’re longer than they are.
15. Jumbo Low Bubble Braid Ponytail for Thick Hair
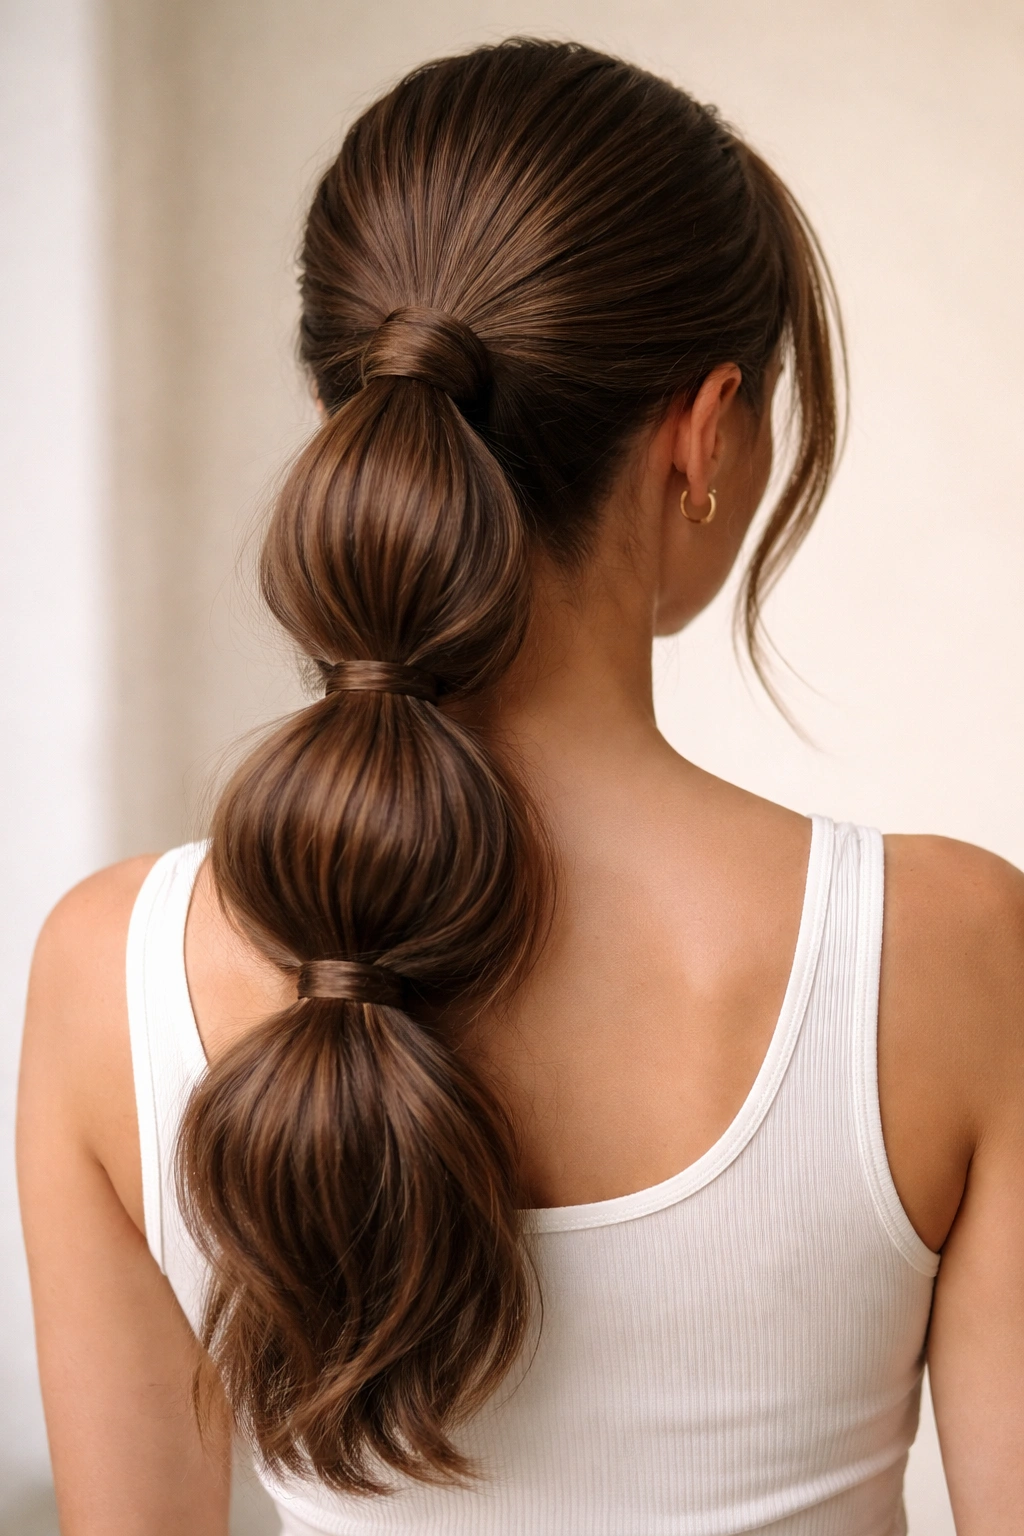
Thick hair wants fewer sections and bigger bubbles. If you try to make too many tiny bubbles, the ponytail starts to feel bulky in a bad way.
This is the version where spacing matters most. Leave more hair between elastics—sometimes 2½ to 3 inches, depending on length—and don’t tug every section too hard. Thick hair already has volume. The style works better when you shape it instead of fighting it. A braid that’s snug at the base and a few large bubbles usually look better than a dozen tiny ones.
If your hair is heavy, use stronger elastics and maybe double them at the first bubble. The base has to carry the whole style, and thick strands will pull harder than you expect. That part is easy to underestimate until the ponytail starts sagging.
16. Padded Low Bubble Braid Ponytail for Fine Hair
Fine hair usually looks best when it has a little help under the surface.
A tiny bit of backcombing at the crown, a texturizing powder near the roots, or even a slim hair pad hidden inside the first bubble can make the style look fuller. You do not need a lot. Too much teasing turns the top into a nest. Just enough lift is the target. That gives the braid something to sit on and keeps the bubbles from collapsing.
What Helps Fine Hair Most
- Use small elastics that don’t slide.
- Pull each bubble outward only a little, then stop.
- Keep the sections fewer and slightly larger.
- Finish with a light mist of flexible-hold spray instead of stiff lacquer.
The goal is shape, not fake thickness. That difference shows up fast in person.
17. Workout-Proof Sleek Low Bubble Braid Ponytail
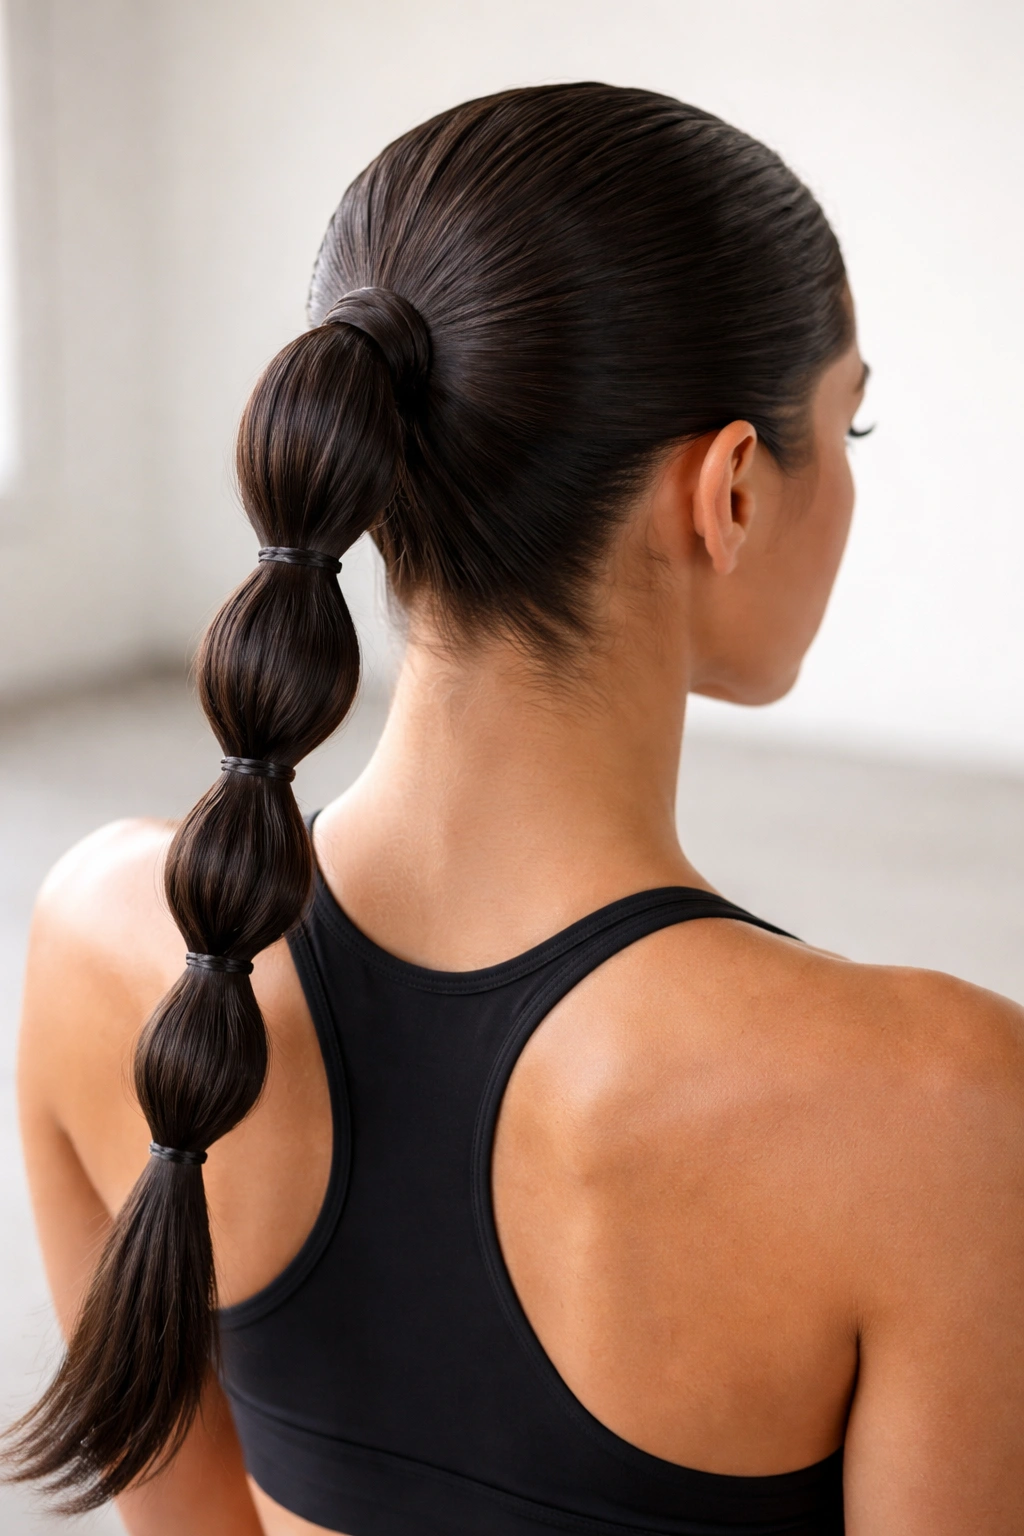
This version is about staying power first and prettiness second, though it still manages both.
The crown should be brushed flat and secured with a little gel or cream, then the braid should run tight into the low ponytail with almost no loose pieces around the face. Every elastic needs to sit snugly, and the bubbles should be smaller than you’d use for a dressy version. That keeps the ponytail close to the head so it doesn’t bounce around while you move.
I like this when I want the style to survive heat, humidity, or a long commute without much fuss. The braid protects the top from unraveling, and the bubble sections stop the tail from falling into a flat, boring line. Practical. Still cute. That’s a useful combination.
18. Pearl-Pinned Low Bubble Braid Ponytail
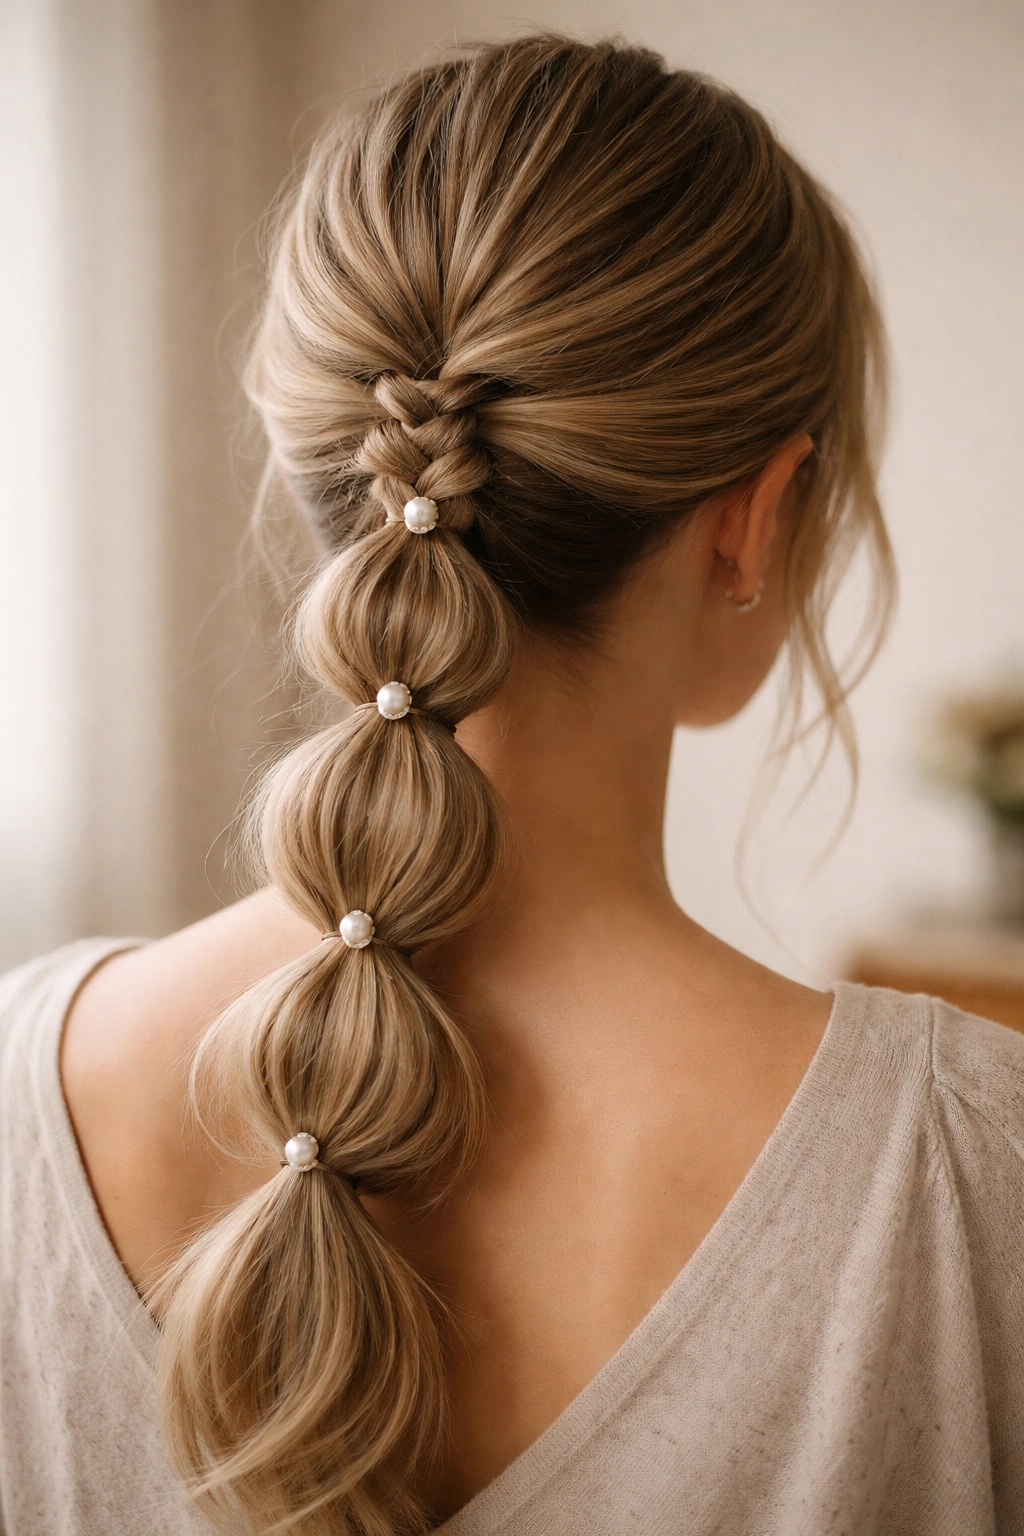
Pearl pins turn the style from simple to dressed-up in about ten seconds.
The trick is not to scatter them everywhere. A few pins placed where the braid meets the ponytail, or tucked along one side of the bubbles, is usually enough. Too many pearls start to look like craft-store overflow. Three to five small pins is plenty for most styles.
What to Watch For
The pins should follow the shape of the braid, not fight it. Place them where the eye naturally lands—near the base, between the first two bubbles, or just above the last section if you want a subtle finish. If the pins are heavy, anchor them into a braided part of the hair rather than a smooth section. That keeps them from slipping.
This is a good choice for weddings, formal dinners, or any outfit that needs a little shine without full-on sparkle.
19. Undone Low Bubble Braid Ponytail
Messy only works when it looks chosen. That’s the line here.
Start with a loose braid at the crown, then stretch the bubbles wider and allow a few shorter strands to fall free around the nape. A little dry texture spray at the roots helps the shape stay airy instead of just loose. You’re aiming for movement, not a half-done ponytail. Those are different things.
This version is useful when your hair has natural wave or curl, because you can work with the texture instead of flattening it into submission. Let the bubbles look uneven on purpose. A slightly irregular rhythm often looks more expensive than an over-pressed style that tries too hard.
20. Crisscross Elastic Low Bubble Braid Ponytail
Ever wanted the ponytail to feel a little more geometric? This is the one.
Instead of simply tying straight sections, you cross small side pieces over the ponytail before each elastic, which creates a crisscross effect along the spine of the style. It sounds fussy. It isn’t, once you get the rhythm. The pattern gives the bubble braid a woven look that stands out even when the bubbles themselves stay modest.
How to Keep the Pattern Clean
- Take the side pieces evenly so both sides mirror each other.
- Keep each crossover tight before you add the elastic.
- Use slim elastics so the pattern stays visible.
- Pause after every two sections and smooth the sides again.
This style looks best when the finish is crisp. If the crossovers are sloppy, the whole point gets lost.
21. Rope-Braid Low Bubble Ponytail
A rope braid changes the texture without adding bulk, which is useful if your hair already feels full.
Twist the two sections of hair tightly in the same direction, then wrap them around each other in the opposite direction. That gives you the rope effect before the ponytail turns into bubbles. It’s a good choice when you want something cleaner than a fishtail but less plain than a three-strand braid.
The bubbles can stay medium-sized here, and I’d keep the spacing fairly even so the rope braid at the top still feels like part of the same idea. If the twists are too loose, the style loses its shape. Tight at the root, a little softer through the tail—that’s the sweet spot.
22. Low Side Bubble Braid Ponytail
A low side ponytail changes the balance in a really satisfying way.
By shifting the base behind one ear instead of centering it, the bubbles fall over the shoulder and feel more relaxed straight away. The braid can curve into the side placement or start at the crown and drift downward. Either way, the side angle makes the style feel less formal and a little more playful.
This version is nice when you want the hair to show from the front. A center ponytail hides more than people expect. A side ponytail gives you movement across the collarbone, which looks good with one-shoulder tops, off-the-shoulder necklines, or a plain tee that needs some help.
23. Claw-Clip Accent Low Bubble Braid Ponytail
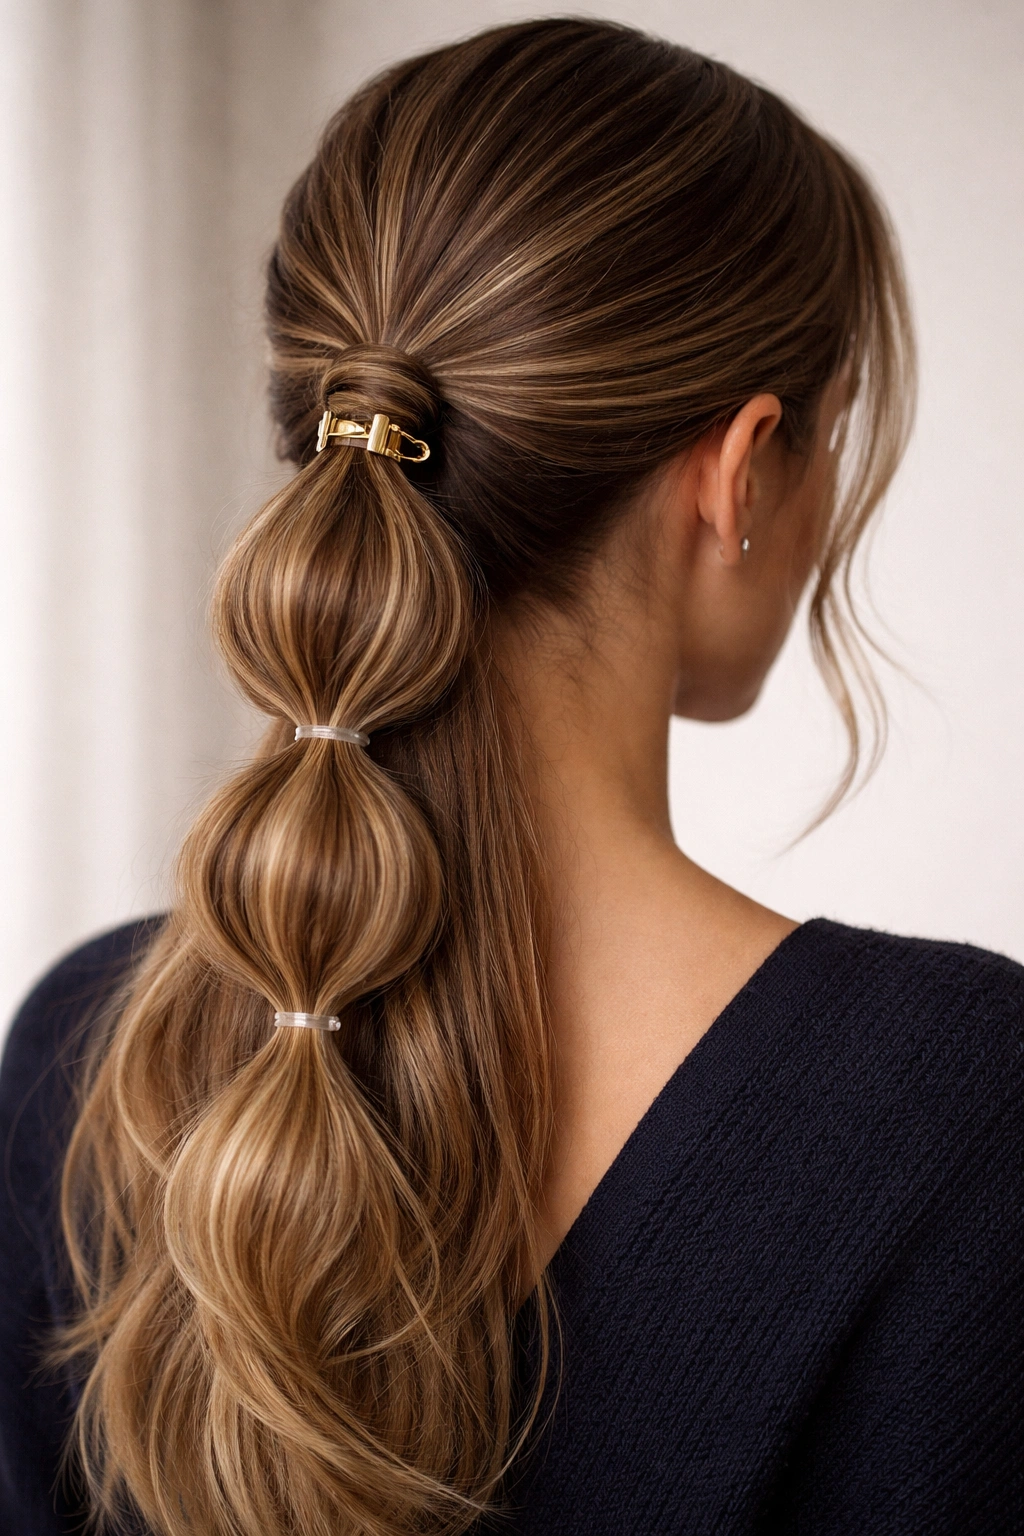
A small claw clip at the base can make the ponytail feel more current without stealing the whole show.
Use a mini clip, not a giant one. The clip should sit near the braid-to-ponytail transition or hold a small section of hair just above the first bubble. That gives you a layered look without cluttering the style. Large clips can overpower the bubbles fast, so size matters more than color here.
Where the Clip Works Best
If your hair is thick, the clip can help anchor the top section before the elastic goes in. If your hair is fine, it works better as a visual accent than as support. Either way, it adds a little edge. I like it most with matte black, tortoiseshell, or transparent clips, because those look deliberate instead of loud.
24. Low Bubble Braid Ponytail for Curly and Coily Hair
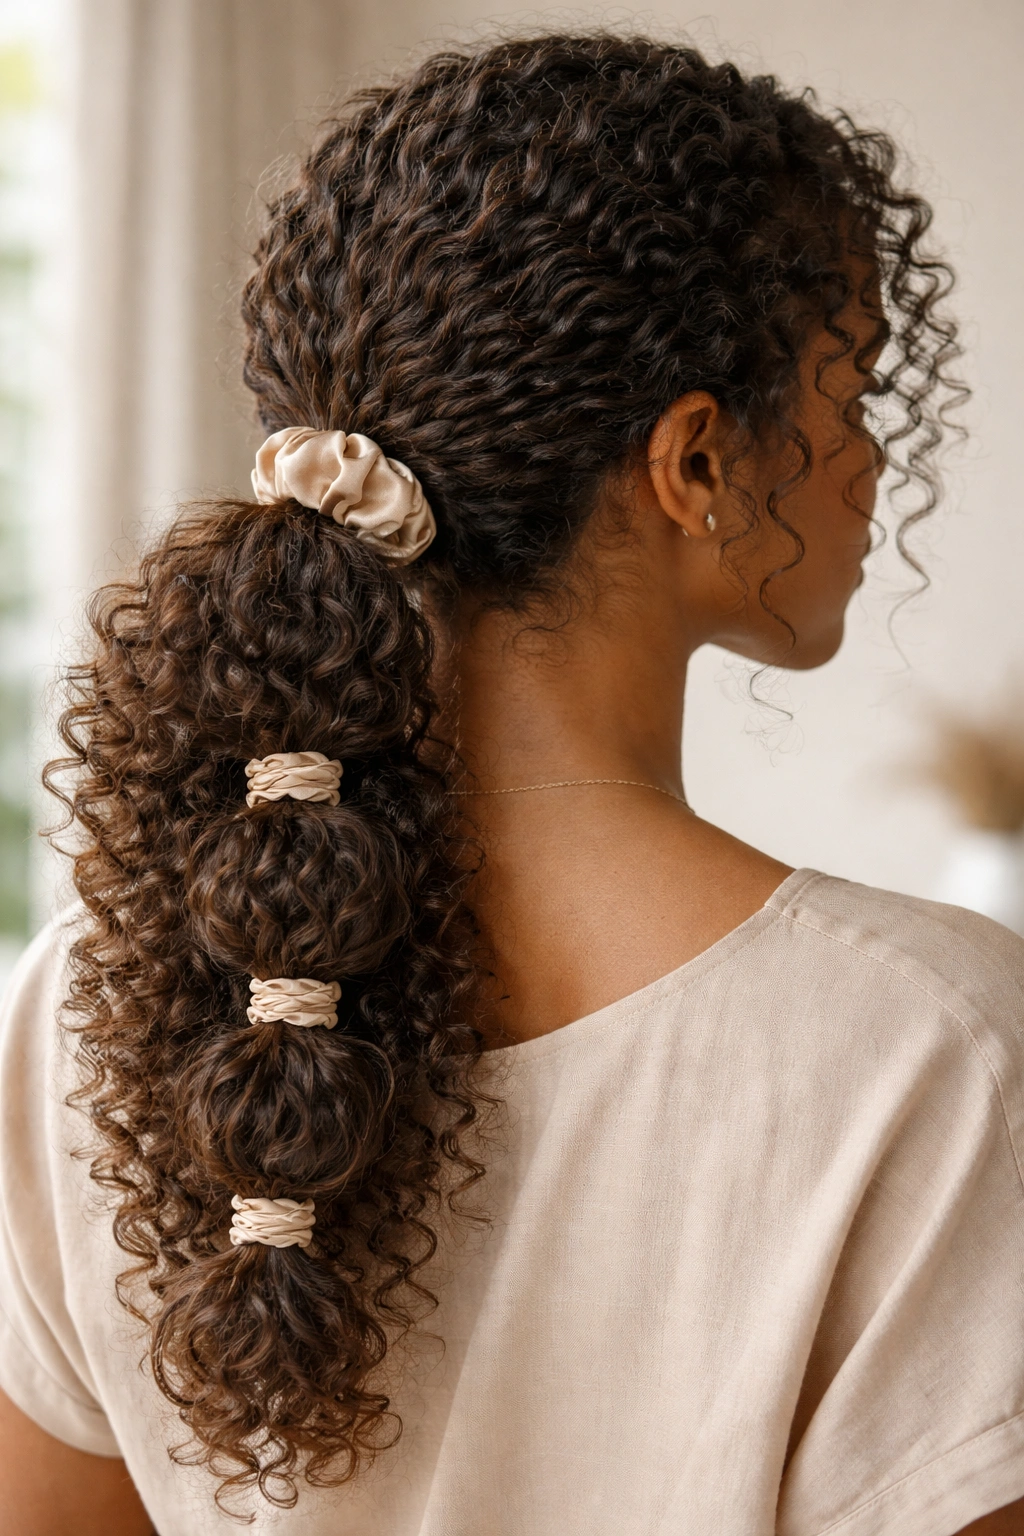
Curly and coily hair brings its own texture to the style, and that texture deserves space.
Start by smoothing the roots only where you need to, then leave the lengths textured so the bubbles can show the natural pattern. A satin scrunchie or a snag-free band is kinder than a tiny hard elastic on tightly coiled strands. You can also stretch the hair slightly while braiding to keep the base neat without flattening the curl pattern completely.
The best version of this style usually keeps the bubbles a little looser and less forced. You want the curls to stay visible in and around each section. That gives the ponytail a rich, full look that plain straight hair can’t fake. And if you do use gel at the hairline, keep it light. A hard shell at the front can make the whole thing feel stiff.
25. Metallic-Elastic Low Bubble Braid Ponytail
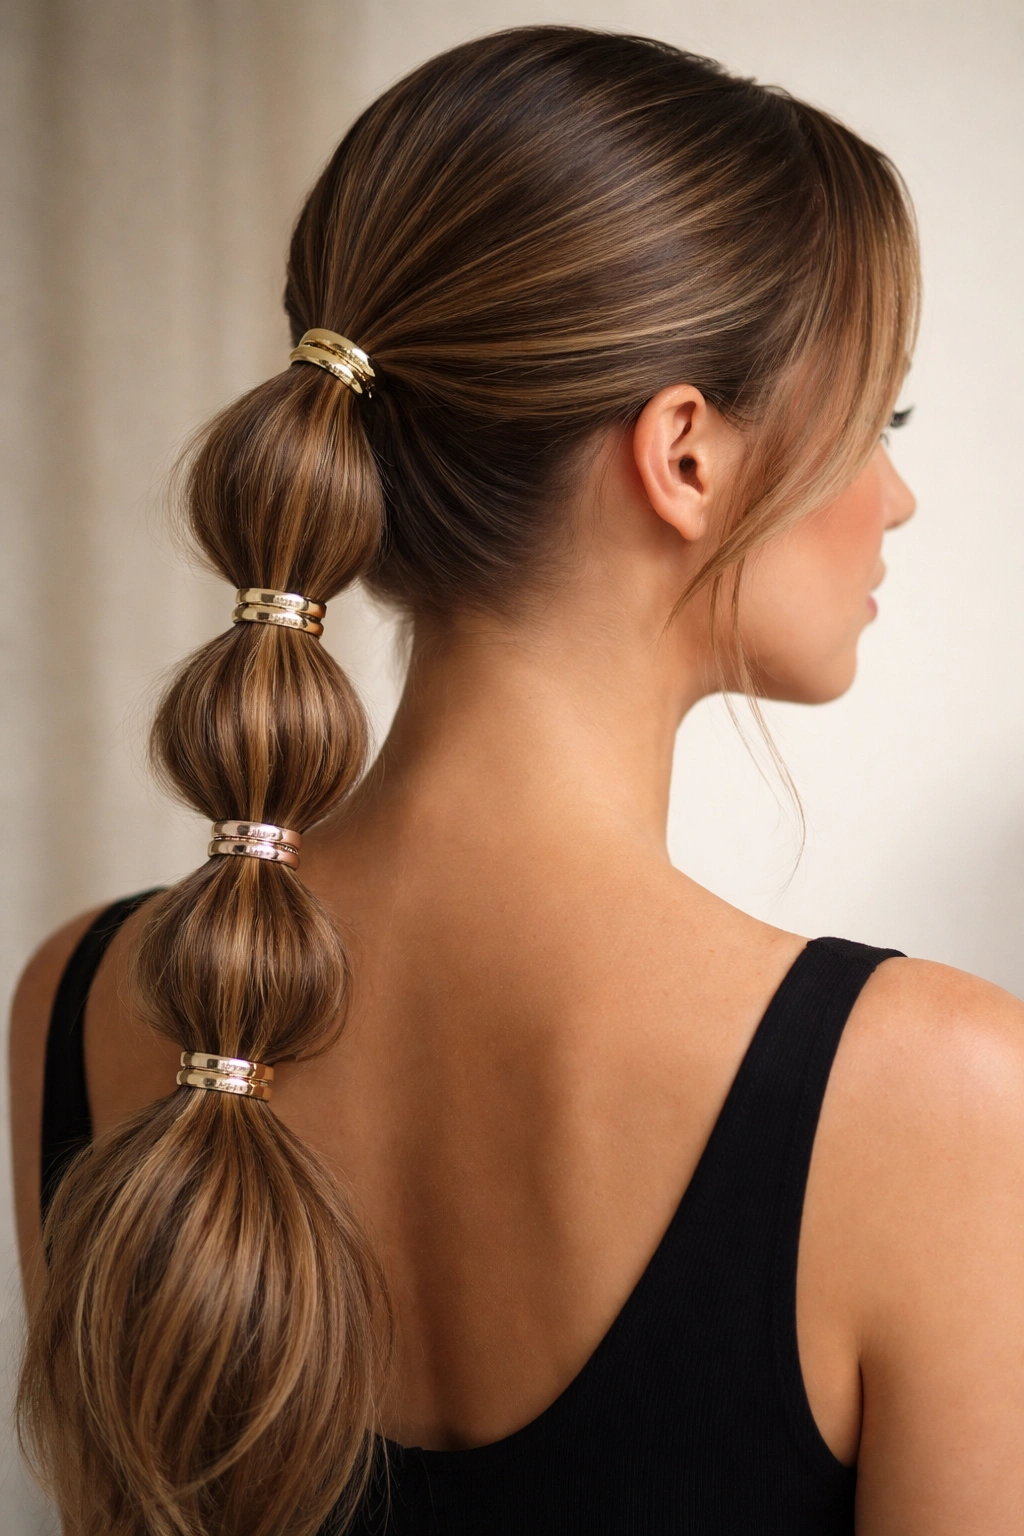
Metallic elastics are the easiest way to give the style a party mood.
Gold, silver, or rose-gold bands work best when the braid is simple enough for them to stand out. If the braid is already very detailed, the metallics can get lost. Keep the sections smooth, the bubbles even, and the shine concentrated at the ties. That’s where the eye lands first anyway.
A style like this can handle a little extra polish—maybe a smooth finish, maybe a touch of gloss spray, maybe both—but it doesn’t need full decoration. The elastics are the decoration. That’s the beauty of it. A simple bubble braid ponytail with metallic bands can look thoughtful without turning into a costume.
Final Thoughts
A low bubble braid ponytail works because it gives you control without demanding perfection. The braid at the top keeps the style anchored, and the bubble sections let you decide how polished, loose, or playful you want it to feel.
Start with the version that suits your hair’s texture instead of forcing one shape on every head of hair. Fine hair usually needs a little support, thick hair usually wants fewer sections, and curly hair often looks best when some texture is left alone. Small choices matter here. A lot.
And if you only change one thing, make it the part, the spacing, or the accessory. One clear decision is usually enough.