Curly hair and Viking hairstyles get along better than most people expect. The texture does half the work for you. It gives braids grip, gives knots bulk, and makes even a simple half-up style look like it belongs on a shield-bearer instead of in a hair tutorial.
What people miss is that Viking-inspired hair is not about making curls behave. It’s about giving them a shape. A little structure at the scalp, some roughness through the lengths, and enough looseness that the curl pattern still shows through — that’s the sweet spot. Too neat, and it starts looking stiff. Too loose, and the whole thing turns into “I meant to do something” hair.
Curly hair is also forgiving in the best way. A straight braid can look sparse if the sections are thin. Curly hair fills space. It reads bigger, fuller, and more dramatic without needing a lot of extra teasing or product. That said, the wrong braid tension can make your roots puff out in the worst possible place, so the trick is not control everywhere. It’s control in the right places.
If you want Viking hairstyles for curly hair that still look good after a few hours of moving around, sitting in a car, or tossing on a cloak, leather jacket, or plain white shirt, the details matter more than the fantasy. Parting, pin placement, braid width, curl prep — all of it changes the result. Start with the style that matches your curl pattern and your patience level.
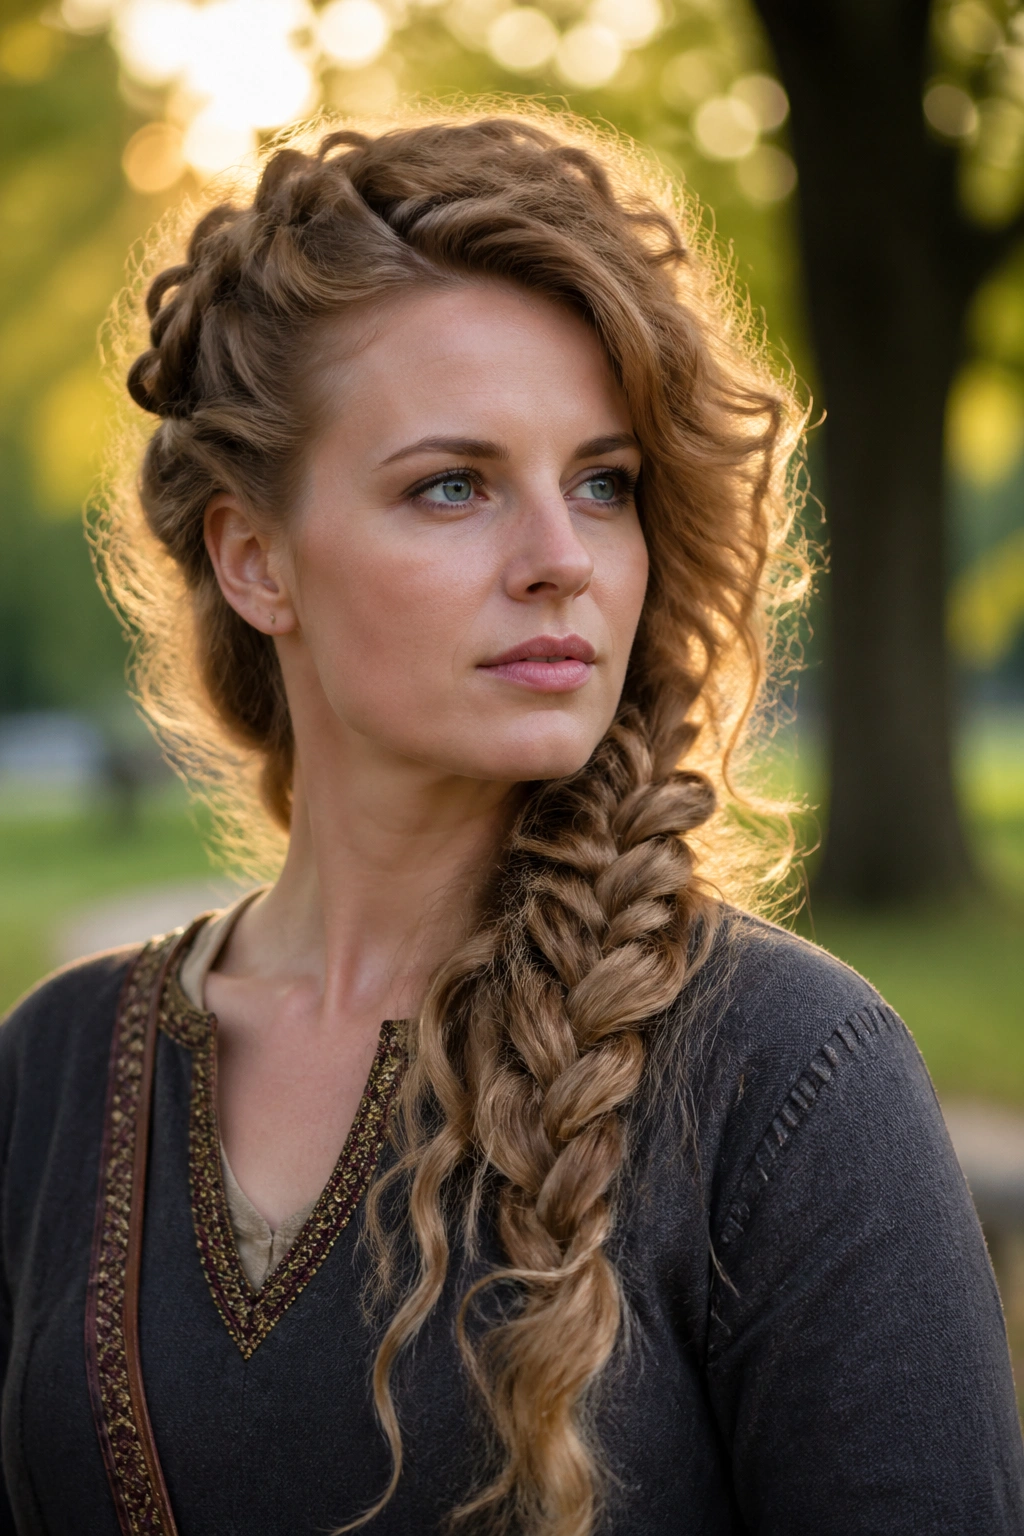
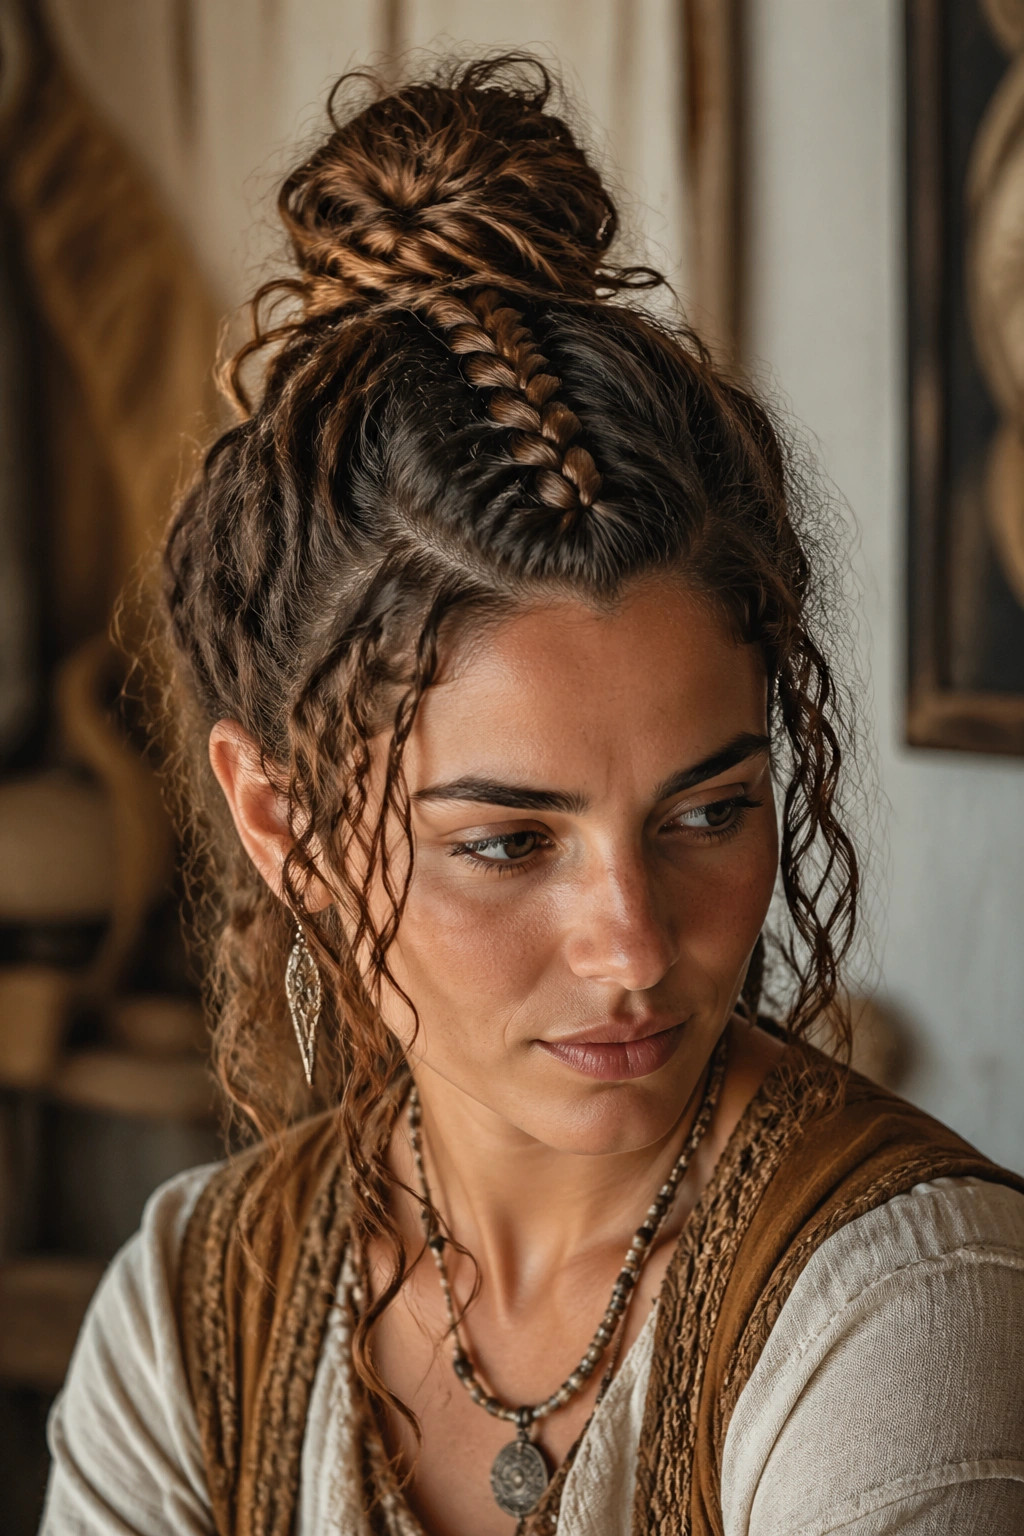
1. Half-Up Braid Crown for Curly Viking Hair
This is the easiest place to start, and honestly, one of the best-looking options too. A half-up braid crown keeps the top half of your curls under control while letting the rest of the hair stay big and loose. That balance matters. You get the Viking shape without flattening the curl pattern that makes the style work in the first place.
Why curls help here
Curly hair gives this style a built-in lift at the crown. Even if you only braid two small sections from each temple and pin them at the back, the hair looks fuller than the same style on straight strands. The crown reads as deliberate because the curls underneath keep moving and breaking up the outline.
A clean center part is the simplest route, but a slight side part works too if your curls naturally fall that way. Keep the braid sections about 1 to 1½ inches wide, and don’t over-tighten them at the scalp. You want the braid to sit snug, not pull hard enough to leave red lines behind.
Quick styling notes
- Start on damp or lightly misted curls with leave-in conditioner and a pea-size amount of curl cream.
- Braid the top sections while the hair still has a little slip; bone-dry curls fight back.
- Secure the back with two crossed bobby pins or a small clear elastic hidden under the braid.
- Leave a few curls loose around the ears if you want the style to feel less rigid.
Tip: If your hair frizzes fast, smooth only the braid sections with a tiny bit of styling gel. Leave the rest alone.
2. Curly Mohawk With Tight Sides
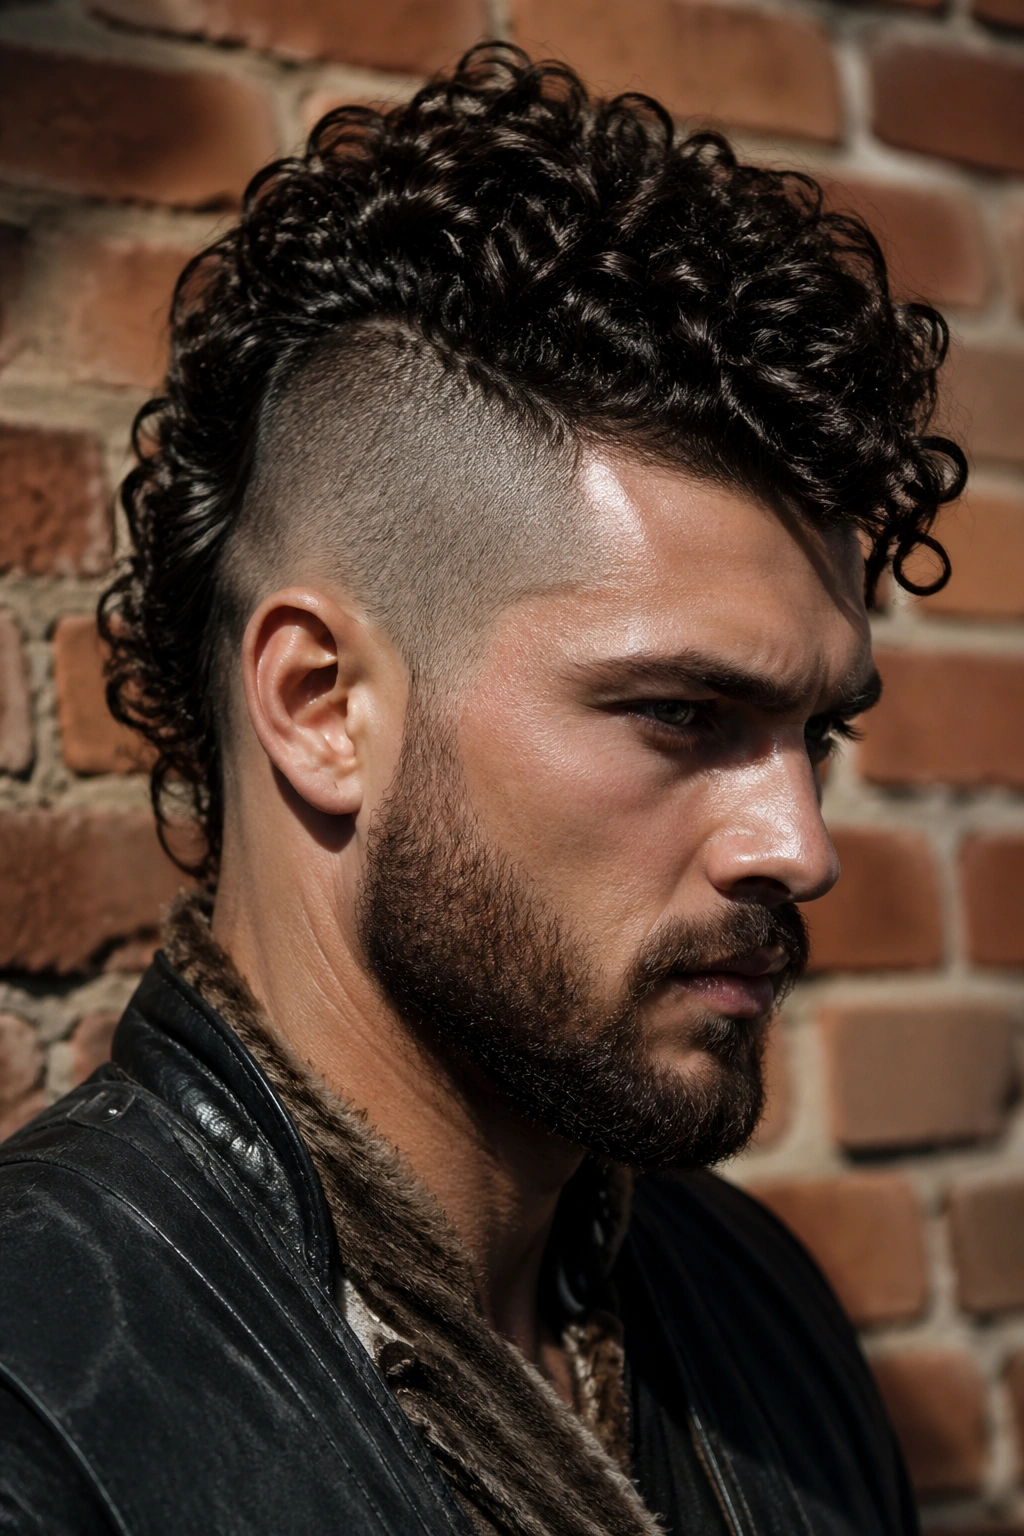
If you want the strongest silhouette in the whole group, this is it. A curly mohawk with tight sides looks sharp, rough, and a little wild in the best way. It also saves time on styling, which matters more than people admit. A bold shape is easier to keep looking good than a fussy one that falls apart by lunch.
Sharp. That is the whole point.
You can fake the side-shave effect by slicking the sides back with gel, braiding them flat against the head, or pinning them low behind the ears. If your hair is short on the sides already, even better. The center strip should stay wide enough to show off the curl pattern — think 3 to 5 inches across at the crown, depending on density.
The best part is how little precision the top needs. Let the curls stack upward, then shape them with your fingers instead of a brush. If you use a brush here, the top gets too soft and puffy. A wide-tooth comb or just your hands keeps the edges rough. That roughness is what sells the style.
For a cleaner finish, use a light-hold mousse on damp curls and diffuse upside down for 3 to 5 minutes. The root lift makes a huge difference. If your curls are denser, a tiny bit of pomade on the sides can keep flyaways from taking over. Don’t drown the style in product. It should look held together, not lacquered.
3. Single Center Braid and Loose Length
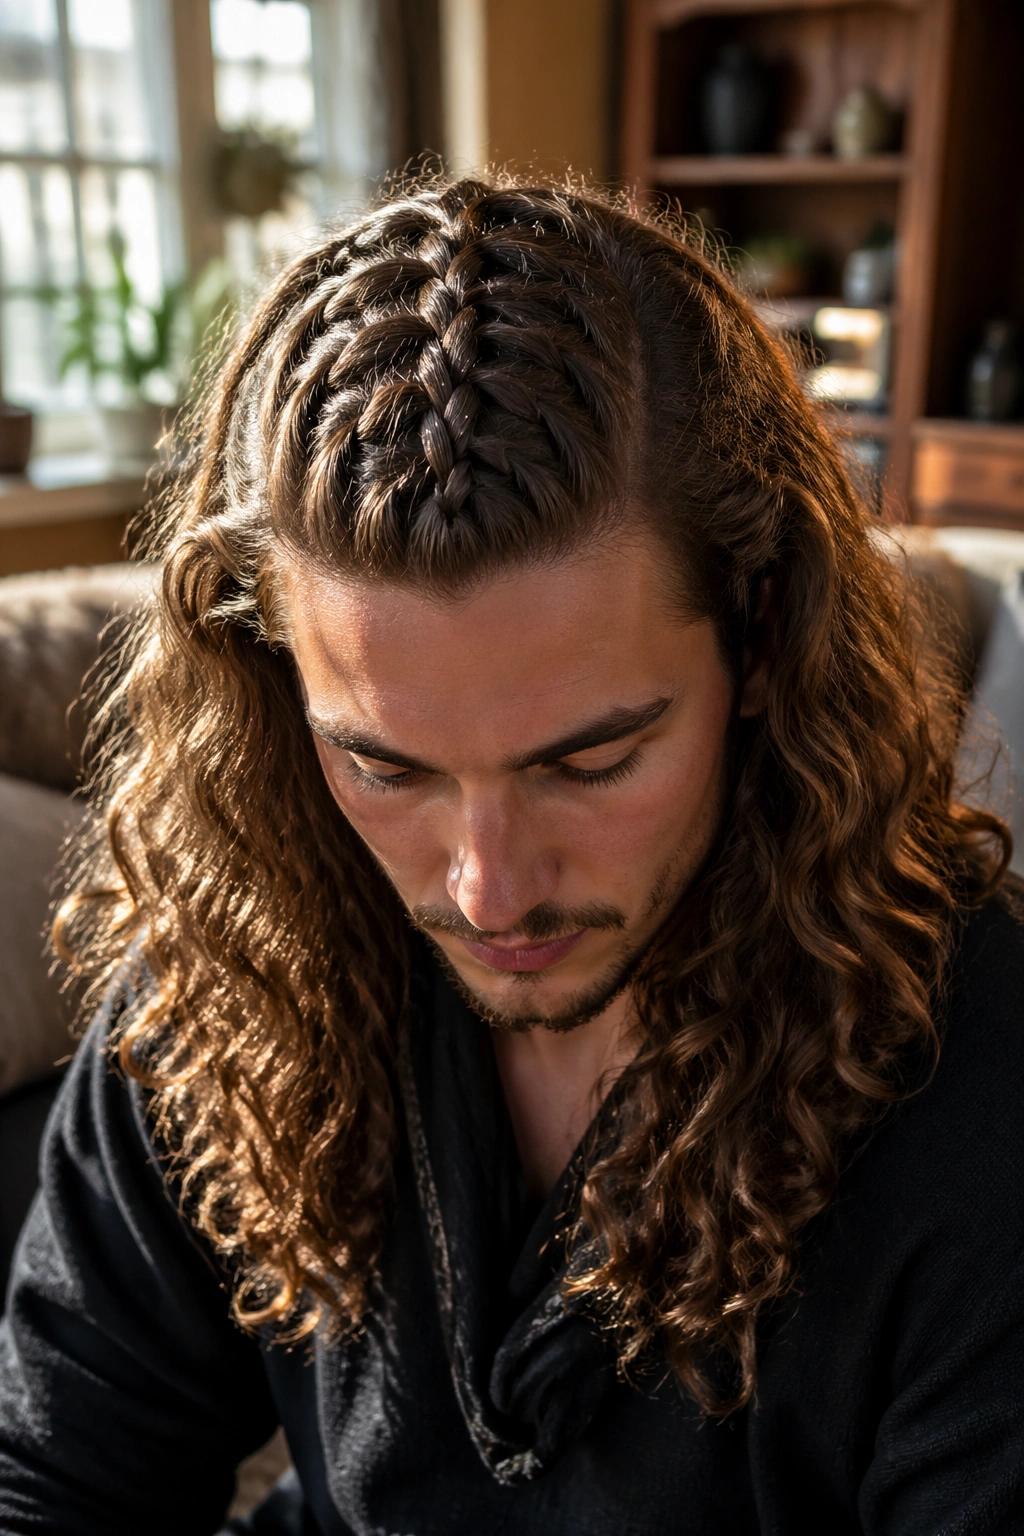
Why does one braid feel more rugged than a full head of braids? Because it gives the eye a strong line to follow, and curly hair does the rest. A single center braid down the top or through the middle can look surprisingly old-world, especially when the lengths around it stay loose and textured.
This style works best when you want the hair out of your face without losing the bulk of your curls. Braid a strip from the front hairline back toward the crown, or take the braid all the way to the nape if your hair is long enough. Keep the braid centered by using your nose as a guide in the mirror — sounds odd, works well. If the braid drifts left or right, it reads messy instead of intentional.
How to keep it centered
- Part the hair with the point of a rat-tail comb or the end of a styling brush.
- Take the first braid section from a line about 1 inch wide.
- Check the mirror after the first three crosses, not after the whole braid is finished.
- Stop pulling once the braid sits flat at the scalp; the curls will add bulk on their own.
A leather tie at the end looks good here, but a small clear elastic works if you want the braid to disappear into the hair. Leave the rest of the length loose and finger-separate the curls so they don’t clump into one heavy mass. That little separation makes the style look fuller. And yes, fuller is better here.
4. Double Braids Pulled Back Into Curls
Picture second-day curls that keep sliding into your face. This style fixes that without making the whole head look pinned down. Two braids from the temples, pulled back and stopped around mid-head or mid-length, give you that warrior look while letting the bottom half of the curls keep their shape.
The trick is symmetry, but not perfection. The braids do not need to be identical down to the millimeter. They just need to mirror each other enough that the eye reads them as a pair. Start each braid about 2 inches above the ear, then angle them back toward the crown. If your hair is thick, keep the braid sections narrow. Big sections make the front look bulky fast.
A style like this benefits from a little grit in the hair. Freshly washed curls can be too slippery, which makes the braids slide. Day-two hair, or hair with a touch of dry shampoo at the roots, holds better. If the ends are especially springy, leave the last 4 to 6 inches loose instead of braiding all the way down. The loose curls soften the look and keep it from turning too stiff.
The whole style works because it mixes control with movement. The top stays put. The bottom keeps bouncing. That contrast is what gives it some edge.
5. Braided Bun With Curly Ends
A braided bun is the style I reach for when I want the hair off my neck but still want the braid to show. On curly hair, it has a nice built-in messiness that never looks accidental if you place the bun well. The braid provides the spine. The curls supply the shape.
Start with a high or mid ponytail, depending on how much height you want. Braid the ponytail to the ends, then twist it around itself into a bun. If your curls are long and springy, let the last inch or two peek out on purpose. That little bit of texture keeps the bun from looking too severe. On shorter curly hair, you can tuck the ends under and pin them flat, but don’t smooth everything until it disappears. The style needs some life.
A bun like this can sit tight and compact, or it can be spread out with your fingers for a bigger, looser shape. I prefer the second version. It feels more natural. Use 3 to 5 bobby pins, crossing them into the braid rather than jabbing them straight into the bun. That gives you better hold and fewer pins slipping out later.
Do not saturate the hair with gel before you twist it up. Curly hair in a braided bun looks better when the surface has a little texture. Too much product turns the edges hard and shiny, and that is not the mood.
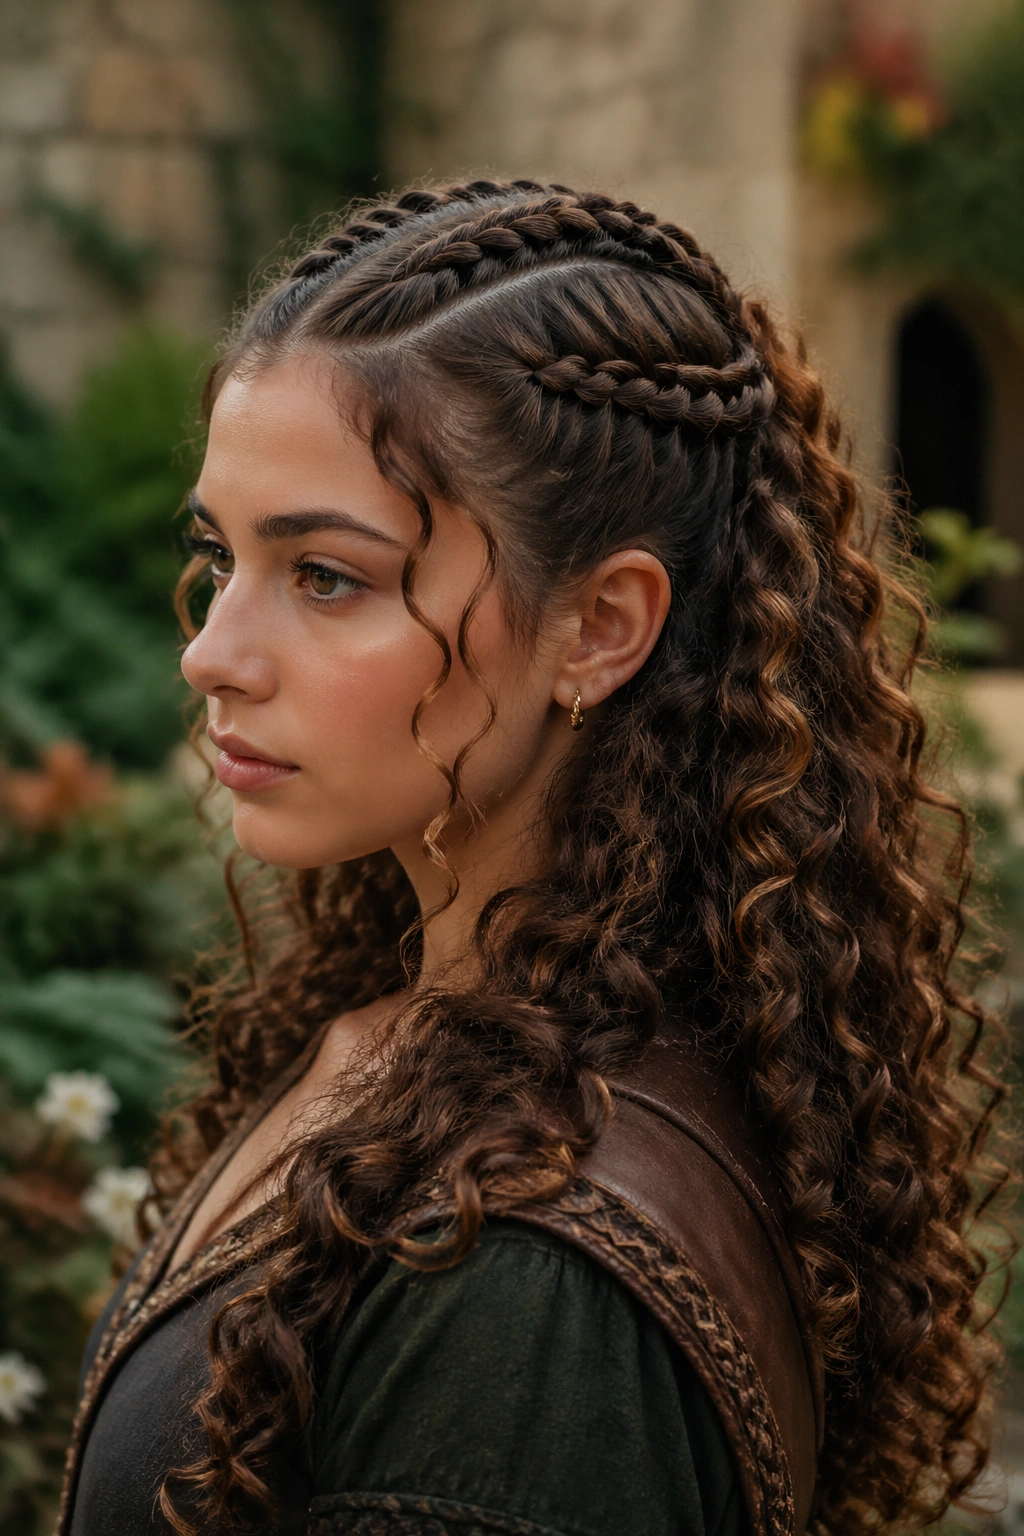
6. Side Braid and Swept-Over Volume
Unlike a center braid, a side braid gives you a cleaner diagonal line and a little more drama across the face. It also plays nicely with curly volume, which is why I keep coming back to it. The shape feels strong without needing a lot of accessories or complicated sectioning.
This is a good choice if your curls naturally fall to one side. Fight that, and you’ll spend the whole day fixing it. Work with it instead. Build a deep side part, then braid the heavier side from the front hairline toward the ear, letting the rest sweep over the opposite shoulder. The braid can be tight at the scalp and looser through the length, or it can stay uniform the whole way down. Both work. The first version feels rougher and more Viking-inspired; the second looks softer and more polished.
If you have a round face, the diagonal line can add some length. If your face is longer, keep the braid lower so it does not stretch the look upward too much. That sounds fussy, but it’s the kind of detail that makes a style land.
A side braid also works when your curls are uneven on different days. One side can look fuller than the other and the braid still hides most of it. Use a small tie at the end, then fluff the opposite side with your fingers. Easy. Clean. No drama beyond the good kind.
7. Undercut With a Curly Top
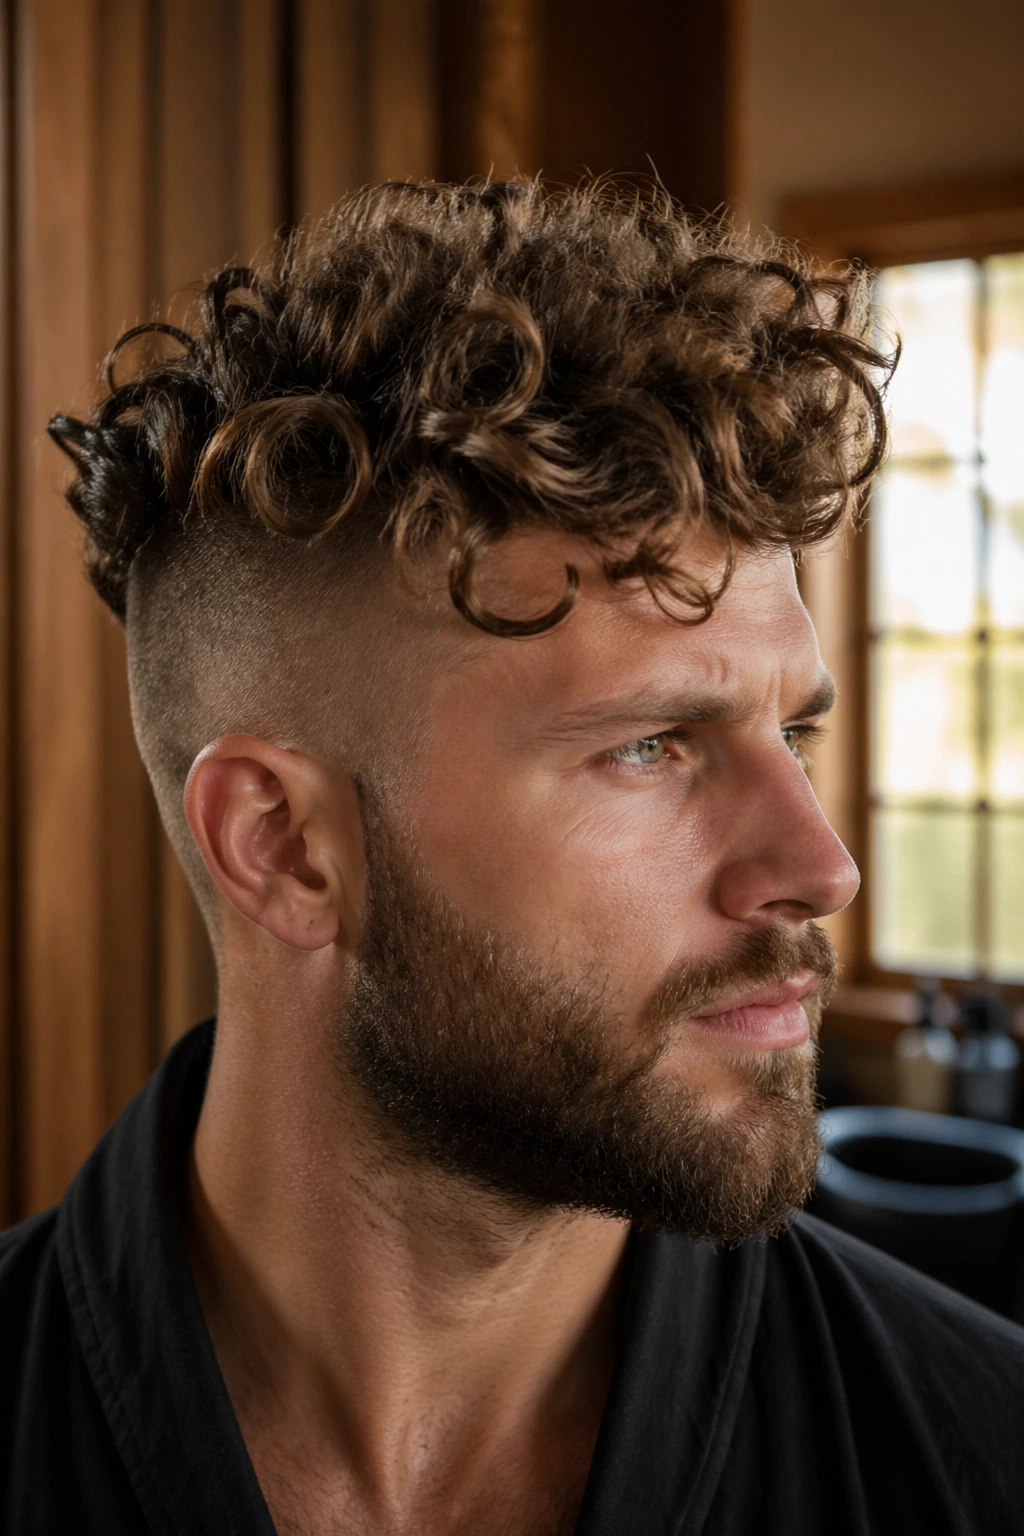
An undercut changes the whole equation. Once the sides are clipped short, the curls on top get all the attention, and the Viking shape becomes much easier to read. It’s a strong look, and it stays strong even when the top gets a little messy.
What the undercut solves
The biggest problem with curly Viking styles is bulk in the wrong places. An undercut removes that extra width from the sides and back, so the top curls can rise instead of spreading out. That gives the style height, which looks especially good if your curls are dense or springy.
If you’re asking a barber for this, a #2 or #3 guard on the sides is a practical starting point. You can go shorter, but you can’t undo it quickly, so do not rush the clipper decision. Leave the top long enough to braid or twist — at least 4 inches for smaller braids, more if you want a full top knot or mohawk shape.
How to style the top
- Apply curl cream or light mousse to damp hair.
- Scrunch upward, not outward.
- Diffuse on low heat, or air-dry and finger-lift the roots.
- Add one braid, a top knot, or a small series of twists across the front.
The undercut can feel bold at first. It is. But that’s part of the appeal. The contrast between the shaved sides and the curly top gives the whole style a harder edge than a full-length braid ever will. If you want one hairstyle that looks finished with almost no daily fuss, this is hard to beat.
8. Twin Warrior Braids
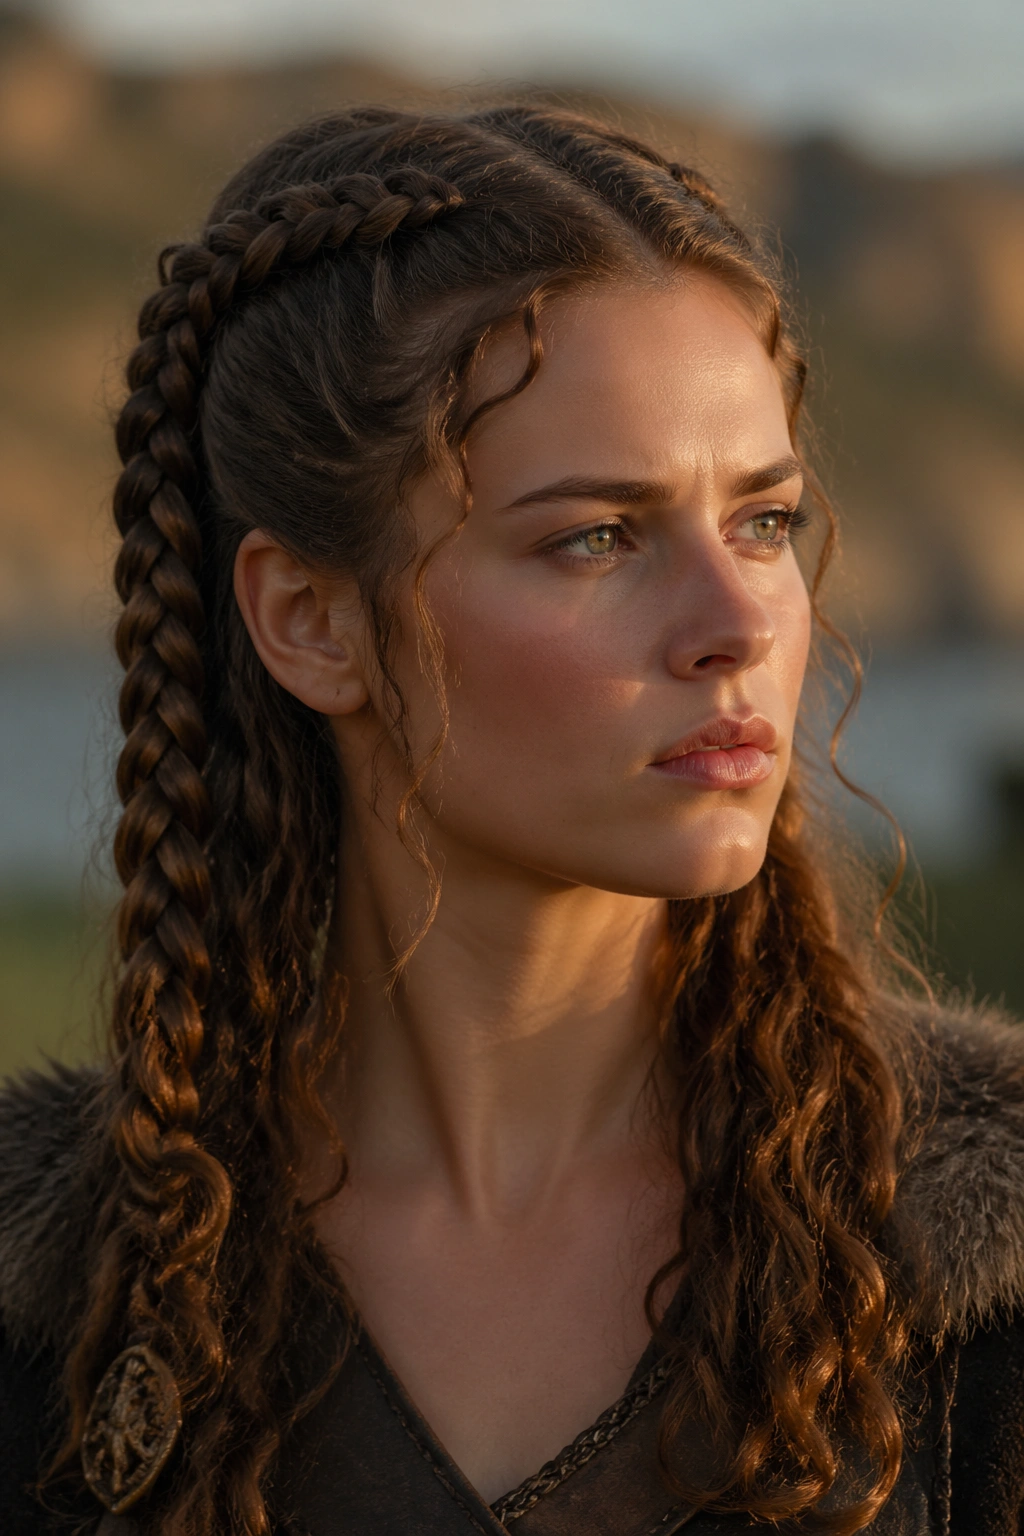
Two braids down the sides read instantly as warrior hair. There’s no guessing. The silhouette is strong, the center stays open, and curly texture keeps the style from looking too tidy. I like this on shoulder-length hair just as much as on long hair, because the structure shows up fast.
Tight, not painful.
That matters more than people think. Braids pulled too hard at the scalp can give you a headache by mid-afternoon, especially on dense curls that already have some weight at the roots. Keep the tension firm enough that the braid lies flat, but stop before the hairline starts to feel tight. If the braid hurts while you’re putting it in, it’s already too much.
A pair of Dutch braids looks more sculpted than plain three-strand braids, and that extra texture can help if your curls are soft or slippery. If your hair is coarse, a regular braid may hold better and look rougher. Either way, you can tie the ends with leather cords or small elastics. A few tiny beads near the ends can work too, but I’d keep them sparse. Too many accessories start to look costume-y fast.
- Best on hair that reaches at least the shoulders
- Holds well with second-day curl texture
- Looks strongest when the parts are clean and the braid tension is even
- Works well with a center part or two slightly offset parts
This style has a blunt honesty to it. That’s why it works.
9. Rope-Twist Ponytail
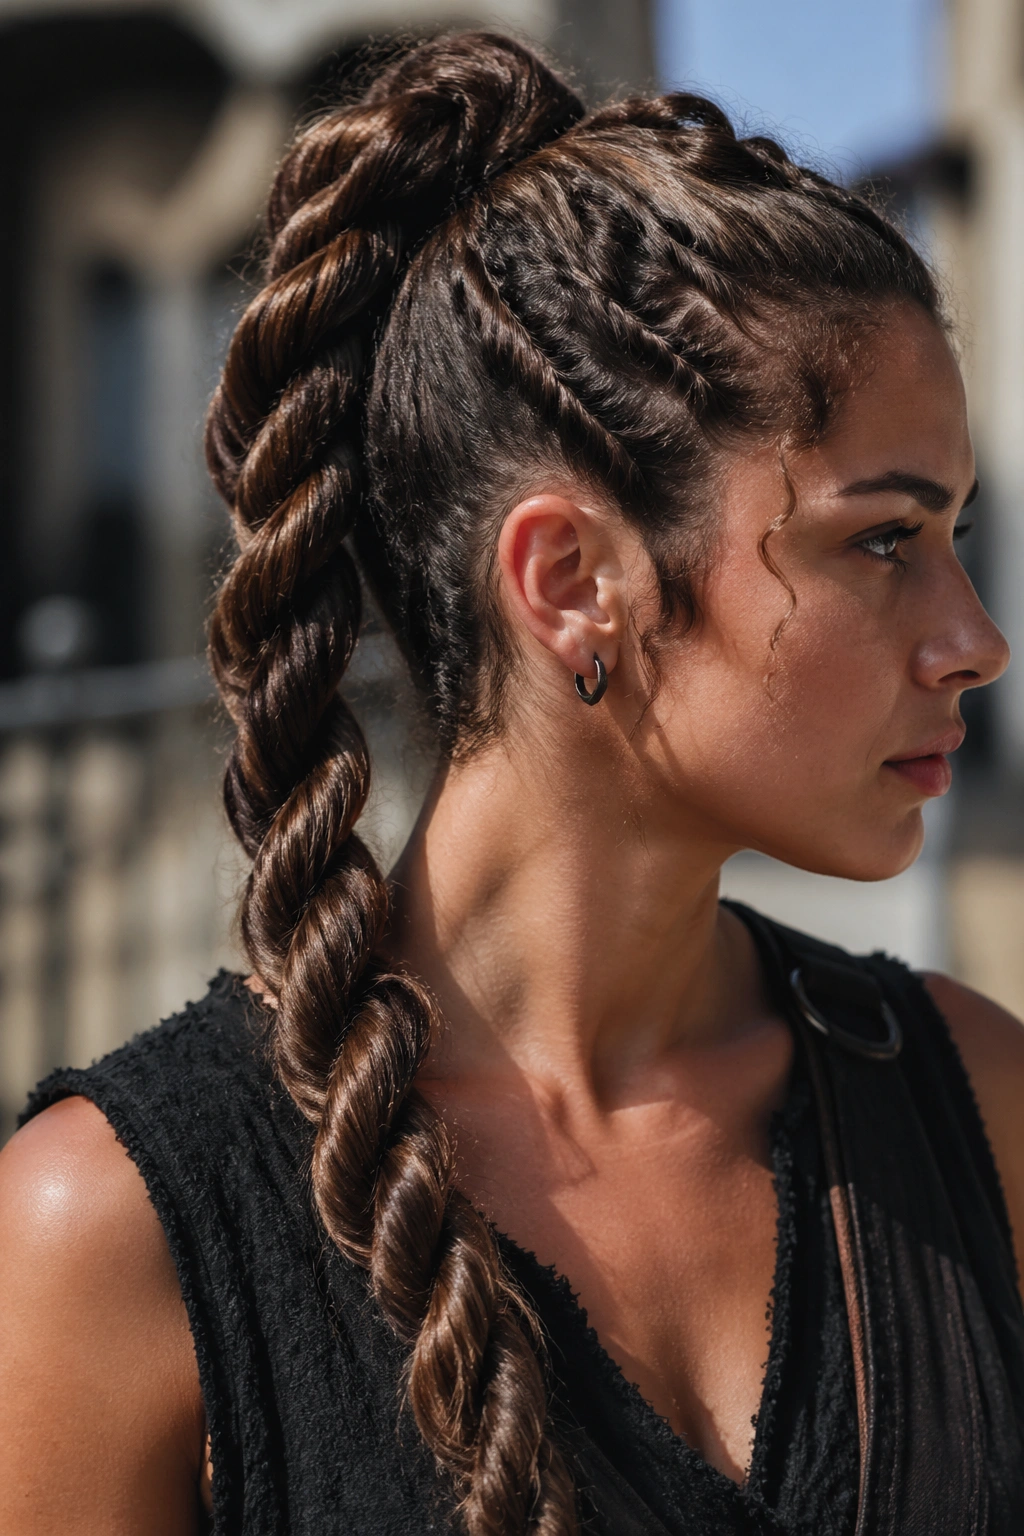
Rope twists are the sleeper pick here. They take less hand skill than a braid, they hold texture well, and curly hair makes them look thicker than they actually are. If you want a Viking-inspired style that feels faster than a full braid but still has shape, this is a smart move.
Start with a mid or high ponytail. Split the ponytail into two equal sections, twist each section in the same direction, then wrap them around each other in the opposite direction. That opposite-direction move is the whole trick. It keeps the twist from unraveling. Secure the end with a small elastic, then tug the outer edges a little to widen the rope. Don’t pull so hard that the twist loses its grip.
The style looks especially good when your curls have some dry texture in them. Freshly washed curls can be too soft, and the rope twist will puff apart. If that happens, a light mist of water mixed with leave-in conditioner — just enough to dampen the lengths, not soak them — can give the hair a little more control before you twist.
The end result is less formal than a braid and less slick than a ponytail. That in-between feel is useful. It works for long days, outdoor events, or any time you want the hair back without losing the rough shape that makes Viking hairstyles for curly hair so satisfying.
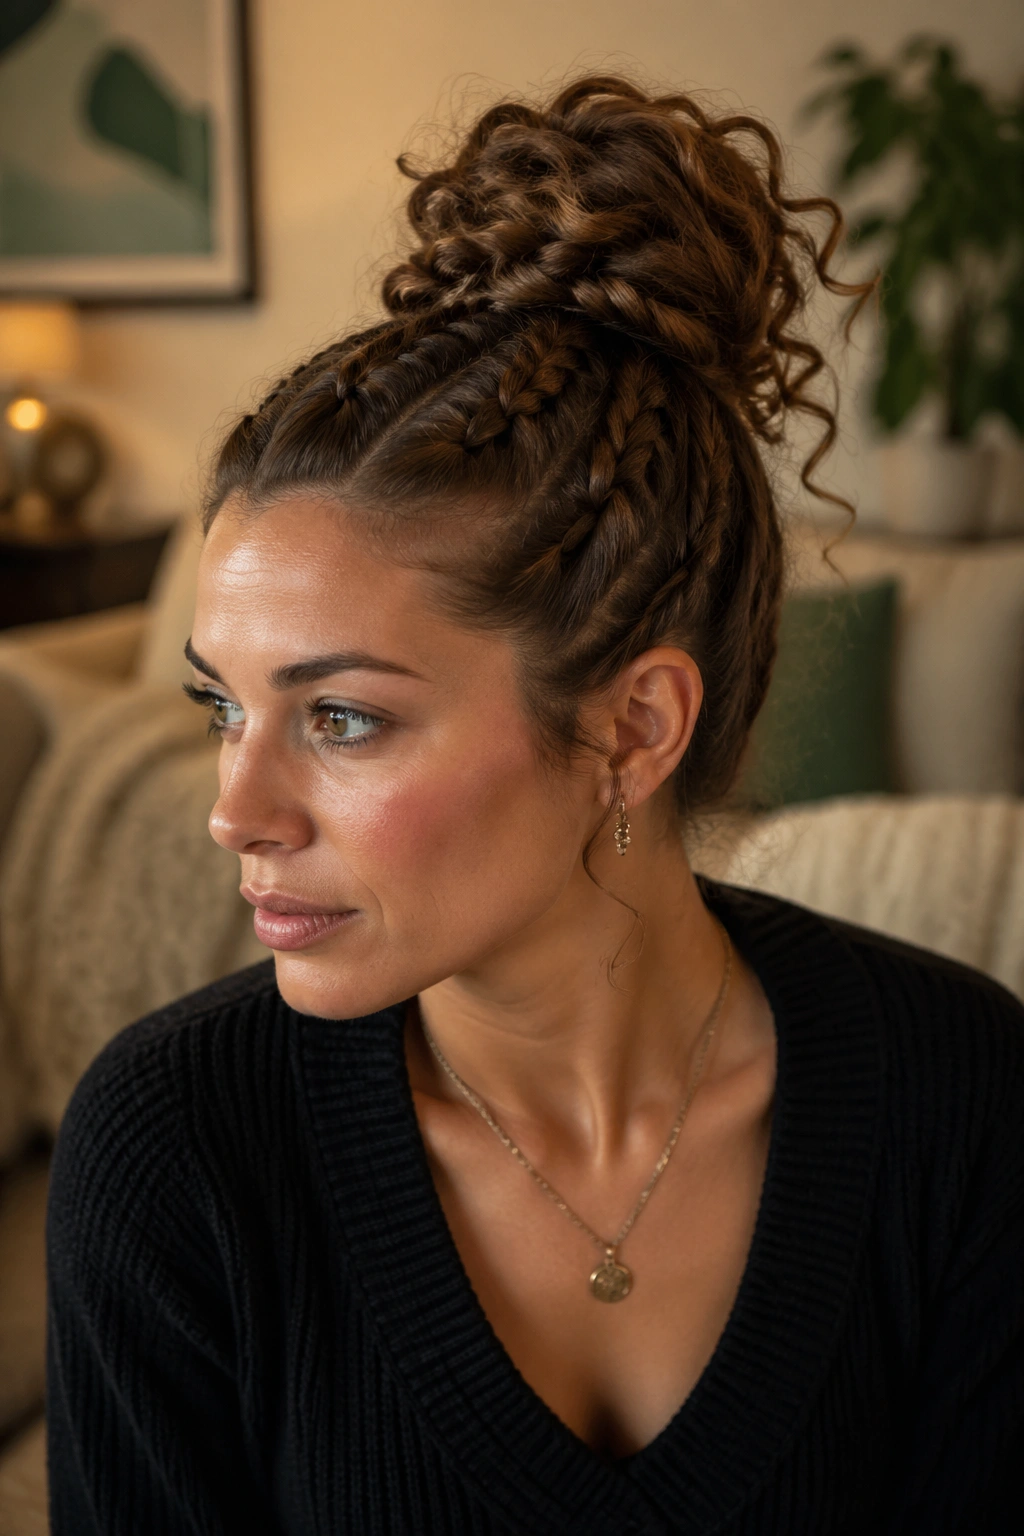
10. Braided Top Knot
Can a top knot still look rough and raw instead of polished? Yes, if you let the curls do some of the work. A braided top knot keeps the hair out of the way but avoids the flat, tight shape that can make buns look generic. On curly hair, it gets a little height and a little mess, which is exactly where the style starts to feel right.
The best version begins with a small braid at the front or center top, then gathers into a knot high on the crown. You do not need to braid the whole head. In fact, that can make the knot too heavy. One braid through the front strip is enough to anchor the style visually. After that, twist the remaining hair into a knot and pin it with at least 3 bobby pins or two strong U-pins crossed through the base.
How to stop the knot from collapsing
Use a small amount of texturizing product at the roots before you gather the hair. That gives the knot a better grip. If your curls are very soft, lightly backcomb the base with a tail comb — just two or three strokes, not a full tease. Then twist the knot loosely and pin it from several angles.
A top knot like this looks best when a few curls escape around the hairline. Let them. Those pieces soften the shape and keep the style from turning rigid. If the knot sits a little off-center, I’d actually leave it. Perfect symmetry can make the style feel stiff, and this one does better with a rough edge.
11. Loose Face-Framing Braids

Small braids at the temples do a lot of work for very little effort. That’s the appeal. You get the Viking nod right where people see it first, but the rest of the curls stay loose, so the style never feels heavy. For curly hair, that’s a win.
This is the look I’d choose when you want a subtle version instead of a full costume moment. Two slim braids, one on each side, or even one braid on the heavier side of your part, can shift the whole mood of the hair. Keep the braids narrow — about the width of a pinky finger or a little wider — so they don’t overpower the curl pattern. The loose hair around them should remain soft and springy.
A few small metal rings or leather ties can make the braids feel more finished, but you only need one or two. Add too many, and the style starts to fight itself. The appeal here is restraint. The braids frame the face, the curls fill the rest, and the eye gets a clear line without losing movement.
Best part: this style hides the days when your roots are a little flat and your ends are a little frizzy. It doesn’t need perfection. It needs shape.
12. Crown Braid With Free Curls

The crown braid is the one that starts calm and ends louder than expected. You braid around the head, keep the hairline controlled, and leave the rest of the curls free underneath or behind the braid. On curly hair, that contrast looks rich, not fussy. The braid creates the outline. The curls make it feel alive.
Keeping the crown from sagging
A crown braid needs grip, so slightly lived-in hair is better than squeaky-clean hair. If your hair was just washed, add a little mousse or dry texture spray at the roots before braiding. That helps the sections stay where you put them. Pin every 2 inches or so along the hidden side of the braid, and slide the bobby pins under the braid rather than on top of it.
The braid itself can be a full wrap or a partial halo, depending on length. A partial halo is easier if your curls are thick or if your arms get tired halfway through. A full crown takes more patience, but it gives the most finished shape. Either way, keep the braid a touch looser than you think you should. Curly hair expands, and a too-tight crown can start to look narrow once the curls settle.
If you want the style to read more Viking than bridal, leave a few stronger curls out at the nape or along the temples. That rough edge matters. It stops the braid from feeling too precious. And that, to me, is the whole point of Viking hairstyles for curly hair: they should look intentional, not sealed in place. Give the curls room, give the braid a shape, and let the style breathe a little.