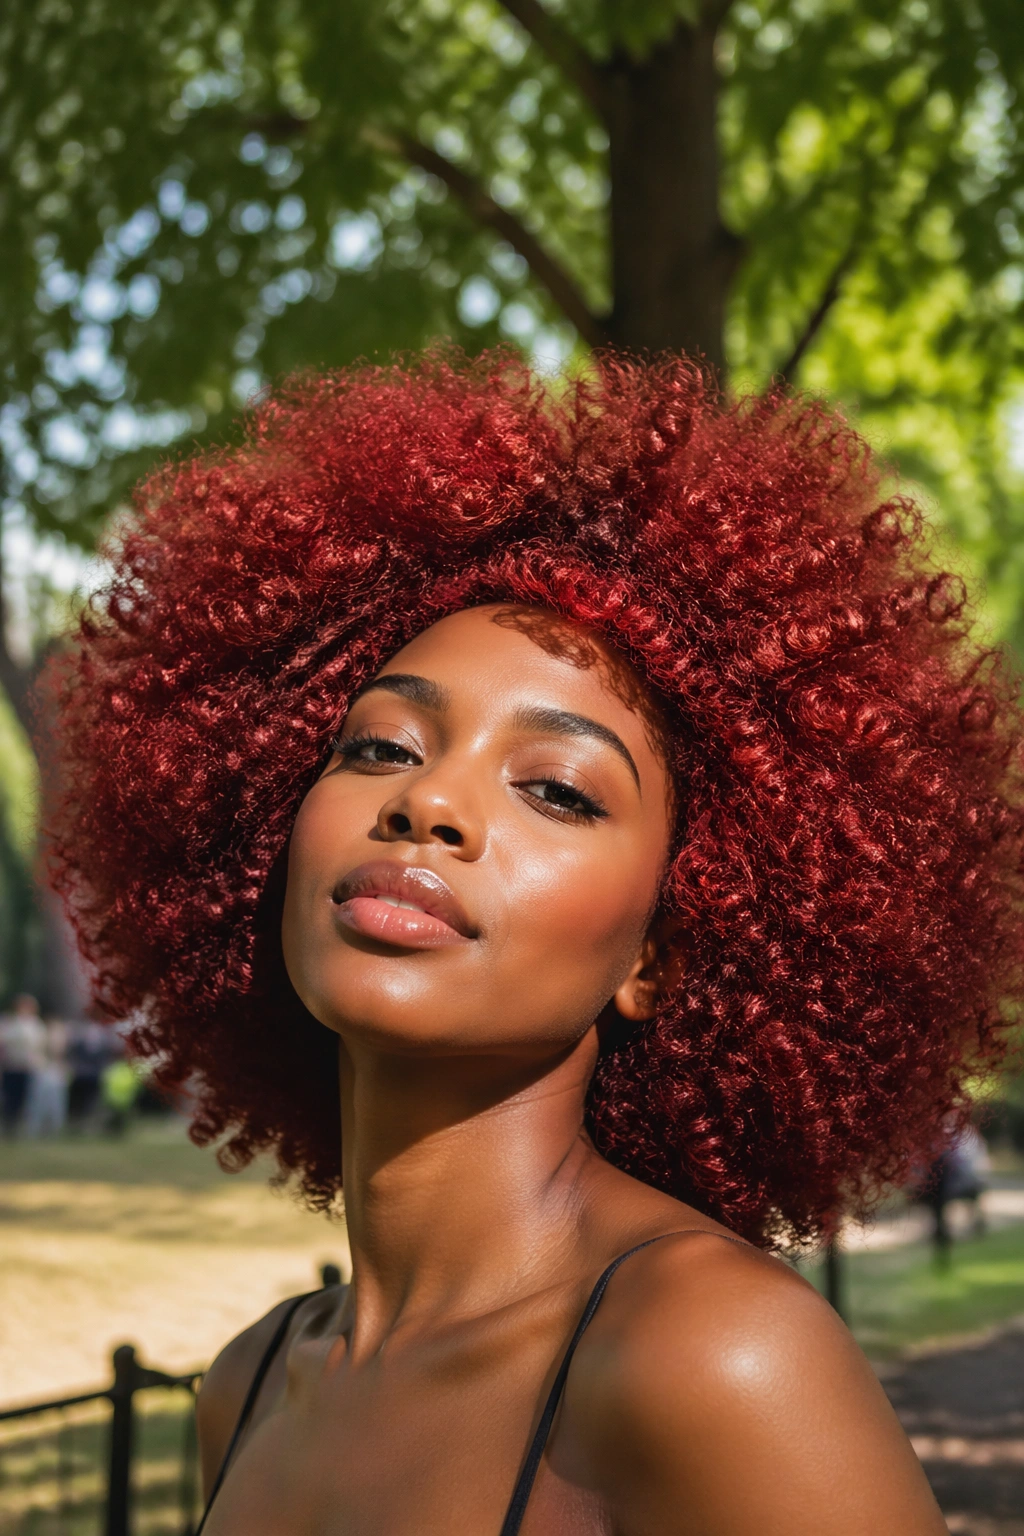
A red lace front wig on curly hair can look expensive in five minutes or a little costume-y by lunch. The difference usually comes down to the part, the curl pattern, and how much shine you leave on the lace.
The best red lace front wig styles for curly hair do one simple thing: they let the color and the curl shape support each other. Cherry red, burgundy, copper, and wine all read differently once you add coils, ringlets, or loose waves, and that’s why the same wig can feel soft one day and bold the next.
I also think the lace matters more than people admit. A 13×4 or 13×6 front gives you room to push curls off the face, carve out a clean side part, or fake a little extra scalp space when the density is high. Tiny part space and tight curls can fight each other. A wider lace area gives you breathing room.
The smartest styles aren’t the ones with the most going on. They’re the ones that make the red look rich, the curls look deliberate, and the hairline look like it belongs there. The first place I start is the part, because it changes everything.
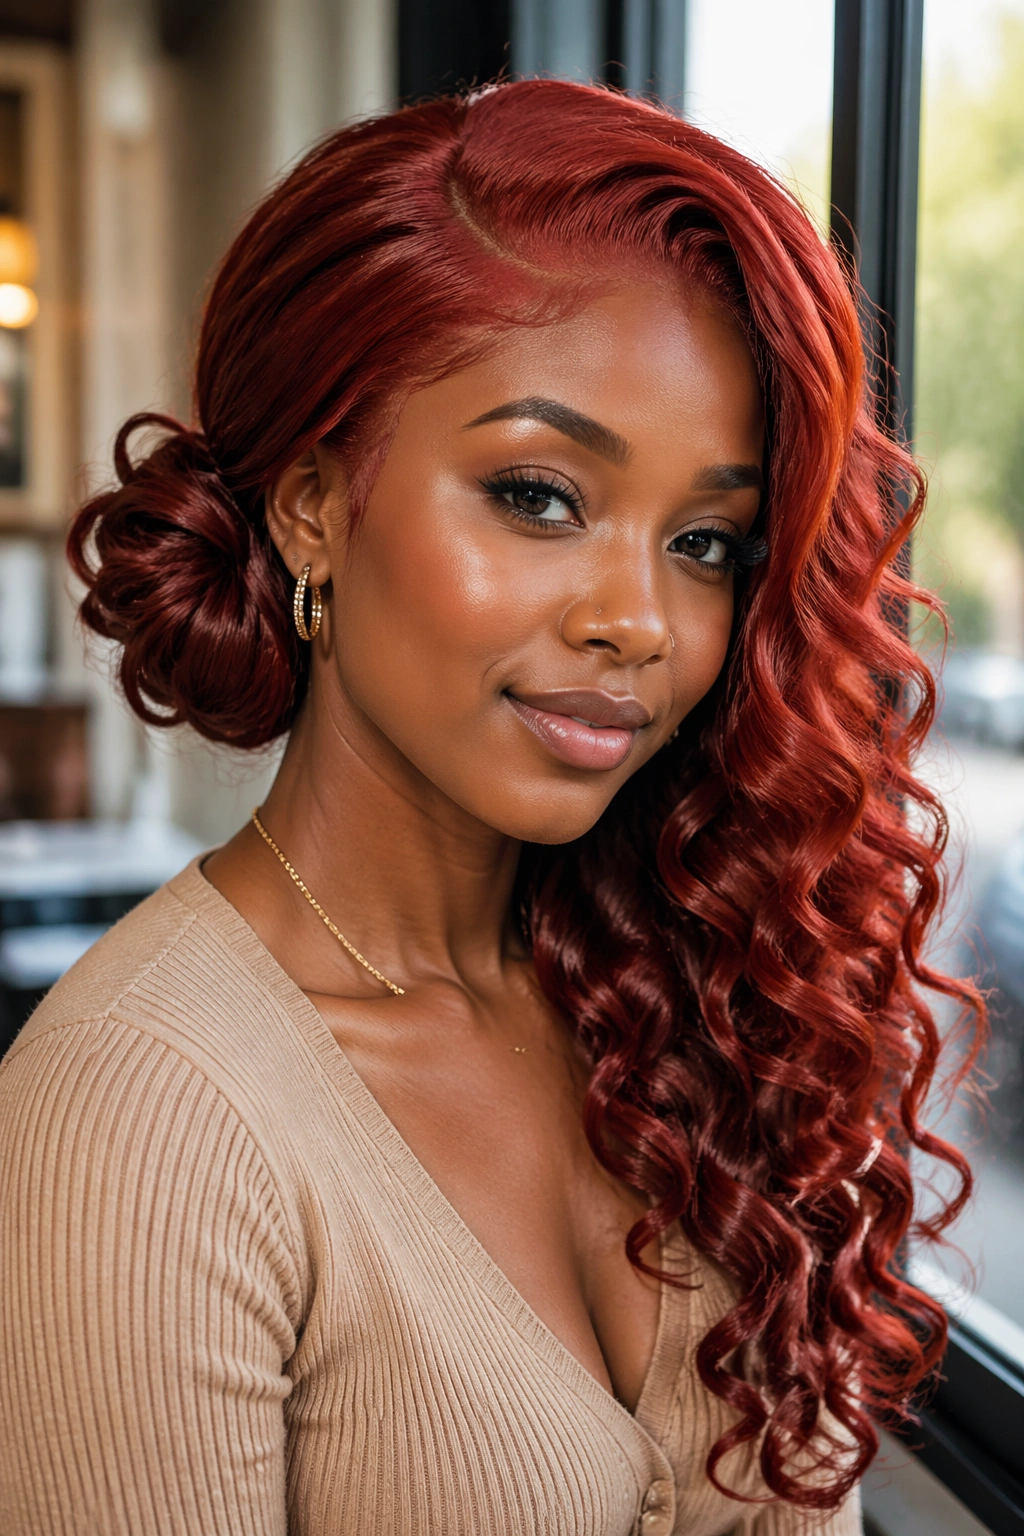
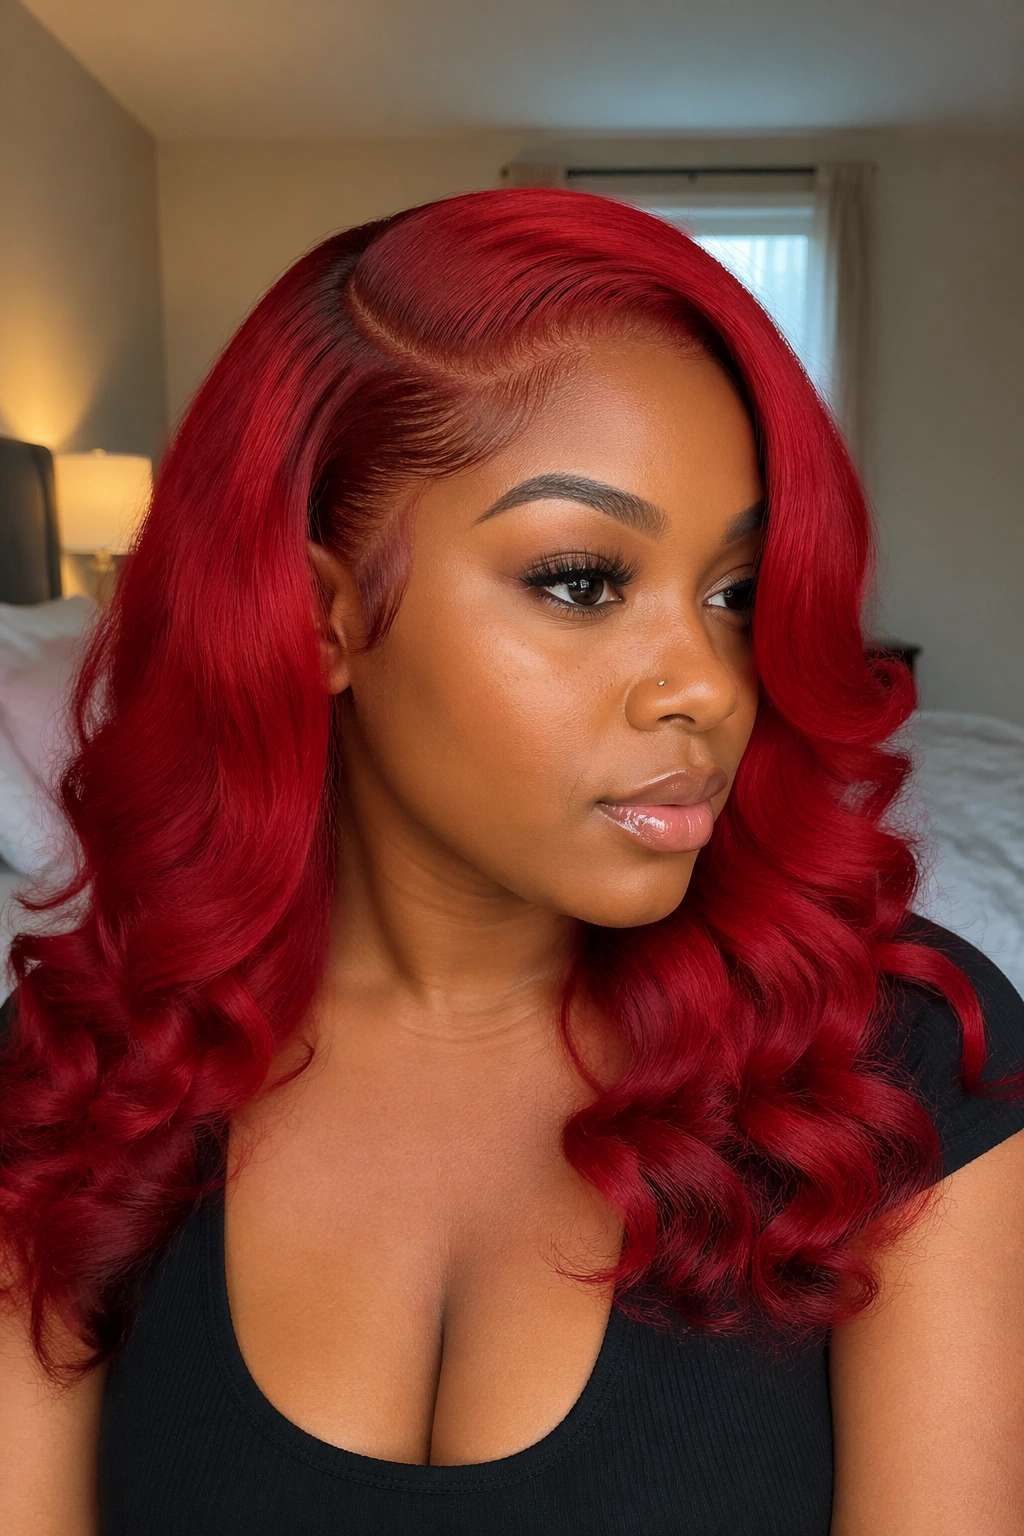
1. Deep Side Part for a Red Lace Front Wig
A deep side part is the quickest way to make a red lace front wig feel intentional instead of flat. It shifts the weight of the curls, breaks up the color block, and gives the face a little shape without asking for much else.
I like this with loose ringlets, brushed-out spirals, or medium curls that still hold some definition. On a bright cherry red wig, the side part keeps the color from sitting in one solid curtain. On burgundy or wine, it adds a softer, richer line that feels a little more grown-up.
Why the angle matters
The part should not be a tiny scratch in the lace. Give yourself at least 1 to 1½ inches of visible parting space, then press the roots down with a rat-tail comb so the line looks clean. A little lace tint near the hairline helps too, especially if the wig knotting is dense.
- A side part pulls attention to the eyes and cheekbones.
- It helps heavy curls fall in a more natural shape.
- It gives red shades a deeper look because the light hits the hair from different angles.
- It works well on 13×4 and 13×6 lace fronts because you have room to place the part where you want it.
My rule: keep the lace matte, not shiny. Shine at the roots is the fastest way to make the whole style look fake.
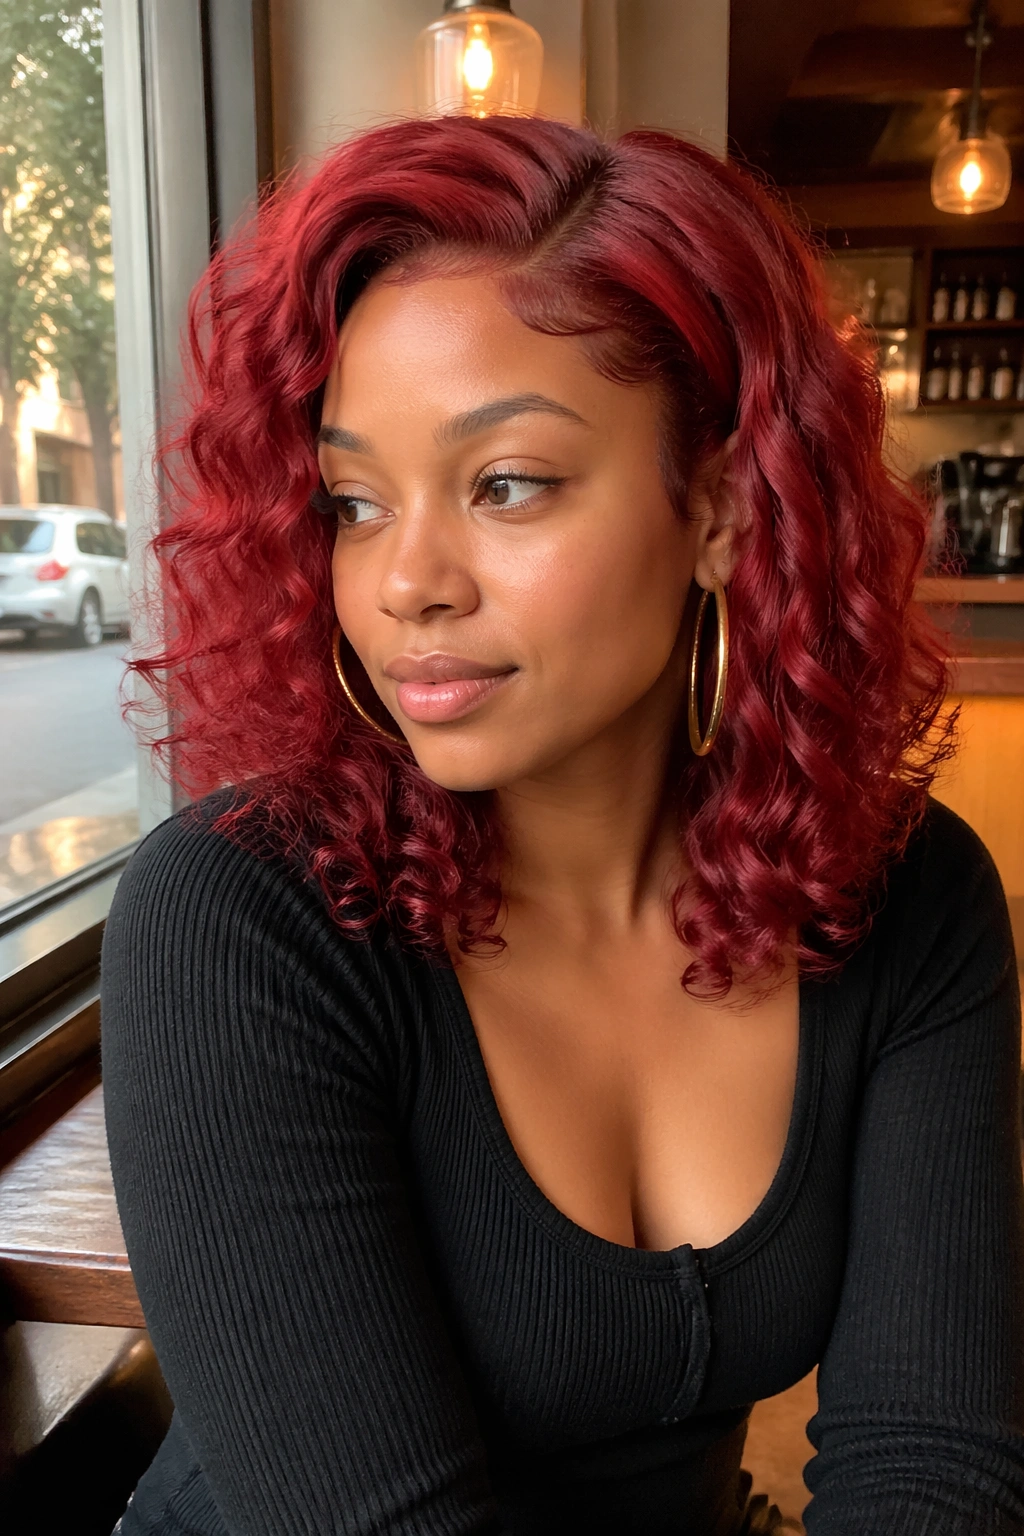
2. Middle Part With Face-Framing Spirals
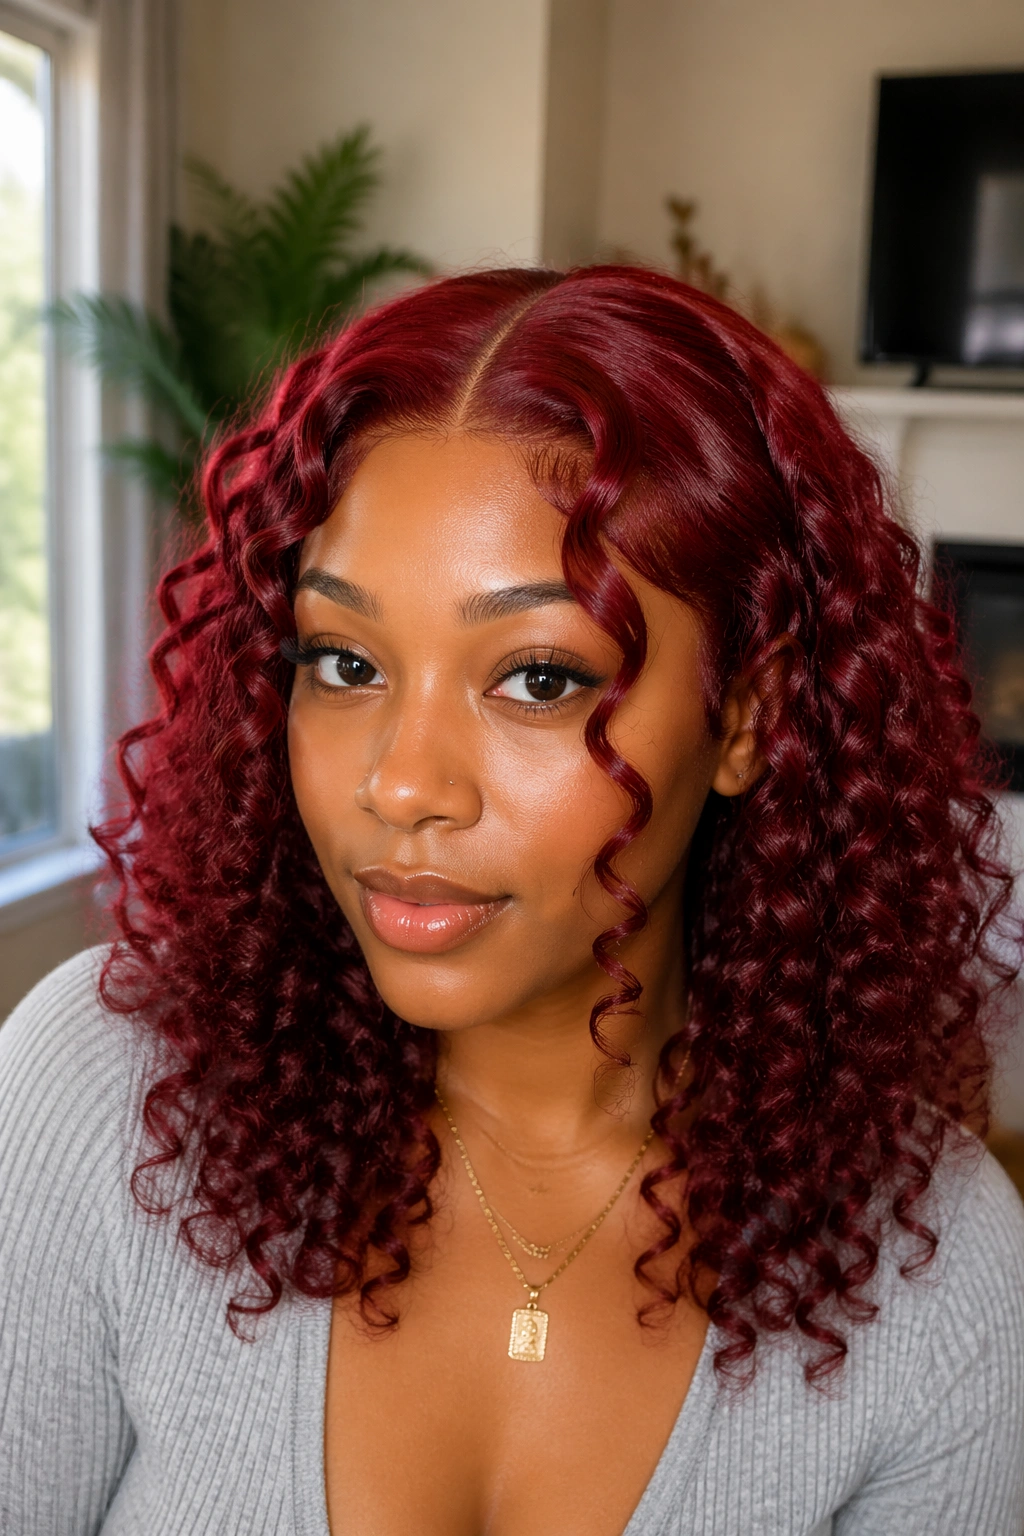
A middle part sounds simple until you see it on curly hair with a red tone. Then it can look sharp, balanced, and honestly a little expensive in the best way. The trick is to leave enough softness around the face so the part does not feel severe.
This style works especially well when the curls start a little lower near the temples. That gives the middle part a clean line up top and still keeps the front from looking boxy. If the wig is a brighter red, like copper or fire red, the face-framing spirals soften the color so it doesn’t overpower your features.
I’d reach for this on wigs with defined S-curls, loose ringlets, or layered spiral ends. If the unit is human hair, a little water and leave-in on the front pieces helps the curls sit neatly. If it’s synthetic, go lighter; too much product turns the front into a sticky mess.
A good middle part needs symmetry, but it does not need perfection. A tiny offset at the crown can keep it from looking stiff. And if the wig has pre-plucked knots, even better. That small detail keeps the part line from drawing too much attention to itself.
3. Half-Up, Half-Down With a Curly Crown
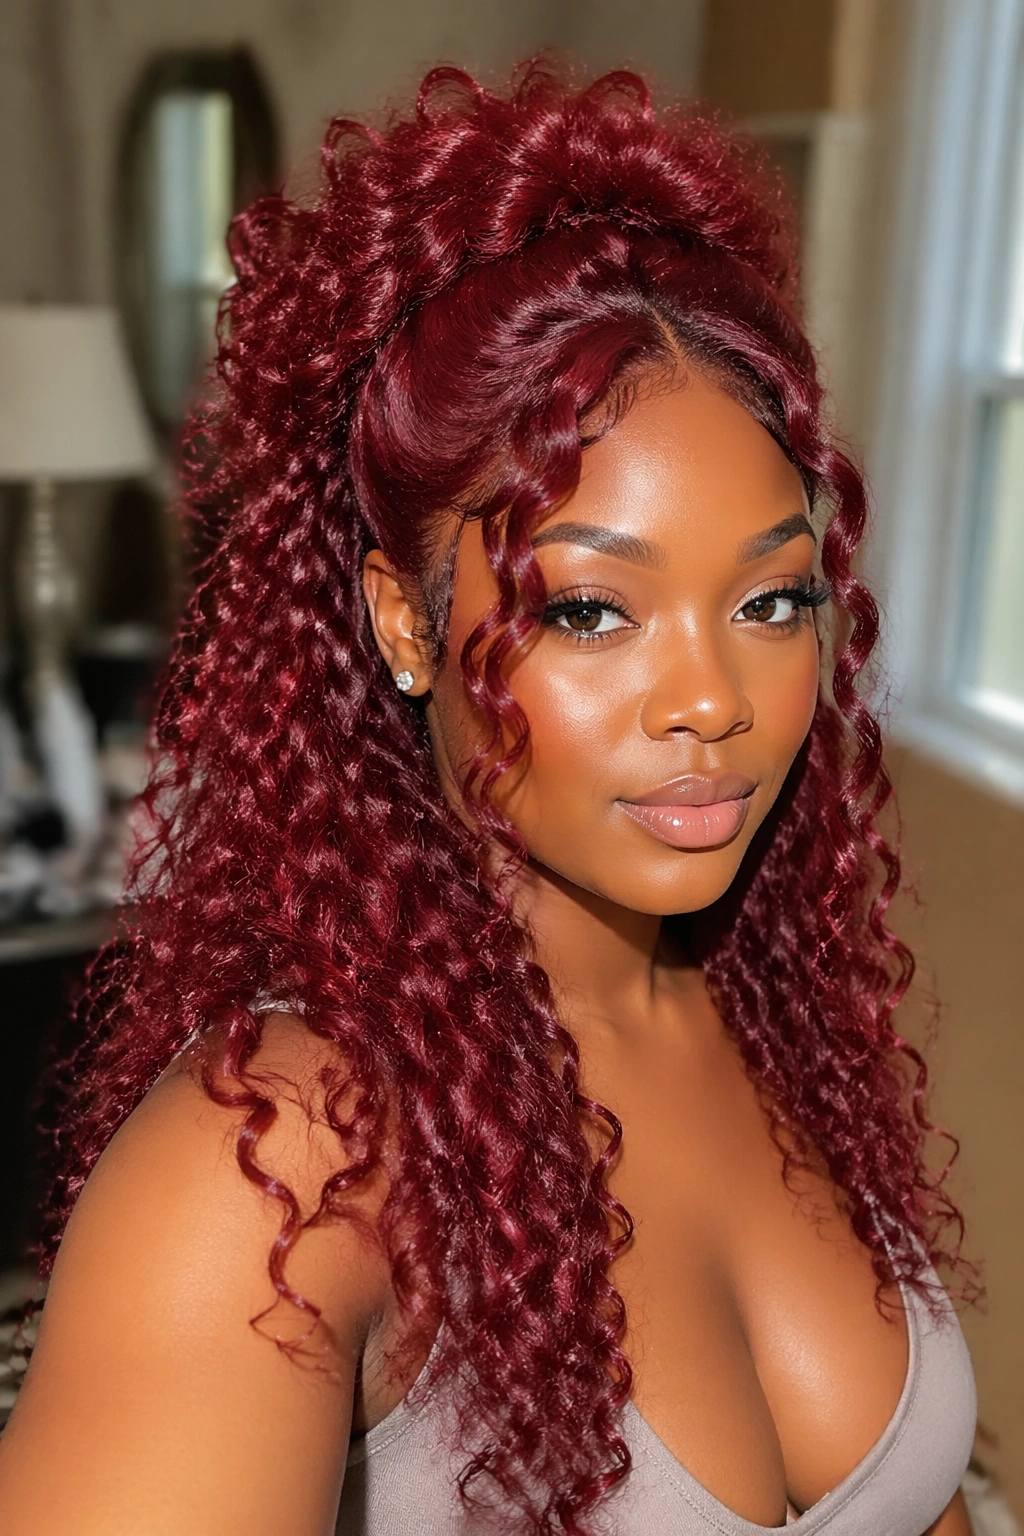
When you want the wig off your face but still want the length to move, half-up, half-down is the clean answer. It works on red curly wigs because the top section gives shape while the loose curls below keep the style from feeling too formal.
The best version of this style starts with a section from temple to temple. Gather the top half just enough to lift it, then secure it with a snag-free elastic or a small claw clip. Leave a few front curls out on each side. Those loose pieces matter. They stop the style from looking like it was pulled back in a rush.
How I’d place the top section
- Start about 2 inches behind the hairline so the lace front stays hidden.
- Smooth the crown with a soft brush or a wide-tooth comb.
- Keep the top section loose enough that the curls don’t flatten.
- Finish with a light mist of water or wig foam on the loose curls, then separate them with your fingers.
This style is especially good on wigs with medium density. Too little hair, and the half-up section looks thin. Too much, and the top can feel bulky fast. That’s the one downside nobody likes talking about, but it is real.
4. High Curly Ponytail With Sleek Sides
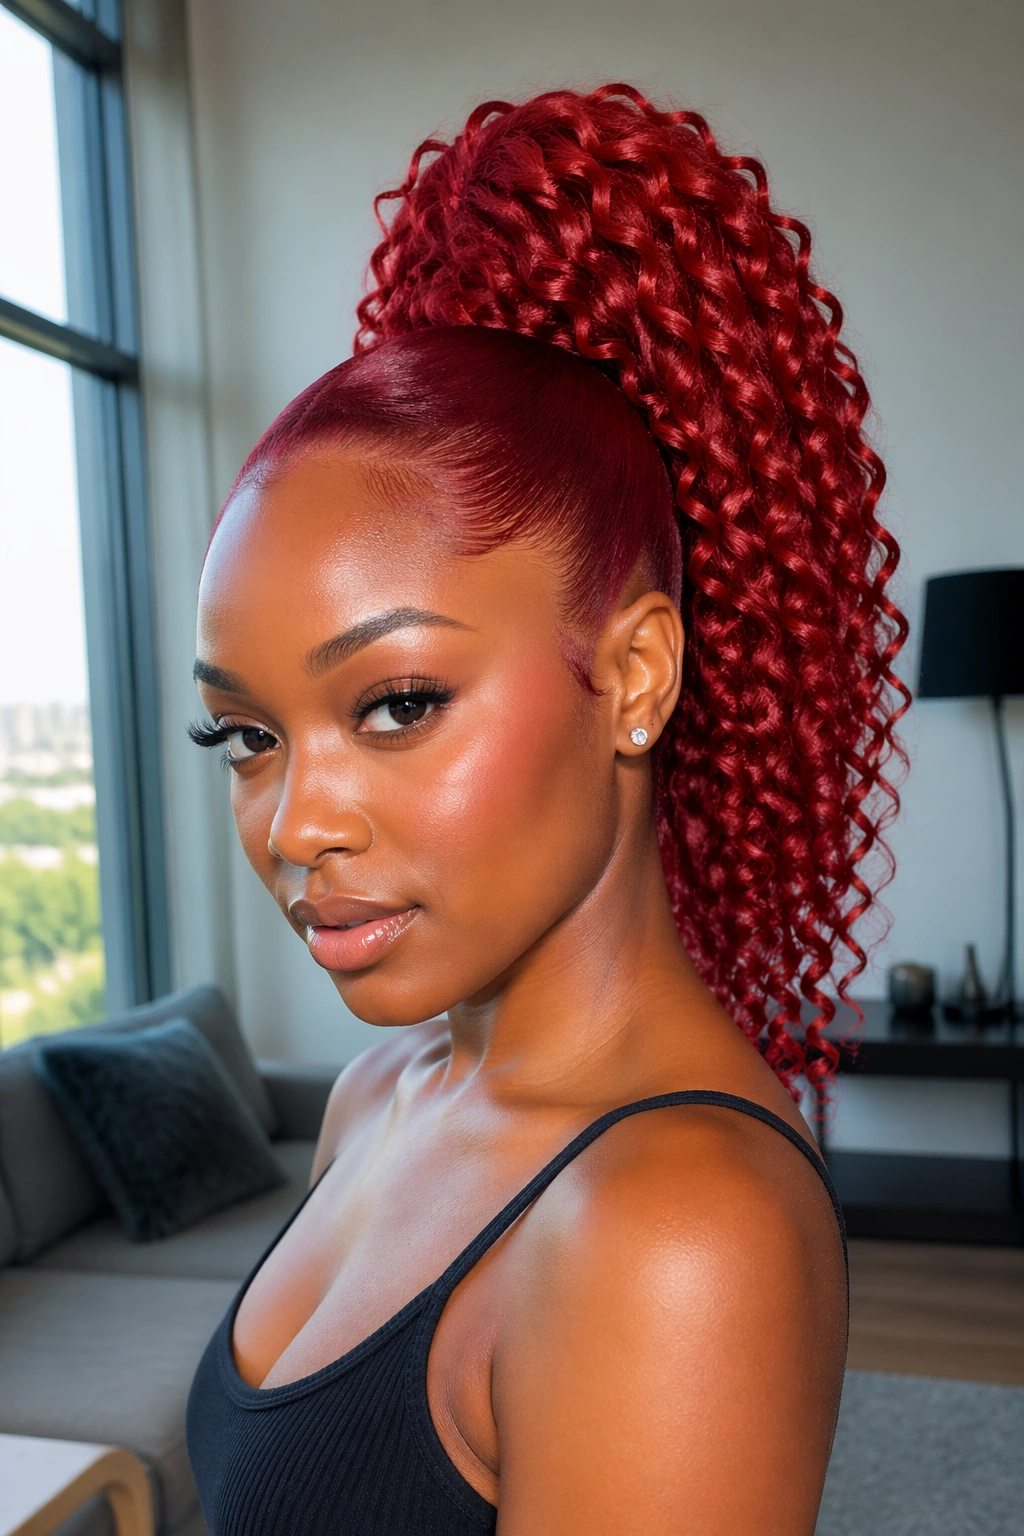
A high ponytail on a red lace front wig turns the whole look upward. It lifts the face, shows off the hairline, and gives curly texture a more dramatic outline. If the wig has long ringlets or springy curls, the ponytail can look energetic without trying too hard.
The sides should be sleek, but not wet-looking. I usually smooth them back with a light gel or styling cream, then stop. You want the hairline pressed, not shellacked. Too much product on a red wig makes the color look flat, and the curls lose their bounce when the roots are stiff.
A small wrapped strand around the base of the ponytail cleans up the finish. Use one curl or a thin strip of hair to hide the elastic, then pin it underneath with a couple of bobby pins. That one move makes the whole style look more finished. It’s a tiny thing, but it counts.
Skip this if the wig cap sits too high at the temples. A high ponytail pulls on the lace, and that tension shows fast. If the unit has adjustable straps, a comb, and a snug elastic band, you’re in better shape. If not, keep the ponytail lower and save yourself the headache.
5. Low Curly Ponytail at the Nape
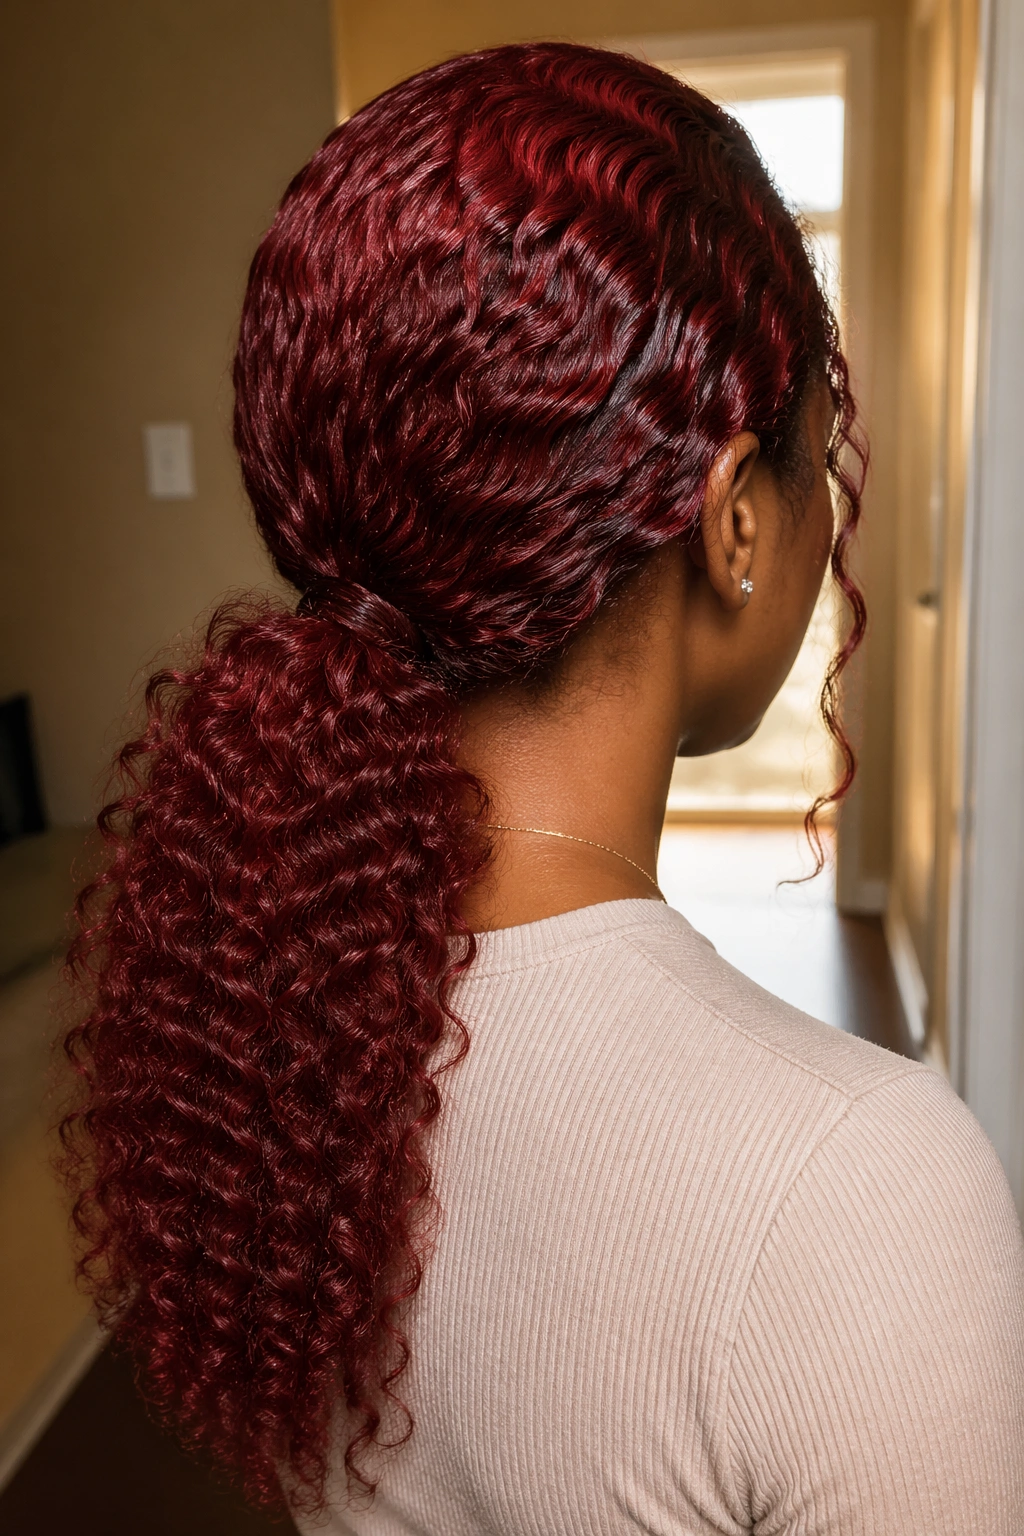
A low ponytail is the quieter cousin of the high one, and I like it for that reason. It keeps the curls under control while letting the red shade stay rich and visible across the shoulders. On burgundy or auburn wigs, the look feels polished. On brighter red wigs, it feels calmer.
This style works best when the ponytail sits right at the nape or just above it. That placement keeps the back smooth and lets the curls fall in one soft line. If you put it too high, the shape starts to compete with the lace front. Too low, and the style can lose energy.
One thing I do like here is a slight side part. It gives the ponytail a little asymmetry, which helps curly texture feel less formal. If you prefer a center part, that works too. Just make sure the front isn’t puffy at the roots.
Simple. And useful.
A silk ribbon, narrow velvet tie, or even a clean wrap of hair around the base can make the style feel finished. I’d choose this for days when you want the wig to stay neat from morning to evening without constant touching. It’s not flashy, which is exactly the point.
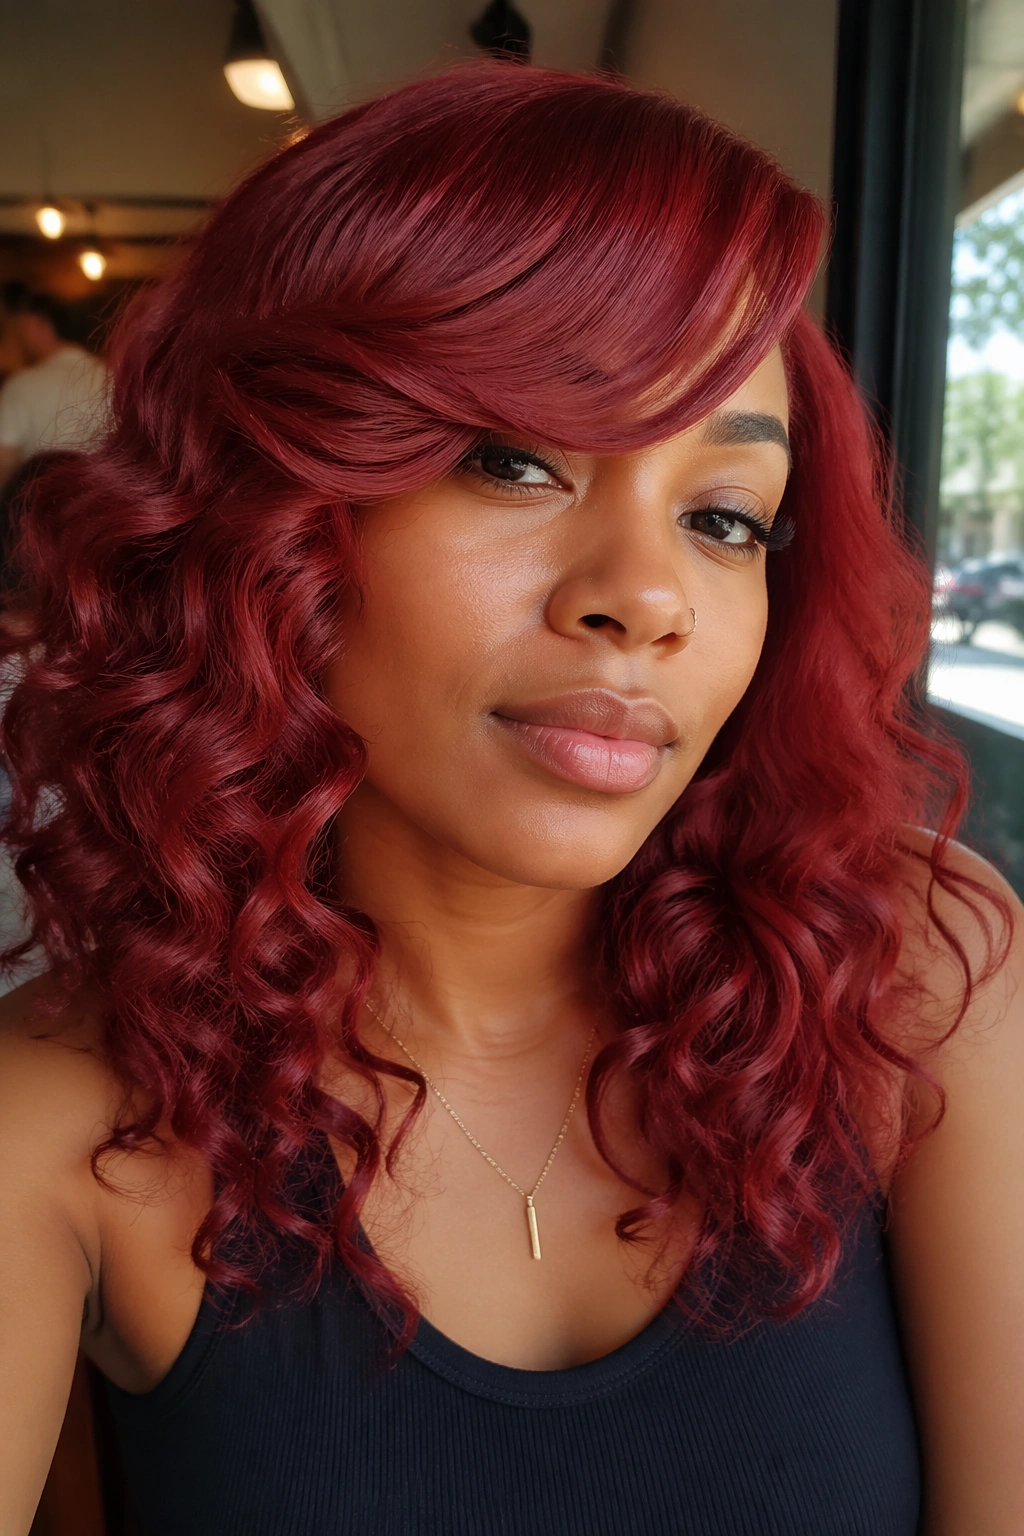
6. Shoulder-Length Layered Curls
Shoulder-length layers are the sweet spot when you want red curly hair to move without swallowing your face. Long curls can overwhelm a bright red wig if the density is high. Shoulder length trims the visual weight and keeps the shape light enough to wear all day.
Unlike extra-long units, layered shoulder-length curls do not need a lot of styling to look finished. The cut itself does half the work. It gives the curls room to separate, and that separation is what keeps the style from becoming one giant rounded shape.
Who should reach for it
- People who want a wig that feels easier to manage.
- Anyone who likes red shades but doesn’t want the color to dominate the whole outfit.
- Wearers who need a style that moves from casual to dressy without a full reset.
- Anyone using a wig with 150 to 180 density, where the shape can get bulky at longer lengths.
I like this look in copper, cinnamon red, or deep auburn because the layers show off the color shifts. If the wig comes with blunt ends, a soft trim around the face can stop the curls from stacking up near the jaw. That tiny bit of shaping makes a bigger difference than people expect.
7. Blunt Curly Bob in Cherry Red
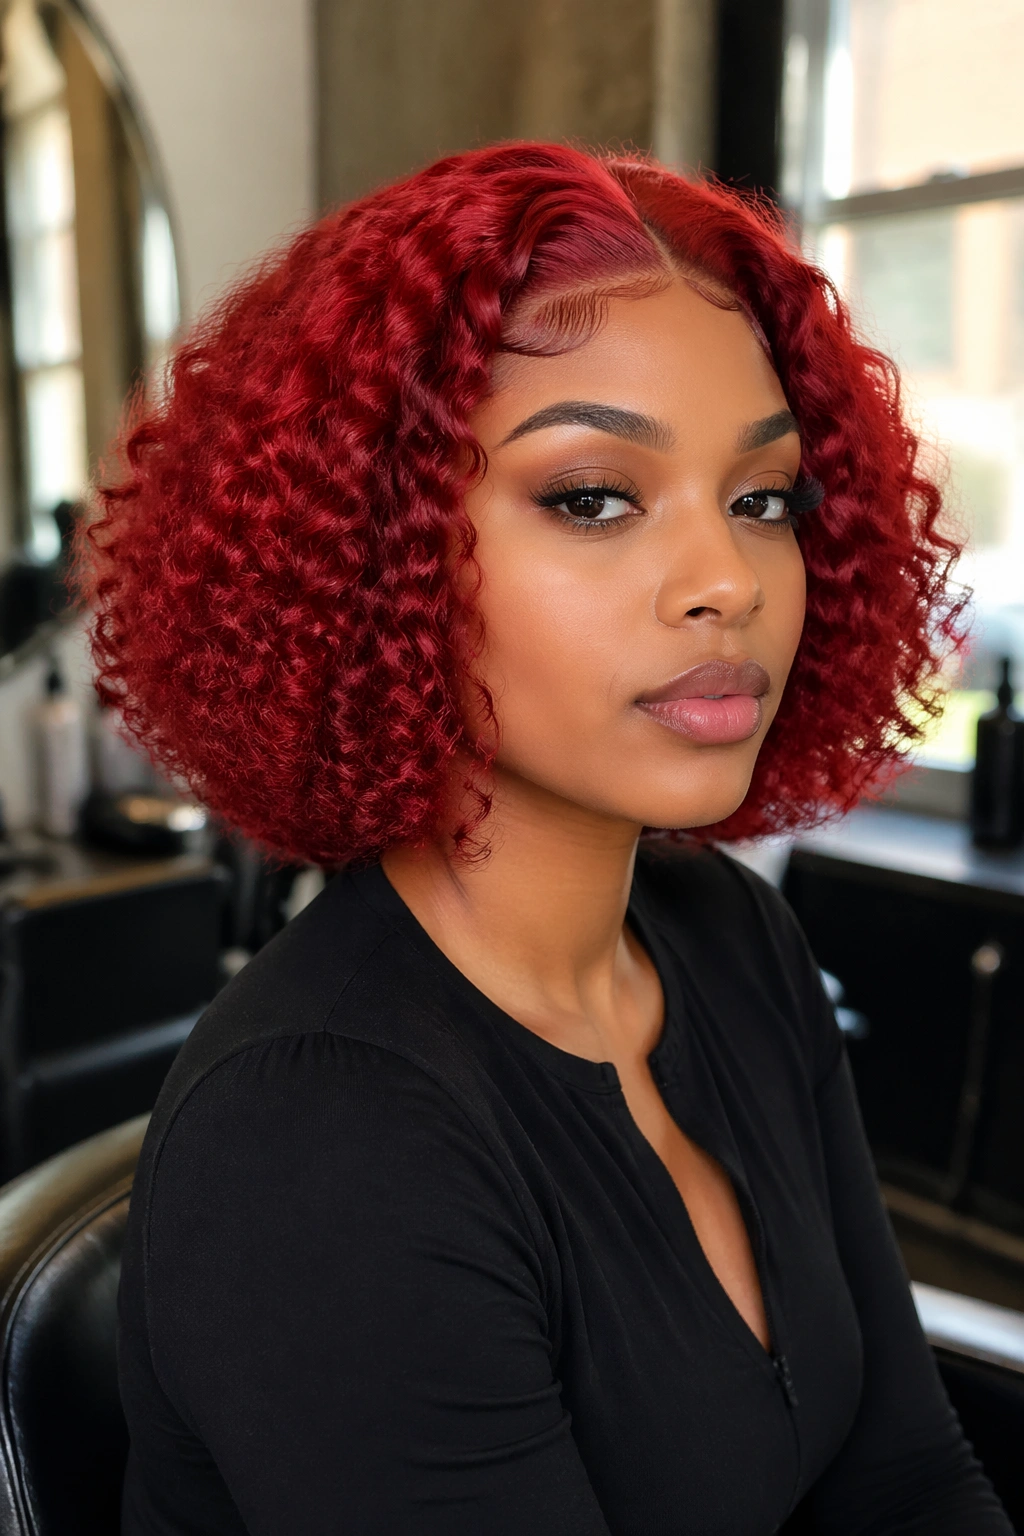
If you want the wig to look like a haircut instead of a costume, a blunt curly bob does the job. The short shape puts all the attention on the curl pattern and the color, which is exactly what a strong red shade needs.
A bob that sits around the chin or just below it works well because the curls still have room to spring, but they don’t drag the whole style down. On cherry red, the cut looks sharper. On a darker red, it looks thicker and more plush. I prefer it when the curls are medium-sized rather than tiny, since tiny coils can make a bob look wider than it really is.
The lace front matters a lot here. A clean hairline keeps the short cut from looking boxy. If the part is too heavy or the lace sits too dark against the skin, the bob loses that crisp little edge that makes it work.
There’s also a nice practical side to this style: it’s easier to refresh. You can fluff the ends with your fingers, define a few curls around the crown, and go. No elaborate styling. No fuss. And in a wig with a bold red tone, that restraint is a relief.
8. Side-Swept Bangs and Soft Volume
Want to soften a strong red shade fast? Add side-swept bangs. A fringe that falls diagonally across the forehead breaks up the color and gives curly texture a little movement right where the eye lands first.
This works especially well on square or longer faces, because the angled bangs cut across the structure in a gentle way. But face shape aside, what really makes the style work is the balance between fullness and control. If the bangs are too thick, they can crowd the face. If they’re too sparse, they disappear into the curls.
How to get the most from it
- Keep the fringe section separate while styling the rest of the wig.
- Set the bangs with a small pin curl clip for 10 to 15 minutes so they fall in the right direction.
- Use a light mousse or foam instead of heavy cream.
- If the wig is human hair, a cool blow-dry can nudge the bangs without flattening the curl pattern.
This is one of those styles that can rescue a unit that feels too full at the front. The bangs give the eye a place to rest. And once that happens, the red color reads softer too.
9. Wet-Look Finish on a Red Lace Front Wig
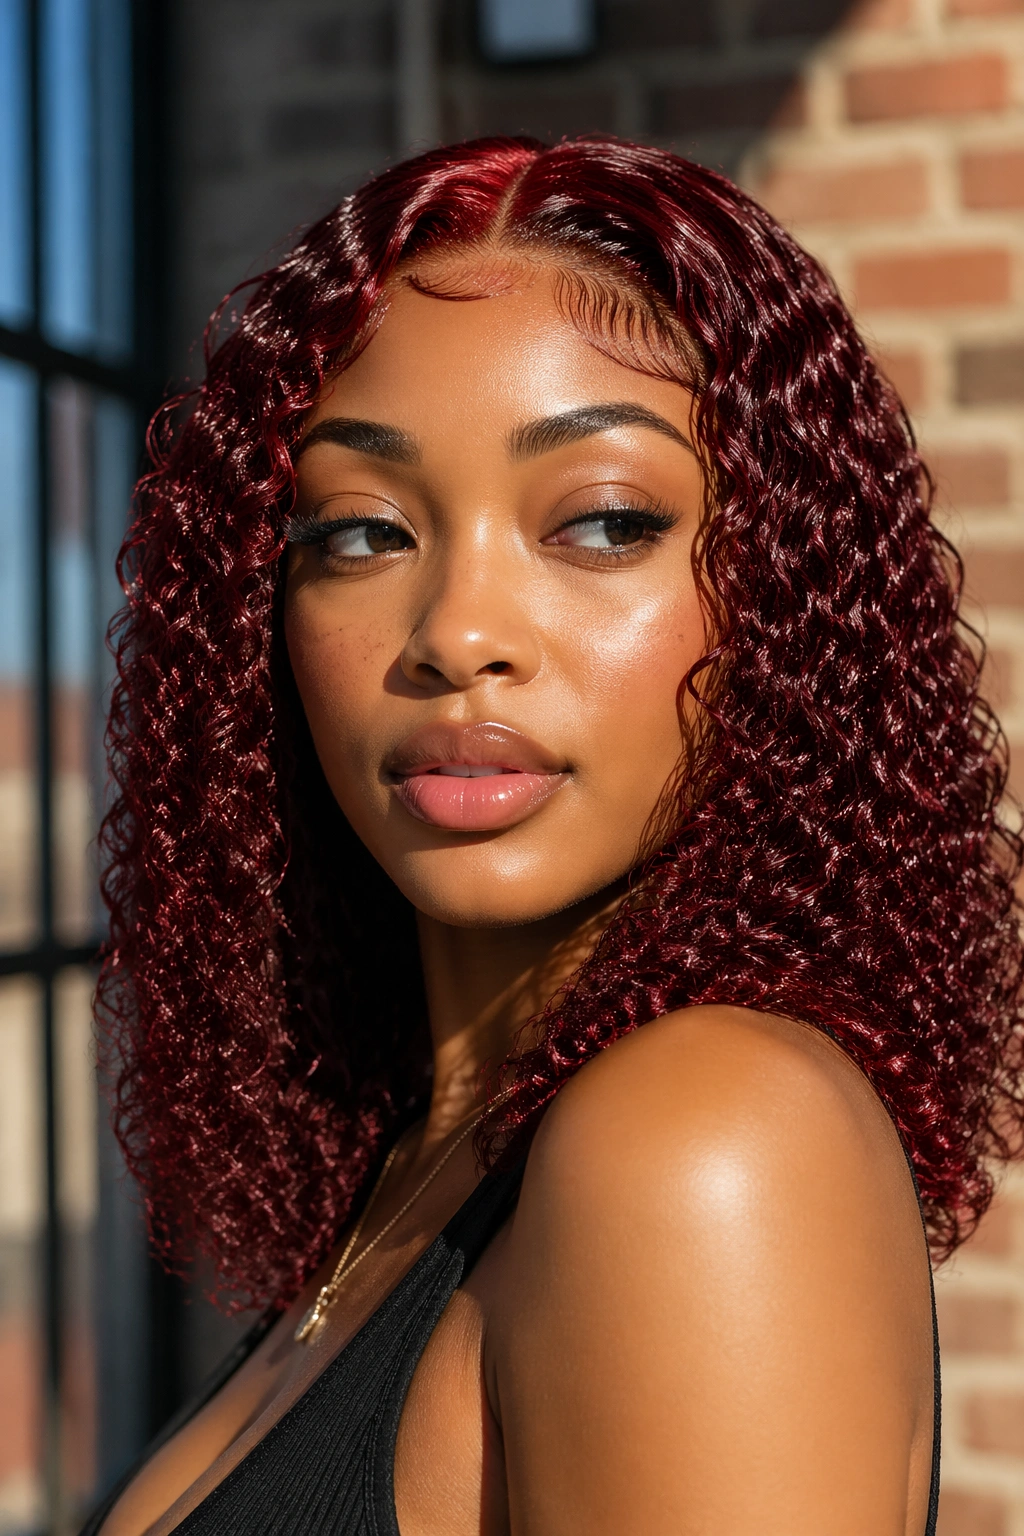
A wet-look finish can be a lifesaver on a red lace front wig, especially when the curls are tight and the color is loud. It gives the texture a sleek, high-shine look that feels deliberate instead of busy. That matters more than people think.
I’d use this on a wig with defined curls, not a fluffy, brushed-out shape. The idea is to clump the curl groups together a bit and let the shine do the talking. On a deep ruby or wine red unit, the wet look can feel rich and glossy. On bright red, it can lean edgy.
What to keep dry
- The lace itself. Product buildup near the front is where the style starts to slide into mess.
- The ear tabs, because they need to stay flat.
- The root area if the wig is synthetic and prone to stiffing up.
- The ends if they already hold enough curl on their own.
Use a water-based foam or curl gel in small amounts, then scrunch the curls with your hands. If you’re working with synthetic fibers, go light. Heavy oils make them look greasy, and that ruins the point. If the wig is human hair, a touch more moisture is fine, but you still want the curls to look controlled, not drenched.
I like this look when the outfit is simple. The wig does the talking.
10. Kinky Curly Afro With Full Halo Volume
Some red wigs need height, not length. A kinky curly afro gives the color a big, soft halo that looks confident and full without begging for extra styling. It’s one of the few curly wig styles where the volume becomes the point.
This works especially well in auburn, rust, and dark cherry red because those shades read deeper when the curls are dense. Bright red can work too, but you need a clean hairline and a matte finish so the shape doesn’t turn harsh. The wig should feel rounded, not helmet-like.
A wide-tooth pick at the roots is your friend here. Keep it off the ends unless you want the texture to expand even more. A little lifting at the crown and temples is enough. If you keep pulling through the whole wig, the shape can get frizzy in a way that looks tired, not fluffy.
- Choose at least 150 density if you want a true halo shape.
- Keep the part very short or skip it.
- Use a light mist of water or foam, not heavy cream.
- Press the lace gently at the front so the hairline stays believable.
This is a style with attitude. Not loud in a bad way. Just sure of itself.
11. Braided Front Detail With Loose Curls
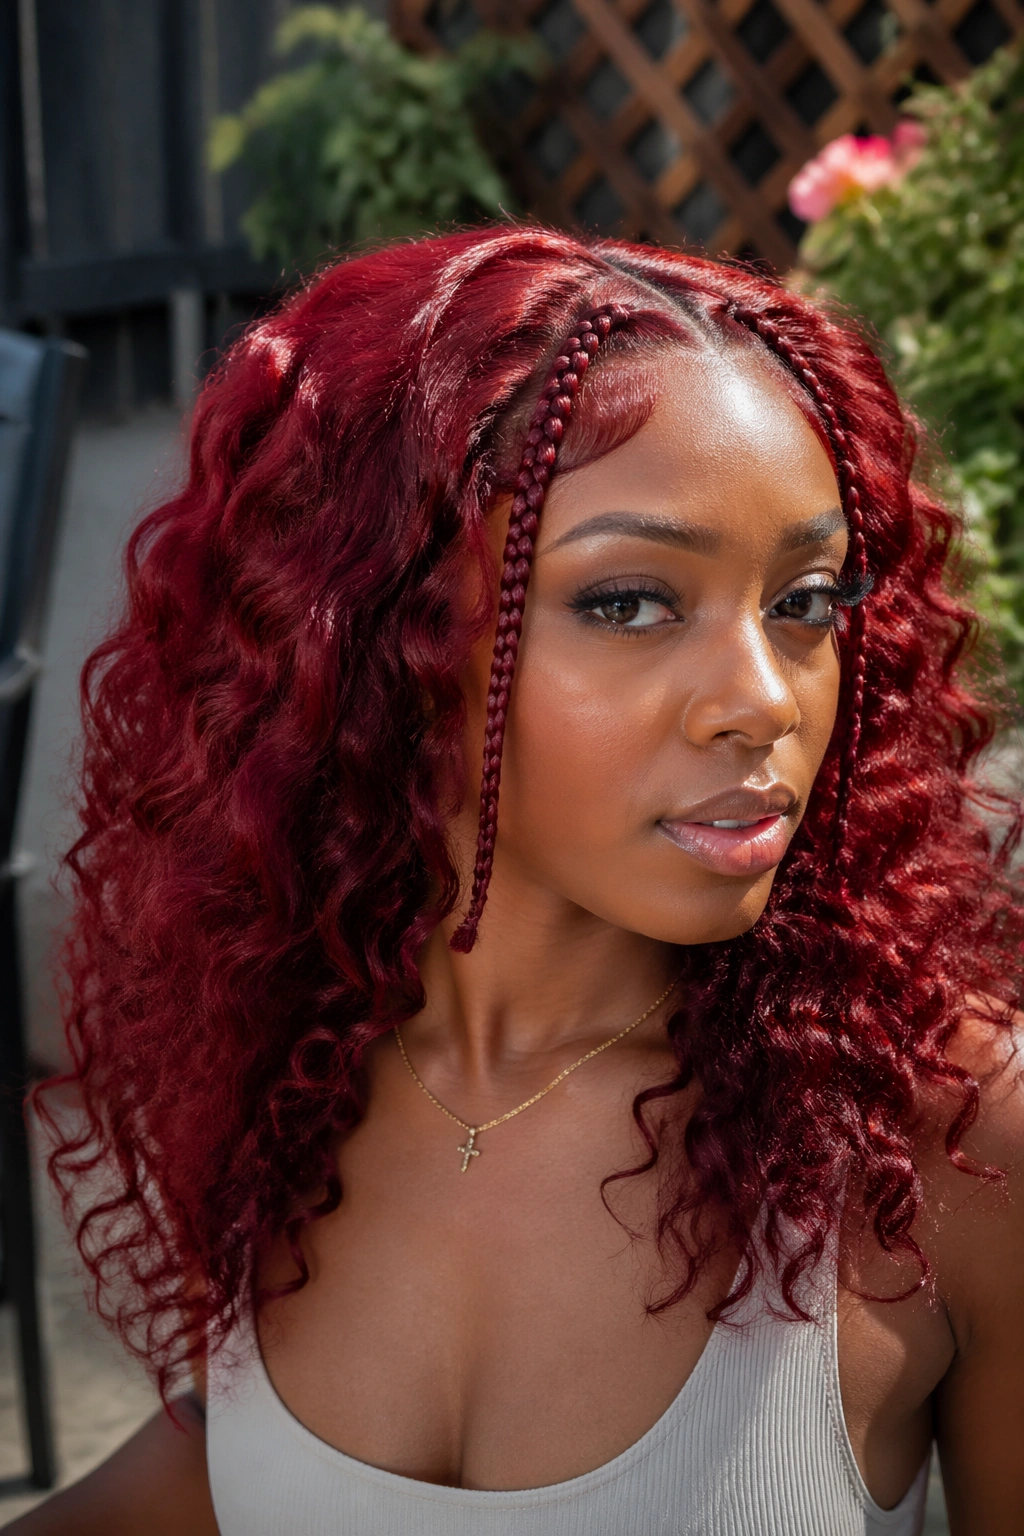
A braided front detail gives a red curly wig a little edge without stealing the show from the curls. I prefer two slim braids or a narrow braided crown at the front, then leaving the rest loose. That way you get structure up top and movement everywhere else.
Unlike a full braided style, this one keeps the curls in charge. The braid is just a line, a frame, a small interruption in the color. On red hair, that interruption helps a lot. It stops the wig from reading like one solid block and makes the curl pattern easier to see.
This style works best when the braids are loose enough to stay soft. Tight braids can tug on the lace and make the front look tense. I’d keep them thin and pin them gently into the wig instead of pulling them hard across the scalp line.
Best use cases
- Casual days when you want a little more detail.
- Outdoor events where loose curls might need a little control.
- Looks that need texture near the hairline but still want volume through the lengths.
- Red wigs with medium to dark tones, where the braid adds contrast.
Tiny clear elastics help here. So do a couple of hidden pins. That keeps the braid neat without making the front of the wig look crowded.
12. Claw Clip Updo With a Few Curls Left Out
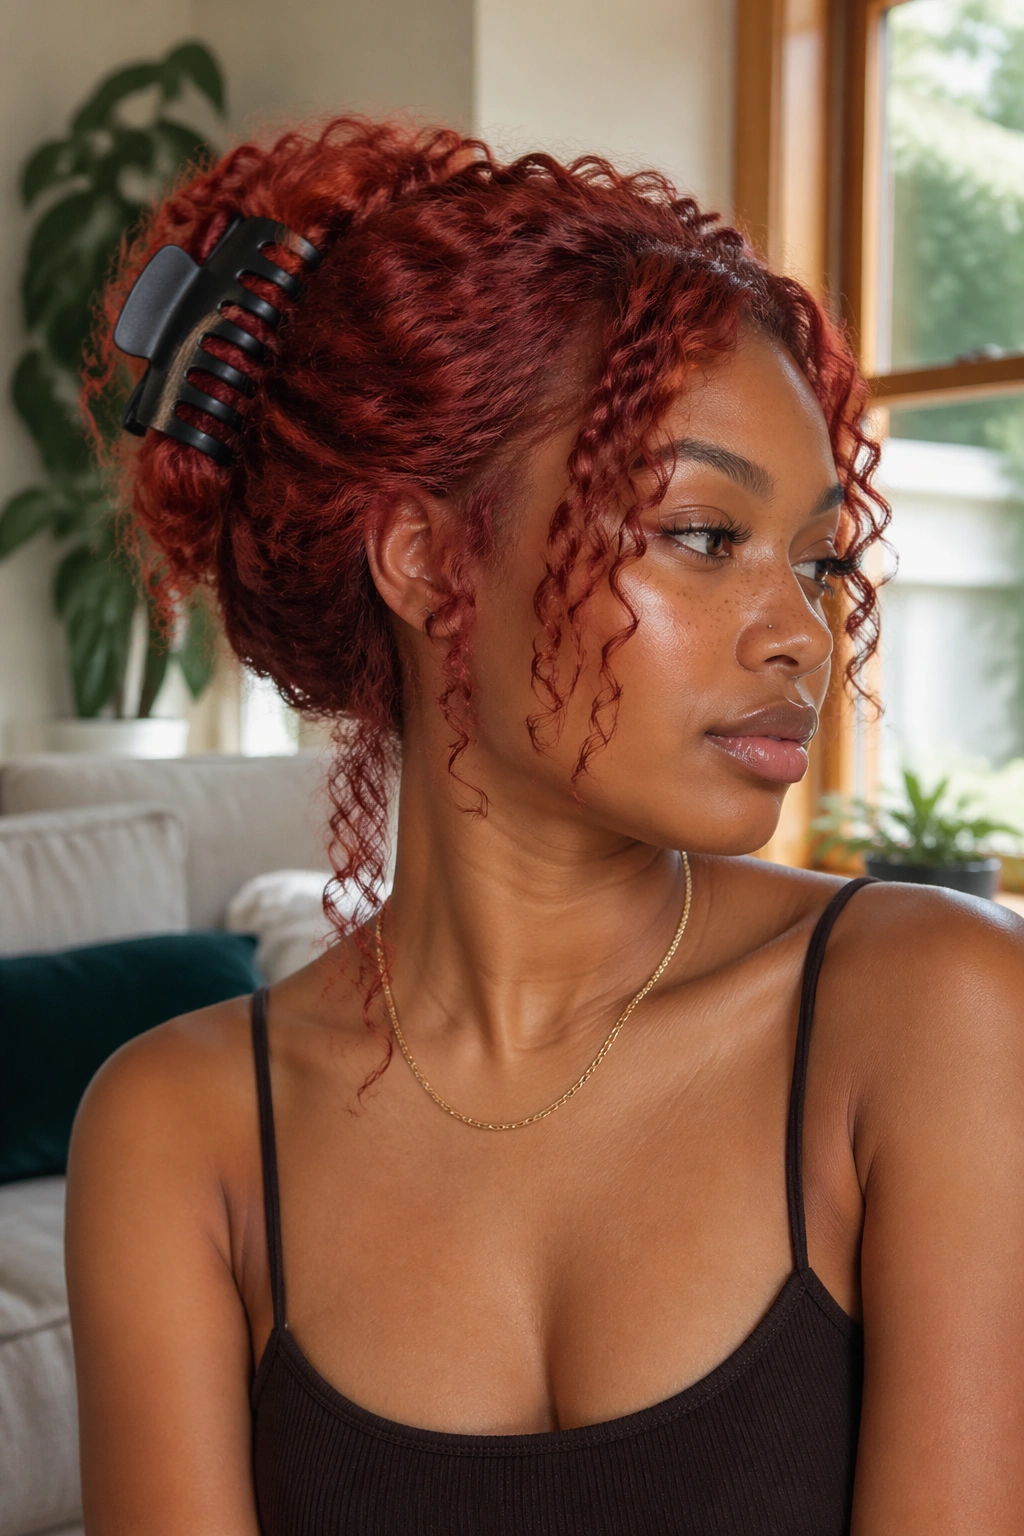
A claw clip updo is the easiest way to make a red curly wig feel put together in under a minute. Twist the length up loosely, catch it with a large clip, and let a few curls fall around the face and neck. Done.
The trick is not to overthink it. If you twist too tightly, the wig loses shape and the front can look strained. If you twist too loosely, the clip slides. I’ve had the most luck with a medium-to-large matte clip, usually around 4 to 5 inches long, depending on how dense the wig is.
The curls you leave out matter. A couple at the temples soften the face, and a few at the nape keep the style from looking like it was pinned up in a rush. On a red wig, those loose pieces also catch the light nicely against the rest of the updo.
Make it hold
- Prep the roots with a little mousse or foam first.
- Twist the hair once or twice, not a dozen times.
- Choose a clip with a strong spring.
- Pin any slippery pieces under the twist, not on top of it.
This is a smart style for long wear because it keeps the wig from getting heavy on the neck. And that matters on dense curly units.
13. Faux Hawk With Tapered Sides
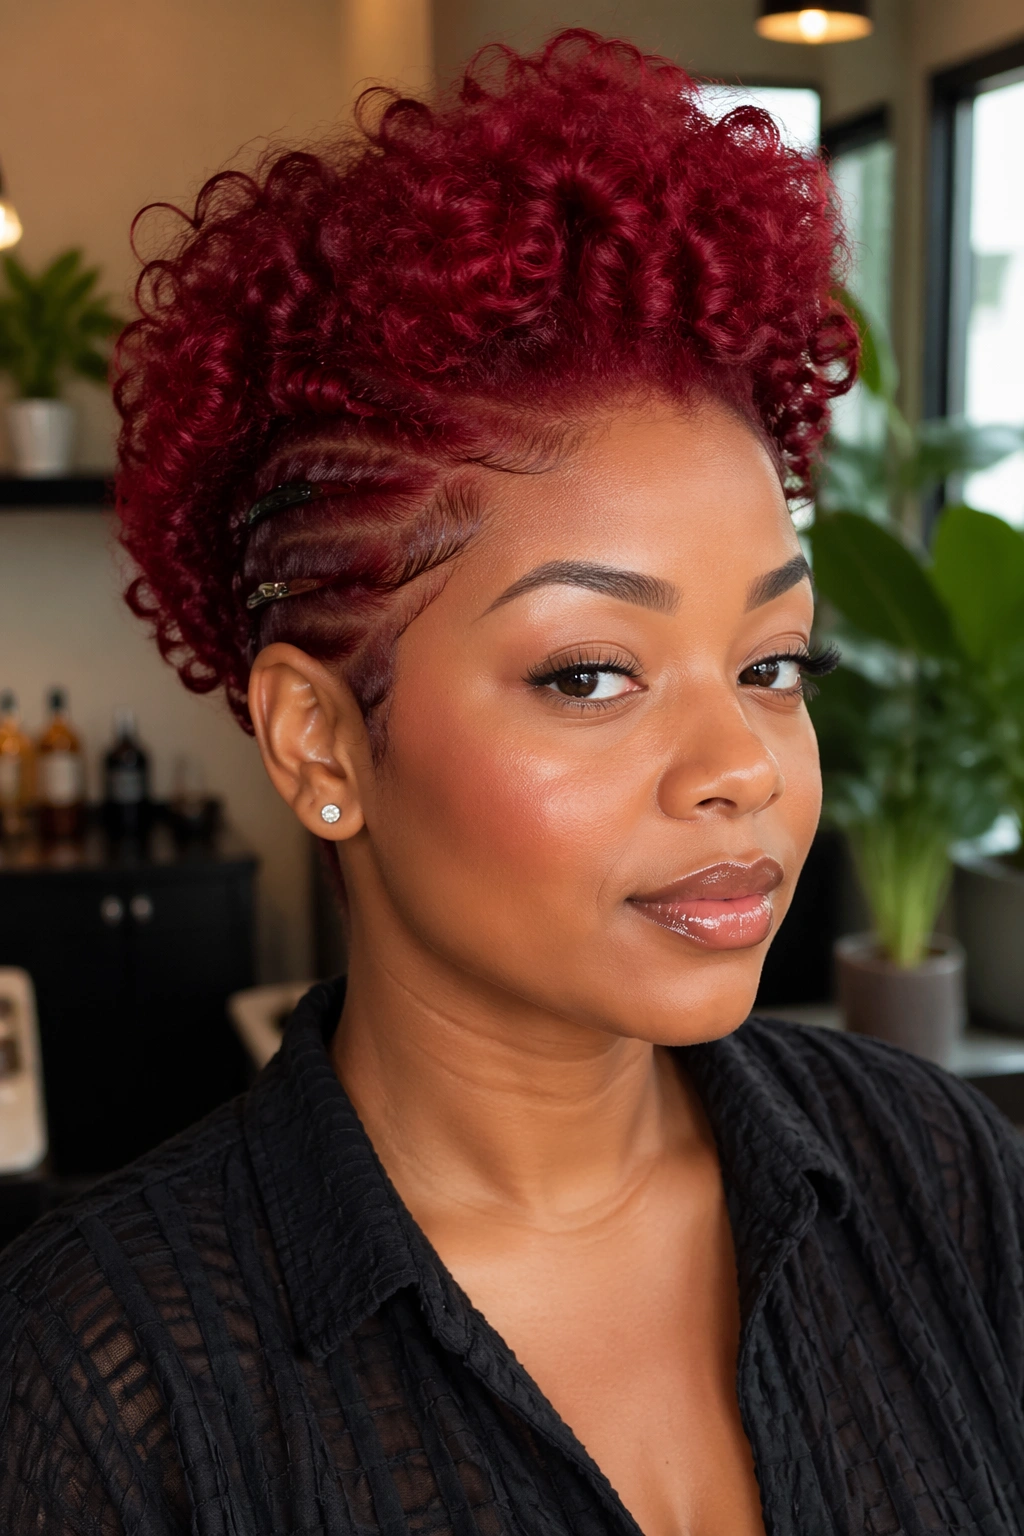
A faux hawk is one of those styles people think is too much until they see it on curly red hair. Then it makes sense. The middle volume creates height, the sides stay sleek, and the whole thing gets a strong shape that curls can hold onto naturally.
I like this especially on wigs with a tapered illusion at the sides or a deeper lace front. The middle section gets lifted and pinned upward, while the sides are smoothed back with a light product and a few hidden pins. It looks sharp, but not hard. That distinction matters.
Less is more here.
If you pile on product, the style turns stiff. If you over-fluff the center, it loses the line that makes it a faux hawk instead of a puff. I’d start with a small amount of mousse at the crown, then push the curls upward with your fingers until the shape stands on its own. After that, stop touching it.
This style works well in darker reds, too, because the shape keeps the color from spreading out too much. The result is compact and bold at the same time, which is not an easy balance to get on curly hair.
14. Side Bun With Cascading Curls
Need a polished style that still lets the curls move? A side bun does that job nicely. It gathers the wig low and to one side, then lets loose curls spill across the shoulder or down the chest. The shape feels soft, but it still has structure.
The bun should sit around ear level or slightly below it. Any higher and it starts competing with the curls. Any lower and the style can look droopy. I like this on red wigs because the side placement shows off the color in layers instead of one flat mass.
How to anchor it
- Gather the wig loosely toward one side.
- Twist the length once, then form a soft bun.
- Secure with 2 to 4 U-pins or long bobby pins.
- Leave a few curls free at the front and one or two at the nape.
If the wig is dense, a small hairnet under the bun helps the shape stay neat. I know that sounds fussy, but it makes the style last longer and keeps the curl pile from slipping. For a richer red shade, like merlot or mahogany, the bun looks especially good because the shade catches light in the folded sections.
15. Center-Part Glam Curls for Red Lace Front Wigs
A center-part glam curl style is the one I’d keep on standby if I wanted a red lace front wig to look clean, balanced, and expensive without doing much. The curls should be defined, the part should be straight, and the baby hair should stay light. That last part matters. Too much baby hair can make the whole style look busy.
This look works with almost any red shade, but it shines on burgundy, cherry, and deep copper because the center part gives the color a neat frame. I like it when the curls start just below the cheekbones and fall in even sections on both sides. That keeps the length from swallowing the face.
You do not need a heavy hand here. A fine edge brush, a bit of water, and a small amount of mousse are enough to keep the front tidy. If the lace is HD or transparent, the part can stay narrow and still look convincing. If the wig is thicker at the crown, press the roots flat before you do anything else.
This is the style I’d choose when I wanted one wig to do a lot of jobs: errands, dinner, photos, or a dressier event. It’s calm without being plain, and that’s a nice place for red curls to live.