Curls hate being bossed around. That’s why half up half down curly updos work so well: they keep the shape, the bounce, and the movement, while getting the front sections off your face and a little bit of heat off your neck.
Pull too much hair up, and the whole style can go flat at the crown or spring back in odd dents. Leave everything down, and you may spend the day tucking curls behind your ears. The sweet spot sits in between. It’s a tiny balancing act, and once you get the hang of it, the result feels easy in the best possible way.
I’ve always liked curly half-up styles because they respect what curls already do well. They don’t ask for poker-straight symmetry. They let volume stay where it belongs, which is usually the whole point. A few well-placed pins, a soft braid, a twist, a clip, or a small bun can change the whole silhouette without flattening the texture that makes curly hair interesting in the first place.
The trick is to style the top section with a light hand. Dry curls first. Use enough hold to keep the crown in place, but not so much that the curl pattern underneath turns stiff. The first style below is the one I reach for when I want something clean, soft, and dependable.
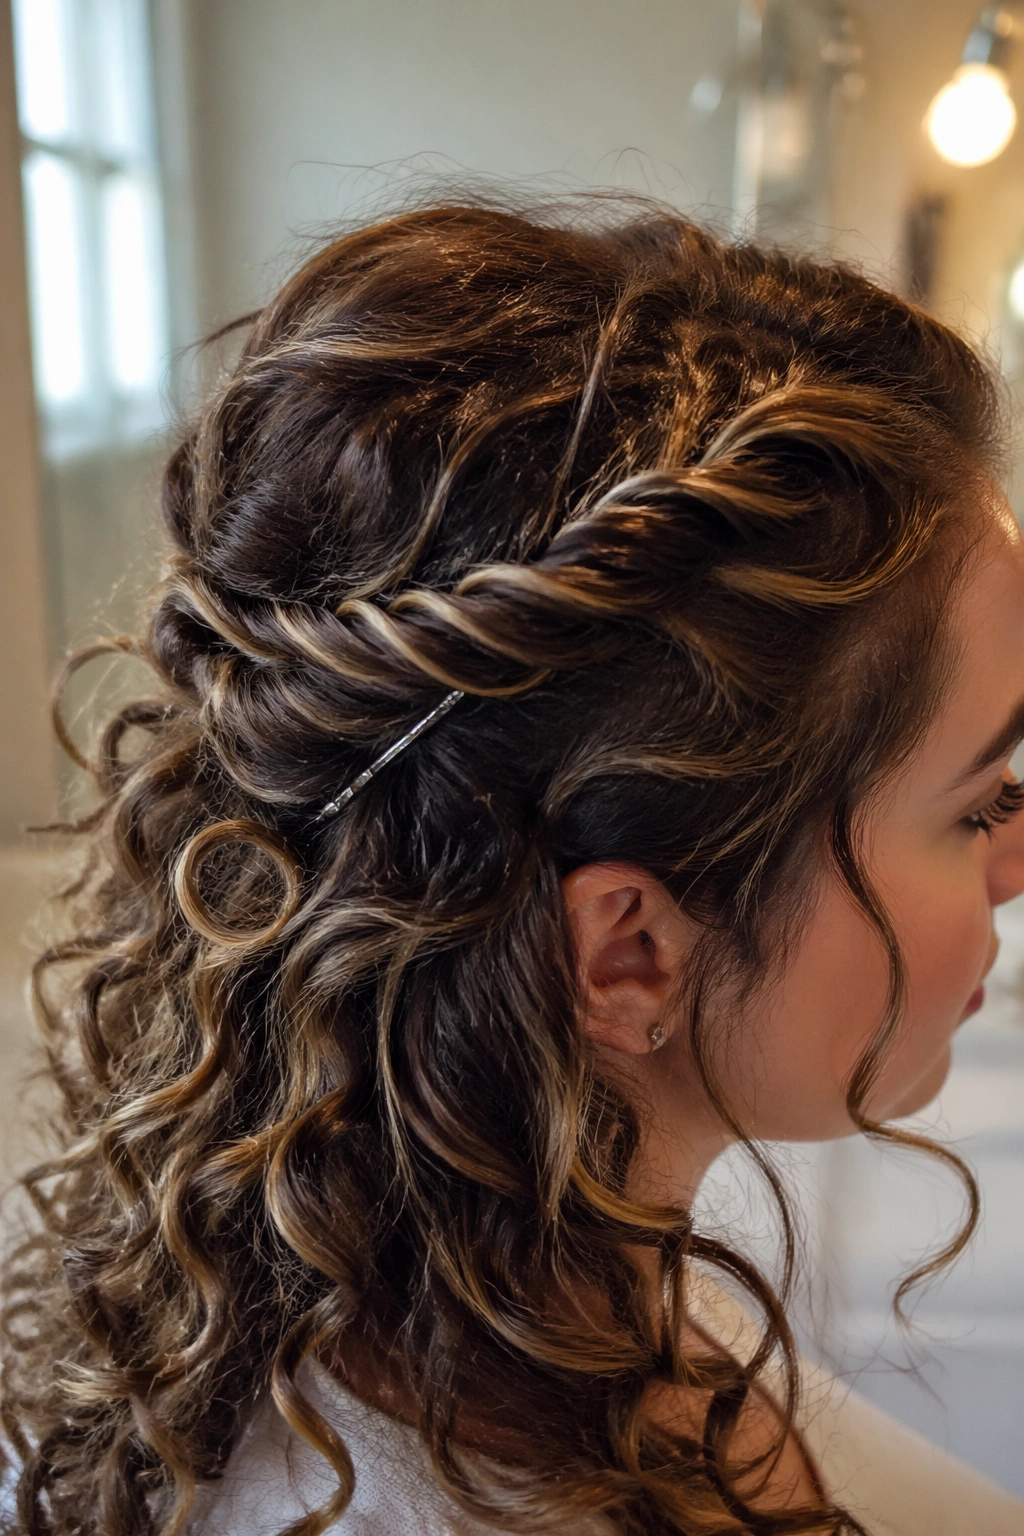
1. Twisted Crown Half-Up on Loose Curls
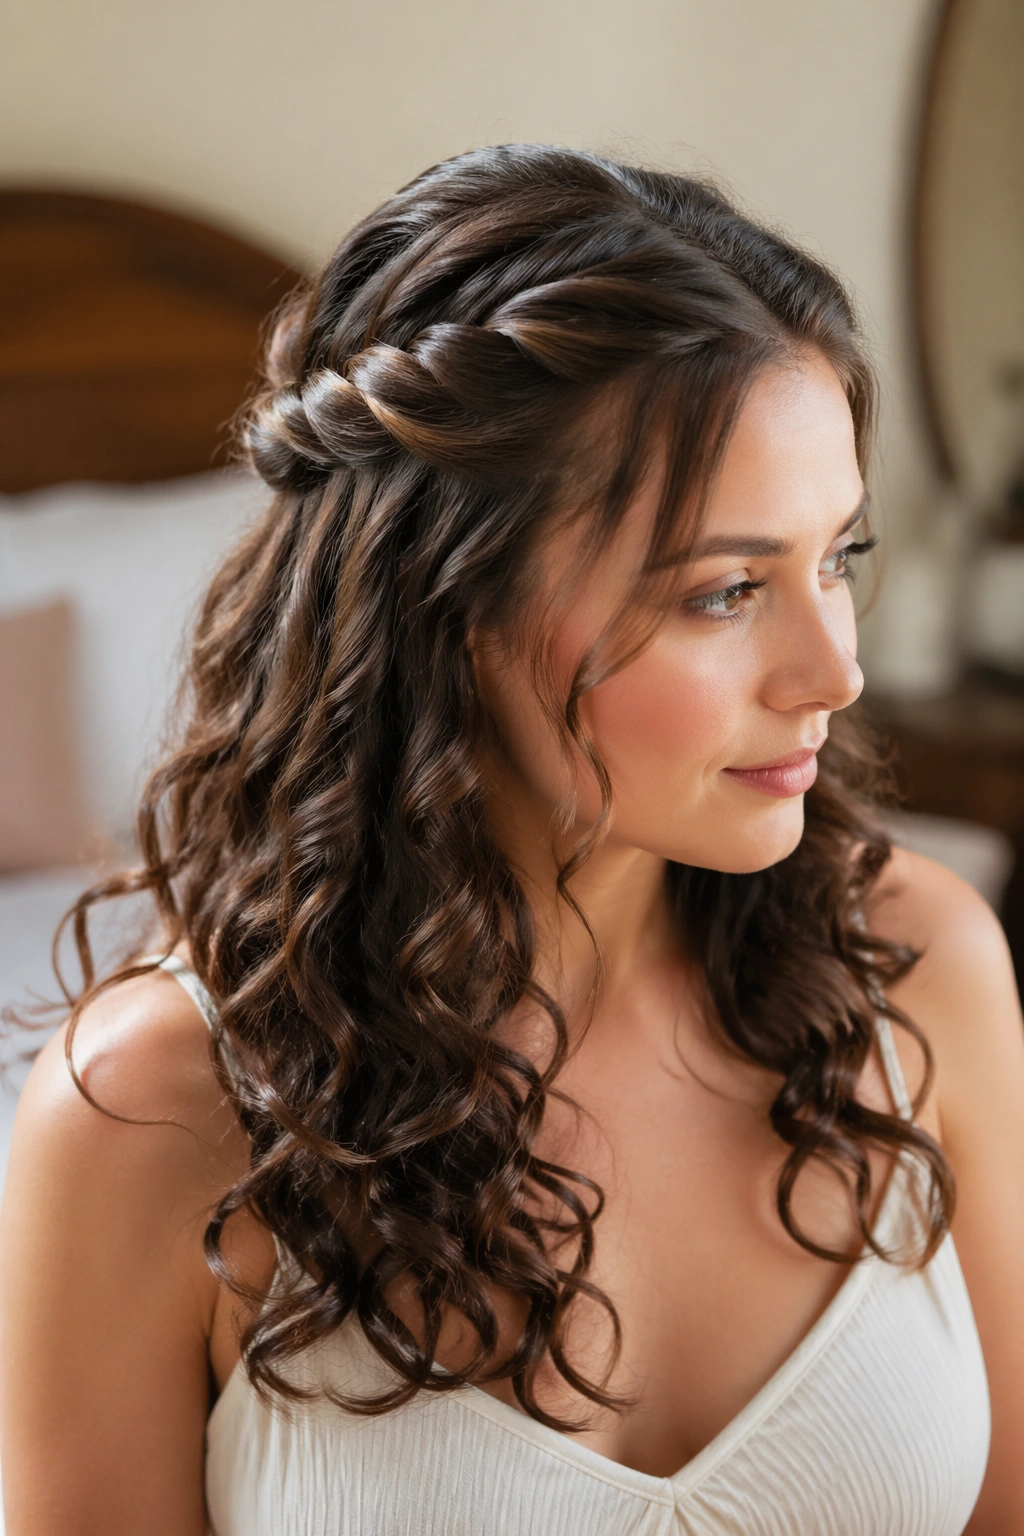
This is the style I recommend when someone wants to look put together without looking like they spent an hour wrestling with their hair. The twist starts at the temples, hugs the head just enough to make a shape, then disappears into the curls at the back. It’s neat, but not severe. That matters.
Split off two sections from just above each ear, each about 1 to 2 inches wide, and twist them back toward the center. Keep the twist loose. If you pull hard, the front curls lose their spring and the whole thing starts to look tight in a bad way. Pin the twists where they meet, then let the rest of the curls fall over the pins and hide them.
How to keep the twist soft
- Twist with your fingers instead of a comb.
- Use 2 bobby pins per side if your hair is thick or slippery.
- Leave a few tiny tendrils at the temples for shape.
- Smooth only the outer layer with a little cream or serum; don’t coat the curl mass underneath.
A twisted crown looks especially good on medium and long curls because the back length gives the style some swing. It also works when your curls are a little frizzy, which sounds like a downside until you realize the twist gives the frizz a job to do. It reads as texture, not mess. That’s a useful distinction.
Best tip: pin the twist slightly lower than you think you should. High placement can make the front feel lifted in a way that’s too obvious.
2. Loose Braided Half-Up with Face-Framing Curls
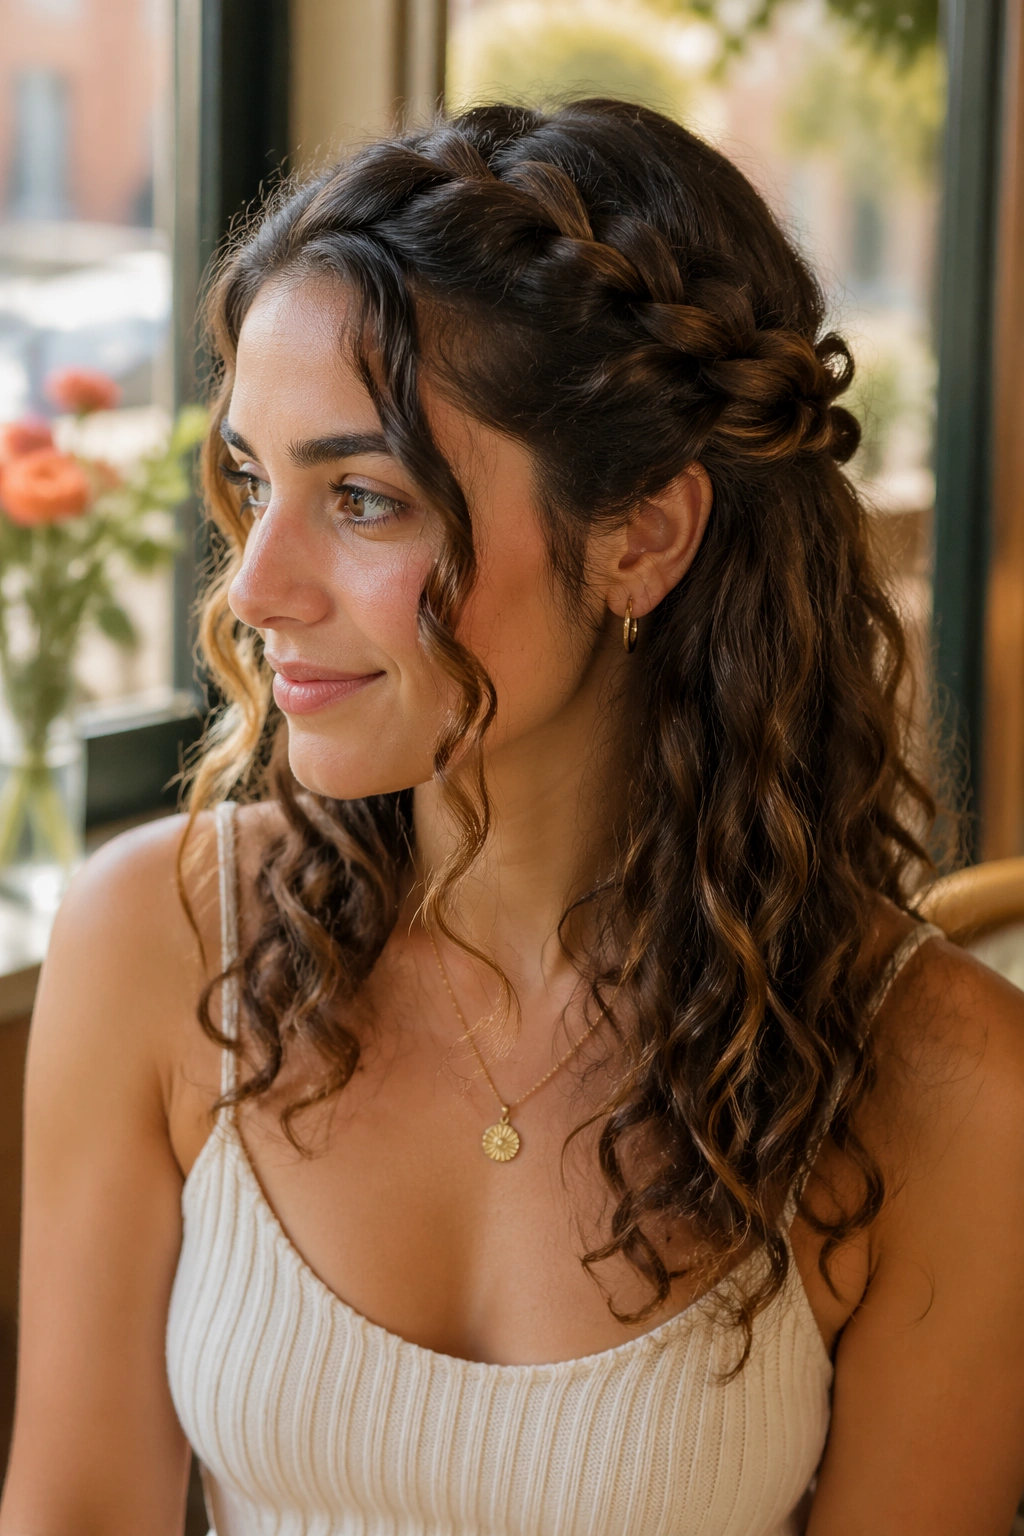
Want more structure without flattening the curl pattern? A loose half-up braid gives you that middle ground. It looks more styled than a simple twist, but it still leaves plenty of curl movement through the lengths. On curly hair, that balance is half the battle.
Take a section from each temple and braid them together at the back in a soft three-strand braid. Stop before the braid gets too tight or too long. The sweet spot is usually around the middle of the head, just above the upper back curve of the skull. If the braid gets pulled too low, the style can sag. If it’s too tight, you lose the airy look that makes it work.
Braid placement that flatters the face
- Start the braid a little higher if you want lift at the crown.
- Start lower if you want softness around the cheekbones.
- Keep the braid loose enough that you can slip a finger under it.
- Use a clear elastic, then hide it with a small curl wrapped around the end.
This style suits thick curls especially well because the braid has something to hold on to. Fine curls can wear it too, but the braid should stay small and relaxed. I also like this one for second-day hair, when the curls already have a bit of grip and the braid doesn’t slide around as much.
Pro tip: gently tug the outer edges of the braid after it’s secured. Don’t yank. Just widen it a little so it looks softer and fuller.
3. Curly Half-Up Top Knot with Soft Ends
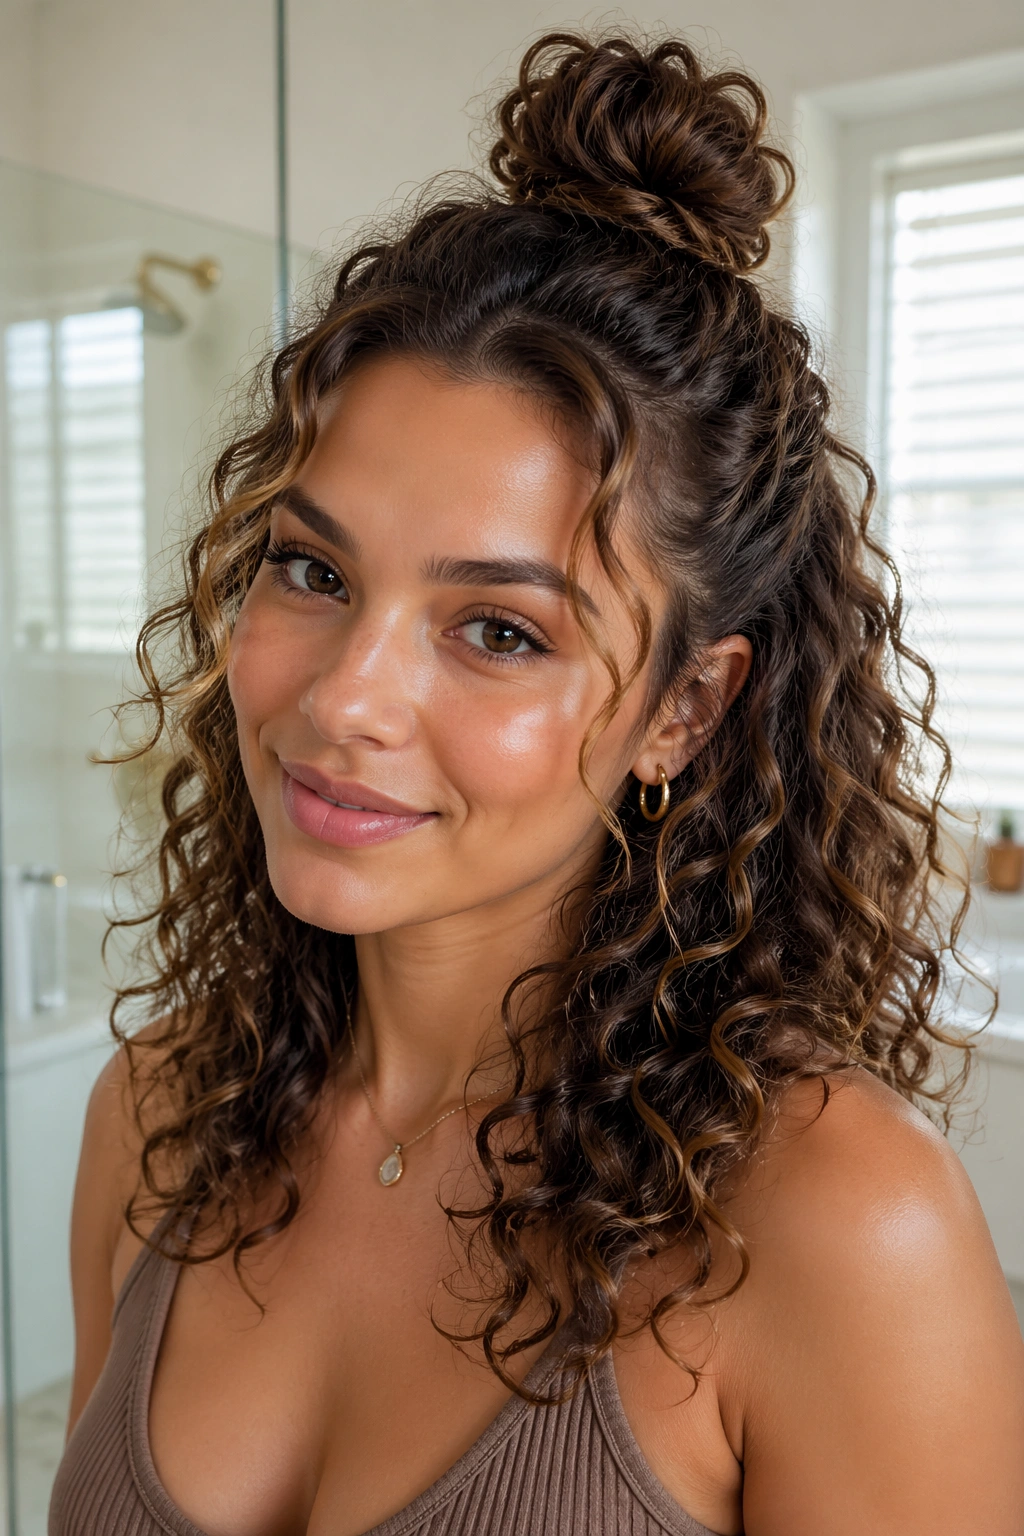
On days when your curls are getting in your way, a half-up top knot solves the problem fast. You get the lift of a bun, the freedom of loose curls underneath, and enough height at the crown to make the whole style feel intentional. It’s one of those styles that can look casual or dressed up depending on how tidy you make the bun.
Gather the top third of the hair from temple to temple, then secure it into a small ponytail at the crown. Twist that ponytail once or twice and wrap it into a compact knot. Leave the ends a little soft rather than stuffing every strand under the elastic. The tiny bit of fuzz around the bun is what keeps it from looking stiff.
A satin scrunchie helps if your hair snaps out of elastics easily. If your curls are dense, use two small elastics stacked one over the other before wrapping the bun. That extra grip keeps the knot from sliding after a few hours.
One thing I like here: you can change the mood just by shifting the bun placement. Higher feels playful. Lower and slightly back feels calmer. Too far forward, though, and you start fighting your own forehead. No need for that.
This is the half-up half-down curly updo I’d call the most forgiving. It doesn’t ask for perfect parting. It just wants a little shape.
4. Bubble Half-Up Ponytail on Defined Curls
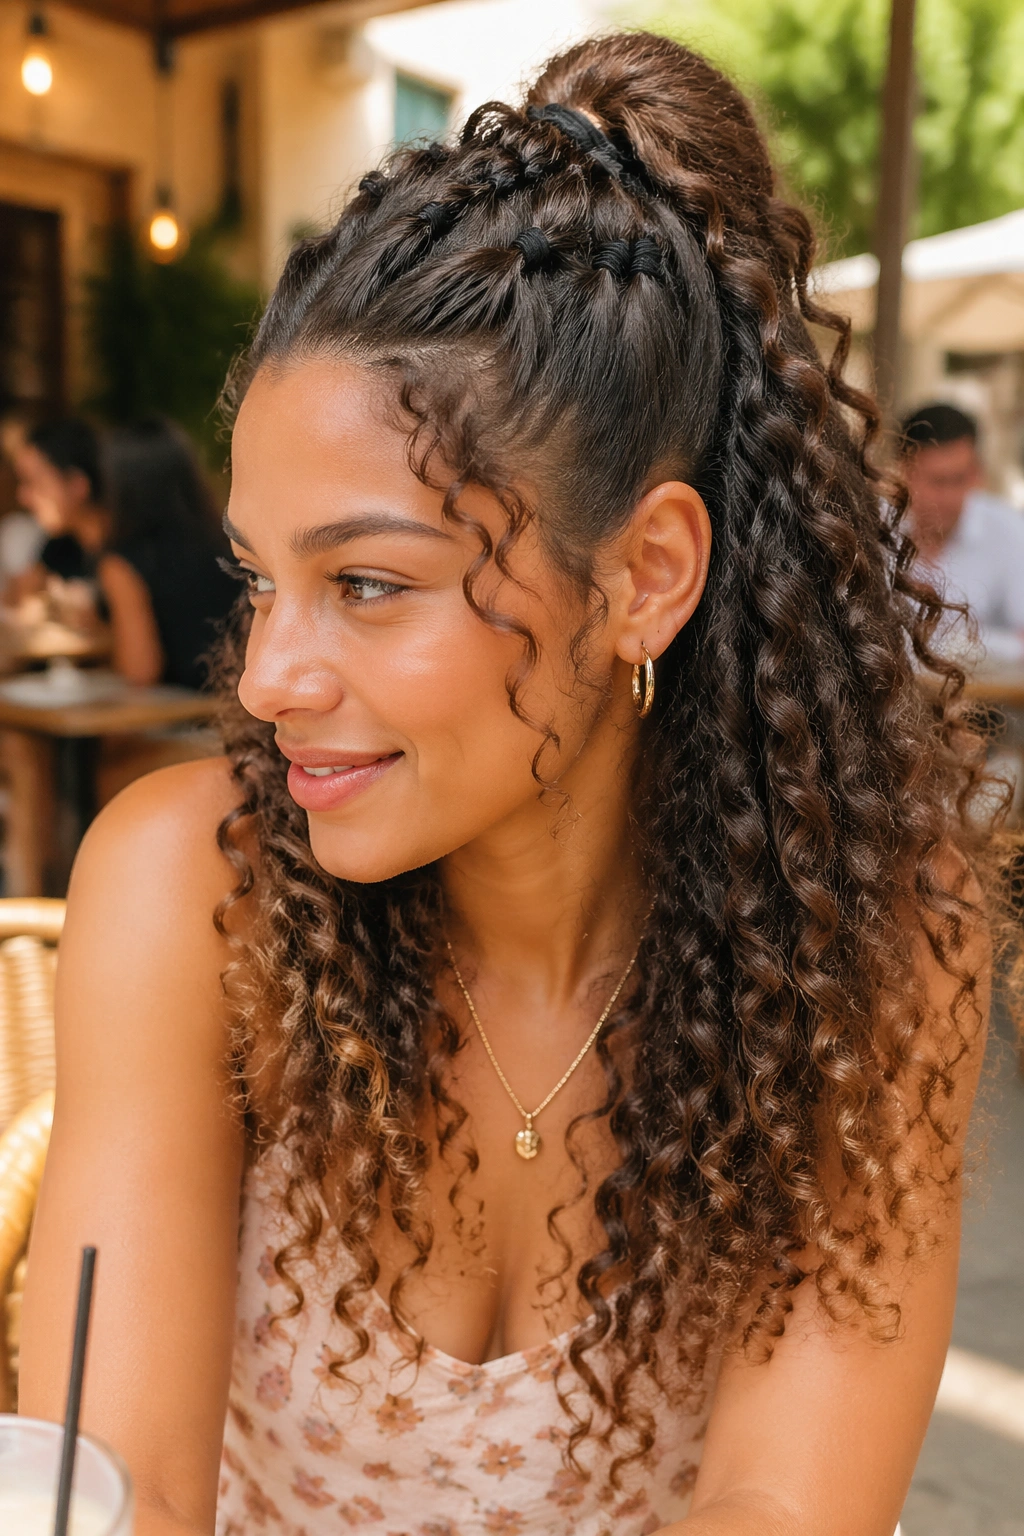
The bubble ponytail is one of those styles that looks more playful on curls than it does on straight hair. The little elastic sections break up the shape in a way that suits texture. Curly hair already has movement; the bubbles just give it a rhythm.
Start with a half-up ponytail secured at the back of the crown. Then add small elastics every 1½ to 2 inches down the length of the pulled-up section. After each elastic goes in, gently tug the section between the elastics so it rounds out into a bubble. Don’t pull the center strands too hard. The goal is volume, not a stretched-out tail.
Elastic spacing matters
- Use 3 to 5 small elastics, depending on hair length.
- Space them evenly so the bubbles look deliberate.
- Choose clear elastics or ones close to your hair color.
- Smooth the crown first, then leave the curls below untouched.
This style works best when the curls are already defined. The bubbles keep the top section orderly, while the loose lengths keep the whole thing from feeling childish. It’s a nice option for a brunch, a casual event, or any day when you want your hair to look a little more styled than “I clipped it back and hoped for the best.”
One warning: if your curls tangle easily, remove the elastics carefully at the end of the day. Tiny clear bands love to snag.
5. Claw Clip Twist Half-Up for Big Curls
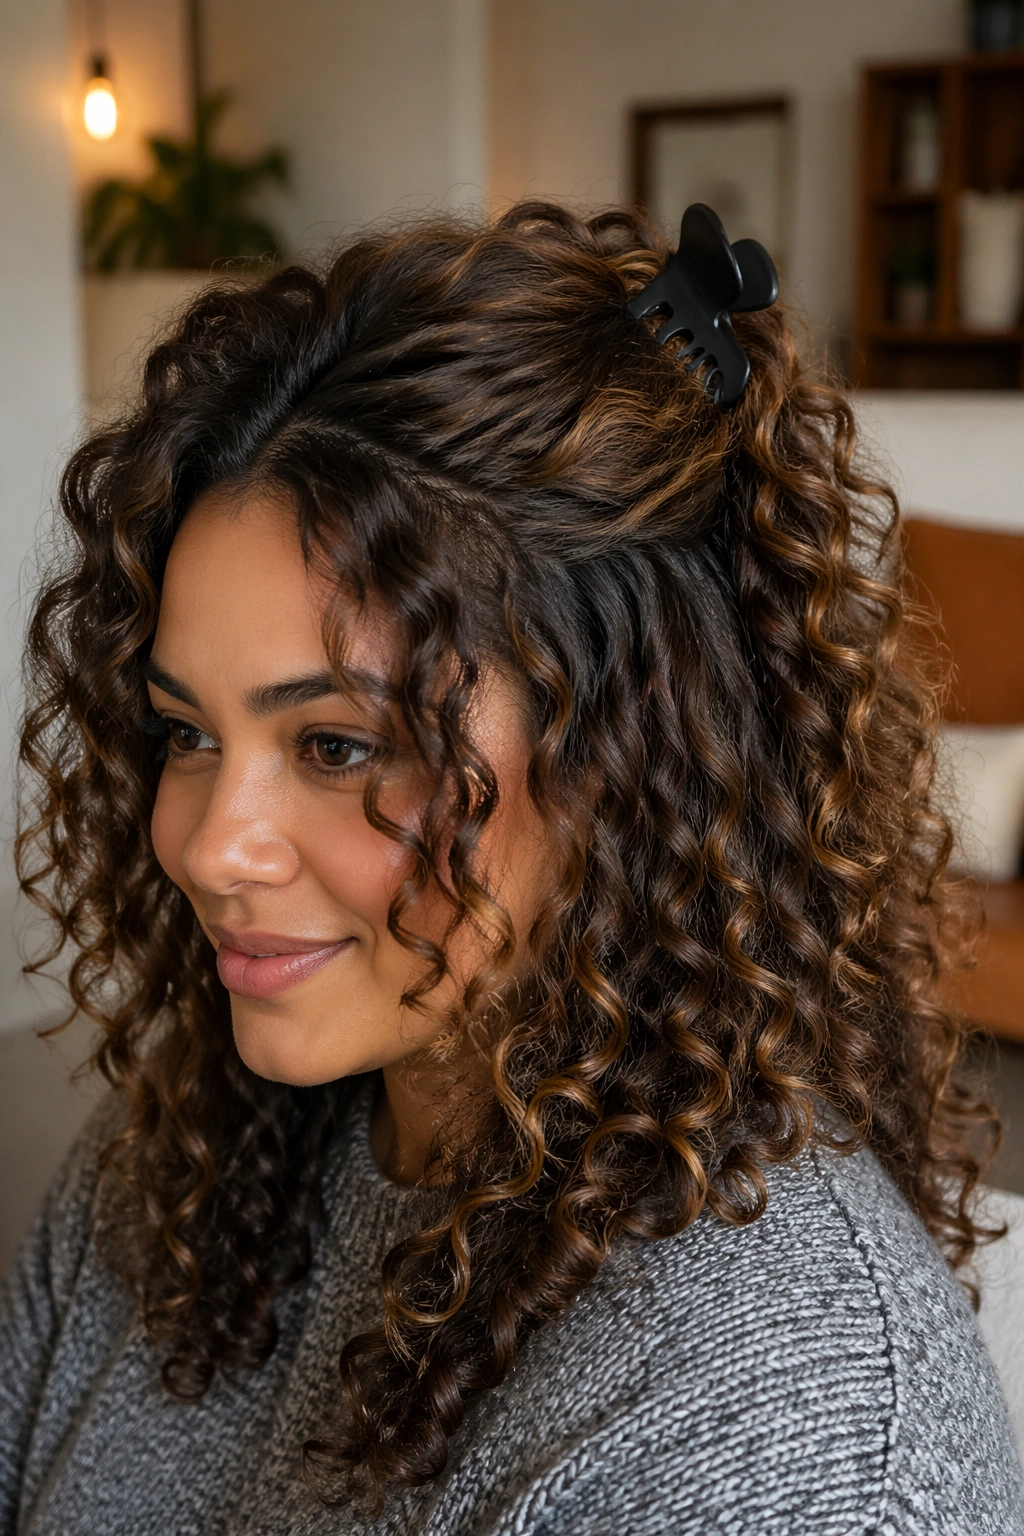
A claw clip can look lazy or polished depending on how you use it. On curly hair, the difference usually comes down to tension. Twist the top section loosely and place the clip so it grabs the twist without crushing it. Leave enough curl length down the back so the clip doesn’t feel like it’s carrying the whole style on its own.
For thick curls, choose a medium or large matte clip with teeth that can actually hold hair. Tiny glossy clips tend to slip, and cheap plastic can crack under weight. A clip with a little texture grips better. I like a shape that’s at least 3 inches long for dense hair. Smaller clips are fine for lighter curls, but they won’t do much heavy lifting.
This style looks best when the twist sits a little off-center. Straight-up-back can feel severe. Slightly angled to one side feels easier and gives the style some movement. Leave a couple of face-framing pieces out if you want a softer shape, or tuck everything back if you want clean lines.
The nice thing about the claw clip twist is speed. You can get it in place in under a minute once you’ve done it a few times. The less nice thing is that the wrong clip will slide halfway through the day. That’s not a styling problem so much as a hardware problem.
Choose the clip first. Then the style takes care of itself.
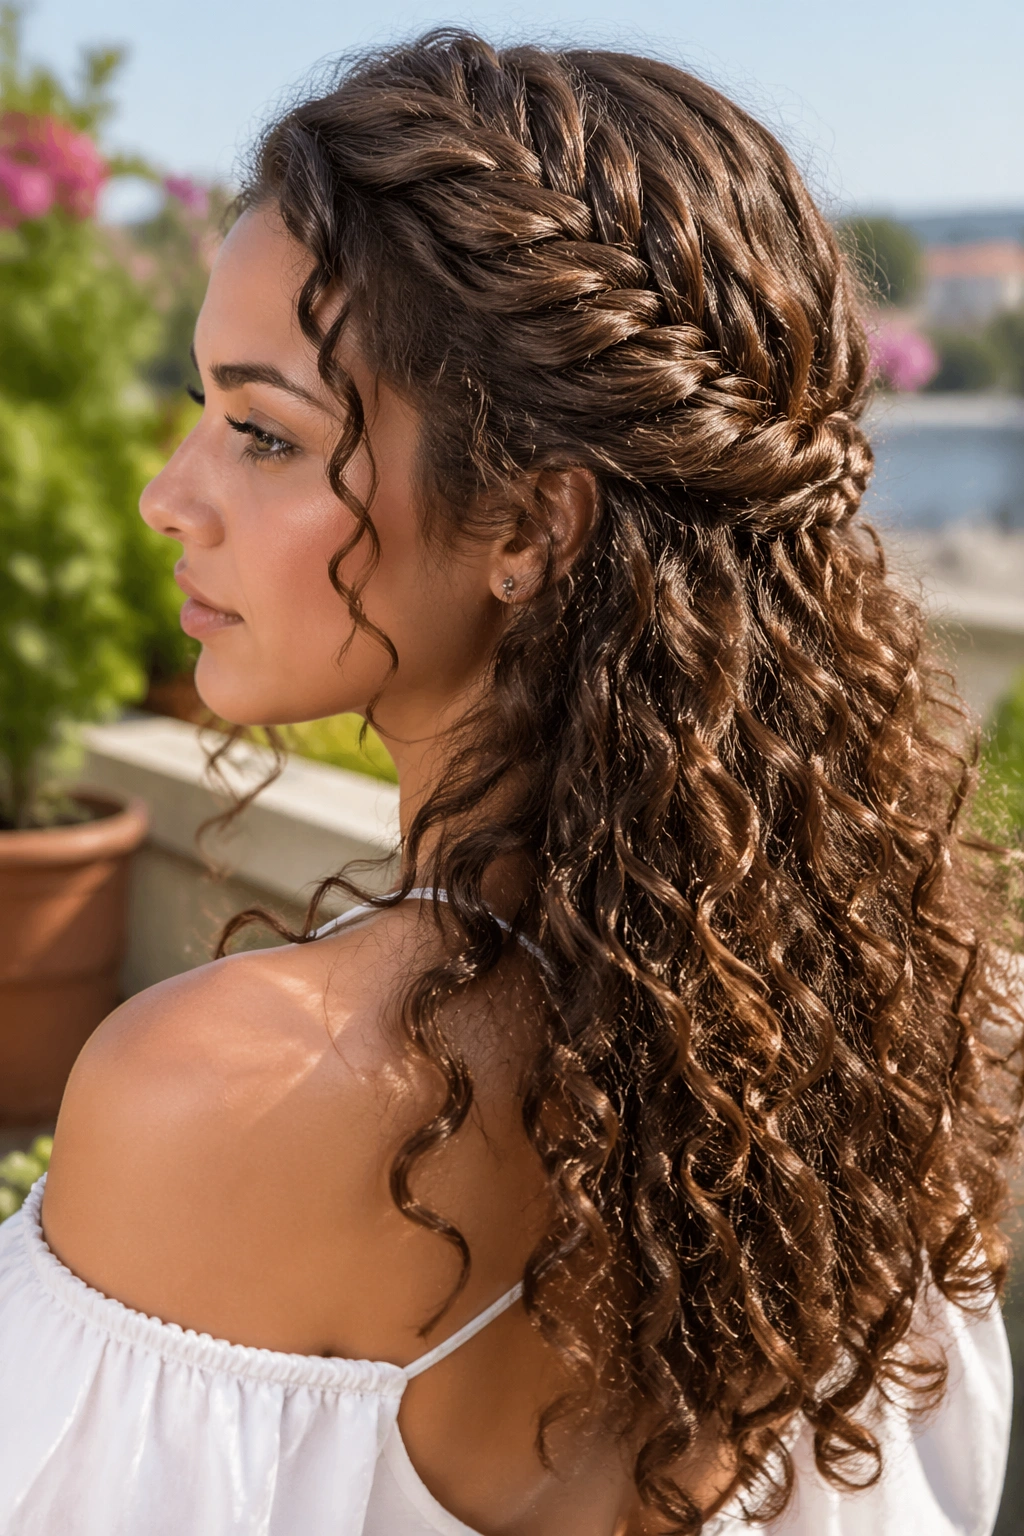
6. Waterfall Braid Half-Up with Loose Spiral Ends
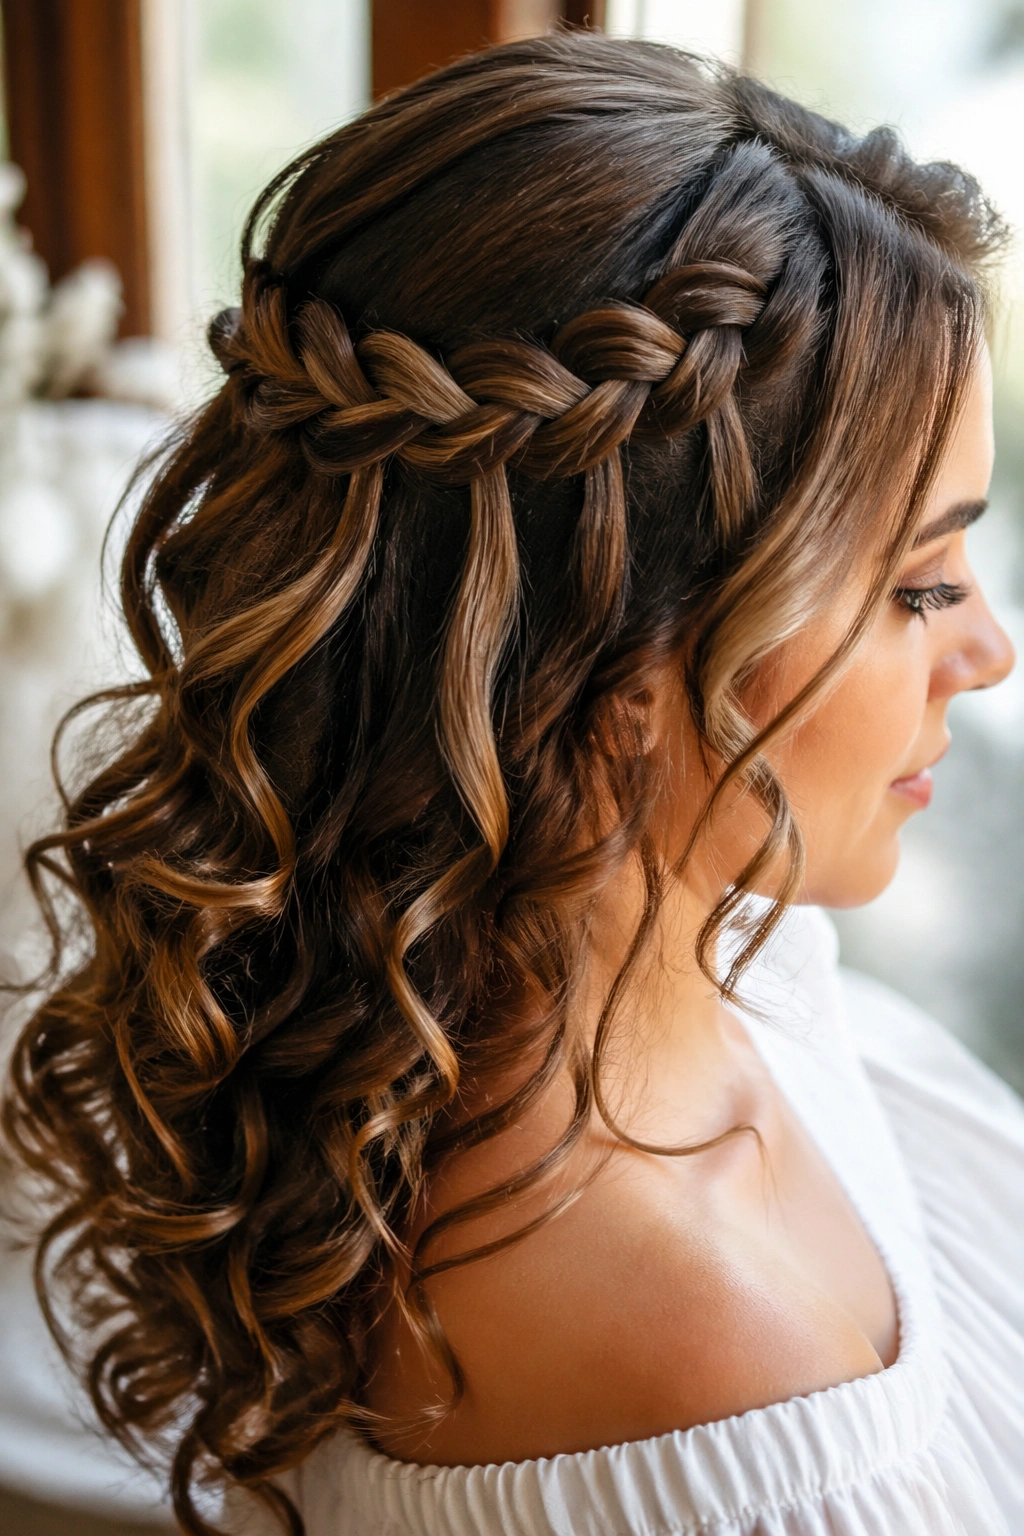
The waterfall braid is the half-up style I suggest when somebody wants something a little more romantic without going full formal. It has movement built into it. Strands drop out of the braid on purpose, so the curls underneath become part of the design instead of something you hide.
Begin the braid on one side, just above the temple. As you braid across the back of the head, drop one strand each time and replace it with a fresh section from above. That creates the “waterfall” effect. Keep the braid close to the scalp so it looks intentional, but not so tight that the dropped curls flatten against your head.
What makes the braid read clearly
- Use medium-sized sections so the pattern stands out.
- Keep the dropped curls loose and separated with your fingers.
- Secure the braid with a hidden pin behind the opposite ear.
- Mist the braid lightly with flexible-hold spray before you finish.
This style really likes curls with definition. The spiral ends that drop through the braid make the whole thing look layered and a bit dreamy. If your curls are very tight, the pattern can blur a little, so widen the braid slightly and don’t make the dropped sections too tiny.
I’ve always thought this style feels like it took more work than it did. That’s useful when you want the hair to do some of the talking.
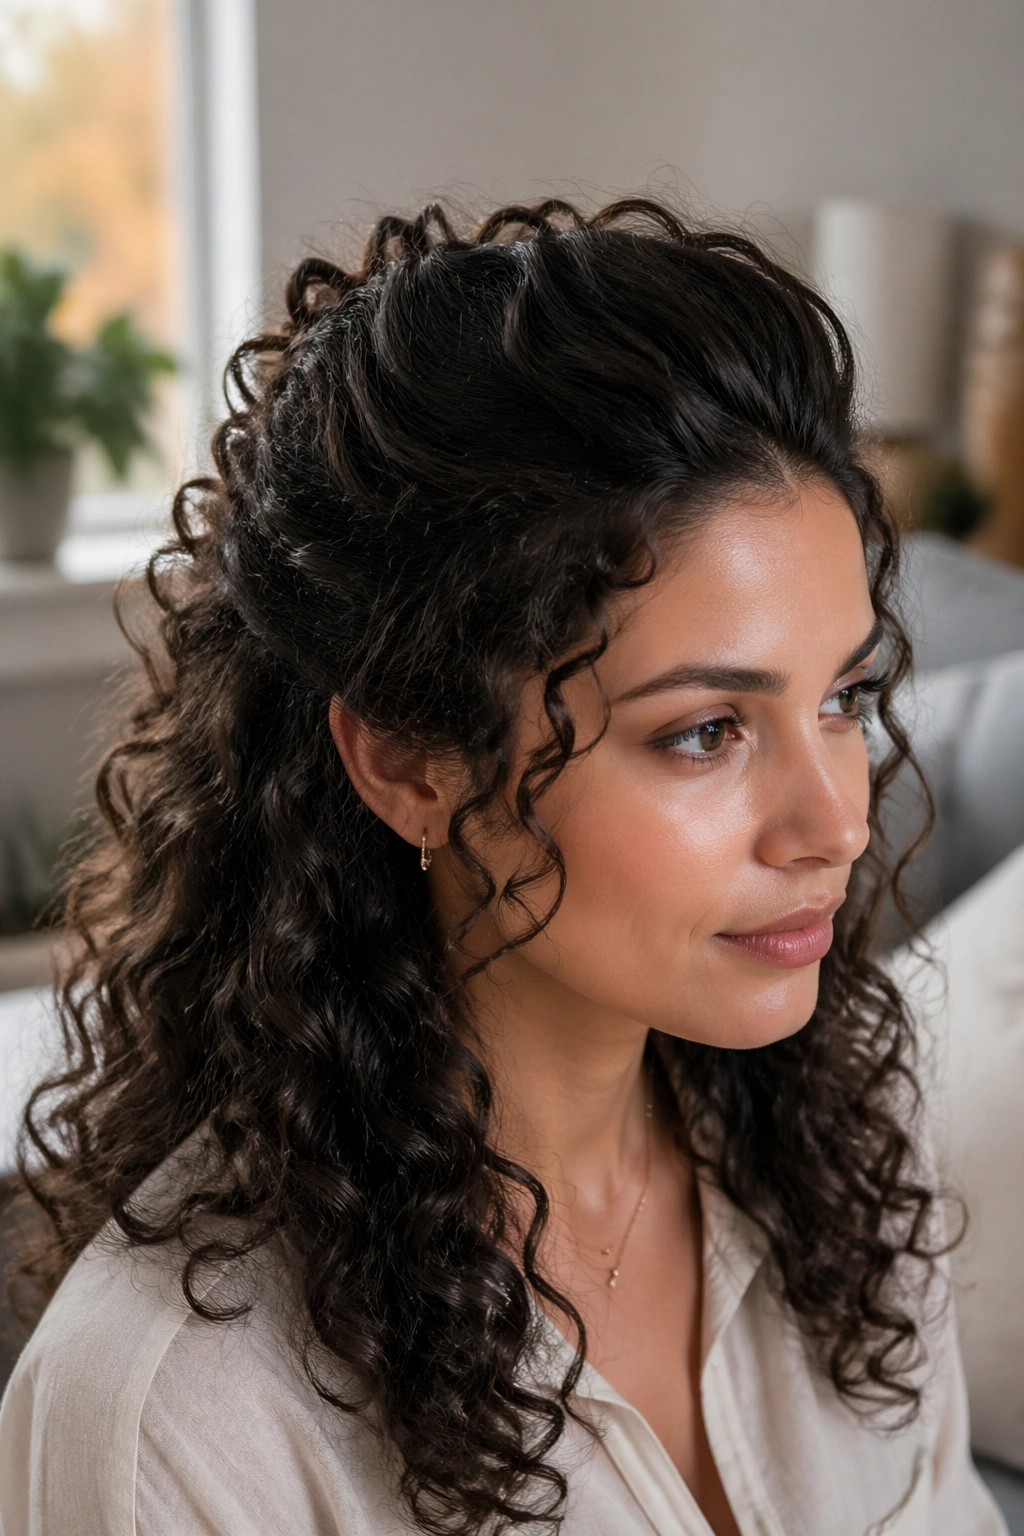
7. Curly Faux Hawk Half-Up with Crown Volume
If you want drama without a full updo, this is it. A curly faux hawk keeps the sides controlled, lifts the crown, and leaves the back length loose so the curls still move. It has edge, but it doesn’t go stiff or severe unless you push it that way.
Section off the sides from temple to behind the ears, then pin them back toward the center line. Don’t flatten the middle. That’s the whole point. The top should stay lifted, almost like a soft ridge, while the loose curls below hang freely. If your hair is layered, the shorter pieces around the crown help create shape fast.
What to lift and what to leave alone
- Tease only the root area at the crown, not the whole section.
- Use 4 to 6 bobby pins, crossed in an X when extra grip is needed.
- Smooth the sides with your palms, not a brush, if you want to keep texture.
- Leave the lower curls out of the pins so the style stays airy.
This is a good one for oval, heart, or round faces because the vertical line at the center adds length. It also suits thicker curls that can support volume without collapsing. Fine curls can wear it too, but the crown needs a little more support, maybe with a root-lift spray or a tiny clip hidden under the top section.
It’s bold, yes. But it’s not fussy. That’s why it works.
8. Curly Space Buns Half-Up with Loose Length
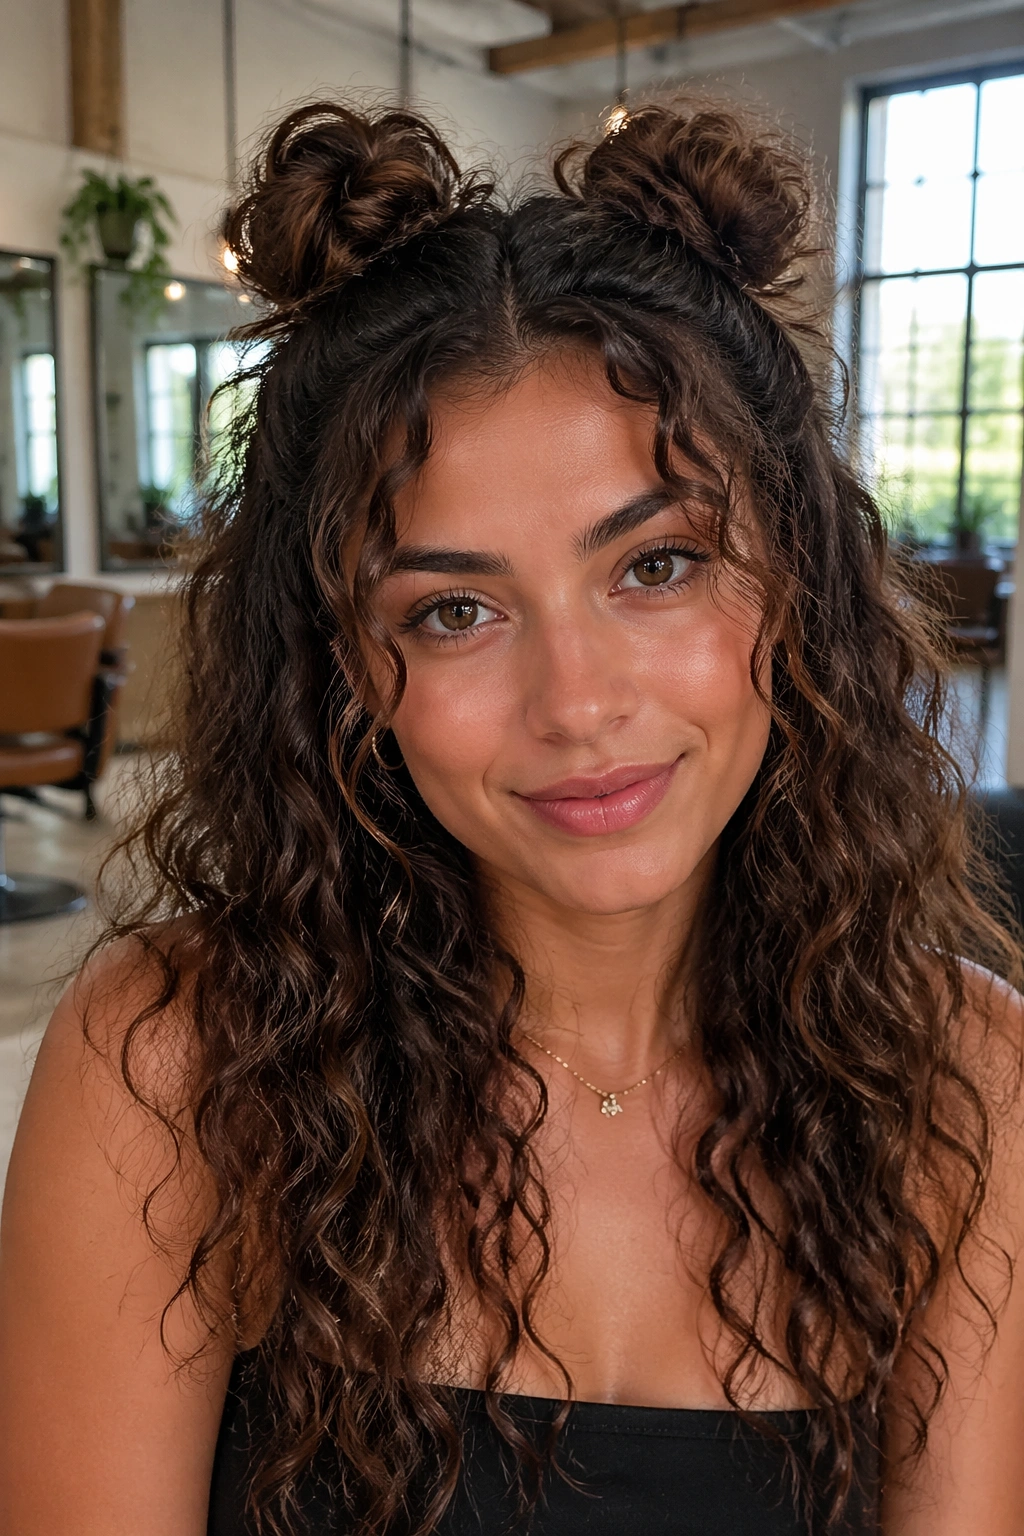
Two small buns can look playful instead of childish when the rest of the curls stay loose and bouncy. The trick is size. Keep the buns compact, high enough to read clearly, and let the bottom half do the soft, curly work.
Part the top half of the hair into two sections, one on each side of the center part. Secure each into a small ponytail, then twist and coil them into buns. Don’t worry about perfect symmetry. Curl texture already gives you enough visual interest. If the buns are a little uneven, they usually look better, not worse.
This style is especially nice on shoulder-length curls, where the buns can sit neatly without swallowing too much hair. On longer curls, the bun should stay smaller so the loose lengths don’t feel overwhelmed. On shorter curls, the buns can be slightly messier, which suits the style anyway.
A middle part gives the strongest symmetry, but a soft off-center part can make the whole thing feel less severe. I like that version when the hair has a lot of volume at the roots and I don’t want the style to look too planned.
Small detail, big effect: leave a few curled ends sticking out of each bun. A fully tucked bun can look too neat. The little ends make the style feel more alive.
9. Ribbon-Tied Curly Half-Up with Soft Ends
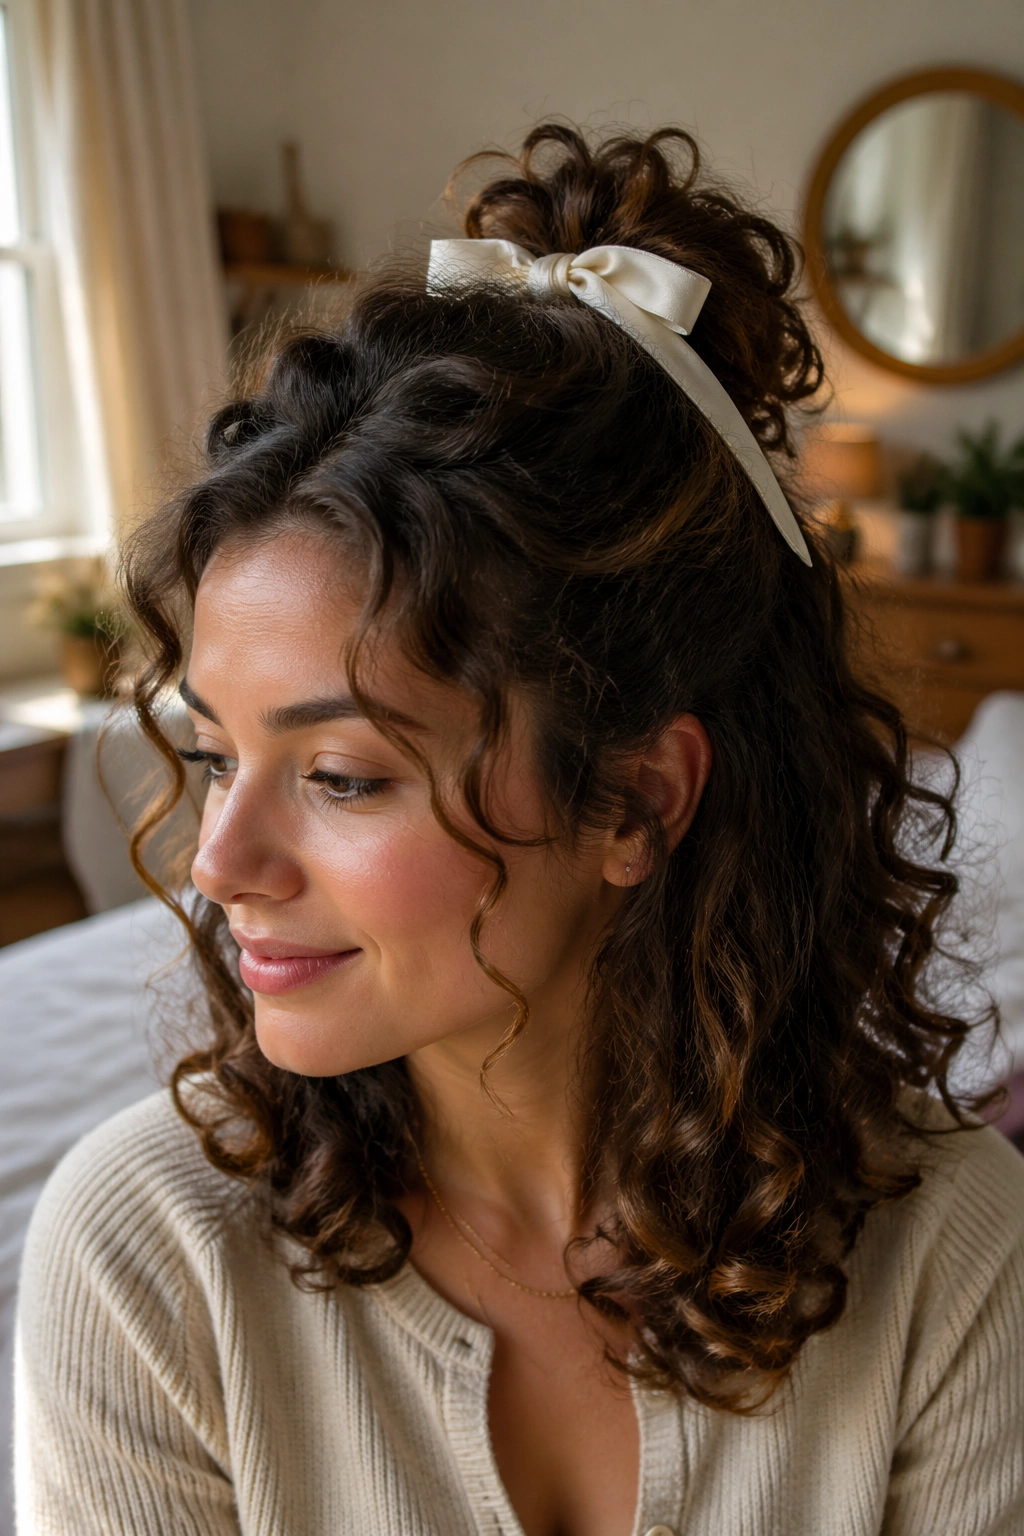
Need something soft enough for daytime but prettier than a bare elastic? A ribbon-tied half-up style does that job with almost no effort. It’s one of the easiest ways to make curls look more finished without changing the curl pattern itself.
Gather the top section into a half ponytail or a small half braid, then tie it with a ribbon instead of a standard elastic cover. A ribbon that’s about ½ inch to 1 inch wide usually sits well on curly hair. Narrow enough to stay neat, wide enough to show. Satin gives a smooth finish, while grosgrain has a little more grip and holds its shape better.
Ribbon choices that actually hold up
- Satin ribbon for a smooth, polished look.
- Grosgrain ribbon if you want more grip and a cleaner bow.
- Velvet ribbon when you want the bow to sit with a little more weight.
- Wire-edge ribbon if you want the loops to stay crisp.
I like this style when the curls themselves are already doing enough. The ribbon adds one small point of focus, and that’s enough. It can be tied at the back of the head, slightly off to one side, or woven through a loose braid for a more dressed-up finish.
Be careful with overly long ribbon tails if your curls are very thick. They can tangle in the lengths. Shorter tails, around 4 to 6 inches past the knot, are easier to manage.
The whole style feels gentle. Nothing about it is aggressive. That’s a nice change.
10. Sleek Front Sections with Defined Curl Cascade
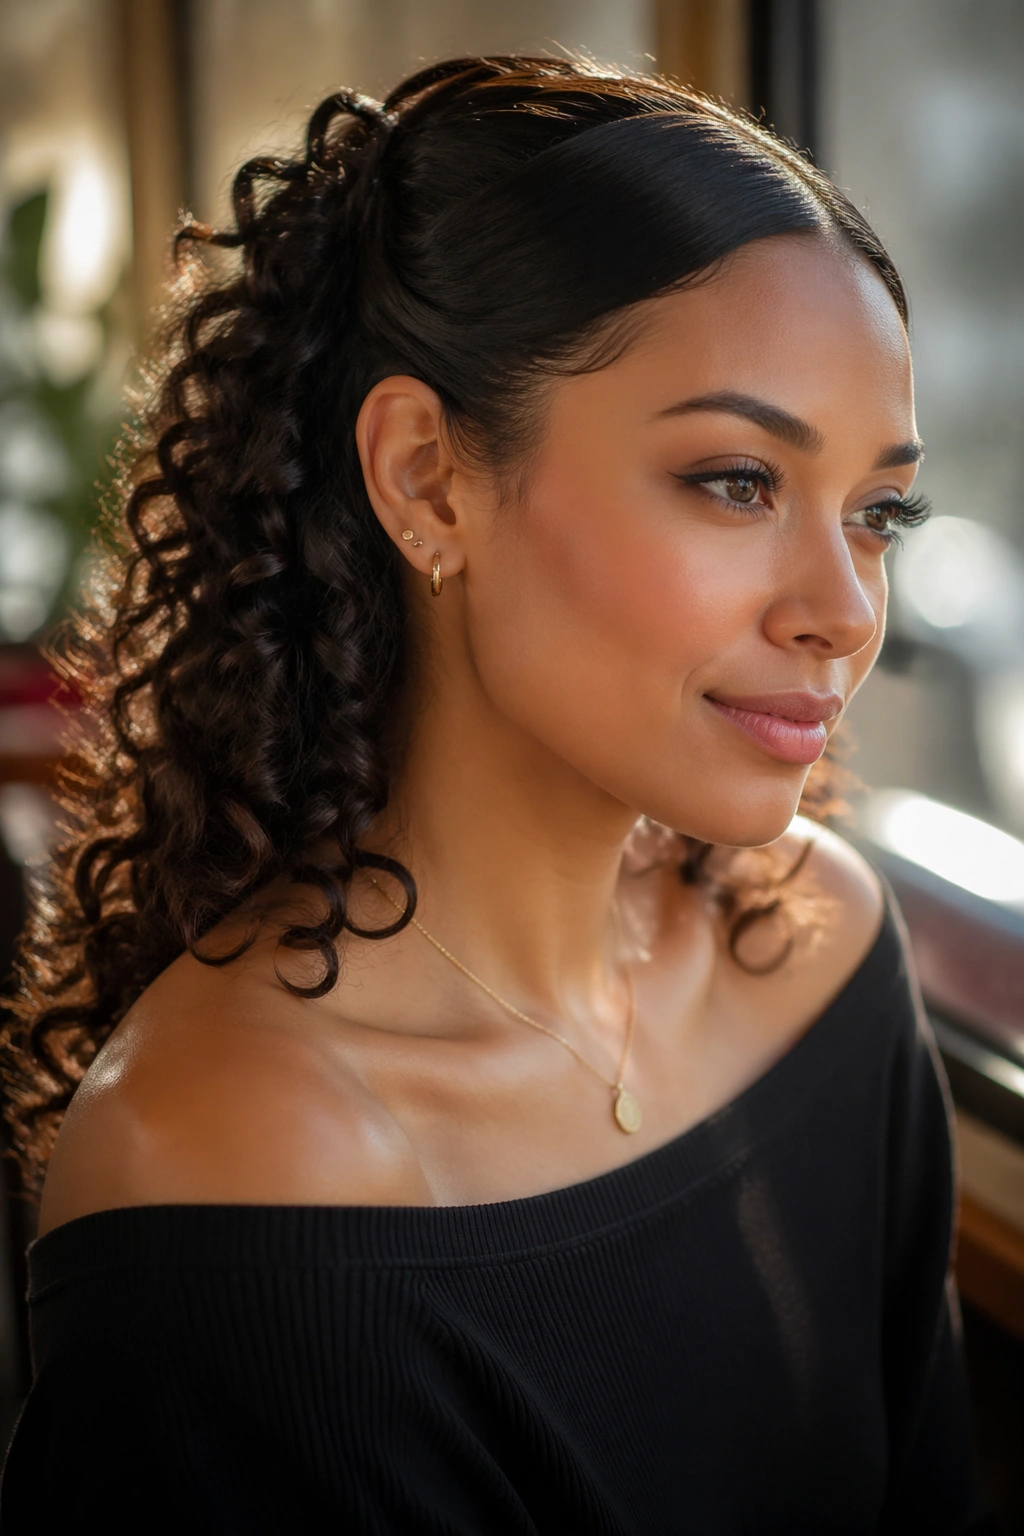
Sleek on top, curly underneath. That contrast is the whole point here, and it’s why the style looks sharper than a standard half-up. The front sections sit smooth against the head while the rest of the hair keeps its curl and spring. It gives the style a clean frame without muting the texture.
Take the side sections from the temples and smooth them back with a small amount of gel or cream. Use a brush with firm bristles if your hair tends to puff up fast, then pin or clip the sections flat just behind the ears. Leave the back curls untouched. Don’t brush through them just because the top is sleek. That’s how you end up with two hairstyles fighting each other.
Keep the back curly, not crunchy
- Apply product only to the top 2-inch sections.
- Use a pea-sized amount first; add more only if needed.
- Scrunch the loose curls after the top is secured.
- If the crown starts to lift, smooth it with damp hands instead of more gel.
This style works especially well when your curls are defined but the roots get fluffy by midday. The sleek front keeps the shape sharp, while the curls underneath keep it from looking too severe. It can read polished enough for work or dinner, but still relaxed enough that you don’t look overstyled.
A small middle part looks crisp. A soft side part looks easier. I prefer the side part when the hair has a lot of volume, because it breaks up the line just enough.
11. Pinned-Back Pouf with Crown Lift
A little crown lift changes the whole silhouette. Without it, some half-up curly styles can sit too flat on top and too wide on the sides. With it, the style suddenly has shape. Not a lot. Just enough.
Take a front section that’s about 3 inches deep across the crown, then lift it gently and backcomb the underside a little with a fine-tooth comb. Don’t tease the ends. You only want support at the root. Smooth the top layer back, pin it behind the crown, and let the rest of the curls fall below.
That tiny pouf works well for fine curls, flat roots, or hair that loses shape quickly. It also helps when the face-framing pieces are long and need something behind them so they don’t slide forward. The lift gives the style a little air.
Where the pins should land
- Pin just under the lifted section, not on top of it.
- Use 2 crossed bobby pins for stronger hold.
- Hide the pins inside a curl cluster if you can.
- Stop teasing once the section has enough lift to stay put.
This one can look retro if you make the pouf too round, so keep it soft. I like a little unevenness here. A perfectly shaped pouf can feel old-fashioned in a way you may not want. A slightly loose lift feels friendlier and more modern, even though those words get tossed around too much. Here, they mean something.
12. Fishtail Braid Half-Up with Curly Length
A fishtail half-up braid looks more detailed than a regular braid, but it doesn’t need to be complicated. The trick is using smaller pieces than you think you need. On curly hair, that fine texture helps the braid stay visible against the loose lengths.
Start the braid from one temple or from both sides feeding into the center, depending on the look you want. Keep the sections small and even. A fishtail braid can look messy in a good way when the pieces aren’t perfect, but it should still read as deliberate. Once the braid reaches the middle back of the head, secure it and let the curls below stay loose.
How to keep the braid readable
- Use ½-inch pieces when you cross hair over.
- Keep the tension even from top to bottom.
- Gently spread the braid after securing it.
- Stop braiding before the pattern gets too narrow and disappears.
This style suits medium to long curls because the loose lengths give the braid a base to sit against. On shorter curls, it can still work, but the braid should stay compact so it doesn’t swallow the top section. I also like this one when the hair has a mix of textures. The braid gives structure, and the curls underneath keep the style from feeling too tidy.
It’s a little more time-consuming than a twist. Not much. Just enough to matter if you like detail.
13. Rope-Twist Accent Half-Up for Quick Styling

If you want the fastest half-up curly updo, rope twists are hard to beat. They take less time than braids, need fewer pins, and still give the top section some shape. You twist, cross, secure. Done.
Take a small section from each side of the head near the temples. Twist each section tightly in one direction, then wrap them around each other in the opposite direction. That cross-twist creates the rope look. Pin the finished twist at the back, or let it join into a small half ponytail if you want a softer finish.
This style is handy on second-day curls because the hair has a little more grip. Freshly washed hair can work too, but use a bit of styling cream on the fingers so the flyaways stay down while you twist. Don’t oversaturate. Rope twists look better when the curl pattern is still visible, not coated into submission.
The shape is clean without feeling formal. It’s the kind of style I’d choose when I need something practical, but I still want the front of the hair to look like I made an effort. Not a huge effort. Just enough.
Best for: medium curls, long curls, and mornings when your patience is running thin.
14. Pearl-Pin Half-Up Curly Style

Pearl pins change the tone of a curly half-up style fast. A plain twist can look casual. Add a few pearl pins, and the same shape starts to feel dressy enough for a wedding, a graduation, or any night when you want the hair to look a little more considered.
The key is placement. Don’t line the pins up in a row unless you want a very formal look. Scatter them through one side of a twist, braid, or pinned-back section so the pattern feels softer. Four pins can be enough on fine hair. Thick curls may need six or eight, especially if you want the pins to stay visible and not disappear into the texture.
Where the pins should land
- Place 1 or 2 pins near the point where the hair is already secured.
- Leave a little space between pins so the design doesn’t feel crowded.
- Angle the pins slightly upward for better hold.
- Push each pin into a section with some structure, not into the loosest curls.
Pearl pins show up beautifully against dark curls, but they also pop on blonde, copper, or silver hair. The contrast gives you a little shine without requiring a full head of accessories. I prefer this style when the curls are already well defined, because the pins sit better against a crisp texture. On very frizzy hair, they can get lost unless the section is smoothed first.
It’s a small detail, but it changes the whole mood.
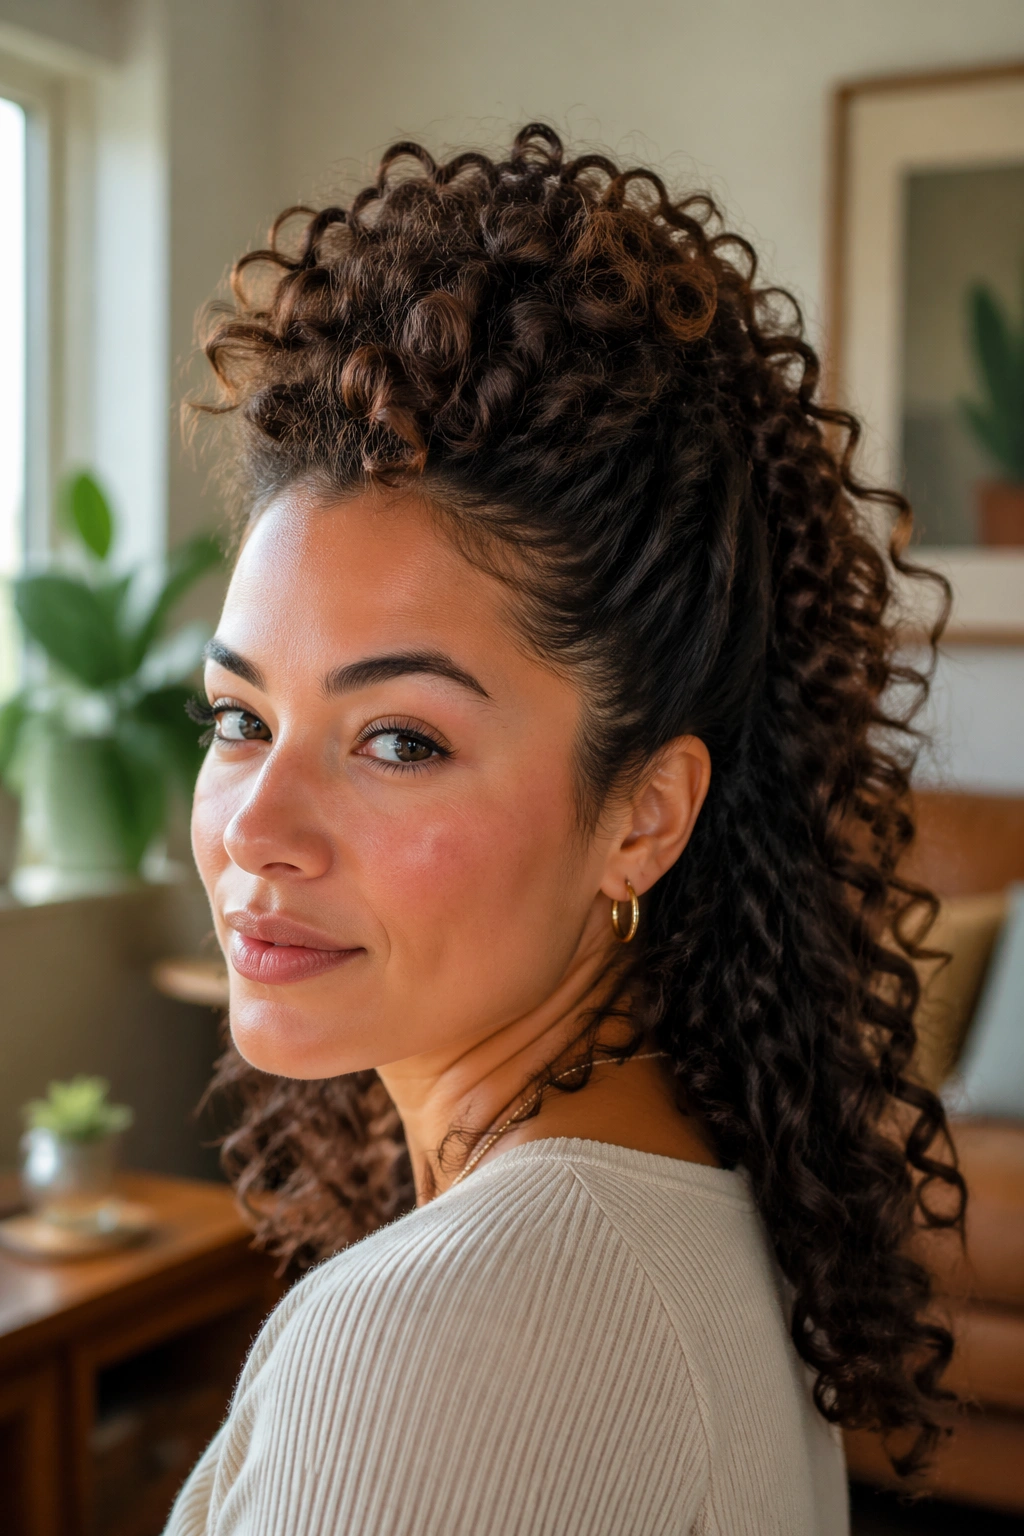
15. High Half Pony with Curly Cascade
A high half pony is the style I trust when I want volume up top and curls falling freely through the back. It holds its shape through a long day, and it doesn’t ask for the kind of precision that some of the fancier styles demand. That alone makes it useful.
Gather the top half of the hair from temple to temple and secure it high at the crown with a snag-free elastic. Before you tighten it completely, lift the base slightly so the top keeps a little height. Wrap one curl around the elastic and pin it underneath if you want the finish to look cleaner. Leave the lengths down and let the curls cascade naturally.
This style is especially good for thick curls because the top section can carry some weight without collapsing. It also works when the hair is longer, since the down section keeps the silhouette balanced. If the top starts to feel too tight, loosen the front a touch and let a few curls fall forward. The style gets better when it stops looking overmanaged.
I keep coming back to this one for a reason. It gives you lift, control, and movement in one move, which is more than most styles can say.
The best half-up curly looks are the ones that leave room for the curl pattern to breathe. Pin enough to shape the top, then stop. Let the bottom do what it does best.