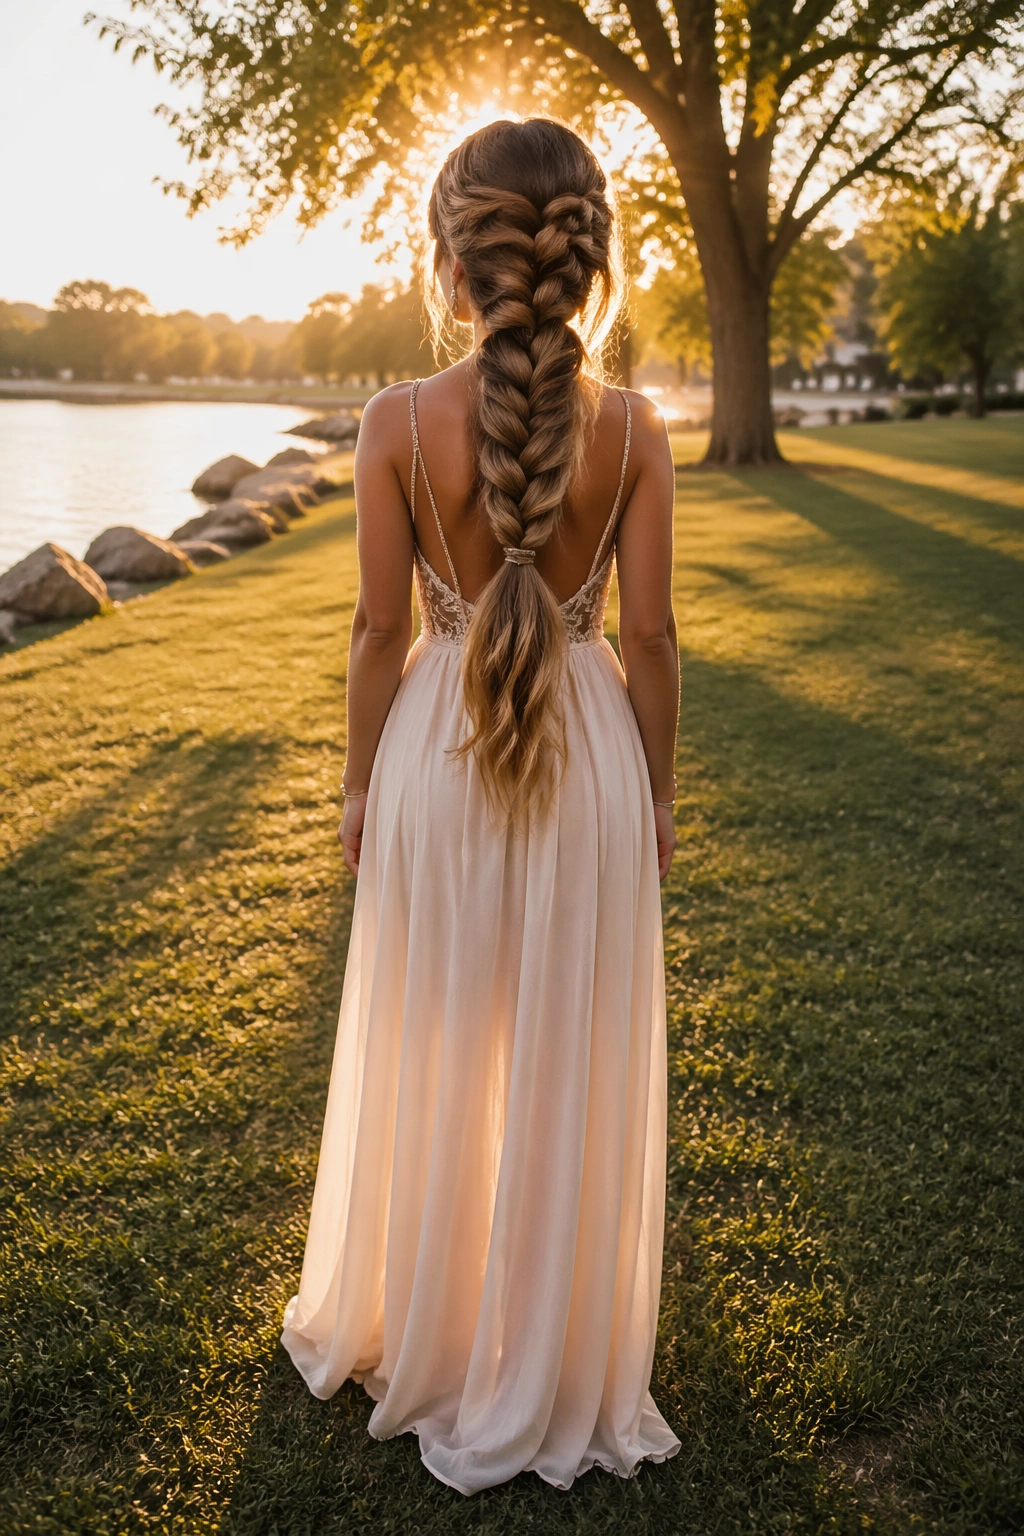
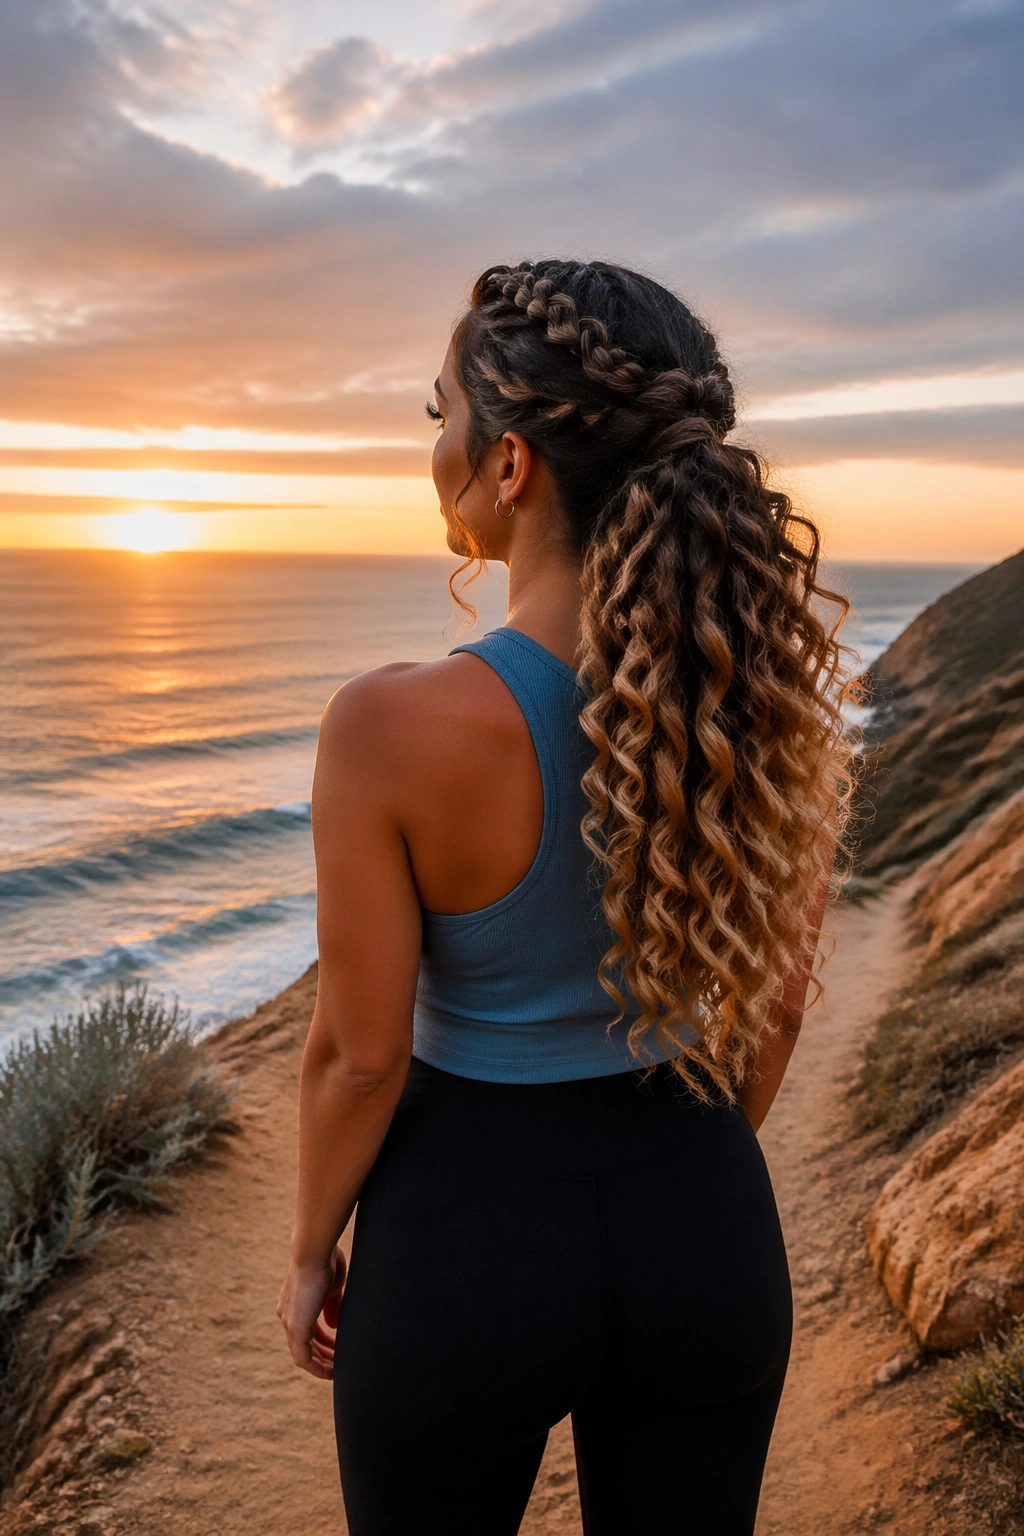
An ombre braided ponytail does something a plain ponytail rarely bothers to do: it gives the color a place to move. The fade from dark roots to lighter ends, or from chestnut to caramel to honey, looks sharper when it’s woven through a braid instead of hanging flat.
That’s why this style keeps showing up in places that ask for very different moods. It can feel polished enough for a meeting, soft enough for a wedding, or sporty enough for a day when you want your hair off your neck and out of the way. The braid does the heavy lifting. The ombre does the rest.
I’ve always liked hairstyles that earn their keep, and this one does. A good braided ponytail can hide day-three texture, make layered hair look fuller, and show off color without requiring a lot of fuss. The details matter, though — where the ponytail sits, how tight the braid starts, whether the ends are curled or left straight, and how much shine you put on the base.
That’s where the fun begins.
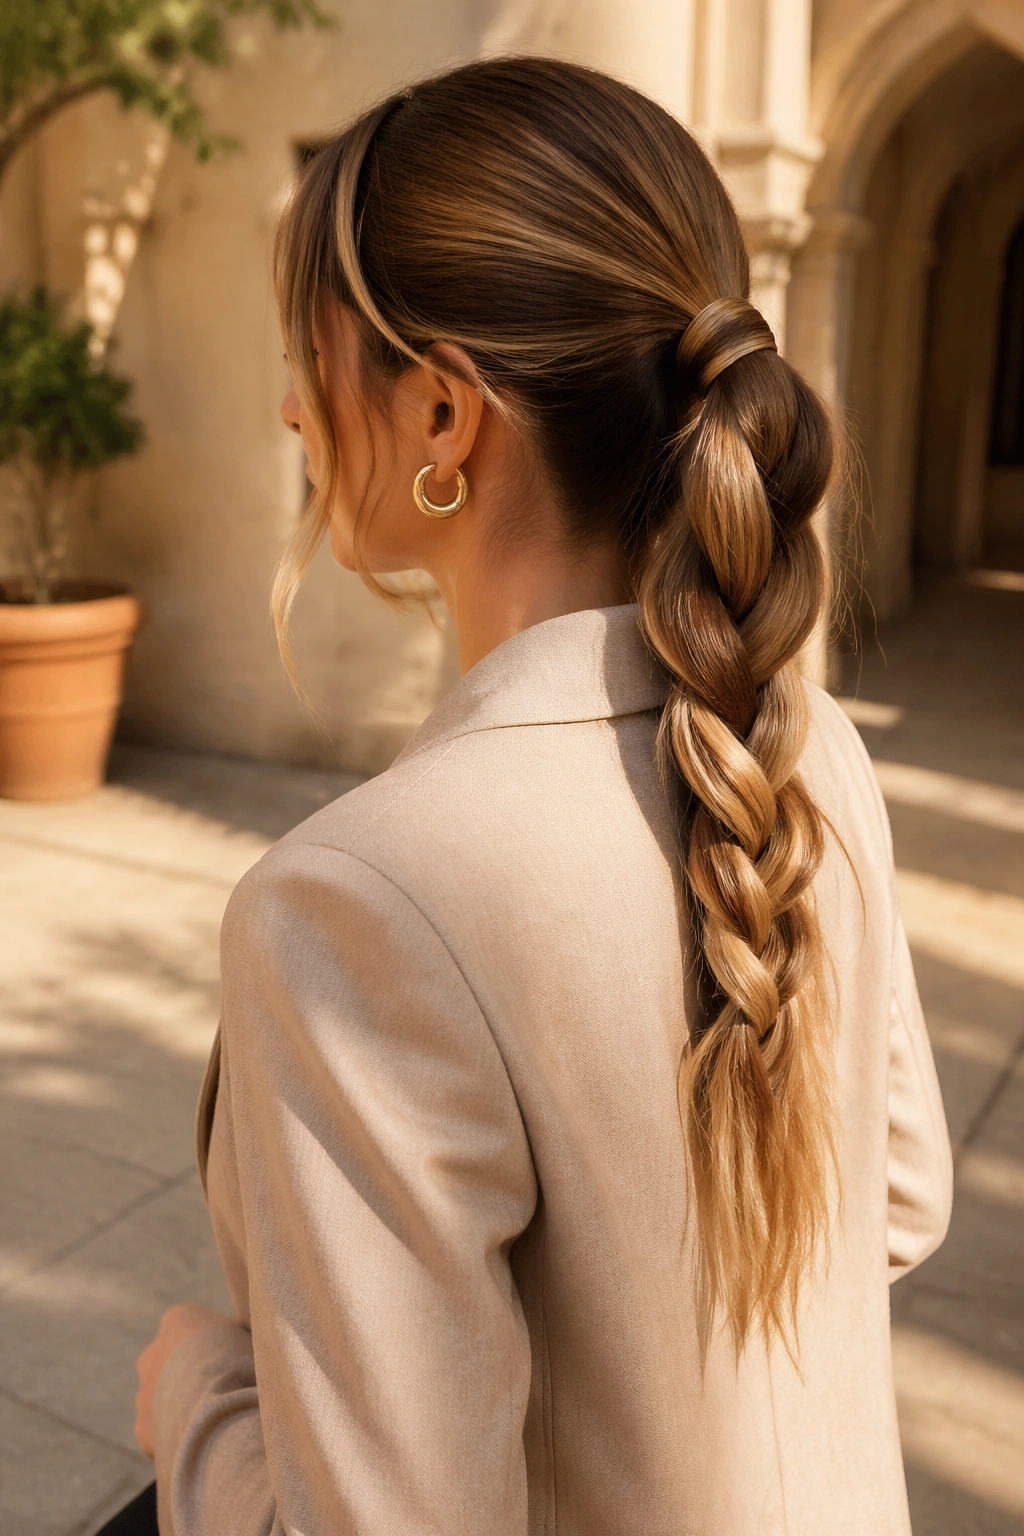
1. Sleek Low Ombre Fishtail Ponytail
A low fishtail braid is one of the cleanest ways to show off an ombre melt without making the whole look feel stiff. The tight, woven pattern pulls light and dark strands together so the color shift reads like a ribbon, not a stripe. It’s polished, but not fussy.
This version sits best at the nape or just above it, where the hair can lay flat and the braid can fall over one shoulder. Use a smoothing cream from mid-length to ends, then make the ponytail with a small elastic before you start the fishtail. If your hair is layered, mist the ends with a light-hold spray first so the shorter pieces don’t poke out.
It looks sharp without trying. That’s the appeal.
For work, dinner, or a dressy daytime event, this is the braid I’d pick first because it doesn’t fight with earrings, collars, or makeup. The ombre gets a clean frame, and the fishtail gives the length enough texture that it never feels plain.
2. High Bubble-Braid Ombre Ponytail
Bubble braids make ombre color look bolder than almost any other ponytail style. The spaced-out sections turn the fade into a series of soft, rounded bands, which is handy when you want the color to read clearly from across a room.
Why the bubbles help the color pop
Start with a high ponytail at the crown, then add clear elastics every 2 to 3 inches down the length. Gently tug each section outward until it forms a rounded bubble, but stop before the hair starts to look stretched. A little fullness is enough. You don’t need giant balloons hanging off the back of your head.
Quick styling notes
- Best for long hair or clip-in extensions that reach past the shoulder blades.
- Use a firm elastic at the base so the ponytail doesn’t slide.
- Keep the bubbles even, but not identical.
- Works well with straight, waved, or blown-out hair.
This is the style for concerts, birthday dinners, and photos where you want the ombre to look graphic and fun. If you want motion, this has it. A tiny bit of shine spray on the outer layer keeps the bubbles from looking dry under bright light.
3. Dutch-Braid Crown Ponytail
Need something that stays put through a long day and still looks like you meant business? A Dutch-braid crown ponytail does that job well. The braid sits on top of the hair instead of disappearing into it, which gives the upper half a raised, carved look before the length drops into a ponytail.
How to keep the lift without the frizz
Braid from the hairline back toward the crown, adding small sections as you go. Keep the sections neat and the tension even, or the braid will wobble at the edge and puff up in odd spots. Once you reach the crown, gather the rest into a ponytail and secure it low or mid-height depending on how much drama you want.
The ombre part matters here because the braid shows off the darker roots near the scalp and then lets the lighter ends open up at the back. That contrast makes the style look more deliberate than a regular pulled-back ponytail.
This one suits busy days, active afternoons, and anyone who wants the front of the hair controlled without losing length. It’s tidy. Not severe. Big difference.
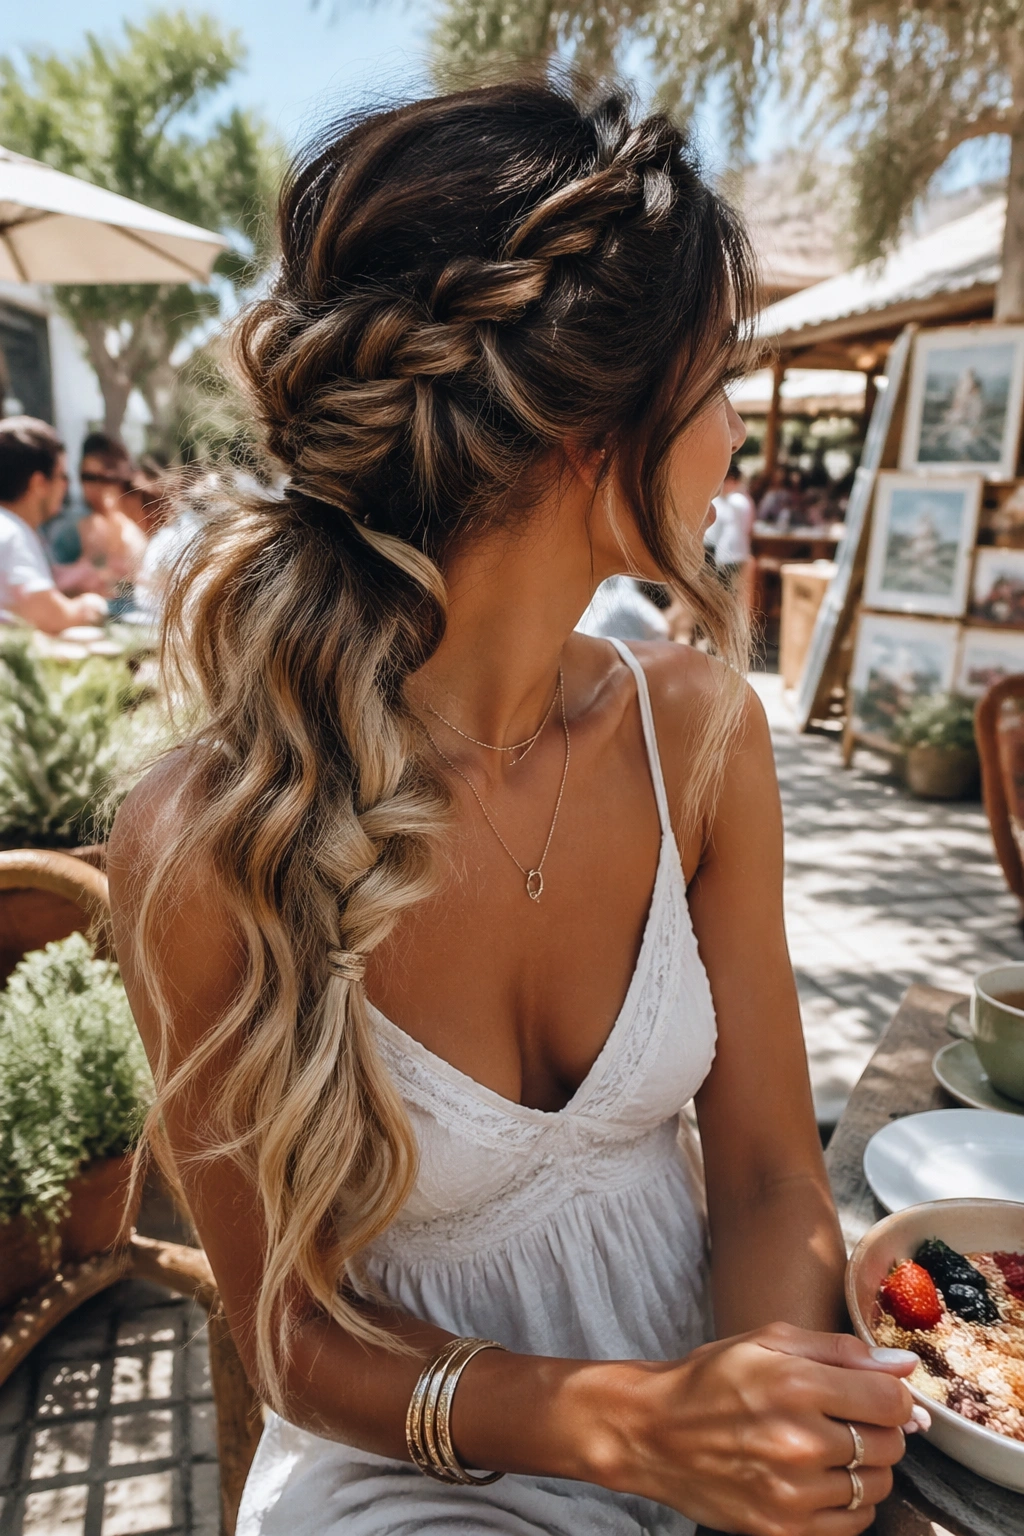
4. Side-Swept Braided Ponytail
Picture hair gathered over one shoulder, with the braid starting near the temple and trailing into a low ponytail that rests against the collarbone. That’s the mood here — softer, more romantic, and a little more flattering than a straight-back ponytail when you want the face to feel open.
A side-swept braid gives the ombre a chance to pool on one side, which looks especially good when the fade is strong. If the ends are blonde or warm caramel, they’ll frame the face near the shoulder and pick up the light as you move. I like this style with a deep side part, but a soft off-center part works too.
- Place the braid about 1 to 2 inches behind the ear.
- Use a light texturizing spray before braiding.
- Leave a few face-framing pieces loose if the occasion calls for softness.
- Curl the last 3 to 4 inches for a more dressed-up finish.
It’s a smart choice for dates, cocktail parties, and dinner plans where you want the look to feel a little easier than a full updo. One shoulder is enough. Sometimes that’s all the styling a person needs.
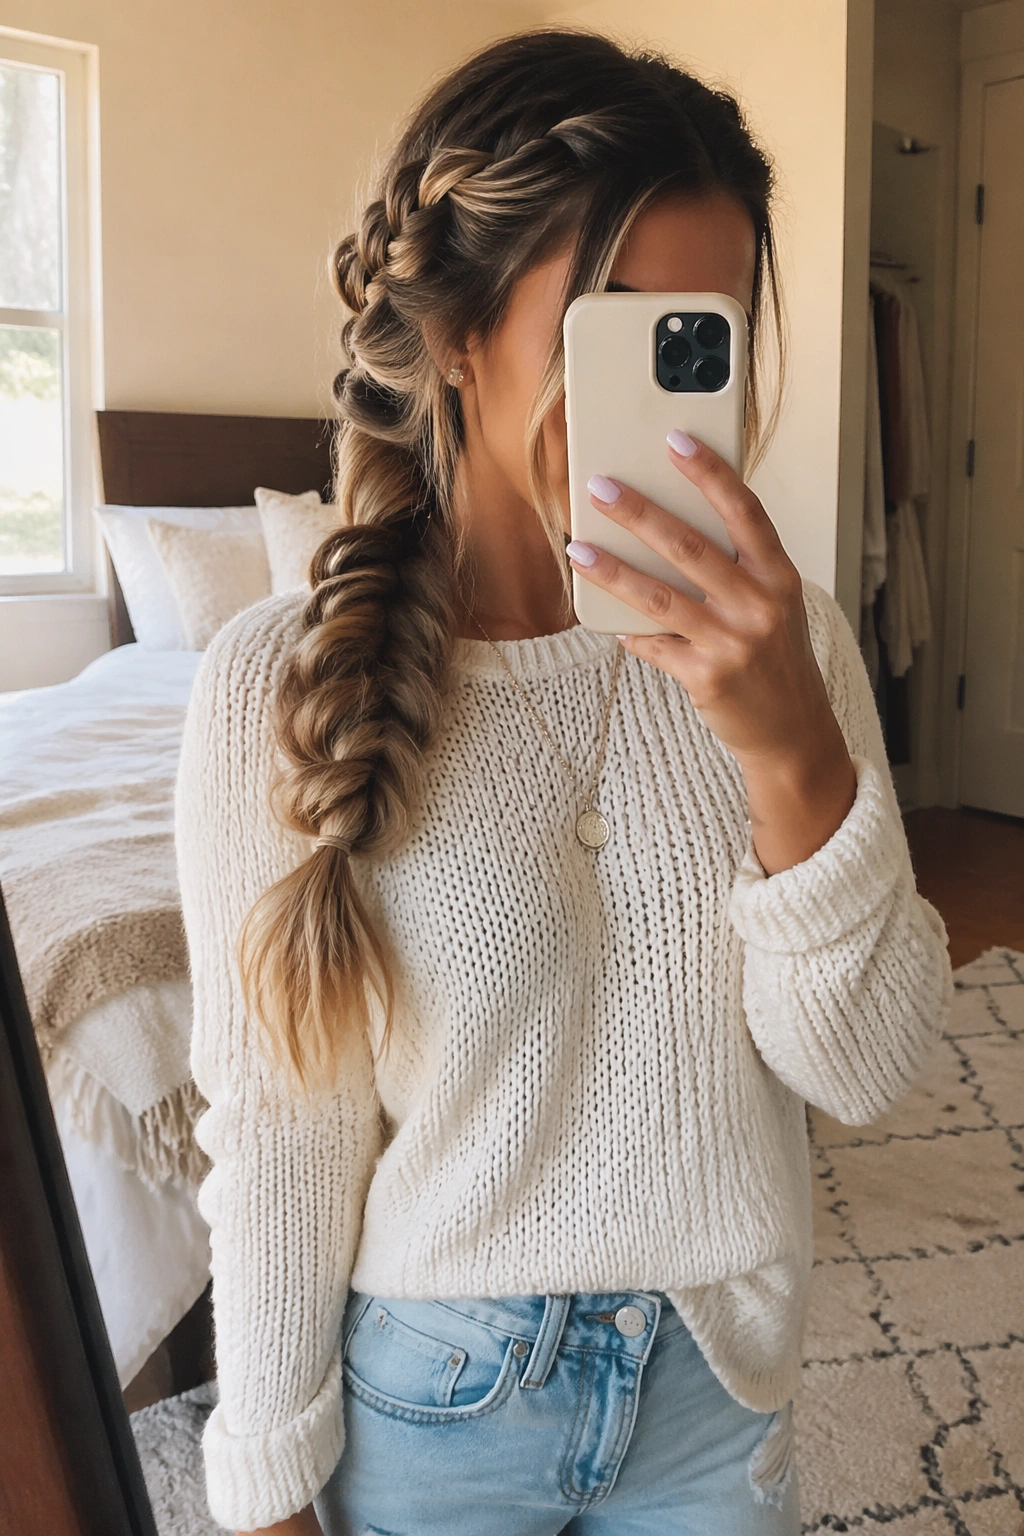
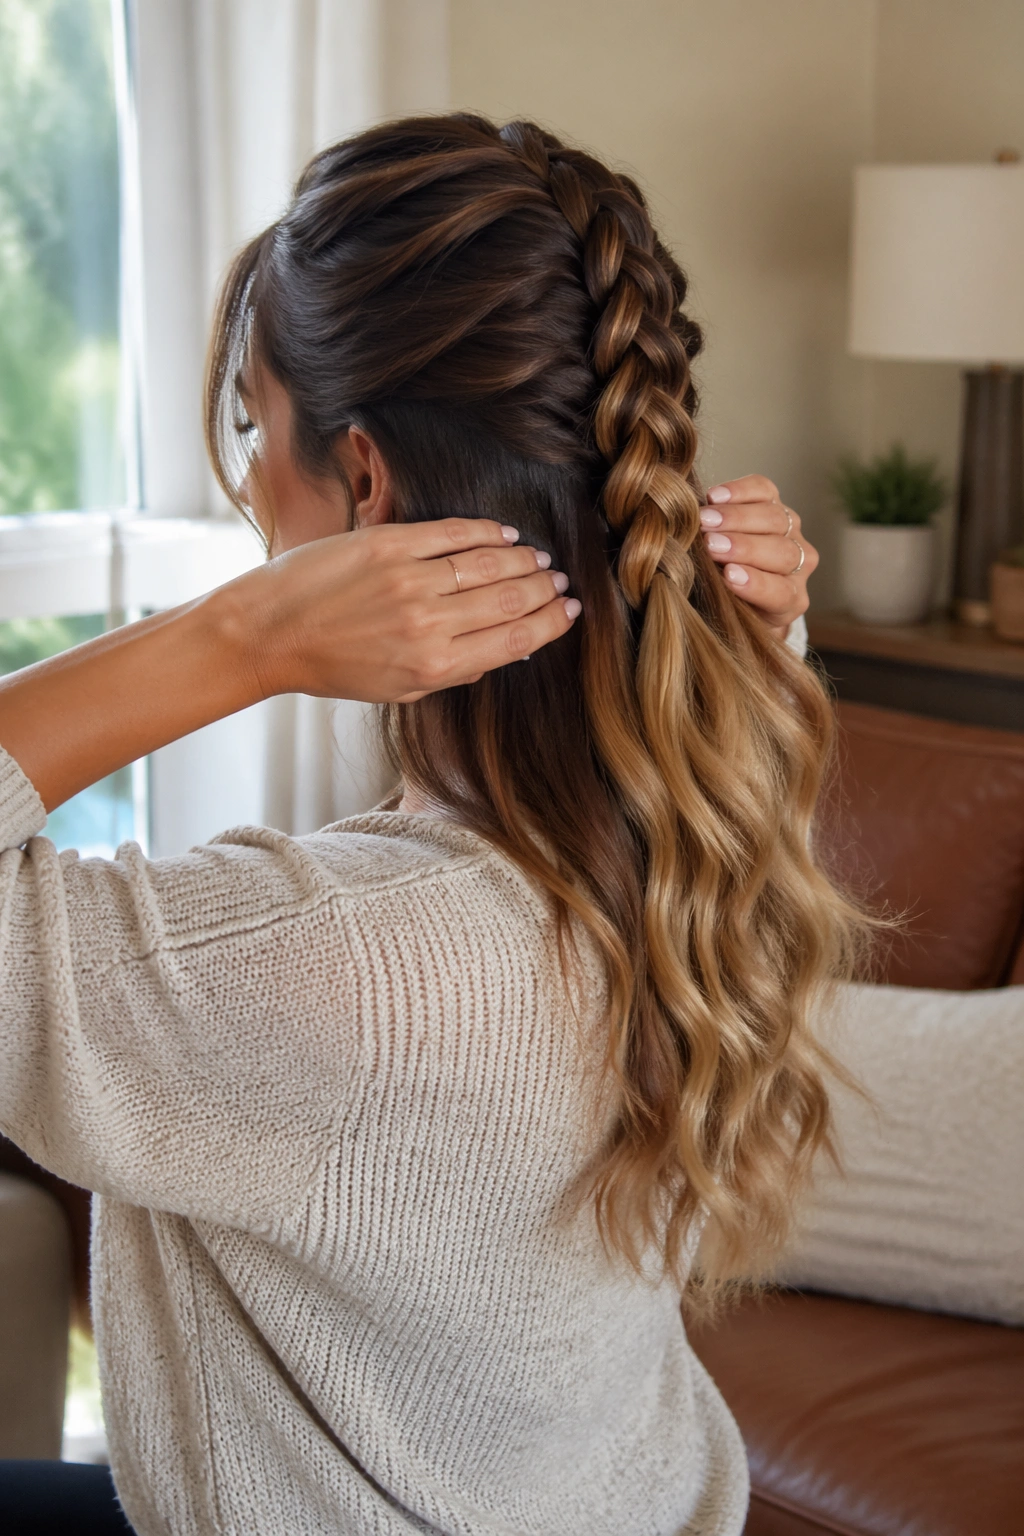
5. Messy Boho Ombre Ponytail
A messy boho ponytail is what happens when you stop trying to make every hair obey. The braid is loose, the texture is soft, and the ombre ends get to look a little piecey in the best way. It has movement, and movement is the whole point.
This style works especially well if the color fade is gradual. The braid breaks up the transition so the darker top and lighter bottom don’t fight each other. A few pulled-out pieces at the crown make the style feel lived-in rather than overworked, and a 1-inch curling wand on the ends can give the ponytail a bend that keeps it from hanging limp.
Do not drown it in oil. That’s the fastest way to flatten all the texture you just created.
I like this one for brunch, outdoor parties, art fairs, or any day when the vibe is relaxed but you still want your hair to look styled. The braid does not need to be perfect. In fact, if it is, the whole thing loses its charm. A little roughness is the secret sauce here.
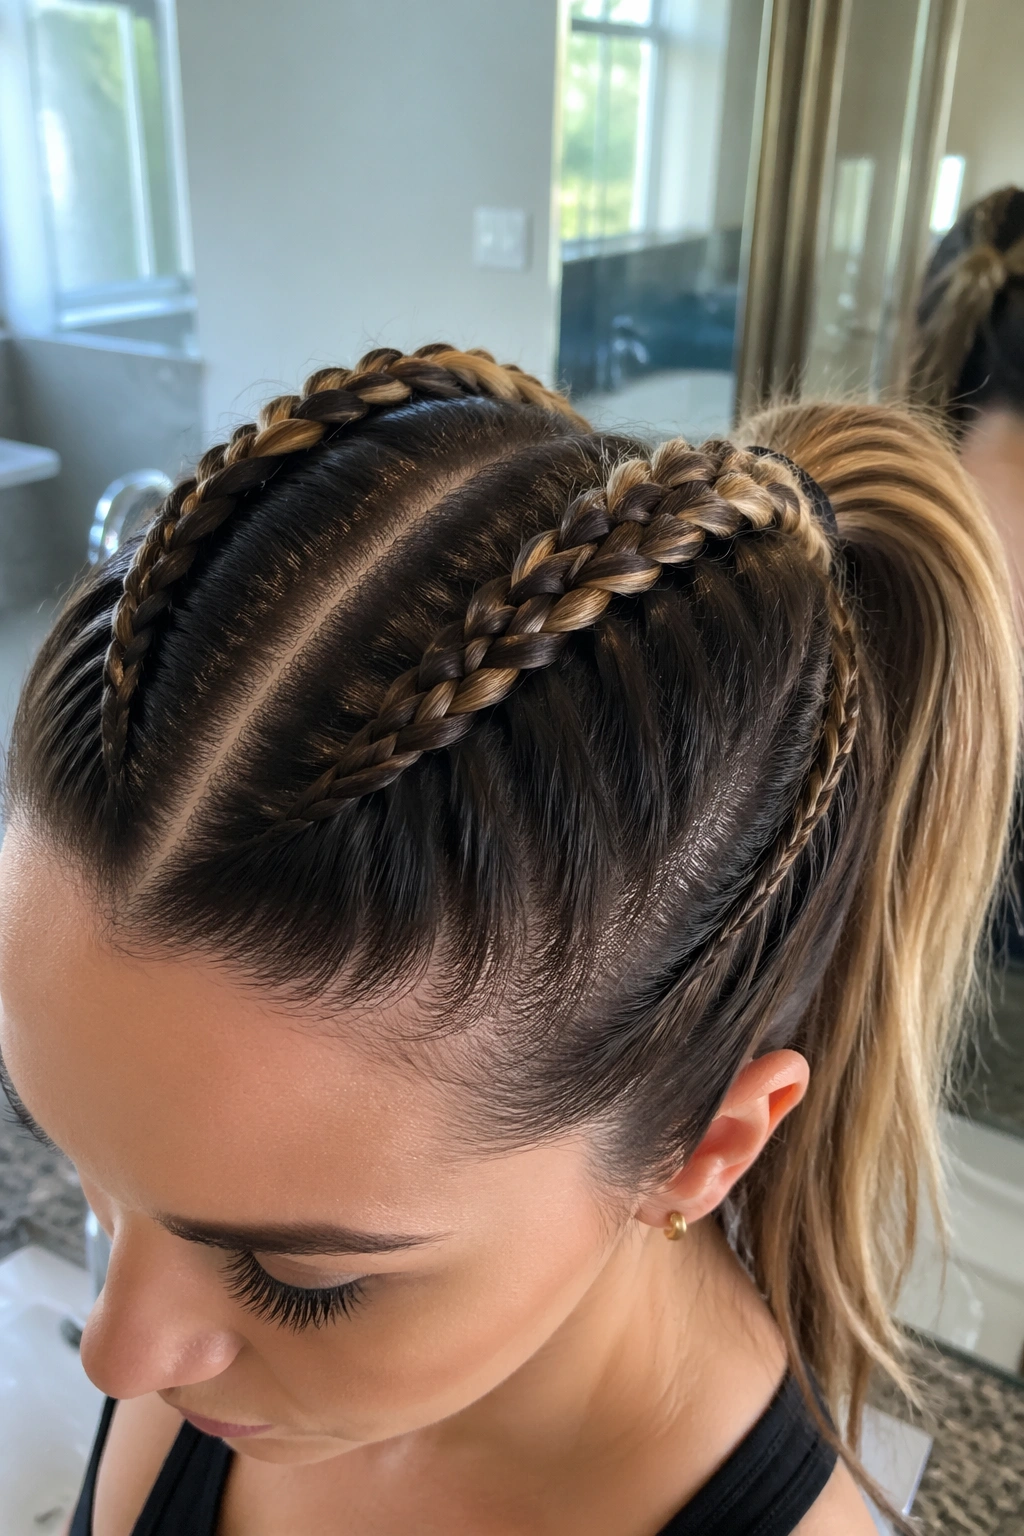
6. Cornrow Feed-In Ponytail With Ombre Lengths
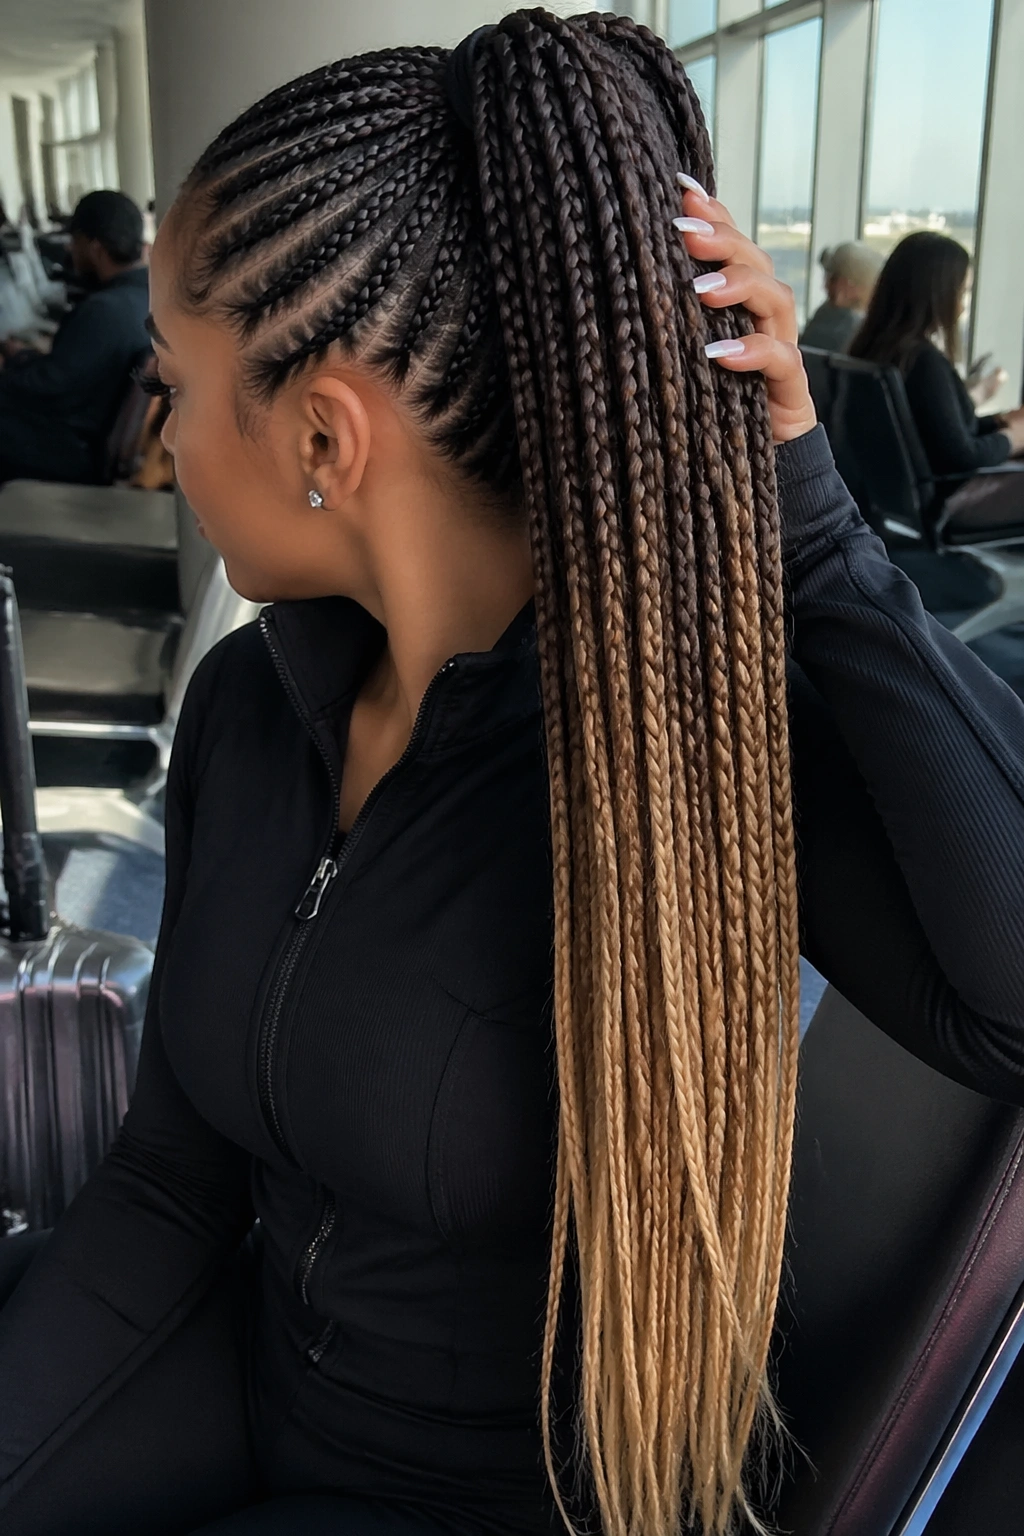
A feed-in cornrow ponytail is the cleanest option on this list, and it has a real advantage: it keeps the scalp pattern neat while letting the ombre length do the talking. The braid starts close to the scalp with tiny sections, then gradually gets fuller as more hair is added, which gives the front a smooth, tapered look.
Compared with a loose braided ponytail, this one is better when you want the style to last through more movement and less touch-up. It works for travel, workouts, long events, and anyone who does not want to fix flyaways every 20 minutes. The base can be straight-back, curved, or slightly angled, depending on what suits your face.
A couple of things matter here:
- The tension should feel snug, not sharp.
- The ponytail extension or natural length should blend at the point where the feed-in ends.
- Edge control should sit only where needed, not caked along the whole hairline.
The ombre is especially striking on this style because the scalp detail frames the color shift so well. It is a protective look with presence. That combination is hard to beat.
7. Rope-Twist Ombre Ponytail
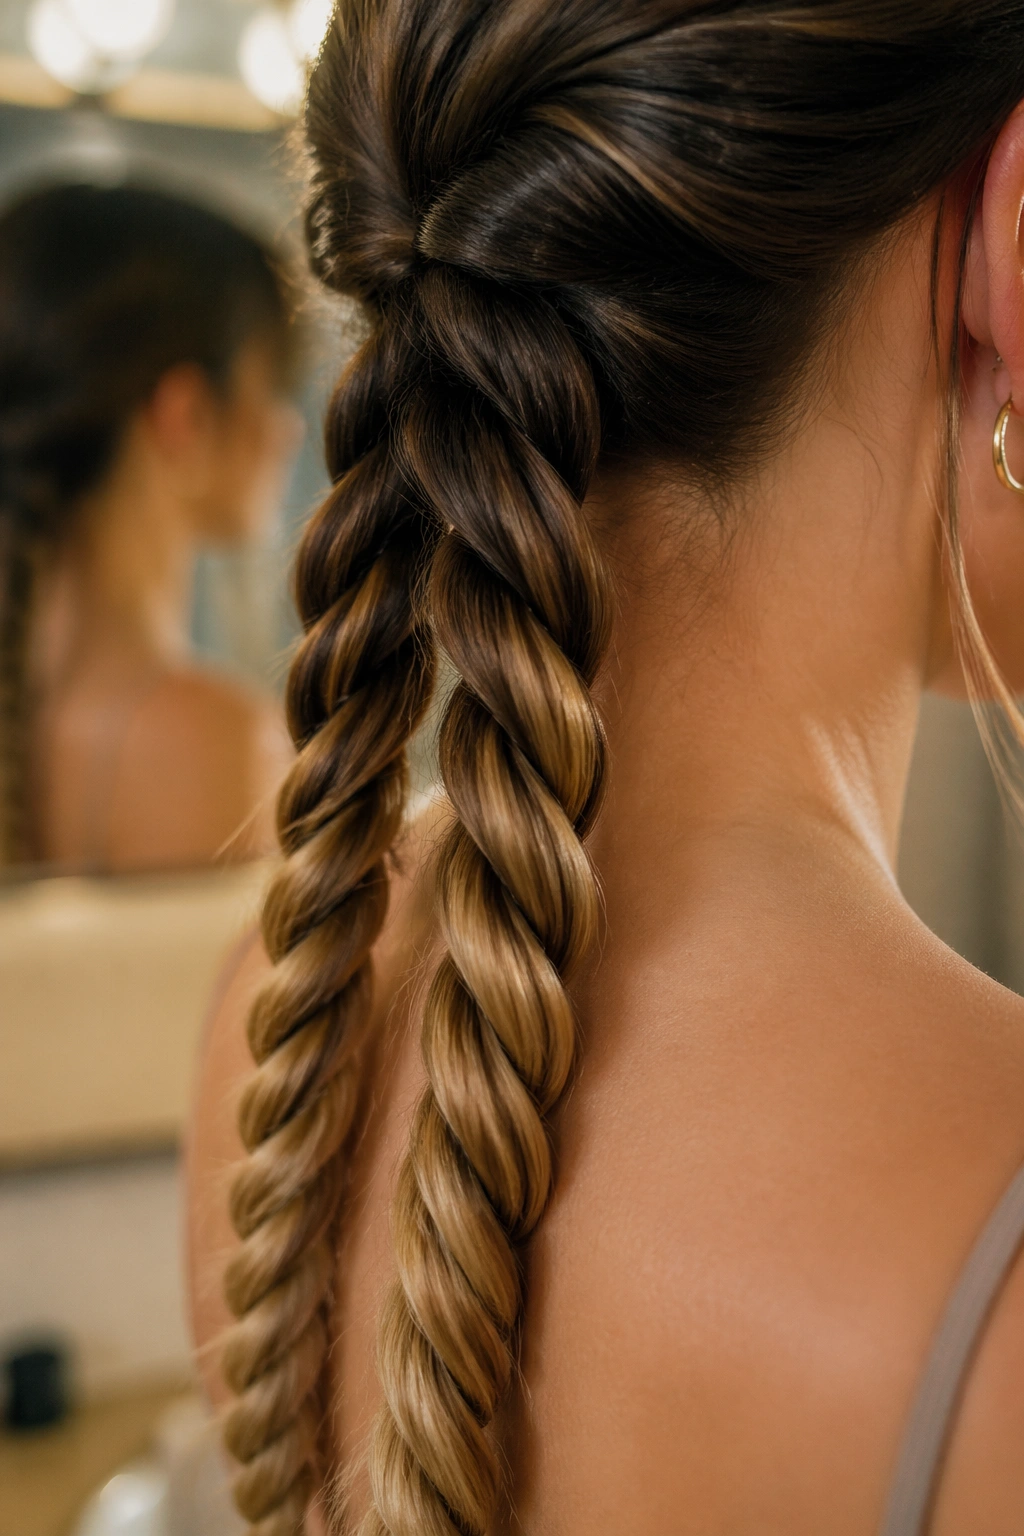
A rope-twist ponytail has a different energy from a braid. It looks smoother, a little more sculptural, and almost glossy when the ombre runs from dark roots into lighter ends. If fishtail is ribbon-like, rope twist is cord-like — tighter, cleaner, and a touch more modern.
To make it, divide the ponytail into two sections, twist each section in the same direction, then wrap them around each other in the opposite direction. That counter-twist is what keeps the shape from unraveling. If the hair is layered or slippery, a small amount of mousse through damp hair gives the twist something to hold onto.
The finish feels neat against the back of the neck, which makes it nice for warm days or dressier outfits that already have a lot going on. Earrings show up well with this one. So do collars.
It’s a good pick when you want braiding detail but not the heavier look of a full plait. Simple doesn’t mean boring. Rope twists prove that.
8. Waterfall Braid Ponytail
The waterfall braid looks like it was made for soft color fades. Strands drop through the braid at regular intervals, which lets the ombre show in little glimpses before everything gathers into a ponytail at the back. It has a gentle, almost floating feel.
Best placement for the braid
Keep the waterfall section across the top half of the head, starting near one temple and ending at the opposite side or the crown. That way the braid acts like a frame, not a helmet. The ponytail can sit low for a romantic finish or mid-height if you want more lift.
What to watch for
- Don’t braid too tightly or the dropped strands will look stiff.
- Curl the loose length before you start if you want a soft, blended finish.
- Use bobby pins that match your hair color; dark pins show fast in lighter ombre blends.
- Mist the braid lightly with flexible-hold spray so the pattern stays visible.
This one works for showers, parties, weddings, and any moment when you want the hair to feel pretty without looking overdone. The braid is the detail. The ponytail is the payoff.
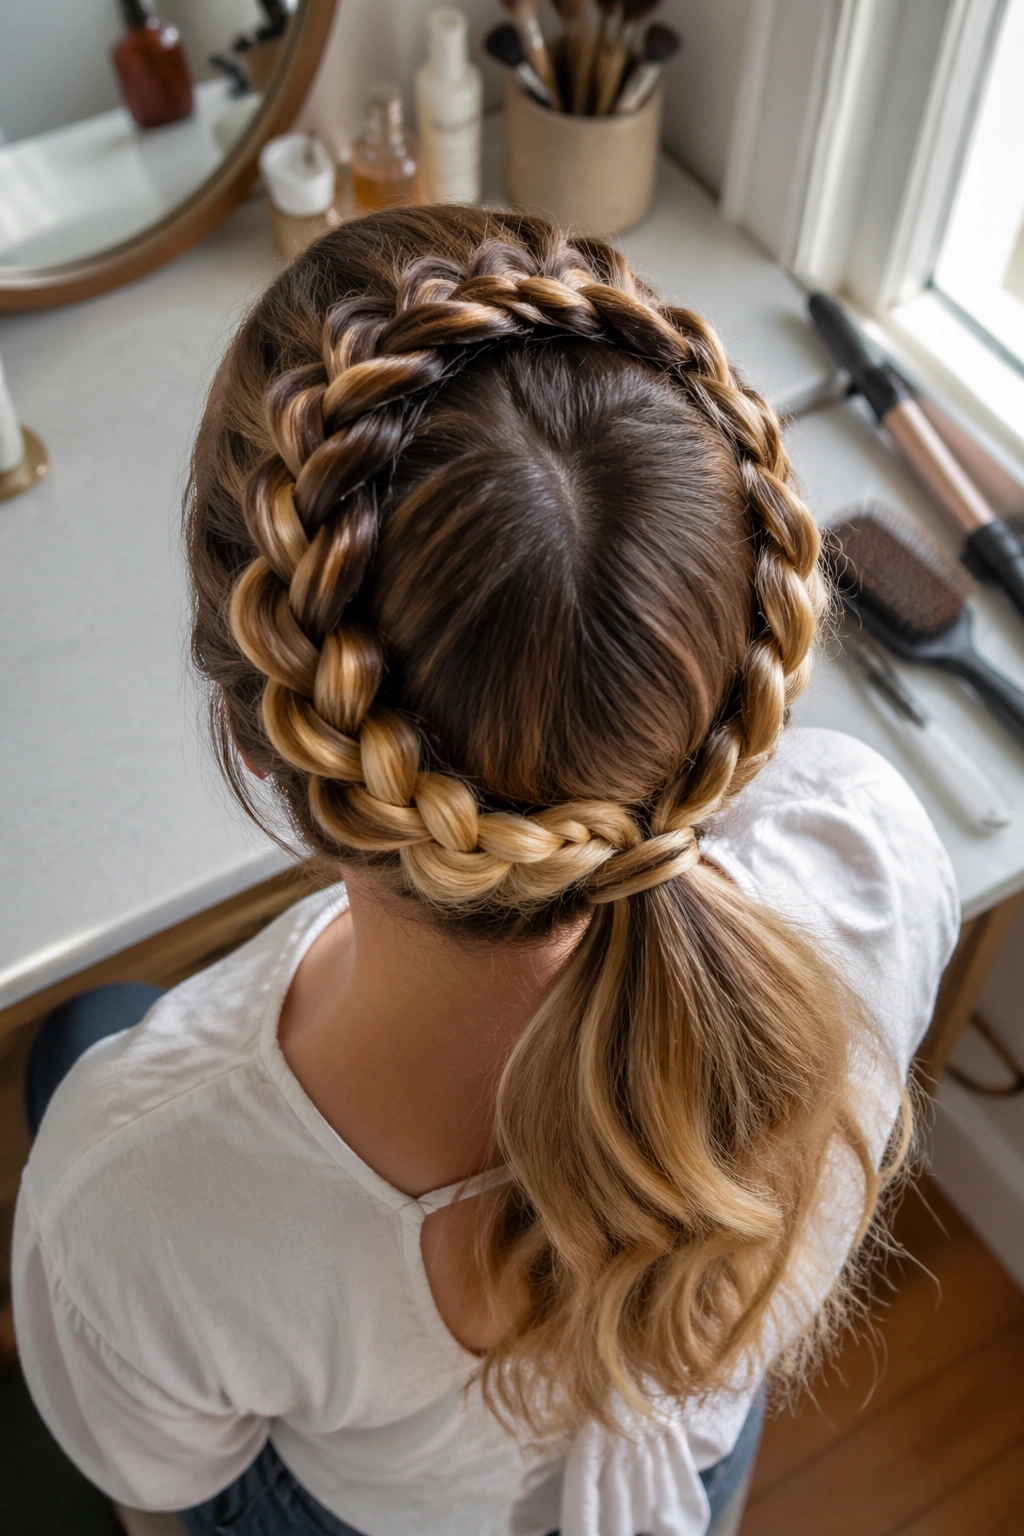
9. Halo Braid Ponytail
Soft. Lifted. A little dramatic.
A halo braid ponytail wraps around the head like a crown, then collects into a ponytail at the back or just below the braid line. It’s a lovely choice for formal events because the braid gives the style shape at the top, while the ponytail keeps it from feeling too precious. There’s enough structure for a dress, but enough movement that it still feels human.
The best halo braids leave the edges smooth and the braid sections medium-sized, not tiny. Tiny braids can disappear once the hair is pulled into the ponytail. Medium sections hold up better and show the ombre shift more clearly as the braid arcs around the head.
A few details worth keeping in mind:
- Start with a center or slight off-center part.
- Keep the braid close to the head but not pulled tight enough to hurt.
- Pin the braid discreetly where it meets the ponytail so the join stays hidden.
This style has real presence in photos, especially when the lighter ends sit against the darker braid. It reads polished without feeling hard. That balance is the good part.
10. Pull-Through Braid Ponytail

If your hair is fine and you wish the braid looked thicker, the pull-through braid is the one to reach for. It is built from small ponytails stacked one over another, which creates a chunky, woven look that can make ombre color appear fuller and more dimensional than it really is.
The best part is that it does not need perfect braiding skills. You’re mostly sectioning hair into even pieces, securing them with elastics, then pulling the top sections over the ones below. That gives you a lot of control over volume. If the hair is sleek and slippery, a little dry shampoo at the roots helps the sections grip.
It’s a smart choice for school events, parties, and long days when you want the style to look like more work than it actually was. That’s not cheating. That’s efficient.
The ombre looks strong here because each elastic break creates a new place for the color to shift. Darker roots, lighter ends, and all the little bands in between — it’s a satisfying look. Volume without bulk. That’s the trick.
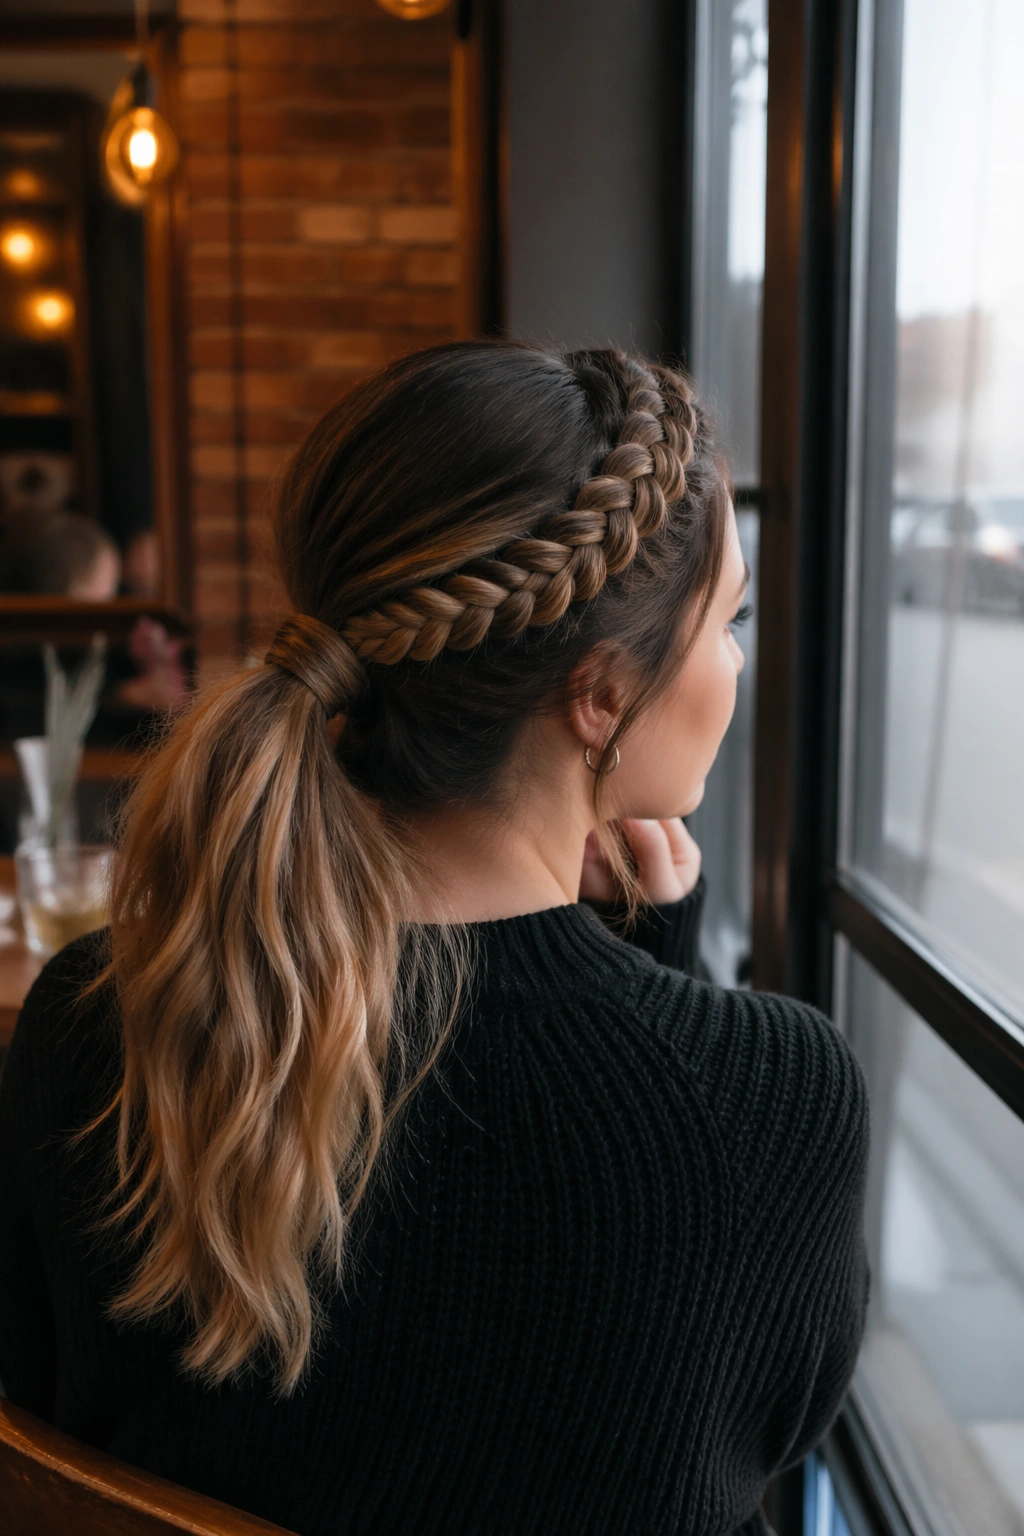
11. Wrapped-Base Braided Ponytail
A wrapped-base braided ponytail is for anyone who likes a clean finish. Instead of leaving the elastic visible, you take a small strand from the ponytail, wrap it around the base, and pin it underneath. That tiny move changes the whole mood. The style suddenly looks deliberate.
I like this version for work events, interviews, and dinners when you want the hair to seem neat without trying too hard. The braid itself can be a standard three-strand braid, a fishtail, or a rope twist. What matters is the base. Once the elastic disappears, the ombre lengths look more like a styled choice and less like an afterthought.
The best execution starts with a polished crown and a ponytail placed exactly where the head wants one to sit — usually mid-nape or just below the crown. If the base is too low, the wrap can look droopy. Too high, and the finish gets awkward fast.
One strand. One pin. That’s it. Sometimes the smallest detail is the one people notice first.
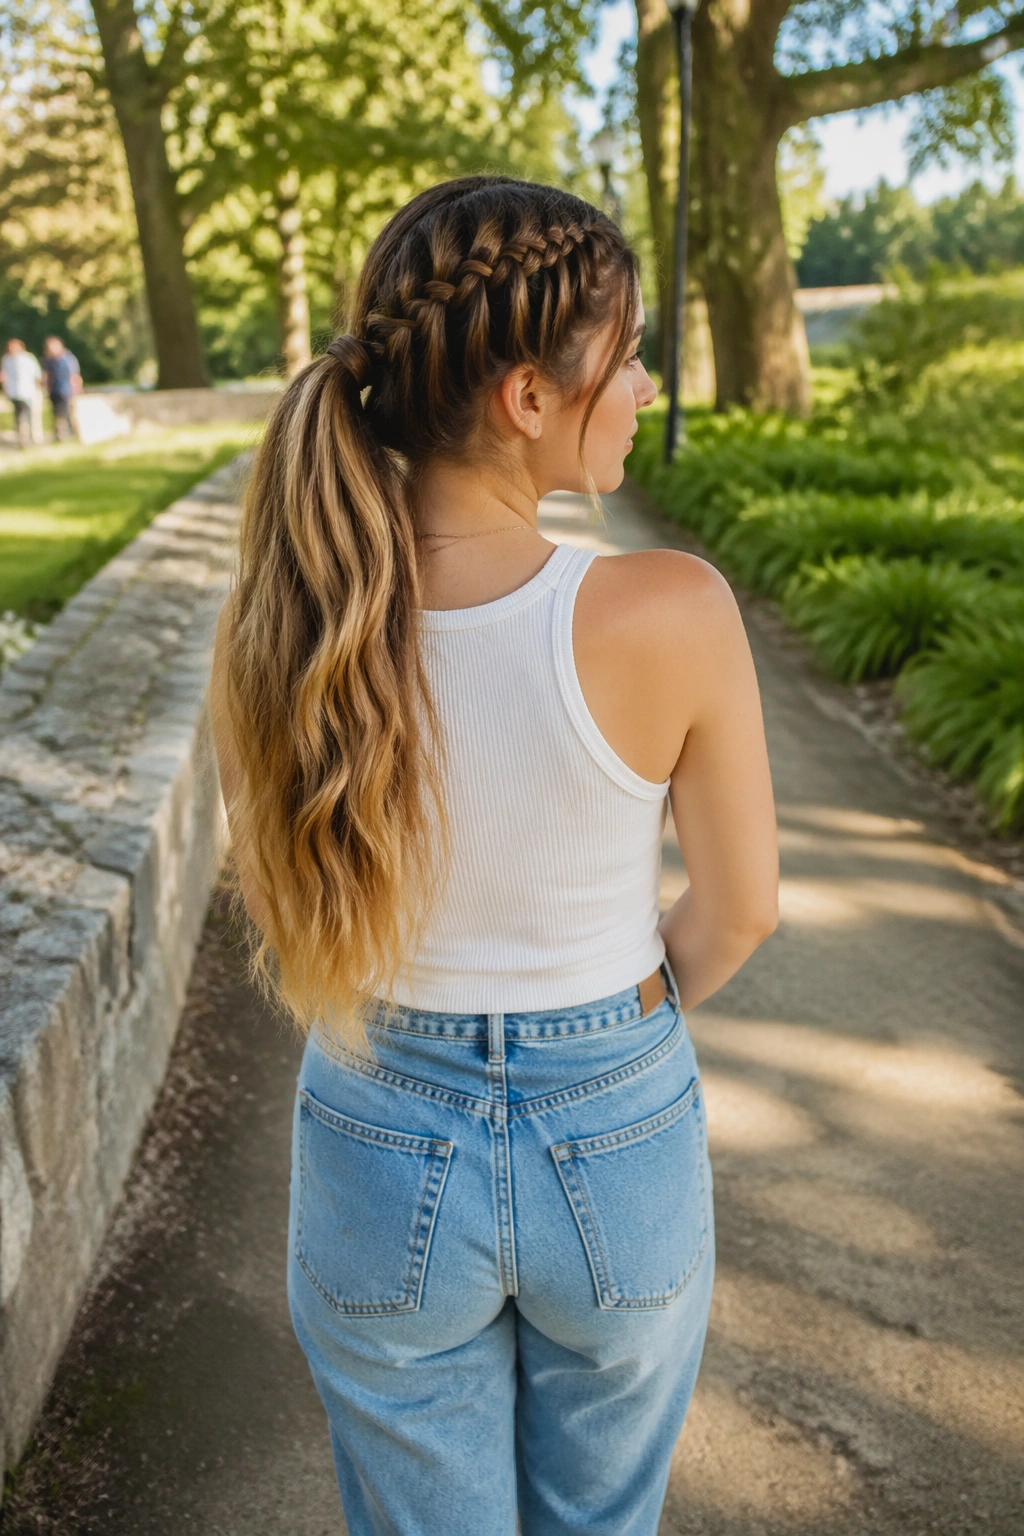
12. Half-Up Ombre Braided Ponytail
A half-up braided ponytail gives you the best of both worlds: lift at the crown and movement through the lengths. It lets the ombre show from the first braid on down, which is useful if the color transition starts high and you want people to see it instead of losing it under a full updo.
This version works well with waves, loose curls, and layered cuts because the bottom half stays free. That keeps the style from feeling too heavy. If the top is braided back into a small ponytail, the rest of the hair can fall over the shoulders in a way that feels easy, not overdone.
I’d use this for daytime weddings, lunch dates, or any occasion where a full ponytail feels too firm. It also behaves nicely on medium-length hair, especially if the ends are curled away from the face.
Maintenance is simple. A few bobby pins under the half-up section, a light mist of flexible spray, and a quick finger comb through the lengths later in the day is usually enough. It’s soft, but it still has shape. That’s why people keep coming back to it.
13. Boxer Braid Ponytail
A boxer-braid ponytail is more athletic than romantic, and that’s exactly why it works. Two Dutch braids run back from the hairline and join into one ponytail, usually at the nape or mid-back. The structure keeps everything secure, while the ombre ends soften the whole thing so it doesn’t feel too severe.
You’ll see this style a lot on gym days, travel days, and weekends where the hair needs to stay put through movement. The tight braid pattern is the point. It keeps shorter layers tucked in and stops the front from puffing out halfway through the day.
If you want to make the fade stand out, keep the braids neat near the scalp and let the ponytail length fall looser once it’s secured. A slight wave through the ends helps too. Straight lengths can look a little rigid with boxer braids, while soft bends make the ombre feel more natural.
This isn’t the prettiest style on the list. It does not try to be. It’s the one that works when practicality wins.
14. Mermaid Braid Ponytail
Why does a mermaid braid look so full even when the hair isn’t especially thick? Because the sections are pulled wider than a standard braid, which makes the pattern look broader and softer. Add ombre color to that, and the braid suddenly has depth at every turn.
The braid usually starts from a low ponytail, then gets widened by gently tugging each woven section outward once it’s secured. That loosened shape lets the lighter ends fan out instead of collapsing into one narrow rope. If the hair is very silky, a bit of texture spray before braiding will save you a lot of frustration.
How to keep it from sagging
Anchor the ponytail first with a strong elastic. Then braid to the ends and secure them with a second elastic that matches the hair. If the braid starts to slip, pinch the top few sections with bobby pins hidden underneath instead of pulling the whole thing tighter.
This style feels special without requiring a fancy updo. It’s a good fit for formal dinners, photo sessions, or any occasion where you want the hair to look long, lush, and a little dreamy. A wide braid makes the ombre easier to see. That’s half the appeal.
15. Accessorized Braided Ponytail
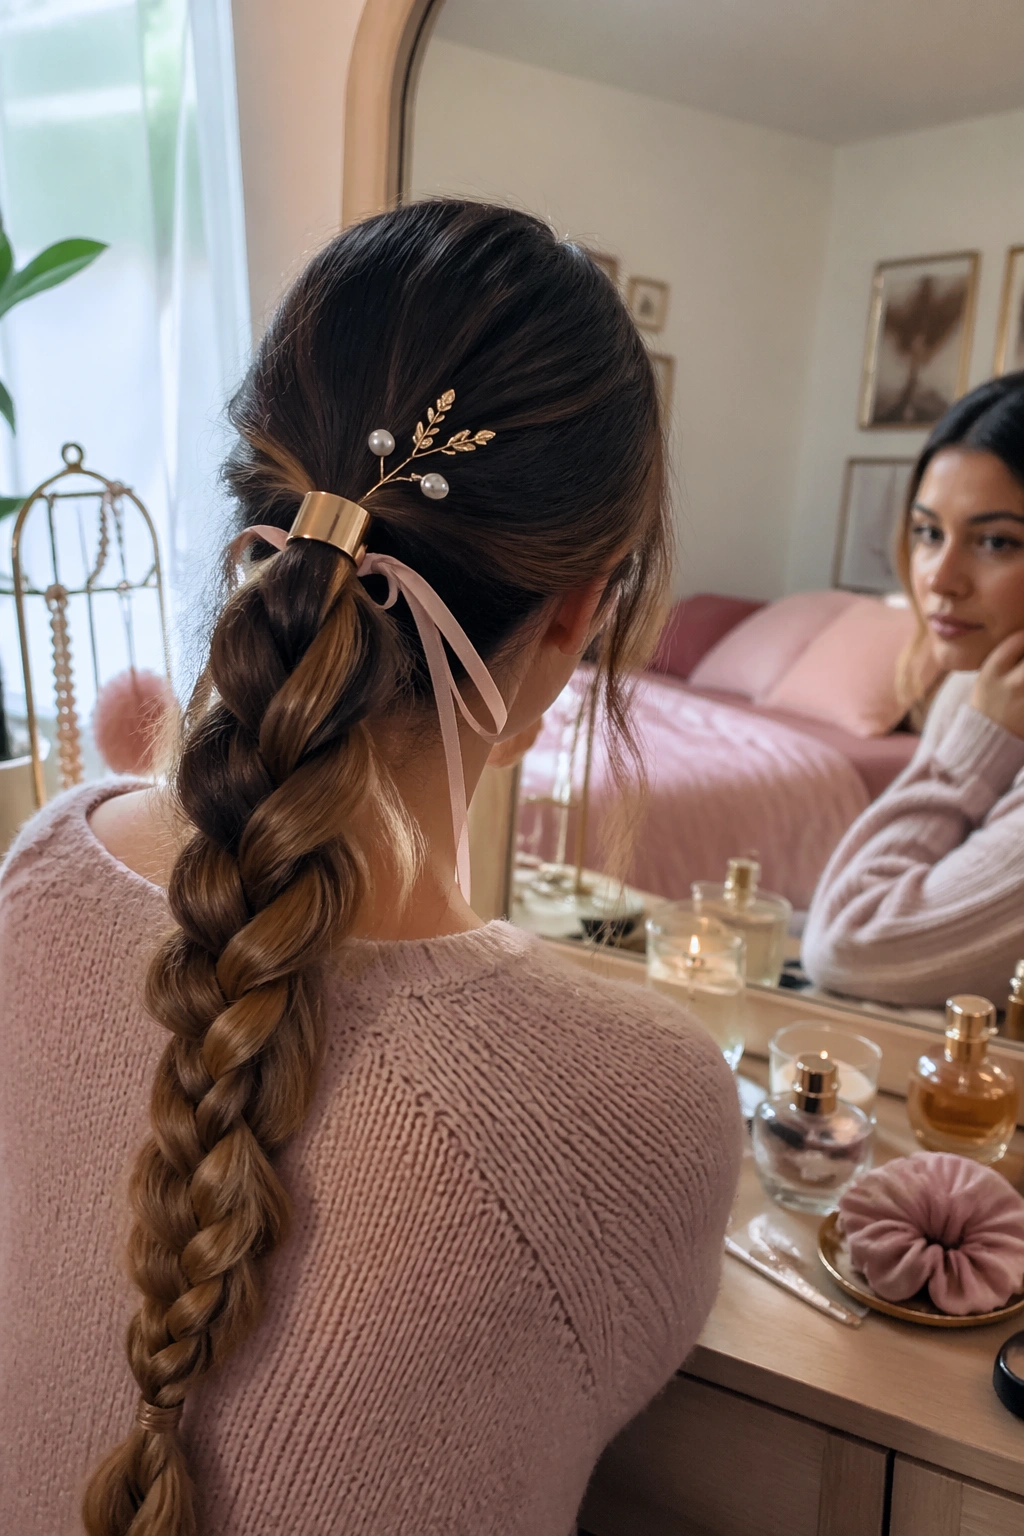
Hair cuffs, ribbon, pearl pins, tiny rings — this is where the braided ponytail turns into a real statement. The ombre gives you a color path, and the accessories give you punctuation. Used well, they do not clutter the style. They sharpen it.
A single gold cuff near the braid base can make a dark-to-caramel fade look warmer. Three evenly spaced cuffs can work on a long fishtail if the hair is straight and sleek. Ribbon is softer and better for events that call for romance. If you use pins or rings, space them out so they follow the braid’s rhythm instead of fighting it.
A few placement ideas:
- Put one cuff where the braid starts and another halfway down.
- Thread ribbon through the base elastic before braiding, not after.
- Use pearl pins on one side only if you want an asymmetric finish.
- Keep the rest of the hair simple when the accessories are bold.
This style suits birthdays, photos, holidays, and evenings when plain hair feels too quiet. The braid is still the main event. The extras just make sure people notice.
16. Short-Hair Braided Ponytail
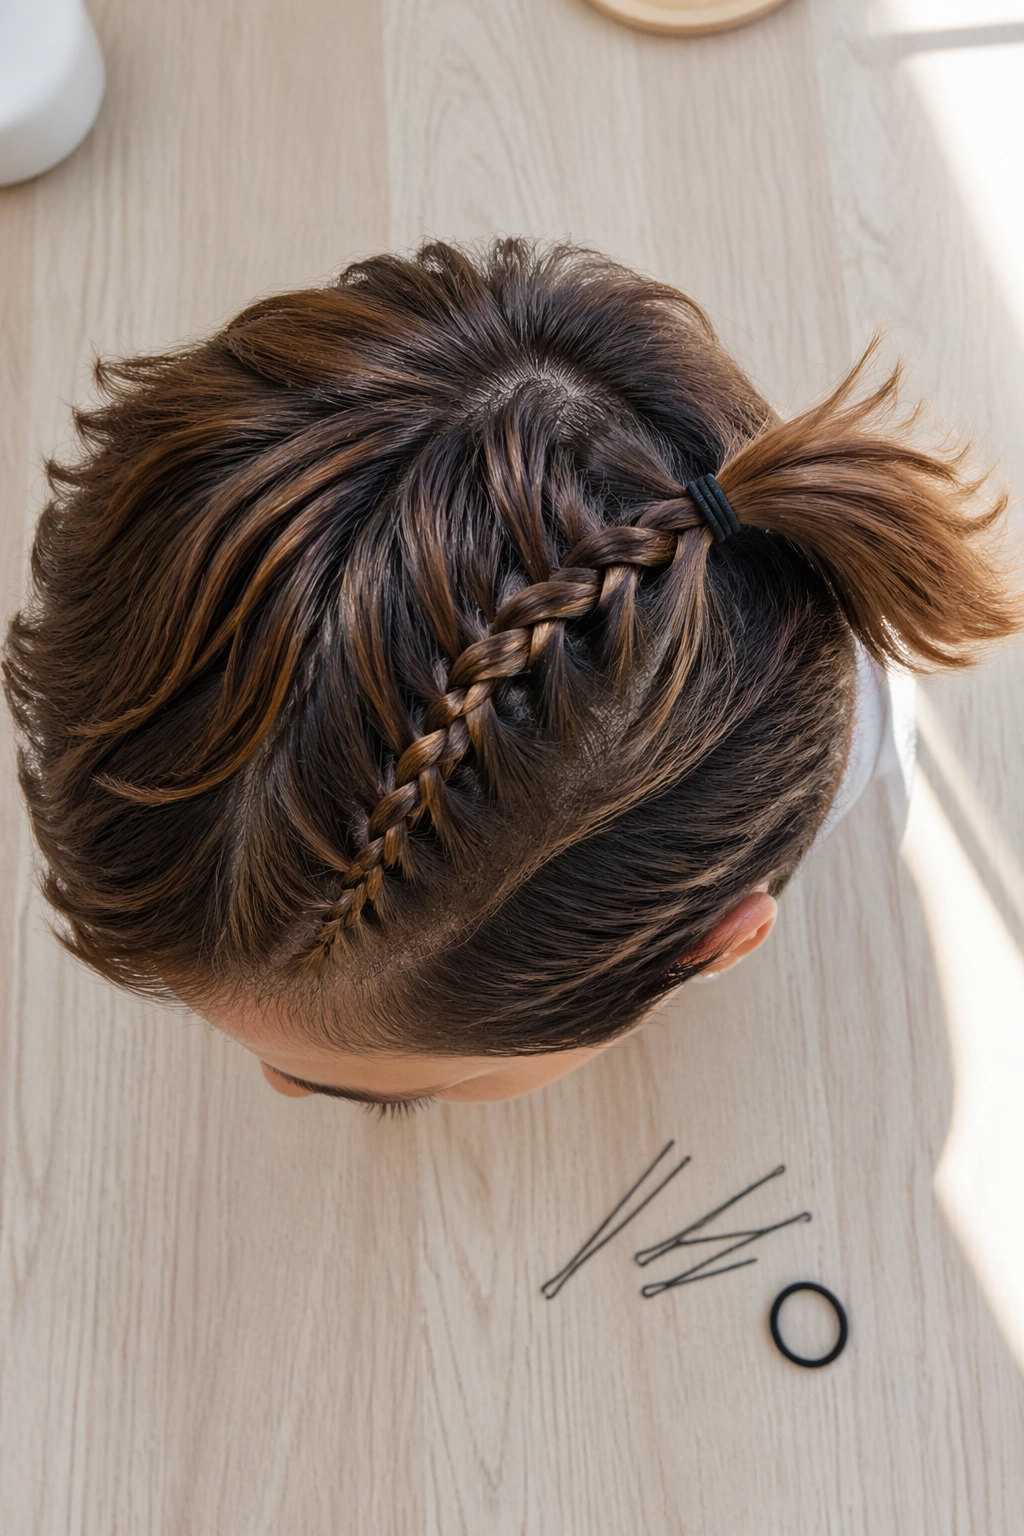
You do not need waist-length hair for a braided ponytail to work. A bob, lob, or shoulder-length cut can pull off an ombre braided ponytail just fine, especially if you use a small braid at the front or add a few clip-in pieces at the ponytail base.
The key is scale. Big braids can overwhelm short hair, so keep the sections smaller and the ponytail placement closer to the center of the head. A tiny Dutch braid at the temple, or two slim braids that feed into a mid-height ponytail, often looks cleaner than trying to force a giant plait into a short cut. If the color fade starts near the ends, this style shows it off without demanding extra length.
A little teasing at the crown helps the ponytail sit properly. So does a texturizing spray with some grit, because short layers can slide faster than people expect. That part is annoying. It’s also fixable.
This is a good choice for anyone growing out a cut, changing up a lob, or wanting something playful without committing to extensions. Short hair can still have braid drama. It just needs a smarter plan.
17. High Sleek Power Ponytail

A high sleek ponytail with tiny braided details at the temples is the one that makes a blazer look sharper and a simple dress feel more intentional. It’s crisp. It’s direct. And the ombre length hanging from the crown does the visual work that plain black hair sometimes cannot do on its own.
The base should sit at the highest point that still feels comfortable, usually around the top third of the head. Smooth the front with a brush and a small amount of styling cream, then add one or two narrow braids near the hairline if you want extra texture. Those little braids keep the style from reading too bare. They also frame the face without crowding it.
I like this one for presentations, formal dinners, or any event where you want the hair to feel confident. That is the right word. Confident, not loud.
If the ends of the ombre are lighter, they’ll swing against the back and give the ponytail a clean shape as you move. A flat iron pass through the top and a soft curl through the lengths can keep the finish neat without making it stiff. Smooth roots, textured ends. That contrast is doing a lot of the work.
18. Curly Ombre Braided Ponytail
Curly hair changes the whole conversation, and that’s a good thing. Instead of fighting texture, this version lets the braid control the top while the curls keep the ponytail lively. The ombre becomes richer because the curl pattern catches color at different angles, which makes the lighter ends look almost layered on top of each other.
The smartest version of this style braids only partway back — maybe along the sides or across the crown — and then gathers the curls into a ponytail so the ends can stay free. If you braid too much of the length, you flatten the curl pattern and lose the best part. That mistake happens all the time.
Use a curl cream or leave-in conditioner on damp hair, then braid once the roots are mostly dry. A satin scrunchie helps more than a tight elastic because it won’t crush the curl base. If humidity is an issue, a light anti-frizz mist on the outer layer keeps the style from puffing up around the temples.
This is the version for people who want a braided shape but refuse to give up their curl. Fair enough. The curls should still look like curls.
19. Low Braided Ponytail for Everyday Wear

This is the one I’d keep in my back pocket when I do not want to overthink it. A low braided ponytail with a soft, simple braid at the nape works for errands, office days, casual dinners, and those in-between plans where the outfit changes but the hair needs to handle all of it.
The braid can be a three-strand plait, a loose fishtail, or even a rope twist if you want a little variation. What matters is the low placement and the clean line from crown to nape. That lower anchor keeps the style calm, and the ombre lets the ends do enough visual work that the look never feels flat.
A few reasons this version earns repeat use:
- It works with most face shapes because the hair stays close to the neck.
- It handles layered cuts better than many higher ponytails.
- It looks good with both straight and waved ends.
- It can be dressed up with a barrette or left completely plain.
Keep the braid a little looser than you think you need, especially if the color fade begins mid-length. Too much tightness will make the ombre look chopped instead of blended. Simple is the point here. When a style can handle sneakers and heels in the same day, that usually means it’s worth knowing.