Long straight hair can look polished in minutes, then slip out of a half-up style before lunch. That is the strange little curse of half up half down for long straight hair: the shape is easy, the hold is not.
The good versions keep hair off the face, show off the length, and still feel soft. The weak versions depend on a single elastic and no structure, which is asking a lot from silky strands that prefer to glide.
Twists, tiny braids, clips, ribbons, and wrapped bases help because they give the style something to grab. Some of these take two minutes. Some take five. None need a complicated set of tools, and the prettiest ones usually leave the ends alone so the length can do its job.
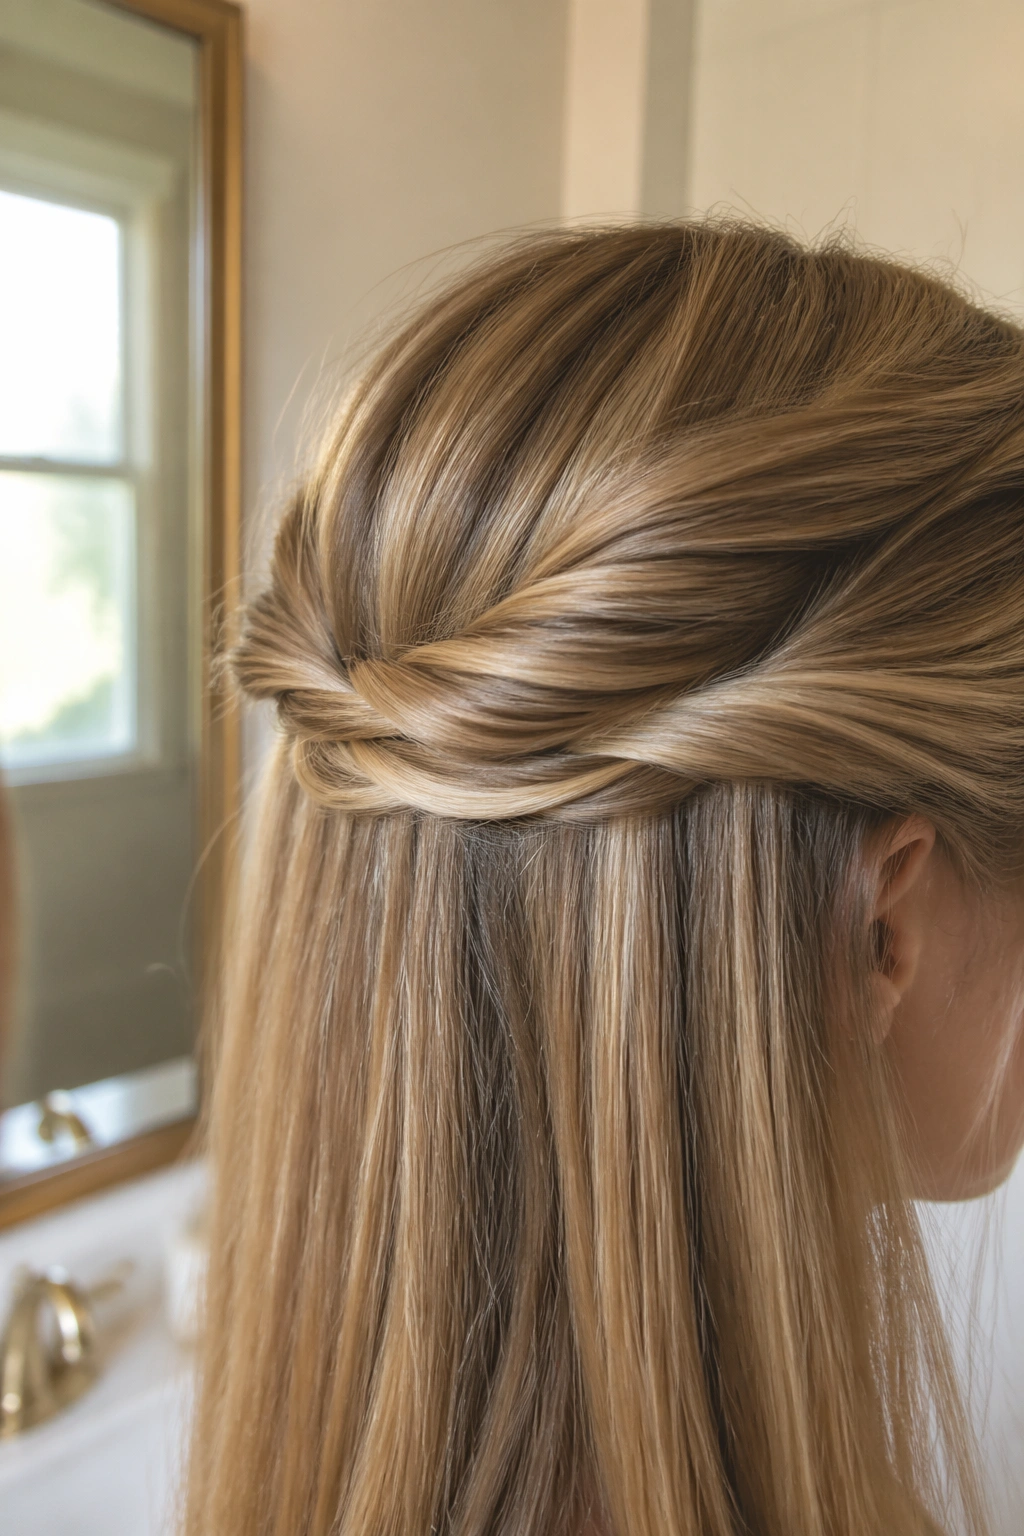
1. Classic Twisted Half Up
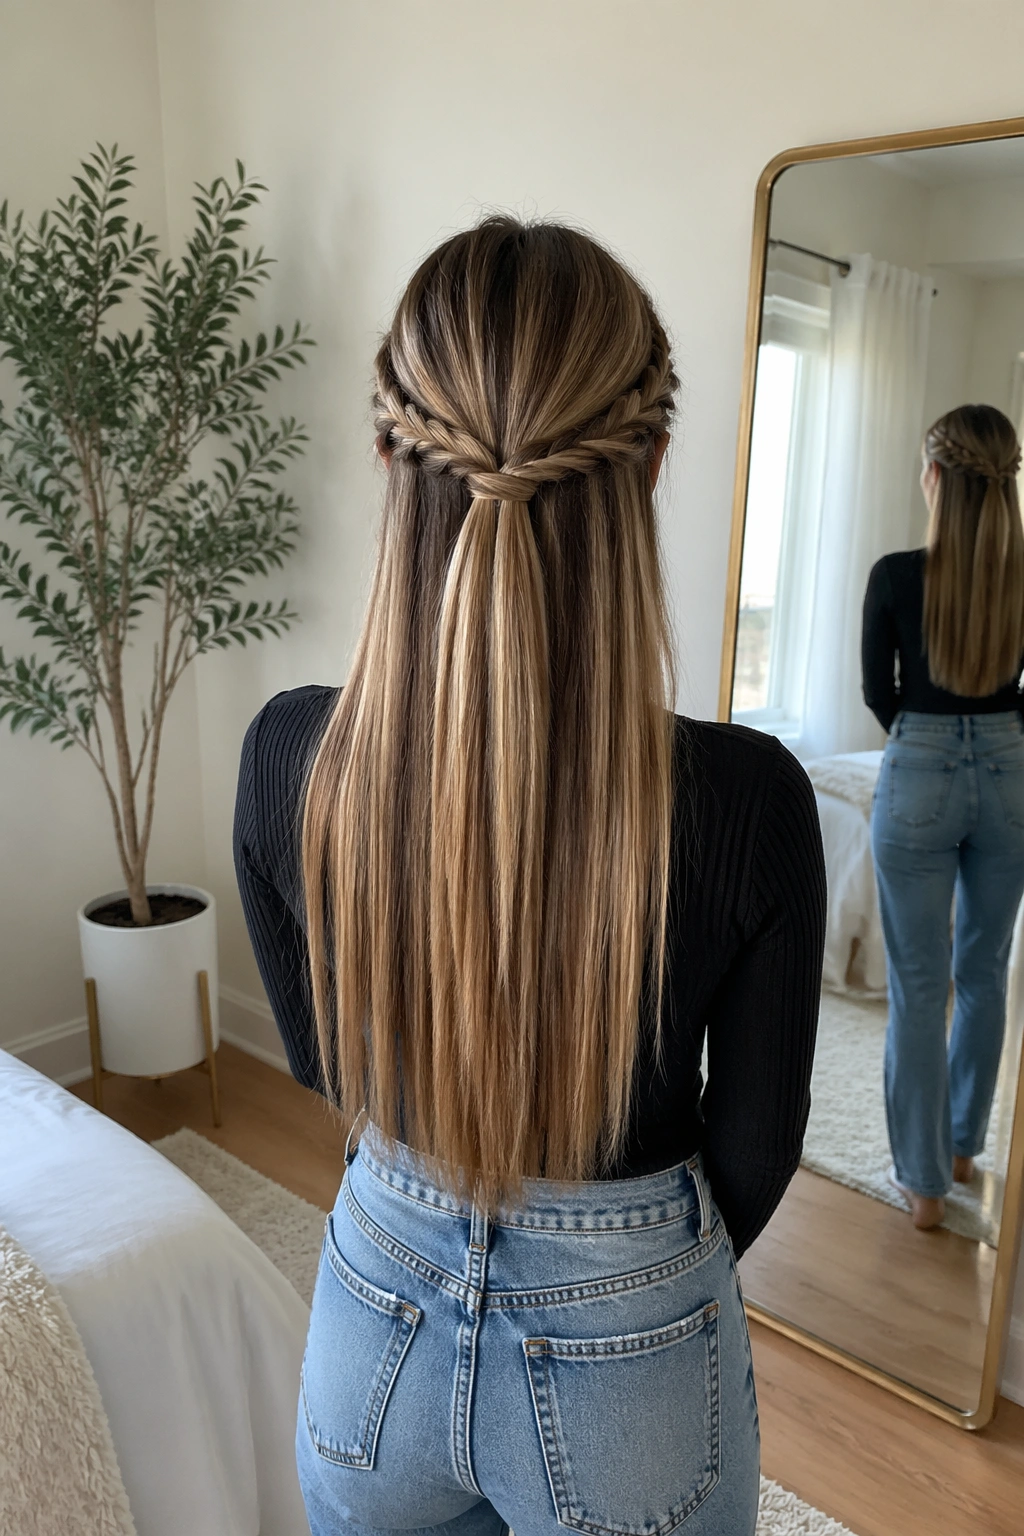
The classic twisted half up is the one I keep coming back to when the hair needs to look neat without looking overworked. It takes the two front sections, twists them back, and leaves the rest straight, which is a smart move on long hair because the length already gives you enough visual weight.
Why It Holds
The trick is in the direction of the twist. Twist each side away from the face, then pin the two twists together at the back of the crown. That little bit of tension helps straight hair stay put instead of sliding down the head.
- Use 2 to 4 bobby pins depending on how thick the hair is.
- Place the twist about 1 inch above the ears for a soft, balanced shape.
- Leave a few face-framing strands loose if the hairline feels too sharp.
- Works well on hair that is brushed smooth but not slippery-clean.
Tip: If your hair slips fast, rub a pea-sized touch of styling paste between your fingers before twisting. That tiny bit of grip makes a bigger difference than people expect.
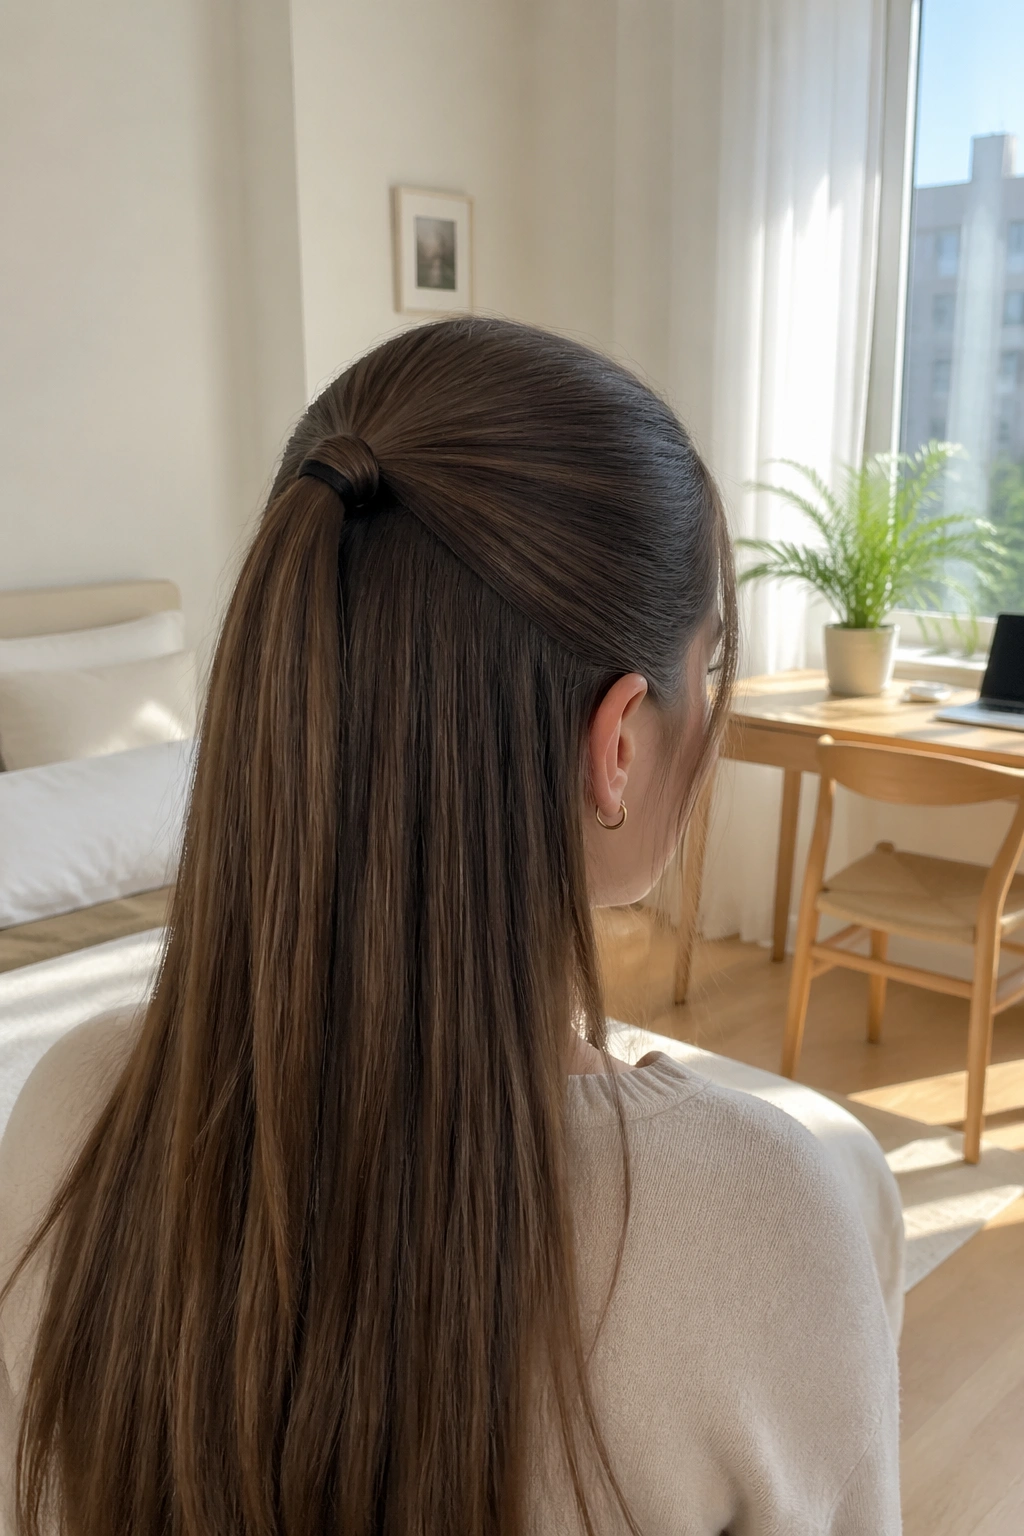
2. Sleek Half Ponytail With a Wrapped Elastic
If you want the cleanest half up half down look, this is the one. A sleek half ponytail with a wrapped elastic gives long straight hair a sharp, tidy finish without needing a lot of teasing or extra pieces.
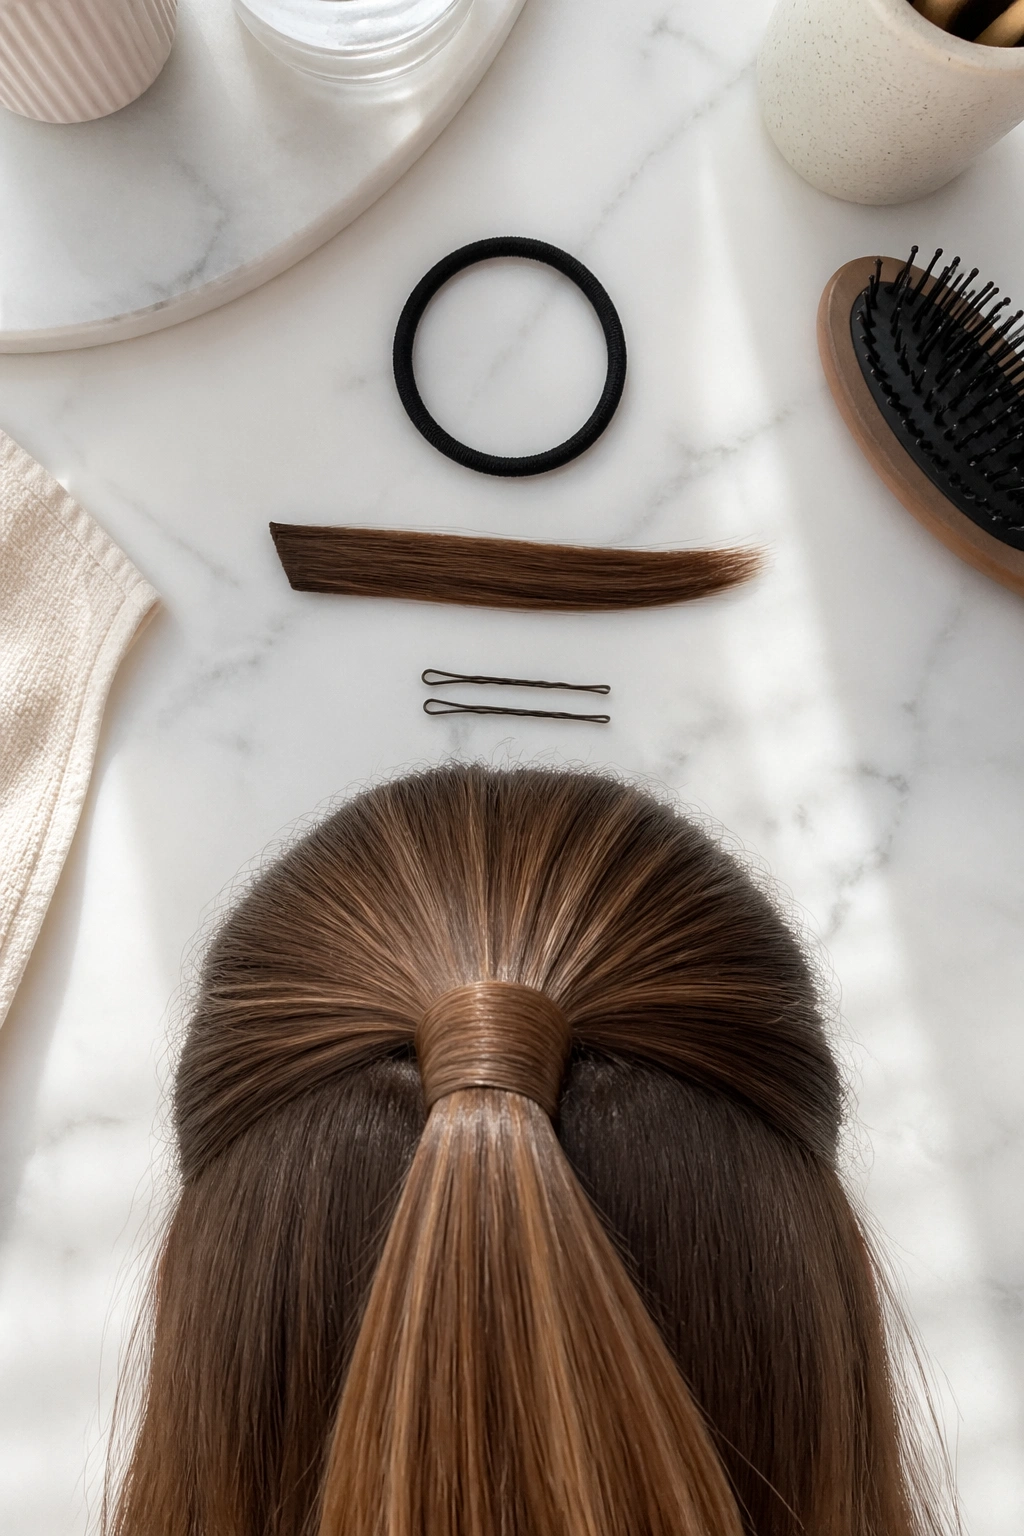
Smooth the top half with a fine-tooth comb, gather it at the crown, and secure it with a clear elastic. Then take a small strand from underneath the ponytail and wrap it around the band until the elastic disappears. Pin the end underneath. It sounds fussy. It isn’t.
The placement matters more than the steps. Too high, and the style starts to look stiff. Too low, and the whole thing loses lift. Aim for the highest point of your head, then slide the ponytail down a half inch if you want a softer shape. On straight hair, that wrapped base looks especially clean because there’s no curl texture to hide unevenness.
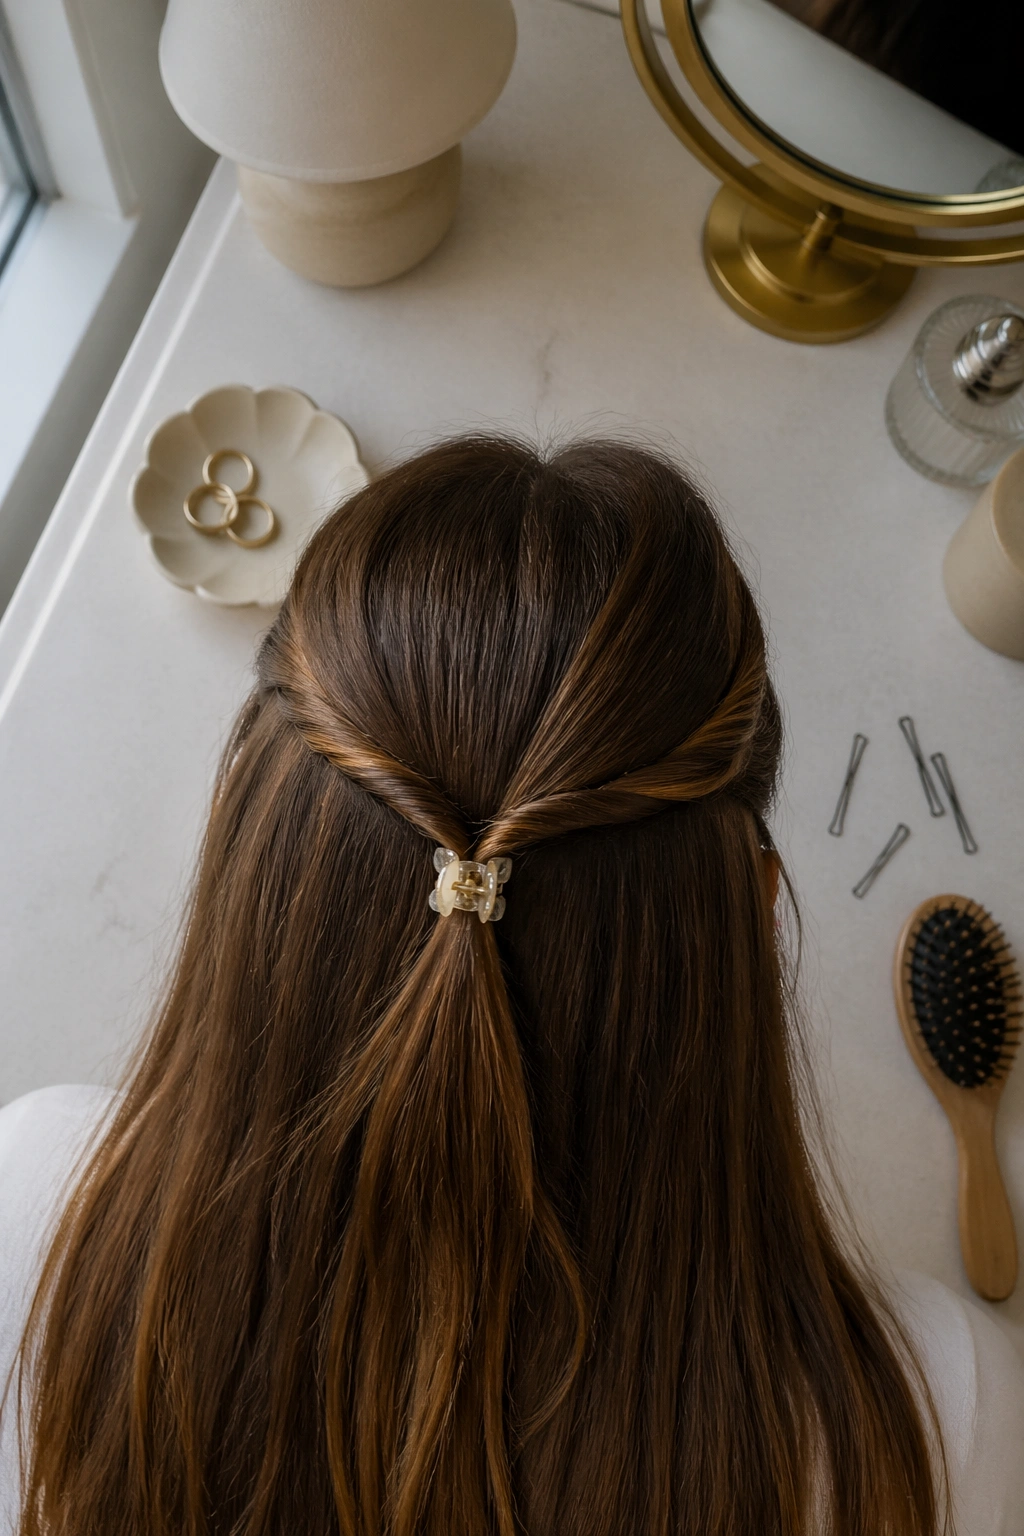
3. Mini Claw Clip Half Up
Why do tiny claw clips work so well on long straight hair? Because they grab a smaller section instead of fighting the whole head of hair at once. That smaller bite is easier to hold, which is why this style stays put longer than a lot of people expect.
Take the front section from temple to temple, twist it once or twice, then fold it upward and clip it just below the crown. A 1.5- to 2-inch clip is usually enough for fine to medium hair. If the clip is too big, it slides. If it is too tiny, it squeezes the section and makes the style look cramped.
How to Wear It
Keep the twist loose enough to show the hair’s shape, but not so loose that the clip has to do all the work. If your hair is very silky, cross one bobby pin under the clip for backup. That hidden pin saves the style when you bend over, which is usually when these things betray you.
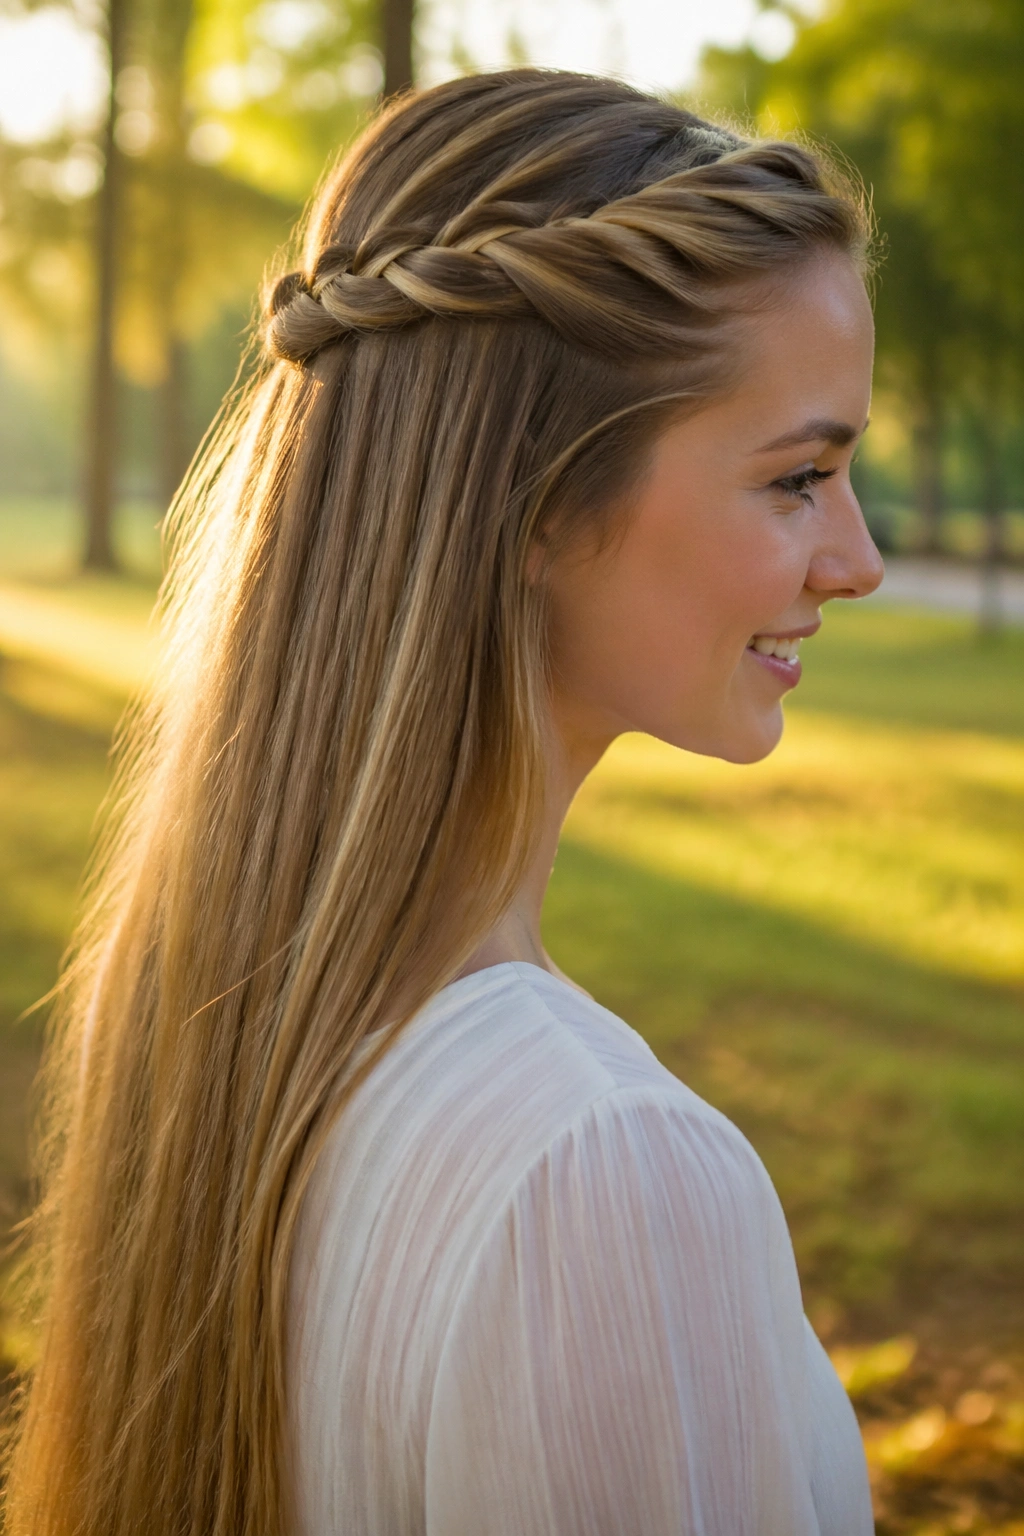
4. Rope-Twist Crown
A rope twist is one of those styles that looks more detailed than it is. You only need two sections of hair, yet the twist gives straight hair enough texture to feel finished.
Start with a section from each temple. Split each side into two pieces, twist them in the same direction, then wrap the two twisted ropes around each other in the opposite direction. That’s the whole trick. It makes a neat, raised shape at the back of the head, and because the twist is narrow, it never feels heavy.
- Take 1 to 1.5-inch sections on each side.
- Twist each side tightly before joining them.
- Pin the finished rope twist in an X shape for extra hold.
- Pull the twist apart a little if you want a wider, softer crown.
One small warning: don’t twist the hair too far down the head. Rope twists look best when they sit high enough to frame the face, not so low that they turn into an awkward half pony.
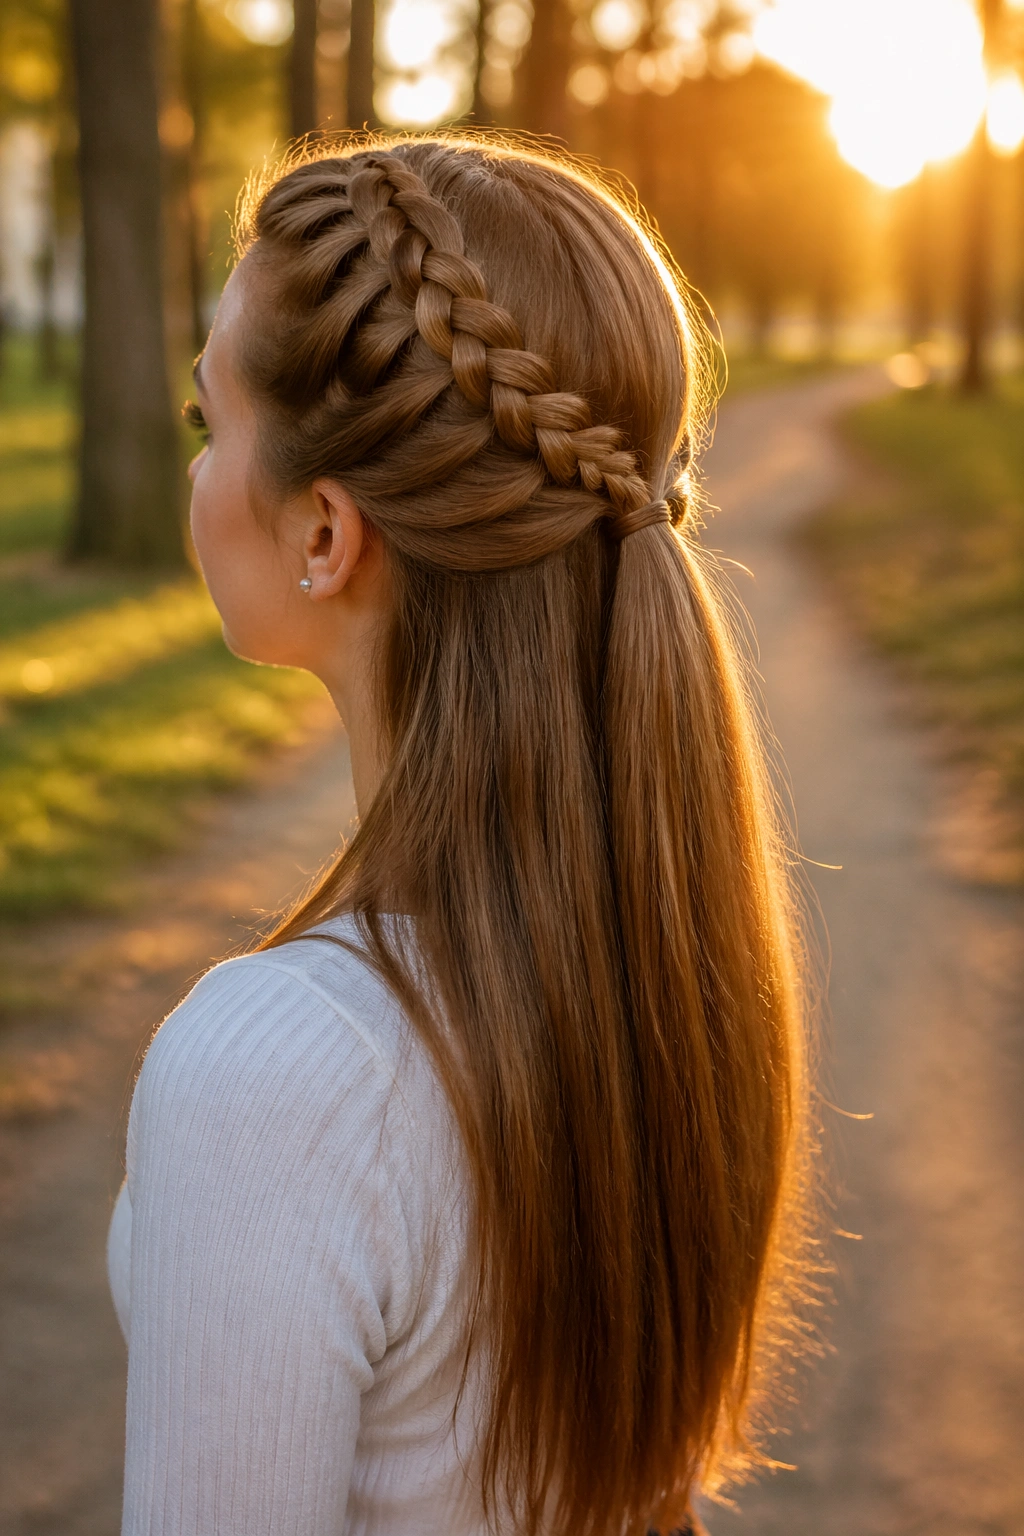
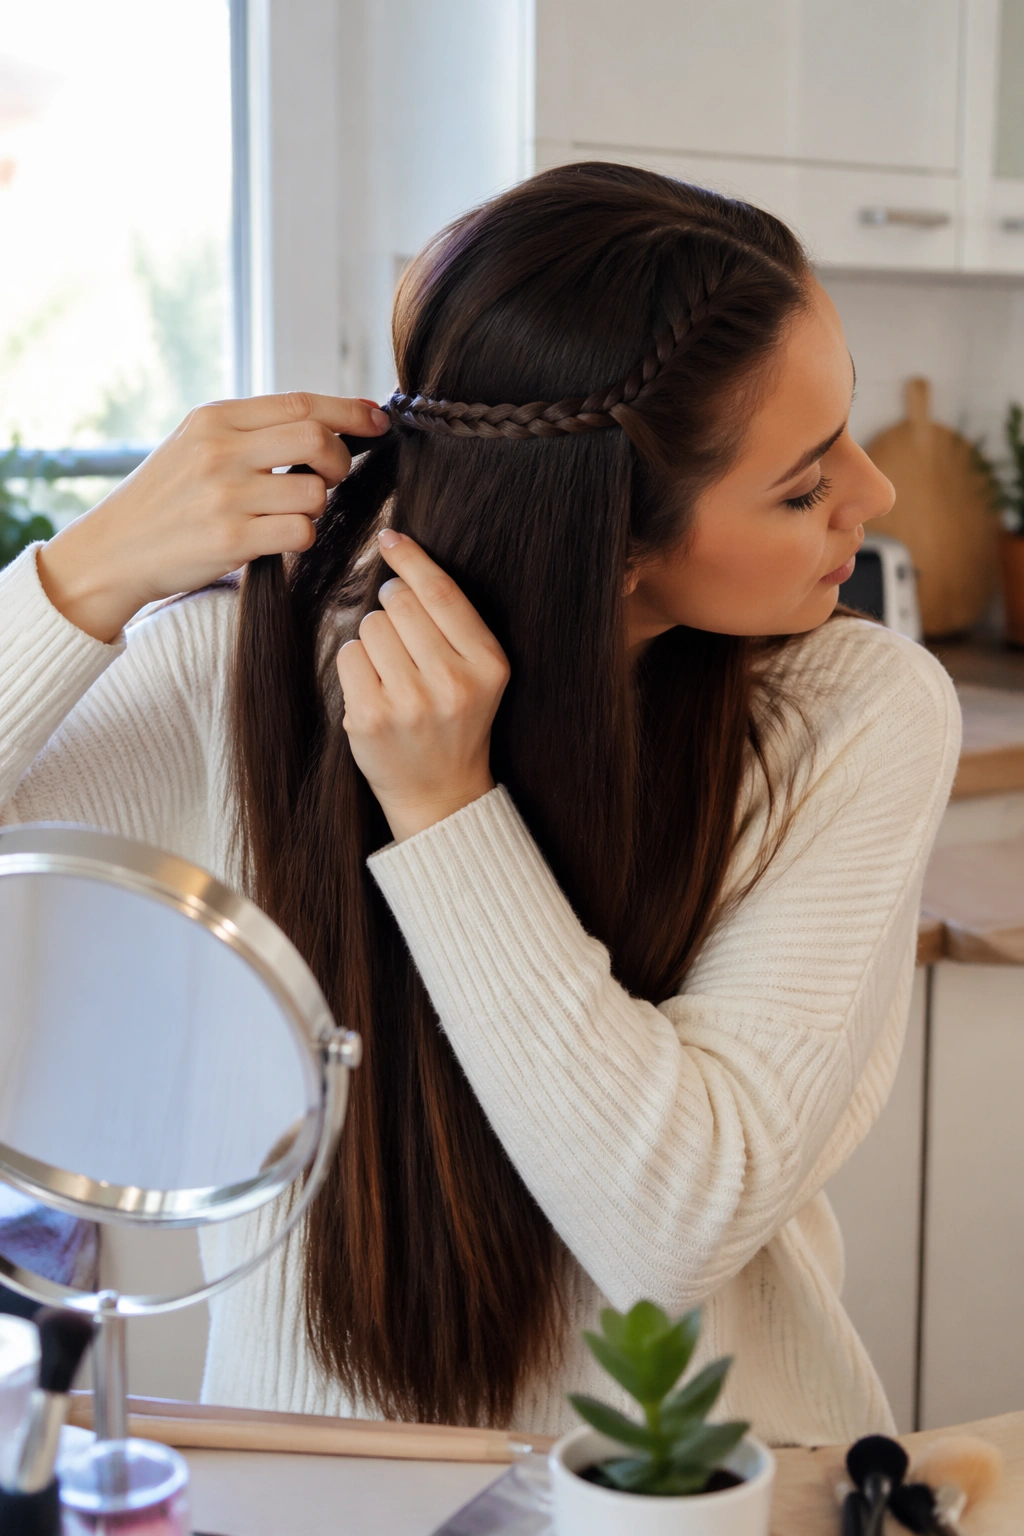
5. Small Side Braid Into Half Pony
A tiny side braid changes the mood of long straight hair fast. It keeps one side of the hairline tidy, gives the style a little pattern, and stops the front from feeling too plain. The rest of the hair stays down, which matters if you like length showing around the shoulders.
Braid a narrow section from one temple back toward the ear, then secure the braid with the rest of the top half. You can leave it as a side accent or feed it into a small half ponytail at the back. Either way, the braid gives the style a bit of grip and breaks up the smooth surface of straight hair.
Keep the braid slim. That’s the part people miss. A fat braid can swallow the whole style and make the hair look busy, while a narrow braid sits there with just enough texture to be useful. If your hair is very fine, stop the braid above the ear so it doesn’t pull too hard on the front.
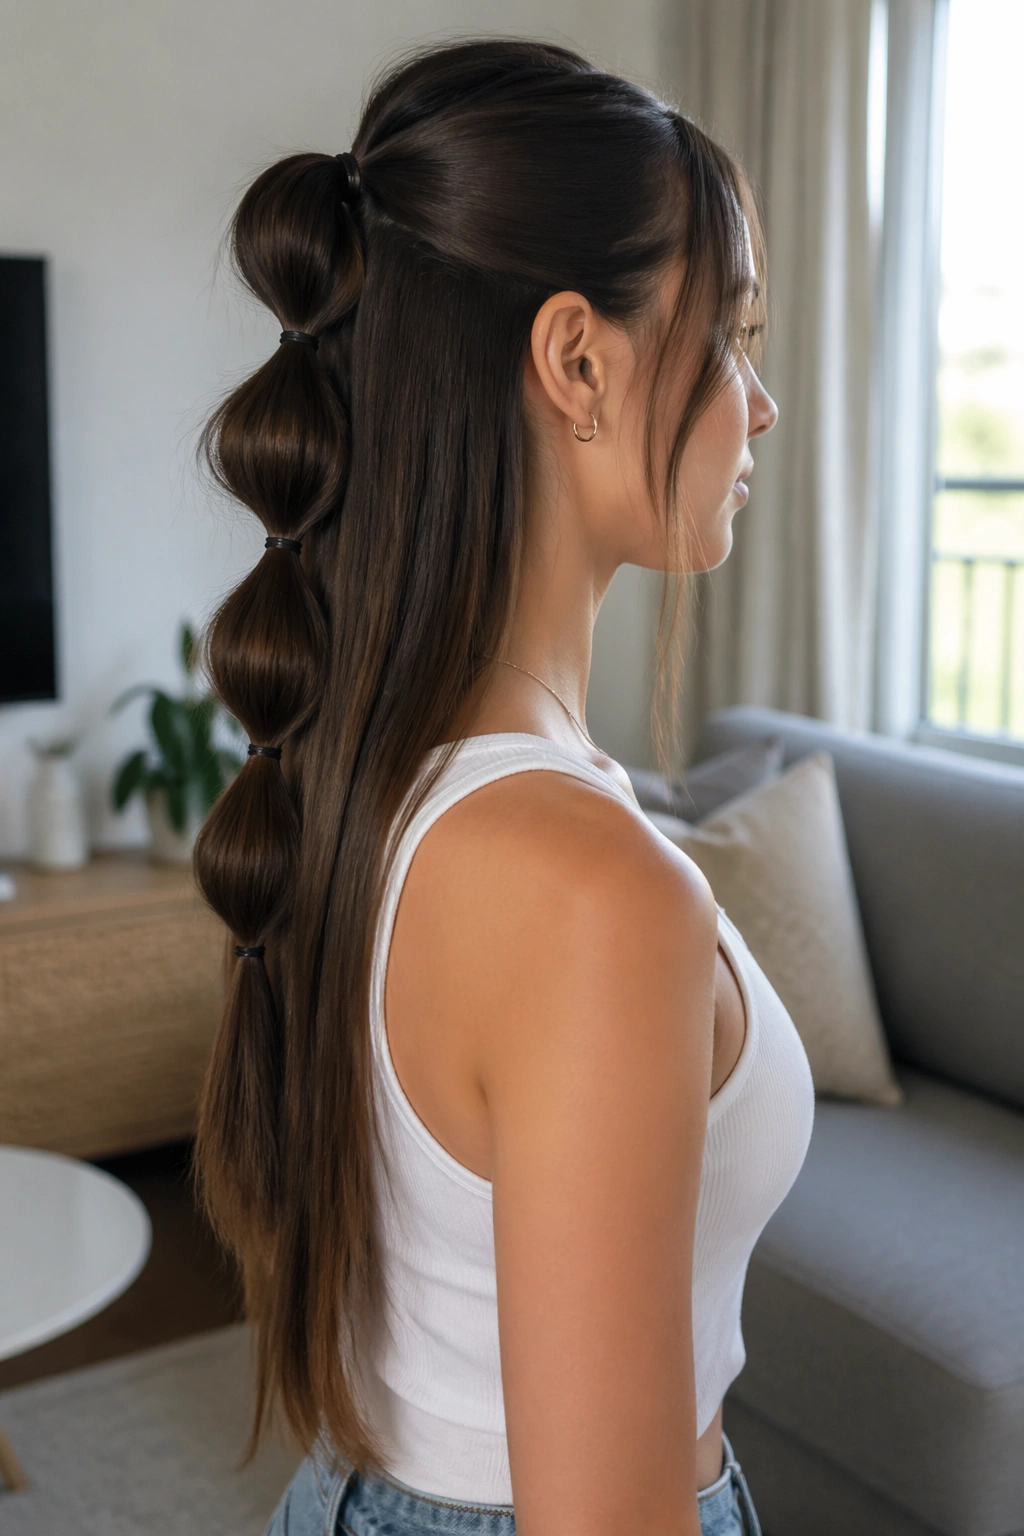
6. Bubble Half Pony
Unlike a regular half ponytail, this one turns the length into a feature. A bubble half pony uses a chain of small elastics to create rounded sections that sit neatly down the back half of the head.
Gather the upper half of the hair and tie it into a ponytail. Then add clear elastics every 1.5 to 2 inches down the length of the ponytail. Gently tug each section between the elastics so it puffs out a little. That’s the bubble shape. Straight hair makes the lines look crisp, which is half the charm.
This style is especially handy when you want something playful but still tidy. It also works well on heavy hair because the bubbles spread the weight out instead of letting everything hang from one point. If the hair is very long, you can add four or five bubbles. If it is medium-long, two or three are enough.
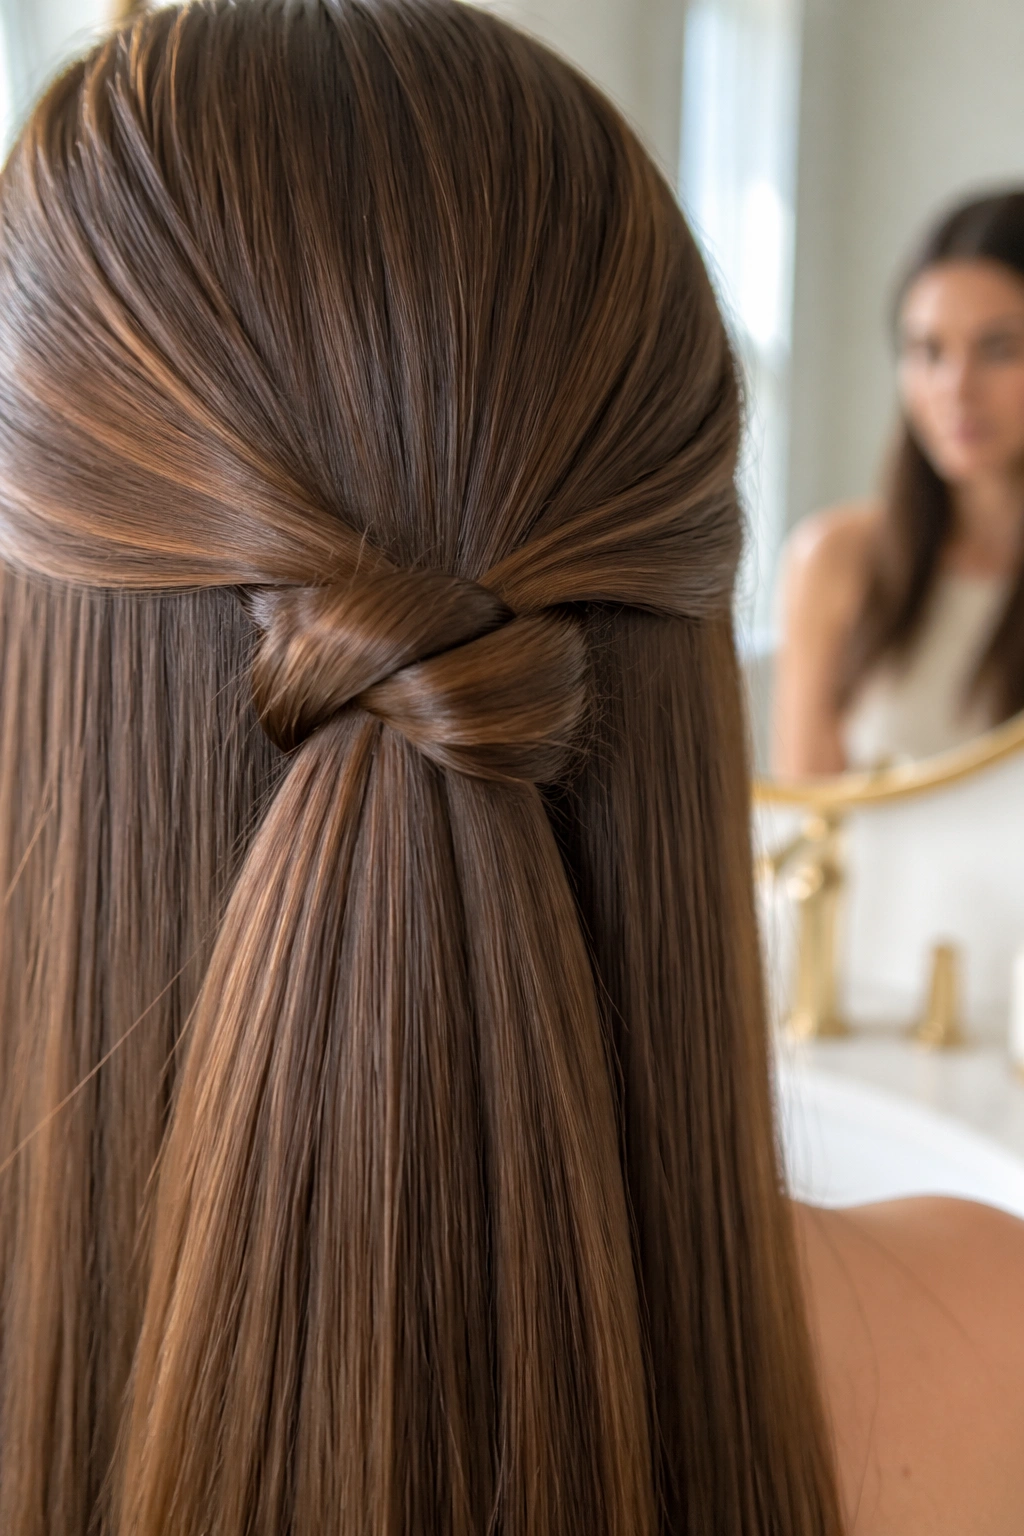
7. Knotted Half Up
A knot reads fancier than it is. That is probably why the knotted half up keeps showing up in my rotation whenever I want something that looks intentional but takes almost no time.
Take one section from each side, bring them to the back, and tie a single loose knot. Then secure the knot underneath with a bobby pin or a small clear elastic. On long straight hair, the knot stays clean because the strands lie flat instead of puffing out into a thick lump.
Where to Place the Knot
Keep the knot just above ear level if you want a soft, wearable shape. Move it a little higher if you want more lift at the crown. The knot should sit flat against the head, not sit up like a tiny bun with opinions.
- Use one hidden pin under the knot if the hair is silky.
- Leave the ends straight for a cleaner look.
- Loosen the sides a touch after tying so it doesn’t pull tight.
- Works well with a center part or a soft side part.
A small knot beats a bulky one every time.
8. Criss-Cross Bobby Pin Lift
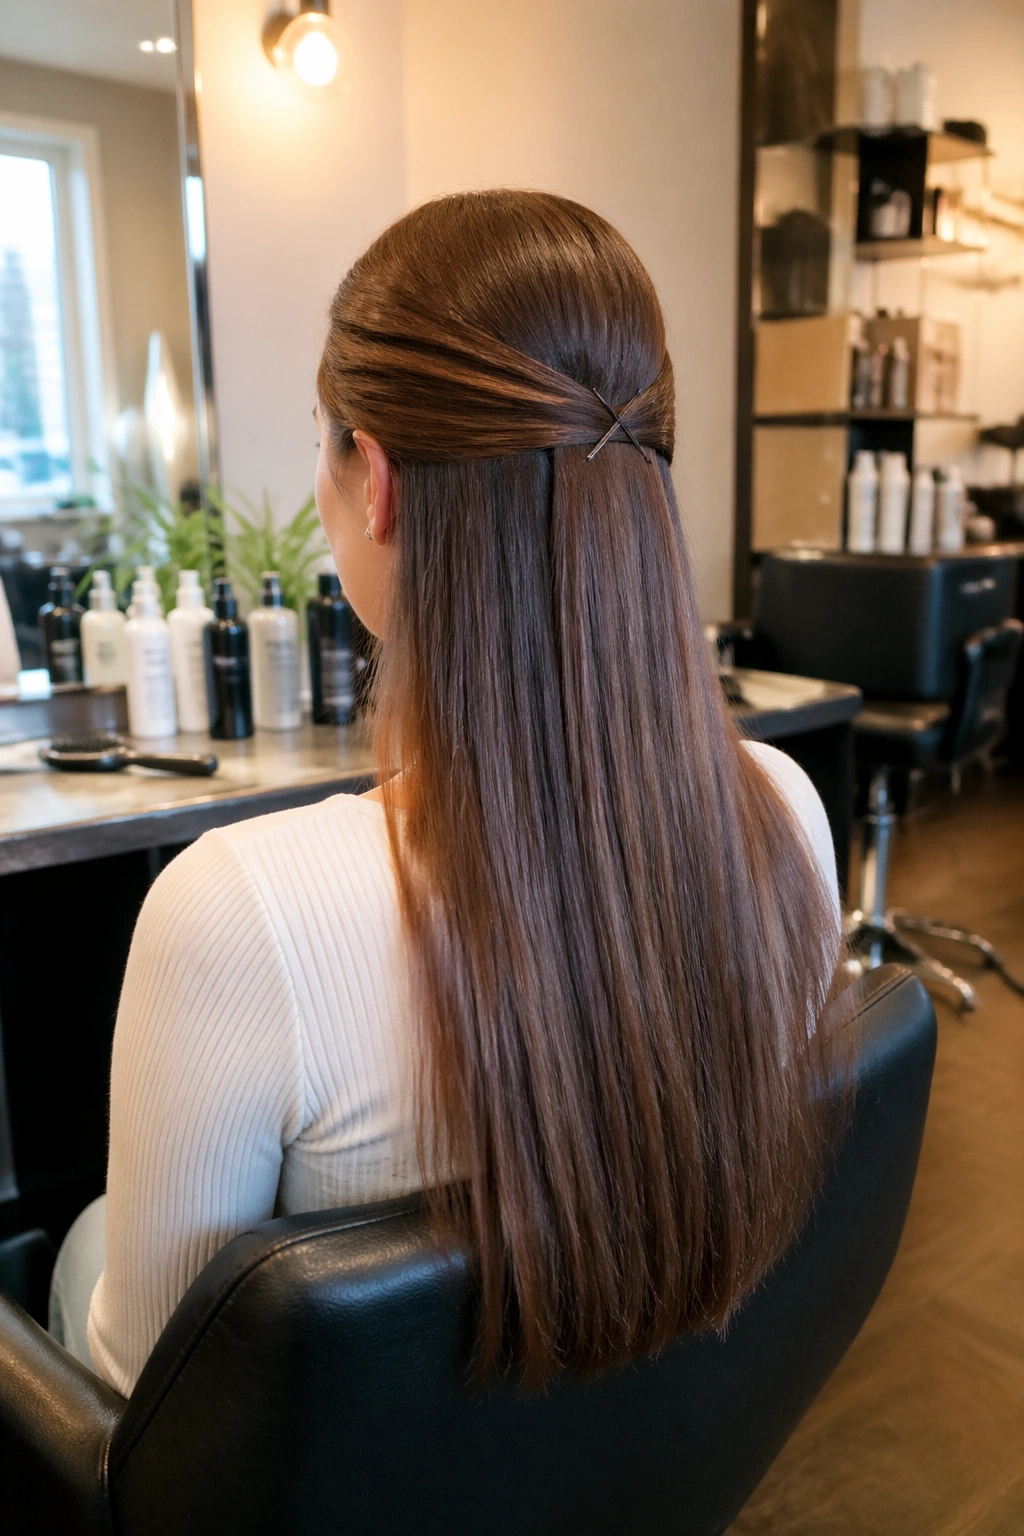
Four pins can do more than ten when they’re placed well. The criss-cross bobby pin lift is one of the easiest ways to turn a plain half-up section into something with shape and a little visual interest.
Gather two small sections from the temples, pull them back, and pin them in place with two bobby pins crossing each other into an X on one side. Repeat on the other side if you want symmetry, or keep the pins on one side for a cleaner asymmetrical look. The crossing pattern keeps the pins from sliding, which is a real problem on sleek straight hair.
This style is useful when you want almost no bulk at the back of the head. It also works well when the rest of the hair is very smooth and you do not want to disturb it. Use matte pins for a softer finish, or polished metal pins if you want the pins to show on purpose. Either way, the shape matters more than the decoration.
9. Ribbon-Tied Half Ponytail
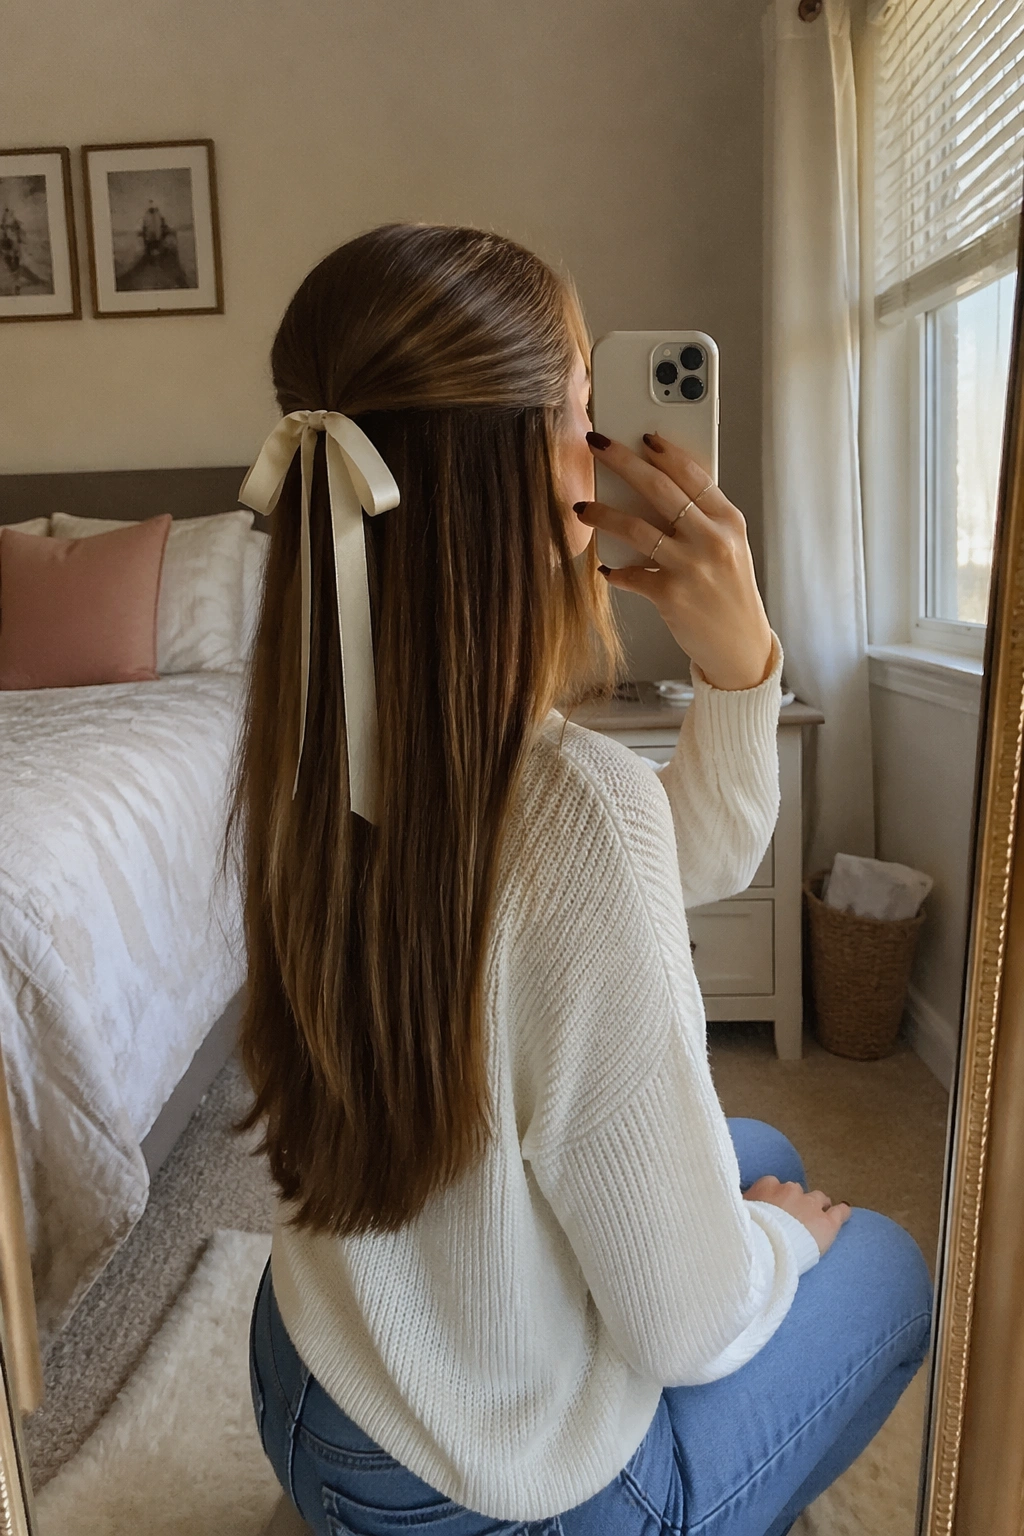
What happens if the elastic becomes part of the design? The whole style suddenly looks softer. A ribbon-tied half ponytail is one of the easiest ways to make straight hair feel less severe without changing the structure much.
Gather the top half into a small ponytail, secure it with a clear elastic, then tie a ribbon around the base. A 1/2-inch satin or grosgrain ribbon works well because it sits neatly and doesn’t overpower the hair. If the ribbon is too wide, it starts to look like the outfit is wearing the hair, and that is never the goal.
How to Tie It
Let the ribbon tails hang long, or trim them short if you want a cleaner finish. Satin gives a smooth look; grosgrain holds a tighter knot. Use a second knot if the hair is heavy and the first one feels loose. Straight hair shows the ribbon clearly, so even a simple color choice can change the whole feel of the style.
10. Half Up Bow
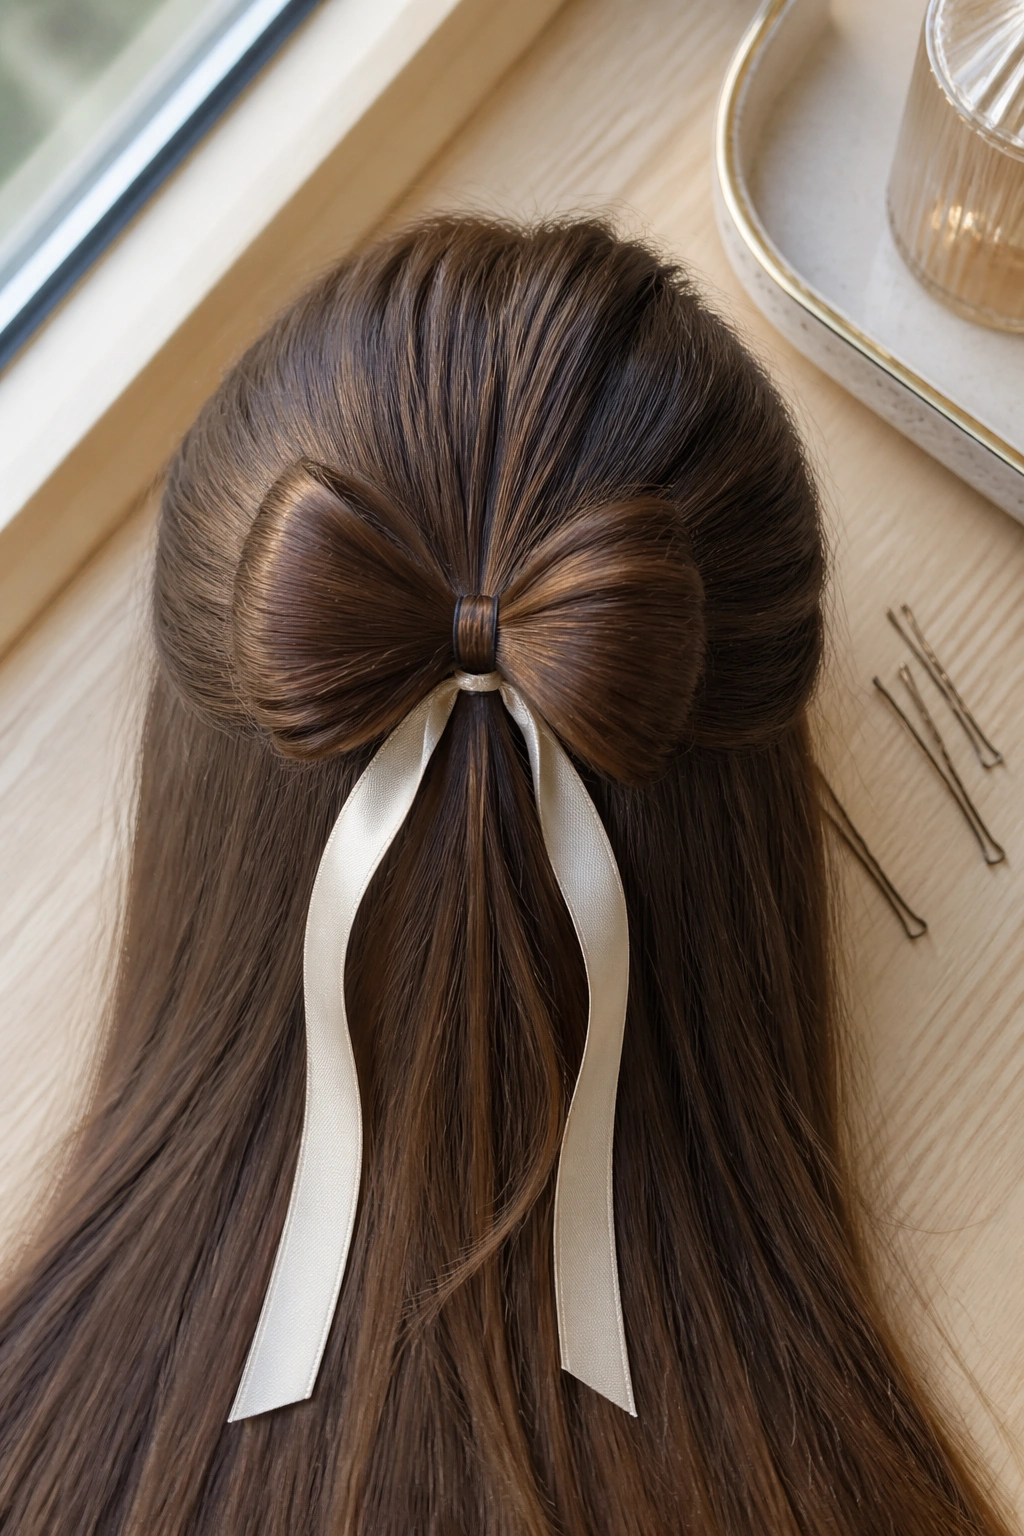
A bow made from your own hair is not as hard as it sounds. It just needs a little patience and a lot less hair than people think.
Start with a half ponytail and loop the hair through the elastic so you create two rounded sides of the bow. Leave the ends hanging in the middle as the center tie. Pin that middle piece tightly so the bow does not open up. Long straight hair makes this style easier because the strands stay smooth while you shape them.
- Keep the bow small and neat so it doesn’t swallow the length.
- Place it at the crown or a little lower, depending on how playful you want it.
- Use a light mist of spray on the section before forming the loops.
- Smooth the surface with fingers, not a brush, once the bow is set.
This one works best when the rest of the hair stays very simple. The bow should be the only thing asking for attention.
11. Tiny Top Knot Half Up

A tiny top knot is the style I reach for when the front of the hair needs to stay out of the way and there isn’t much time to spare. It uses only the top section, twists it into a small knot, and leaves the rest of the hair straight and loose.
The key is size. If the knot gets too big, it starts to fight the clean line of long straight hair. Keep it compact, almost like a little button at the crown. Two bobby pins crossed underneath usually do the job, though very slippery hair may need a third pin.
The style has a nice balance to it because the knot brings the eye upward while the length keeps everything from feeling too severe. It works with a center part, a side part, or no part at all. And unlike a full bun, it doesn’t kill the shape of the hair below. That matters if the ends are the part you actually want to show off.
12. Low Half Bun
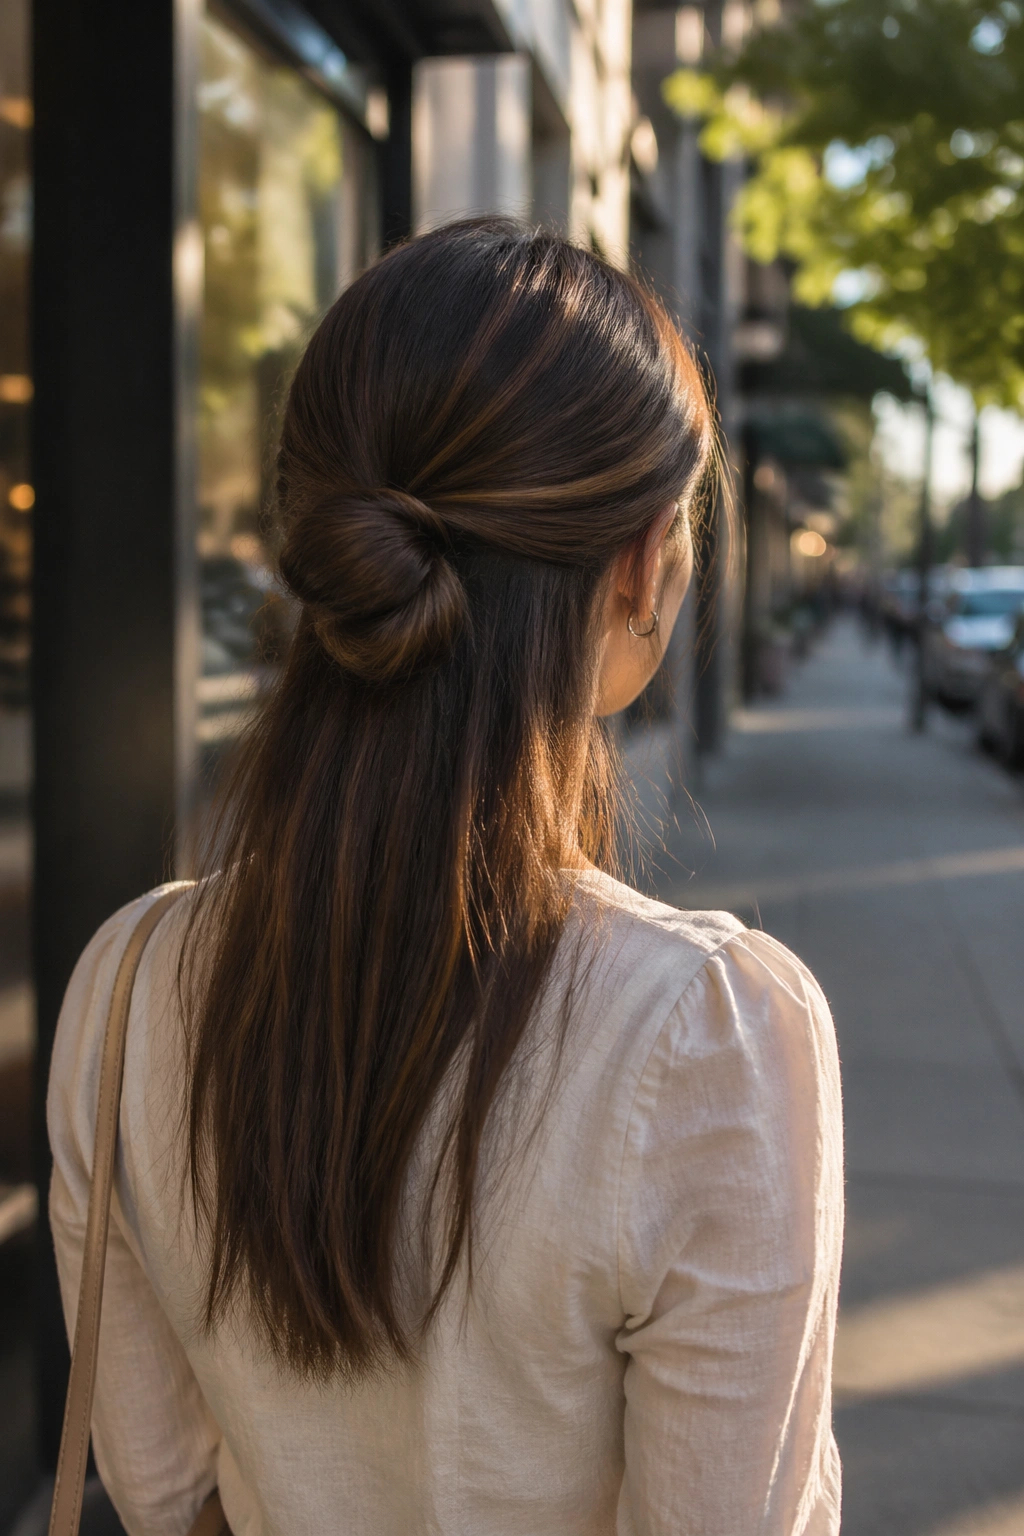
A low half bun feels calmer than a top knot. It sits a little farther back, so the style keeps the crown neat while letting the ends fall naturally over the shoulders.
Gather the upper half of the hair just below the crown, twist it loosely, and coil it into a small bun. Pin it in place with two or three pins depending on thickness. On long straight hair, the low placement keeps the bun from looking too puffed up, which is the main thing that can go wrong with this style.
This is a good one when you want the back of the hair to stay soft. A low half bun also gives room for the length underneath to move, which makes the whole look feel less stiff. Keep the bun slightly imperfect. A polished-looking half bun on very straight hair can end up too rigid, while a softer coil feels easier to wear.
13. Side-Swept Twist Back

If you want one side to do all the work, this is the move. A side-swept twist back is simple, flattering, and a little less expected than the usual center half-up shape.
Take a section from one side, starting near the temple, and twist it back toward the crown. Pin it behind the ear or just above it, then let the rest of the hair fall straight across the shoulders. The asymmetry gives the style a quiet bit of drama without making it heavy.
Small Details That Matter
The side with the twist should feel anchored, not pulled tight. Leave the opposite side loose and smooth so the shape has contrast. If you wear one earring or a statement necklace, this style helps keep the attention where you want it.
- Twist from the wider side of your part if you want more balance.
- Use 2 pins if the hair is fine, 3 pins if it is thick.
- Tuck the twist low enough to hide the pin work.
- Let a few short pieces fall around the cheekbone if the face framing feels harsh.
14. Double Twist Half Up
Two twists look more detailed than they are. That is the real appeal here. You make one twist on each side, bring them together, and the style suddenly looks like you spent more time on it than you actually did.
Twist each side back from the temples, then cross the two sections over each other at the center back. Pin them in place with a couple of bobby pins underneath. On long straight hair, this works because the twists add body where the style needs it most — right at the top — while the length stays sleek below.
This version is useful on windy days or when you know you’ll be moving around a lot. One twist can slip, but two twists work together and hold better. Keep the twists relaxed if you want softness, or tighter if you want a cleaner line. Either way, the hair below should stay smooth and straight so the half-up part remains the star.
15. Accent Fishtail Braid
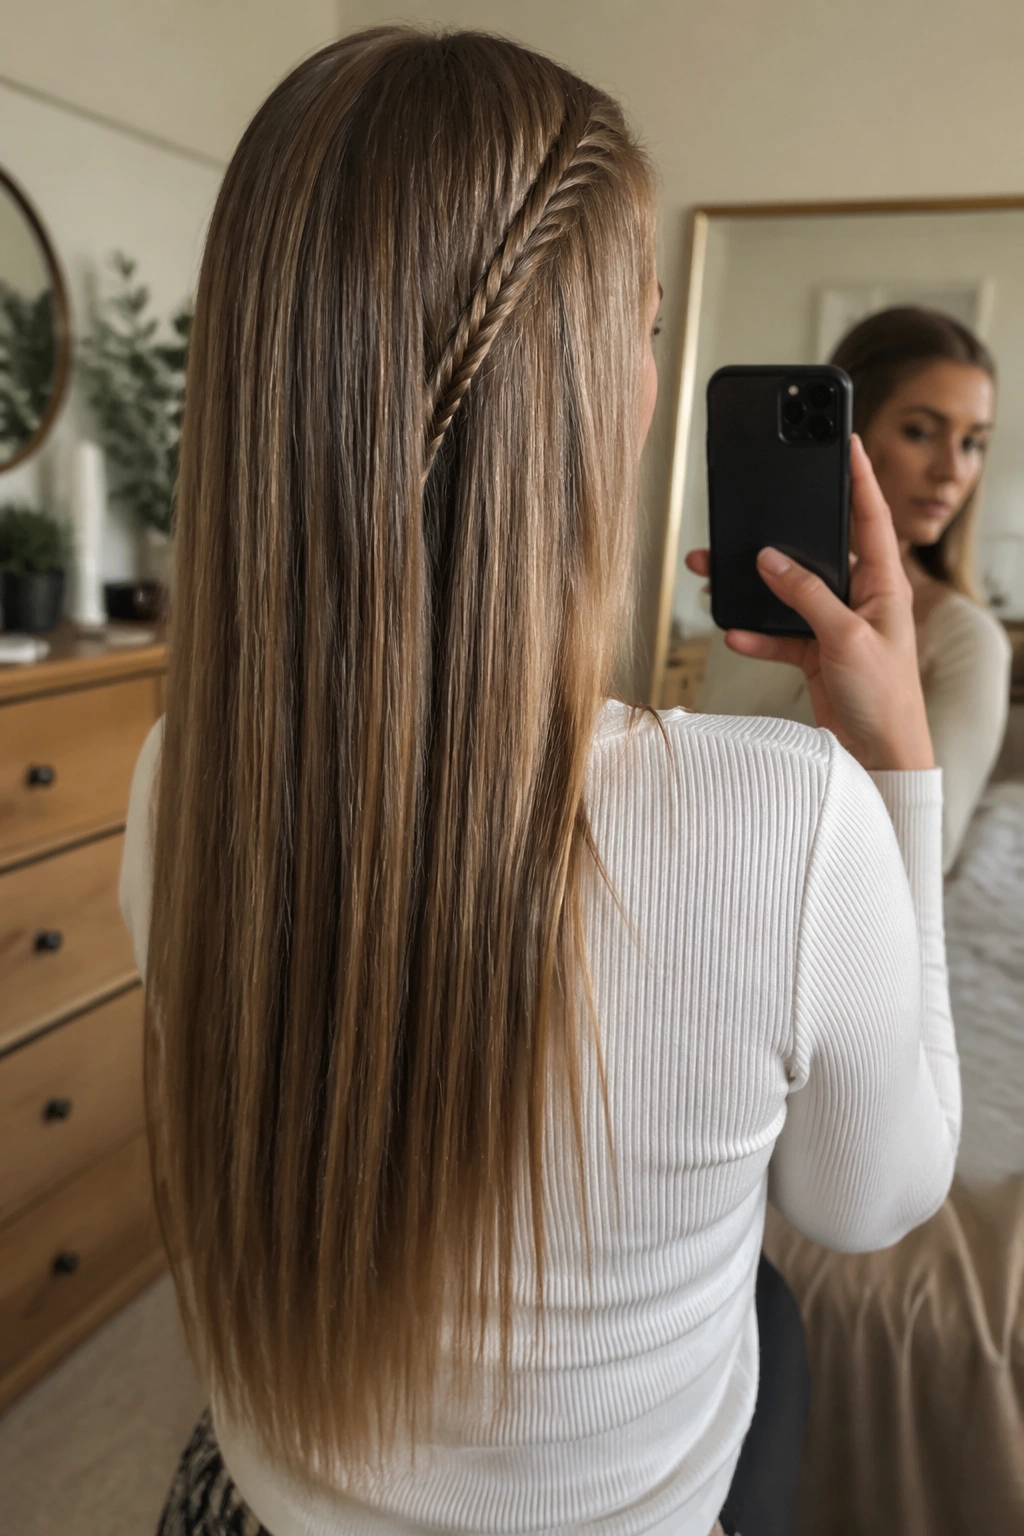
Why does a tiny fishtail look so sharp on straight hair? Because the braid pattern stays visible. With curls, some of the detail disappears. With straight hair, every cross-over sits right on top of the last one.
Braid a narrow section from one side, or braid both sides and meet them at the back. Stop early if you want the look to stay easy. A fishtail only needs a small section to make an impact, which is good news if the rest of the hair is long and heavy. Secure the end with a clear elastic and let the braid blend into the loose length.
How to Use It
Keep the braid skinny and neat. A thick fishtail can look bulky against smooth hair, while a slim one reads as clean and deliberate. If you want a little more texture, pull the edges of the braid outward with your fingertips after it is tied off. That softens the line without destroying the pattern.
16. Half Pony With Hair Wrap
If the elastic is the part you hate, hide it. A wrapped half pony takes the same basic shape as the sleek half ponytail, then covers the band with a strand of hair so the whole thing looks cleaner.
Gather the top section and tie it off with a small elastic. Then pull a thin strand from underneath the ponytail, wrap it around the elastic, and pin the end underneath. Use a strand about 1/4 to 1/2 inch wide so it covers the band without turning into a thick rope.
- Smooth the wrapping strand before you start.
- Keep the wrap flat against the pony base.
- Pin underneath, not on top.
- Works well when the hair is long enough to leave a full tail hanging.
The nice part is that the wrap makes the style look finished even if the rest of the hair is plain straight. There’s no extra braid or clip to distract from the length.
17. Stacked Barrette Half Up
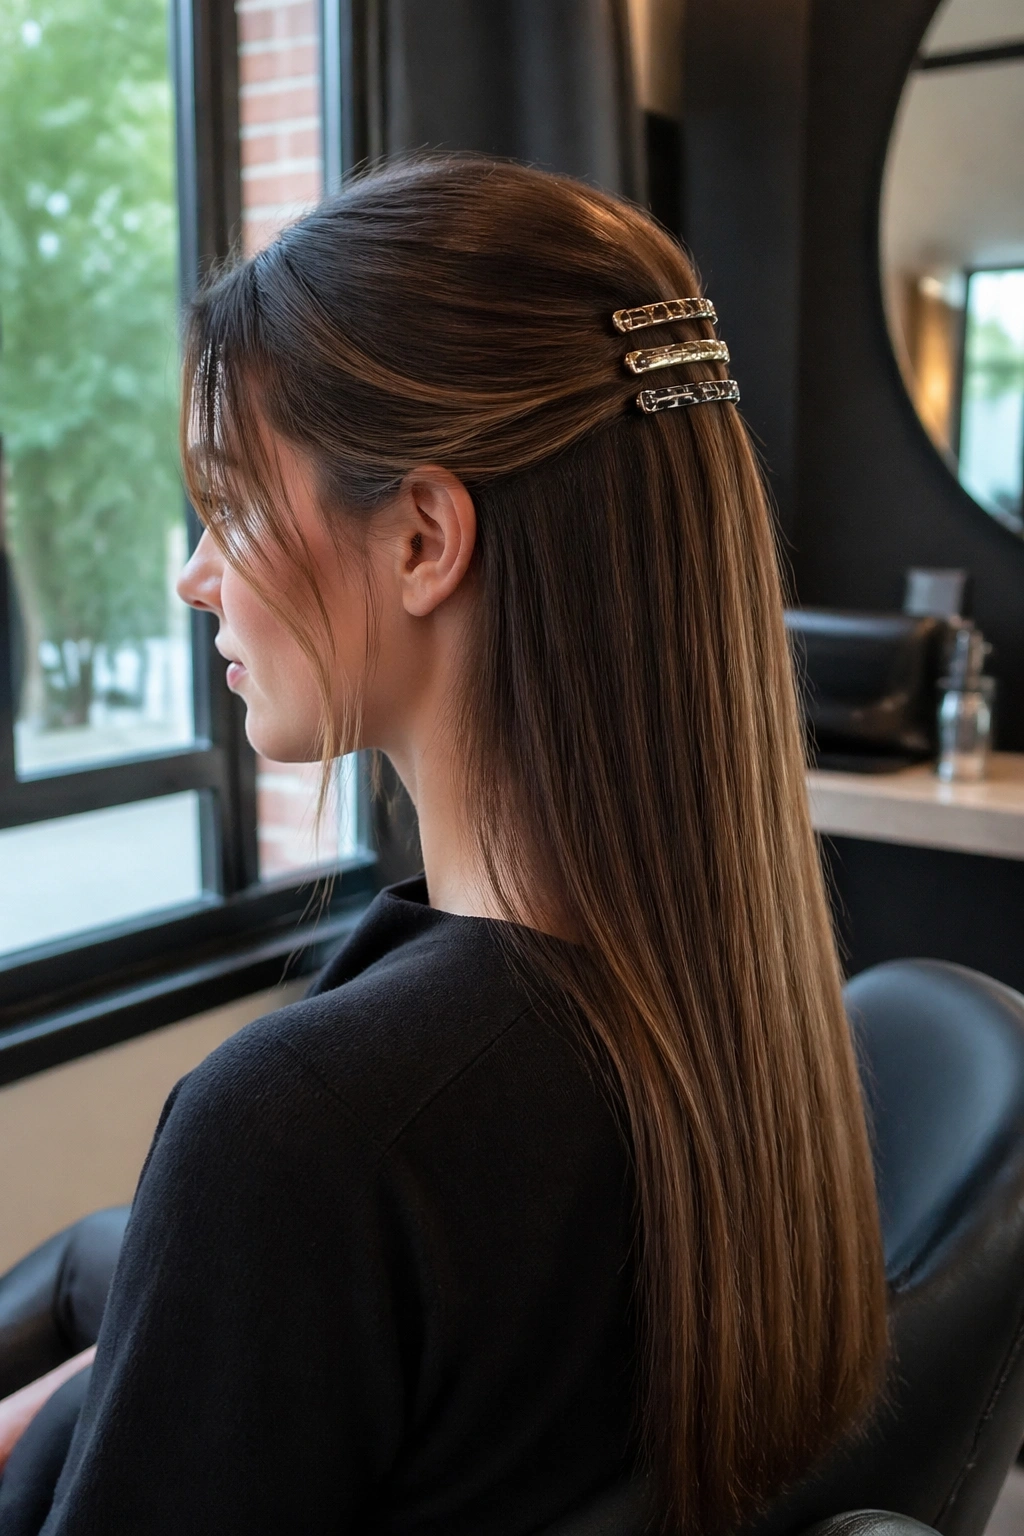
A stacked barrette half up is the cleanest answer when you want decoration without a complicated style. The hair stays simple, and the barrettes do the visual work.
Gather a half-up section and smooth it back. Then stack two or three barrettes either in a vertical line or slightly offset to one side. Straight hair gives the clips a neat backdrop, so the shape of each barrette shows clearly. That’s part of the appeal. On textured hair, the clips can get lost. On long straight hair, they read like design.
Keep the spacing even. About 1 inch between barrettes usually looks tidy without feeling overdone. If the clips are large, use only two. If they’re small, three can look balanced. Mixing metal finishes can be fun, but the style usually looks calmer when the clips share the same tone. That little restraint makes the whole thing feel more intentional.
18. Dutch Braid Into Half Ponytail
Unlike a French braid, a Dutch braid pops off the head a little more. That tiny bit of lift is why it works so well on straight hair. You get pattern and support at the same time.
Start a narrow Dutch braid along the hairline or from one side, braid it back toward the crown, then gather it into a half ponytail or secure it beside the loose length. Keep the braid skinny if you want the style to stay easy. A wide Dutch braid can take over the whole look and leave less room for the length to show.
This one is a touch more involved than a plain twist, but the payoff is real. The braid holds better than a loose twist, and it gives the top of the head a stronger shape. If your hair is very fine, stop the braid early and let the rest of the section join the ponytail. That keeps the style from feeling too tight around the scalp.
19. Pull-Through Half Pony
A pull-through half pony looks braided from a distance, but it is built from little ponytails instead. That makes it a clever option for long straight hair because the sections can be pulled wider without falling apart.
Start with a half ponytail, then split the pony into two loops and tie a small section underneath to create the next segment. Repeat down the length with clear elastics. Each time you pull the loops apart a little, the style grows more rounded and full.
How to Keep the Bubbles Even
The spacing matters. Use 4 to 6 clear elastics on longer hair, and keep the gaps similar so the pattern stays neat. If one section is much larger than the others, the whole style looks lopsided. Finger-comb each bubble after you tie it so the shape opens evenly.
This style is handy when you want more visual interest than a plain half ponytail but less fuss than a full braid. It also gives long straight hair some movement, which helps a lot when the hair otherwise hangs in a single straight curtain.
20. Scarf-Wrapped Half Up
A scarf can do more than a clip ever will. It can soften the shape, add color, and keep a half-up style from looking too plain.
Fold a silk or cotton scarf into a narrow band, then use it to tie or cover the base of a half-up section. You can let the ends hang loose, tuck them into the hair, or wrap them around a twist. A scarf that is about 24 to 36 inches long gives you enough length to tie it comfortably without making the knot bulky.
The scarf works especially well on long straight hair because the smooth surface lets the fabric stand out. A plain ponytail looks plain. Add a scarf, and suddenly the style has shape. Keep the hair section underneath simple so the scarf stays the focus. If the scarf is slippery, anchor it with a clear elastic first, then tie the scarf over that. That tiny extra step saves a lot of frustration.
21. Crown-Teased Half Pony
Why tease the crown on straight hair at all? Because a little root lift changes how the whole half-up style sits. Without it, the top section can flatten in an hour and the ponytail starts to look tired.
Backcomb the root area under the top half with a fine comb or a teasing brush. You only need 1 to 2 inches of section at the crown. Smooth the top layer over the tease so it still looks neat, then gather the half ponytail and secure it. The outer surface stays clean, but the inside gets the support it needs.
How to Get Lift Without a Rat’s Nest
Don’t tease the ends. That’s where things go wrong. Keep the backcombing close to the roots, then press the surface lightly with your palm to settle it down. A light mist of flexible spray helps, but heavy spray can make the hair stiff and sticky. The goal is lift, not a helmet.
22. Temple Twist Halo
A temple twist halo is one of the softer-looking half-up styles you can do with straight hair. It pulls the sides back from the hairline and creates a gentle frame around the face, which is useful when you want the length to stay down but the front to feel controlled.
Take a section from each temple, twist each side toward the back, and pin them together under the crown. The twists should sit close to the hairline and cross just behind the top of the head. That keeps the style from feeling too formal. It also gives the face a bit of shape without wiping away the length.
- Keep the twists close to the scalp for a clean line.
- Cross them just under the crown so the pins stay hidden.
- Loosen the edge pieces around the face if the style looks too tight.
- Use 2 hidden pins for fine hair, 3 for thicker hair.
This one feels soft, a little romantic, and not at all complicated once you’ve done it twice.
23. Half-Up Pigtails
Half-up pigtails are playful, but they don’t have to look childish. On long straight hair, the trick is keeping the sections small, neat, and placed with purpose.
Part the hair down the middle, then take the upper half and split it into two ponytails, one on each side of the crown. Keep them relatively small so the rest of the length still falls freely below. If the pigtails are too big, the style starts to feel heavy. If they’re too low, they get lost in the rest of the hair.
This style works nicely when you want movement and a little symmetry. It can feel sporty, casual, or even polished depending on the accessories. Thin elastics keep the shape clean, and a wrapped base on each pigtail makes the style look more finished. Straight hair helps here because the lines stay crisp. There’s no curl pattern breaking up the shape, so the pigtails read clearly.
24. Jeweled Pin Half Up
A jeweled pin does the work of several accessories without crowding the hair. That’s why I like it for long straight hair: you get a polished half-up style with almost no effort, and the pin gives the whole look a focal point.
Twist back a small section from one side or gather both sides into a simple center half-up shape. Then secure it with one decorative pin or two slim pins placed close together. Put the pin through the thickest part of the section so it has something solid to hold. If your hair is very smooth, hide a plain bobby pin underneath before adding the decorative one.
This style works because the hair stays simple and the pin becomes the detail. Use a single stone or pearl if you want a clean finish. Use a cluster if you want more shine. Either way, the base should stay tidy. On long straight hair, that contrast between plain length and a small bit of sparkle is usually enough.
Final Thoughts
The easiest half up half down styles for long straight hair usually do one of two things: they add grip, or they hide the fastening. Twists, braids, wrapped elastics, and clipped sections all solve the same problem in slightly different ways.
If your hair slips fast, start with the styles that build in structure — the rope twist, Dutch braid, pull-through half pony, or criss-cross pins. If you want speed, the mini claw clip, ribbon tie, and jeweled pin are hard to beat.
One small placement change can save a style. Move the half-up section an inch higher, anchor the pins under the twist instead of on top, and keep the ends loose so the length still feels like the point.