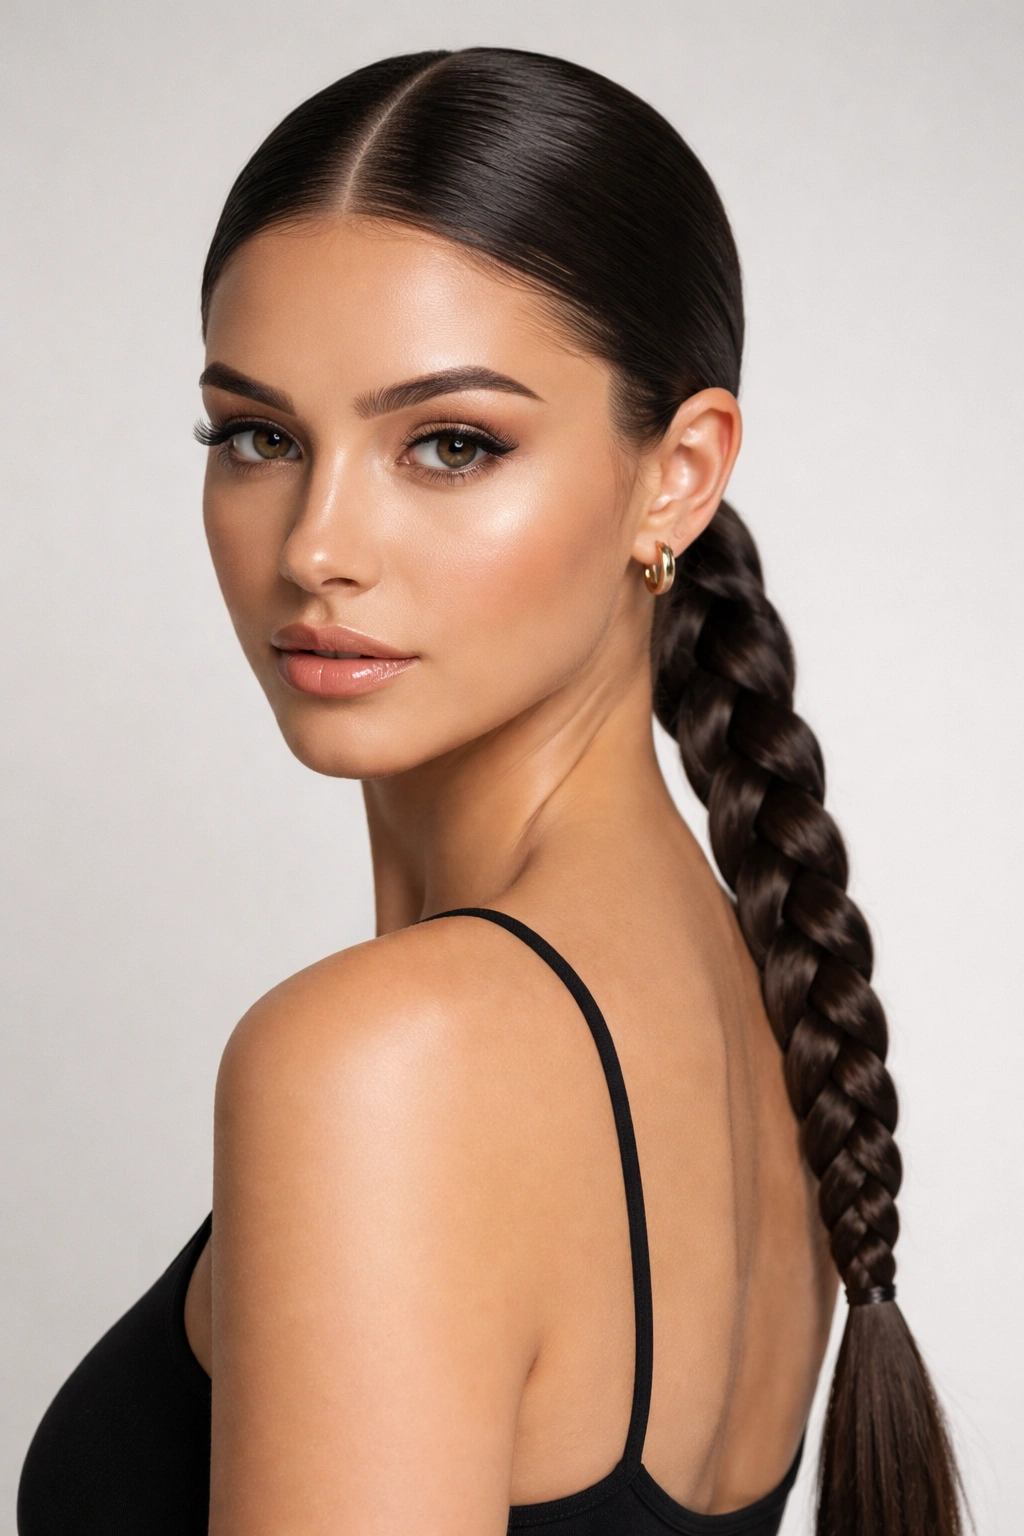
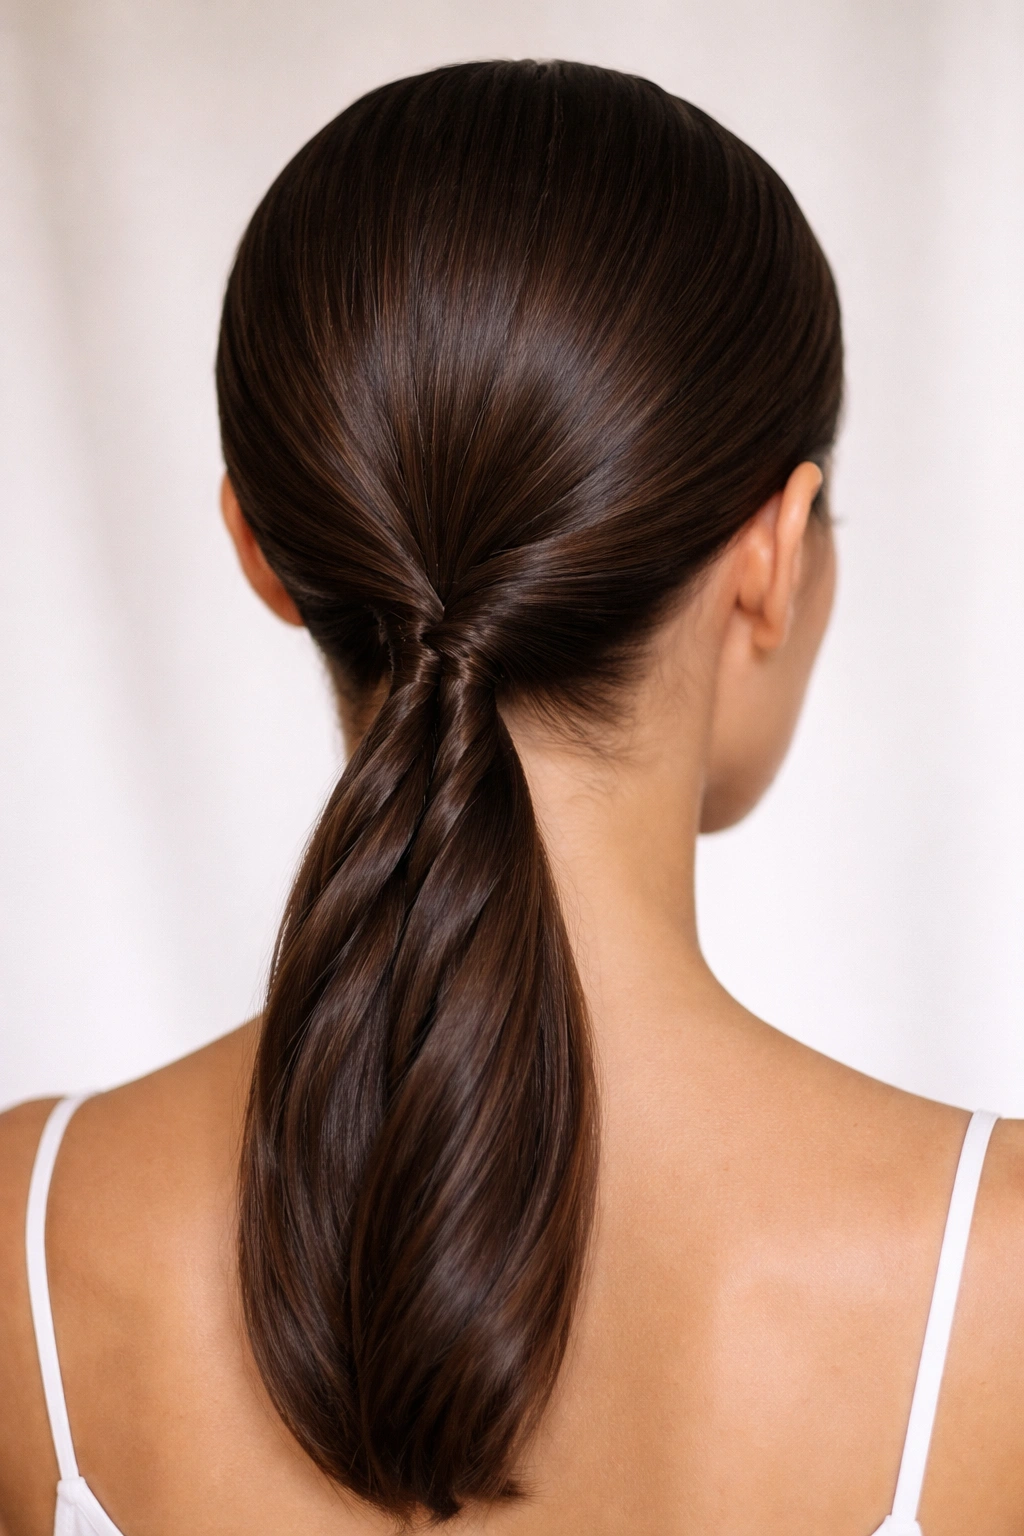
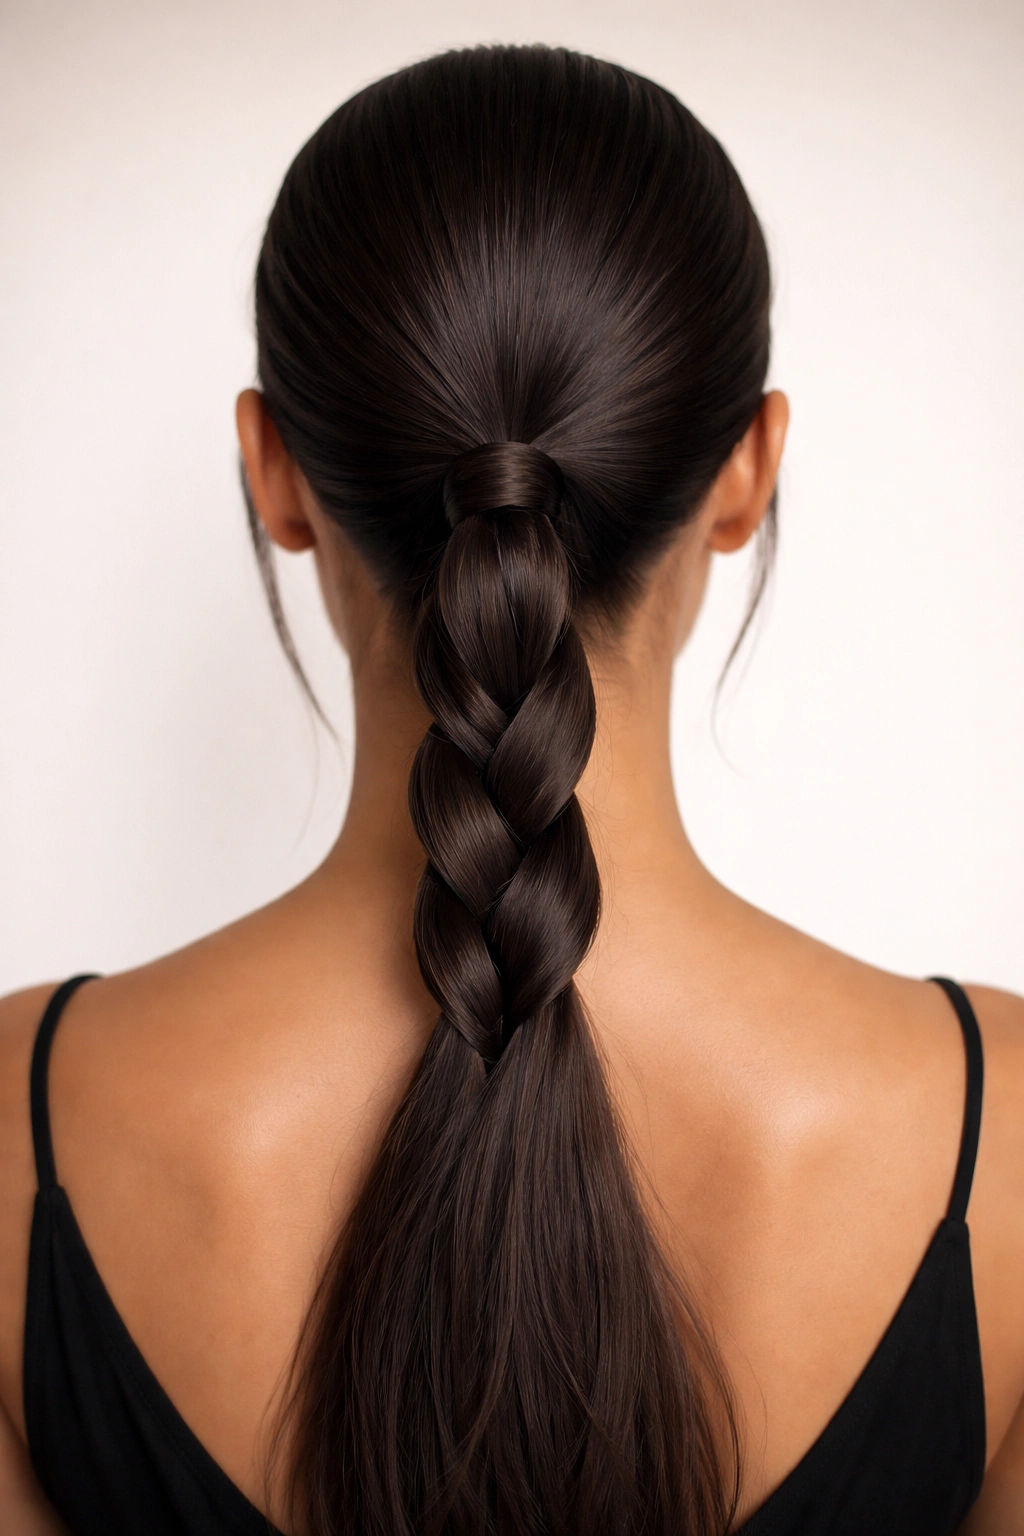
A low braid anchored at the nape can outlast a long day better than most styles that look twice as elaborate. The trick is never the braid alone. It’s the base: a clean part, a smooth crown, and enough tension at the scalp to keep everything where you put it.
A sleek low braided ponytail looks simple from a distance. Up close, it is all about control. The hair has to lie flat before the braid begins, the elastic has to bite without snapping, and the sections have to stay even enough that the plait doesn’t start drifting to one side halfway down.
That’s why some low braided ponytails feel fussy and fall apart fast, while others stay tight and neat through humidity, movement, and the usual tugging at your own hair when you’re thinking. A rattail comb, a strong-hold gel, and a couple of snag-free elastics do more work than most people realize. So does the way you section the front hair.
The styles below lean on different braid patterns, finishes, and hair textures. Some are quick and spare. Some take a little patience. All of them keep the low placement that makes the look feel polished instead of overdone.
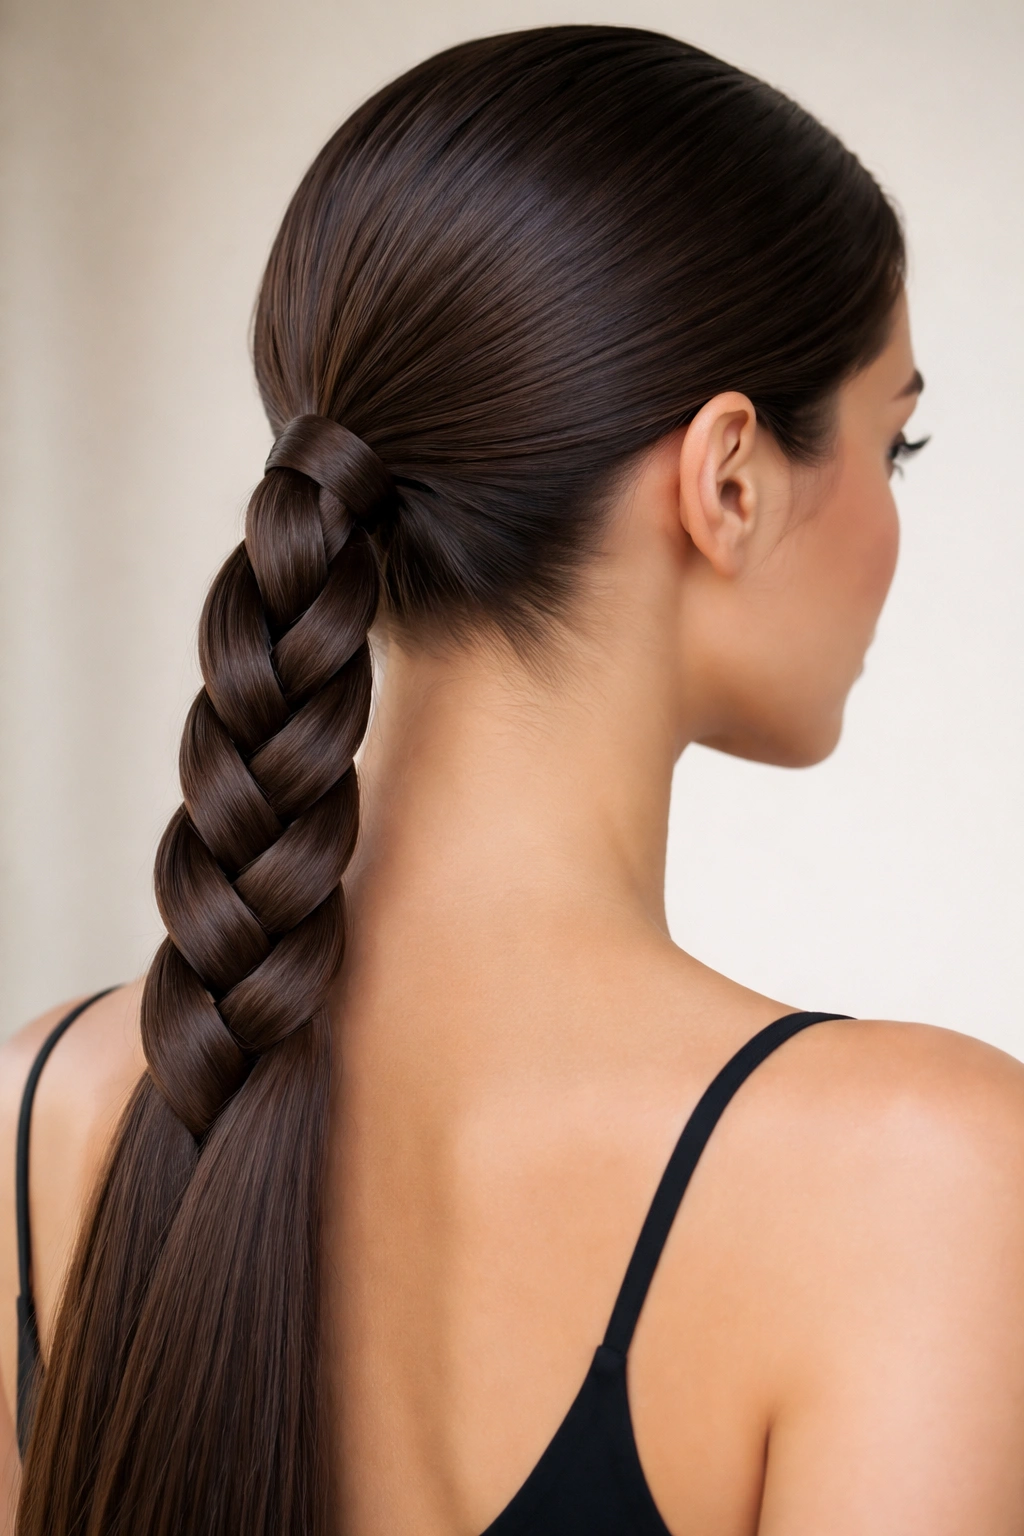
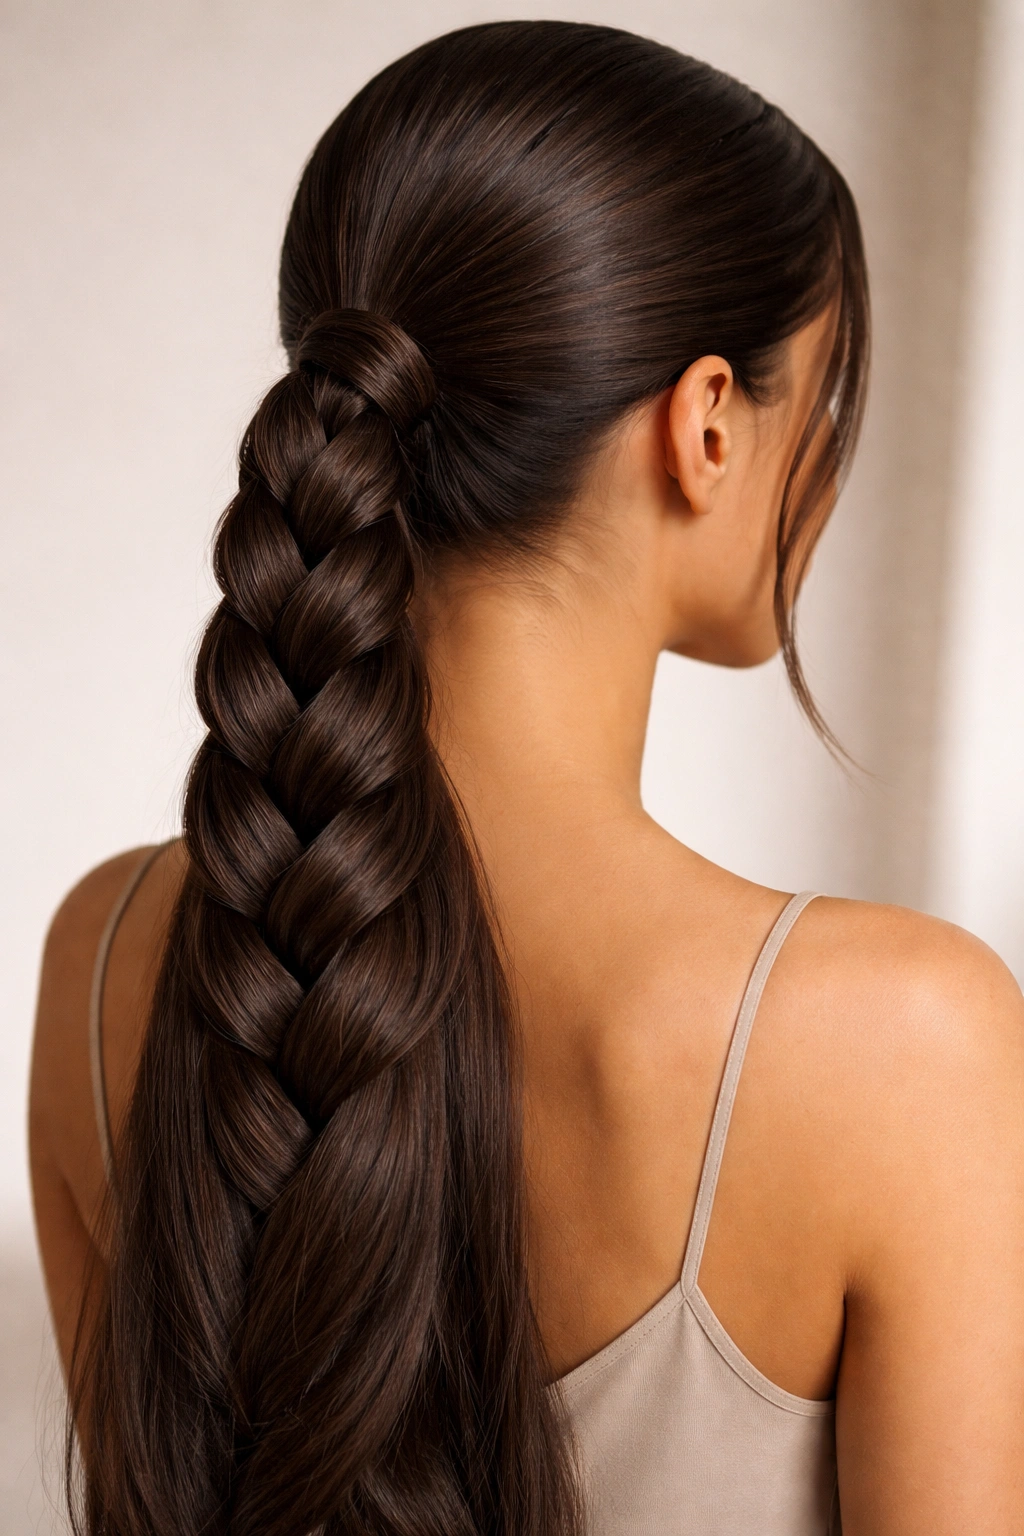
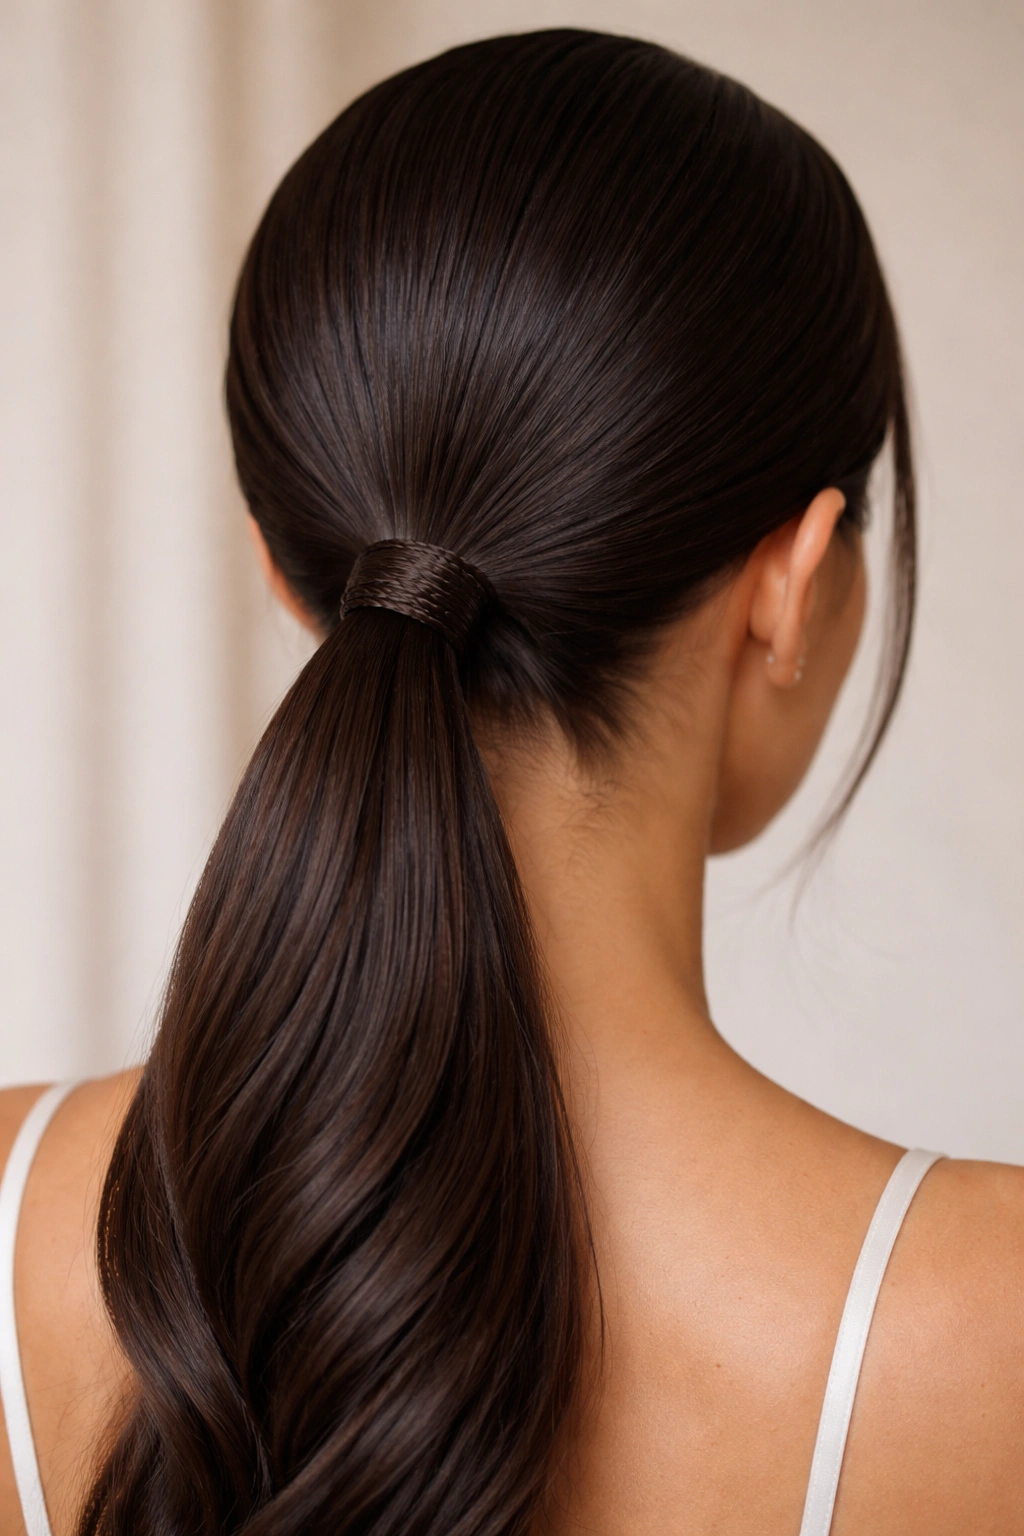
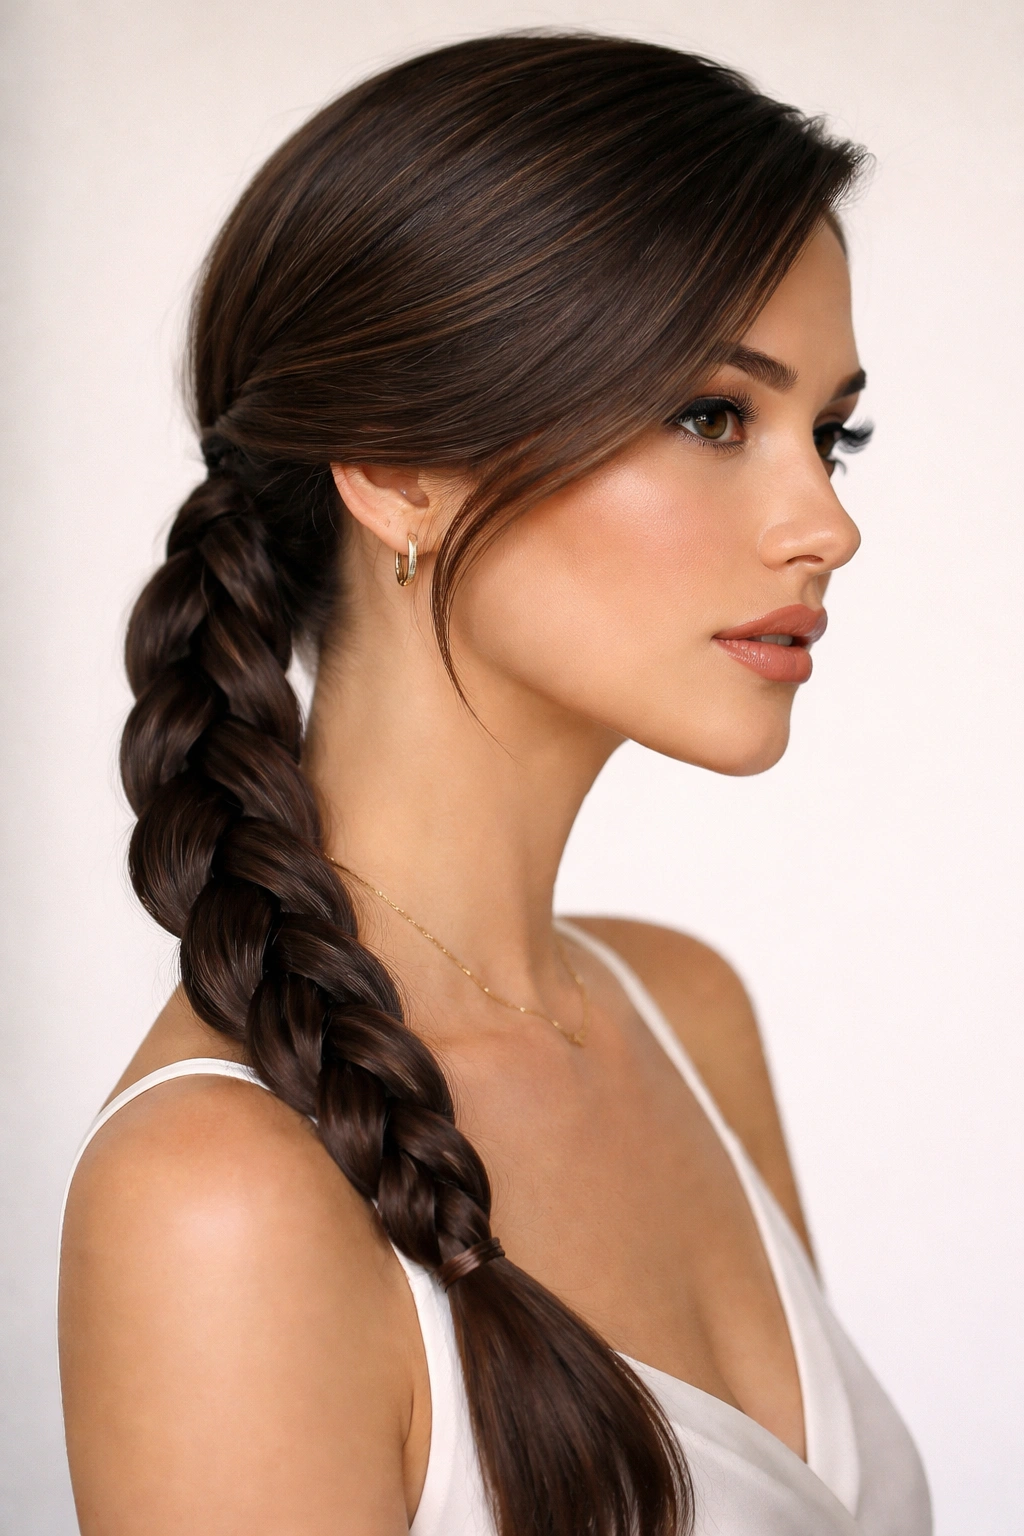
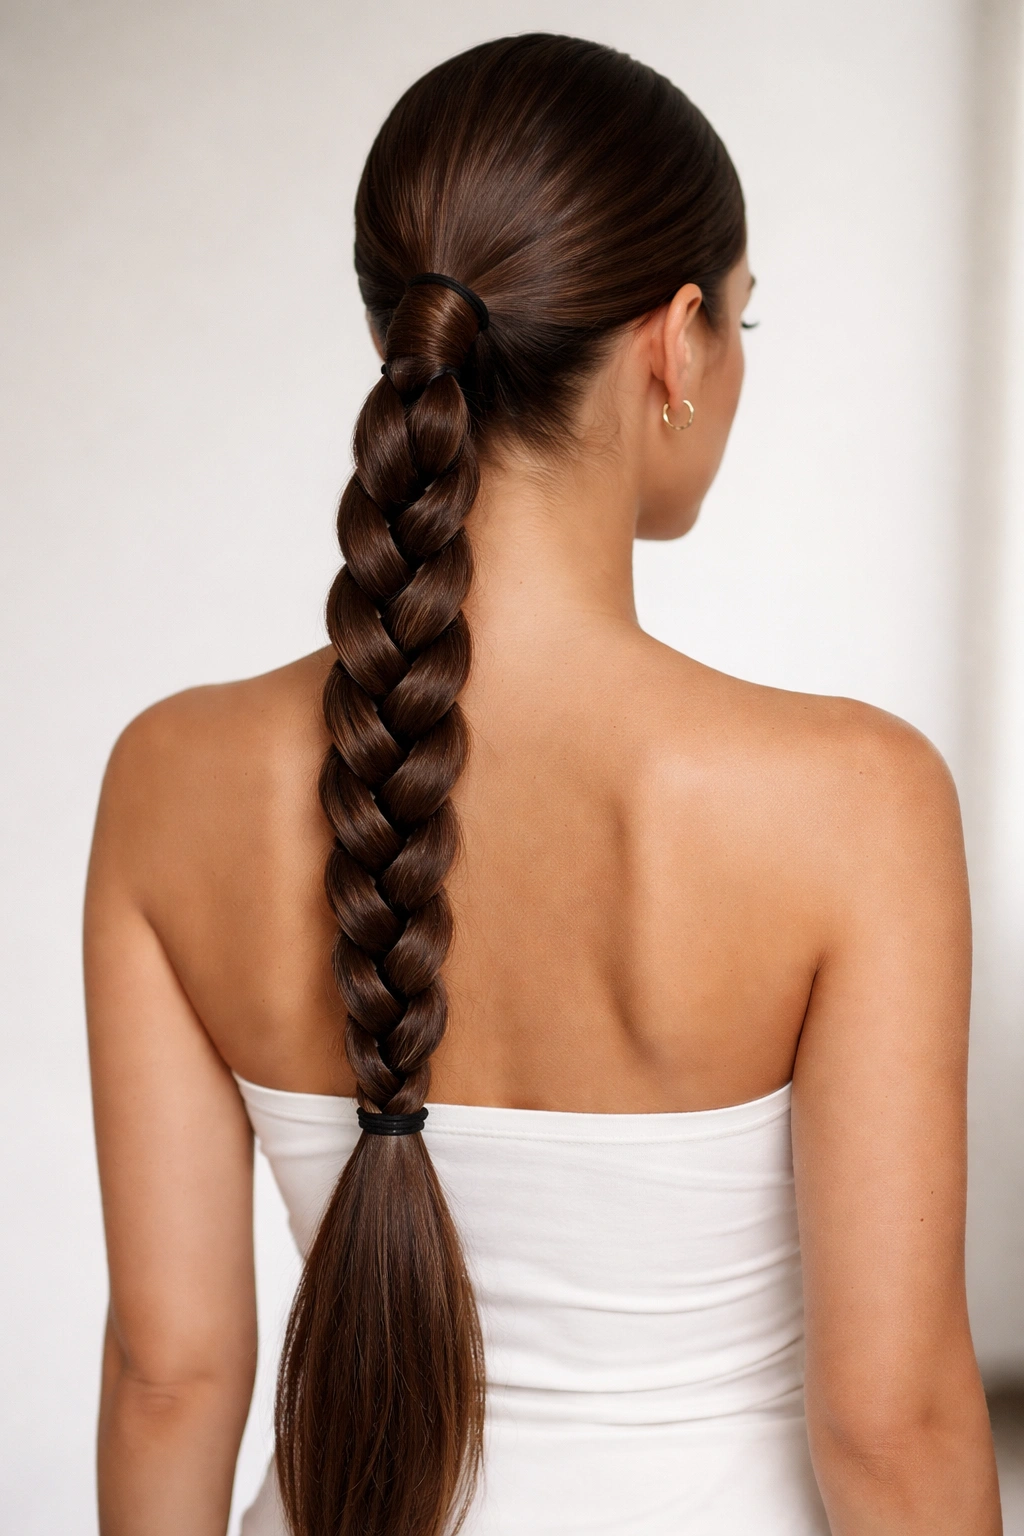
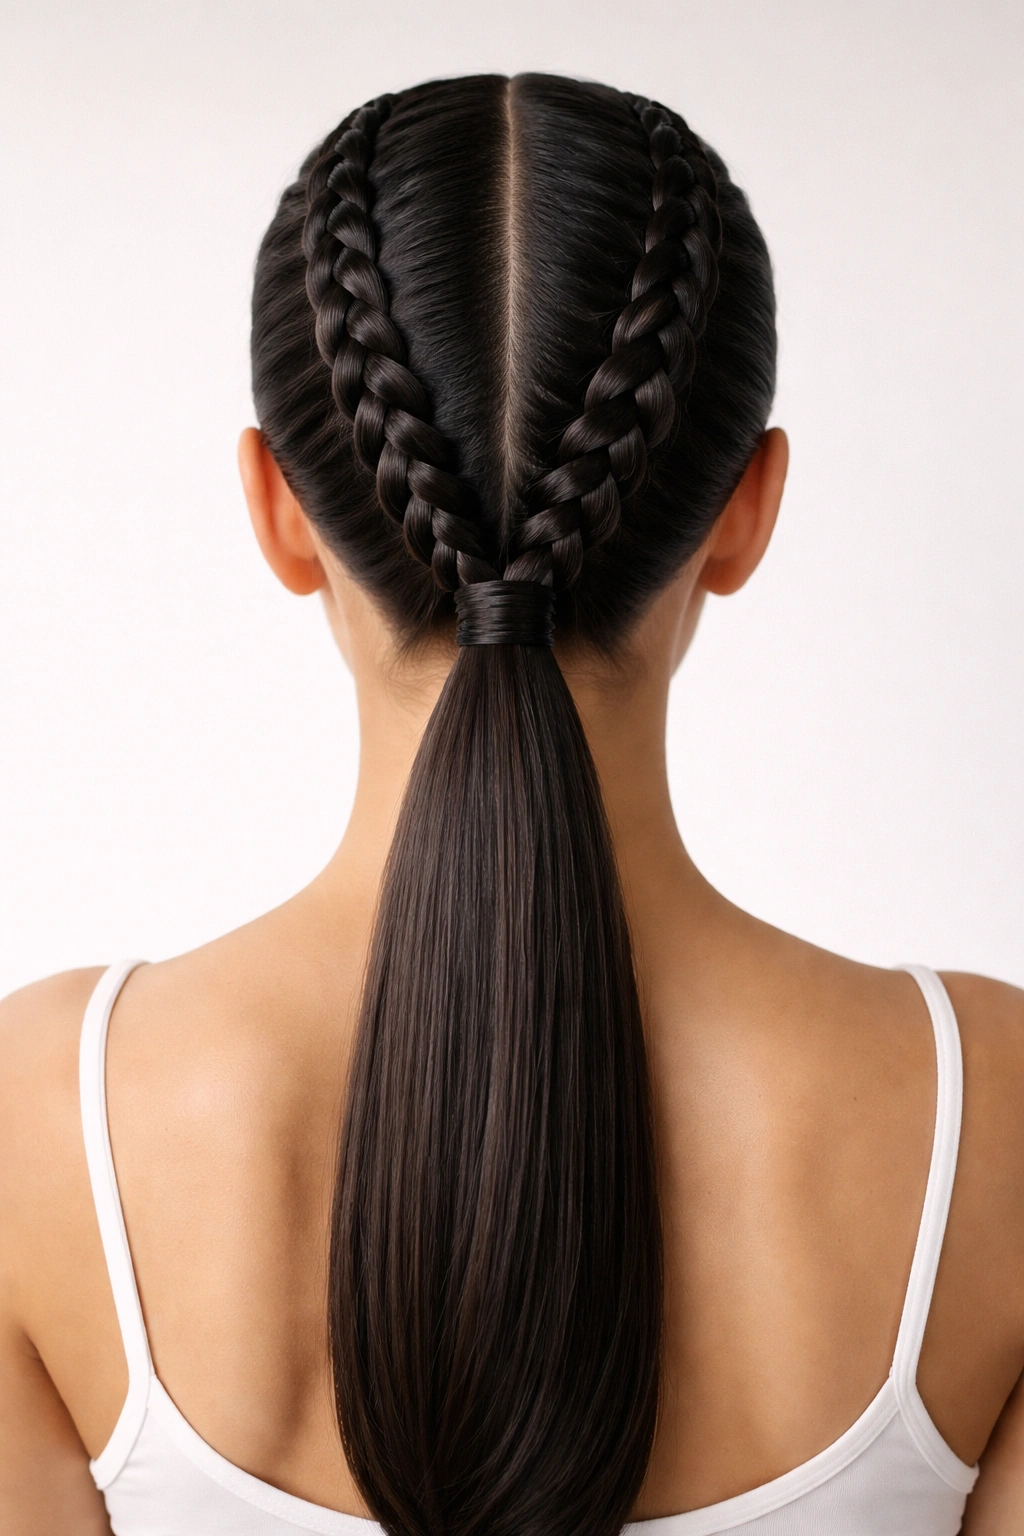
1. Center-Part Sleek Three-Strand Braid Ponytail
A straight center part gives this style its cleanest shape. It also makes the ponytail feel deliberate, not accidental. Smooth the hair back with a light layer of gel, gather it low at the nape, and secure it with a small elastic before you start the braid.
Why It Holds So Well
The tightness comes from the low anchor point. Hair that starts braided right at the nape has less room to slip than hair that’s loosely gathered first and braided later.
Keep the three sections even, and braid with your hands close to the head for the first inch or two. That part matters. If you braid while lifting the hair away from the scalp, the crown loosens fast.
- Best on straight, relaxed, or lightly wavy hair
- Use a tail comb to keep the center part crisp
- Wrap a thin strand of hair around the elastic for a cleaner finish
Quick tip: mist the crown with a touch of hairspray before smoothing; too much product makes the part look greasy.
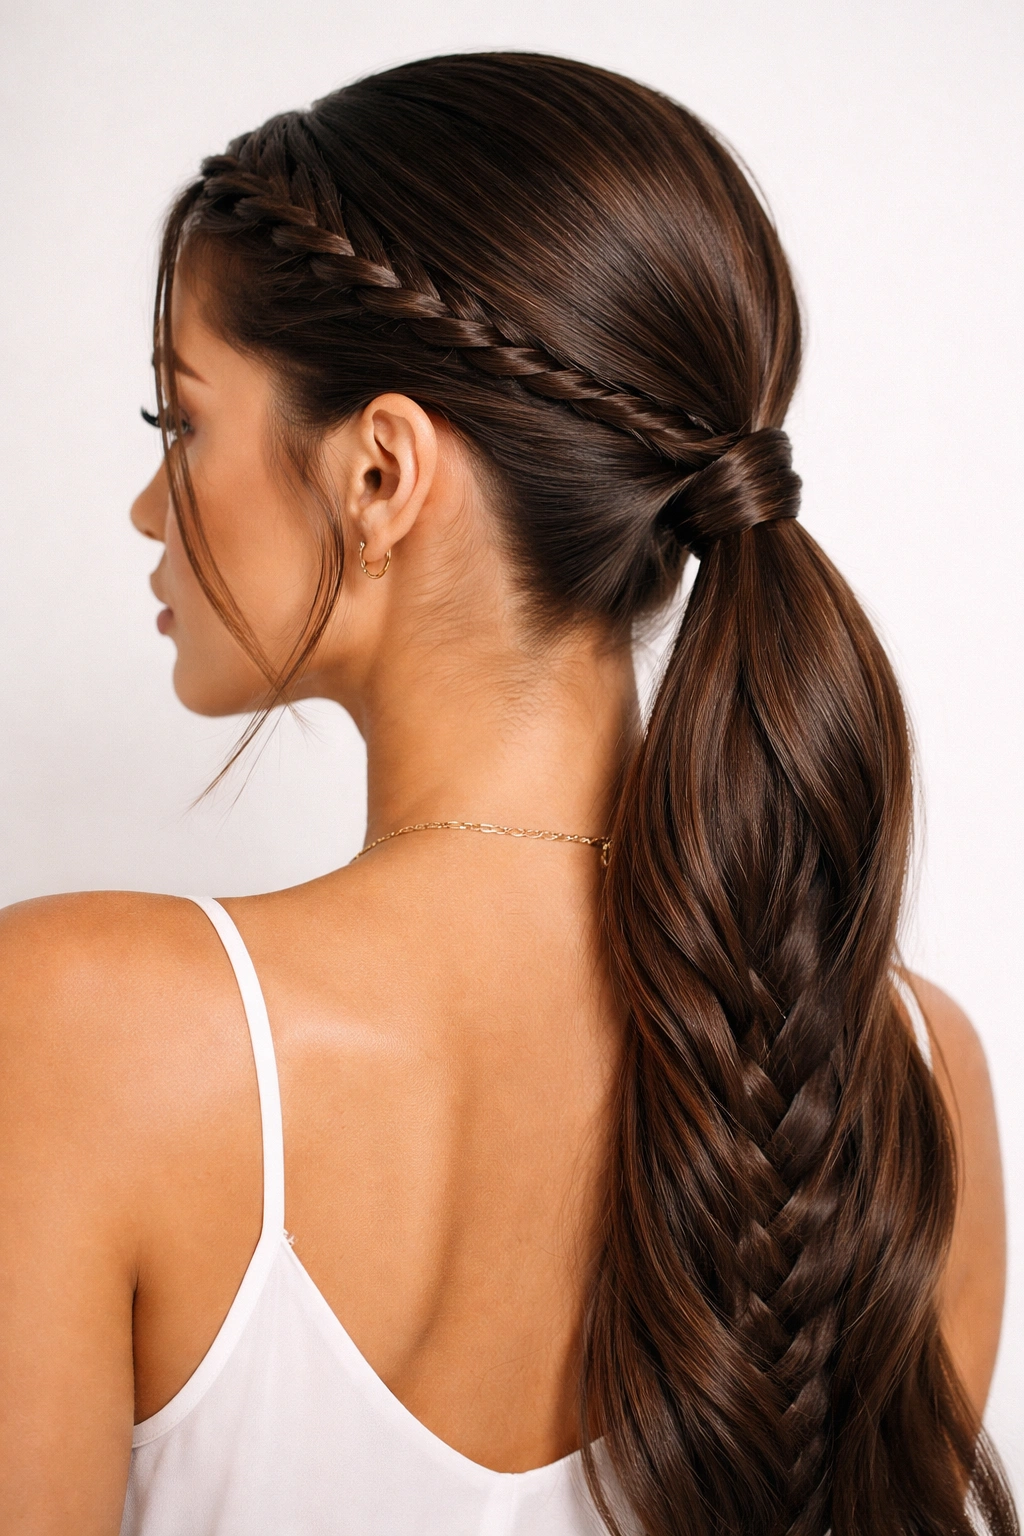
2. Side-Part Dutch Braid Ponytail
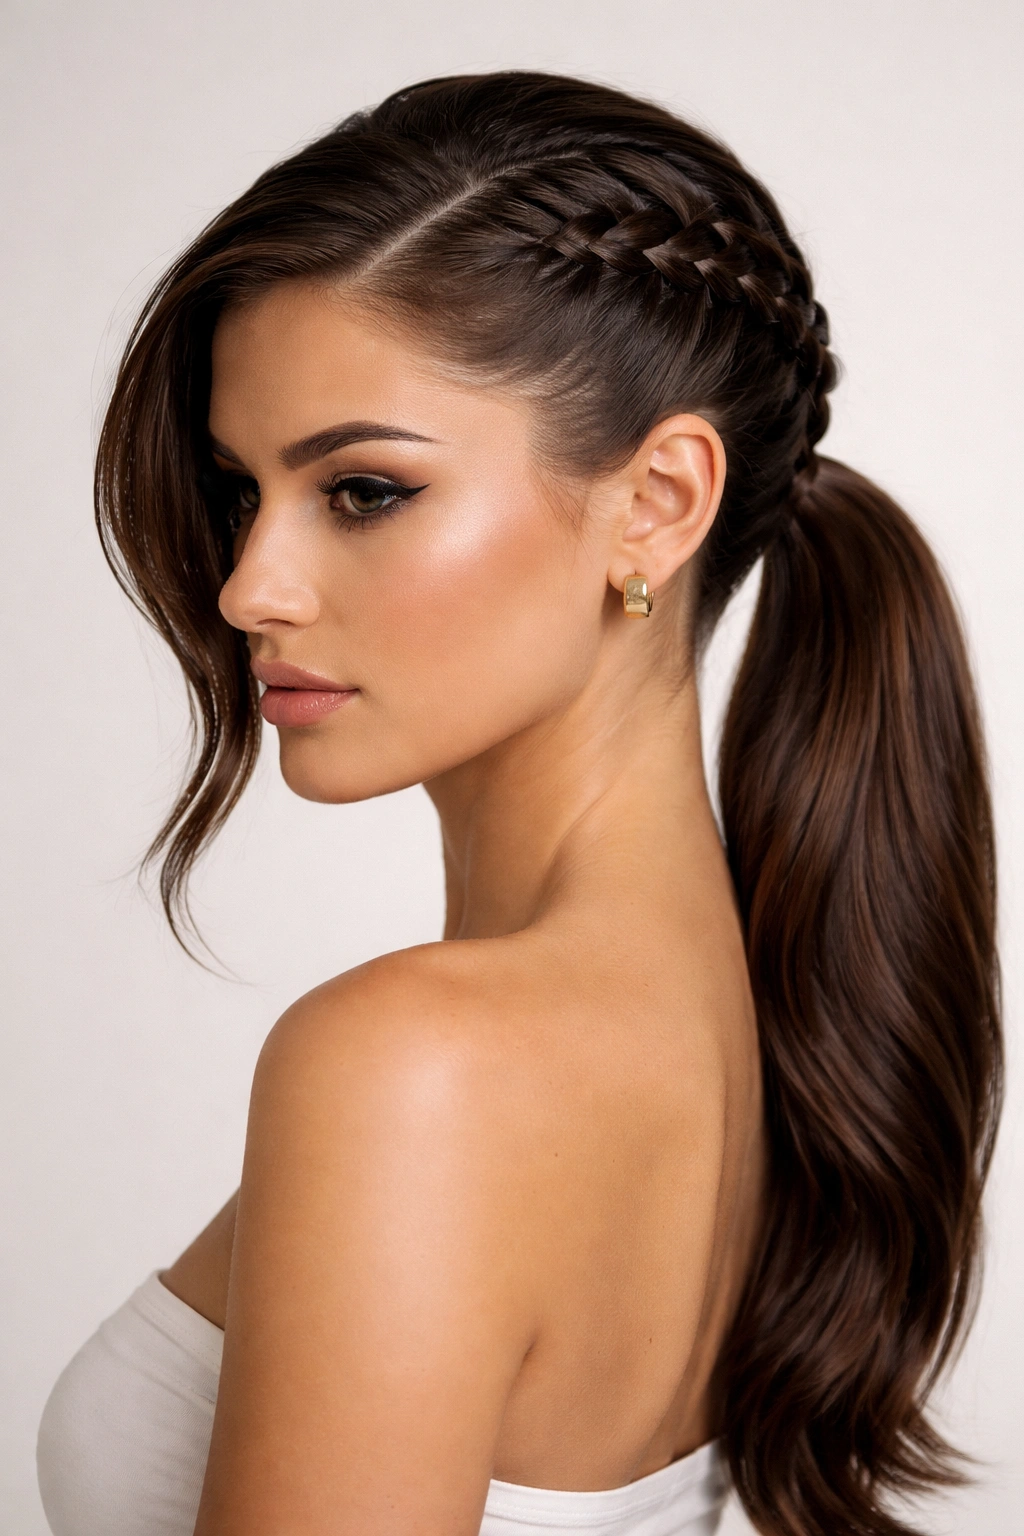
Why does a side part change the whole feel? Because it gives the braid a little direction before you even start. The heavier side frames the face, while the Dutch braid keeps the top section raised and secure instead of flat and sleepy.
Start on the fuller side of the part, braid close to the scalp, and feed hair in as you move toward the nape. Once the hair is gathered low, continue the braid into the ponytail length. The result feels tidy, but not severe.
This one works well if your hair slips out of standard ponytails. The Dutch braid grips the roots better than a simple gather, and it gives fine hair a bit more visual thickness. Keep the sections narrow at the front. Big chunks make the braid wobble.
3. French Braid That Fades Into a Low Ponytail
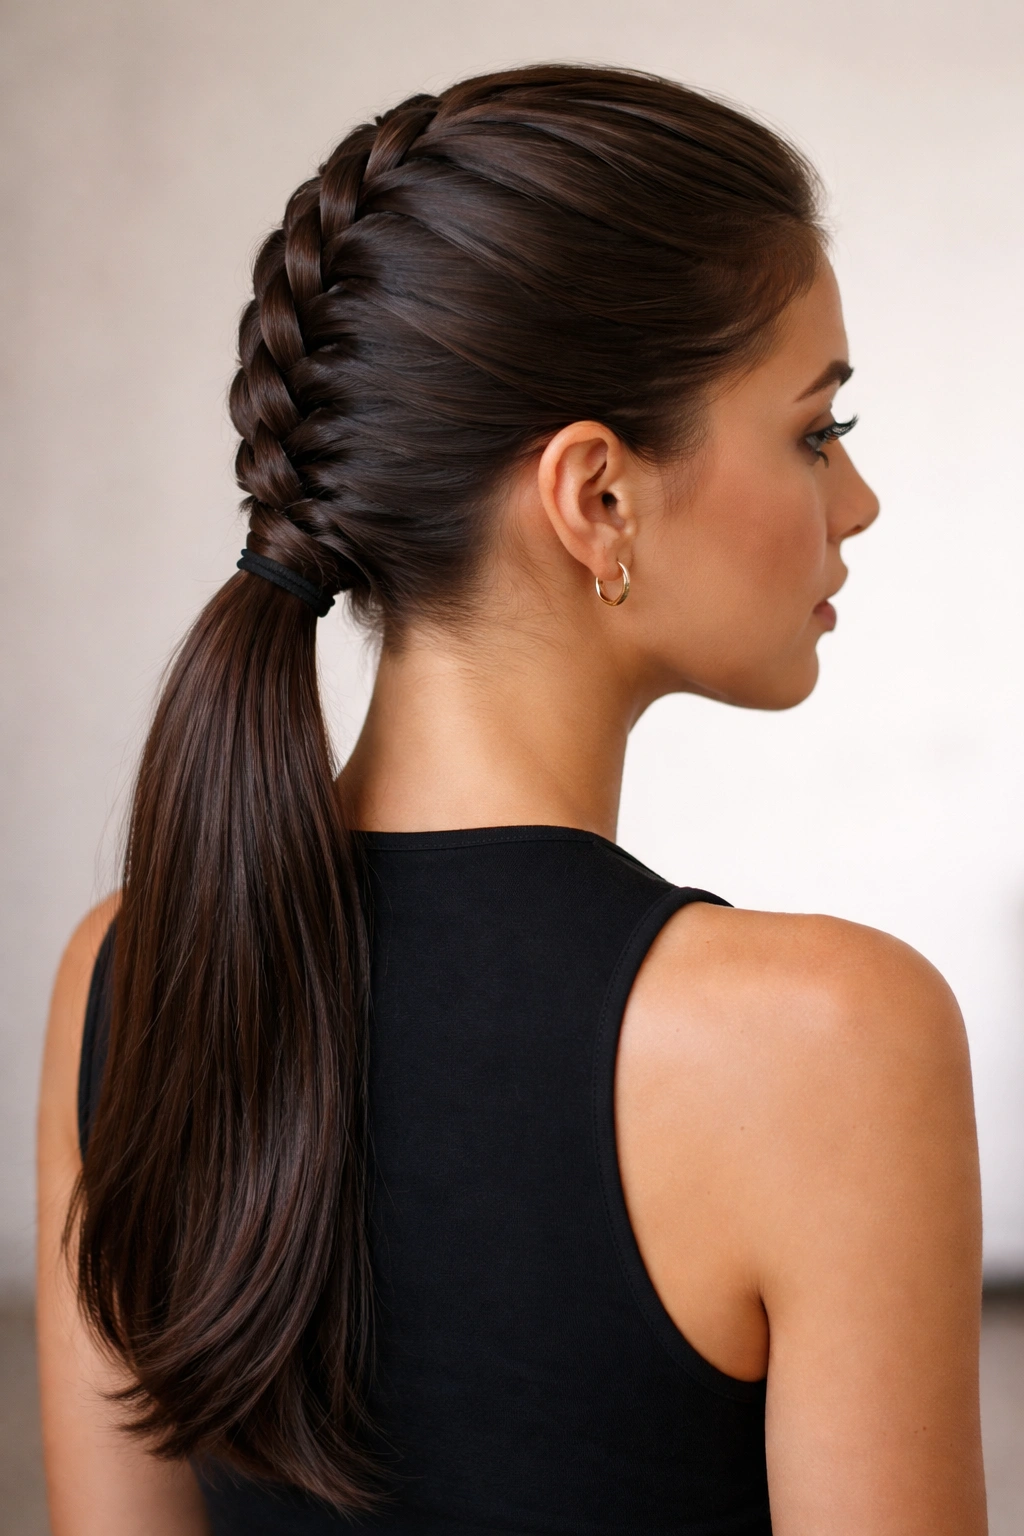
A French braid into a low ponytail is one of those styles that looks more complicated than it is. The braid starts high enough to control the crown, then gradually relaxes into the ponytail once you reach the nape. That shift gives you structure without turning the whole head into a rigid braid.
The key is to keep the added hair sections even on both sides as you move down. If one side gets bigger, the braid starts to lean. Nobody wants that crooked little drift in the back.
Use a medium-hold cream on dry hair and smooth the section behind each ear before you begin. It keeps flyaways down without making the braid sticky. Finish with a small clear elastic, then tug the braid edges gently if you want a little width. Not too much. Just enough to soften the lines.
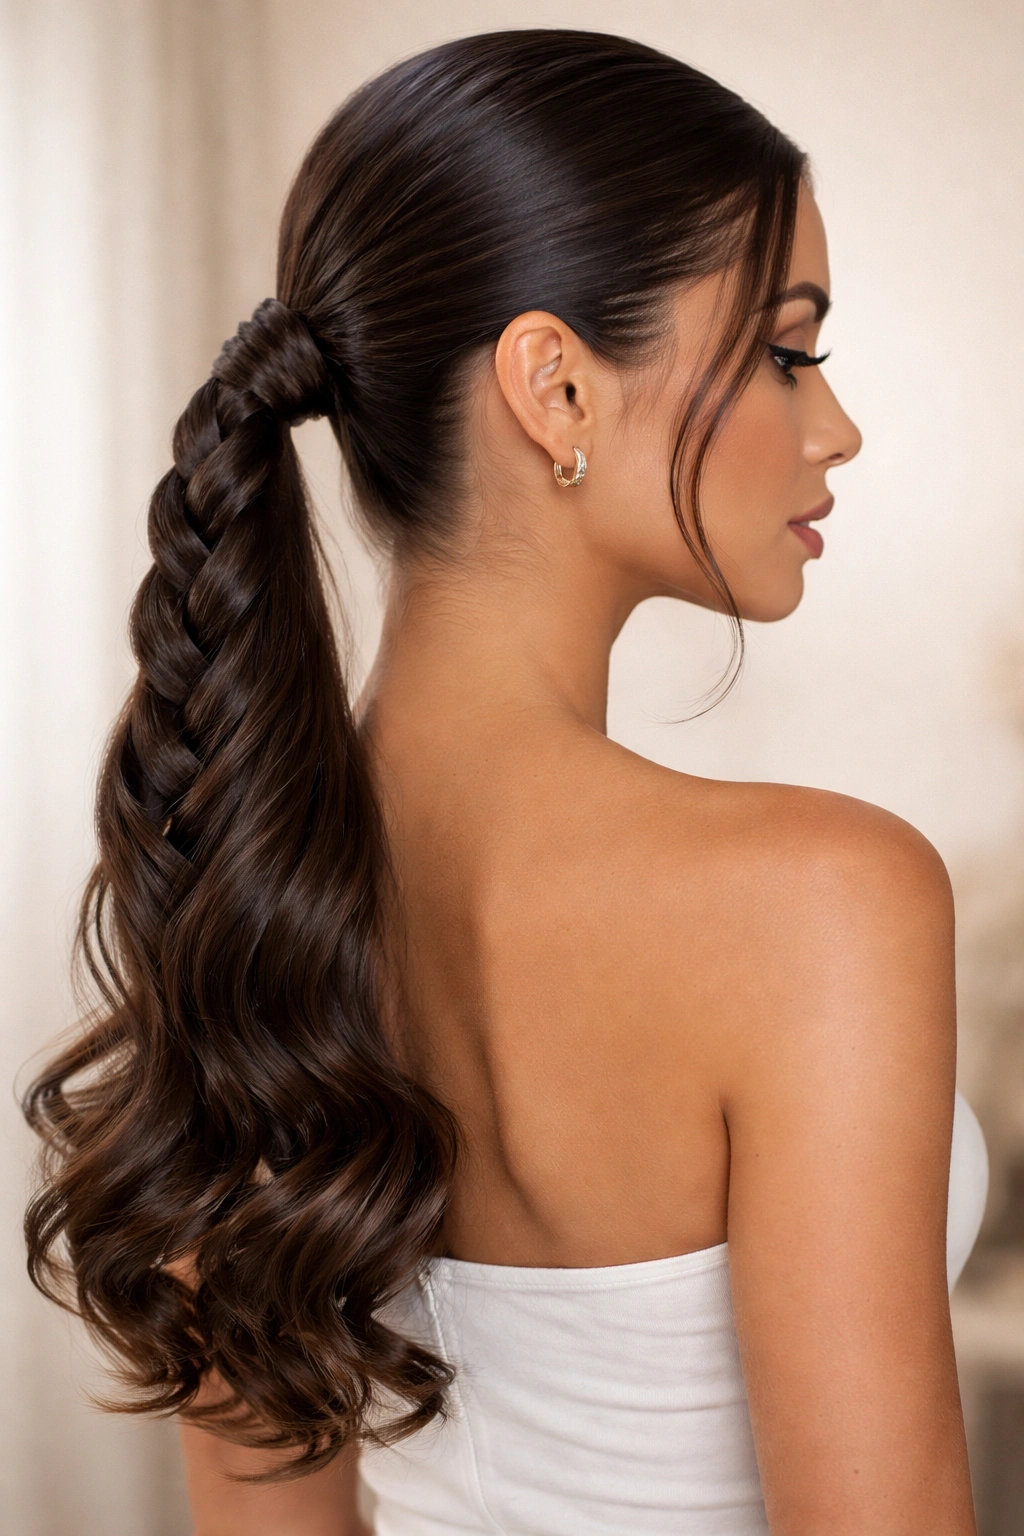
4. Fishtail Low Braided Ponytail
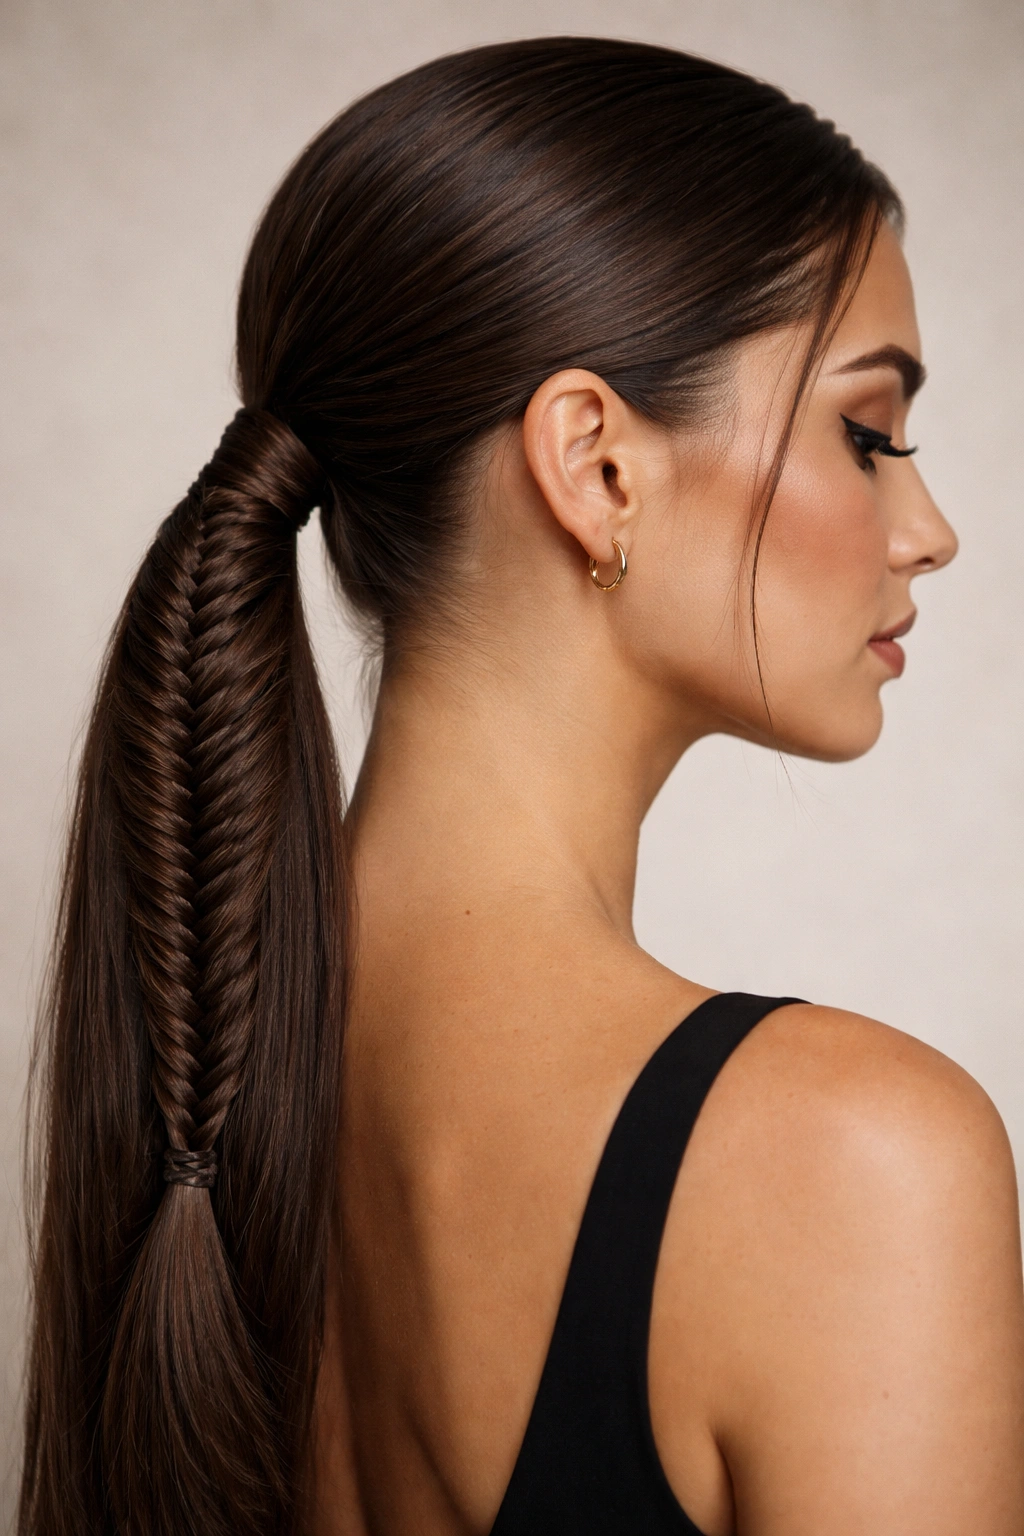
A fishtail braid looks intricate, but it stays neat because the pattern locks so many small sections together. It’s a good choice when you want a sleek low braided ponytail that has texture without feeling bulky.
Split the ponytail into two main sections, then move tiny pieces from the outside of one side into the opposite side. Tiny is the word here. Thin pieces make the braid denser and less likely to puff out.
What Makes It Stay Tight
The tighter the fishtail, the less hair can slip free. That’s the whole game.
This braid is best when the hair is long enough to show the pattern clearly. If your lengths are shorter, keep the braid closer to the nape and secure the end with two elastics, stacked one above the other. That little extra hold saves you from a tail that starts unraveling by lunchtime.
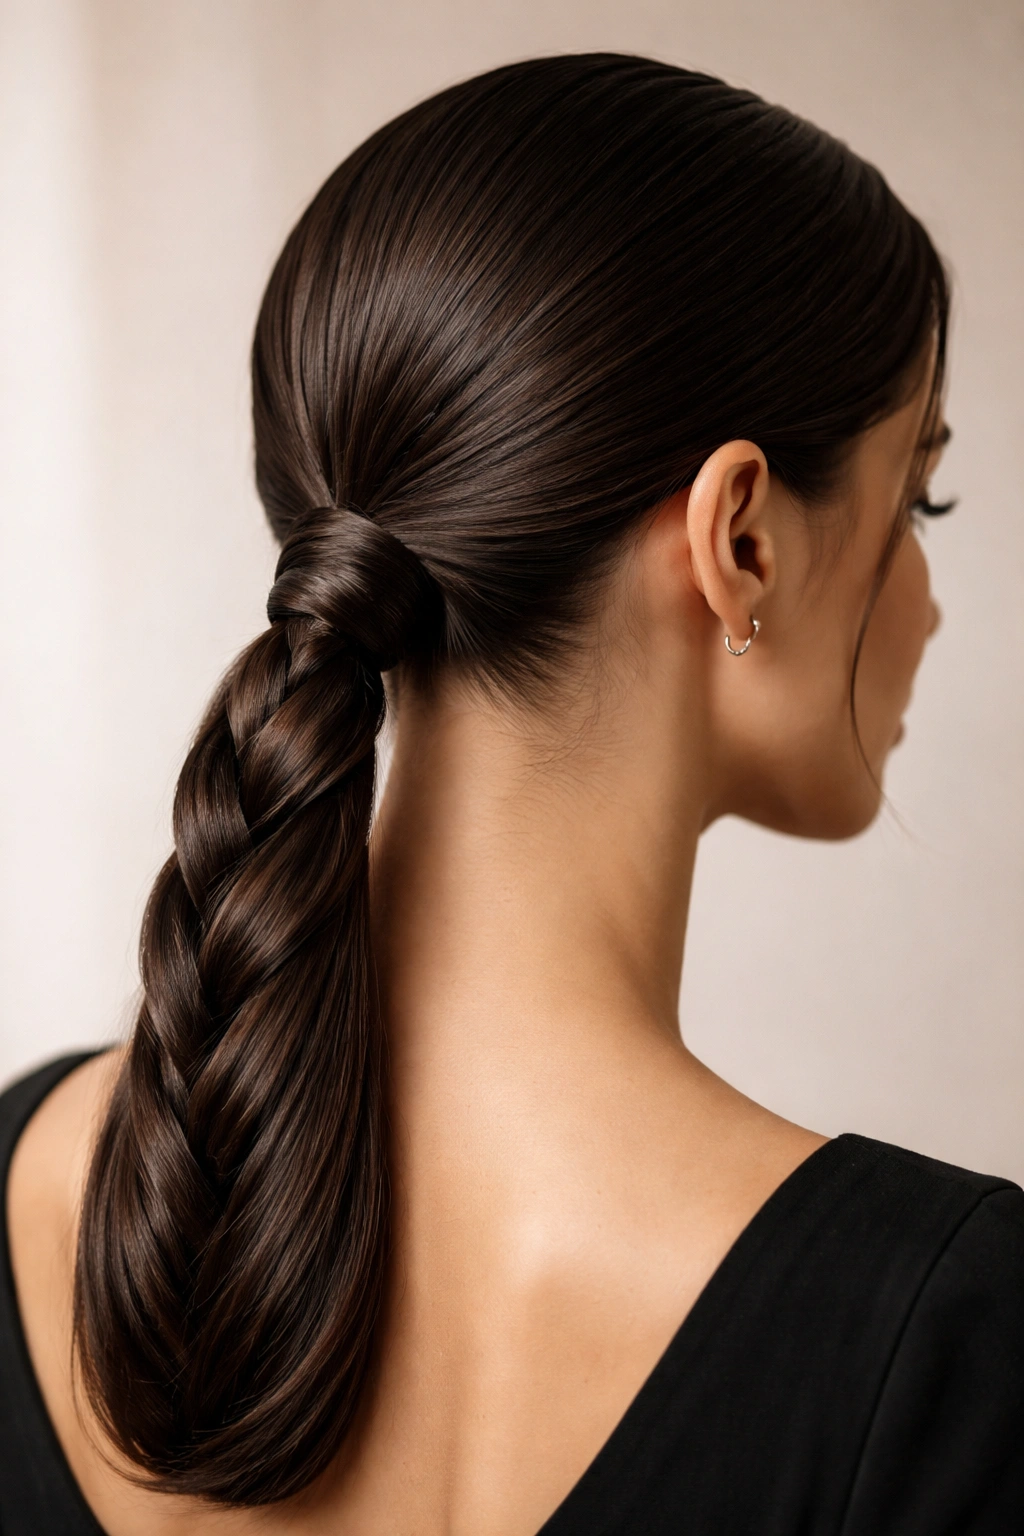
5. Rope-Twist Ponytail
A rope-twist gives you the smoothness of a braid with a cleaner, shinier look. Divide the ponytail into two sections, twist both in the same direction, then wrap them around each other in the opposite direction. The twist tightens on itself. That’s why it stays put.
This style is especially good on hair that already has a bit of grip, like day-two hair or naturally wavy strands. Freshly washed hair can be slippery, so a small amount of styling cream helps.
Keep your wrists steady. If one twist is tighter than the other, the rope starts to kink. Secure the base low and neat, then finish with a clear elastic. If you want a sharper look, smooth the crown first and leave the texture only in the length.
6. Pull-Through Braided Low Ponytail

Pull-through braids are a cheat, and I mean that in the nicest way. They give you the look of a thick braid without requiring three-hand coordination. For a low version, start with a sleek ponytail, then add clear elastics every 1 to 1½ inches down the length.
Split each section above the next elastic, pull the lower pony through, and repeat. The style keeps its shape because each elastic creates a locked segment. That’s why it’s so good on slippery hair.
Use small, snag-free elastics and don’t pull each segment too hard. The shape should stay rounded, not puffed to the point of looking cartoonish. A little fullness is fine. A lot starts to look messy fast.
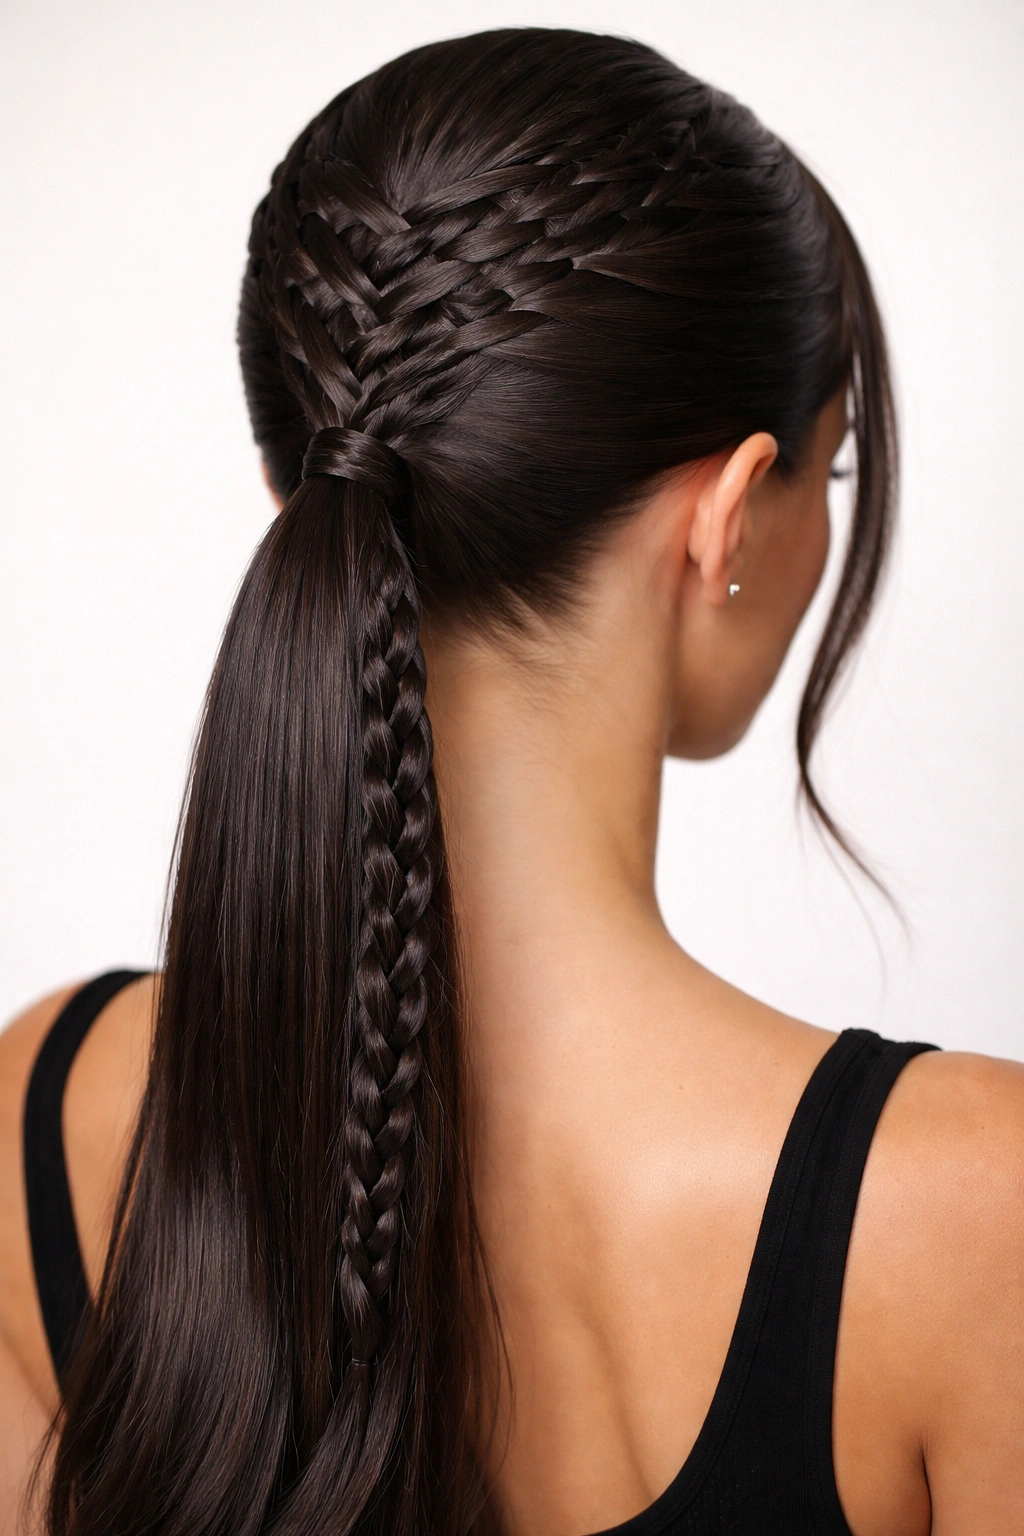
7. Four-Strand Braided Ponytail
Four strands give this braid a wider, flatter finish than the usual three-strand version. That makes the low ponytail look a touch more refined, especially when the hair is very straight and you want more visual pattern.
Clip the four sections apart before you begin. People skip this part and then spend the whole braid hunting for the right strand. Don’t do that to yourself.
Braid close to the base for the first several passes, then keep the tension even all the way down. A four-strand braid can loosen on one side if you rush. The best version feels tidy and almost woven, like the braid was pressed into place rather than loosely formed.
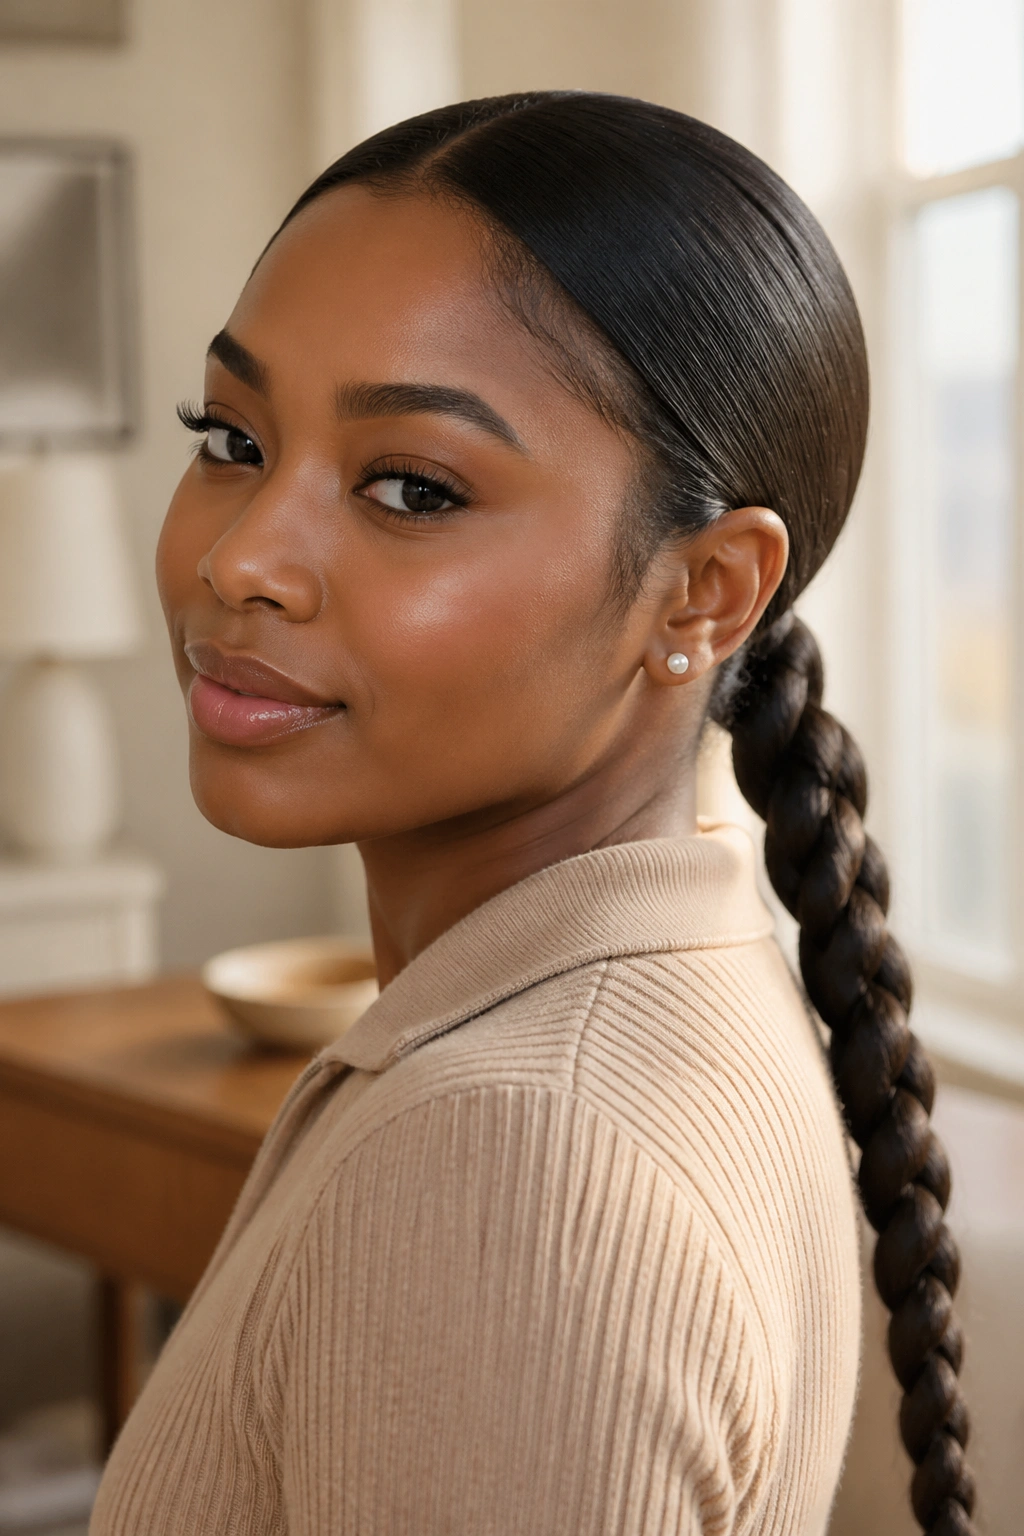
8. Five-Strand Braided Ponytail
Five strands sound fussy until you see how full they look in the finished ponytail. This braid has more surface detail, so it reads as polished even when the rest of the style stays very simple.
It works especially well on thick hair or on hair with extensions, because the braid needs enough length to show the pattern. If the hair is too short, the design gets lost. If it’s too fine, the braid can look thin and busy instead of elegant.
Use small clips or hairpins to keep the outer strands from tangling while you work. Seriously, that tiny bit of organization saves the whole style. Once the braid is done, smooth the base with your fingers and a dab of pomade so the crown stays flat.
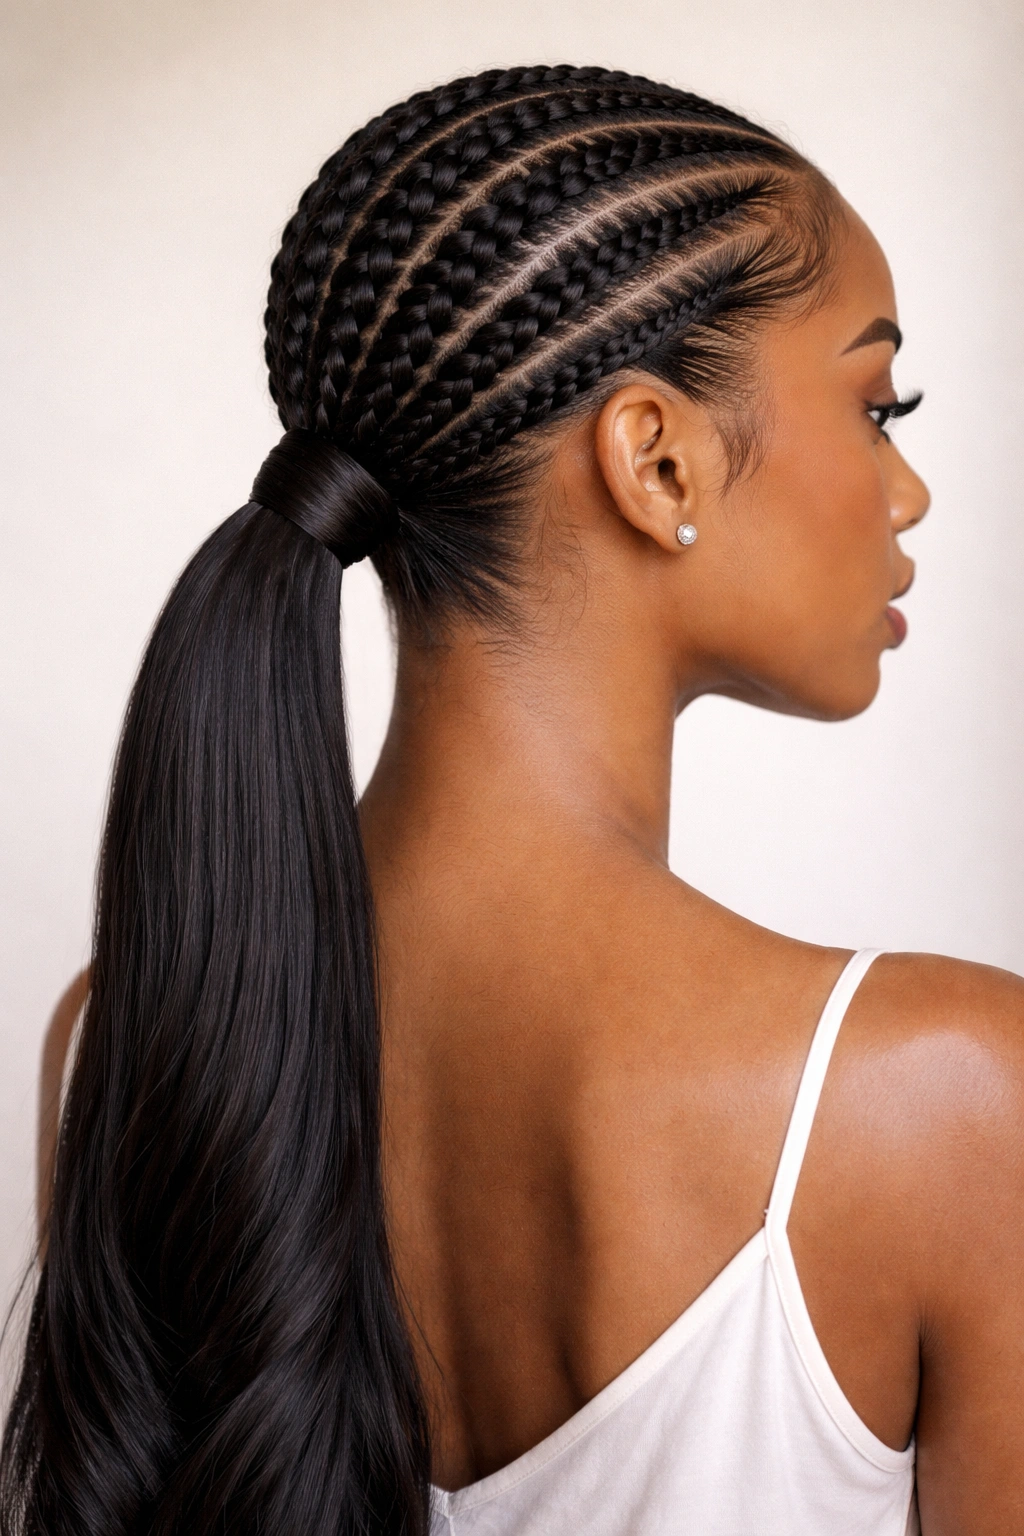
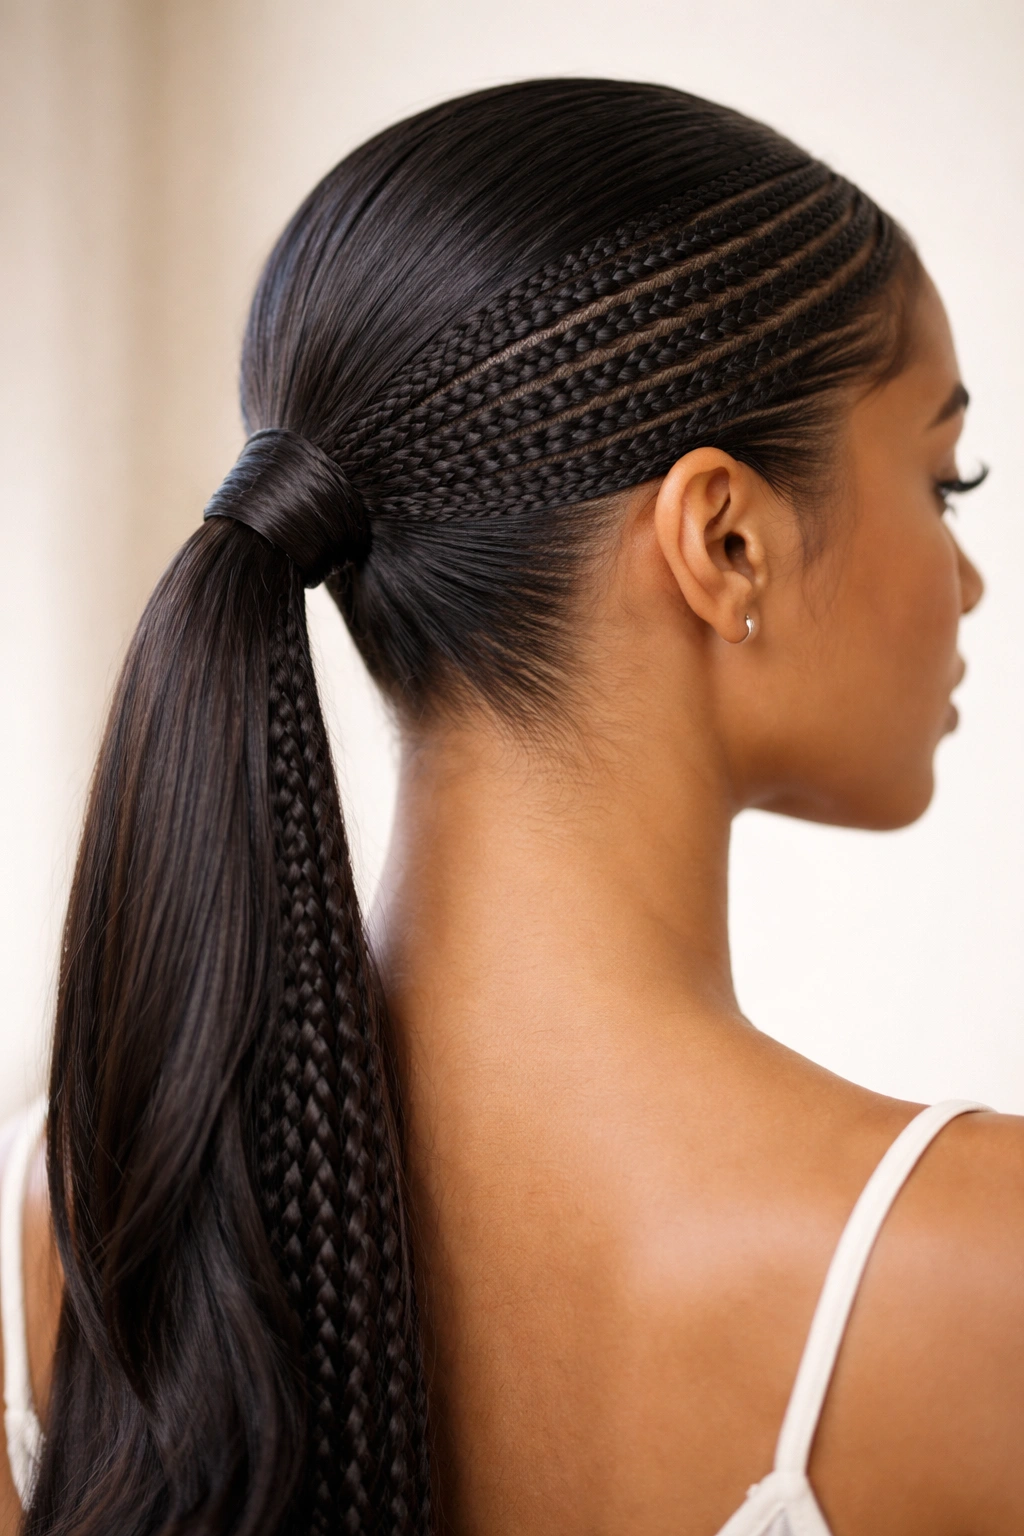
9. Feed-In Cornrow Ponytail
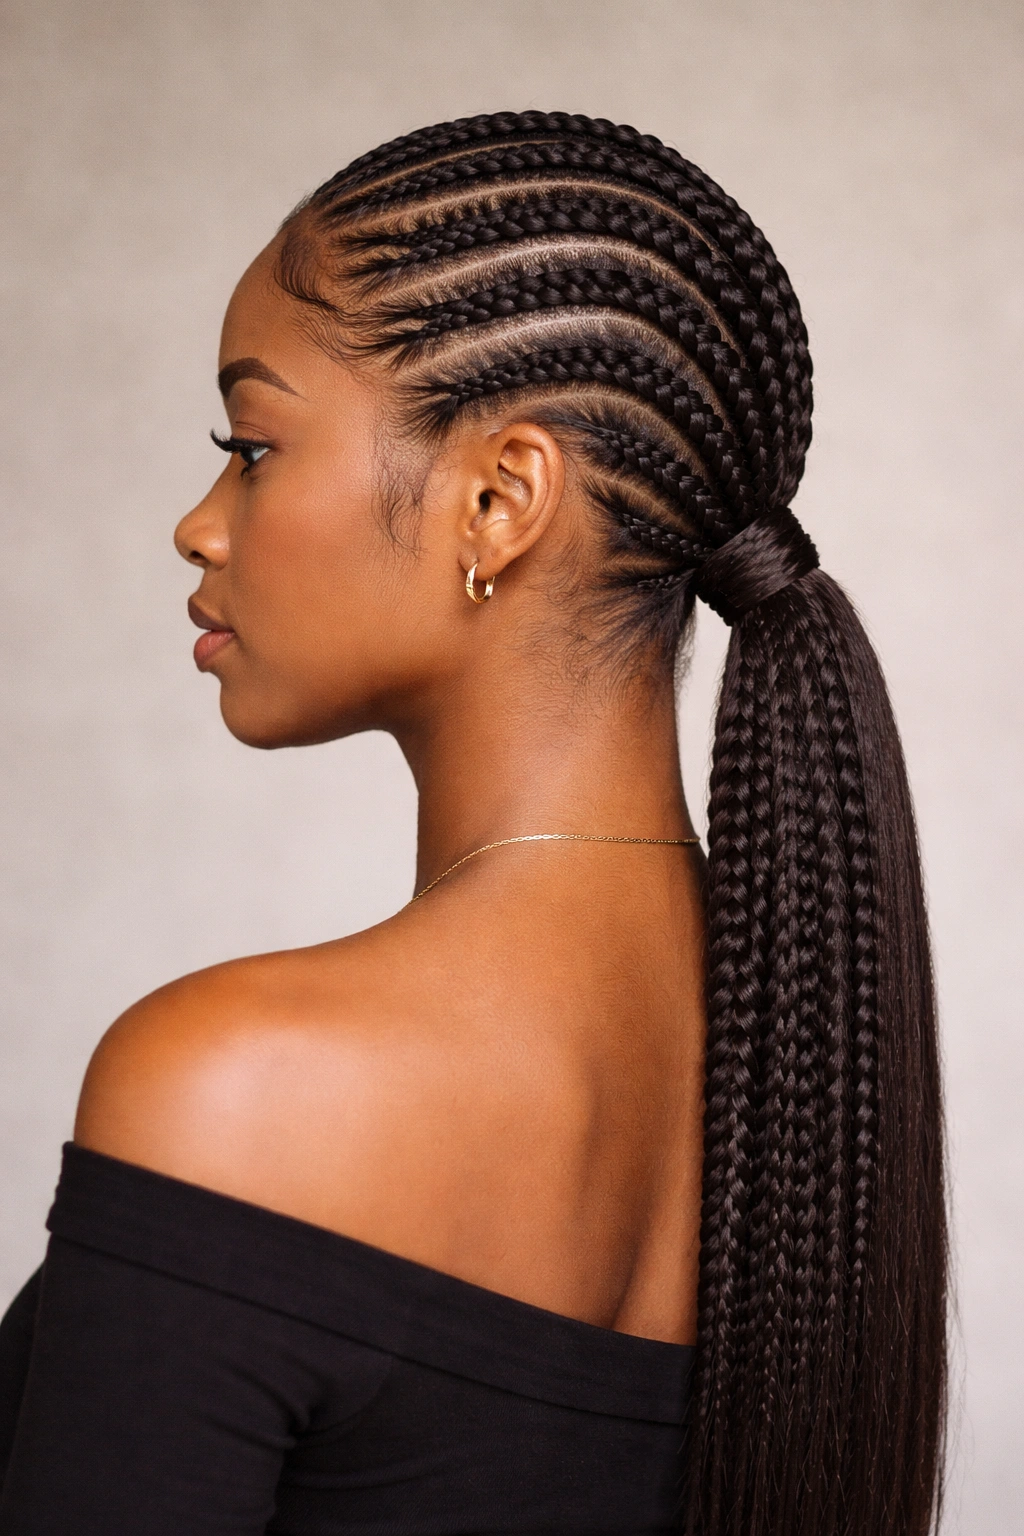
Feed-in cornrows are one of the strongest options on this list. They stay tight because the braid starts at the scalp and gradually adds hair, so there’s no loose root area waiting to puff up later.
The rows can be straight back, slightly curved, or angled toward the nape depending on the shape you want. Keep the parts clean and the feed-in sections small. Large sections make the braid thicker, but they also make it harder to lay flat.
This style is especially good for natural textures, active days, and anyone who wants a low braided ponytail that feels locked in. A light edge gel helps the front hair stay smooth, but the real hold comes from the braid itself. Once the cornrows meet at the nape, secure everything with a firm elastic and braid the tail out.
10. Stitch Braid Ponytail
A stitch braid has that crisp, lined look that makes people glance twice. The pattern comes from the way the braid crosses over the scalp in a straight, deliberate path instead of the softer curve of a French braid.
The Look Is All in the Parting
Use the tip of a rattail comb to create narrow, even rows. About ⅛ to ¼ inch wide is enough for a neat line without making the braid feel delicate. If the parting is uneven, the stitch effect disappears.
How to Keep It Sharp
Work with a small amount of gel or styling pomade on each section. Too much turns the roots slick in a bad way. Too little lets flyaways creep out immediately.
This is a style that rewards patience. Keep your hand close to the scalp and your sections tidy, and the ponytail will hold its shape beautifully.
11. Double Dutch Braids Into One Low Ponytail
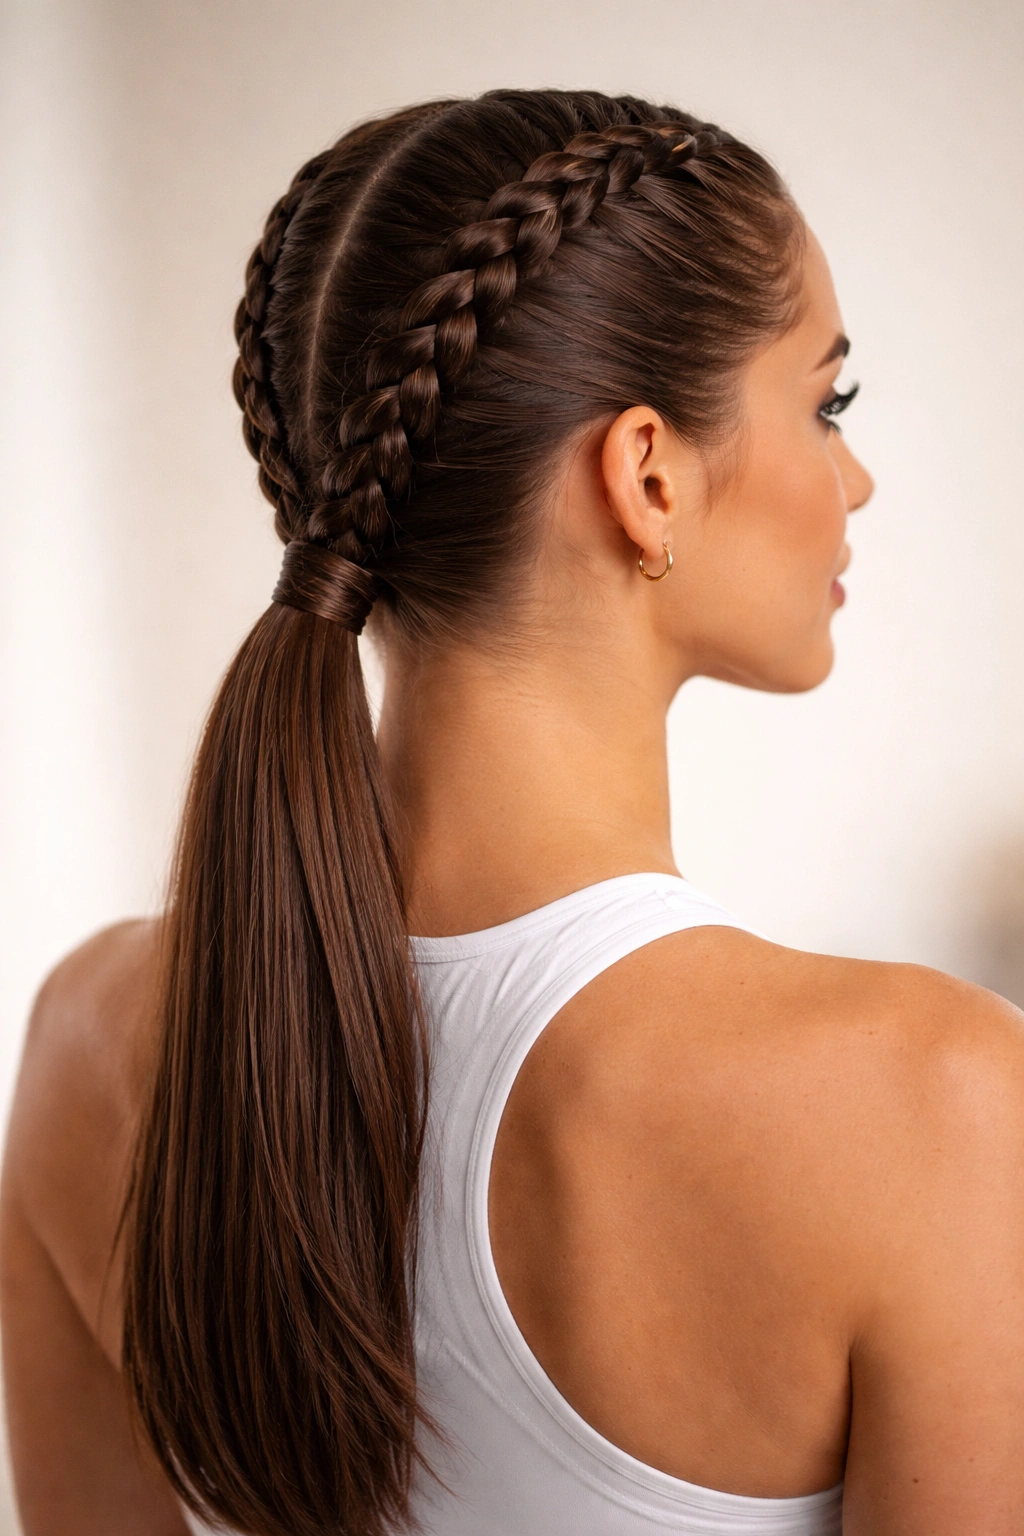
Two Dutch braids feeding into a single ponytail give you balance. The hair is split evenly from the start, which means the tension spreads across both sides instead of pulling awkwardly from one point.
This style is a smart choice when the front of your hair tends to frizz or when you need the crown to stay flat for hours. Braid each side toward the nape, then combine the two ends into one elastic before braiding the length or leaving it loose.
The look feels sporty, but it doesn’t have to read casual. Smooth the part, keep the braids tight near the hairline, and wrap one small braid around the joined elastic. That tiny finish changes the whole mood.
12. Halo Braid Feeding Into a Low Ponytail
A halo braid can sound dramatic, but the low version is practical. The braid follows the hairline, controls the front pieces, and then tucks into the ponytail at the nape. No loose side hair. No fighting with the baby hairs every hour.
This style works well if your hairline has shorter layers that refuse to stay put. Braid those front sections into the halo rather than trying to flatten them into submission. It’s kinder, and it looks cleaner.
Keep the braid snug around the head, especially behind the ears. That’s where halo styles often loosen first. Once the braid reaches the back, secure it with pins and merge it into the low ponytail. The finish should feel secure, almost wrapped.
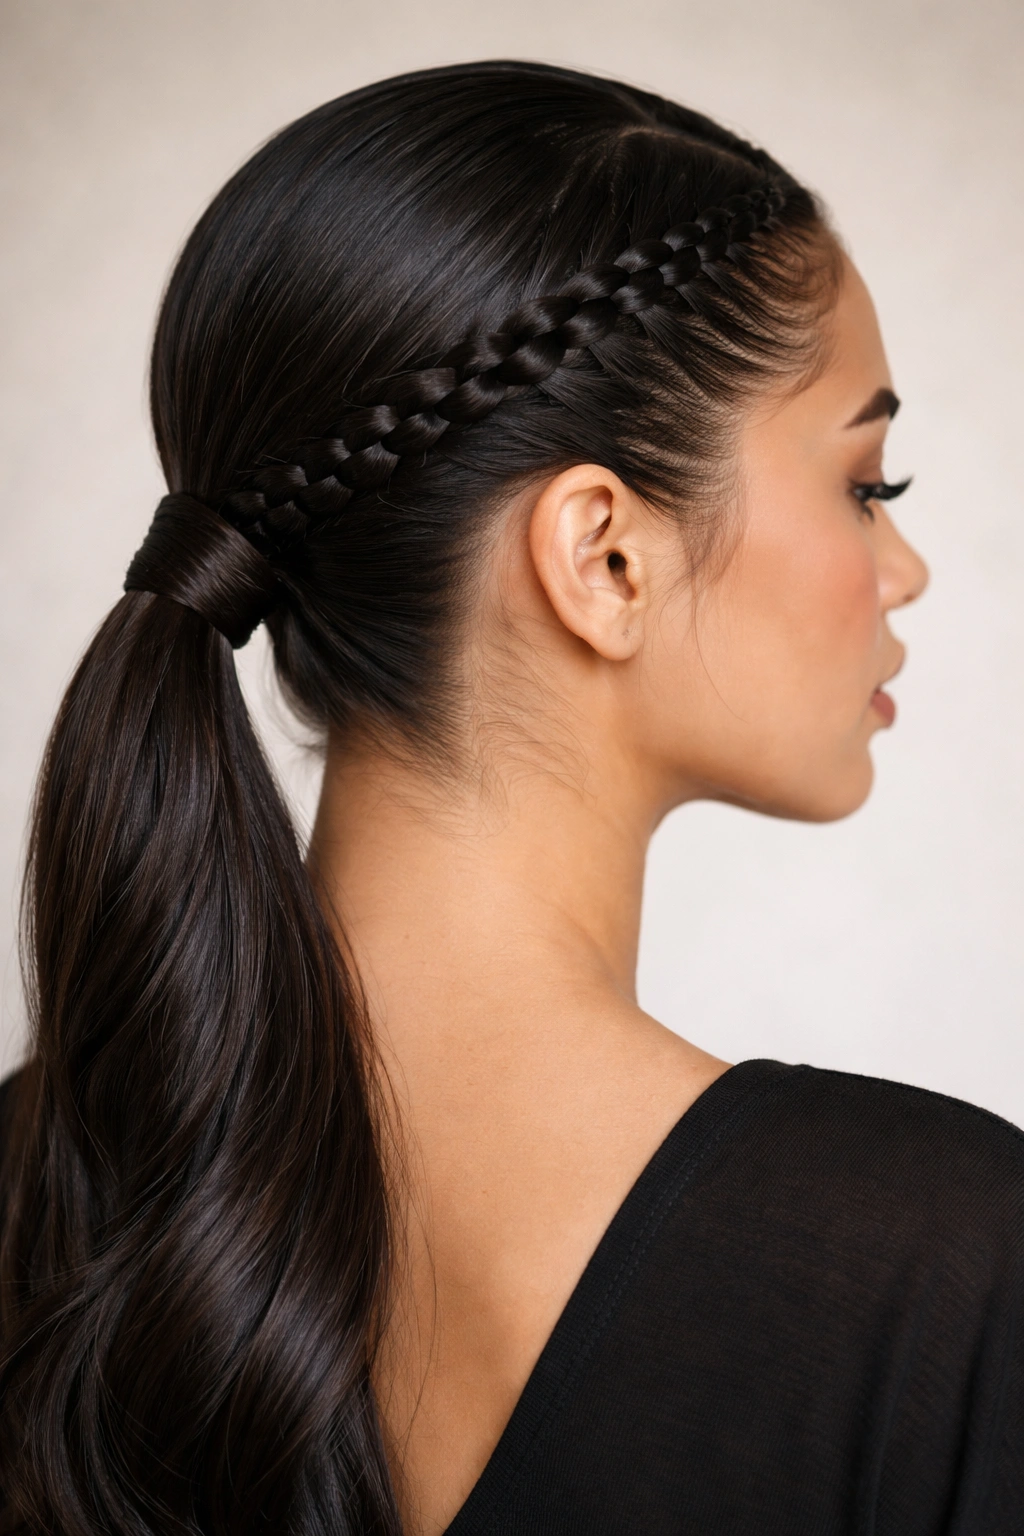
13. Temple Accent Braid Into a Sleek Ponytail
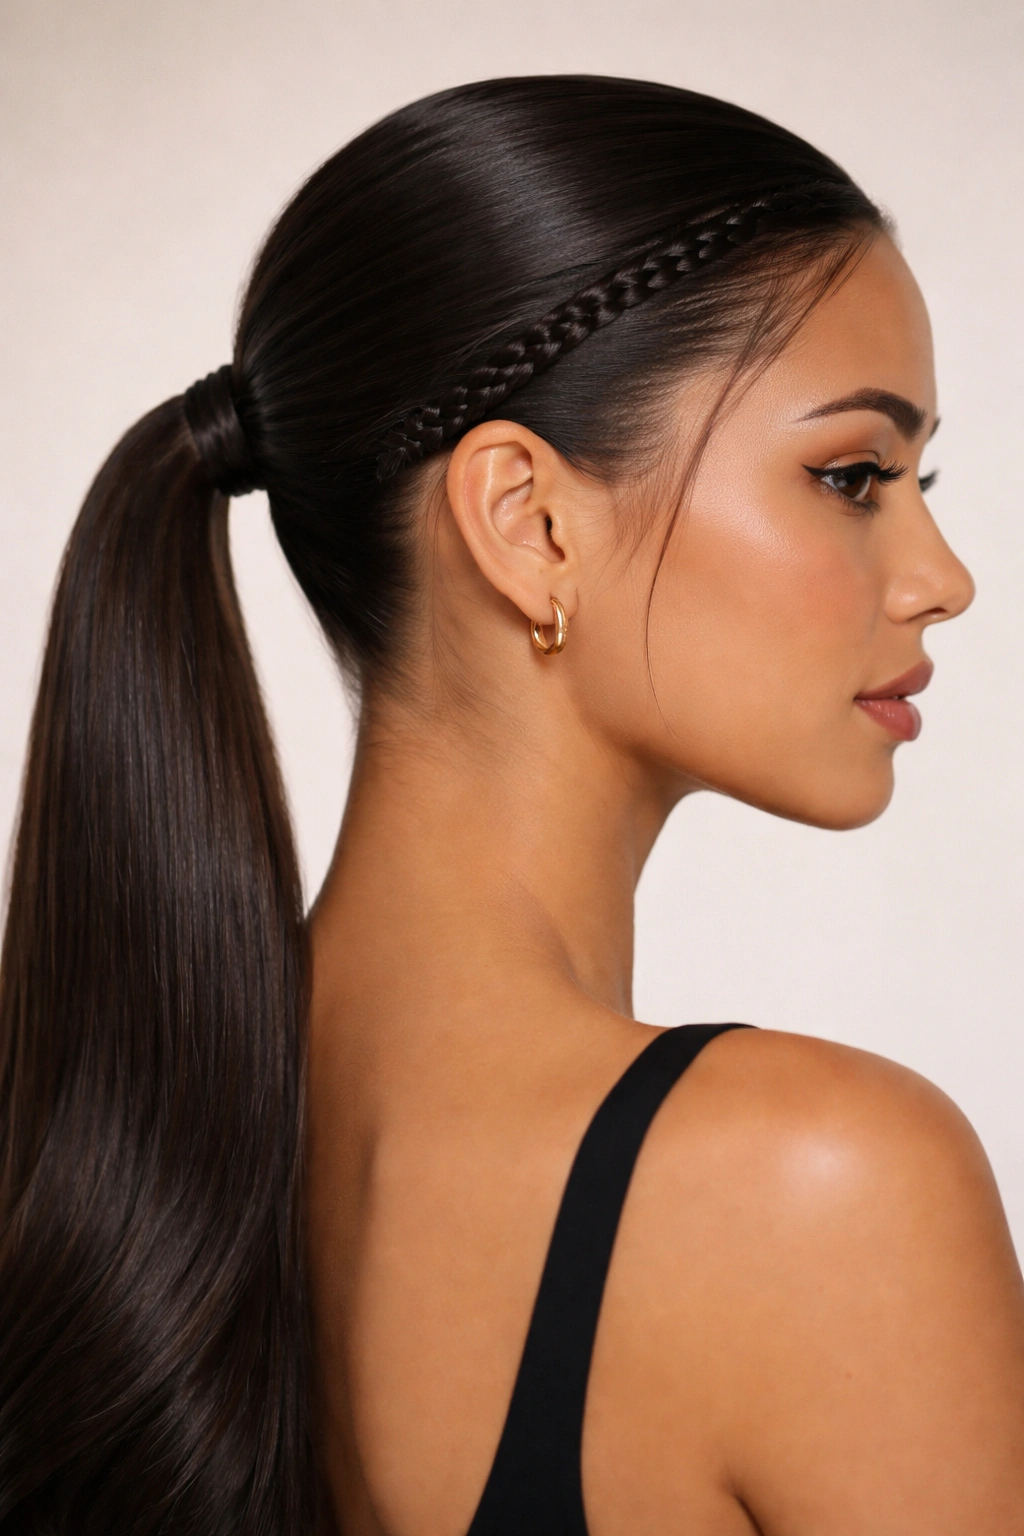
A single accent braid near the temple is a small detail, but it changes the whole ponytail. It adds texture at the front while letting the rest of the hair stay sleek and low.
Braid a narrow section along one side of the hairline, keeping it flat against the scalp, then feed it into the gathered ponytail. If you want symmetry, mirror the braid on the other side. If not, let one side do the work and keep the rest smooth.
This is a good option for someone who likes minimal detail. It doesn’t ask for much. But it gives the style enough grip at the front that the hair feels anchored rather than slicked back and bare.
14. Braided Elastic Wrap Ponytail
Here’s the cleanest finish in the bunch. Once the ponytail is secured, take a thin strand of hair, braid it, and wrap it around the elastic until the base disappears. Pin the end underneath.
That little braid wrap does two jobs at once. It hides the elastic and reinforces the base so the ponytail looks more finished. It also keeps the style from looking too plain when the rest of the braid is simple.
Use a small amount of gel on the wrap strand so it stays smooth while you wind it. If you have layered hair, choose a section from underneath so the wrap doesn’t puff. The goal is a tight little collar at the base, not a fluffy knot.
15. Scarf-Woven Braided Ponytail
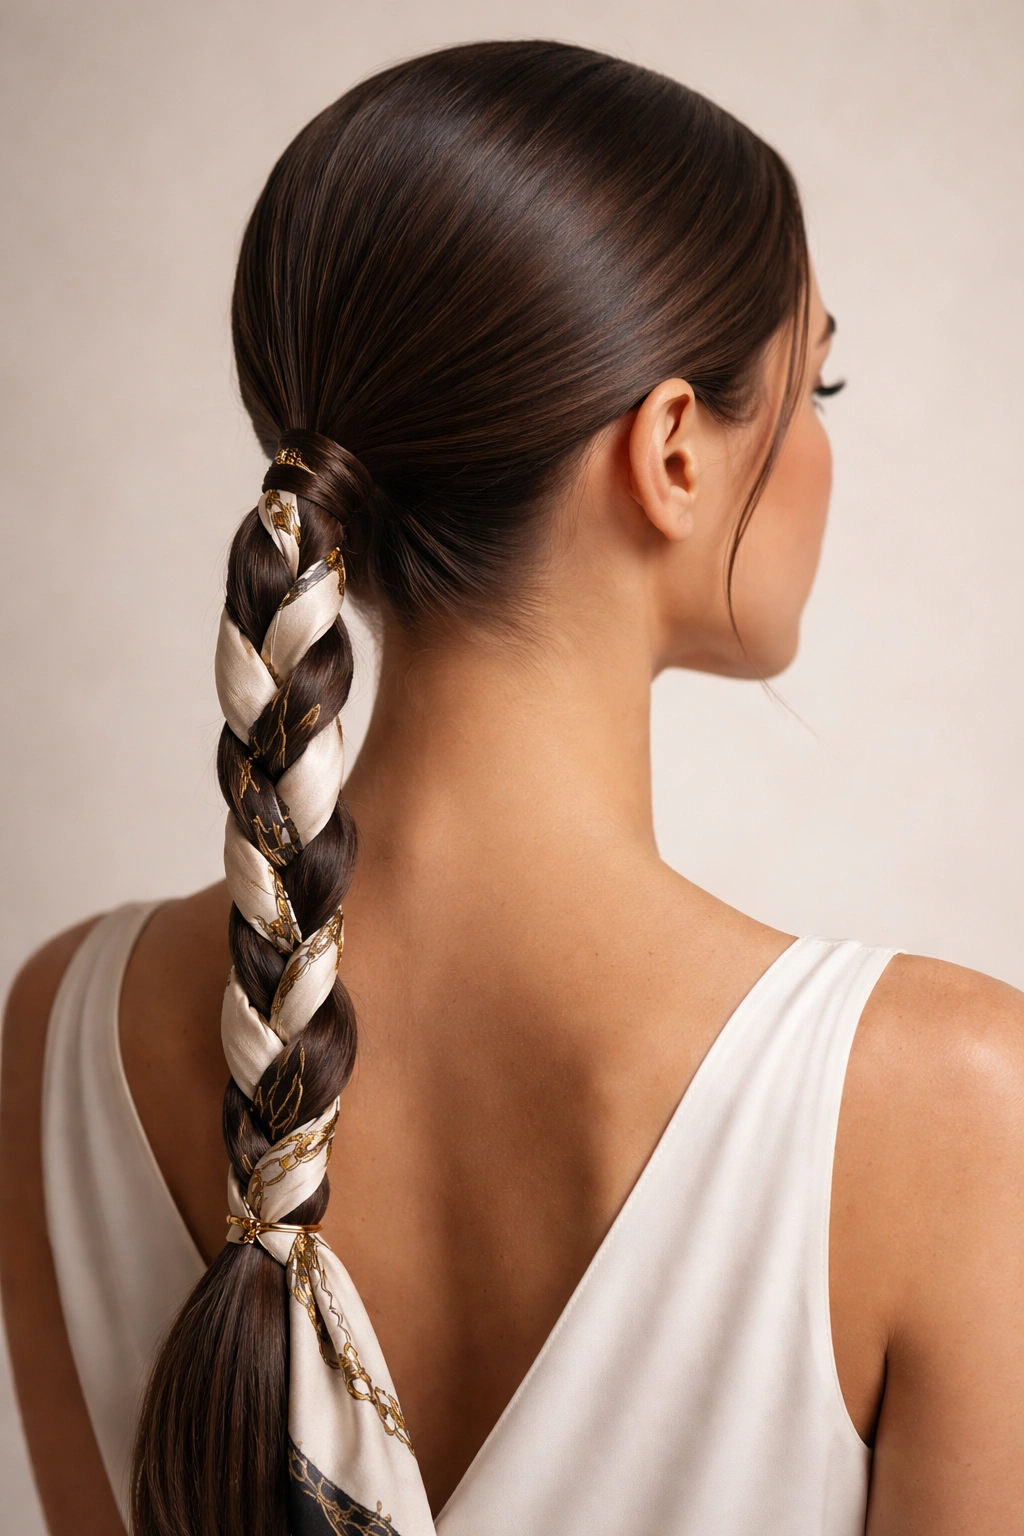
A scarf woven into a low braid works best when the scarf stays flat. If it bunches or twists into a rope, the braid starts looking bulky and the whole style loses that sleek feel.
Fold the scarf into a narrow strip and treat it like one of the braid sections, or tie it around the base and let it trail through the length. Soft silk or satin gives the neatest line. Thick cotton can feel heavy and push the braid apart.
Best Way to Wear It
Choose a scarf that’s about 1 to 2 inches wide when folded. Wider strips can overwhelm a low ponytail, especially on finer hair. Keep the rest of the hair smooth and the braid simple.
The scarf does the visual work. The braid does the holding.
16. Ribbon-Woven Low Braided Ponytail
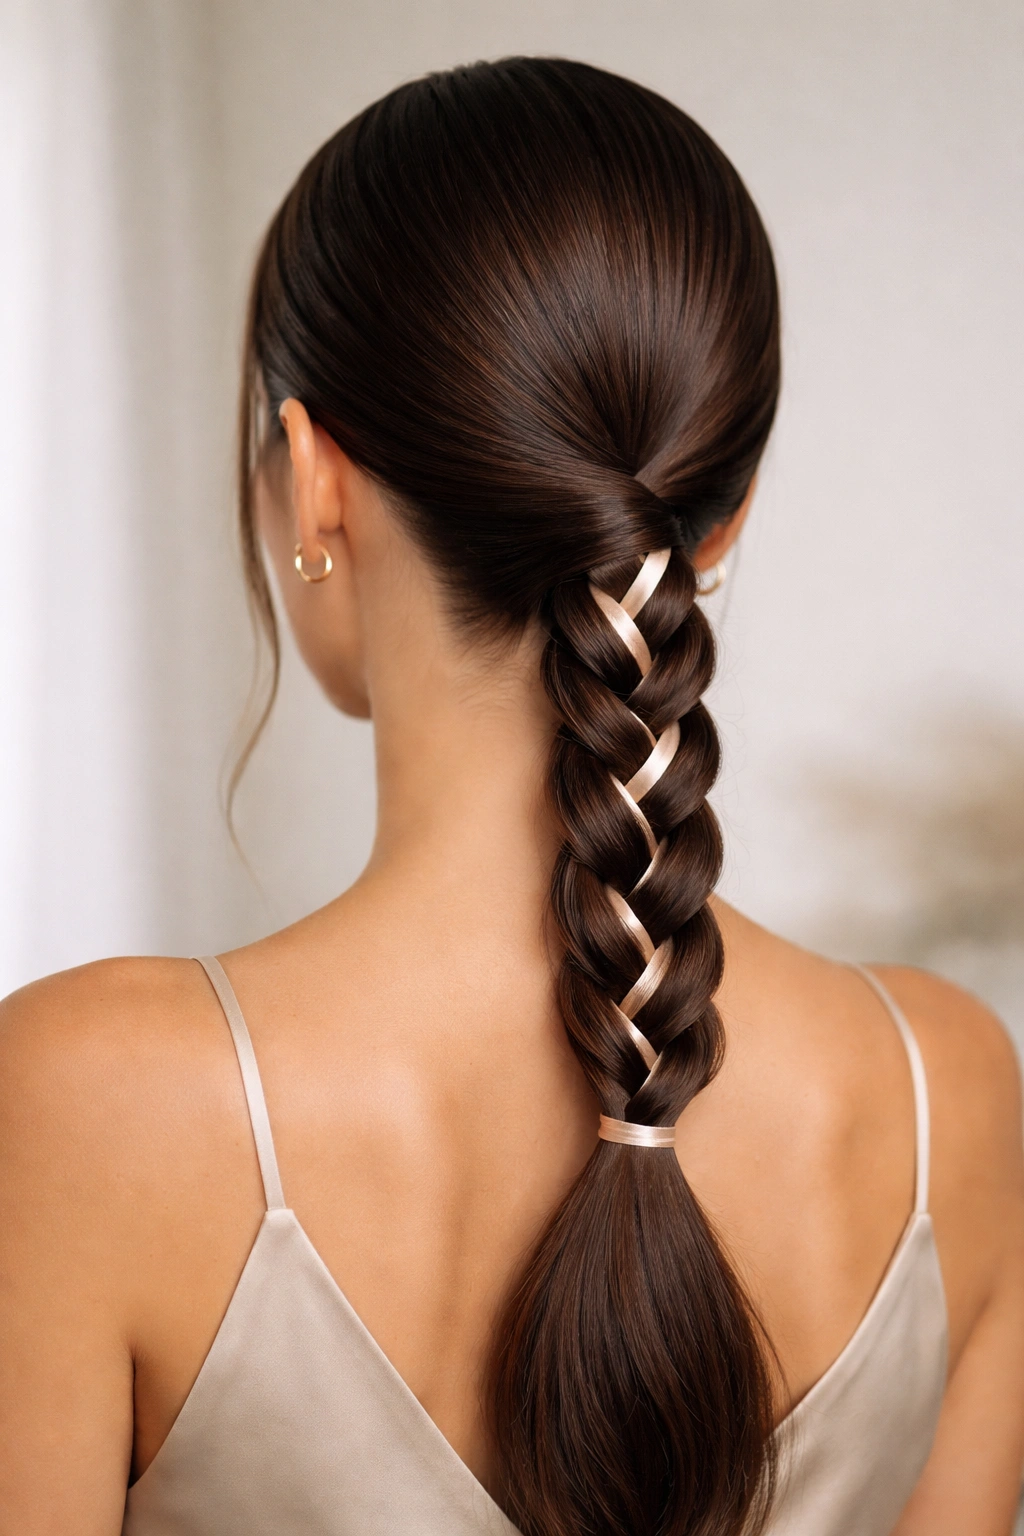
Ribbon gives the braid a sharper, more finished look than a scarf does. It lies flatter, especially if you keep the ribbon satin and narrow. That flatness helps the ponytail stay sleek instead of fluffy.
Thread the ribbon through the braid as one of the working strands, or stitch it through the finished plait with a needle and thread if you want the cleanest result. The second method takes more time, but it stays tidier.
This style is lovely for dressier settings, yet it doesn’t need to feel formal. A matte black or deep brown ribbon can be quieter than a bright one, and that often looks better. Bright colors can tip the whole style into costume territory fast.
17. Beaded Braided Ponytail
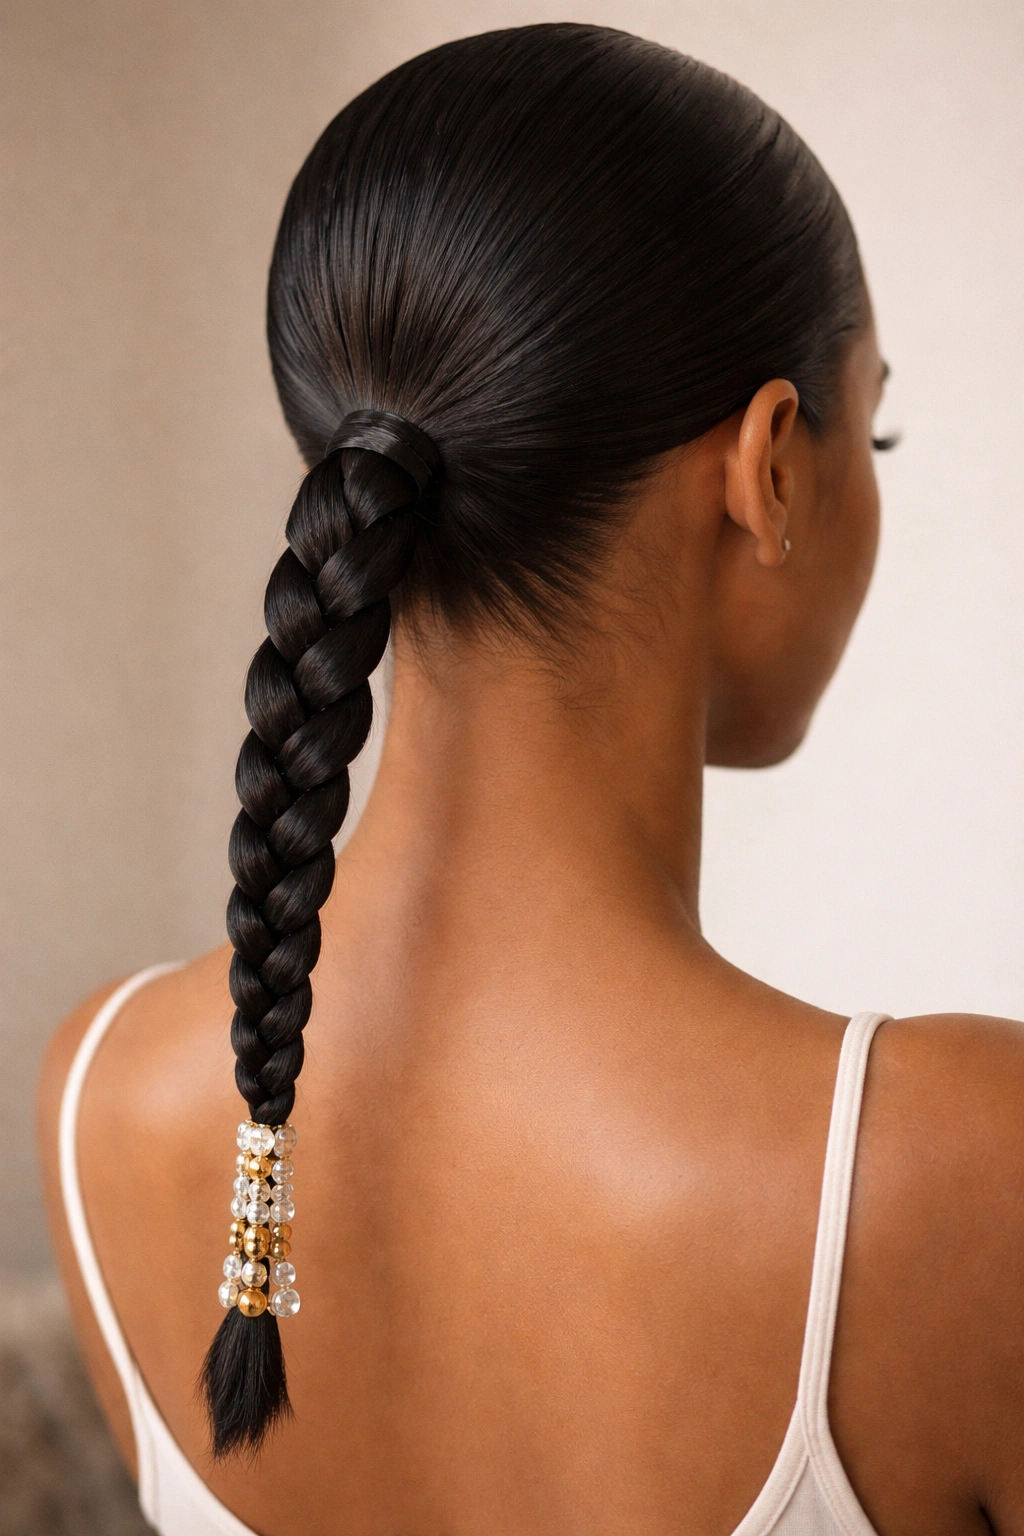
Beads change the weight and rhythm of the braid. A few small ones at the end of the ponytail are enough. You do not need a whole row unless you want the extra sound and swing.
Place beads only where the braid is fully secure, usually on the last 2 to 3 inches. That keeps them from tugging at the hair near the nape. If the hair is fine, choose lighter beads. Heavy ones slide and pull.
This style feels strongest when the top is very smooth and the braid itself is tight. The beads become the detail, not the entire story. That balance matters. Too many beads can make the style drag and loosen the base.
18. Braided Ponytail with Curled Ends
A tight braid with curled ends gives you structure up top and softness at the tail. It works because the braid controls the crown, then the last few inches loosen into movement. That contrast keeps the style from looking too severe.
Braid the hair down to the point where you want the curl to begin, usually mid-length, then set the ends with a 1-inch curling iron or flexi rods. If you use heat, hold each curl for about 10 seconds and let it cool before touching it. That’s what helps the shape last.
Use a touch of flexible hairspray, not a shellac-like spray that turns the ends crunchy. You want bounce, not a helmet.
19. Braided Ponytail with Knot Detail
A knot detail gives the braid a little interruption in the best way. It breaks up the straight line and adds a more tailored look without turning the ponytail into a heavy style.
Take two small sections from the top of the ponytail, tie them into a loose knot once, then continue braiding below it. Keep the knot low and centered so it doesn’t pull one side off balance. If the knot sits too high, the ponytail starts to bend awkwardly.
This works especially well on medium to long hair. The knot needs enough length to sit cleanly without tugging. Once it’s in place, the rest of the braid can stay simple and snug.
20. Side-Swept Low Braided Ponytail
A side-swept low braided ponytail feels softer at the front and still stays anchored at the base. The part begins off-center, the braid angles toward one shoulder, and the whole shape follows that line naturally.
This is a good style when you want the face to look a little longer or you just don’t want a strict middle part. Keep the side sweep smooth over the crown, then braid low so the weight sits close to the neck.
What Keeps It from Slipping
Use two pins crossed under the braid where it meets the nape. That tiny hidden anchor helps the braid hold its angled shape. One pin usually isn’t enough, especially if the hair is thick or slippery.
The finished ponytail should rest over one shoulder without pulling at the scalp. If it feels tight in the wrong place, adjust before you leave the mirror. Hair tells on you later.
21. Twisted Crown Into a Braided Ponytail
Two rope twists along the hairline make a nice change from a full braid, and they work especially well when the front pieces are layered. Twist each side back toward the nape, join them, and then braid the tail from that point.
This style keeps the front neat without looking overworked. The twists act like little rails, holding the hairline down while the braid handles the length. It’s a smart choice for medium to thick hair that needs more control at the temples.
A drop of smoothing cream on each twist makes a difference. Keep your fingers close to the scalp and twist firmly. Loose twists unravel faster than people expect.
22. Extension-Length Braided Ponytail
Extensions change the whole mood here. They turn a modest low braid into a longer, heavier, more dramatic shape, which is useful when your own hair won’t give you enough length to show the braid pattern.
Anchor the natural hair into a low ponytail first, then add the extension hair at the same point. Make sure the weight is balanced before you start braiding. If the extension is lopsided, the braid will drag to one side and feel awkward.
This style needs two elastics, not one, if the hair is fine. Secure the natural ponytail, attach the extension, then braid down with steady tension. A light wrap around the base makes the join disappear.
23. Micro-Braid Base Ponytail
A micro-braid base sounds detailed because it is. Tiny braids at the front or across the crown give the ponytail serious hold, especially on hair that slides out of plain updos. The smaller the braids, the more grip you get.
You can place them only where the hair tends to puff, or you can braid the whole front section into fine rows before gathering the ponytail. That choice depends on texture and patience. Some days you want a little control. Some days you want the whole head pinned in place.
How to Make It Last
Keep the micro-braids neat and close together. Gaps invite frizz. Once the base is collected, smooth the ponytail with a small amount of cream and keep the braid itself uncomplicated. The detailed part is the root work.
24. Crisscross Braided Ponytail
A crisscross braid gives the crown a lattice look before the ponytail drops low. It looks fancy, but the real value is in the way the intersecting sections hold the hair flat. The crossings lock the front down.
Use small sections and cross them over one another in an X pattern before feeding them into the braid. If you work too wide, the lattice loses its shape. Tight rows are the whole point.
This style suits hair that has enough length at the front to show the pattern. It also works nicely with a very low ponytail, where the braid can be the main visual feature. Keep the rest of the finish plain so the crisscross detail gets room to show.
25. Tucked-Nape Braided Ponytail
A tucked-nape finish keeps the style compact and polished. Instead of letting the braid flare out loosely at the base, you tuck the lower sections in close and pin them so the shape sits nearer to the neck.
This is a good fix when the ponytail tends to spread out or when you want the back to stay sleek under a collar or jacket. The tucked shape keeps the braid from bulking up at the nape, which can make the whole style feel cleaner.
Use hairpins that match your hair color and slide them in from underneath. Hidden pins matter here. If you can see them, the style loses its sharp edge fast.
26. Boxer-Braid Low Ponytail
Boxer braids into a low ponytail bring real hold, plain and simple. The two braids along the scalp do most of the gripping, so the final ponytail stays secure even when the hair is active, thick, or stubborn.
Braid each side tightly from the hairline back toward the nape, then combine the ends into one low ponytail. Keep the part even so the style doesn’t feel tilted. That symmetry matters more here than in some of the softer looks.
If you want the style to feel less sporty, smooth the braid tails and wrap one small section around the elastic. A small polish step changes the whole mood. Still tight. Just less gym bag.
27. Braided Bubble Ponytail
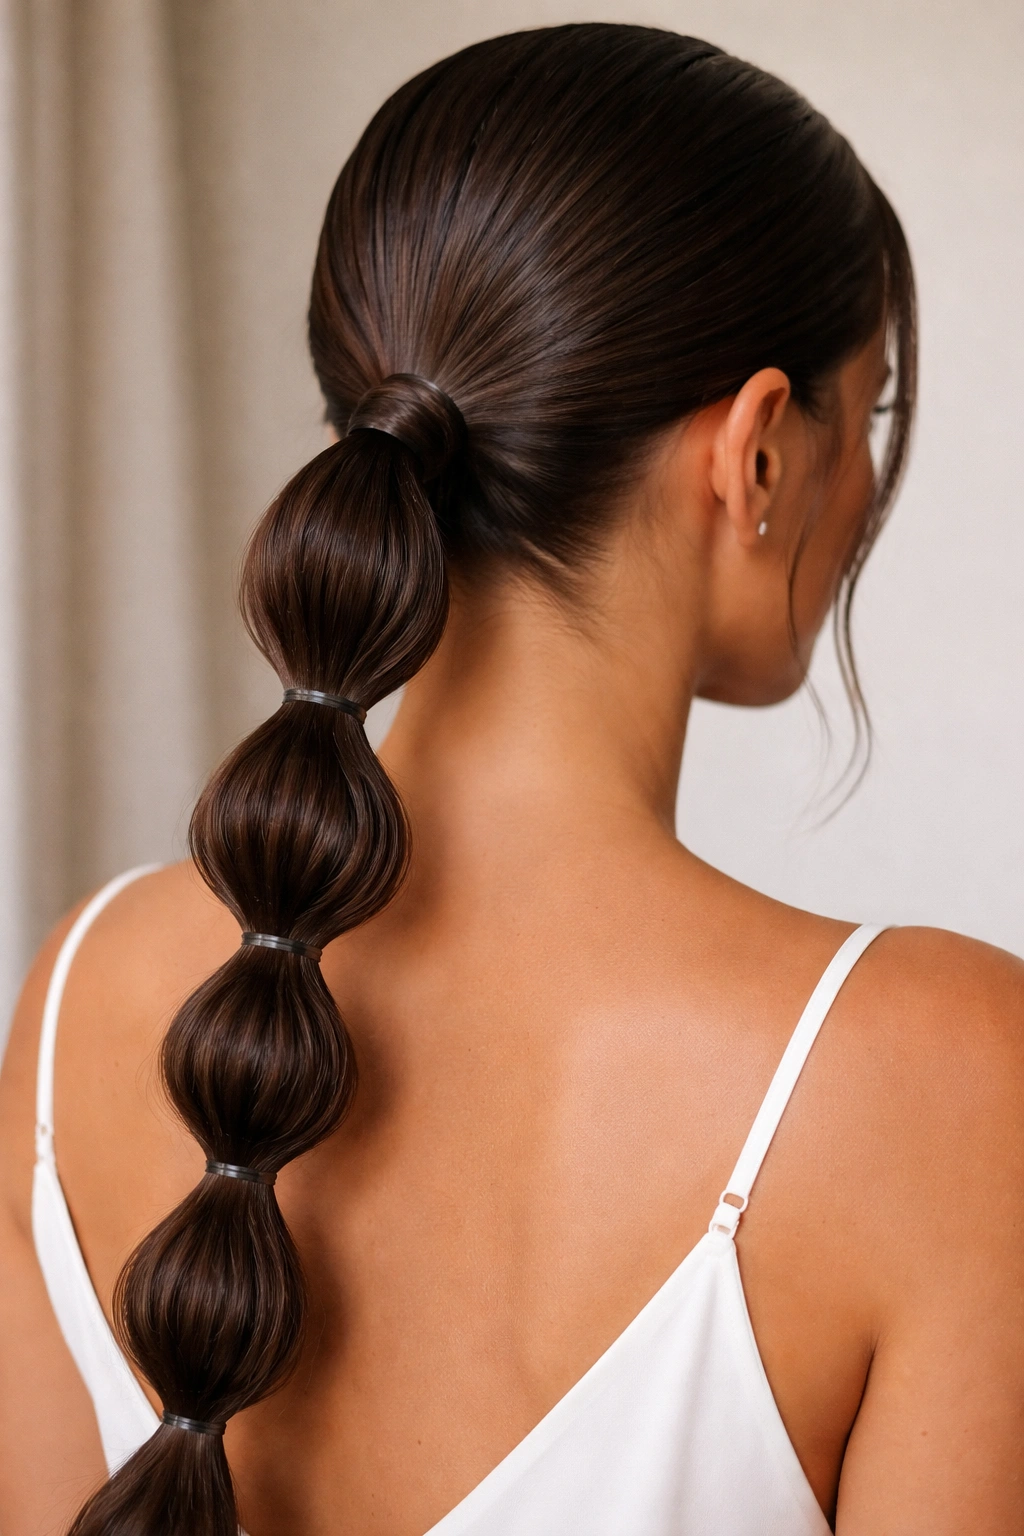
A braided bubble ponytail is a nice last twist because it mixes texture and control. Start with a low braid near the base, then add elastics every few inches down the length to create rounded sections. The braid keeps the top secure, while the bubbles give the ponytail shape.
Keep each bubble about the same size if you want a tidy finish. Uneven spacing makes the style look accidental, and that is not the goal. A light tug on each section after banding gives the bubbles volume without causing them to collapse.
This one works best when you want something a little more playful but still neat enough to wear anywhere. The braid steadies the style. The bubbles keep it from feeling flat.
Final Thoughts
The strongest low braided ponytails all have the same bones: a clean base, tight sectioning, and a finish that matches the hair’s texture instead of fighting it. If the roots are smooth and the anchor sits low and firm, the braid gets to do the pretty part while the structure does the hard work.
Some of these styles are quick. Some ask for patience and a steady hand. That’s fine. The difference usually shows in the first hour, when a rushed braid starts to loosen and a well-built one still sits exactly where you placed it.
Pick the version that fits your hair’s grip and your own tolerance for detail. A braid that stays tight is worth more than one that only looks good in the mirror.