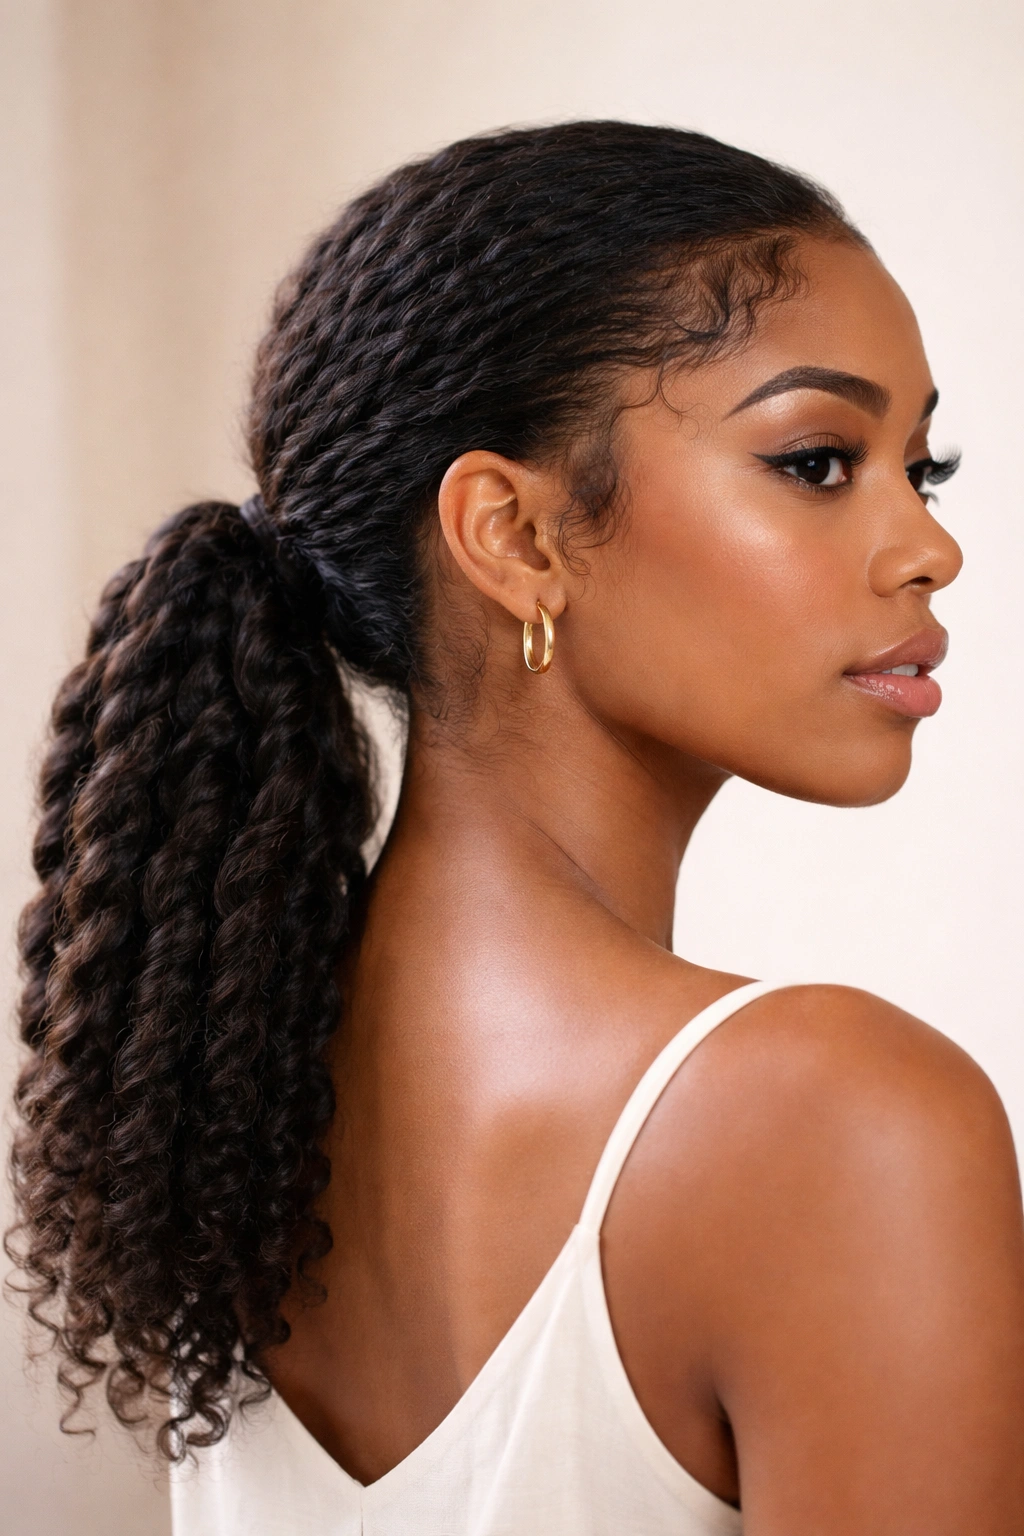
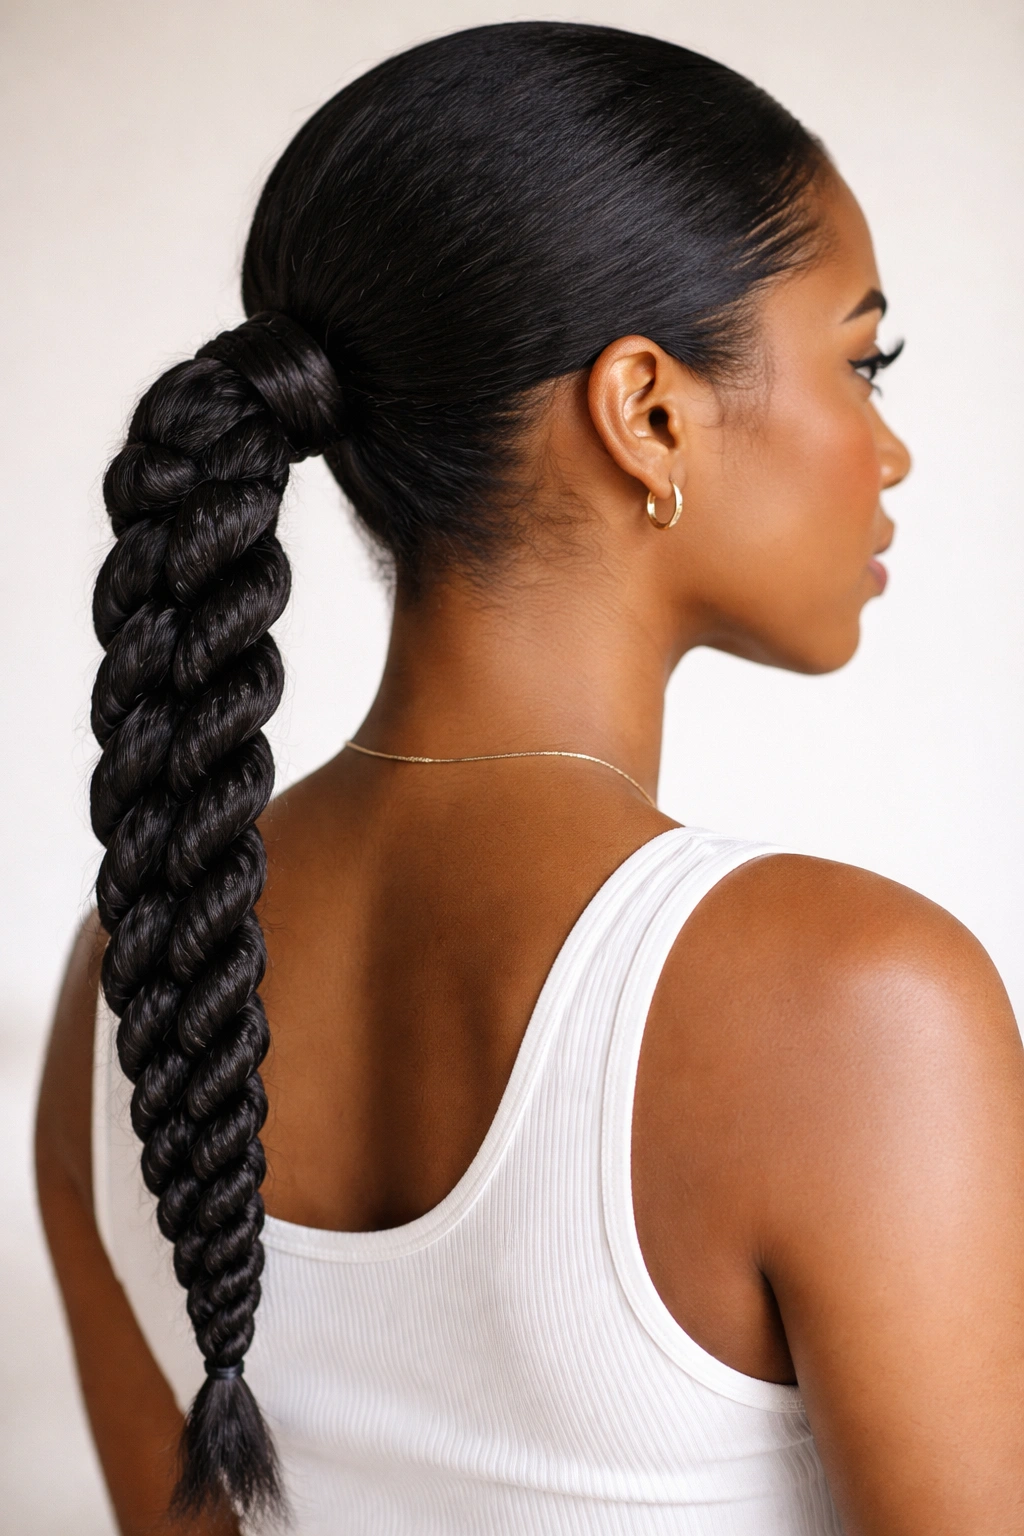
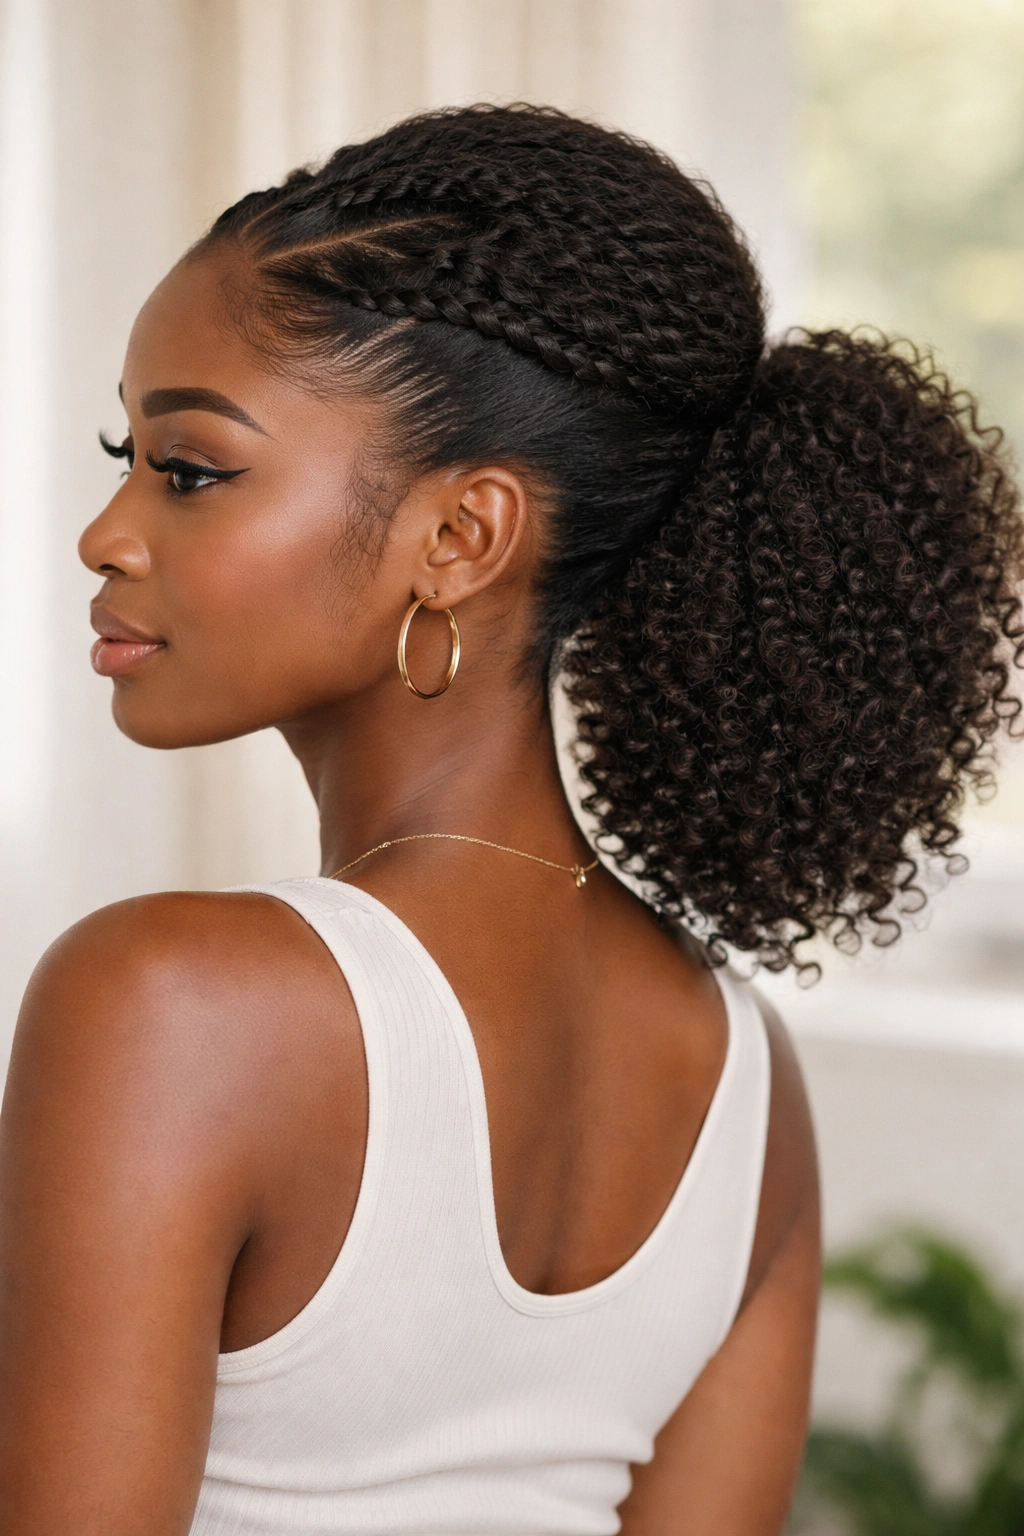
Twist low ponytails save mornings. On natural hair, they give you a neat base, a little shape at the crown, and enough twist detail to stop the style from looking flat. If your hair shrinks the second it sees air, you already know why that matters.
The trick is not brute force. A low ponytail sits better when the roots are stretched a bit, the part is clean, and the twists are anchored with enough grip to hold without yanking the hairline. A good style should feel secure by midday, not painful by lunch.
I love these styles because they can go sleek, soft, dressy, or protective without asking for a full salon setup. Some lean on a deep side part, some use flat twists across the front, and some keep the texture loose so the ponytail still feels like natural hair, not a helmet.
The easiest versions are the ones that match your hair’s length and density instead of fighting them. Start there, and the rest gets simpler fast.
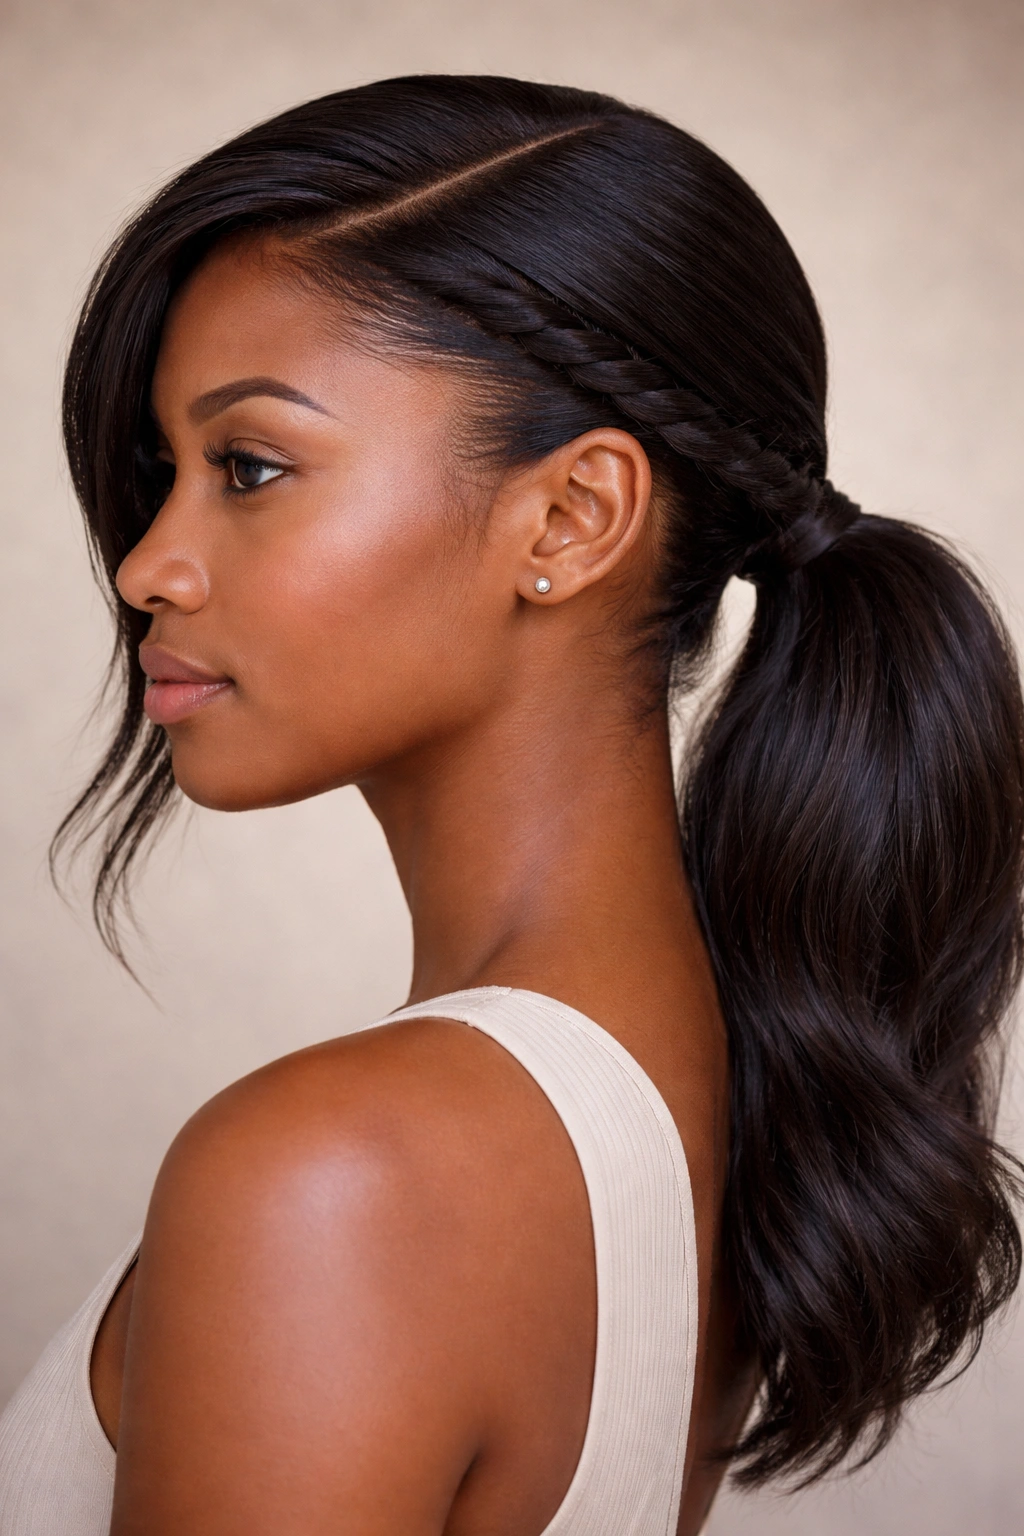
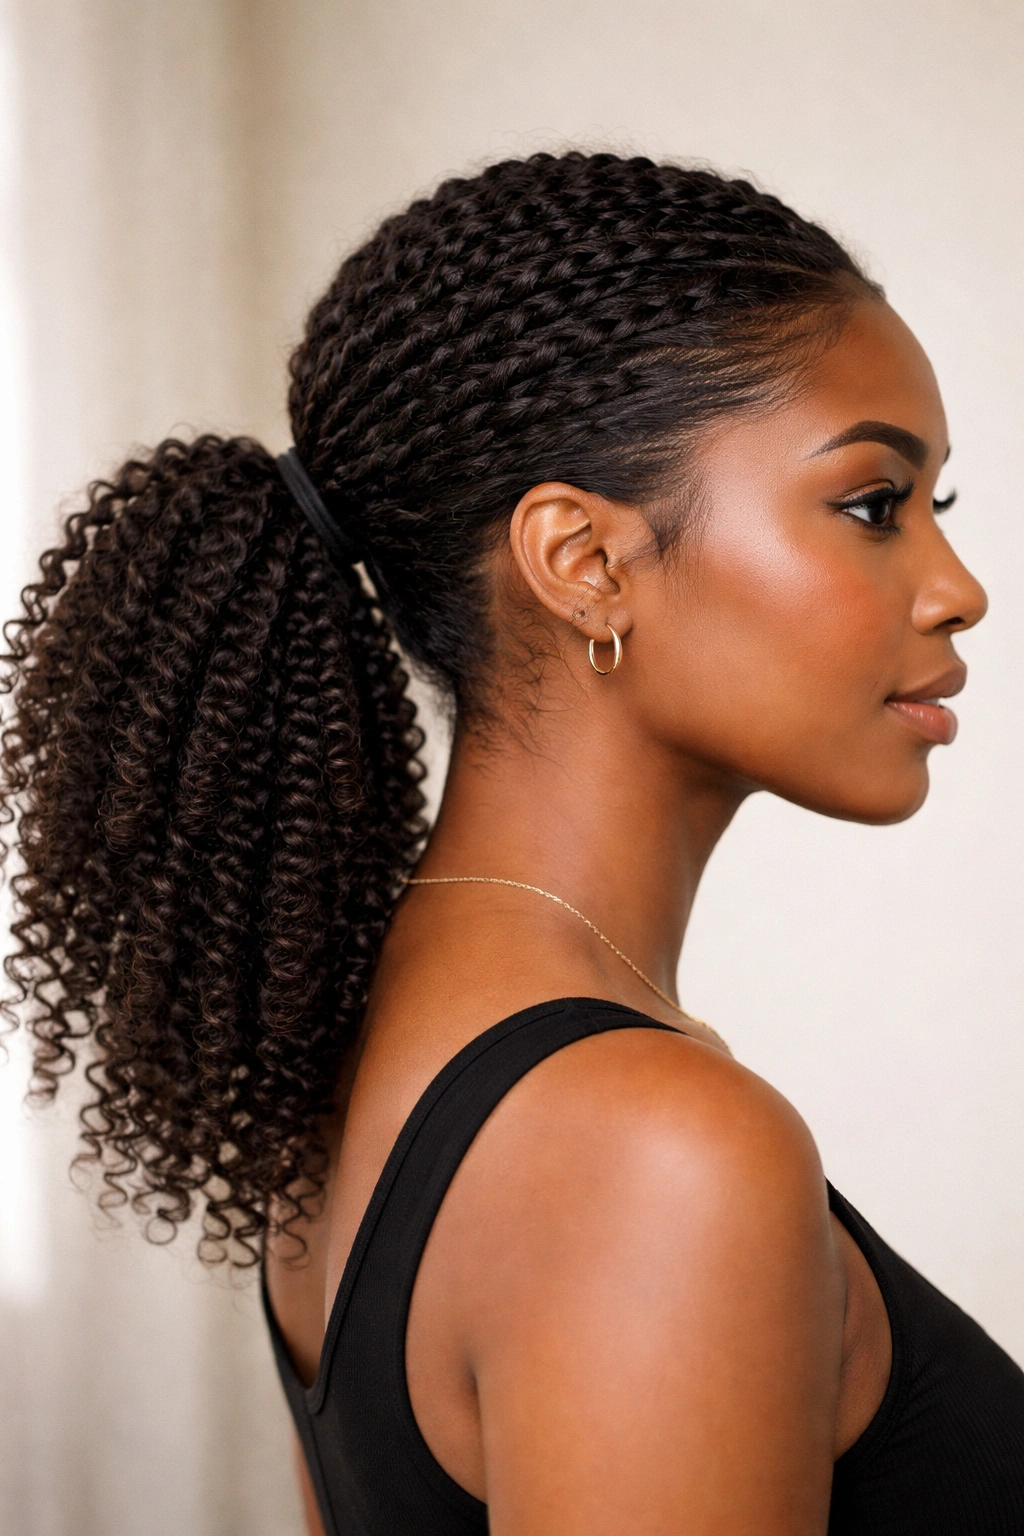
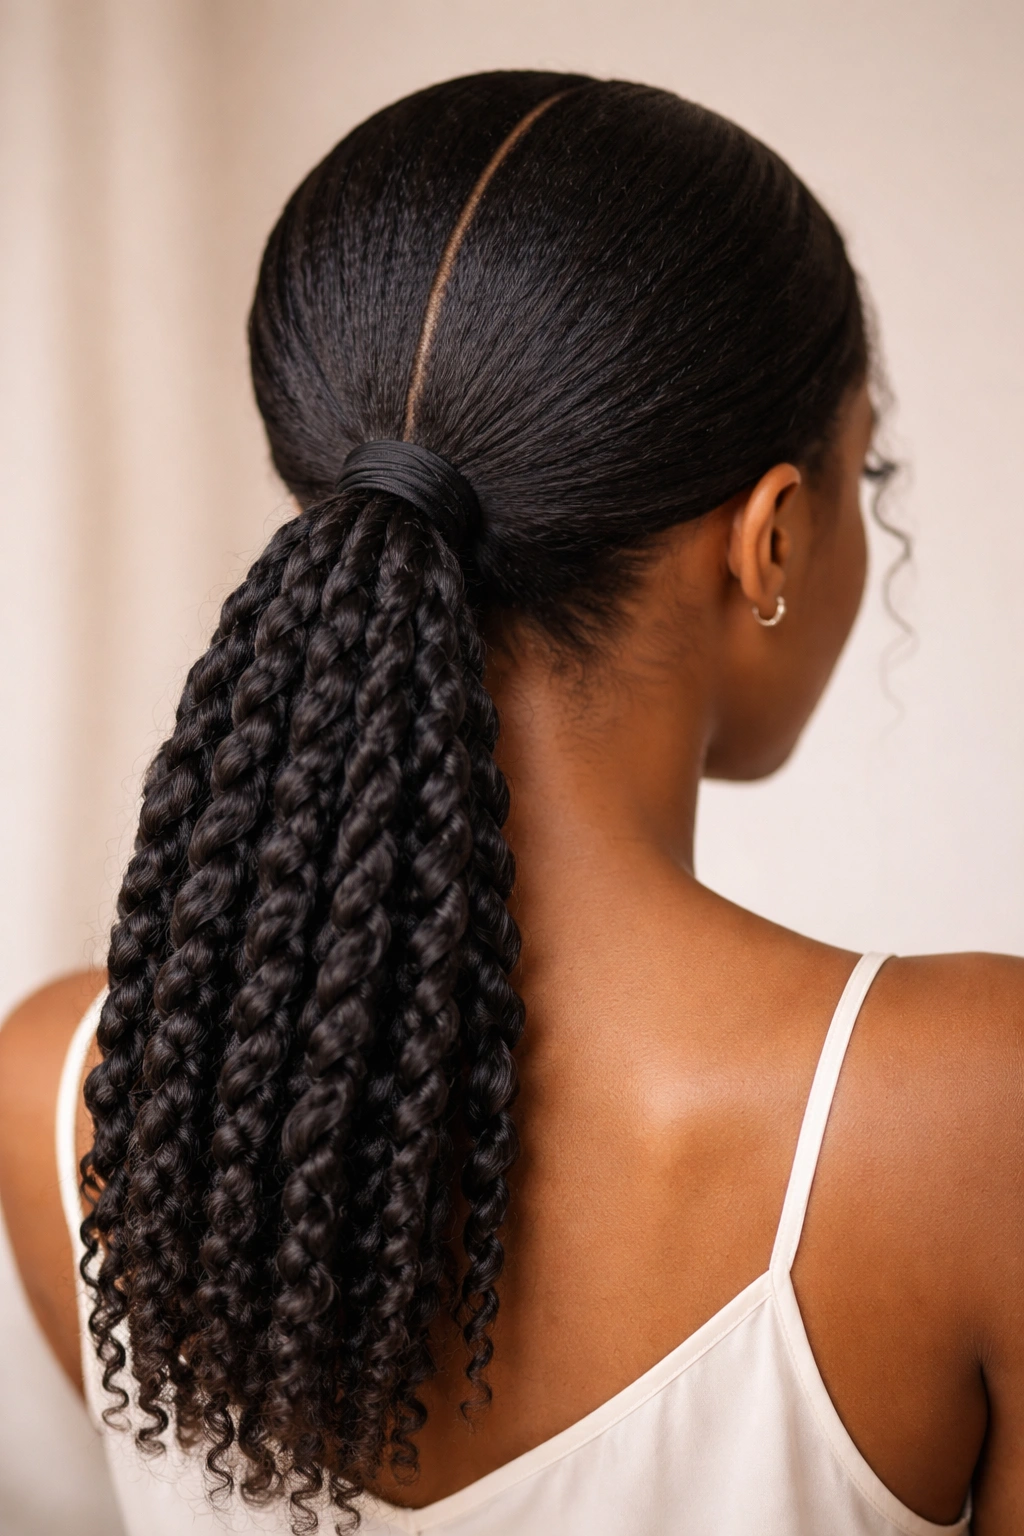
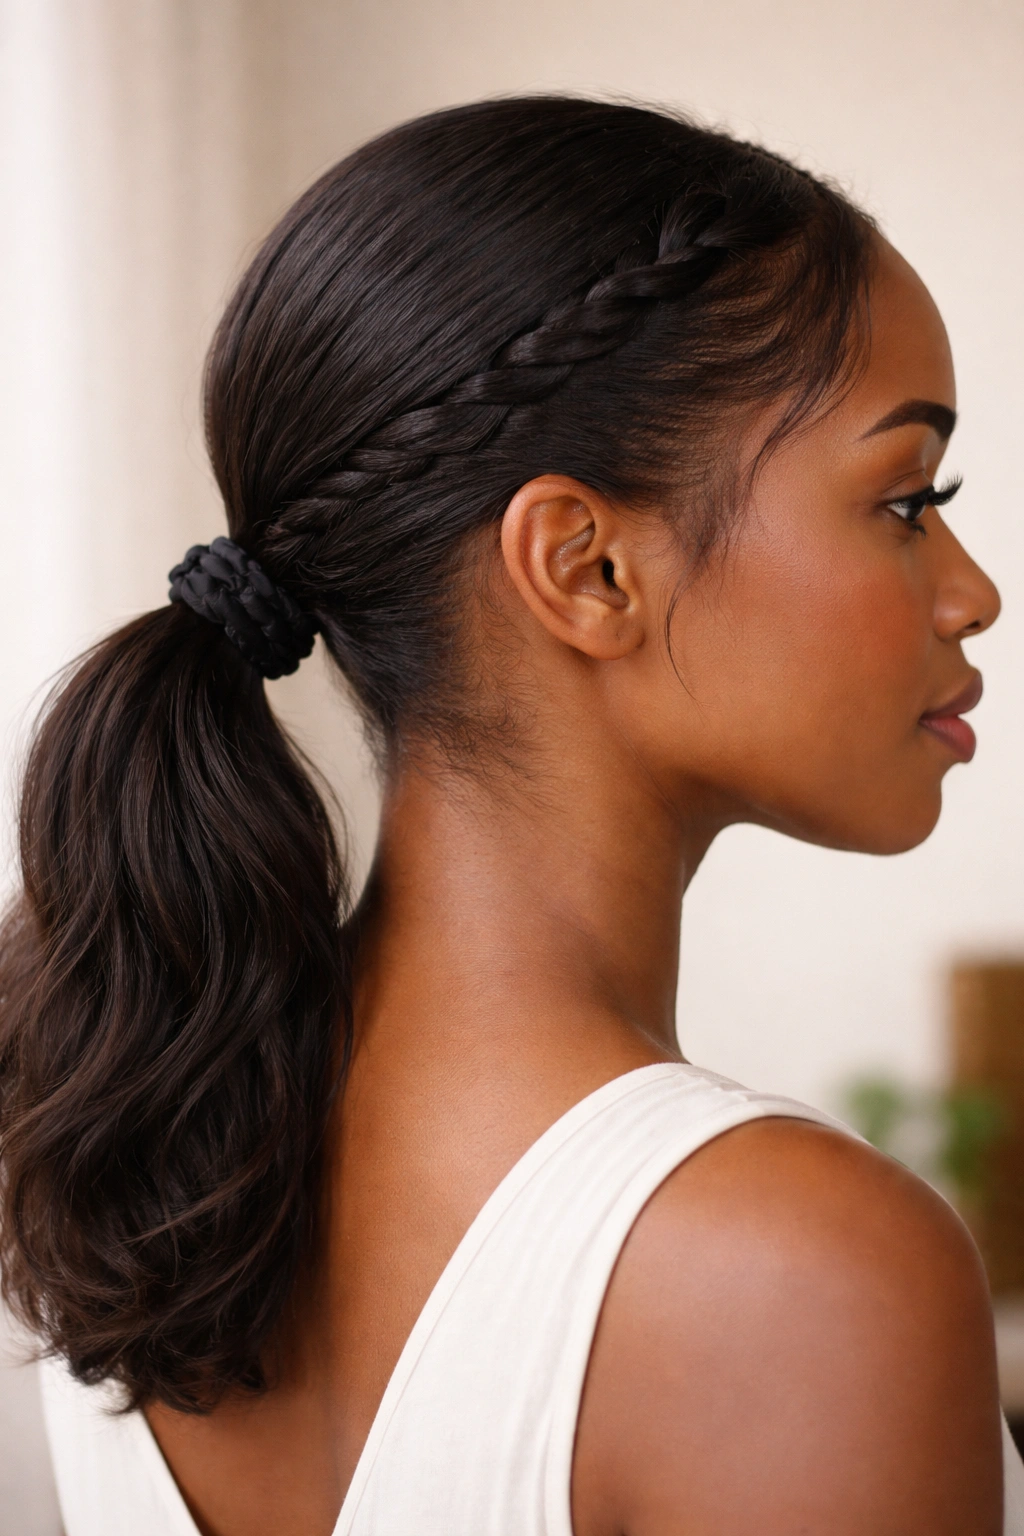
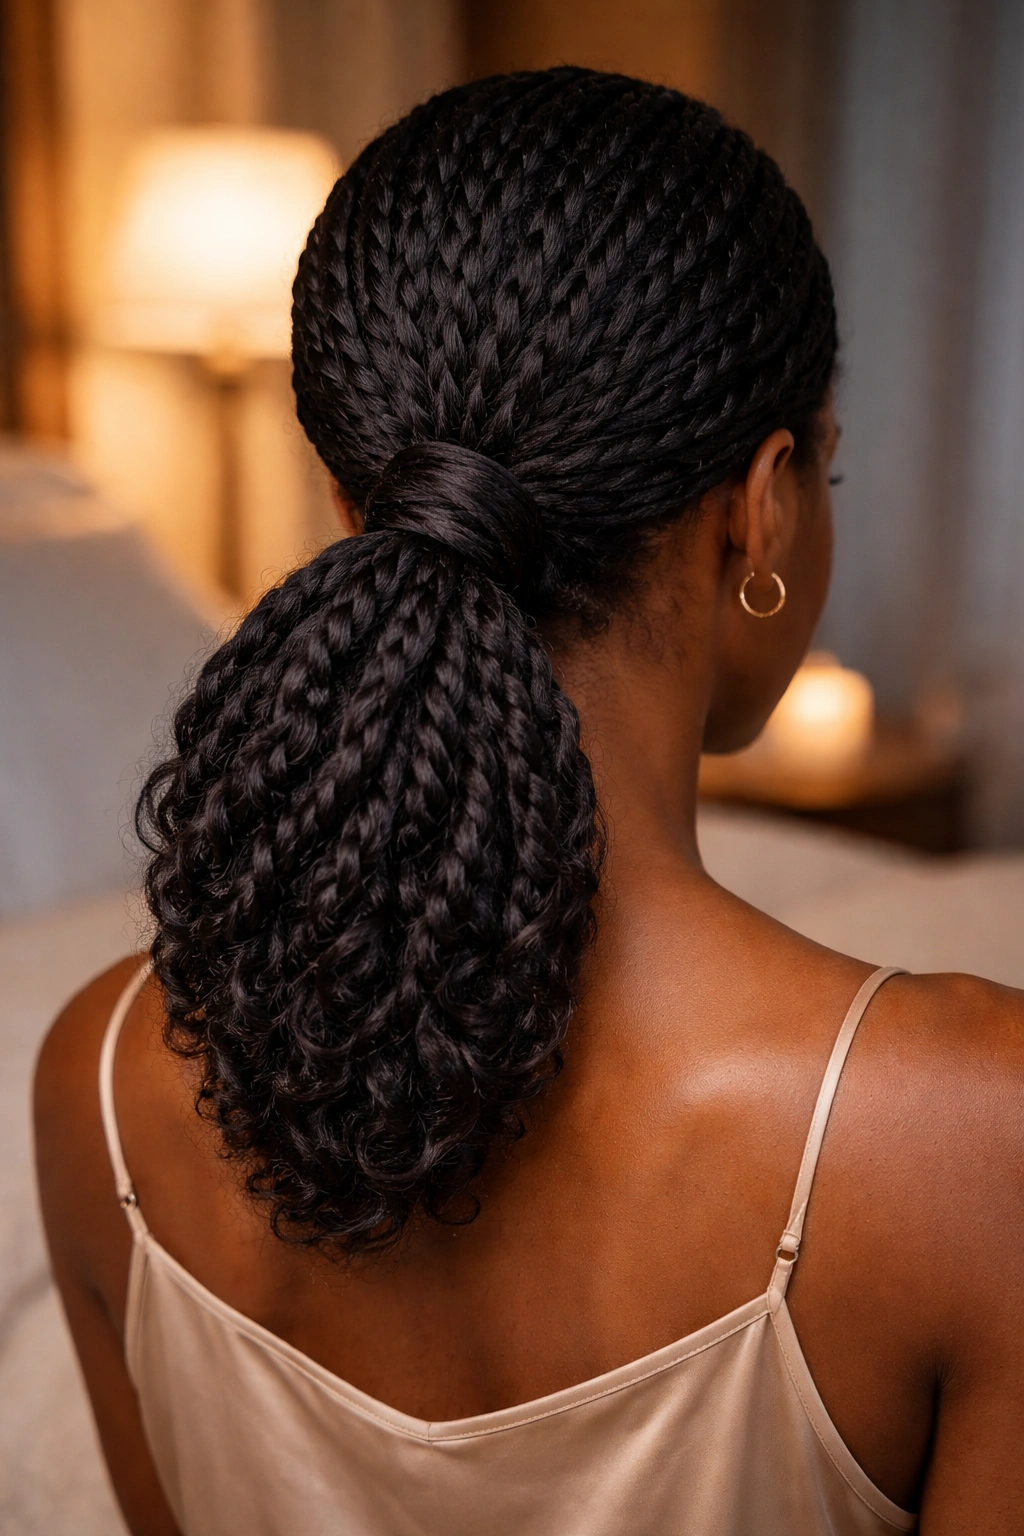
1. Sleek Center-Part Twisted Low Ponytail
A clean center part gives this style its backbone. Two twists frame the face, then meet at the nape where the ponytail sits low and close to the head. It’s one of those looks that feels calm without looking plain.
I like this version best on hair that has been stretched a little first — banding, a loose blow-dry, or even a chunky twist-out that has been fully dried. The roots lie flatter, the part looks sharper, and the twists don’t puff up before you leave the house.
- Keep the part about ½ inch wide so it looks neat but not harsh.
- Smooth the roots with a light gel or foam, then brush only the first 2 inches of hair.
- Wrap a small piece of hair around the elastic if you want the base to look finished.
Tip: a satin scrunchie holds better on thick natural hair than a thin rubber band that bites into the strands.
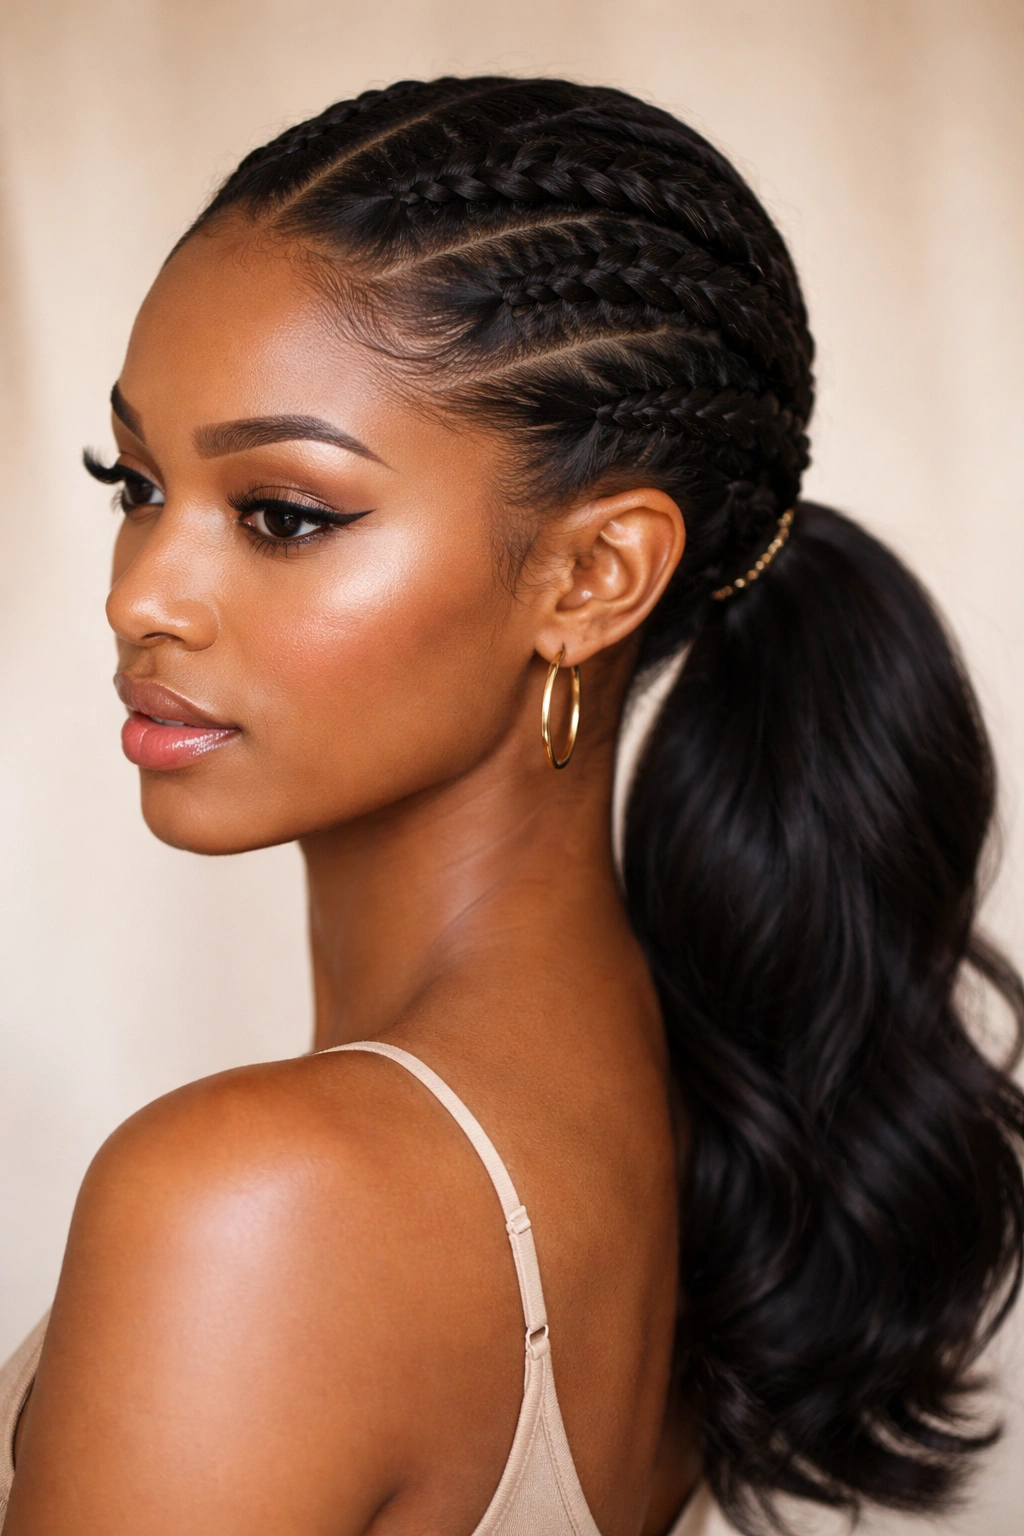
2. Deep Side-Part Twisted Low Ponytail
A deep side part does more work than people think. It changes the whole mood of the style, especially when one twist sweeps across the forehead and the ponytail falls just off-center at the nape.
This is a good pick when your hair naturally wants a little volume. The side part gives you a built-in shape, so you don’t have to flatten every inch of the crown. That matters on coily hair, where too much brushing can make the top look stiff.
If you want the front to stay neat, use a little edge control only at the hairline and keep the rest soft. Too much product near the roots can make the style look greasy by the end of the day. The side part should read as deliberate, not slicked into submission.
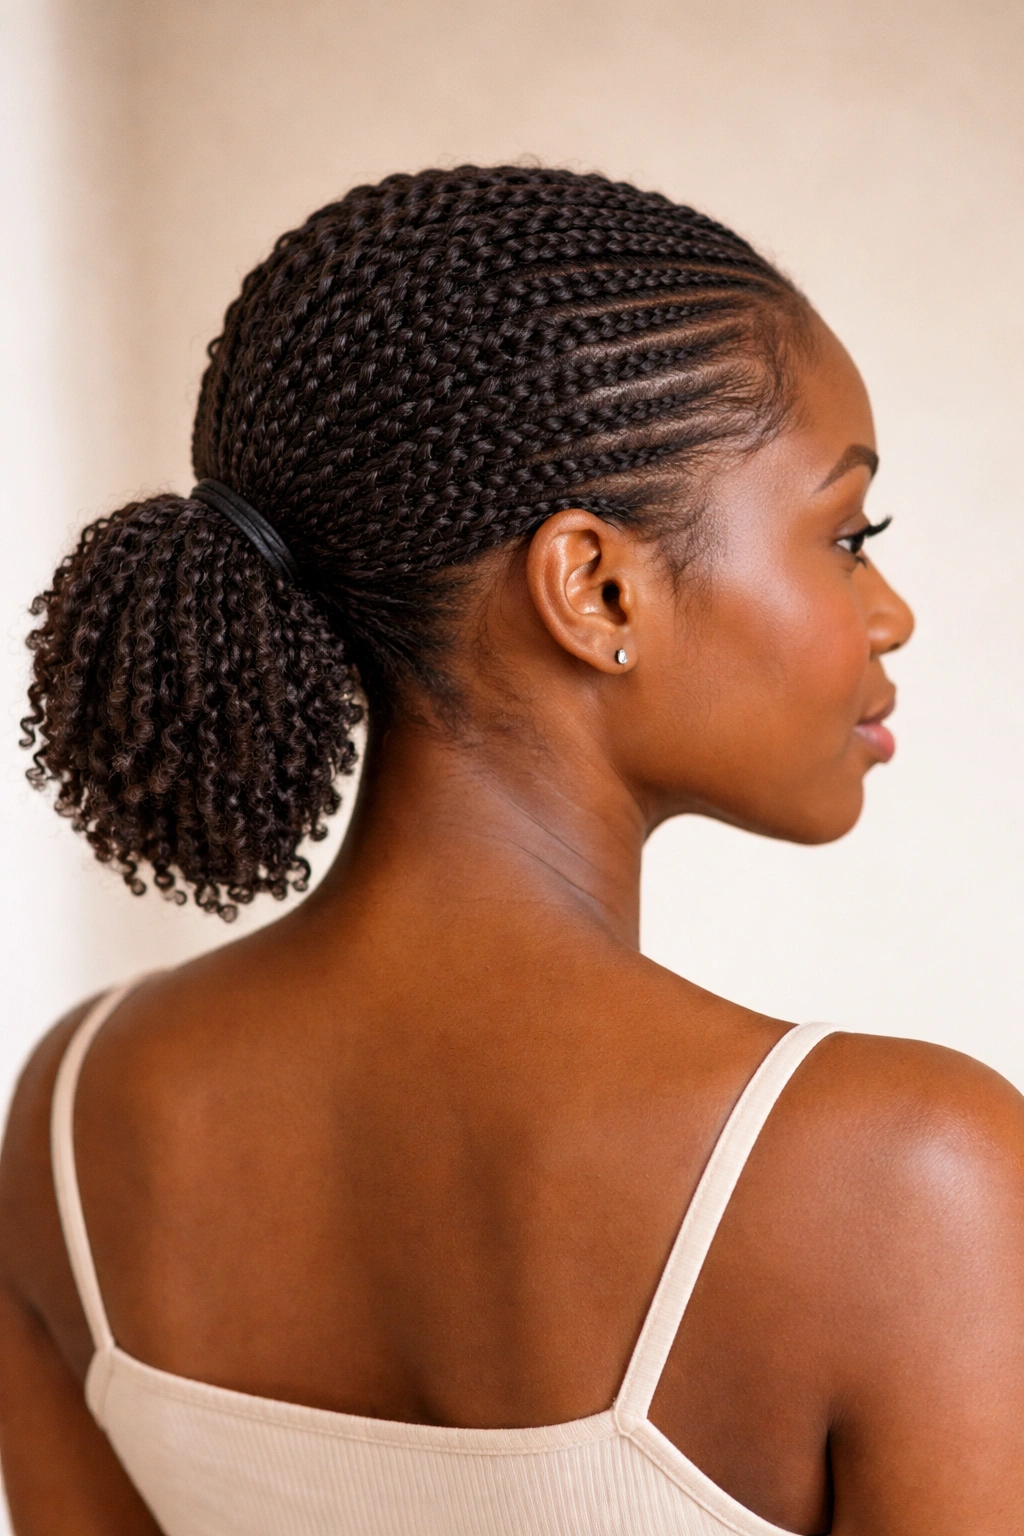
3. Flat-Twist Crown Into a Low Ponytail
Want the front to stay put for days? Flat twists are the move. They pin the hair close to the scalp, which gives the style a clean crown before the length drops into a low ponytail.
Why the crown matters
A flat-twist crown works especially well if your hairline frizzes quickly. The twist lays the hair down in a tidy path, and that makes the ponytail itself look smoother without much extra effort. It also helps if you like a style that still looks neat after a bonnet comes off.
How to place it
- Start the flat twist just behind the hairline, not right on top of it.
- Keep the twist medium-sized so it does not pull too tight.
- Stop the twist at the back of the head and gather the rest into one low ponytail.
A small detail changes everything here: tuck the end of the flat twist under the ponytail base with a bobby pin. That tiny hide-and-pin move keeps the whole style from feeling loose.
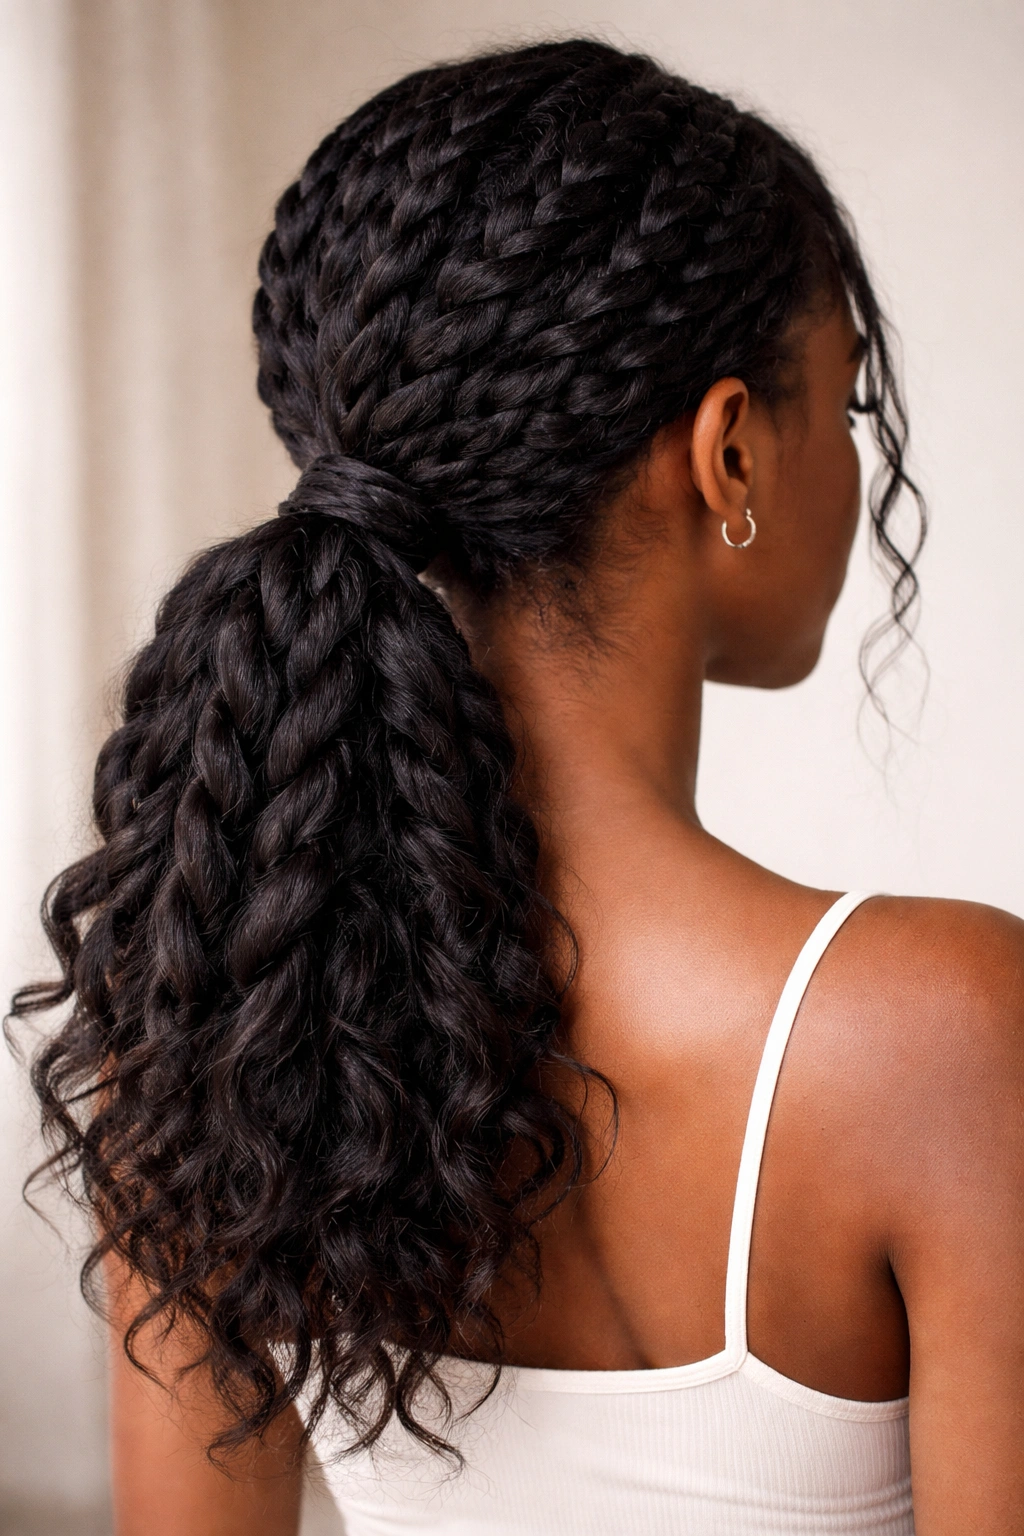
4. Jumbo Two-Strand Twists Gathered at the Nape
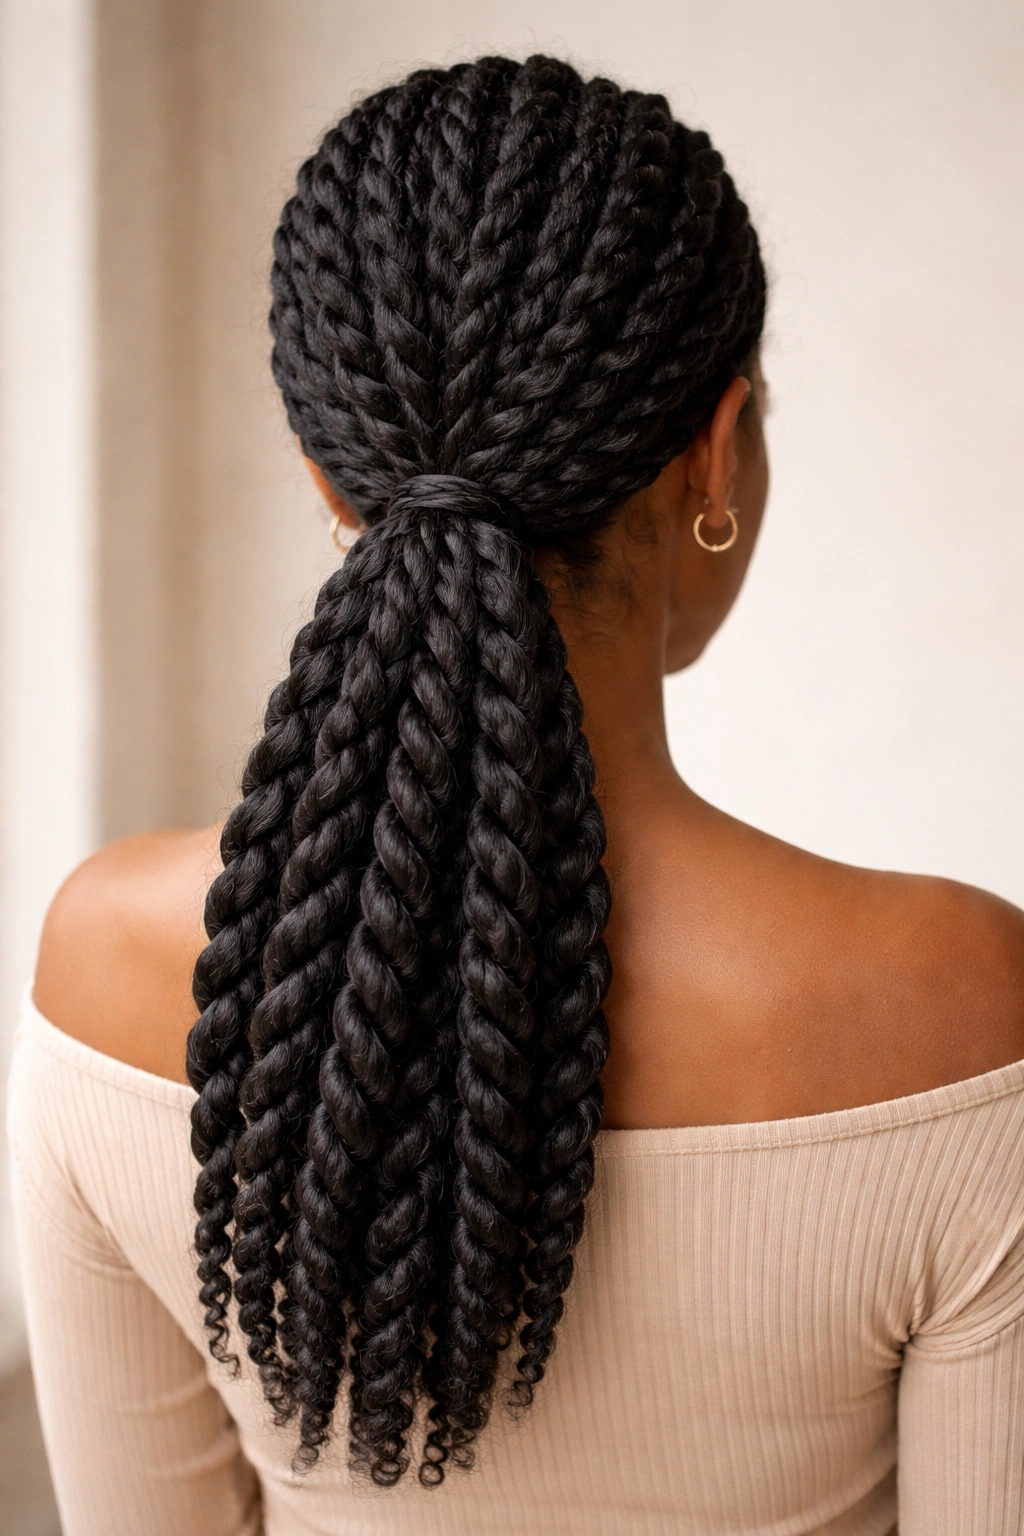
This one is for the days when your hair wants body, not restraint. Jumbo twists look full from a distance and still sit neatly in a low ponytail, especially if your hair is thick or layered.
The beauty of jumbo twists is speed. Fewer sections mean less time spent parting, and the finished style has a bold, rope-like look that holds its shape well. If you have 4B or 4C hair and you’re trying to keep manipulation low, this is a smart choice.
You can leave the twists loose at the tail or gather them together with one elastic and a wrap of hair around the base. Both work. The key is to twist each section evenly so one side does not look tighter than the other. Uneven tension shows fast on chunky styles.
5. Twisted Low Ponytail With a Wrapped Base
A wrapped base is the small detail that makes a simple ponytail look finished. Take a 1- to 2-inch section of hair from the underside of the ponytail, wrap it around the elastic, and pin the end underneath.
That one step changes the whole look. It hides the band, smooths the transition between the crown and the tail, and gives the style a cleaner line at the nape. I use this move when the rest of the hair is textured and I want the base to look intentional without making the ponytail flat.
Don’t pull the wrap too tight. A snug wrap is enough. If you stretch the strand hard, it can look thin and poke out by the evening. The base should feel tucked, not wound up like a rope.
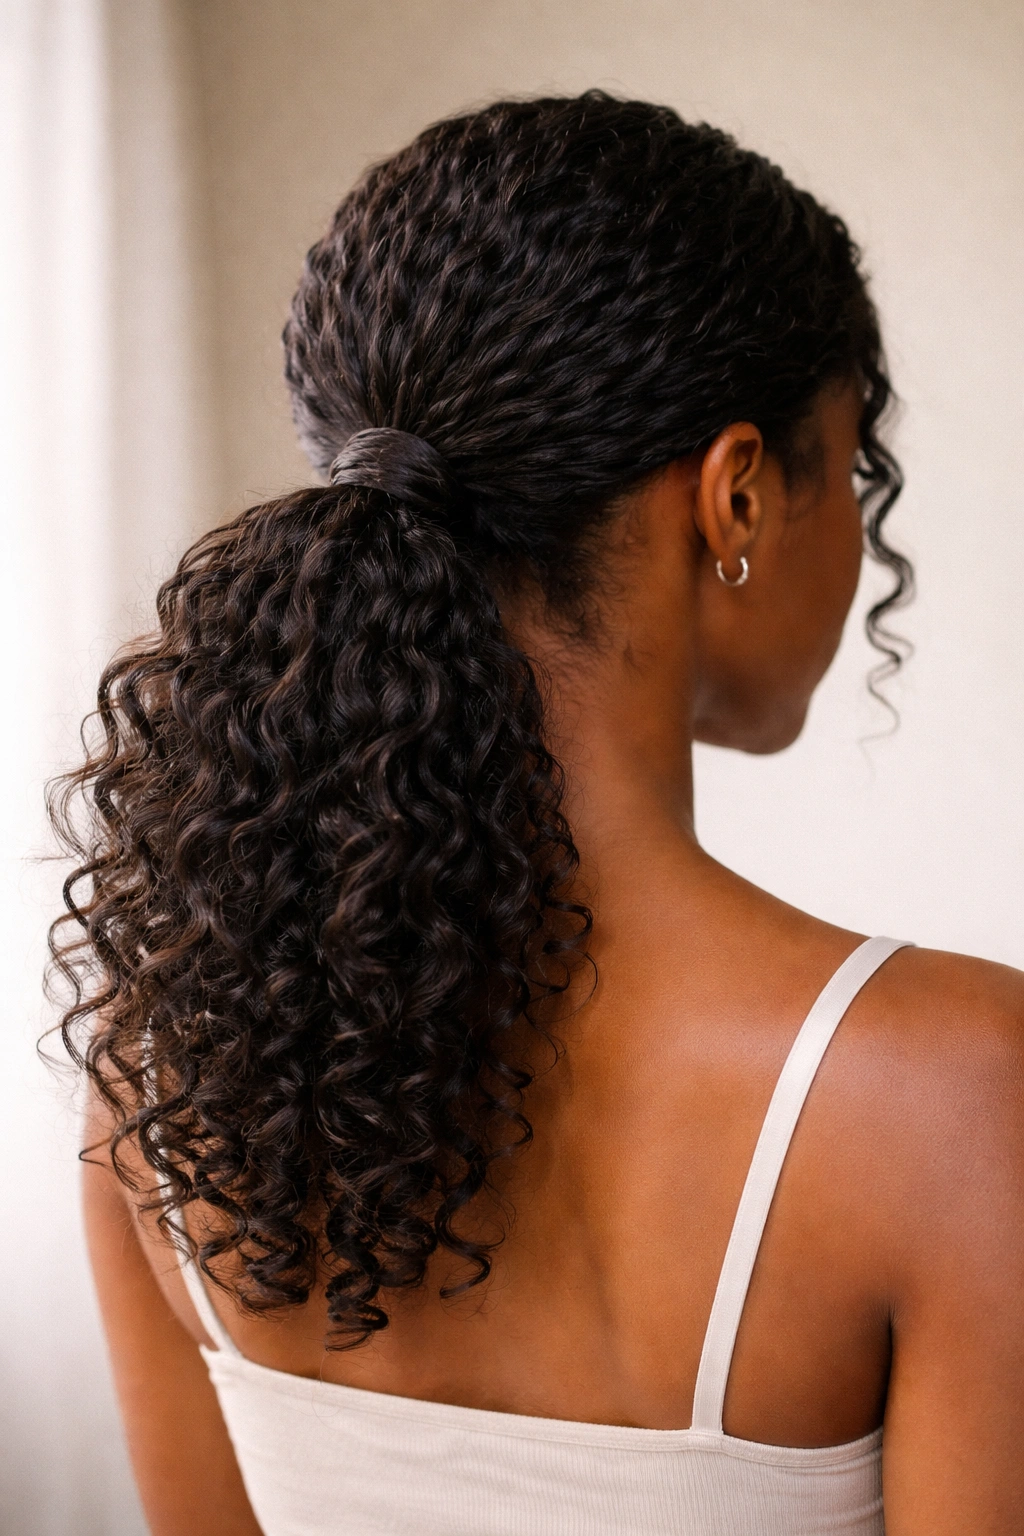
6. Twist-Out Texture Pulled Into a Low Ponytail
Unlike a slick ponytail, this one keeps some of the twist-out body on purpose. That softness is the point. The texture gives the ponytail movement, and the front still looks neat enough for errands, work, or a casual dinner.
It’s a good match for hair that has already been worn in twists and then taken down gently. You do not want a damp twist-out here. Damp hair clumps unevenly, and the ponytail can swell in odd places once it dries.
What I like about this style is the balance. The roots stay controlled, but the tail still has that soft, springy look natural hair does so well. If you want, separate the twist-out lightly with oiled fingers before tying it back. Just don’t separate so much that the curls lose shape.
7. Mini Twist Low Ponytail for Short Natural Hair
Short natural hair can still do a low ponytail that feels full. Mini twists are the trick. They add structure, help the hair sit in one direction, and make the ponytail look longer than it is.
Best for shorter lengths
This style works well when your hair is at chin length, collarbone length, or somewhere in that awkward middle where a single ponytail can slip out. The mini twists create more grip, which means the ponytail has something to hold onto.
Small details that help
- Make each section about ¼ to ½ inch wide so the twists stay neat.
- Use a light cream before twisting, not a heavy butter that leaves the roots soft.
- Secure the ponytail with two small elastics if one feels weak.
A tiny ponytail is still a ponytail. Give it a little shape at the top, and it looks finished instead of squeezed.
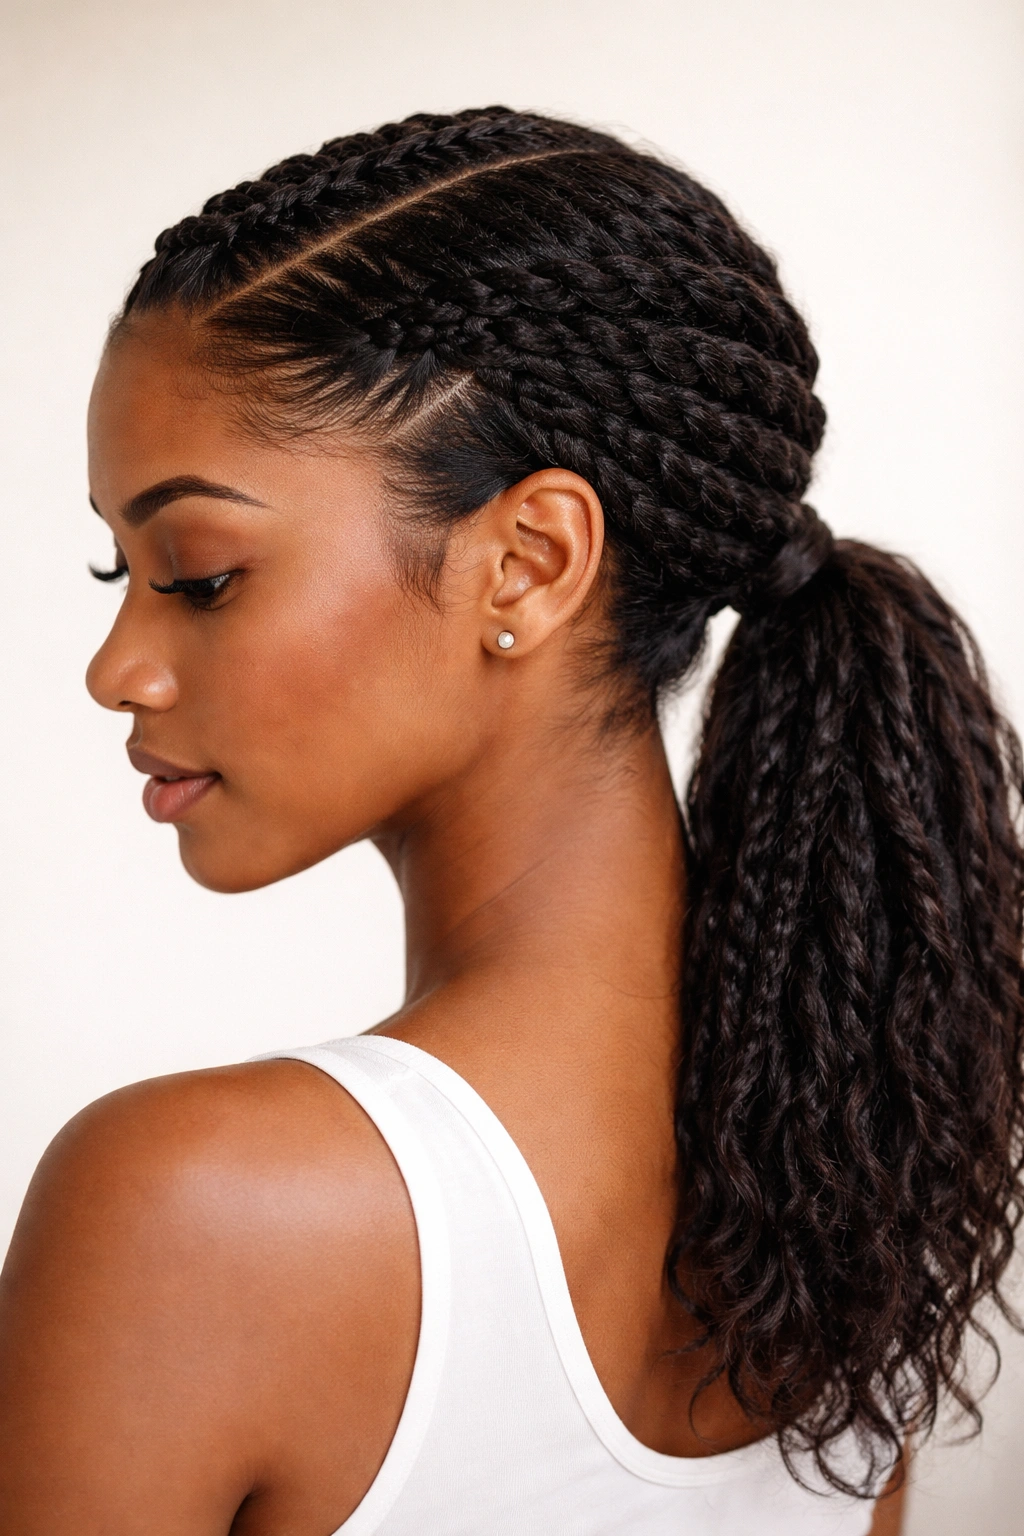
8. Feed-In Flat Twists to a Low Ponytail
Feed-in flat twists look polished because the thickness builds gradually. You start with a small section at the front, then add hair little by little as you twist back toward the nape. That slow build keeps the front sleek without making the first inch feel bulky.
This style is especially useful when you want the top to lie flat but still keep a textured detail. The ponytail itself can stay simple. The real interest is in the path the twists take across the scalp.
Keep the tension even as you add hair. If one side is pulled tighter than the other, the crown will sit crooked, and you’ll see it once the ponytail is tied. A rat-tail comb and a light hand matter more than people think here.
9. Twisted Bangs With a Low Ponytail

Need softness around the face? Twisted bangs do that job without asking for a full fringe. Two small twists or a single front twist can frame the eyes and make a low ponytail feel less severe.
How to keep the bang twist from splitting
Use a front section that’s about 1 to 1½ inches wide, twist it away from the face, and pin the end under the ponytail base. If the section is too thin, it will fray. Too thick, and it turns into a side panel instead of a bang.
The nice part is the shape. Twisted bangs work with round faces, long faces, and anyone who wants a softer line at the hairline. They also make a low ponytail look more styled with almost no extra time.
If your front layers are short, skip the temptation to force a long twist. Pin the end where it lands and let the style be what it is.
10. Mohawk-Style Twist Into a Low Ponytail
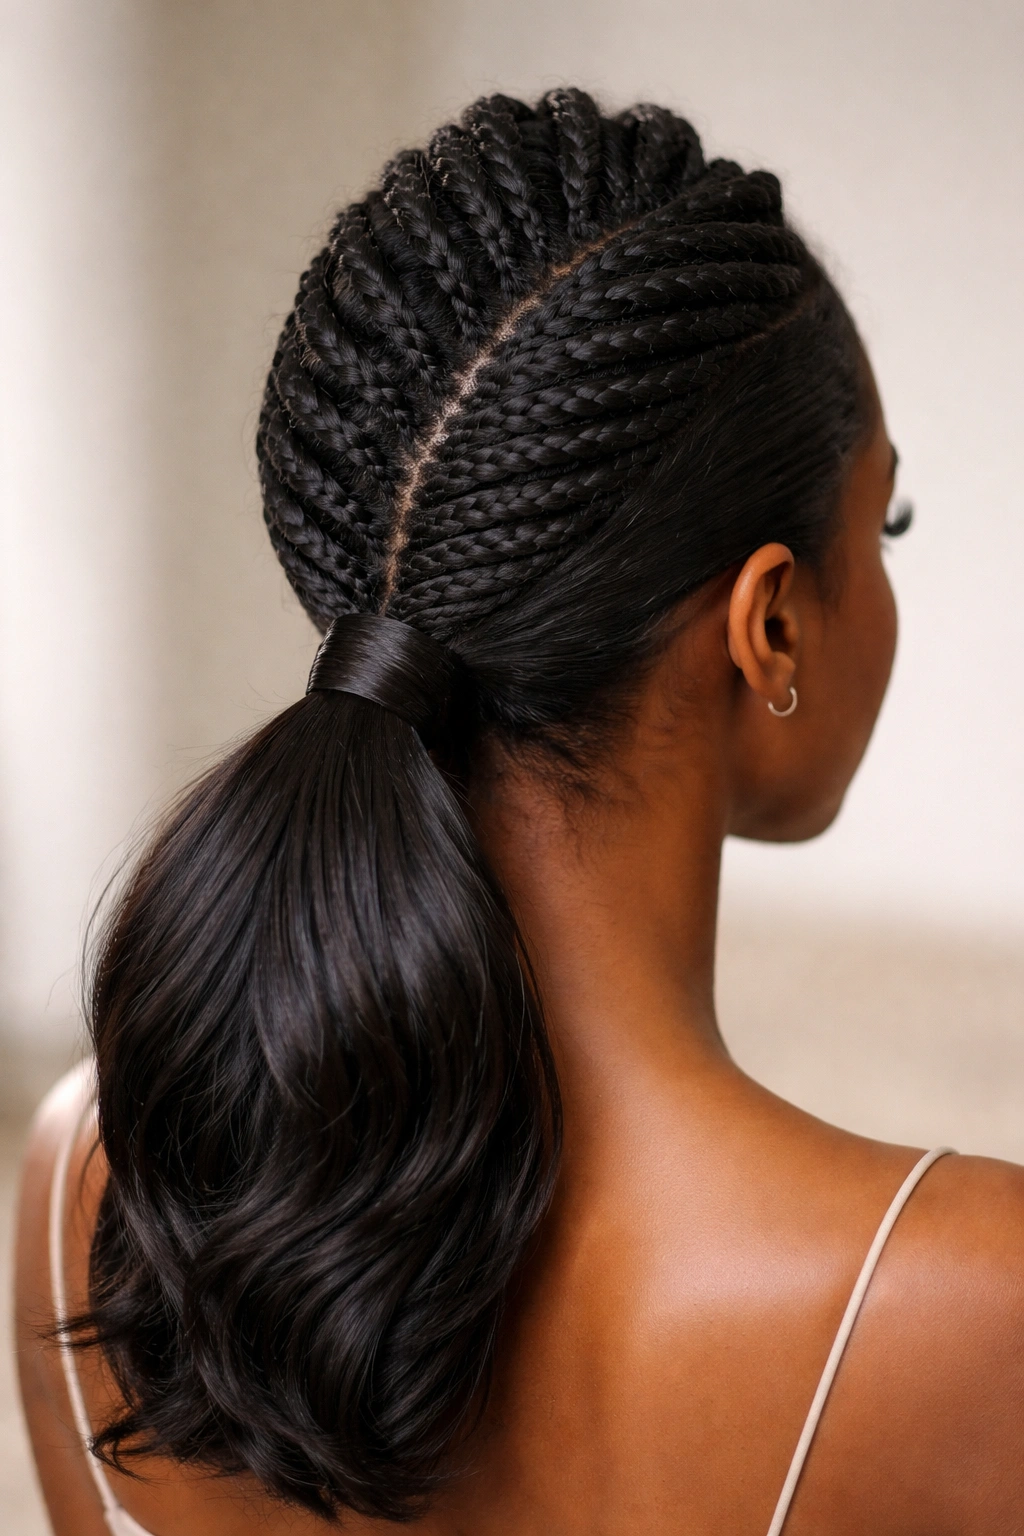
This is the low ponytail that gives height without turning into a high ponytail. A mohawk-style twist runs down the center of the head, often with flatter sides, then gathers at the nape for a stronger profile.
The shape is bold, but it’s not complicated. Three narrow twists down the center can be enough. You can leave the sides smoothed back or make them part of the same twist pattern if you want the top to look even tighter.
I reach for this style when I want something with structure. It looks sharper than a plain low ponytail, and the lifted center gives you a little drama without needing a lot of length. If your hair is dense, this one sits especially well because the crown already has natural body.
11. Twisted Low Ponytail With Soft Edges
Some styles ask for glassy edges. This one doesn’t. Soft edges keep the look relaxed, which is a better fit if you hate that drawn-on hairline feeling some styles create.
A small amount of foam or light gel near the temples is enough. Brush gently with a soft toothbrush or a small edge brush, then stop. You want the front to look smooth, not pasted down. The twist detail should still feel like hair.
This is one of my favorite low-effort looks for day-old natural hair. The texture around the crown can stay a little fuzzy, and the style still works. That fuzz is part of the charm. It keeps the ponytail from looking too formal, which is a relief on a regular weekday.
12. Braided Front, Twisted Back Low Ponytail
Braids hold shorter front pieces better than twists do. That’s why this hybrid style works so well when the front layers keep slipping out of a twist before they reach the back.
The front braid gives you control, and the back twist gives you softness. You get the clean line at the hairline without losing the texture that makes natural hair styles feel alive. The two textures also play off each other in a nice way.
If your hair is layered, this is one of the easiest ways to work around it.
- Braid the shortest front sections first.
- Twist the longer pieces at the back.
- Join everything into one low ponytail at the nape.
A little mismatch in texture can look intentional here, so don’t worry if the braid and twist are not identical. That contrast is part of the appeal.
13. Chunky Twist Ponytail With Loose Ends
If you want a style that reads bold from across the room, chunky twists do the job. The sections are larger, the shape is fuller, and the ponytail looks like it has real weight.
This version works nicely when you do not want to spend ages parting tiny pieces. Two-inch sections, maybe a little smaller if your hair is short, are enough. Let the ends stay a little loose if you want movement. That softer finish keeps the style from looking too rigid.
A quick trick: twist the ponytail tail all the way down, then stop about 3 inches from the ends and let them puff a little. That little bit of softness makes the style feel less severe. It also helps if your ends are not perfectly even.
14. Side-Swept Twist Ponytail
Why does a side sweep look softer? Because it moves the eye diagonally. A low ponytail that starts off to one side feels less strict than one that sits dead center, and the twist line helps guide the shape.
The best place for the part is usually just above the outer corner of one eyebrow. From there, let the front twist travel across the head and collect at the opposite side of the nape. That long diagonal line is what makes the style stand out.
This look is lovely on thick natural hair because the side sweep uses the density instead of flattening it. If your hair has a lot of volume at the crown, don’t fight that. Let the top stay a little lifted, and the ponytail will look fuller by default.
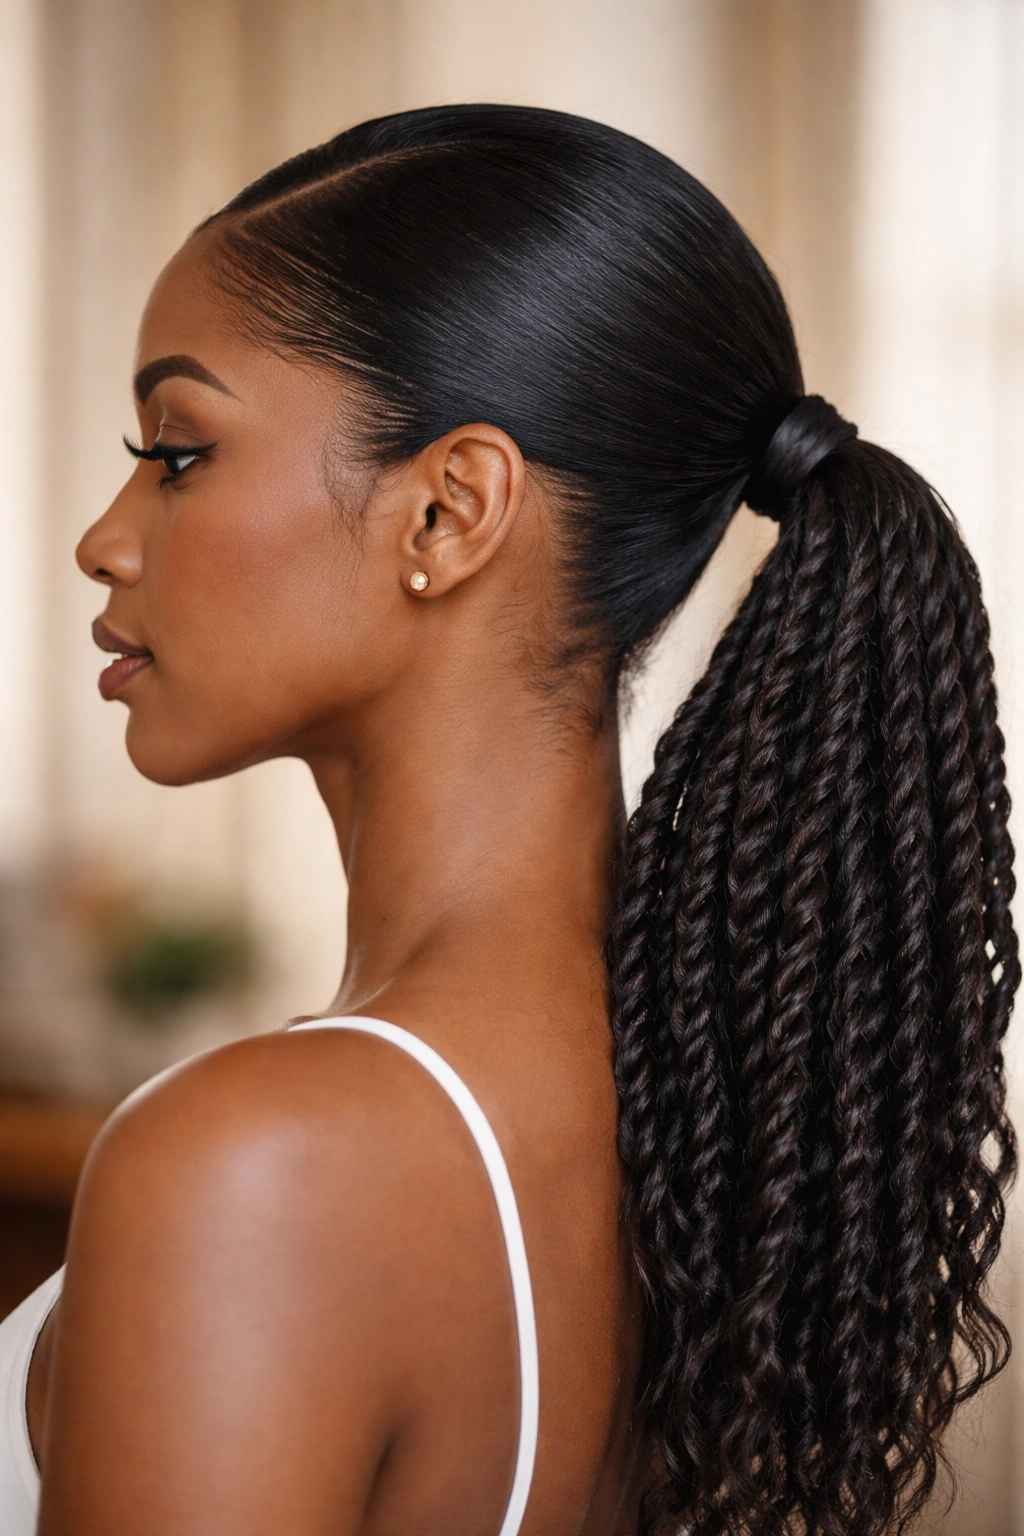
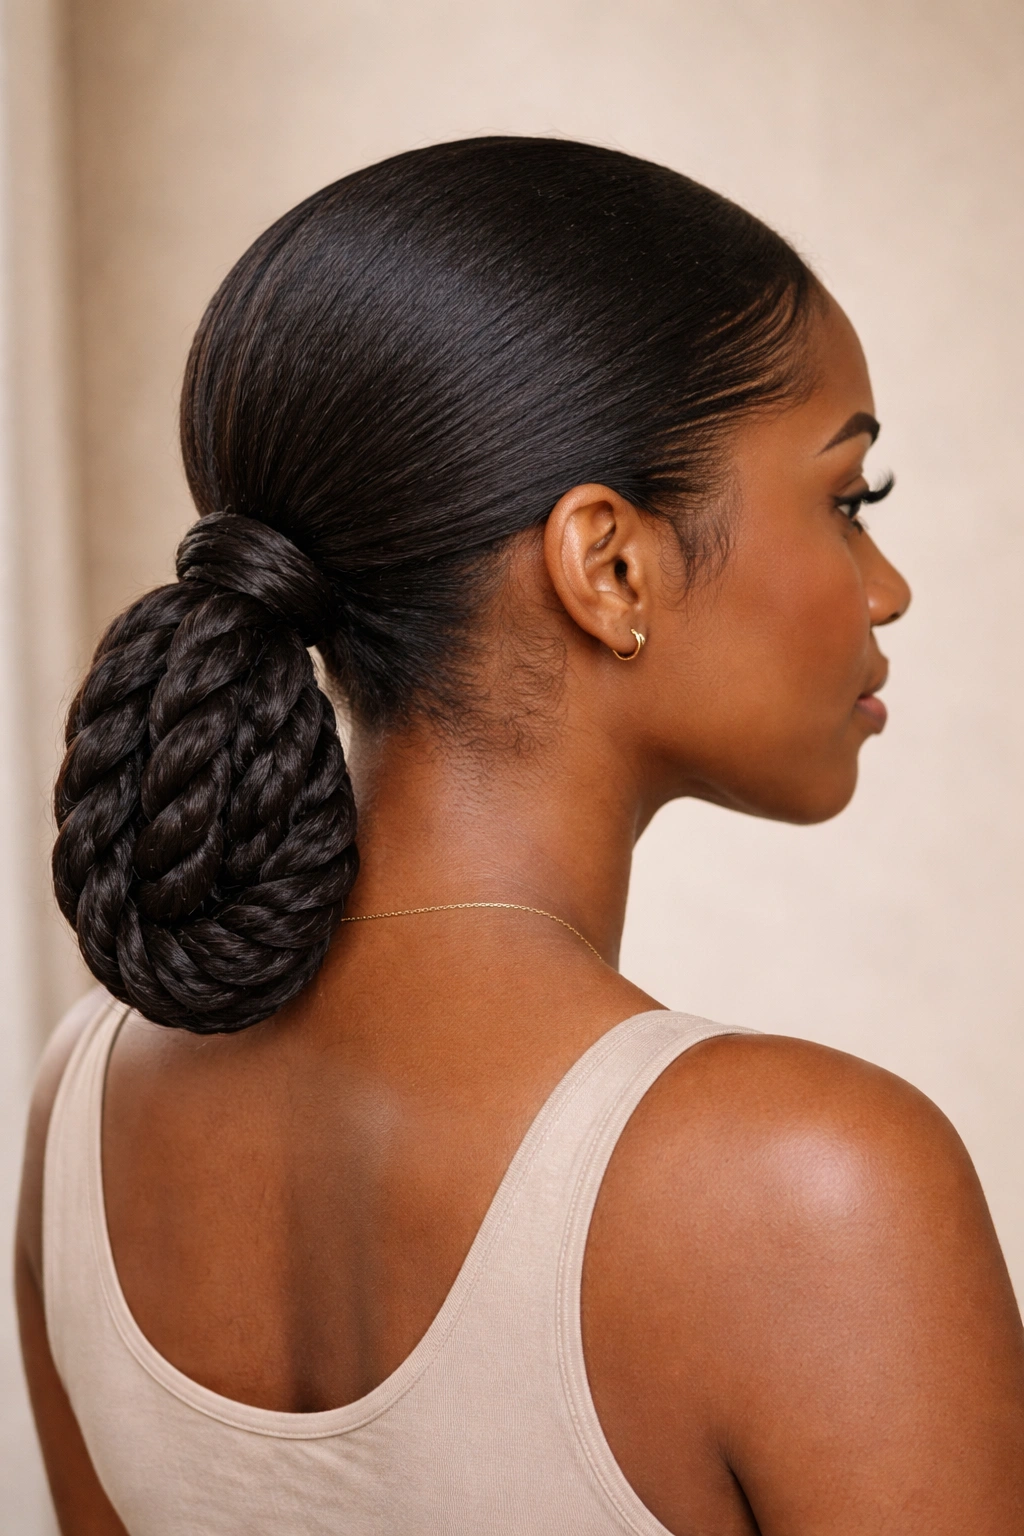
15. Rope-Twist Lengths in a Low Ponytail
Rope twists make a low ponytail look denser than two-strand twists do. They twist tighter, hold their shape well, and create a clean, almost sculpted line down the tail.
The method is simple. Split each section into two, twist both pieces in the same direction, then wrap them around each other in the opposite direction. That opposite motion is what gives a rope twist its neat spiral. Keep the tension even, or the twist will kink in the middle.
This is a good choice if you want the ponytail to stay defined for a while. Rope twists tend to frizz less at the ends than looser twists. They also work well for formal looks because the lines are so tidy.
16. Two-Ponytail Twist Detail at the Nape
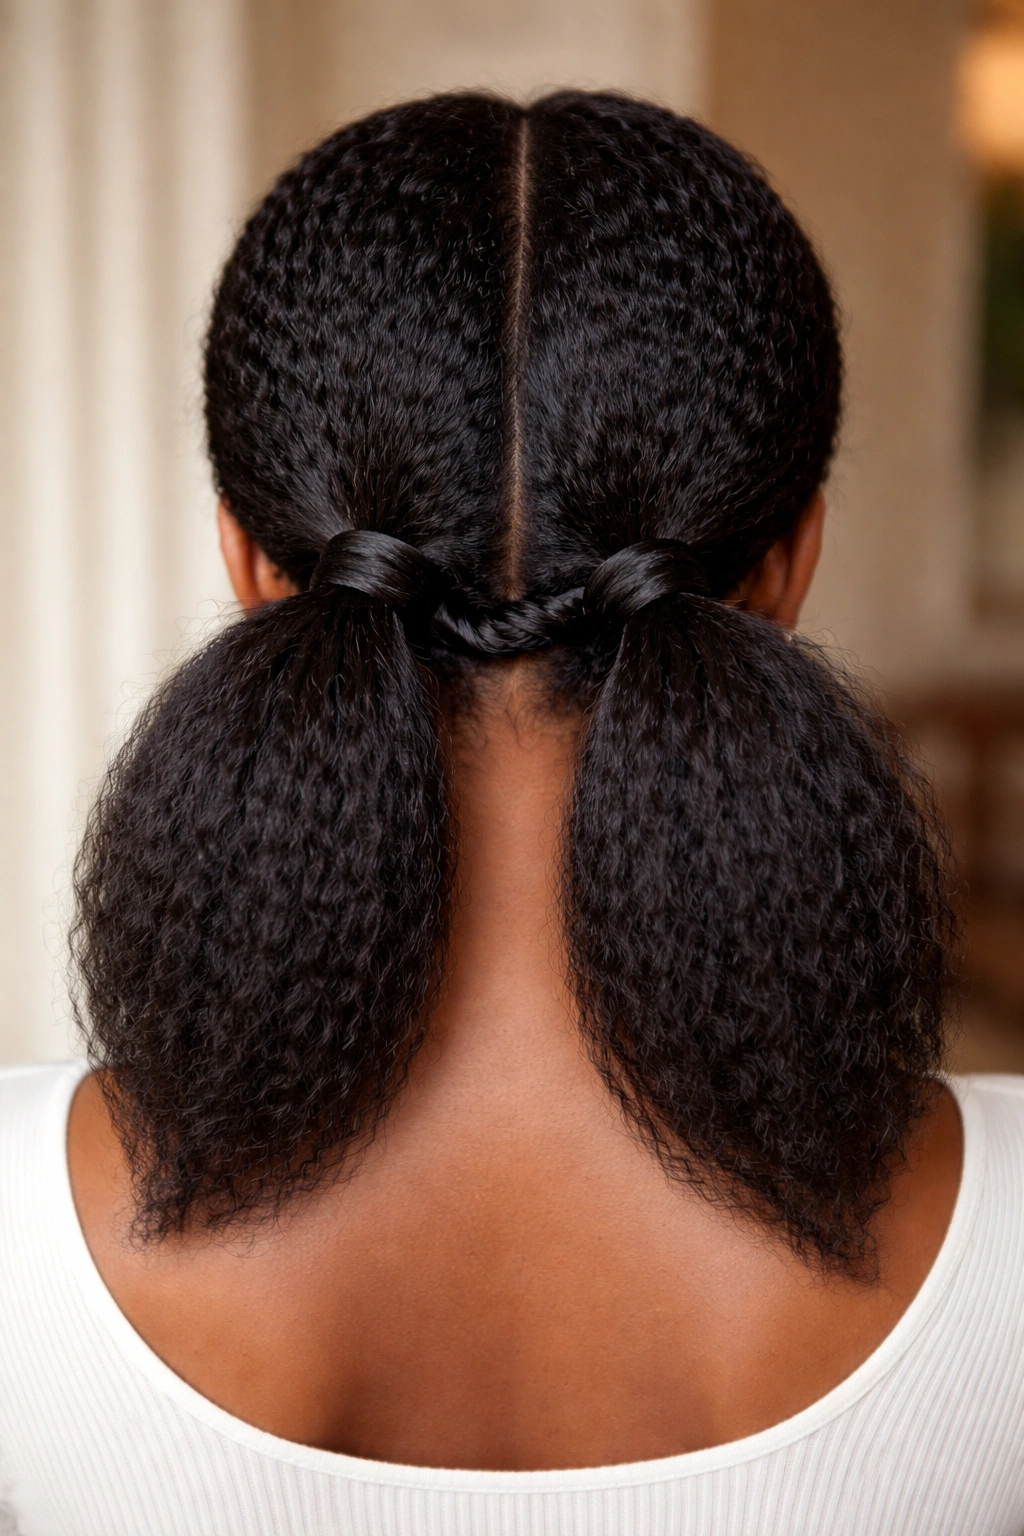
If a single ponytail feels heavy, split the shape into two smaller ties about 2 inches apart. That little adjustment changes the whole silhouette and can make the back look fuller without adding a bunch of extra hair.
I like this trick when the hair is thick and the base starts to collapse under its own weight. The first tie supports the crown, and the second one keeps the lower section from hanging too flat. A short twist or wrap can sit between the two ties and hide the join.
It’s also useful if you want the style to read a little more styled than a basic ponytail. Two anchor points create a subtle curve. Small detail, big difference.
17. Half-Sleek Low Ponytail With Twists
Some styles need every strand controlled. This is not one of them. The half-sleek version smooths the top section and leaves the lower half with softer twist texture, which keeps the ponytail from looking too stiff.
Why I like it
The top gives you a clean line through the crown, while the rest of the hair still feels like natural hair. That balance matters when you want polish but not a hard finish. It also makes day-three hair easier to work with, since the back can stay slightly textured.
Use a little mousse on the top section and less on the tail. The contrast between sleek roots and fuller ends is the whole point. If both areas are equally flat, the style loses its shape.
18. Twist-Back Crown Into a Low Ponytail
Unlike a full flat-twist crown, this version leaves a little lift at the temples. The twists sweep back instead of lying tightly into the scalp, and that softer pull gives the style more air.
It’s a solid option if your head shape looks better with some height at the sides. Some low ponytails look too severe when everything is slicked straight back. This one avoids that problem.
The trick is to start the twists just behind the front hairline and let them sit slightly above the scalp before gathering them. That tiny bit of space keeps the crown from looking pressed. You’ll still get a neat finish, just with more shape.
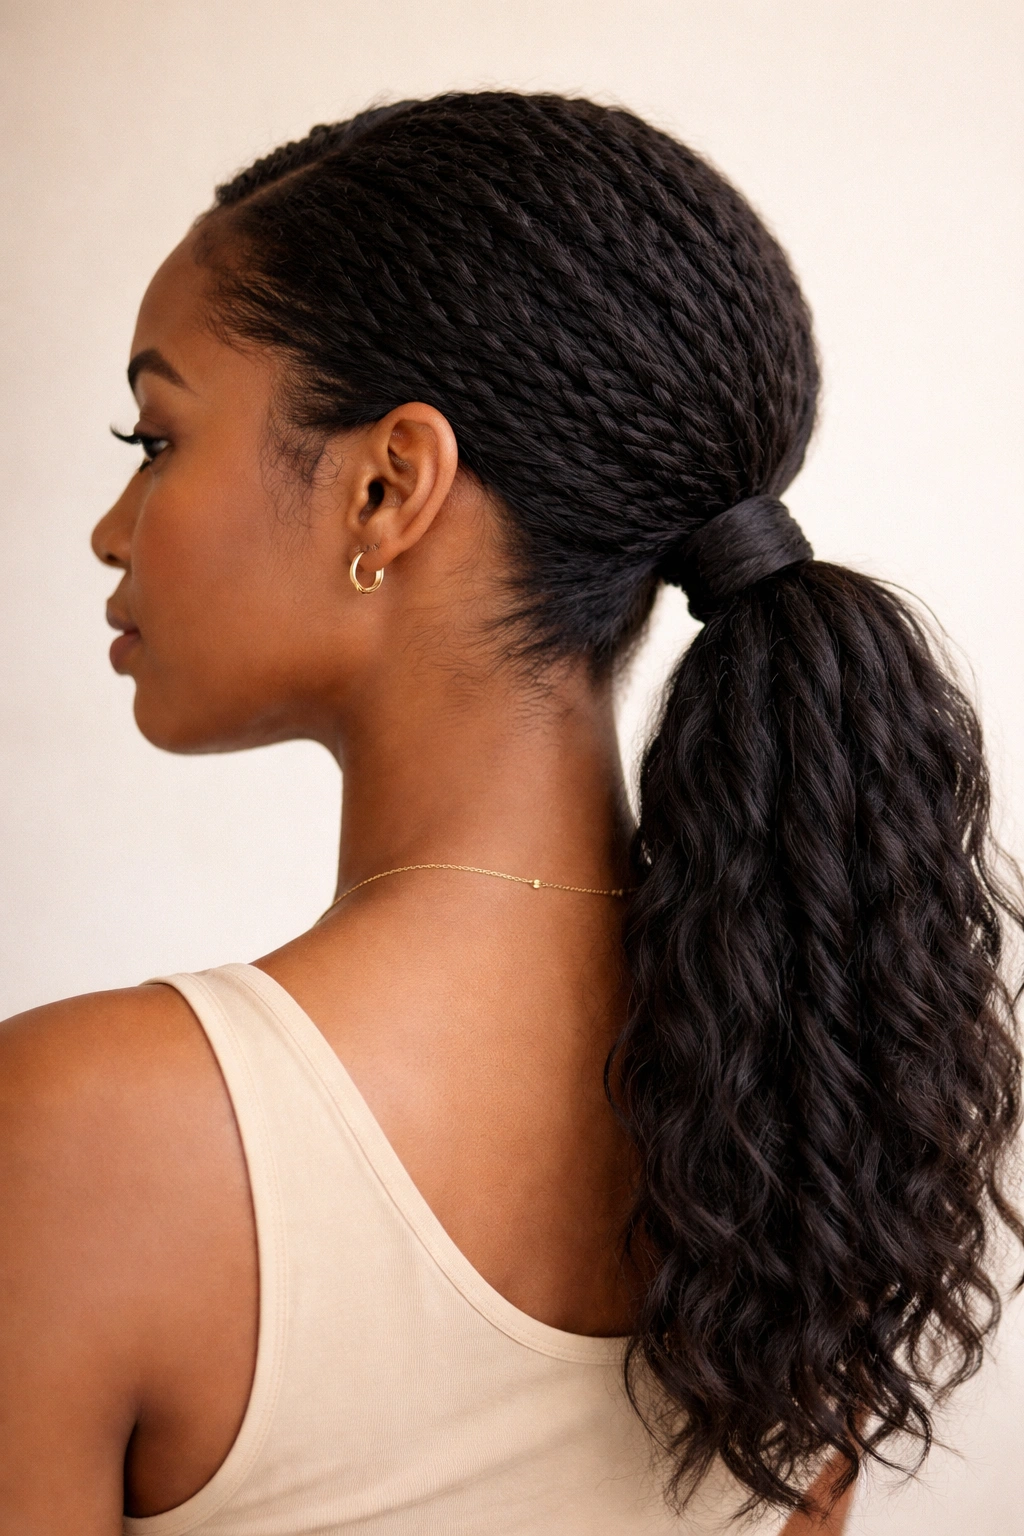
19. Stretch-Blowout Twist Ponytail
Should you blow-dry first? Sometimes, yes. A stretched base makes twist low ponytails easier to part, easier to smooth, and less likely to puff up before the day is over.
Use low heat and a heat protectant if you go that route. You do not need bone-straight hair. You just need enough stretch to see the part and let the twists lay neatly. If you prefer to skip heat, banding or a fresh set of twists can work too.
The difference is in the finish. Blow-dried hair gives the twists a sharper outline, while non-heat-stretched hair keeps more body. Neither is wrong. Pick based on how much fullness you want at the crown and how long you want to spend styling.
20. Twisted Low Ponytail With Beads or Cuffs
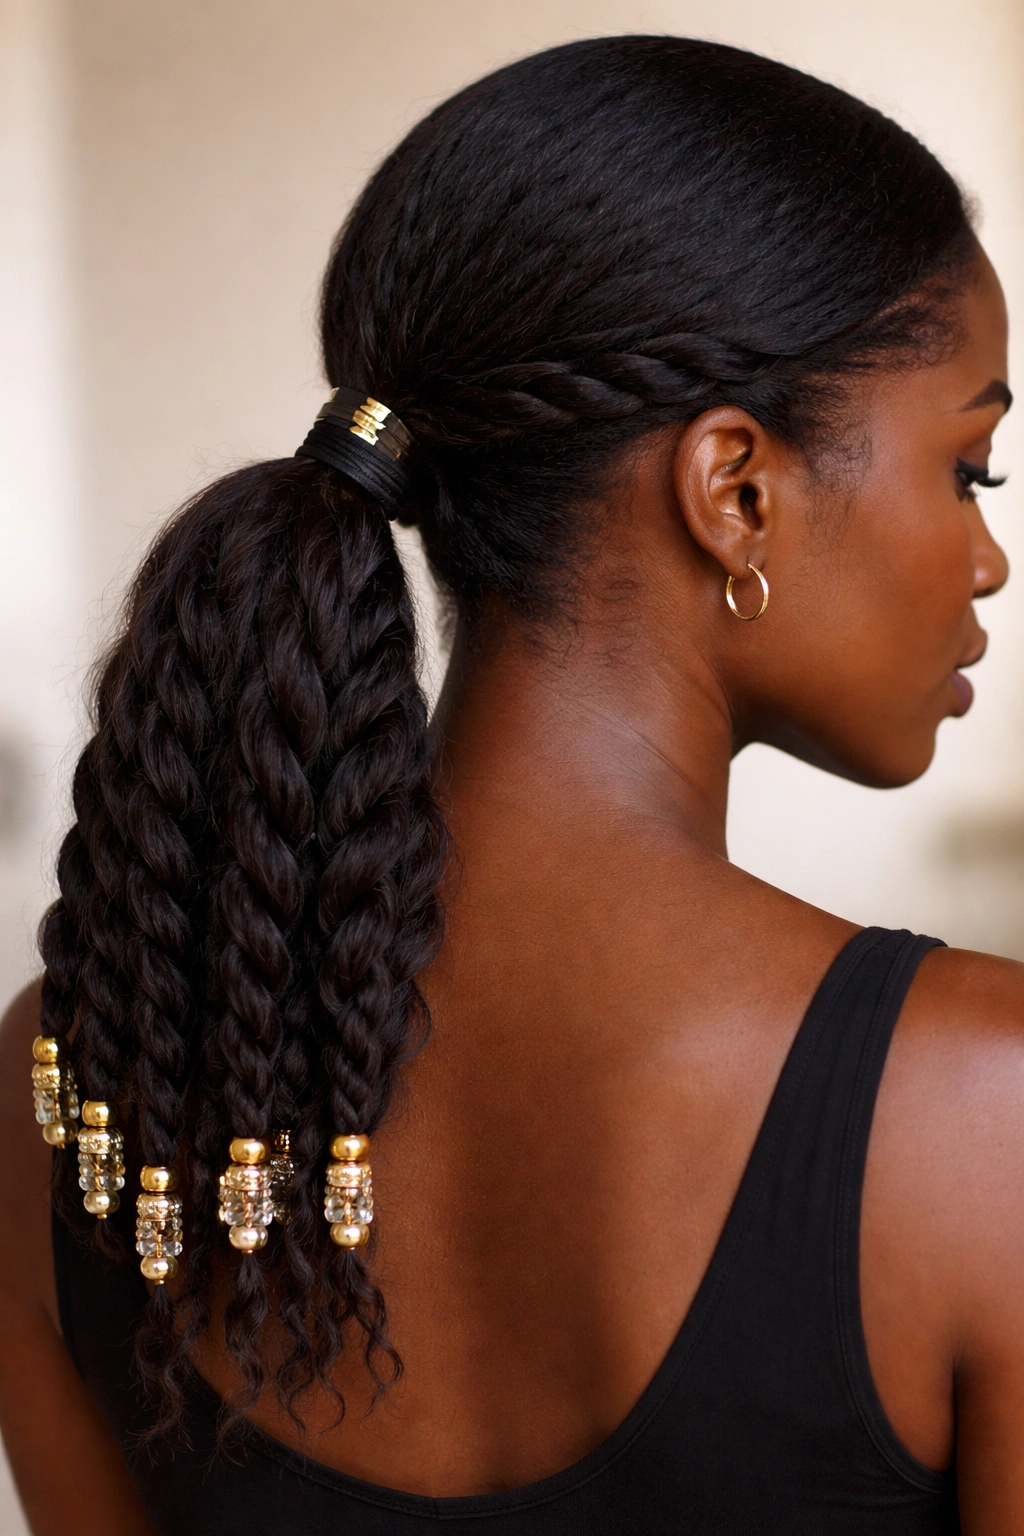
A little hardware can change the whole mood. One gold cuff on the twist near the base, or a few small beads at the ends, turns a low ponytail into a finished look without much effort.
Placement matters
- Put one cuff near the elastic if you want the base to stand out.
- Space small beads evenly on the ends if you want a playful finish.
- Use lighter accessories on finer hair so the ponytail does not droop.
I like cuffs more than heavy clips because they sit close to the twist and do not fight the shape. Beads are better if you want movement. Either way, keep the rest of the style simple so the accessories can do their job.
21. Twisted Low Ponytail With a Scarf Wrap
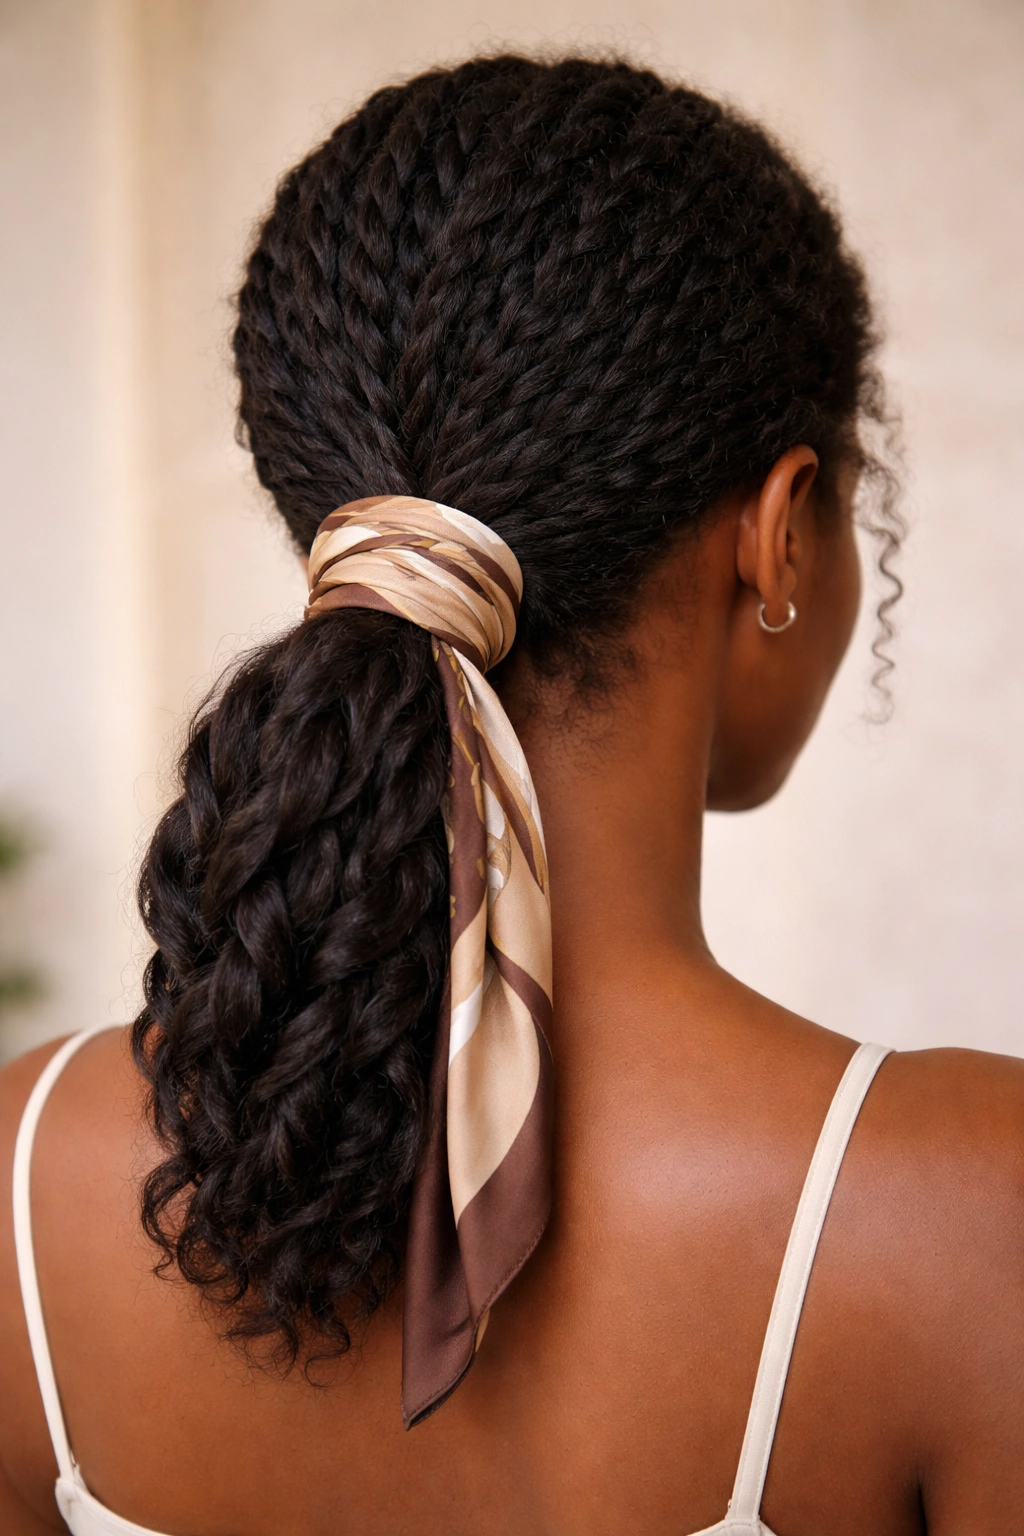
A scarf wrap makes a low ponytail feel styled in half the time. A 2-inch satin scarf gives you enough fabric to wrap the base without overwhelming the twist detail, and the satin helps keep frizz down.
Tie the scarf just above the ponytail base, then tuck the knot under the tail or off to the side. A printed scarf can make the style feel playful, while a plain black or nude one keeps it sleek. Either way, it solves a common problem: a hair tie showing through the style.
This one is handy on mornings when the crown is behaving but the ends need help. Wrap the scarf, smooth the front, and you’re done. Sometimes that is enough.
22. Twisted Puff Low Ponytail
A low ponytail does not have to lie flat. A twisted puff keeps the tail full and airy, which works beautifully on coily hair that wants volume no matter what.
The top can stay controlled with one or two twists, then the ponytail itself can be gathered loosely so the puff keeps its round shape. If you stretch the hair first, the puff looks longer. If you leave it more natural, it reads fuller and softer.
This style is one of the easiest ways to keep natural texture visible. The twist detail gives structure, and the puff gives life. That combination feels honest, which I like more than a style that tries too hard to be sleek.
23. Tension-Light Low Ponytail for Fine Edges
If your hairline is fragile, skip the tight slicked-back version and choose this. The whole point is to keep the style low-pressure while still looking neat.
That means a wider part, softer brushing, and a looser anchor at the nape. You can still twist the front sections, but let the twists sit a touch higher and avoid pulling them hard toward the back. A soft elastic or silk-coated tie helps too.
A tension-light style won’t look as glassy as a hard-slick ponytail, and that is fine. The tradeoff is comfort. If your edges complain after every style, the gentler version is the one worth wearing.
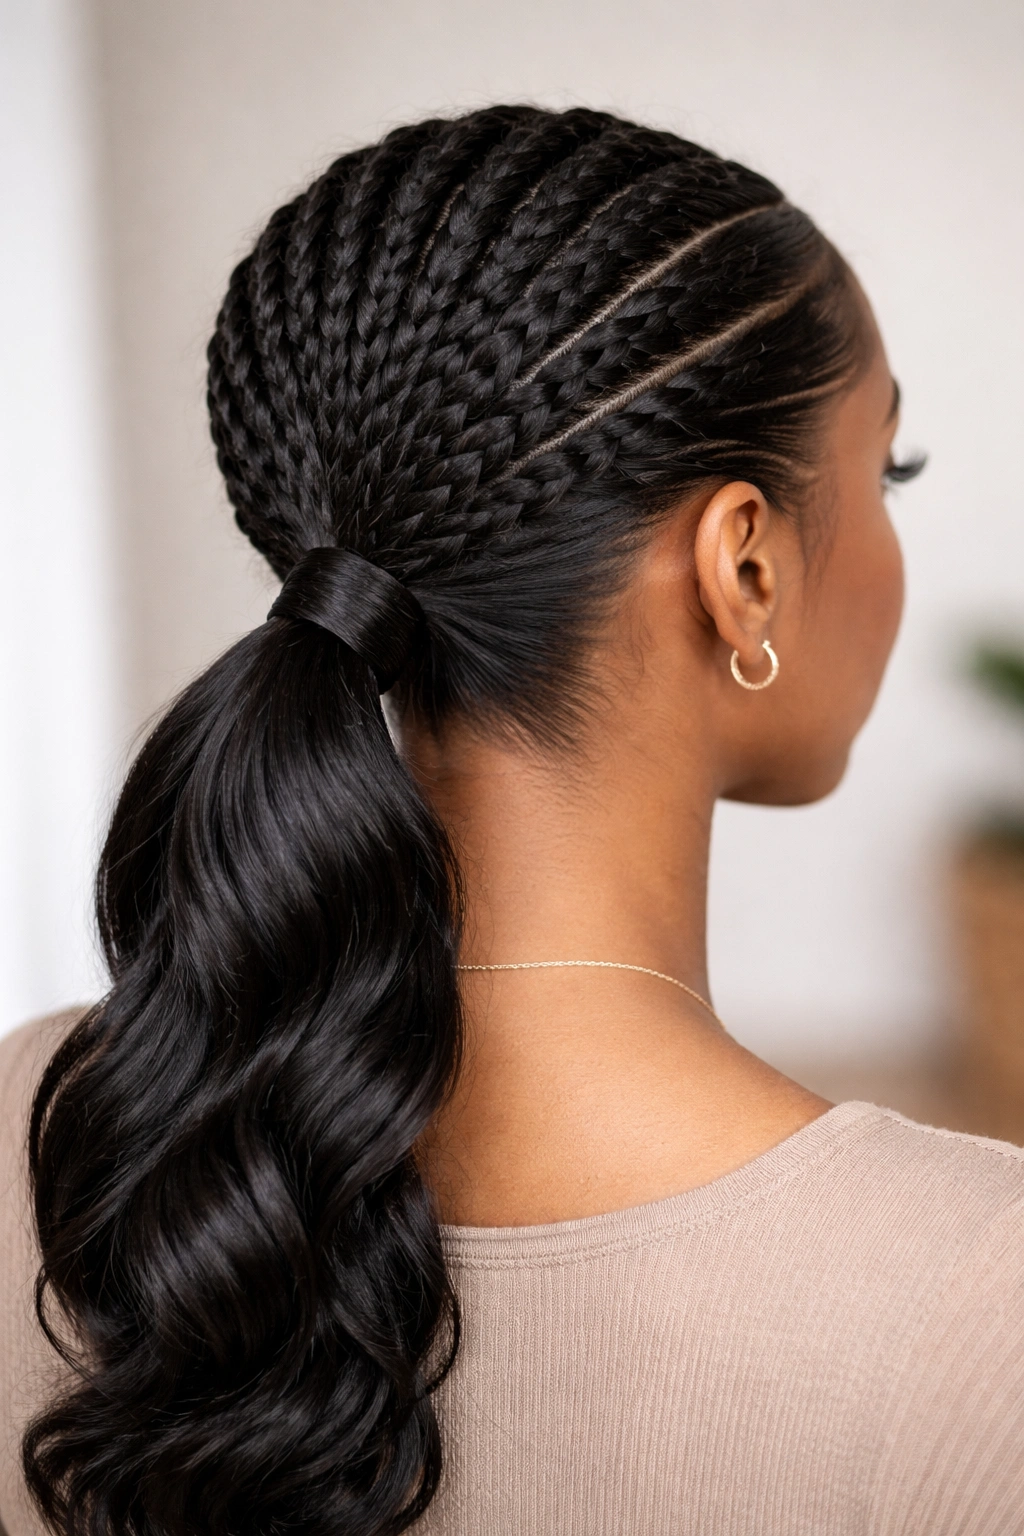
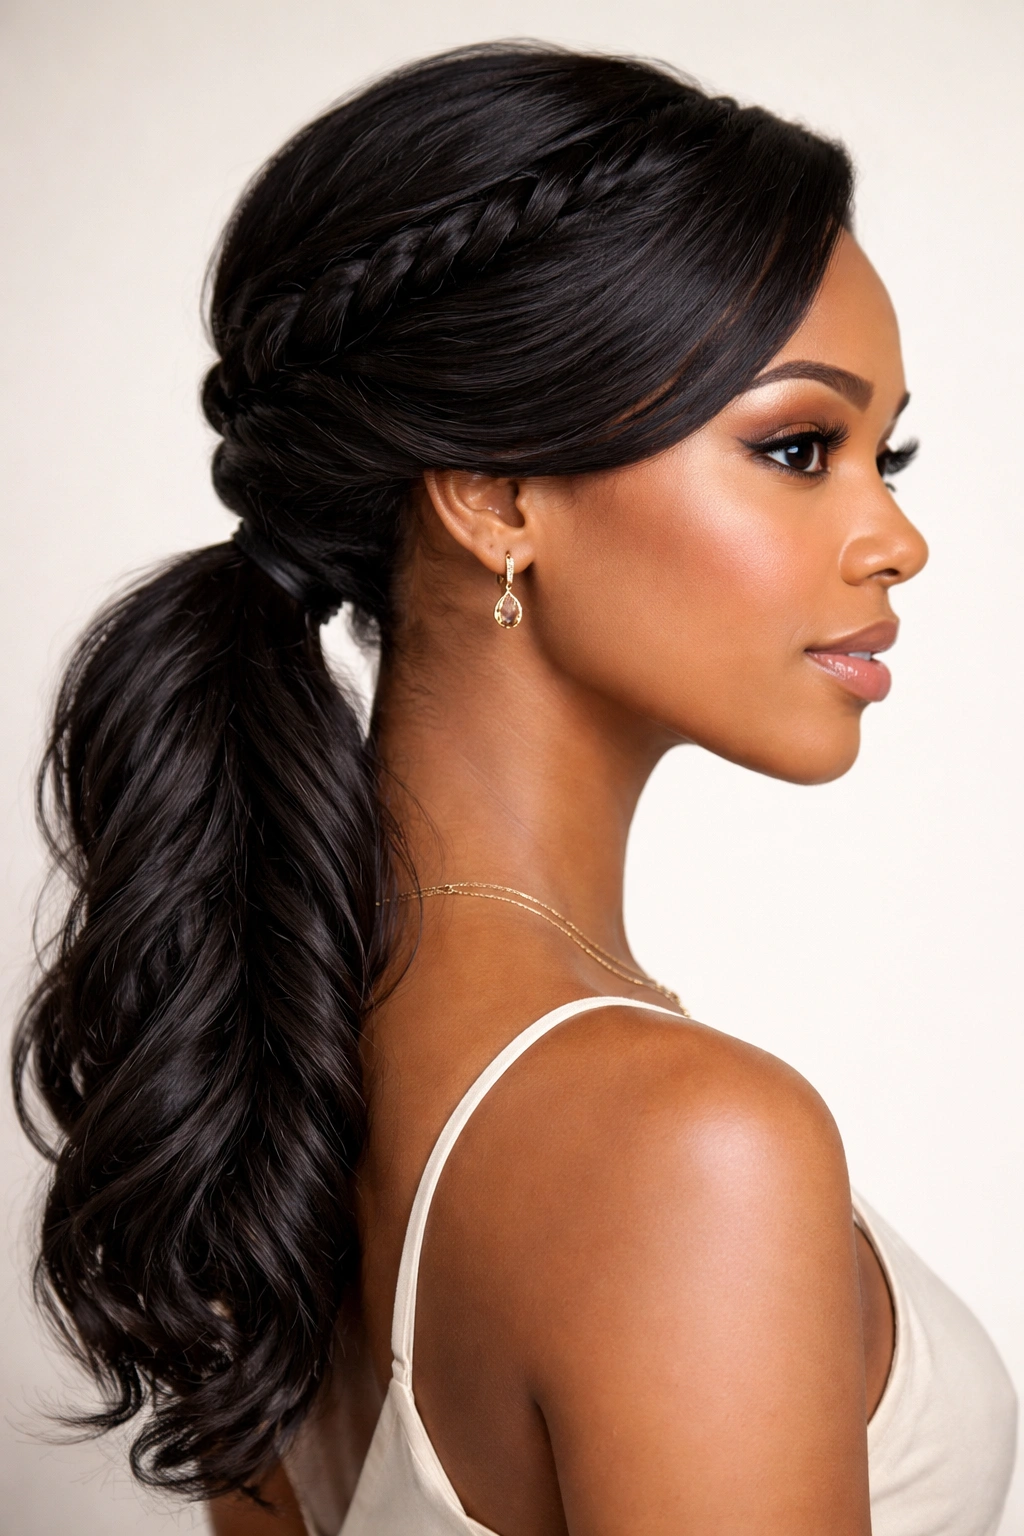
24. Elegant Twist Low Ponytail for Formal Wear
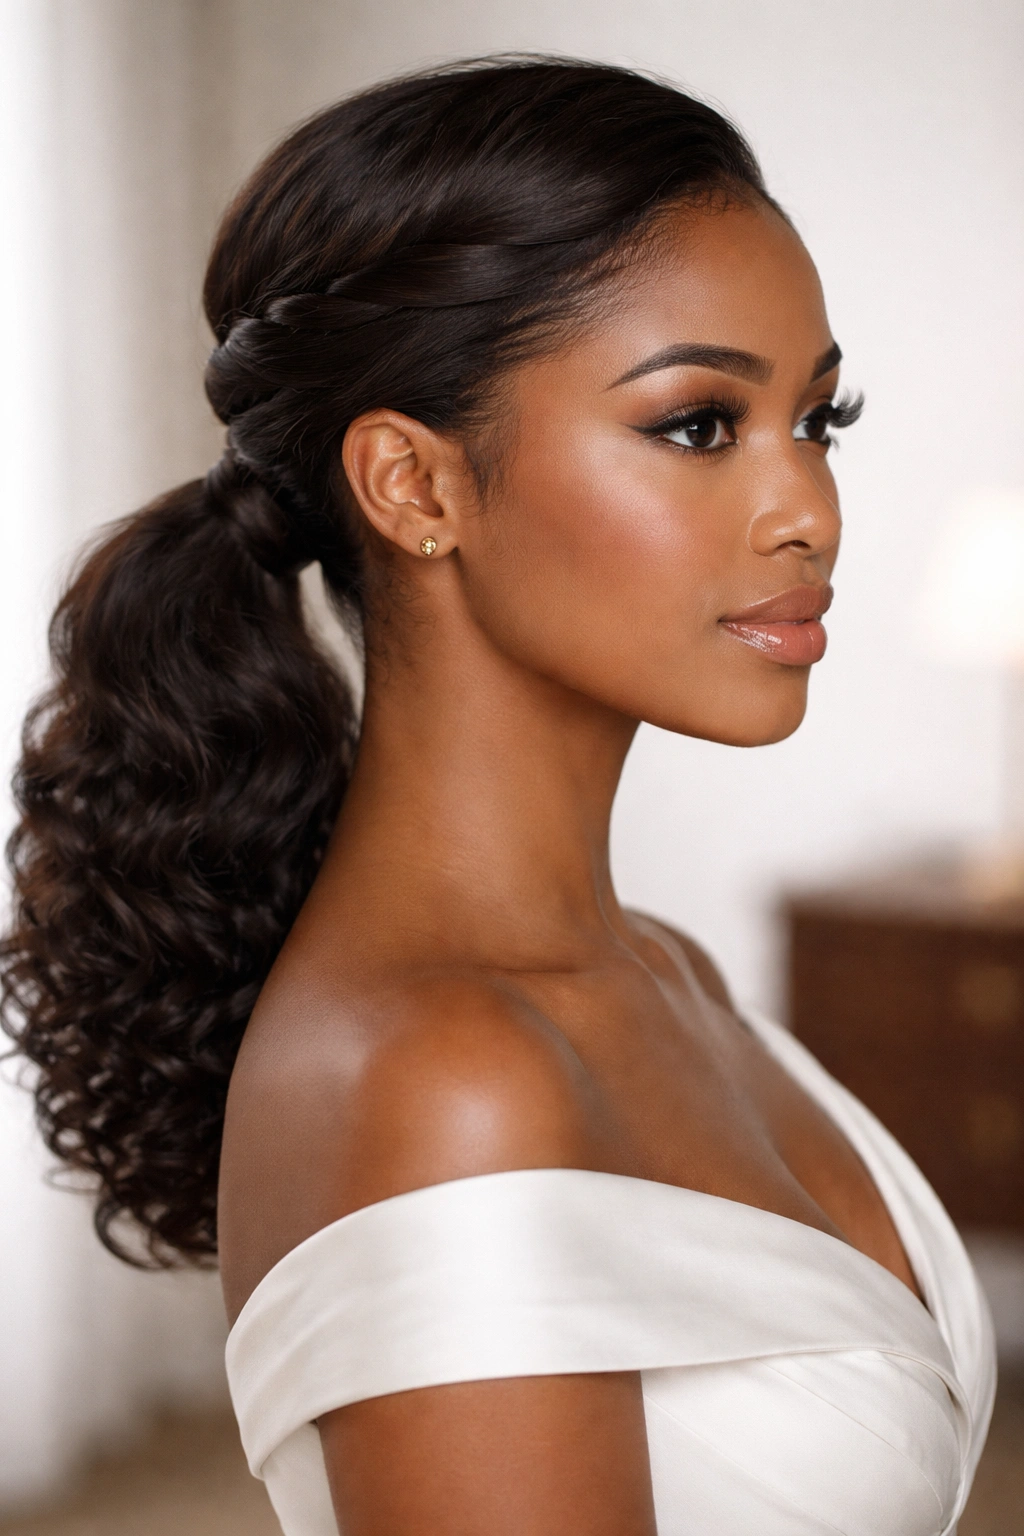
A low ponytail can look dressed-up fast when the twist detail is placed with care. A deep part, a wrapped base, and a smooth crown give the style enough shape to work with earrings, a neck-fitted dress, or a sharp blazer.
I usually like this version with one large twist along the front rather than several tiny ones. The cleaner line reads better in formal settings. You can also curve the ponytail slightly at the ends with rods or a flexi set if you want the tail to look softer.
Don’t overload it with accessories. One cuff, a pin, or a scarf edge is enough. Too many extras make the style look crowded, and the beauty of this one is the clean finish.
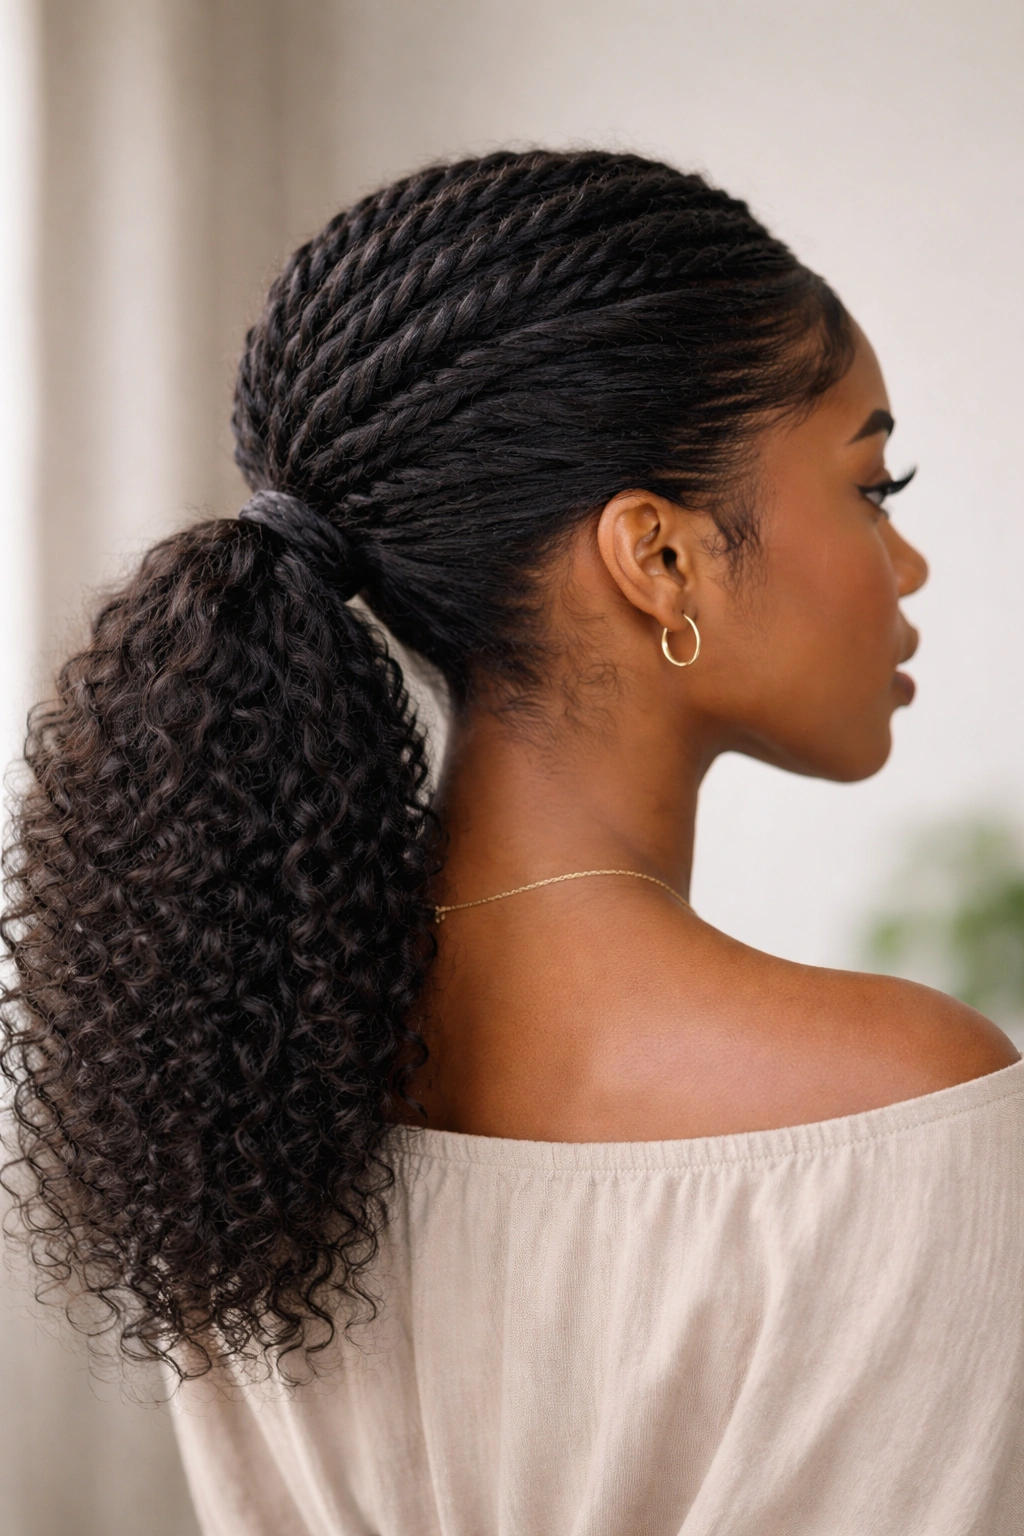
25. Low Ponytail With Curly Ends Left Out
Want the ponytail to feel softer? Leave the ends out. That little bit of curl at the bottom breaks up the line of the style and keeps it from looking too severe.
You can twist the base and then let the last few inches stay loose, or set the ends on flexi rods before gathering the hair back. If your hair already has a springy curl pattern, even better. The tail will fall in a more natural shape without much coaxing.
This is a nice choice when you want the low ponytail to feel casual but still done. It works especially well on layered hair, where the ends can look a little uneven if they’re forced into a tight twist all the way down.
26. Protective Low Ponytail for Busy Weeks
This is the style I would pick when I know I will not want to think about my hair for a few days. The goal is simple: tuck the ends, keep the base stable, and leave the hair in a shape that is easy to refresh.
What helps it last
- Start with hair that is lightly stretched so the ponytail base is easier to control.
- Use a soft gel or mousse rather than heavy grease at the roots.
- Sleep in a satin bonnet or scarf so the twists do not fray at the crown.
- Re-twist the front sections every 2 to 3 days instead of redoing the whole style.
A protective version should protect, not punish. If the style gives you headaches or makes your edges sore, it is too tight.
27. Night-Ready Twist Low Ponytail With Lasting Hold
The styles that survive sleep are the ones with a calm base, not the tightest grip. A night-ready twist low ponytail uses enough product to hold, enough stretch to stay shaped, and enough softness to look decent after a scarf comes off.
I like this version when the hair needs to last beyond one outing. Set the twists on dry hair, smooth the crown lightly, and pin the wrapped base so it does not slide. If the tail is long, fold it once before covering it with satin so it doesn’t catch and frizz at the ends.
In the morning, a little water mist and a dab of mousse usually bring it back. No full reset needed. That’s the real charm here.
Final Thoughts

The best twist low ponytails do two jobs at once: they protect the ends and give the front of the style some shape. That balance is what makes them so useful on natural hair. They can be soft, sharp, playful, or formal, and the base still stays low and easy to wear.
If your hairline is delicate, choose the gentler versions with less tension and softer edges. If you want more drama, lean into side parts, cuffs, wraps, or a scarf. Small changes do more here than big ones.
A low ponytail that feels comfortable all day is the one worth repeating. The rest is decoration.