Curly hair and bows get along better than most people think — if the bow works with the curl pattern instead of fighting it. The smartest bow hairstyles for curly hair keep the crown from going flat, leave enough room for the coils to breathe, and use a ribbon or clip that grips without snagging.
A lot of bow styles fail for one boring reason: the accessory is too heavy for the texture. Satin looks lovely, but it can slide. Velvet grabs better. Grosgrain sits somewhere in the middle, and that little bit of grip matters more than people expect.
Size matters. So does placement.
If the bow lands where your curls already have shape — a half-up crown, a low puff, a side sweep, a braid end, a top knot — the whole style reads as deliberate instead of pasted on. Start there, and the rest gets easier.
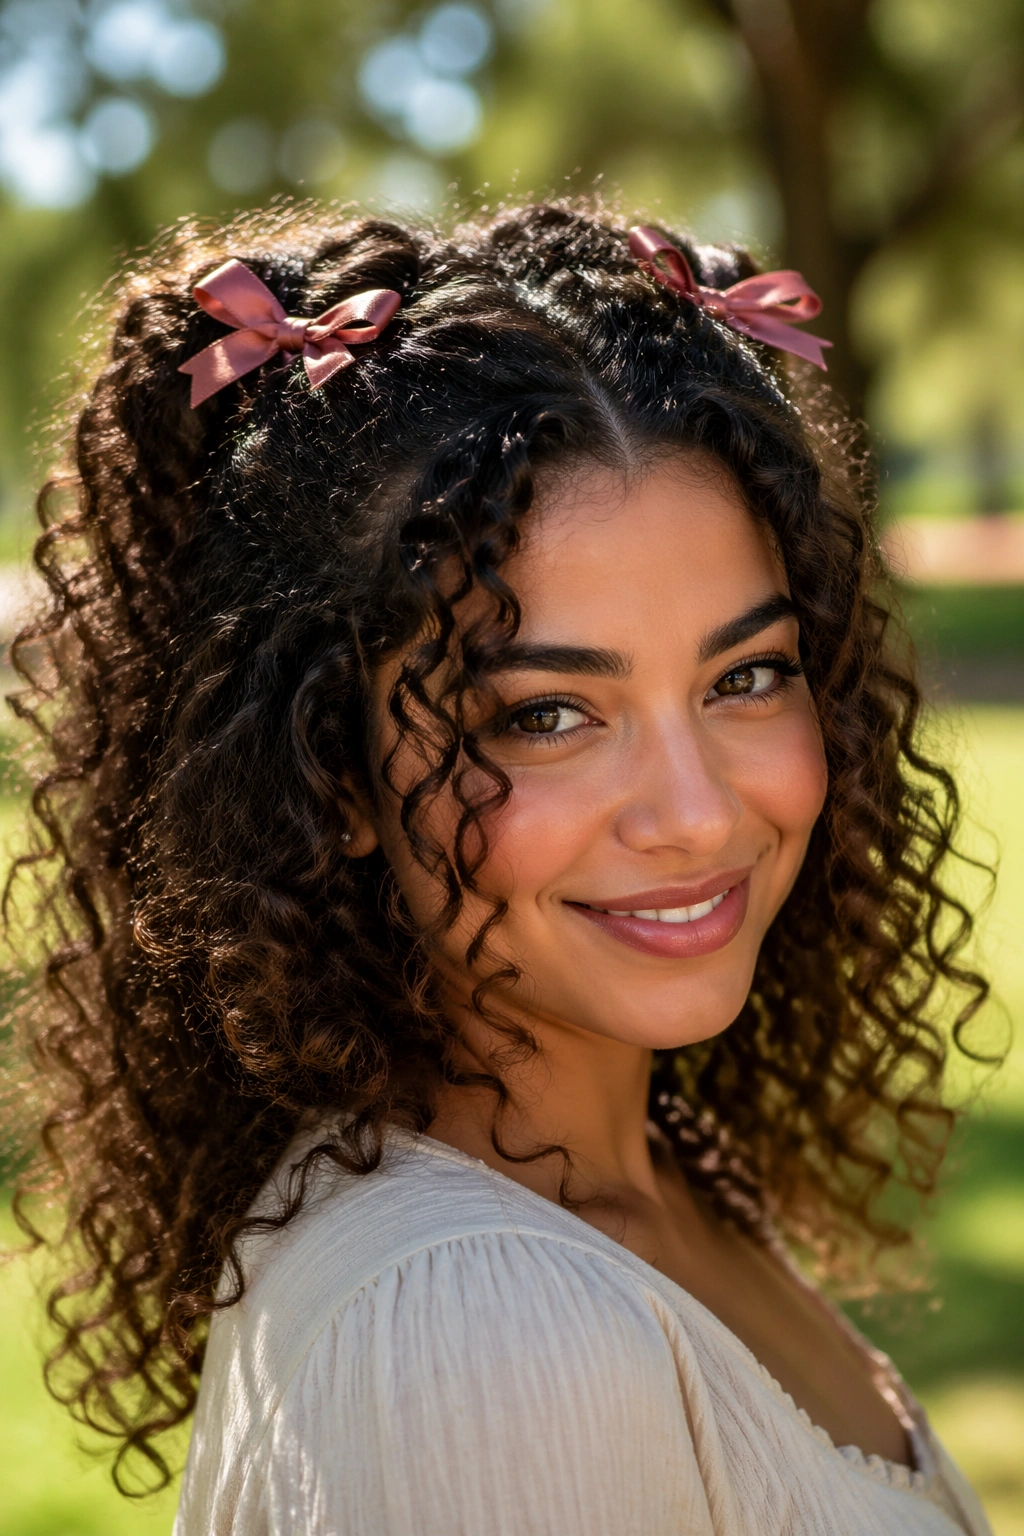
1. Half-Up Satin Bow for Curly Hair
This is the one I’d hand to someone who wants the bow look without flattening the whole head. Half-up styles are kind to curls because they only gather the top section, which leaves the bulk of the texture free to do its thing underneath.
A soft satin bow at the back of the crown gives the style a clean focal point, and the rest of the curls can spill down your shoulders in loose, springy layers. It feels polished, but not stiff. That matters. Curly hair rarely looks happy when you force it into a too-tight shape.
Why It Flatters the Curl Pattern
The trick is to take a section that starts about 2 to 3 inches above the ears and secure it with a small elastic before you add the bow. That keeps the ribbon from doing all the work, which is how you avoid a saggy finish by noon. If your curls are dense, twist the gathered section once before tying the bow so it has a little anchor.
I like this style on wash day or day-two hair, especially when the top still has some lift and the ends have settled into soft ringlets. Satin gives it a smooth, dressy feel, but if your hair is slippery, switch to grosgrain ribbon. It grips better. Simple as that.
- Use a 1/4-inch to 1/2-inch ribbon for a neat bow.
- Place the bow just above the occipital bone, not on top of the head.
- Leave two front curls loose to frame the face.
- Hide the elastic under the knot so the finish looks clean.
Small tip: if the bow feels too sweet, pick a muted color — cream, rust, navy, or black — and let the curls do the talking.
2. Low Puff Ponytail With an Oversized Velvet Bow
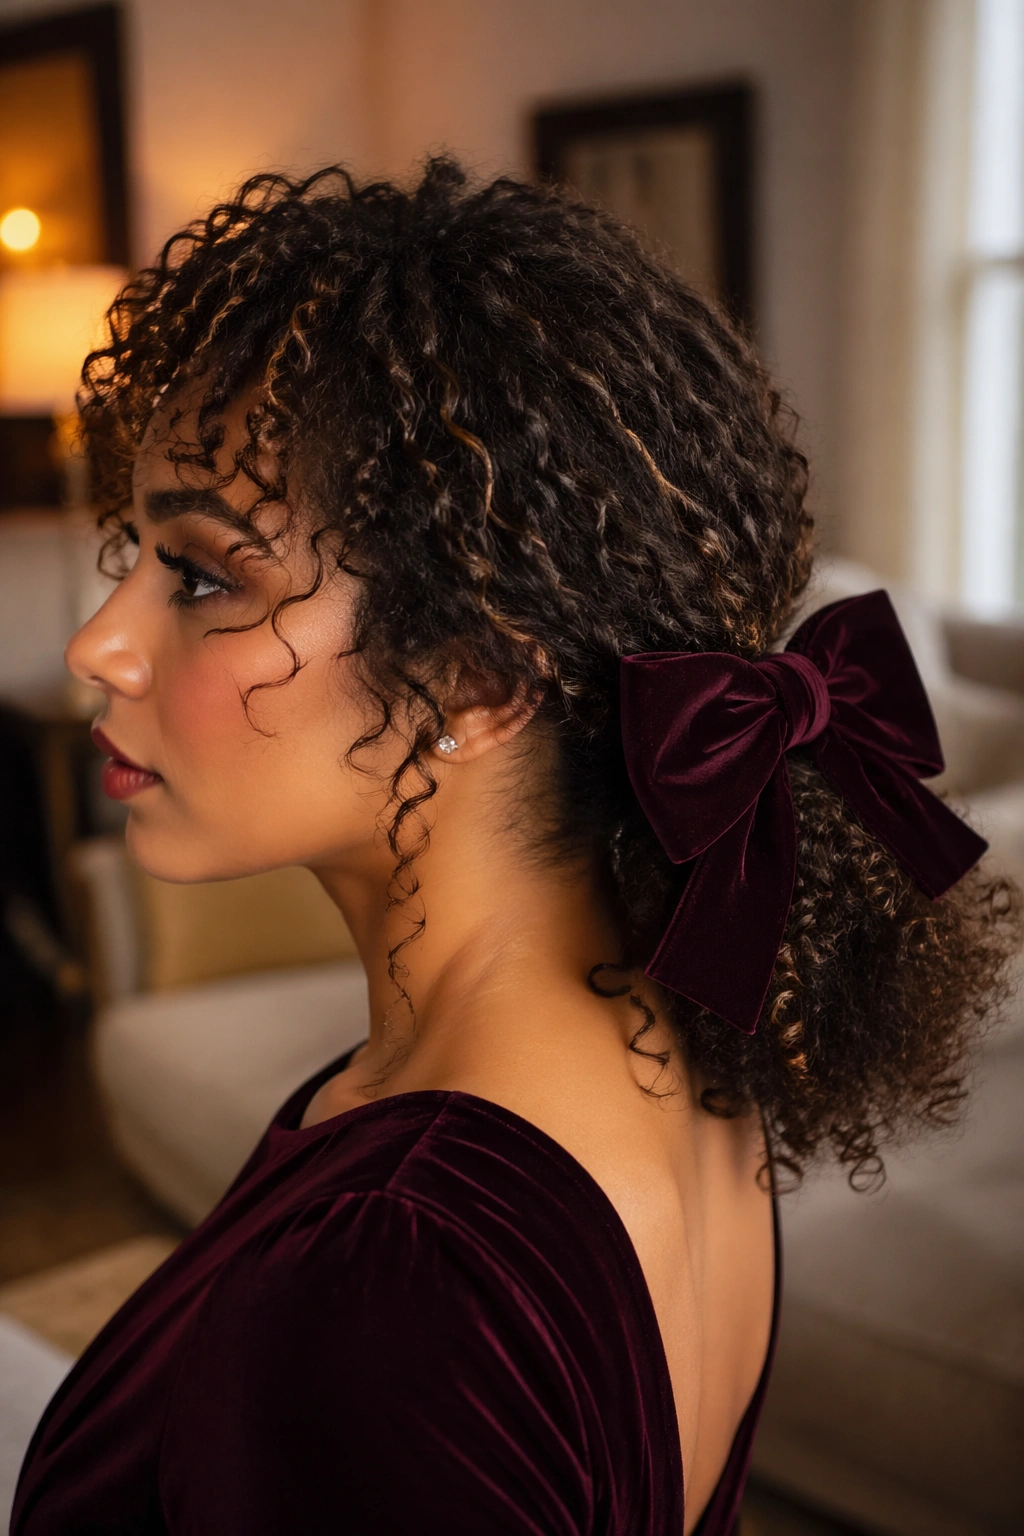
A low puff makes a bow look deliberate, not decorative. That’s the difference between a style that feels grown and one that feels like you raided a craft bin five minutes before leaving the house.
Pull the hair into a low puff at the nape, leave the curls full and rounded, then tie a velvet bow right at the base. The softness of the fabric matters here. Velvet has enough body to hold its shape, and the matte finish keeps it from sliding all over the place the way shiny ribbon sometimes does.
If your curls shrink a lot, this style is especially useful because it celebrates the puff instead of trying to flatten it into a ponytail that never quite stays neat. The bow gives the eye a target, so the volume feels intentional. I also like this one for thicker hair because an oversized bow balances the mass of the curls. A tiny clip can look lost back there.
A 3- to 4-inch bow usually reads well on dense curls. If your hair is finer, go smaller so the accessory doesn’t swallow the style whole. Keep the pony secure with an elastic first, then wrap the bow around the base. That way the ribbon is a finish, not a support system.
3. Pineapple Bow at the Crown
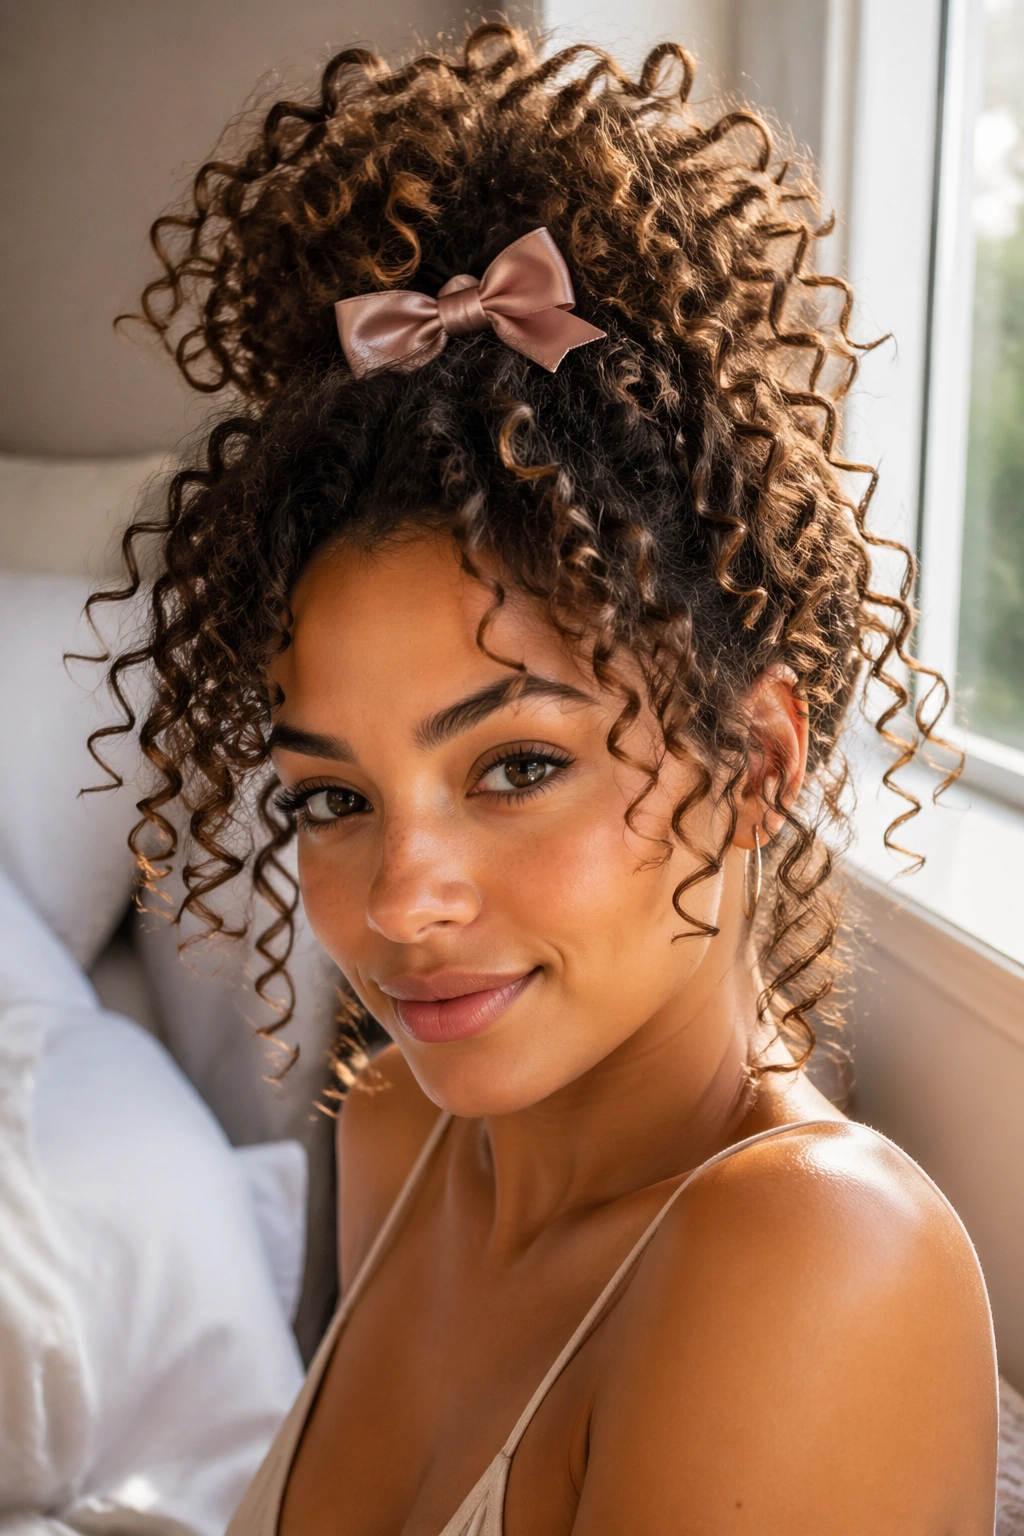
Why does the pineapple look so good with a bow? Because the shape already has height. The bow sits right where the curls begin to fan out, so it feels like a topper instead of an afterthought.
This works especially well on second-day curls, or any time you want the top to stay lifted and the ends to stay soft. Gather your hair loosely at the very top of the head, secure it with a stretchy tie, and tie a narrow ribbon or small bow around that base. Let the tails fall over the back. That little bit of movement keeps the whole style from feeling too rigid.
How to Keep the Volume
- Use a loose scrunchie or elastic first, then add the bow.
- Keep the pony high enough that the curls can still cascade.
- Choose a ribbon that’s light and narrow so it doesn’t drag the roots down.
- Fluff the curls around the crown after tying, not before.
If the hairline tends to frizz, smooth just the edges with a tiny bit of cream or gel. Don’t overdo it. A pineapple should still look airy, not shellacked. And if your curls are very tight, this one is lovely because the bow gives the whole shape a clear finish without asking for much control.
4. Side-Swept Curls With a Small Bow Clip
When one side of your haircut is shorter than the other, this style stops the imbalance from looking accidental. It also gives you a nice excuse to work with asymmetry instead of trying to hide it, which is usually the smarter move with curls anyway.
Sweep one side back, tuck it just above the ear, and clip in a small bow where the hair naturally wants to rest. The bow should sit near the temple or just behind the cheekbone, not buried in the curls. A 1.5-inch to 2-inch bow clip is usually enough. Anything bigger can fight the shape of the face.
This style is especially handy for lobs, curly bobs, and layered cuts that have a little more lift on one side. It keeps the front pieces out of the eyes, but it still lets the rest of the hair move. That movement is the point.
- Place the clip where the hair already has a bend.
- Use a lined clip if your curls are fine and slip easily.
- Leave the opposite side loose so the style doesn’t feel pinned down.
- Pick a bow color that blends with the hair or the outfit — either works.
A side bow has a playful edge without looking childlike. That balance is rare, and I’m always happy when a style manages it.
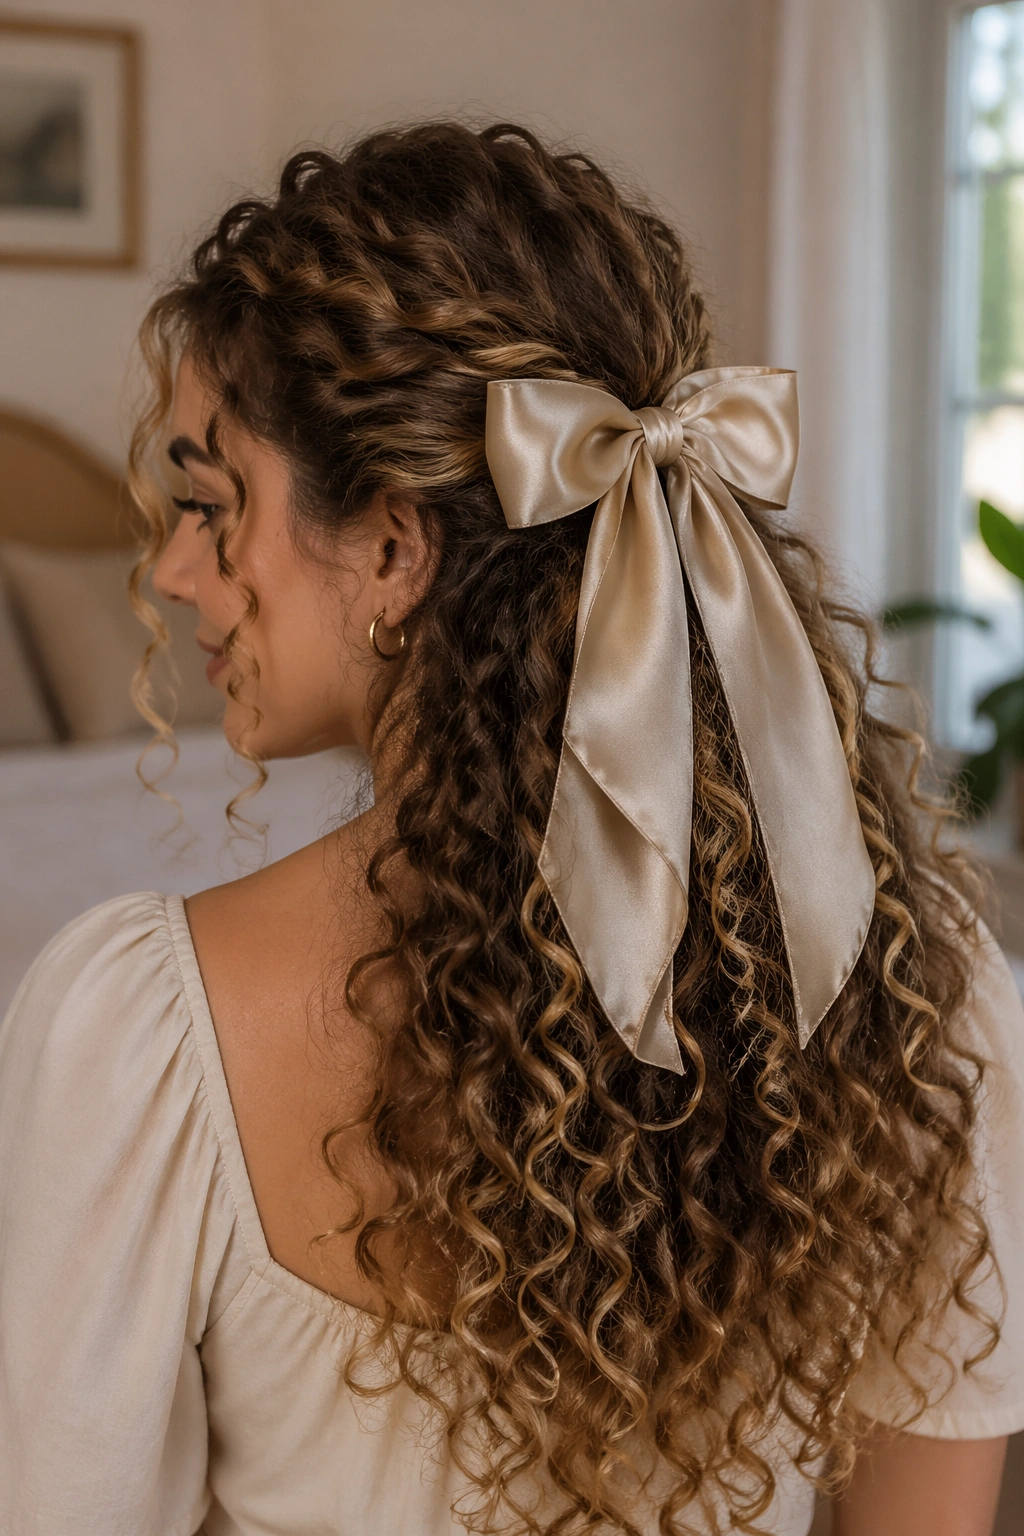
5. Braided Crown Ending in a Bow at the Nape
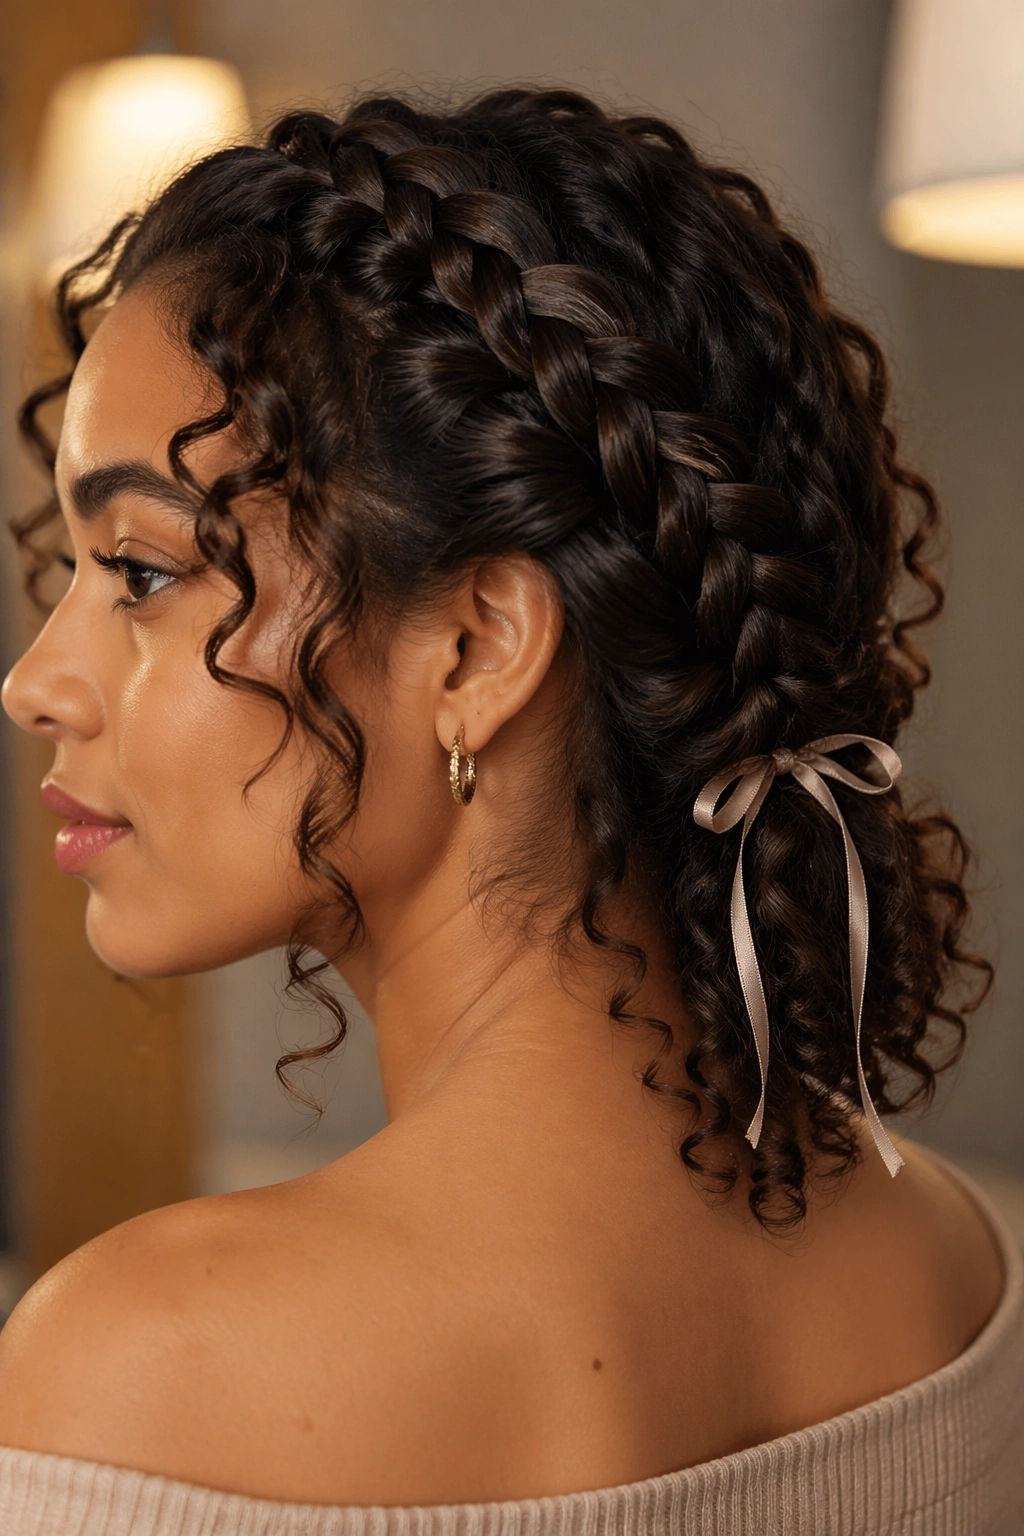
The braided crown is the quietest bow hairstyle in this group, and maybe the most useful when you want the curls off your neck. It looks polished in a way that doesn’t scream for attention.
Start a braid or twisted crown from each temple and bring the sections around toward the back. Don’t pull them tight. Curly hair looks better when the braid has a little softness, because the texture can fill the gaps and keep the shape from looking flat. At the nape, tie the ends together and finish with a narrow ribbon bow centered just below the braid.
A 1/2-inch velvet ribbon works especially well here because it follows the braid instead of overpowering it. Satin can do the job too, but it tends to slide if the hair is slick or freshly conditioned. If your curls are thick, pin the braid in place before tying the bow. That keeps the weight from shifting.
This style has range. It works for a dinner, a daytime event, or any moment when you want the face open and the curls still present. The bow becomes the last note, not the whole song. Nice, clean, and a little romantic without trying too hard.
6. Space Buns With Mini Ribbon Bows
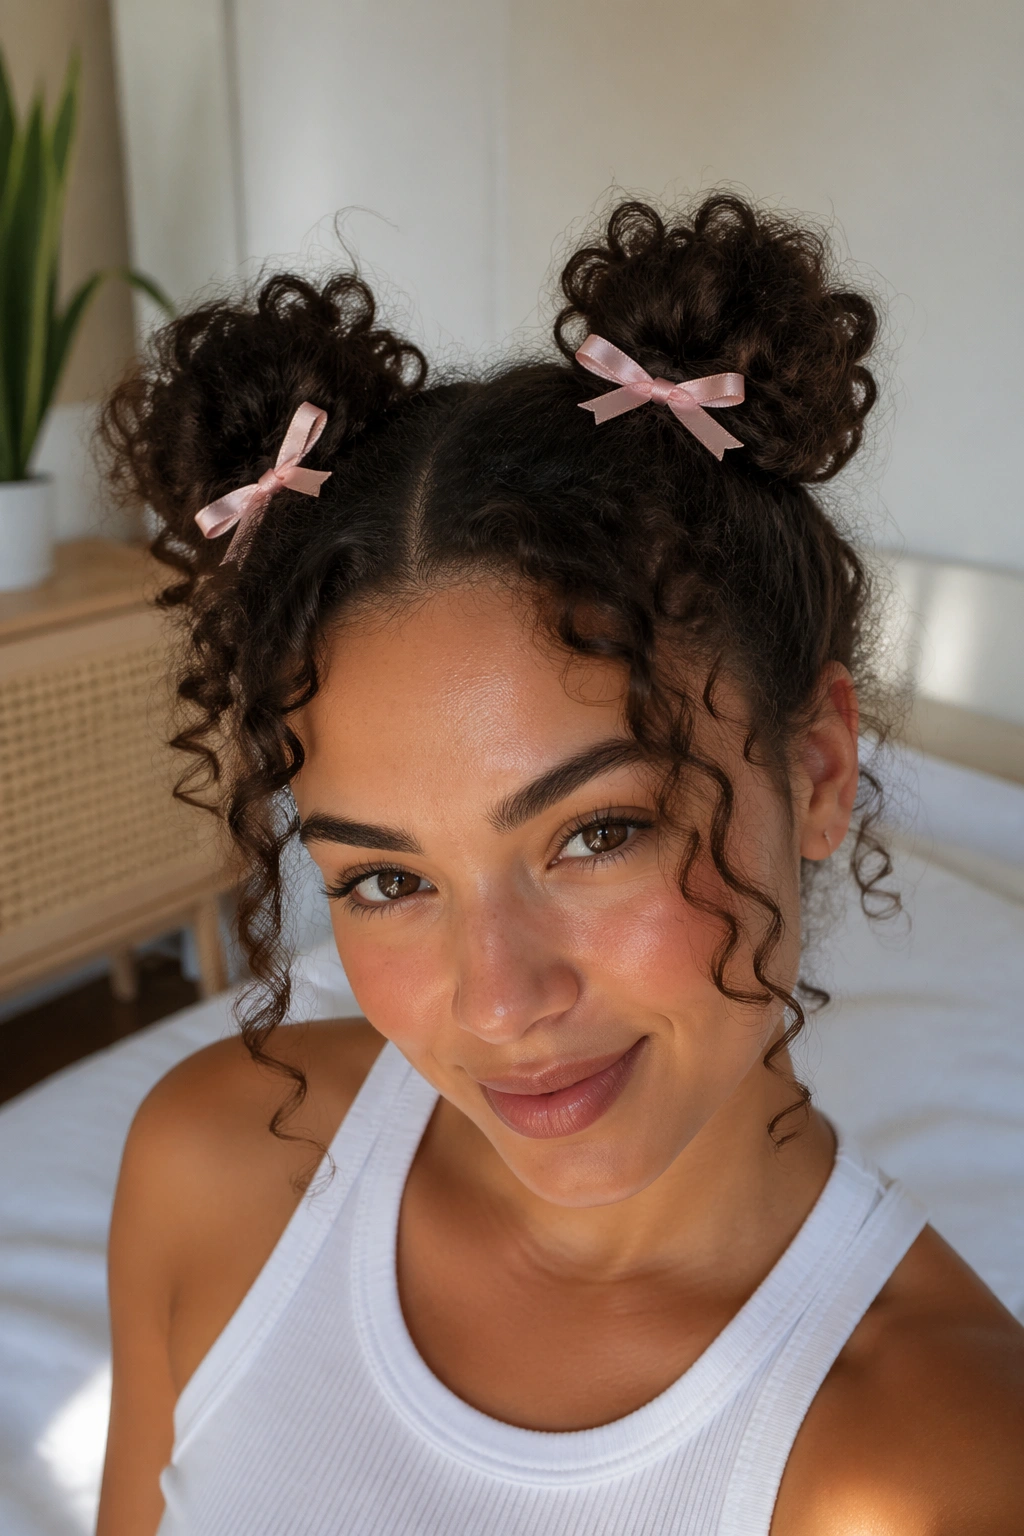
Unlike a single large bow, this style uses two tiny bows to keep the top of the head playful. It’s a small change, but it changes the whole mood.
Space buns and curly hair are natural friends because the texture hides the elastic and gives the buns some shape without needing much fuss. Part the hair down the middle, gather each side into a high puff or bun, and leave the ends soft rather than forcing them into a hard knot. Then tie a mini ribbon bow over each base.
The key is restraint. If the buns get too tight, they stop looking like curls and start looking like little knots. That’s rarely the goal. Keep the buns loose, let some tendrils fall, and choose bows that are proportional to the hair. Tiny satin bows or narrow grosgrain loops usually work better than anything bulky.
This style suits shoulder-length curls, layered cuts, and anyone who wants something that feels fun without being messy. It also works well if the front pieces are short, because the face-framing curls can stay out while the buns do the visual work. Two bows. That’s enough.
7. Bubble Ponytail Bow for Thick Curly Hair

The bubble ponytail is one of those styles that sounds fussy and turns out to be easier than expected. On curly hair, it’s especially good because the texture fills out each “bubble” so the whole ponytail looks full instead of limp.
Start with a mid or low ponytail, then add clear elastics every 2 to 3 inches down the length. Gently tug each section outward to create the rounded bubble shape, then place tiny bows over one or two of the elastics. You do not need bows on every bubble. That usually looks crowded.
What Makes It Stay Fluffy
- Use 4 to 6 small elastics, depending on length.
- Keep each bubble loose enough that the curls can expand.
- Add bows to the top sections first, where the eye lands.
- Mist the surface lightly with water and a little leave-in if the ends feel dry.
This is a strong choice for thick hair because it controls the length without flattening the body. It also gives you a neat line of shape down the back, which can be nice when you want a style that moves but still feels contained. I’d skip oversized bows here. They swallow the bubbles. Tiny ones keep the rhythm going.
8. Curly Top Knot Wrapped With a Bow at the Base
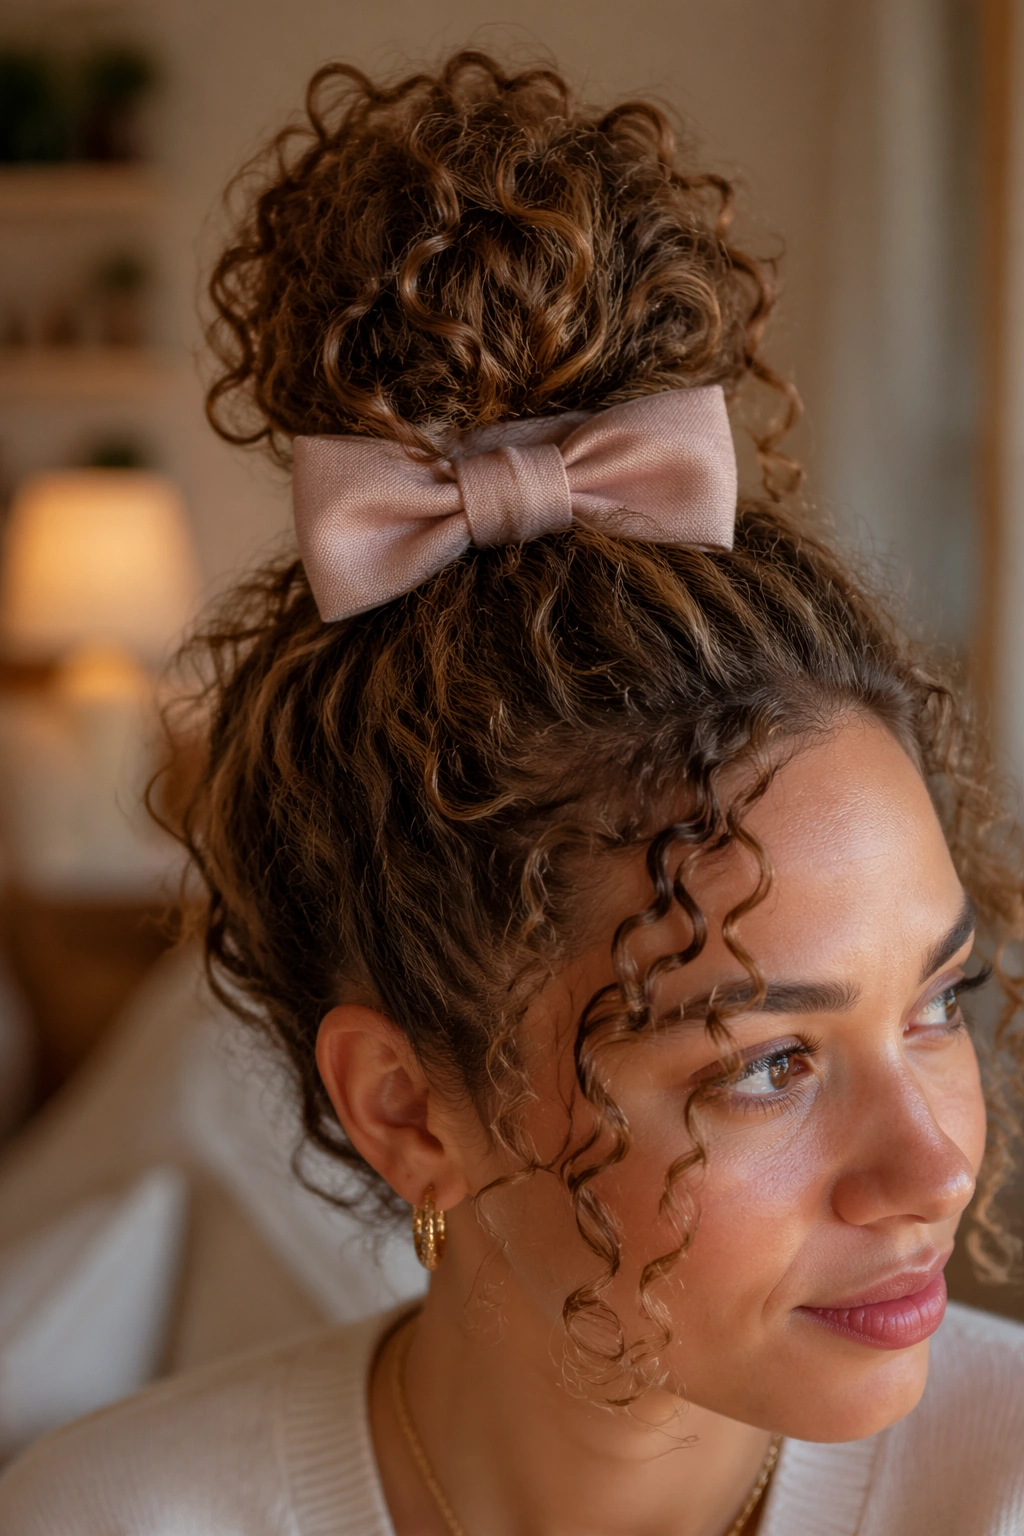
Can a top knot and a bow share the same space? Yes — if the bow sits under the knot instead of fighting it from the outside.
Gather the curls high, twist them into a loose knot, and pin them with 4 bobby pins around the base. Then tie the bow around the foundation of the knot, not over the top of it. That keeps the silhouette round and avoids the weird flattened look you get when the accessory presses the curls down.
This is one of my favorite lazy-day styles because it works on hair that’s a little stretched, a little frizzy, or slightly too big to behave. The bow gives the top knot a finished edge, which helps a lot when the knot itself is imperfect. And honestly, that’s part of the charm.
A 2-inch bow is usually enough. Bigger bows can tilt the knot backward or make the crown feel heavy. If you want more polish, use a ribbon with a little structure. If you want it softer, use a fabric bow with a slightly frayed edge. Both work. The main thing is keeping the knot loose enough that the curls still show some texture.
9. Bow Headband Across the Hairline
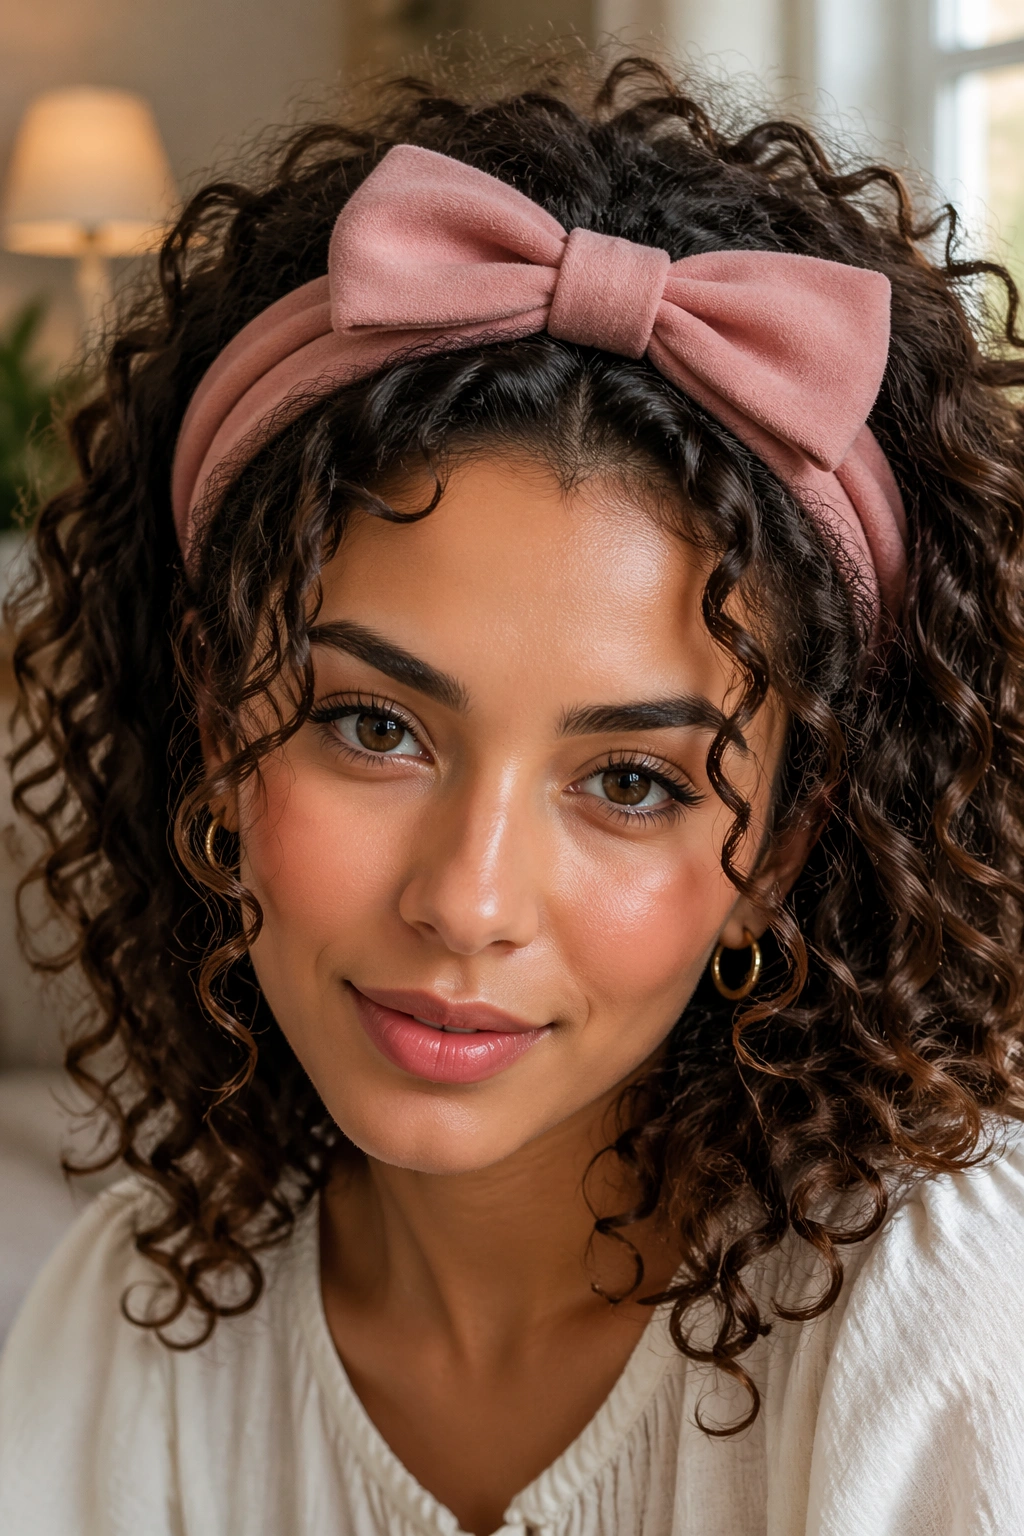
A padded bow headband can change the whole mood of curls in five seconds. It’s one of the easiest bow hairstyles for curly hair because the accessory does most of the work.
The appeal is obvious: you get the bow detail without having to rearrange much of the hair. Slip the headband on just behind the hairline, then let the curls fall around it naturally. If the band is too tight, it will press the crown flat and leave a mark. That’s the part people skip, then complain about later. Give yourself a little room. A finger’s width between the band and the scalp is usually enough.
This style suits curly bangs, wash-day hair, and anyone who wants the face opened up without pins. It also works when the hair is too short for a ponytail but still has enough length to frame the face. Choose a 1- to 1.5-inch-wide band if you want the bow to be visible without taking over.
- Pick a headband with a fabric underside so it grips better.
- Place it where the curls naturally part, not where you wish they did.
- Tuck only the front pieces if you want a softer look.
- Avoid bulky plastic bands on fine curls; they slide and pinch.
A bow headband can look sweet, sharp, or a little retro depending on the fabric. That flexibility is why it stays useful.
10. Low Chignon With a Structured Bow
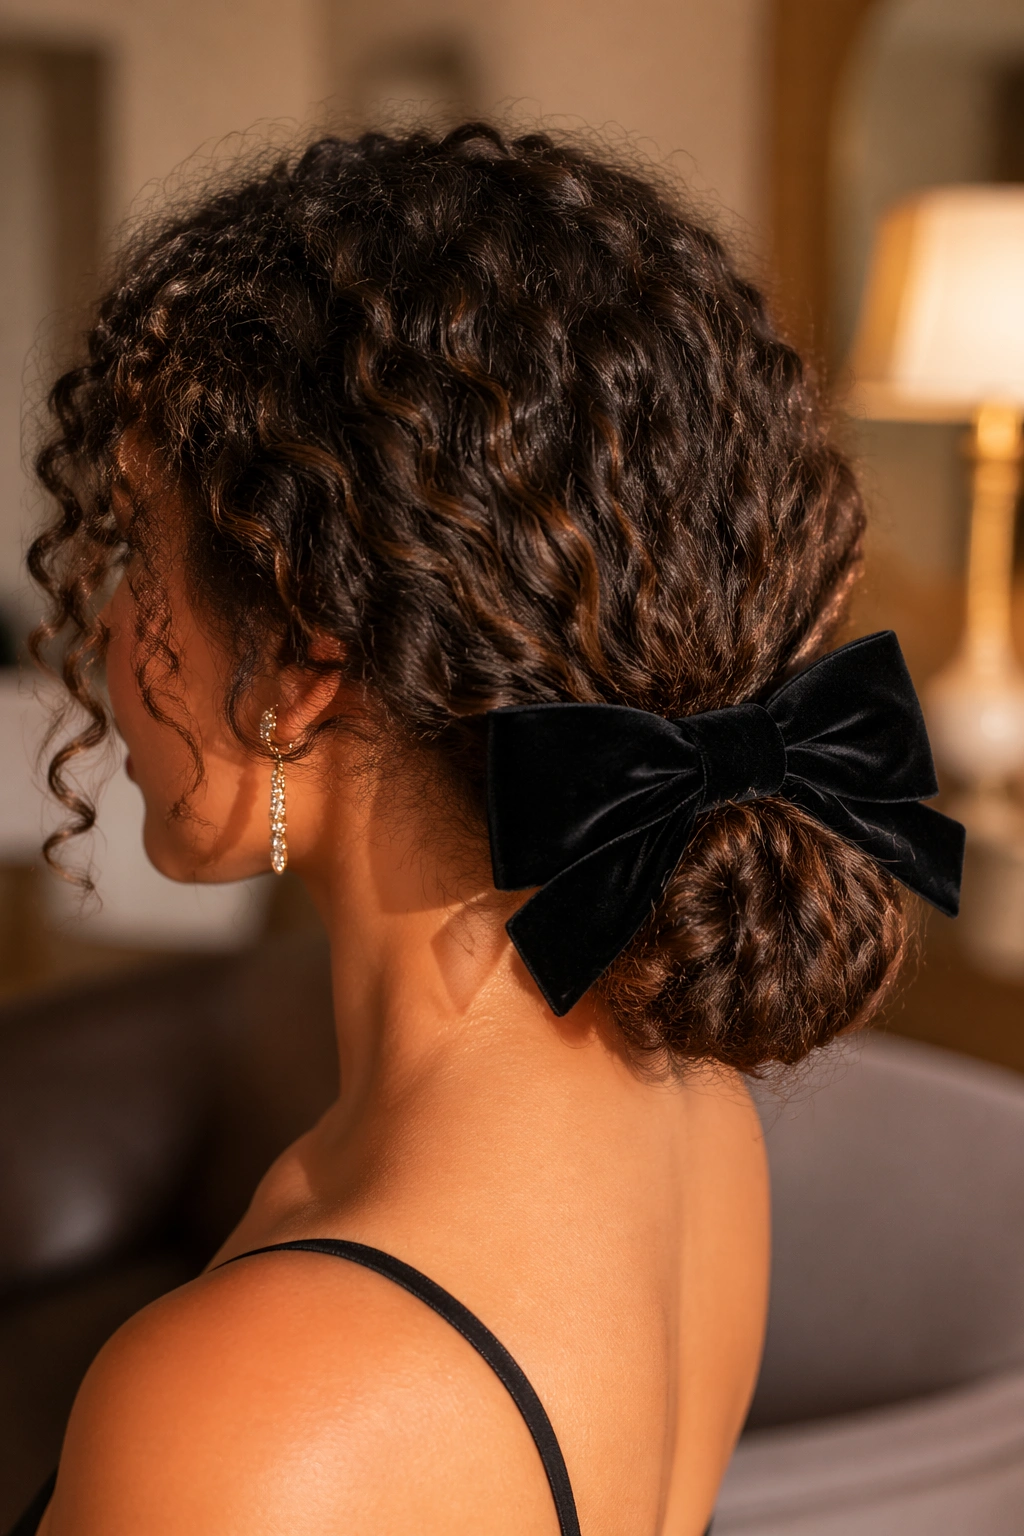
A chignon gives curls a cleaner outline than people expect. When you gather the hair low and tuck the ends into a soft knot, the texture turns from loose volume into something more formal, but not severe.
This is the style I’d reach for when the curls need to look controlled without losing their shape. Pin the hair into a low chignon at the nape, leave the coils slightly airy, and add a structured bow right at the base. A firmer ribbon works well here because the bun already provides softness. The bow becomes the sharp point.
If your hair is thick, use 6 to 8 bobby pins to secure the bun before you place the bow. If your curls are finer, you may only need 4. The aim is to hold the knot in place while keeping the surface of the hair smooth enough that the accessory stands out. A crisp velvet or satin bow can do that nicely.
This style is good for evenings, dressier settings, or any time you want the back of the hair to look tidy from every angle. It’s not the most casual option on the list, and that’s fine. Some days call for a little structure.
11. Double Half-Up Bows for Extra Volume
Unlike a single half-up bow, this version splits the attention and makes dense curls look balanced. Two bows also give you more room to play with placement, which matters when the curl pattern varies from side to side.
Part the top section into two small halves, one on each side of the crown, and secure each with its own elastic. Tie a bow over each anchor point. Keep them at least 2 inches apart so the style doesn’t look crowded at the back. If the bows sit too close together, they blur into one shape and lose the point.
This style works especially well for layered curls because the top sections can be lifted without pulling the rest of the hair too tight. It also gives a little extra height at the crown, which is useful if your curls tend to sit low. A pair of small satin bows feels neat. A pair of velvet bows feels richer and more textured.
Where to Place Them
Put the bows slightly behind the temples rather than straight on top of the head. That placement frames the face and keeps the crown from looking lumpy. You can leave the bottom curls untouched or separate a few face-framing pieces if the style needs softness.
If you want a look that feels cute but not childish, keep the bows small and the part crisp. That balance matters more than people think.
12. Silk Scarf Bow at the Nape
A scarf tied into a bow feels softer than a hard clip. That alone makes it worth keeping around, especially if your curls get frizzy when they rub against regular hair accessories.
Fold a 1-inch silk or satin scarf into a narrow band, wrap it around a low ponytail, puff, or twist, and tie it into a bow at the nape. The tails can hang over the curls or tuck slightly under them, depending on how neat you want the finish to be. I like this version when the hair needs a little polish but I do not want to compress the curl pattern into submission.
Silk slides more than velvet, so it helps to anchor the scarf over a small elastic first. That little underlayer keeps the bow from loosening as you move. If the scarf feels bulky, untwist it once and tie a flatter knot. Curly hair already has enough going on. The accessory should add shape, not bulk.
This last style is the one that feels most forgiving. It works on loose ringlets, tight coils, and everything between. It also has the nice side effect of keeping the ends from looking too dry because the fabric sits gently against the hair instead of scraping at it. If you want one bow look that can travel from casual to dressed-up without much adjustment, this is the one I’d keep in rotation.
The best bow hairstyle is the one that lets the curls keep their own voice. That sounds obvious, but it’s where a lot of people go wrong. They choose the bow first and the hair second.
Pick the shape that matches your texture, choose a fabric that stays put, and give the crown enough room to breathe. Do that, and the bow stops feeling like an accessory. It starts feeling like part of the haircut.