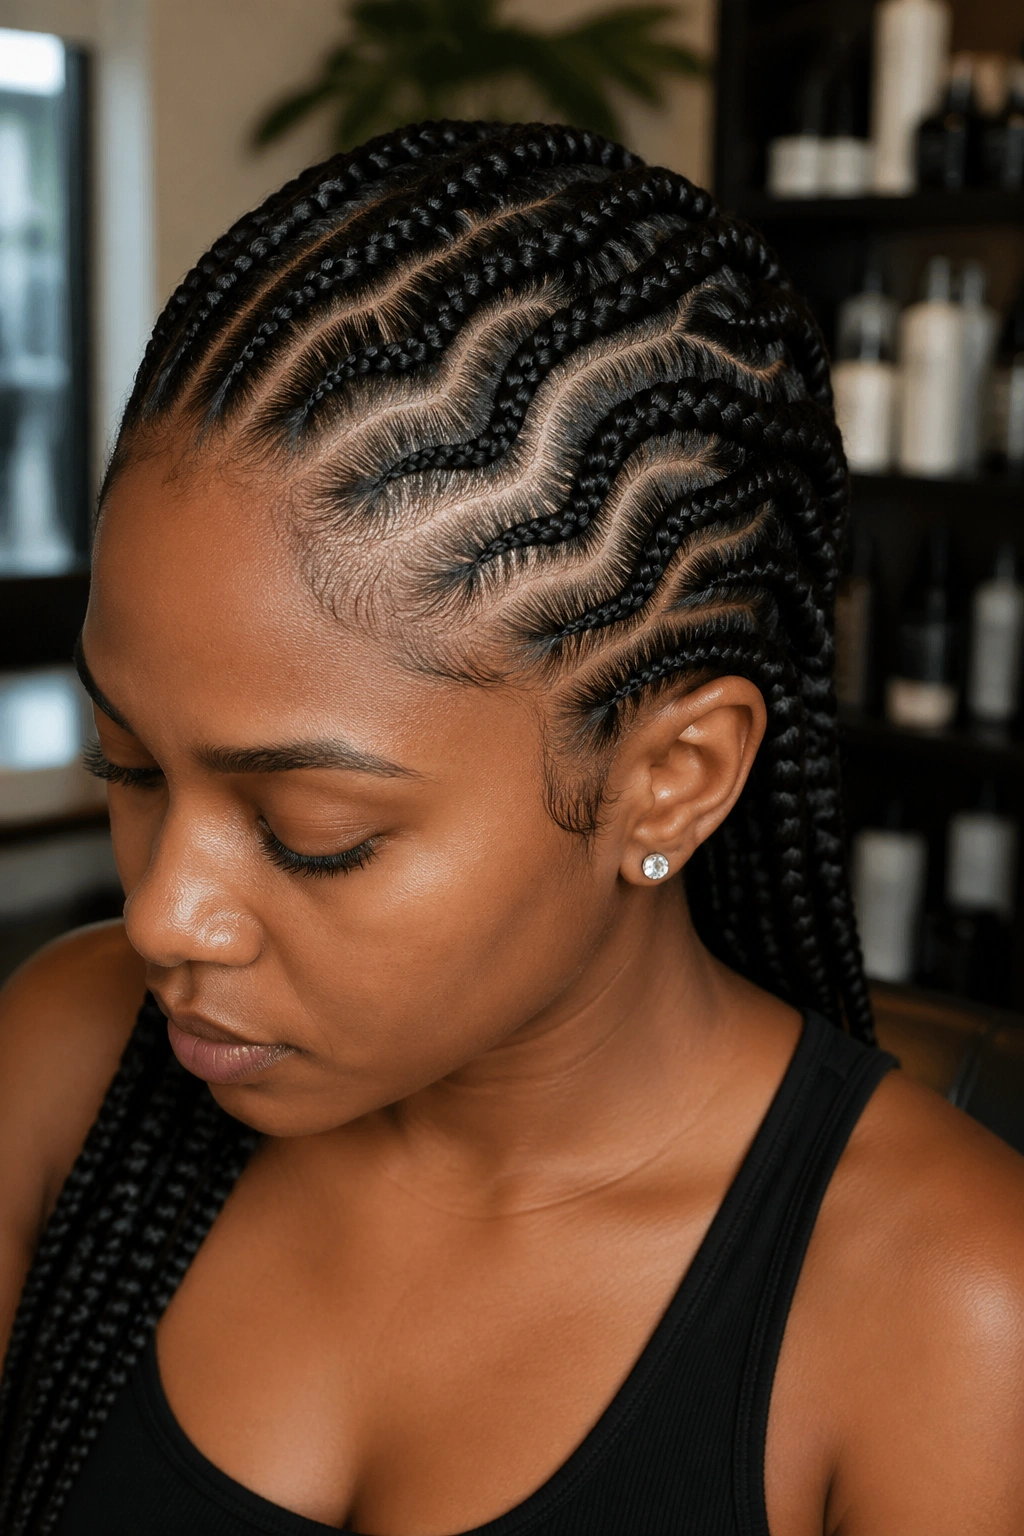
Freehand cornrows are where braiders show off. No measurements. No grid. No cookie-cutter symmetry. Just a comb, a pair of hands, and a vision that unfolds as the braid moves across your scalp.
A skilled freehand braider reads your head shape the way a sculptor reads stone. They follow the natural curve of your crown, work around cowlicks, and let the parts take whatever path looks right in that moment. What comes out is always one-of-a-kind.
This piece covers 22 different freehand cornrow styles — some soft and curving, some bold and angular, some so intricate they look airbrushed. Each style plays with direction, density, and design in a different way. None of them can be perfectly replicated twice, which is part of what makes freehand so special.
What Freehand Cornrows Actually Mean
Freehand cornrowing is cornrow braiding without pre-measured, straight-line parts. Instead of sectioning hair into a grid before starting, the braider creates the parts and directions in real time — usually with just a rat-tail comb and their eyes.
The traditional approach? Section, measure, clip, braid. Everything mapped before the first three-strand hand-over begins.
Freehand throws that playbook out. A freehand braider starts at one point — usually the hairline or the crown — and lets the style grow organically. They adjust tension as they go, change direction based on how the hair behaves, and build patterns that respond to the client’s head rather than forcing the head to fit a template.
The result looks more like art and less like engineering. You’ll see curves, swirls, sweeps, diagonal cuts, and unexpected negative space. Symmetry exists only where the braider wants it.
Why Freehand Style Is Different From Grid Cornrows
Grid cornrows — the classic straight-backs, the boxy geometric designs — are built for speed and repeatability. A skilled braider can bang out ten straight cornrows in under 90 minutes because the pattern is decided before they start.
Freehand takes longer. Usually 2.5 to 4 hours even for a simple design, because each decision happens in the chair.
Freehand also requires more skill. Any braider can follow a grid; few can improvise a design that looks balanced without measuring. You’re paying for vision as much as technique.
The trade-off is identity. A freehand style is yours and only yours. Someone can ask for the same design, and it won’t come out the same way because the braider’s hands won’t move the same way twice.
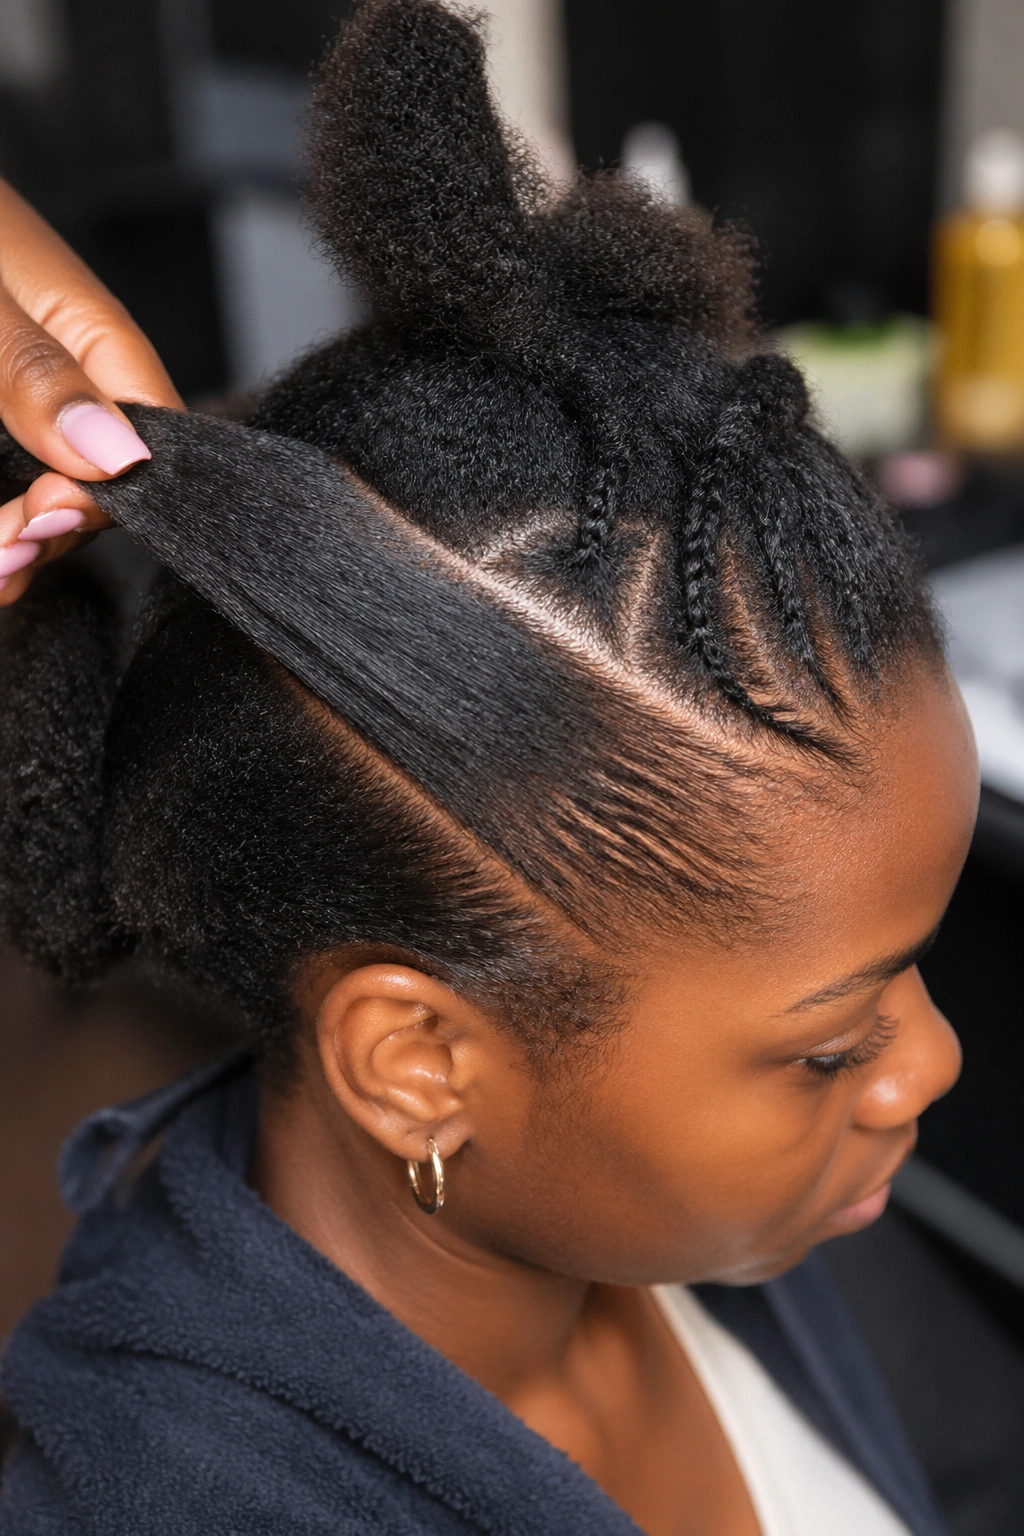
Tools and Prep Before a Freehand Session
Clean hair, stretched. Freehand works best on blow-dried or stretched natural hair because the braider can see the scalp clearly. Shrunken coils make parting lines harder to read.
A rat-tail comb with a long metal tail. The tail traces design lines before braiding. Plastic tails snag and drag.
Light edge gel — not thick. Heavy gel cakes on during the long install. Something creamy like a light foam gel works better.
A handheld mirror. You’ll want to see what’s happening at the back every 30 minutes or so. Trust me.
Water spray bottle. Freehand braiders mist the section before braiding to manage frizz and gain grip.
Braiding hair is optional. Many freehand styles use natural hair only, especially shorter designs. If you want length, kanekalon in a color matching your natural hair looks most seamless.
How to Talk to a Braider About Freehand
Show reference photos, but tell your braider upfront that you want your version — not a copy. Most will appreciate the freedom. A few will default to copying and you’ll lose the freehand magic.
Describe what you like about the reference. Is it the sweep direction? The density of parts? The way the design centers on the crown? Your braider needs to know what matters to you so they can carry it into their freehand interpretation.
Ask about timing. A three-hour freehand is a commitment. Pack water, lunch, and phone entertainment.
Ask if they want to design in front of a mirror or just at their station. Some freehand braiders like client input along the way. Others prefer full creative control until the end. Both work; know which you’re dealing with.
The Single Most Common Freehand Mistake
Overcomplicating the design. The urge to ask for every swirl, curve, zig-zag, and negative-space cutout you’ve ever seen on Pinterest leads to styles that look cluttered rather than artful.
Pick one or two design elements per head. A swirl at the crown plus straight-backs down the nape is stronger than a swirl plus zig-zags plus starburst plus a heart.
Restraint is where freehand shines.
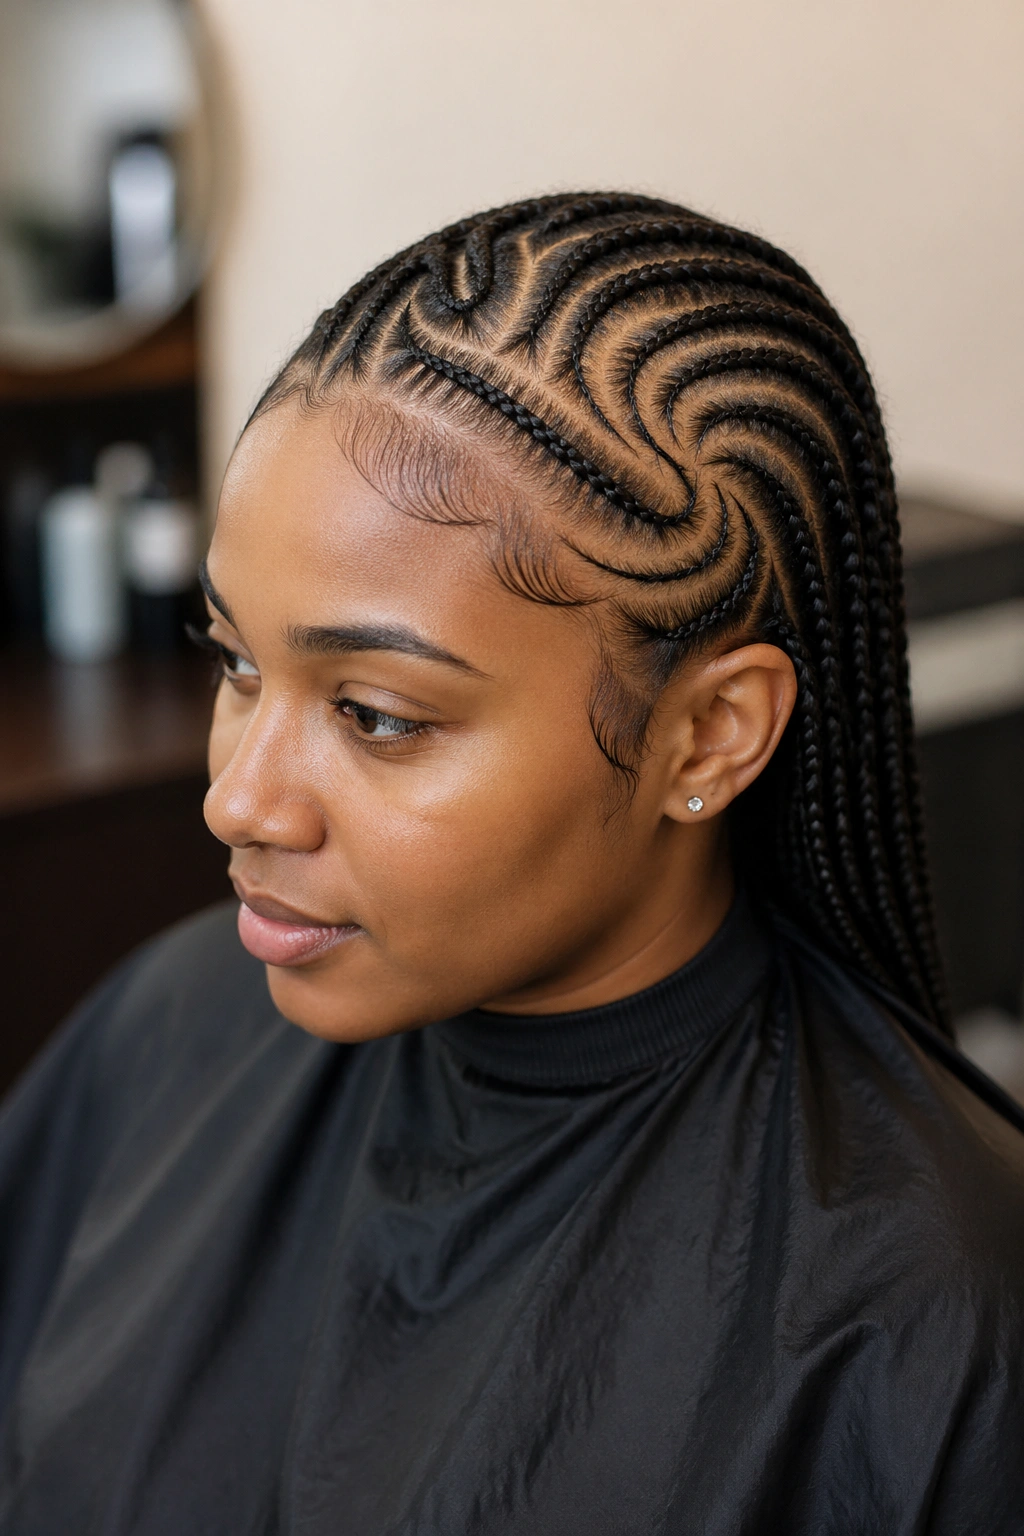
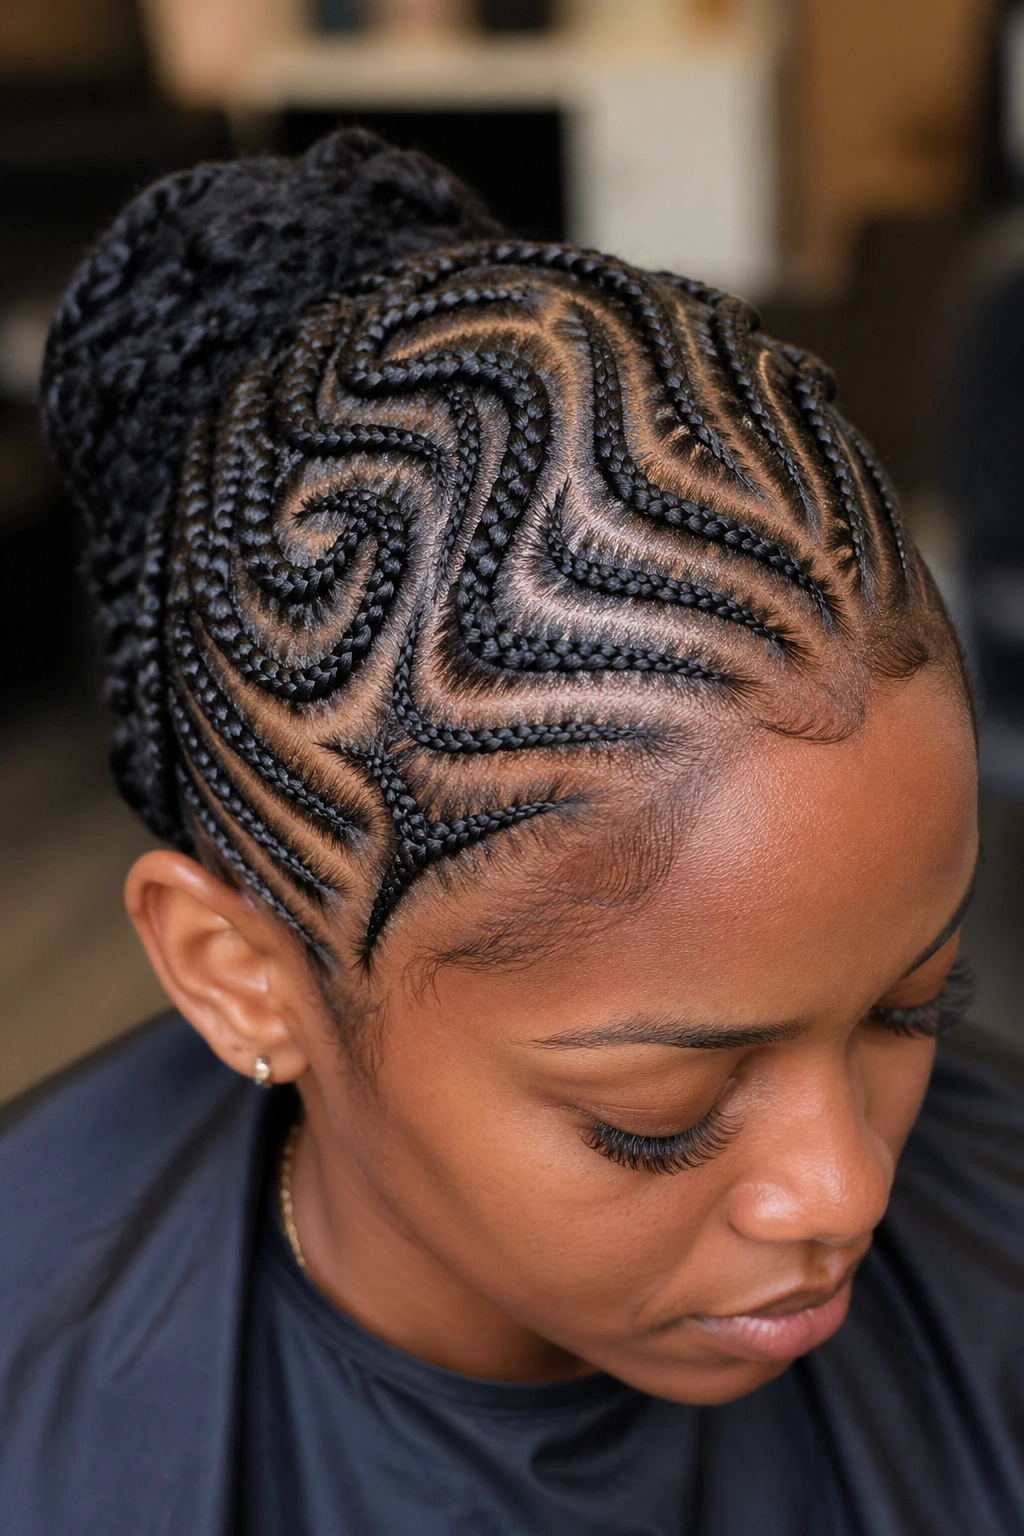
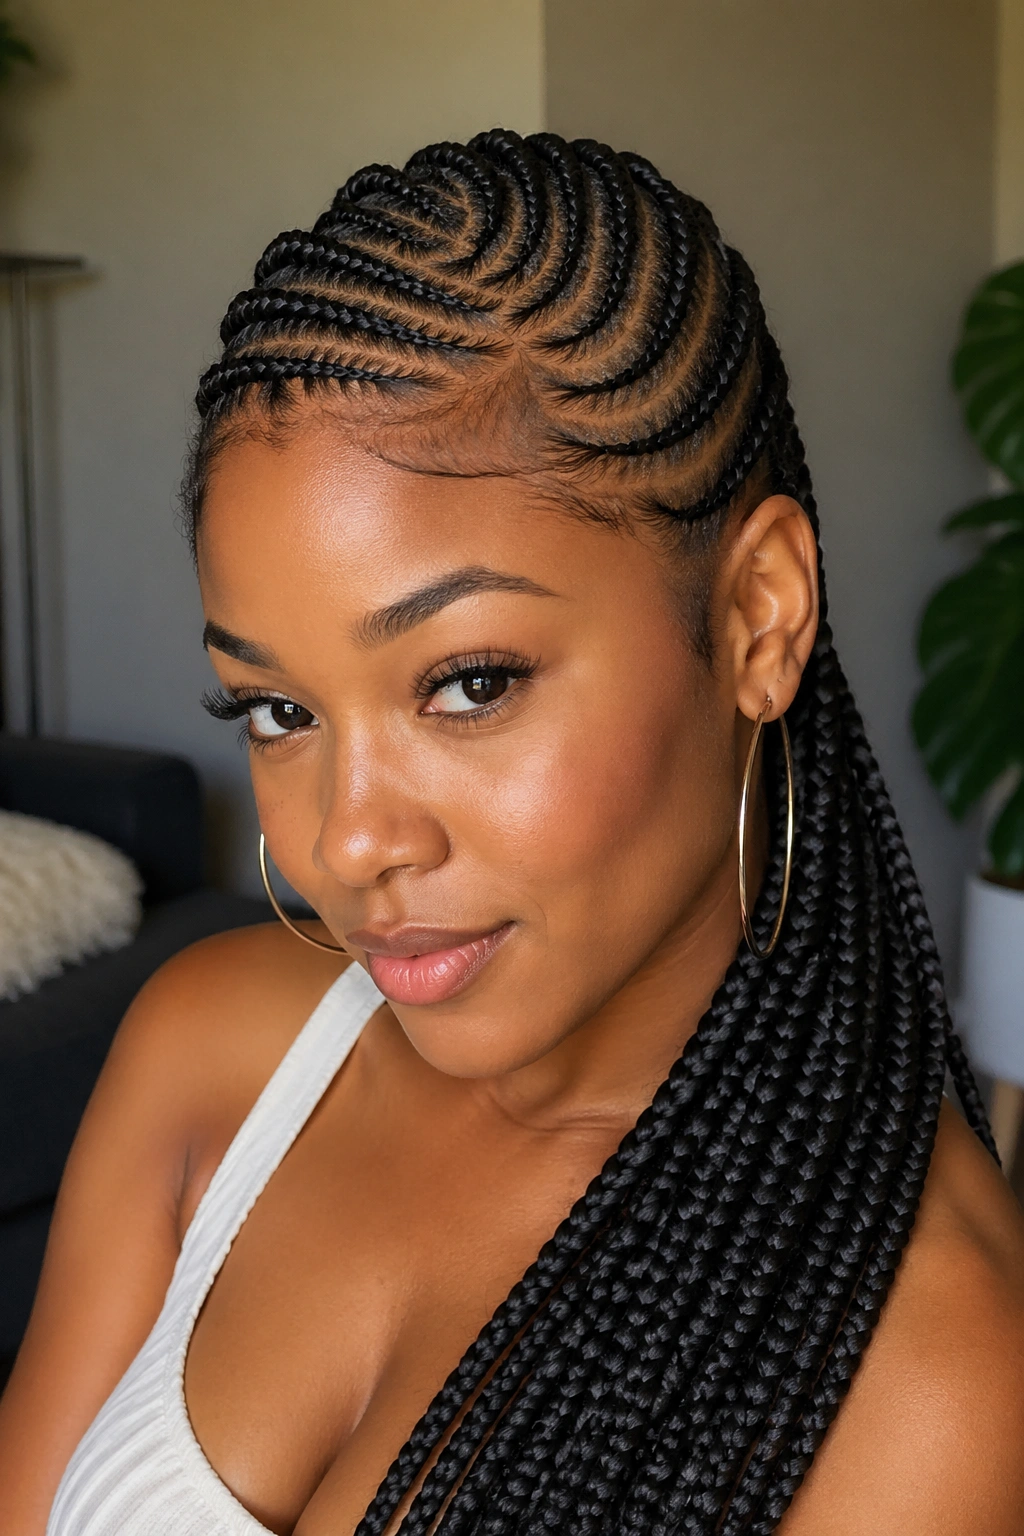
1. Crown Swirl With Side-Swept Back Braids
A single large spiral starts at the top center of the head and winds outward, with the rest of the hair braided in sweeping diagonals toward one side of the nape. The swirl becomes the visual anchor; everything else flows from it.
Why It Works
- The spiral draws the eye upward, which lengthens the face
- The diagonal sweep adds movement to what could otherwise be static
- Works on any face shape, any hair length
- Takes 3-4 hours for a skilled braider
Tip: Ask for the spiral to open counterclockwise if you part your hair on the right — it matches the natural flow. Clockwise on the left.
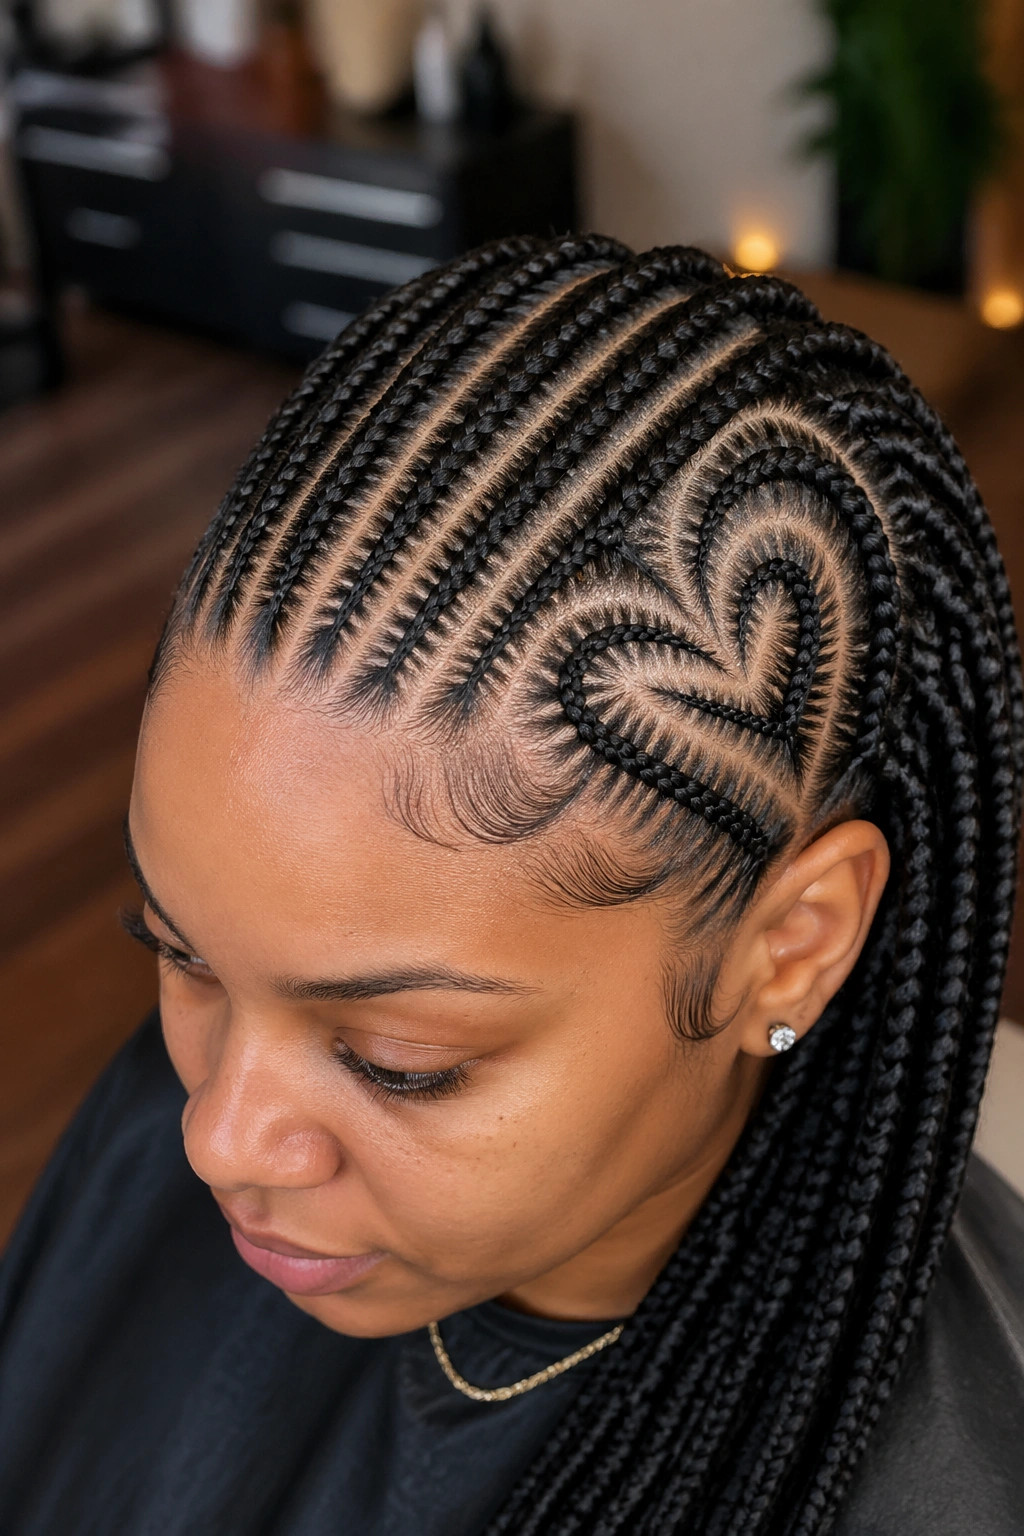
2. Asymmetric Heart-Shape Freehand Design
A heart-shape freehand design occupies one side of the head — say the right side of the crown — while the opposite side stays in parallel straight braids. The heart isn’t centered. That’s the whole point.
Off-center design asks the eye to search, and searching is what makes a style memorable. You don’t glance and move on; you look twice.
The heart can be as subtle as a single heart-shape cornrow path or as dense as a cluster of braids that collectively form the outline. Discuss scale with your braider before starting.
One thing about asymmetric designs: pair them with simple necklines. A busy collar competes with an asymmetric braid and both lose.
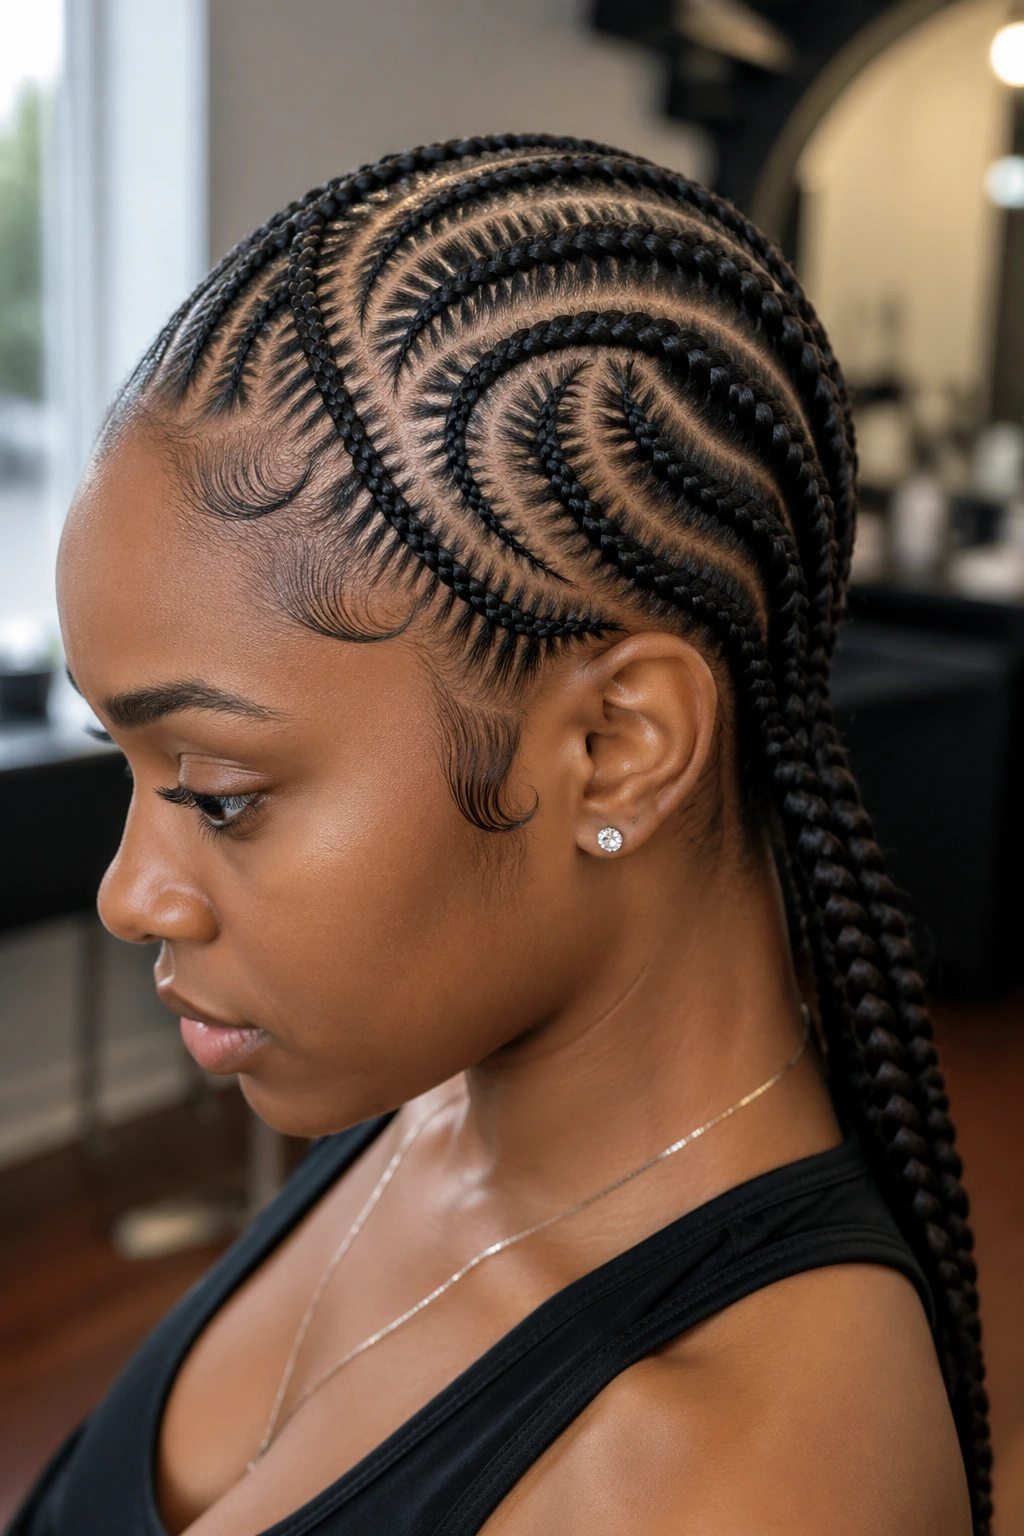
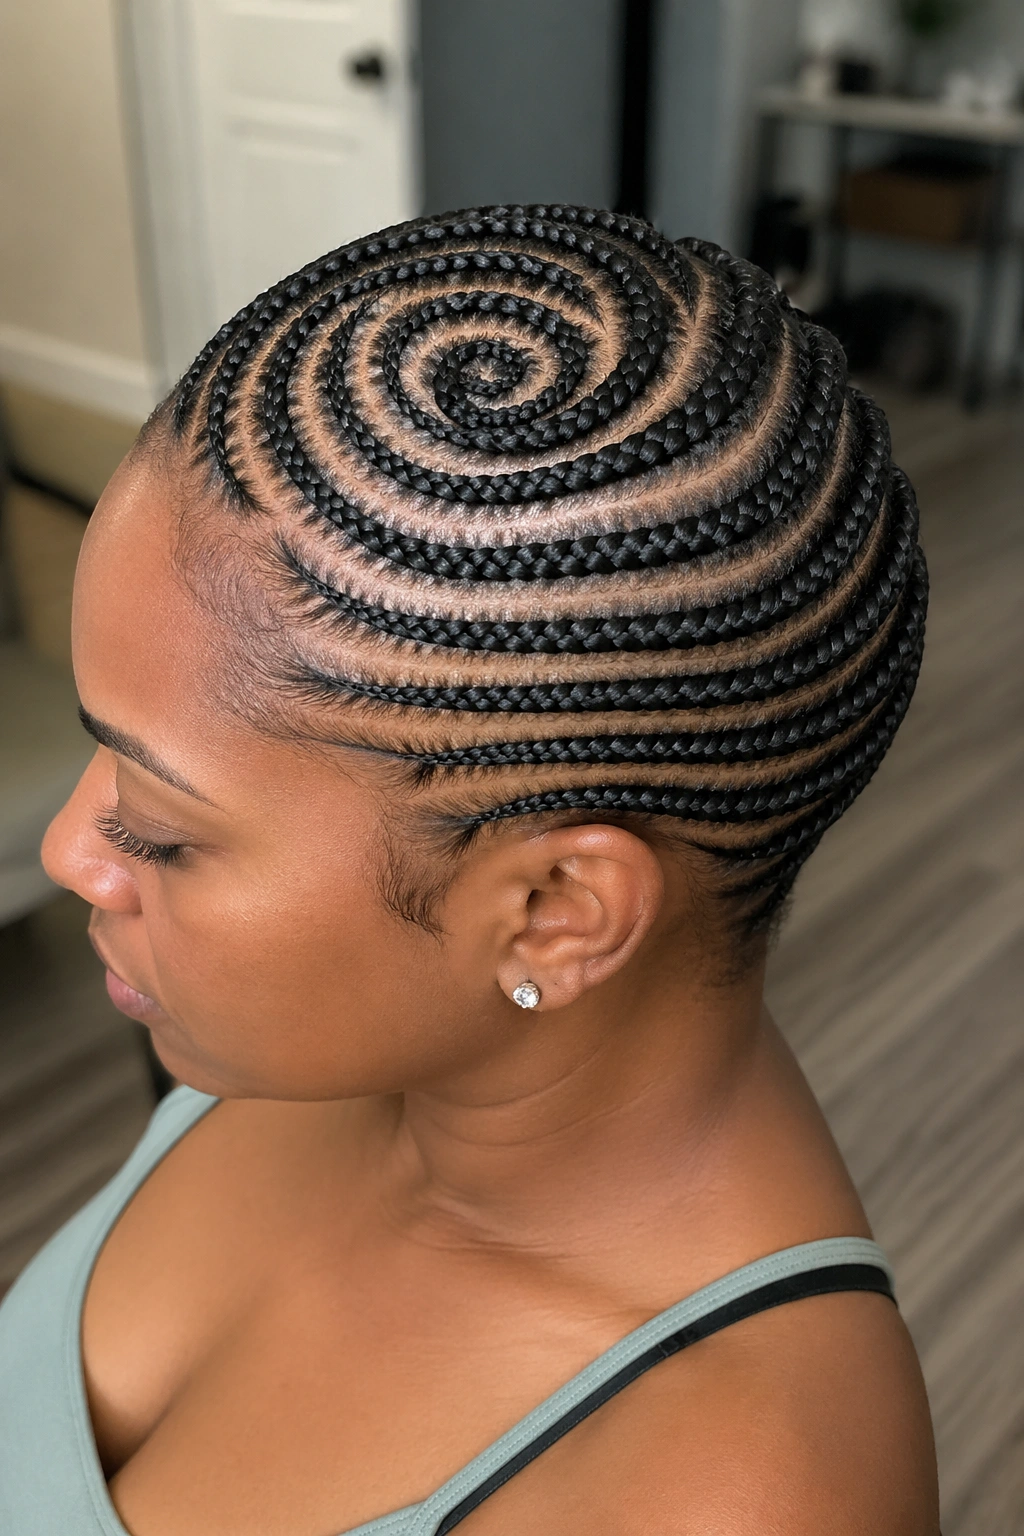
3. Freehand Spider-Web Cornrow Pattern
Concentric spider-web arcs radiate from a single point at the crown — usually toward the back — with straight radial braids connecting the arcs. The whole head reads like a web with the anchor point at the crown.
This takes serious technical skill because the arcs have to stay evenly spaced as they expand outward. Uneven spacing ruins the web effect.
Because the pattern is dense, this style holds its shape for 4-5 weeks. The interconnected arcs brace each other against lifting.
Who’s it for? Someone who wants statement hair that’s also secretly protective. The web looks intricate but the braids are small and tight to the scalp, making it one of the lower-tension freehand options.
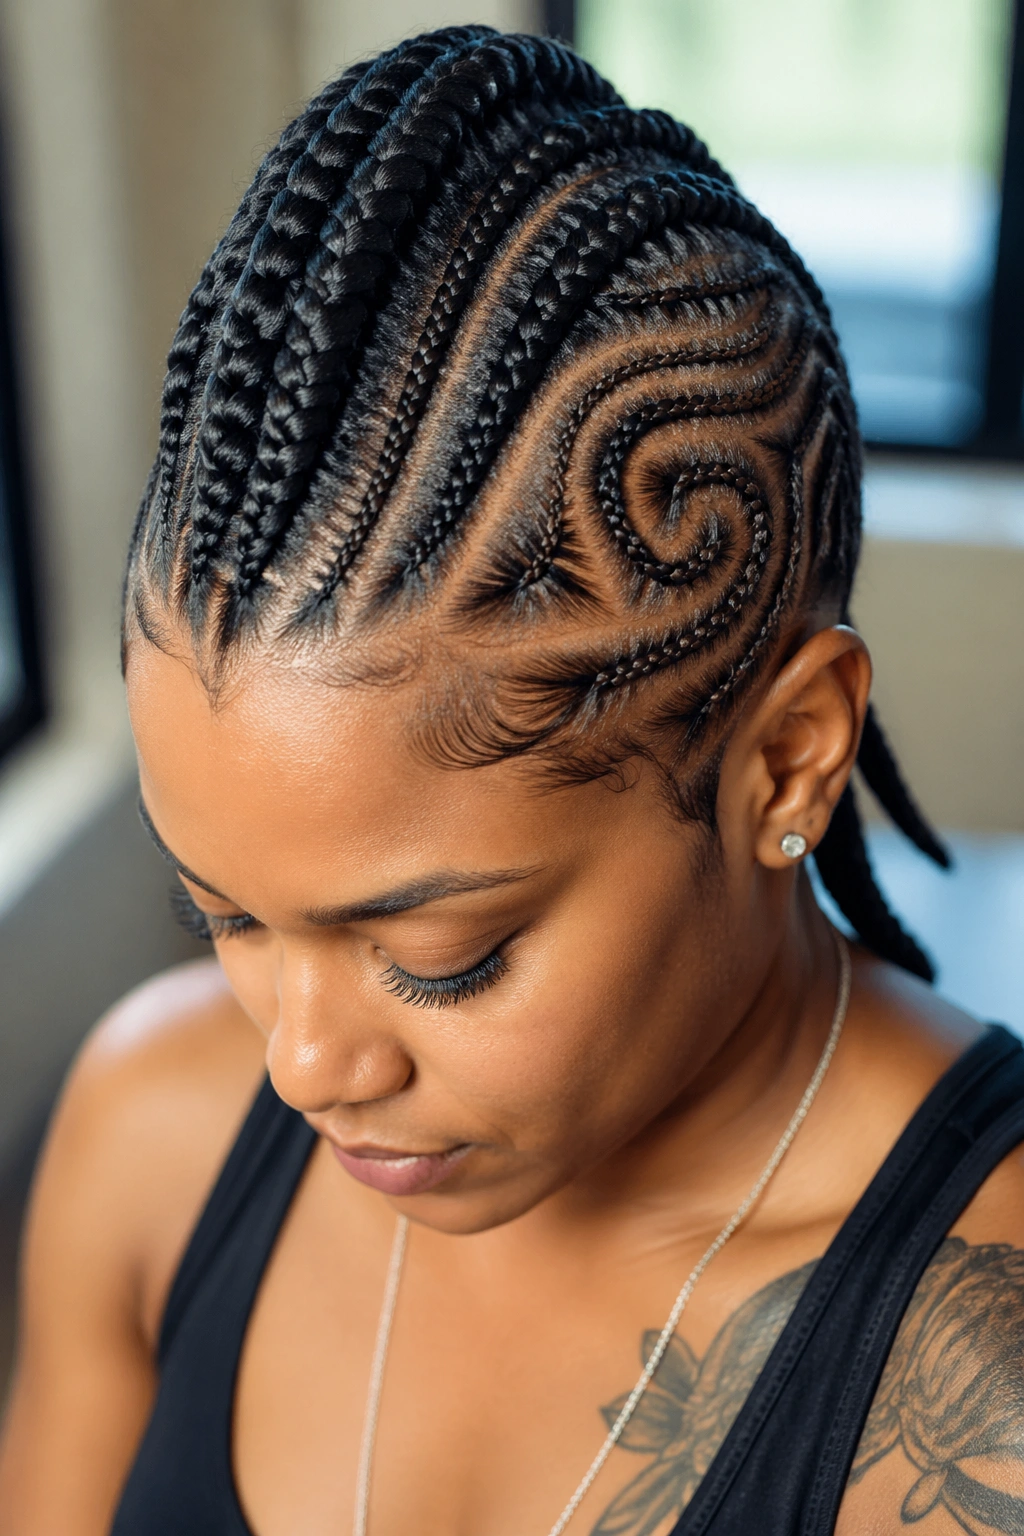
4. Curved Swoop Braids Pulled to One Side
Every cornrow on the head curves in a wide sweeping arc from the front hairline toward one rear corner of the nape. No straight lines anywhere.
Is it dramatic? Yes.
Is it universally flattering? Surprisingly, also yes.
The curves follow the natural shape of the skull, which means the style molds to the head rather than fighting it. From any angle, the braids read as movement — like wind caught in hair.
This pairs well with hoop earrings on the opposite side of the sweep, creating visual balance across the face.
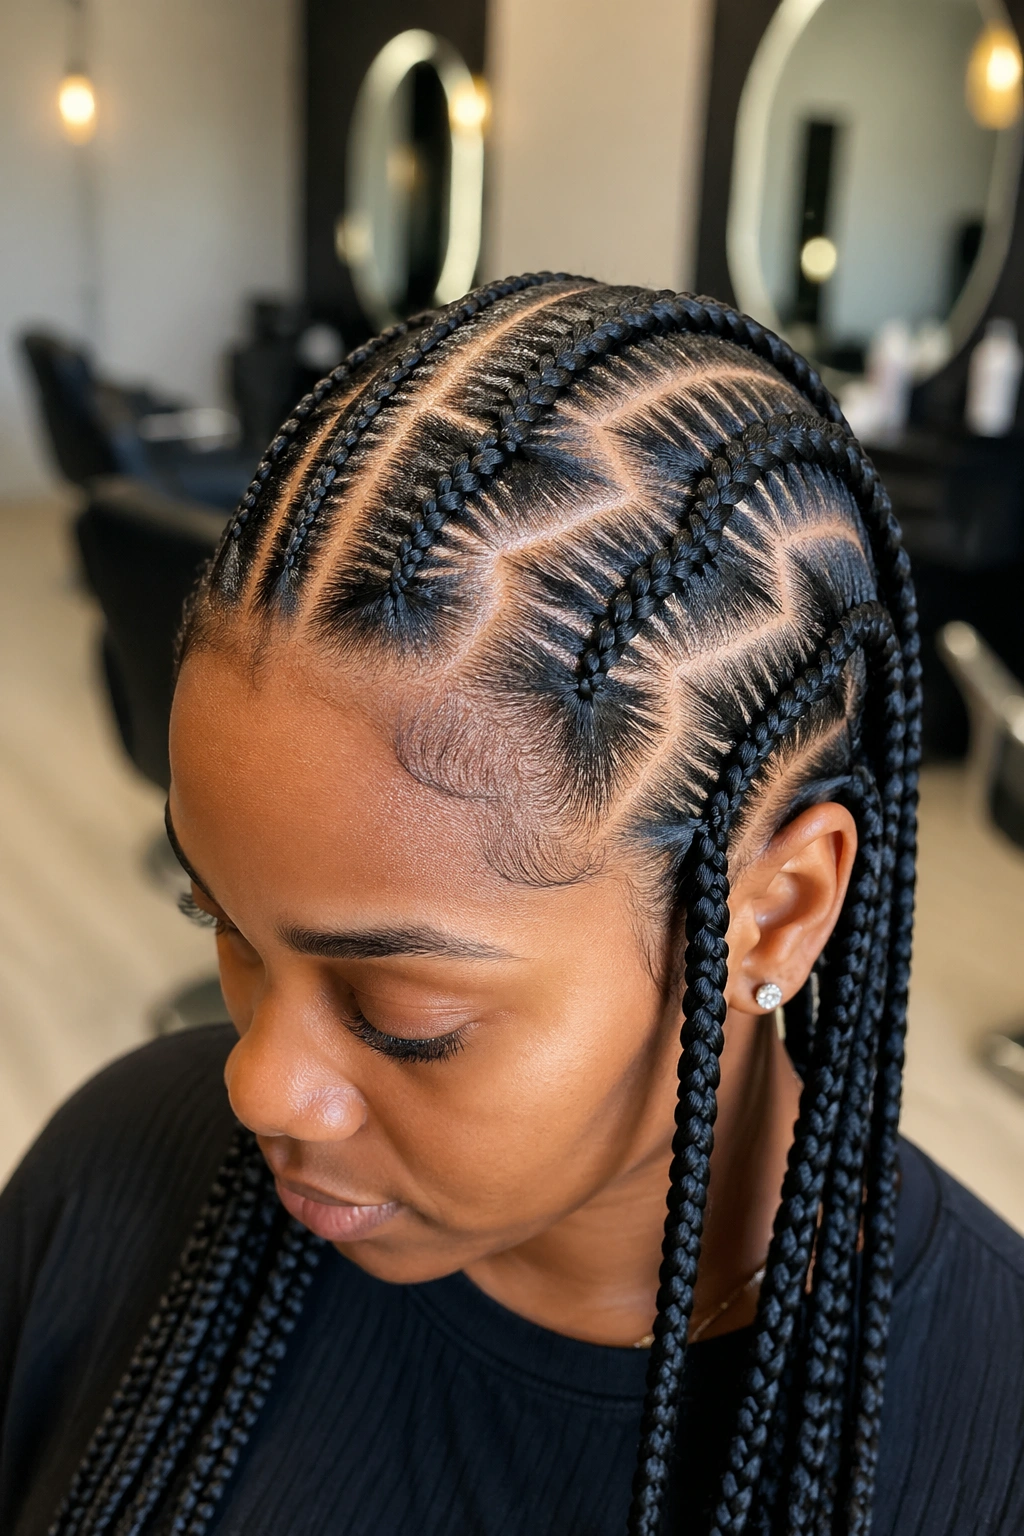
5. Freehand Zig-Zag Partings With Straight Braids
The parts are zig-zag, but the braids themselves stay straight. The contrast between angular parts and linear braids creates visual tension that’s hard to look away from.
How to Style It
- Ask for three to five zig-zag partings between straight parts, not all parts zig-zagged
- Keep the zig-zag peaks uniform for a cleaner read
- Match the zig-zag angle to your jawline — sharper jaws handle sharper angles
- Works well with 8-12 total braids; more looks busy
Tip: A shorter zig-zag wave (tighter peaks) reads graphic. A longer zig-zag wave reads casual. Pick based on mood.
6. Floral Motif Cornrow Design
A flower shape — typically a rose or daisy — braided into the crown or side of the head, with petals radiating outward. The rest of the hair braids straight back or to the nape.
The flower can be genuine freehand artistry or it can follow a loose pattern the braider adapts on the fly. Either way, the petals need dimension — variations in braid thickness or subtle layering — to avoid looking flat.
This style gets attention. It’s a statement piece for events, photo shoots, and milestones. Not daily wear for most women because it’s too ornate, but absolutely appropriate for occasions where you want to be seen.
7. Freehand Cornrow Mohawk With Design Accents
A freehand mohawk combines close-to-scalp braids on both sides with a raised cornrow ridge down the center. Freehand adds custom design work into the side panels — swirls, geometric cuts, or negative-space patterns.
The mohawk structure is bold on its own. Freehand design work pushes it from bold to personal.
Side panel designs matter more than the mohawk itself in terms of visual impact. A plain mohawk with a killer side-panel spiral outperforms a complex mohawk with plain sides.
Ask for small designs on both sides, not just one. Asymmetry works in some styles but not here — a mohawk needs symmetry on the sides to balance the raised center.
8. Freehand Side Part With Cascading Braids
A deep side part — starting at one temple — with braids cascading down and across the head in a freehand waterfall pattern. The cascade can drop straight or curve, depending on how dramatic you want.
The side part itself is freehand, meaning it’s not a ruler-straight line but rather a slight curve that follows the hairline.
This reads elegant. It works for weddings, galas, and red-carpet moments. Less appropriate for gym days.
Give your braider a reference photo but ask them to adjust the cascade angle based on your face shape. Oval faces can handle steep cascades. Rounder faces look better with gentler ones.
9. Geometric Triangle Parting Freehand Design
Triangle parts, but arranged freehand — meaning the triangles aren’t uniform. Big triangles mix with small ones, pointed toward different directions, creating a mosaic-like effect across the scalp.
This is the style for someone who wants geometric hair without the rigid grid feel of standard triangle boxes.
The parts themselves take 45 minutes to design before any braiding starts. The braider sketches the triangle layout with the comb tail first, adjusts the shapes by eye, then begins braiding.
Tip: Four to six different triangle sizes mixed together read intentional. Two triangle sizes look like a mistake.
10. Freehand Crown Halo Braids
A crown of cornrows encircling the entire head, like a halo, braided in a freehand flowing pattern. The braids don’t run uniformly — some are thicker, some thinner, all flowing into each other around the circumference.
The halo sits above the ears and wraps around the back. The top of the head inside the halo can be braided to match or left with a different texture — a freehand twist-out, for example, or a loose bun.
Who This Is For
Women who want an elegant, feminine style that photographs well from every angle. It’s also a practical summer style — no hair touching the neck.
One drawback: the halo can push earrings against the head, so small studs work better than dangling earrings.
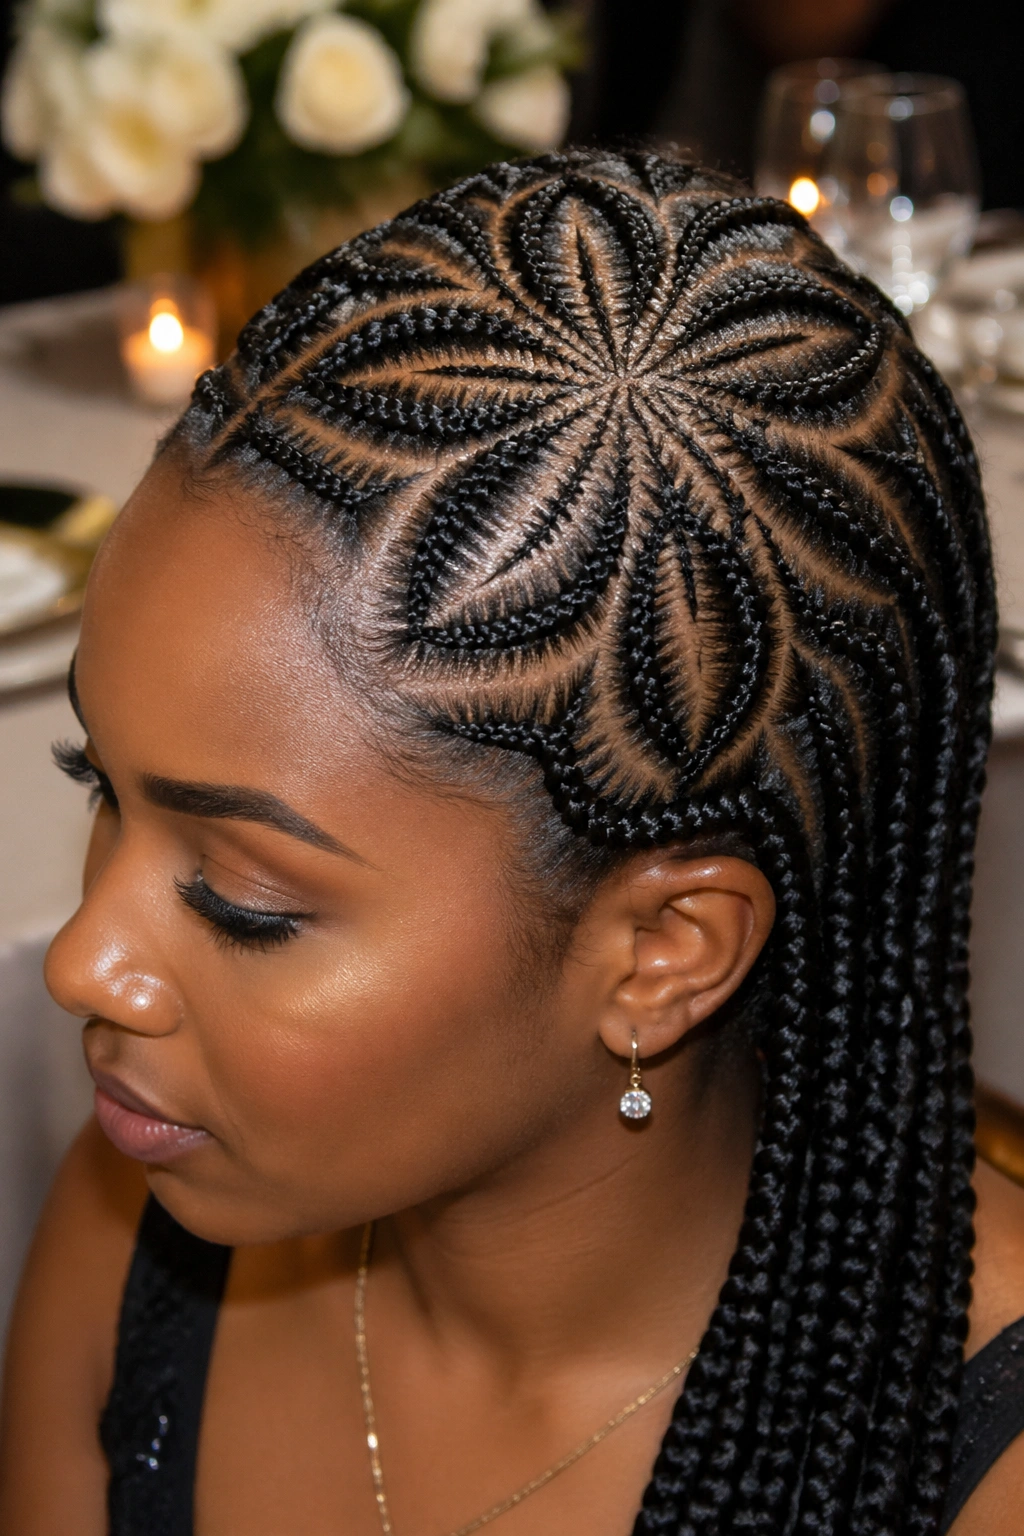
11. Freehand Starburst Design on Crown
A starburst radiates from a central point on the crown, with individual rays of cornrows extending in all directions. The rays can be symmetrical around the point or staggered in length.
From directly above, the style looks like a sunrise made of braids. From the side, the rays fan out in a way that catches light differently depending on angle.
Best starburst designs have 8-12 rays. Fewer looks sparse. More looks busy.
Center the starburst at the highest point of your crown for a flattering effect. Off-center starbursts work too but require more planning to avoid looking lopsided.
12. Freehand Ponytail With Sculpted Base
Cornrows feed into a single ponytail, but the design work happens at the ponytail base. The braider freehands a sculpted pattern — interlocking curves, a rope-twist effect, or scattered smaller braids — that frames the base of the ponytail.
The ponytail itself is usually simple. The base is the showpiece.
This works for professional settings because a sleek ponytail reads polished. The sculpted base elevates it without making it loud.
Budget 3 hours for install. The base sculpting takes time even though it covers a small area.
13. Freehand Double-Ponytail With Center Design
Two low ponytails — one on each side of the nape — with a freehand design filling the space between them. The design anchors the symmetry.
Center designs can be geometric (diamonds, chevrons) or organic (swirls, curves). Either works; the choice depends on vibe.
This style leans playful. It’s reminiscent of schoolgirl pigtails but grown-up through the sculpted center.
Pair with statement earrings. The double-ponytail frames the neck, so jewelry at the earlobe completes the frame.
14. Freehand Cornrow Pompadour
A pompadour translates surprisingly well to cornrows. The front of the head gets a raised, puffed section of cornrows braided upward into a lifted pouf. The rest braids back into a smoother style.
The pouf adds height to the face — great for round faces or shorter women wanting vertical length.
What Makes It Different
- Unlike standard pompadours with loose hair, these use braids to hold the shape
- No styling needed after install; the shape is built-in
- Lasts 4 weeks without losing volume
- Works on any hair length because extensions can bulk out the pouf
Tip: Ask for 8-12 short cornrows in the pouf section, then longer cornrows behind. The short braids give the pouf its upward lift.
15. Freehand Sweeping Fringe With Braided Back
A swept fringe of cornrows at the front — covering part of the forehead or sweeping sideways across the brow — with the rest of the head in cleaner braids toward the back.
The fringe is where freehand personality shows up. Thin braids, wavy braids, or designed braids can make the fringe its own mini-style within the larger cornrow set.
This works well for women who normally wear bangs and feel naked without forehead coverage. It also flatters high foreheads.
Don’t let the fringe hang below the eyebrows. That’s the one rule. Below the brows it reads unkempt.
16. Freehand Waves Flowing Front to Back
Wavy, flowing cornrows run from the front hairline all the way to the nape, each braid curving in an S-shape. No straight lines. No sharp angles. Just waves.
This style is calming to look at. It mimics water, hair caught in wind, gentle curves. There’s something meditative about it.
The S-curves require a braider who can maintain the wave rhythm from root to tip. Inconsistent waves look wobbly, not wavy. It’s a skill difference.
Best for women who want cornrows that feel feminine and soft rather than structured and graphic.
17. Freehand Off-Center Part With Wrapping Design
Part the hair off-center — well off, maybe 2 inches from the midline — and let a freehand design wrap from one side of the part, around the crown, and into the opposite side.
The off-center part is already dramatic. Adding a wrapping design turns the whole crown into a composition.
Designs that work: vine-like curves, continuous-line patterns, spiraling repeats.
Designs that don’t work: any pattern with hard stops. The wrapping effect requires continuous flow.
Tip: Ask for the wrap to end at the opposite ear, not at the back of the head. Ear-to-ear wraps look more intentional than front-to-back.
18. Freehand Chunk Braids With Thin Accents
The head is braided in a mix of thick chunky cornrows and thin accent braids — freehand placed between them. The thick braids are the structure; the thin braids are ornament.
This reads tribal, textural, and hand-crafted. It doesn’t try to be neat. It tries to be layered.
Typical ratio: one thin braid for every two or three thick braids. More thin braids reads busy. Fewer reads unfinished.
Great for shorter-term wear — about 3 weeks — because the thin braids fuzz faster than the thick ones.
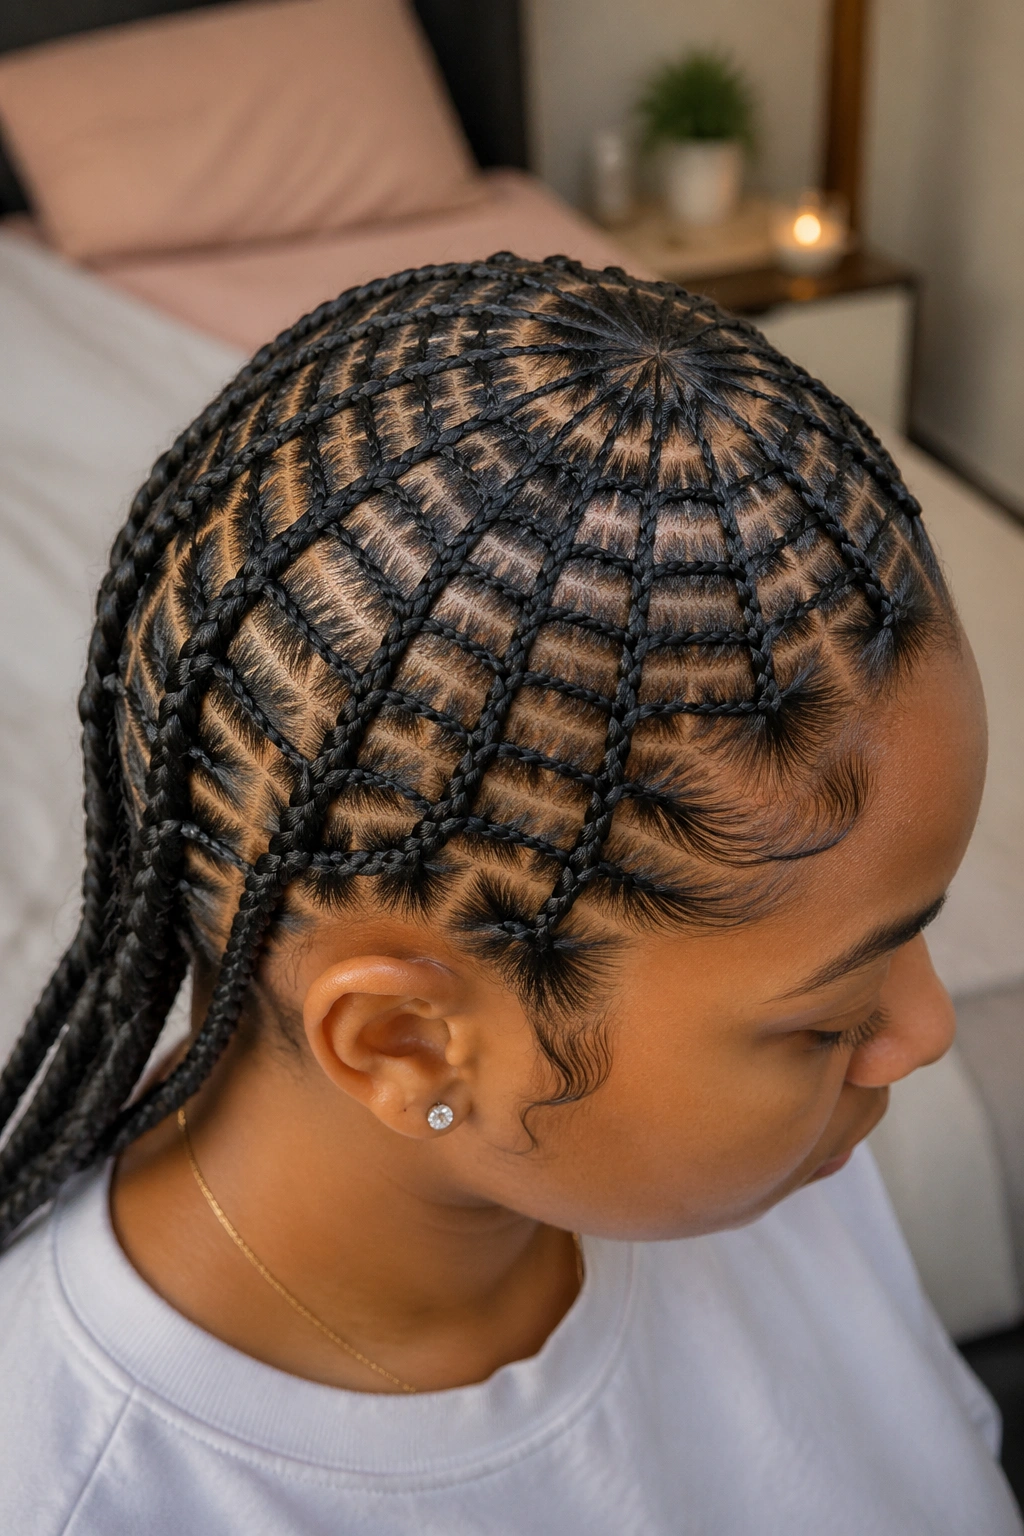
19. Freehand Cornrows With Negative-Space Gaps
Most cornrow styles aim to cover the entire scalp. This one doesn’t. Strategic sections of the scalp are left unbraided, creating negative-space shapes between the braids. The gaps form the design.
The scalp skin becomes part of the style. Bold. Architectural. Not for everyone.
Most negative-space designs use chevron, V, or diamond-shaped gaps because those shapes read clearly from a distance. Random gaps look unfinished.
This style photographs extremely well. In person, it reads minimalist and modern. The gaps need clean edges — no frizz, no fly-aways — so edge control maintenance is non-negotiable.
20. Freehand Cornrow Updo With Design Base
All the cornrows pull up into a high crown-area bun or twist, but the base of the updo — all the way around — features a freehand design band.
Think of it as a hatband made of braids wrapping the updo’s perimeter.
The design band can be geometric, floral, or abstract. What matters is that it reads as a deliberate frame around the bun.
Install takes 3 hours. The design band alone is often an hour of that, but it’s what separates this style from a generic cornrow updo.
21. Freehand Side-Gathered Style With Sculpted Part
Braids sweep across the head toward one side, gathering loosely at the ear. The part line isn’t straight — it’s a sculpted, curving freehand part that runs from forehead to nape.
The sculpted part is the freehand moment. Done well, it looks like an S-curve carved into the scalp.
This works especially well if you have a round or heart-shaped face because the side gather adds asymmetric length. Avoid if you have a long, narrow face — the extra length can elongate unflatteringly.
Maintenance Notes
- Side-gathered styles lift at the gather point within 2 weeks
- Plan to re-wrap or pin the gathered ends as the style ages
- Sleep with the gathered side facing up, not pressed against the pillow
22. Freehand Full-Scalp Design With Cornrow Tips
A full-scalp freehand design — intricate, all-over pattern work — with the braid ends trimmed short or beaded minimally. The scalp design is everything. The tips are an afterthought.
This is for someone who wants the hair-as-art experience. The design might include any combination: swirls, hearts, stars, geometric patterns, cultural motifs, words.
A skilled braider can spend 5-6 hours on a single full-scalp design and charge accordingly — often $300-500.
The payoff is something that’s legitimately art on your head. Whether it’s worth the time and cost depends on what you want from your hair that week.
Tip: Ask your braider to photograph the design from multiple angles right after install. You’ll want those photos for memory and social posting. The design won’t last — no cornrow does — but the record can.
Maintenance: Keeping Freehand Styles Crisp
Freehand cornrows have more visible design work than grid styles, which means they show frizz faster. Edges, parts, and curves all need attention.
Mist with a diluted leave-in spray every other day. Water plus a splash of leave-in conditioner in a small spray bottle. Five seconds of misting keeps everything looking fresh.
Edge touch-ups twice a week. Use a small edge brush and a light gel to re-lay edges along the front hairline and around any design work that frames the face.
Satin scarf overnight is non-negotiable. The sculpted details in freehand styles flatten against a cotton pillow. A scarf — or a satin-lined bonnet — preserves the shape.
Clarify the scalp with diluted apple cider vinegar every 2 weeks. One part vinegar to four parts water in a spray bottle, misted on the scalp, left on for two minutes, then rinsed. This cuts product buildup without stripping.
Scalp Care During Long-Wear Freehand Styles
Heavy design work at the crown can mean tighter tension than straight-back cornrows. The freehand patterns sometimes require braiding against the natural growth direction, which pulls differently on the follicles.
Listen to your scalp in the first 48 hours. If the pressure persists past two days, the braids are too tight. Return to your braider for a loosening pass.
Hot shower steam helps. After a long day in a tight freehand style, a 10-minute hot shower with the water hitting your back lets the steam relax your scalp without soaking the braids.
Massage nightly. Circular pressure from your fingertips — never nails — across the scalp for 5 minutes before bed improves circulation and relieves built-up tension.
Tip: If you feel a specific bump along your hairline that’s tender to touch, massage a drop of tea tree oil diluted in jojoba into that spot nightly. Most tender bumps are minor irritations that resolve in 3-5 days.
Taking Down a Freehand Style Without Damage
Freehand styles can be harder to take down than grid styles because the braid directions vary. You have to follow each braid individually rather than rip through predictable rows.
Spray the entire head with a detangling spray diluted 50/50 with water. Let it sit for 10 minutes to soften the synthetic hair and relax your natural hair.
Use the pointed end of a rat-tail comb to unravel each braid from the tip. Don’t pull. Gentle, steady unraveling.
Take breaks. A full freehand takedown can take 2 hours or more. Your fingers will cramp. Your arms will ache. That’s normal.
Once fully unraveled, finger-detangle each section before any comb touches your hair. Fingers feel snags; combs tear through them.
Wash with a clarifying shampoo, deep condition for 30 minutes minimum, and give your scalp a day or two of rest before the next install.
Picking the Right Freehand Style for Your Face Shape
Oval faces — almost anything works. Oval is the default “flattering” shape most hair styles target.
Round faces — look for styles with vertical elements like pompadours, crown starbursts, or styles swept upward. Avoid styles that add width at the ears.
Heart-shaped faces — side parts, cascading braids, and half-up designs flatter the narrow chin while balancing the wider forehead.
Square faces — soft curves work better than hard angles. Flowing waves, crown swirls, and freehand halo braids soften the jaw.
Long faces — avoid styles that add vertical length. Focus on horizontal design elements like side-sweeps, halo braids, or crown-wrapping designs.
Most braiders will adjust their freehand design based on face shape if you ask. Many won’t think to mention it unprompted — so ask.
Common Mistakes in Freehand Cornrow Styles
Too many design elements. Restraint is your friend. Two strong design elements read as elegant; five compete with each other.
Matching designs front and back. If the front is a spiral, the back shouldn’t also be a spiral. Vary the energy.
Ignoring your head shape. Freehand should respond to the skull. A braider who forces the same design on every head misses the point of freehand.
Choosing a freehand braider based on price. This is one service where cheap usually means bad. A $75 freehand and a $300 freehand are not comparable products.
Skipping the consultation. Walking into a freehand appointment cold without discussing your reference photos, face shape, or lifestyle leads to mediocre outcomes. Five minutes of talking saves four hours of regret.
And one more — don’t compare your freehand result to the photo you showed the braider. Your head isn’t that head. Your hair isn’t that hair. What came out was built for you. If it’s good, it’s yours. That’s the whole point.