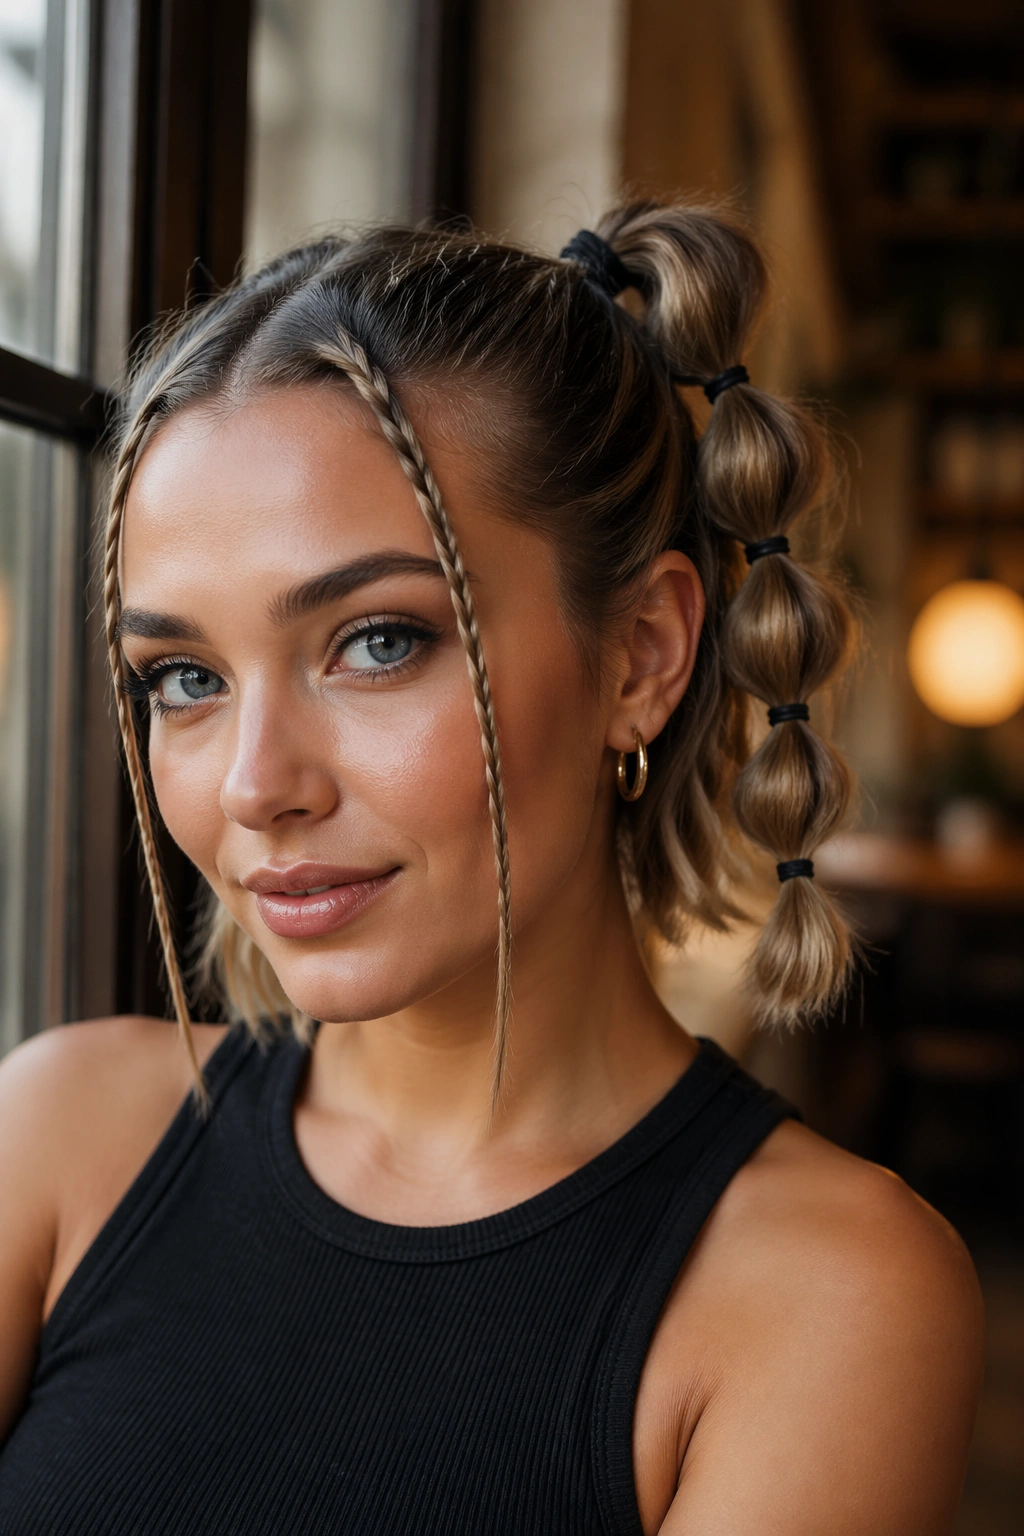
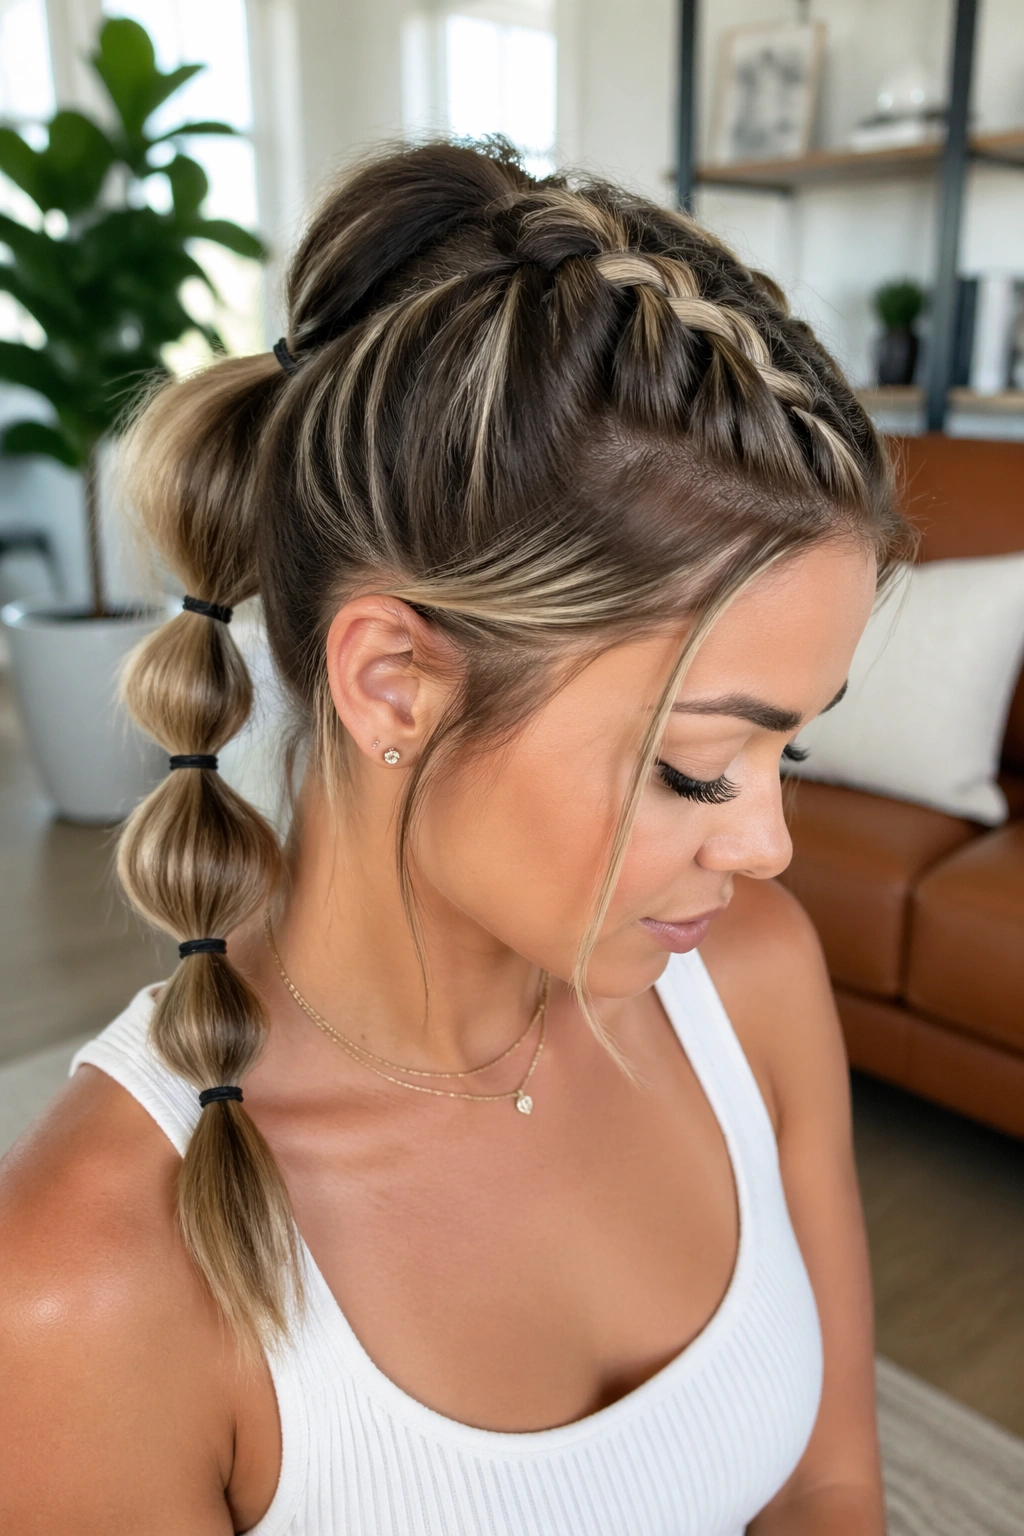
Short hair can do more than people give it credit for. Bubble braid ponytails for short hair are proof: with the right elastics, a little texture, and a couple of pins, a chin-length cut or lob can look deliberate instead of like it was forced into one sad elastic.
The trick is structure. Short strands do not need to swing past the shoulders to make a bubble ponytail work; they need clean anchors, small sections, and just enough lift at the root so each bubble reads as a bubble instead of a lump. Clear bands, mini snag-free elastics, and a light mist of texturizing spray do a lot of heavy lifting here. So does a tail comb. Always.
What I love about this style family is how forgiving it is. A sleek version can look sharp and polished. A messy one can feel relaxed and cool. If your hair keeps slipping, you can hide a pin under the first bubble or tuck the ends into the last section and no one will know unless they’re standing too close.
The styles below start simple and get more dressed up, because short hair likes a ladder, not a leap.
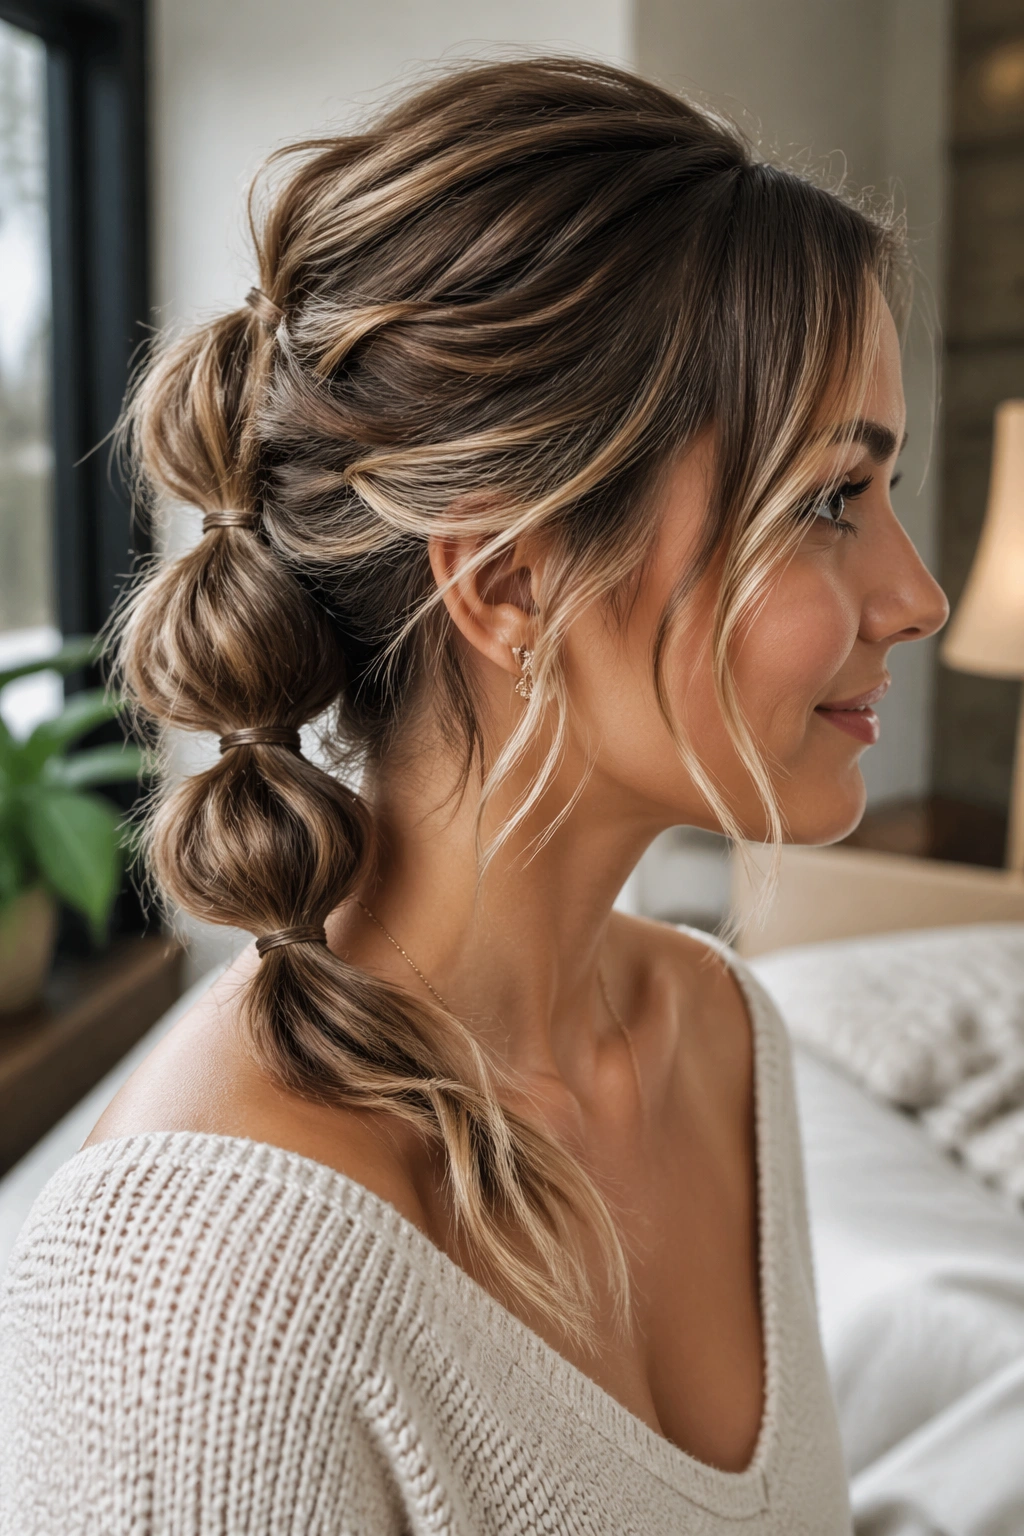
1. High Crown Lift Bubble Ponytail
Short hair looks longer when you lift the crown first. That is the whole game here. Tease the roots at the top of the head, smooth the surface lightly, and place the first elastic a touch below the crown so the ponytail sits high without pulling every layer flat.
Why It Works on Short Hair
A high bubble ponytail gives you height where short cuts often need it most. The lift at the crown creates the illusion of extra length, and the higher placement keeps the bubbles visible even if your ends stop at the collarbone. If your hair is fine, this one is a lifesaver.
- Use 2 to 4 clear elastics, depending on length.
- Keep each bubble about 1 to 1.5 inches apart.
- Pull each section outward gently, not hard.
- Mist the roots with light-hold hairspray before you start.
Tip: If the first bubble collapses, pin the base from underneath with a small bobby pin. That little fix makes the whole style behave.
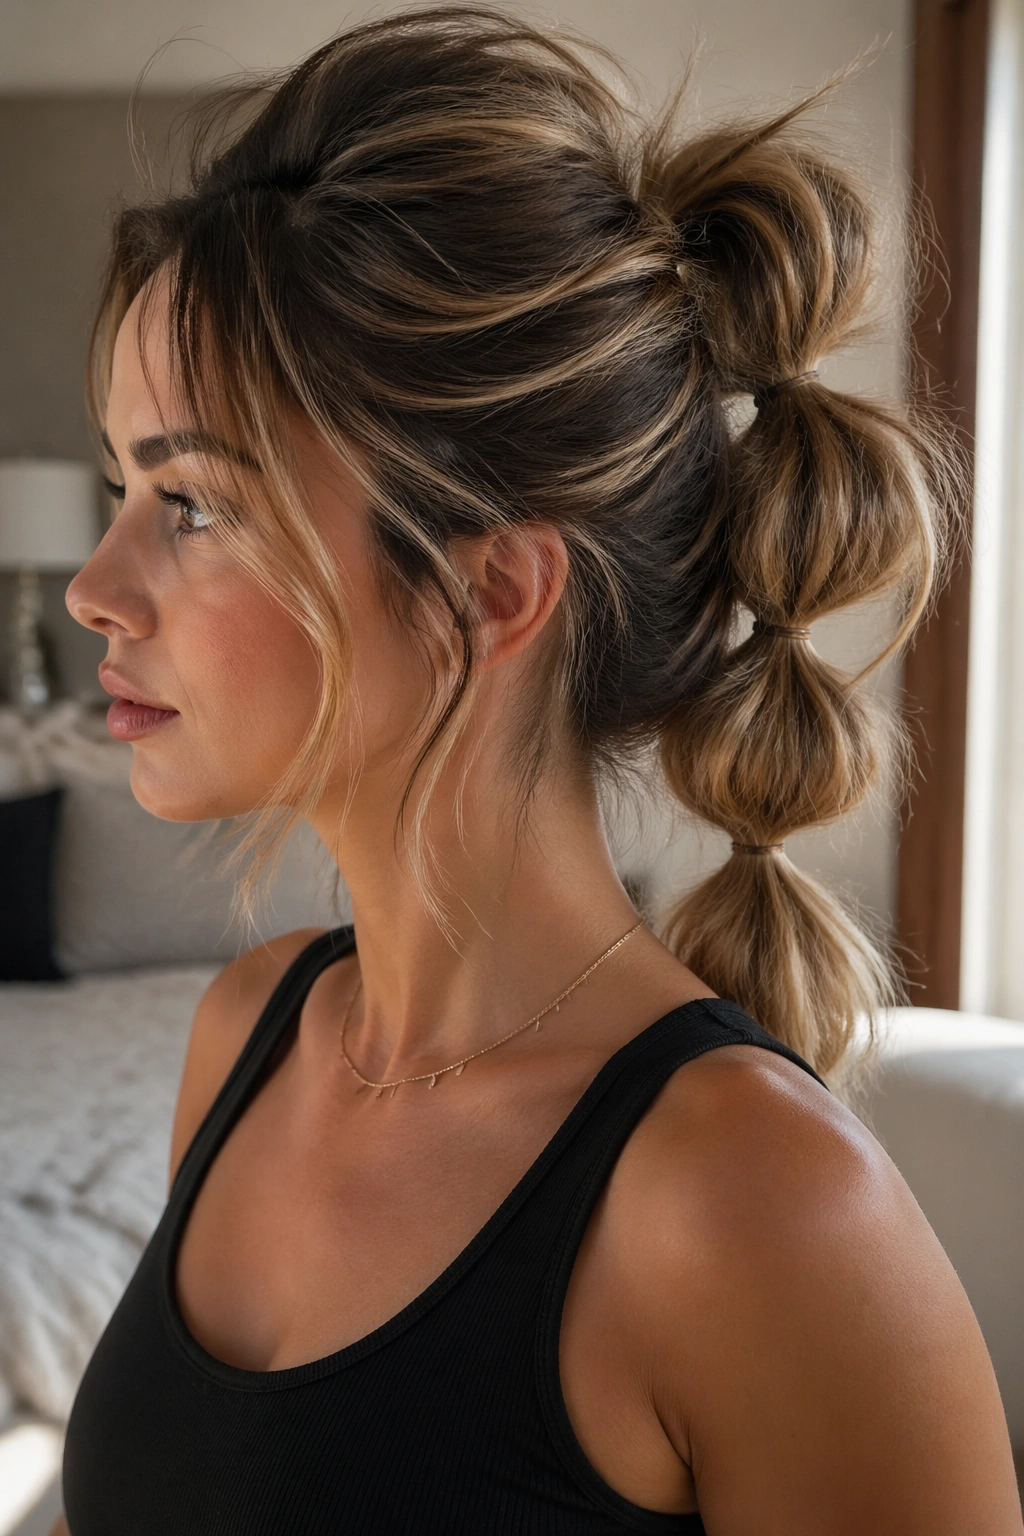
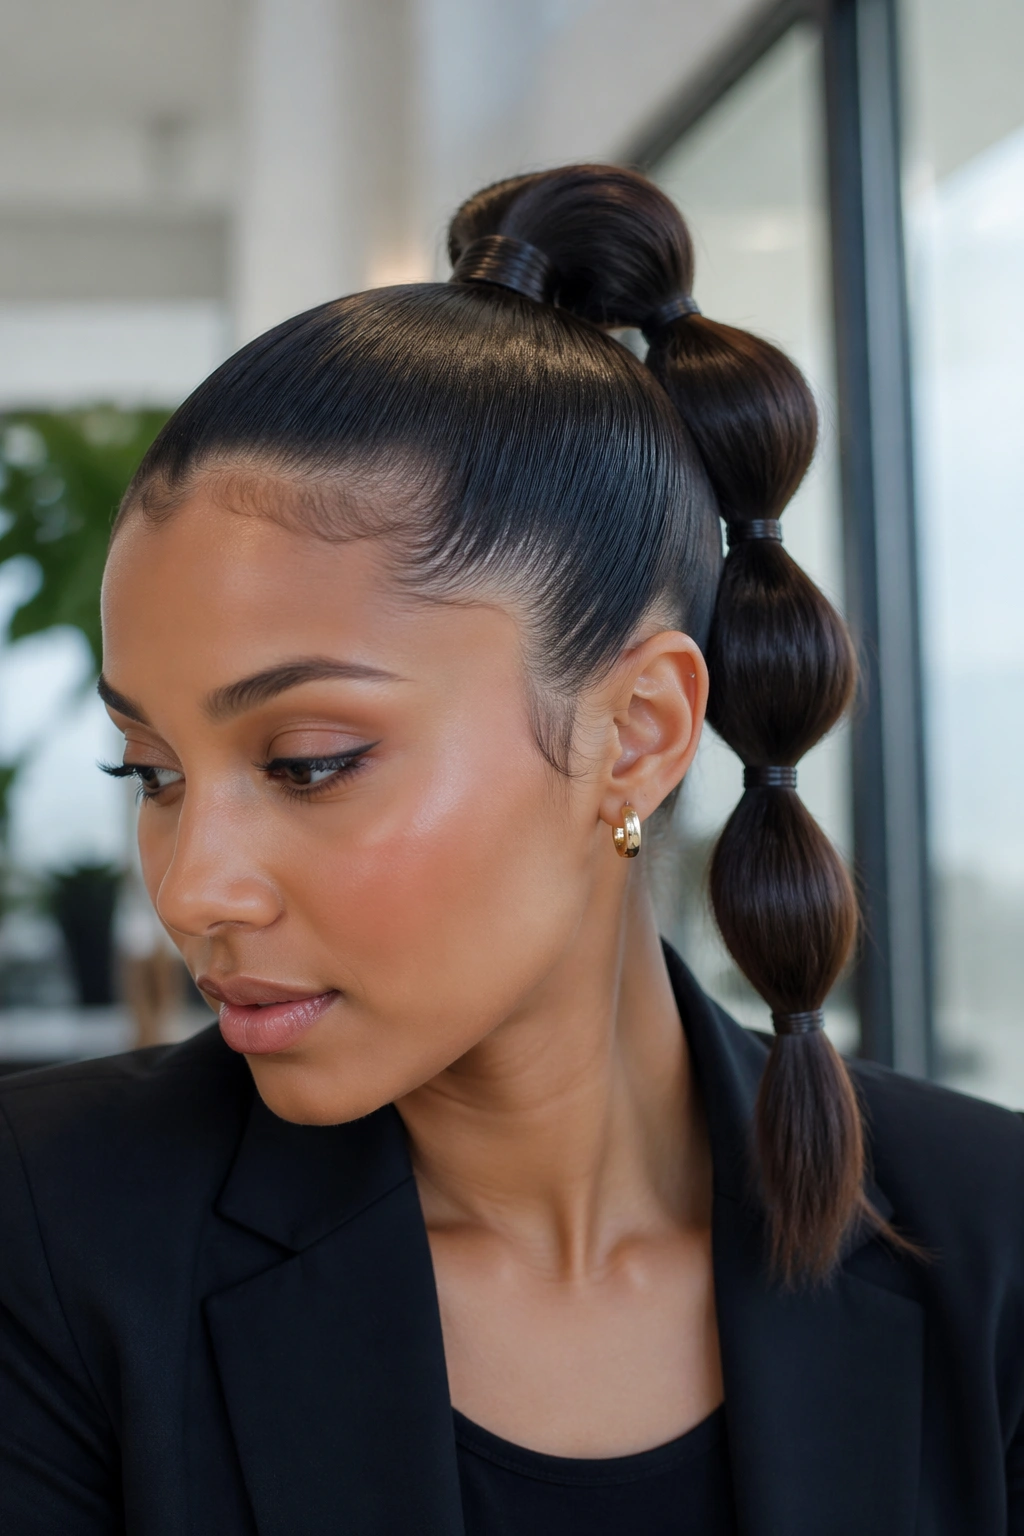
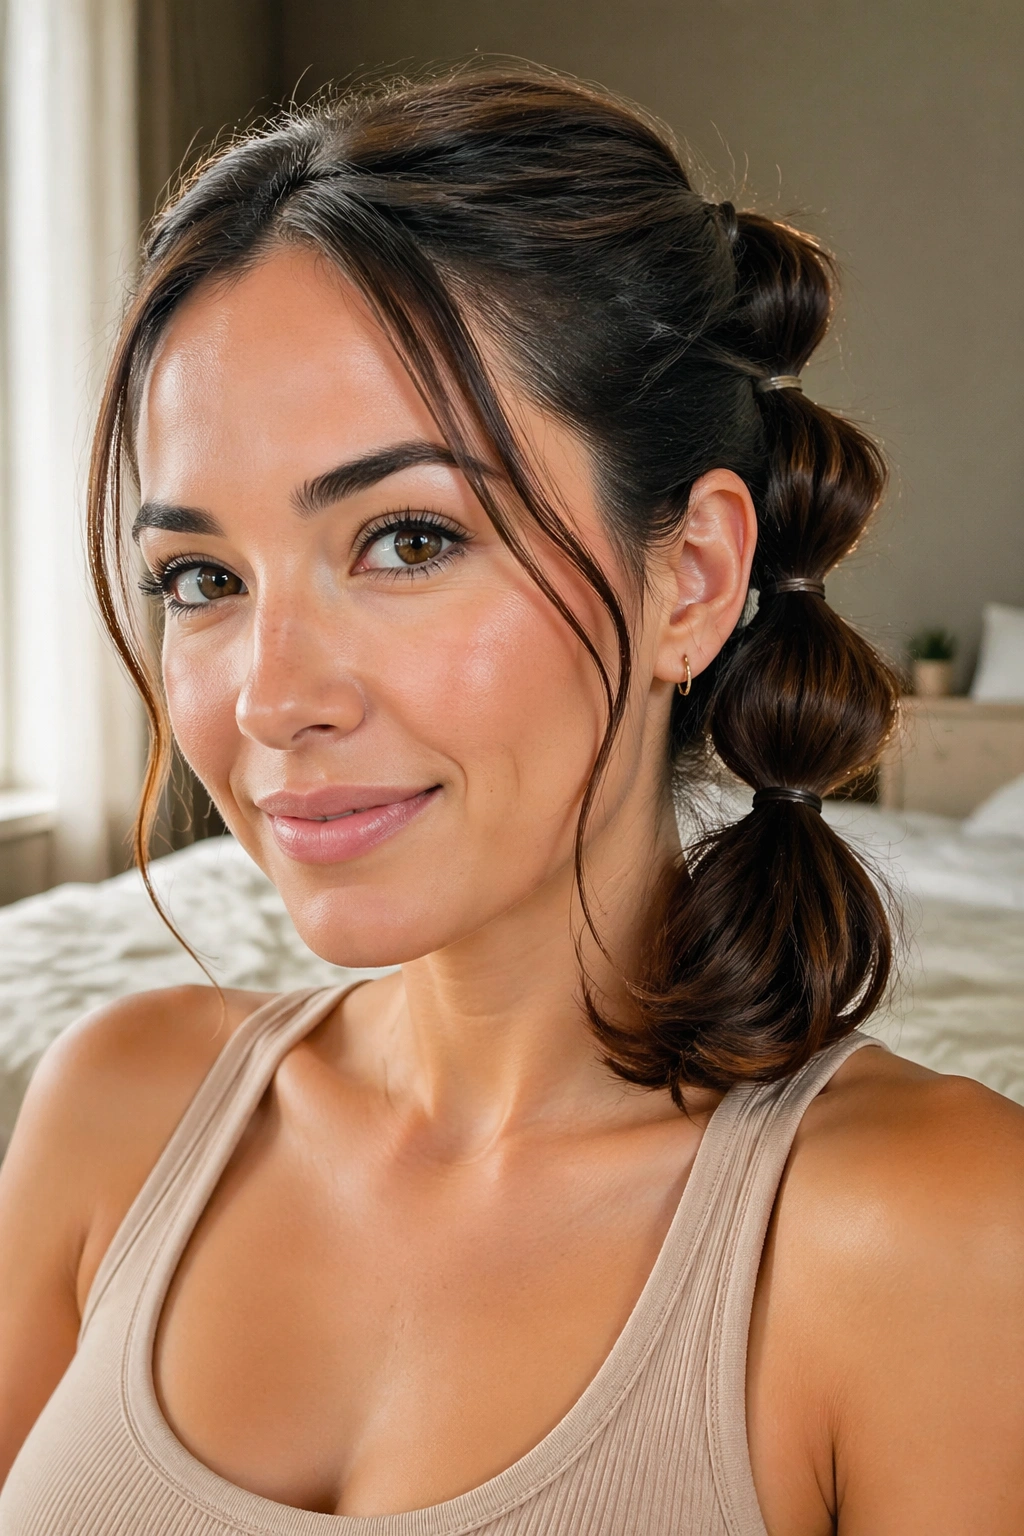
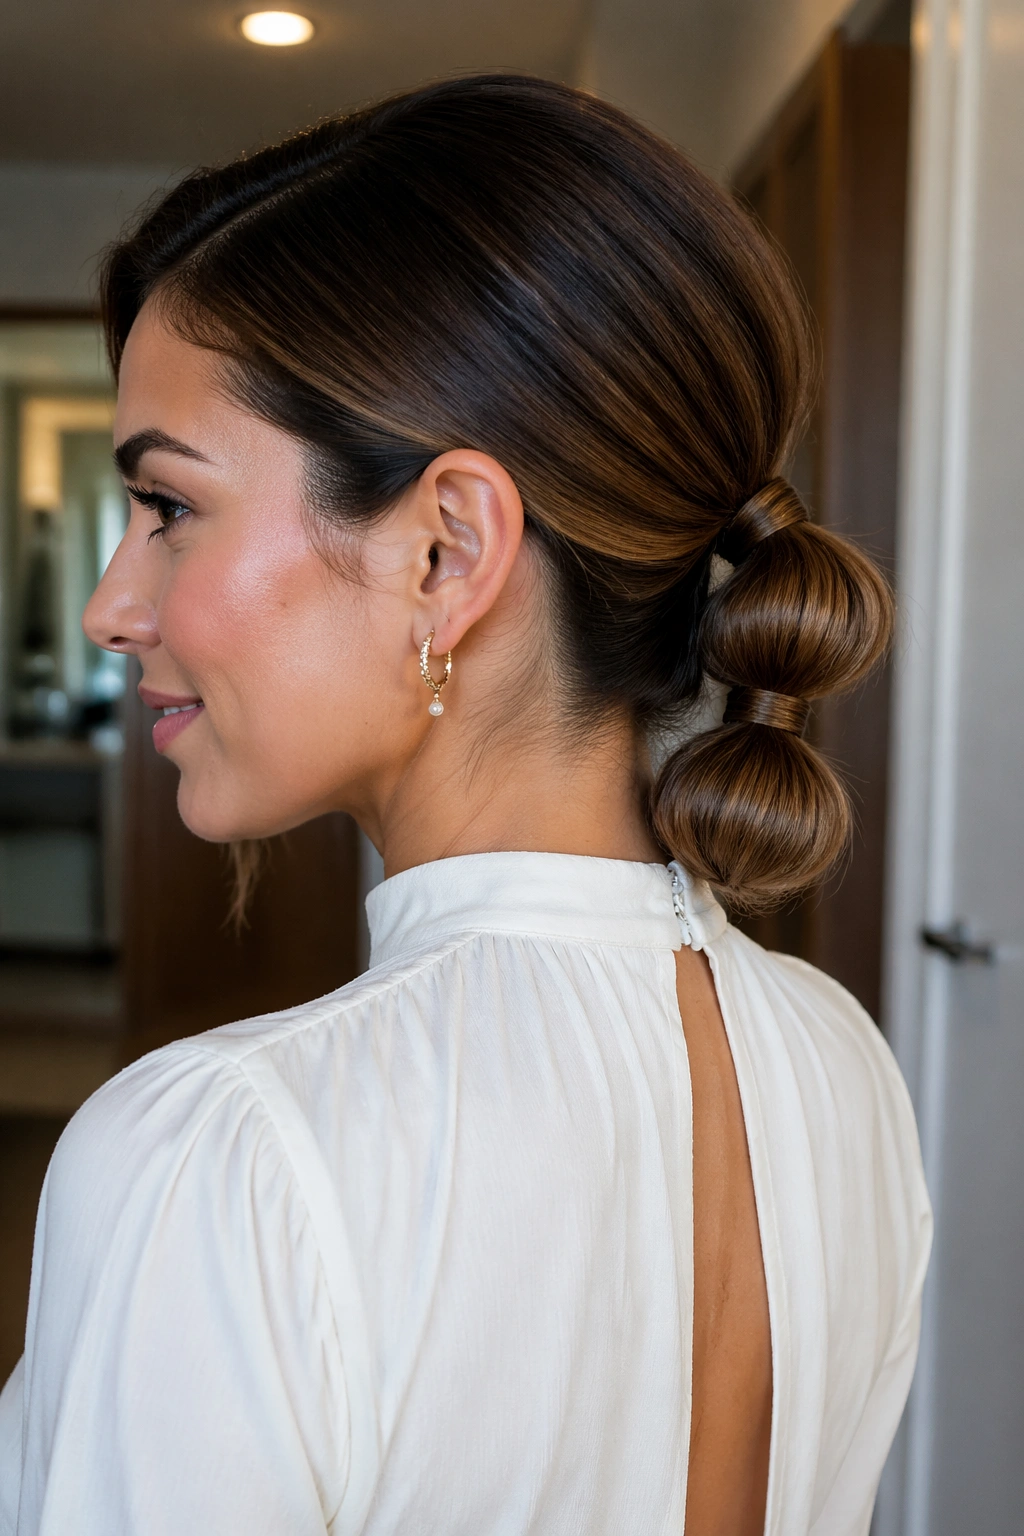
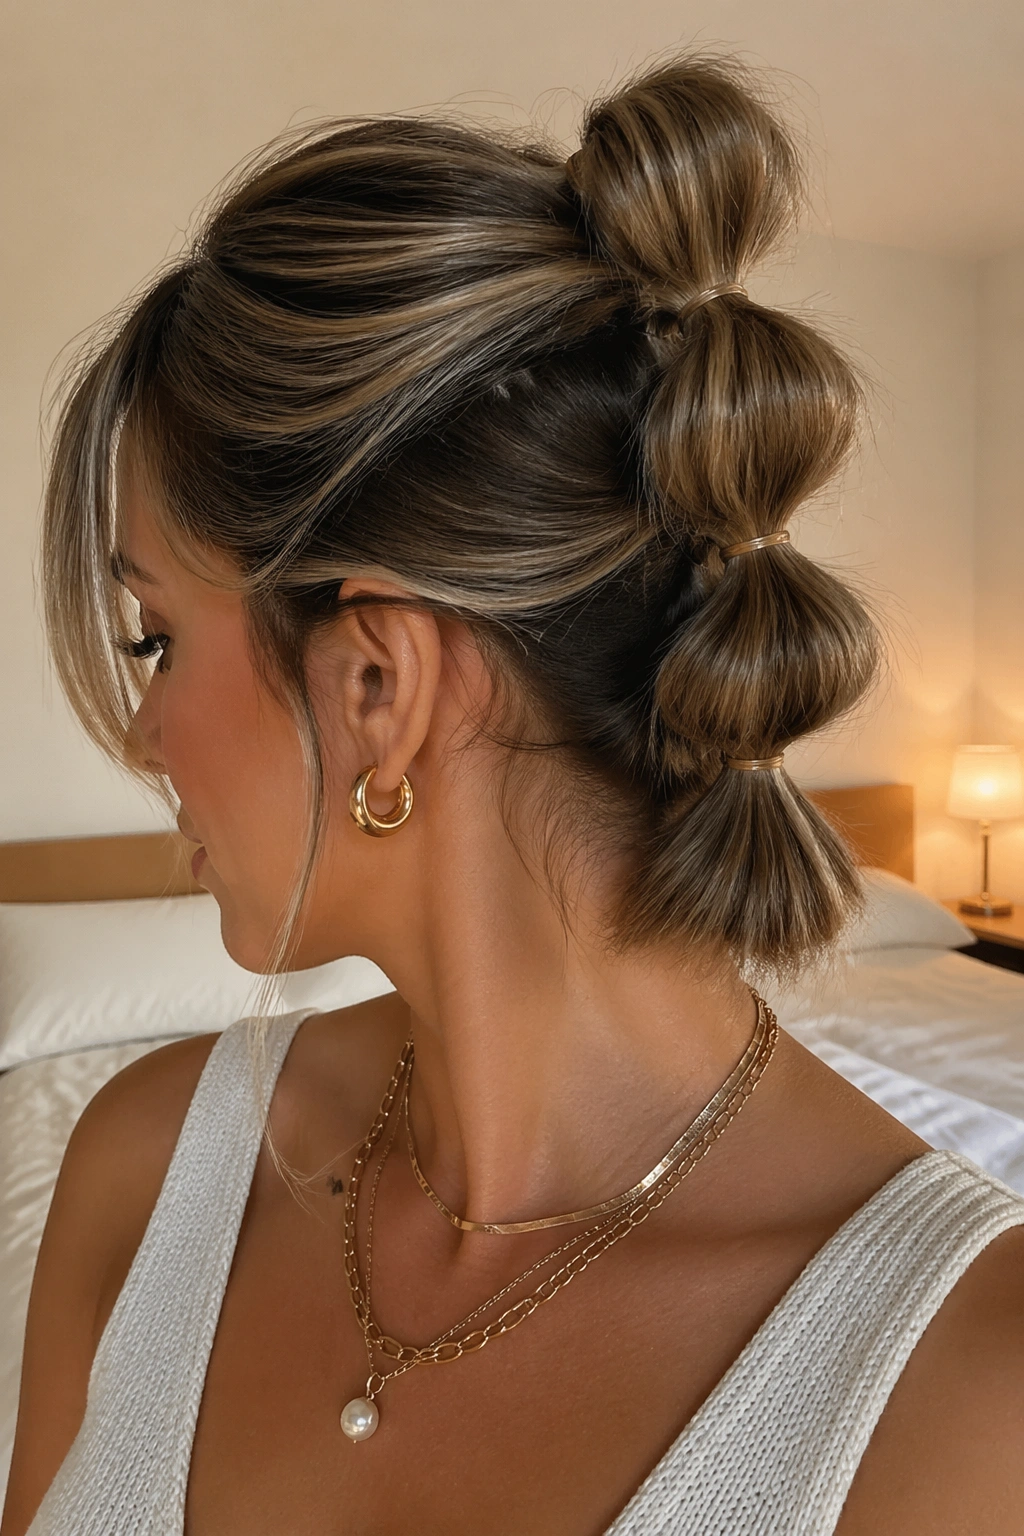
2. Low Nape Bubble Ponytail
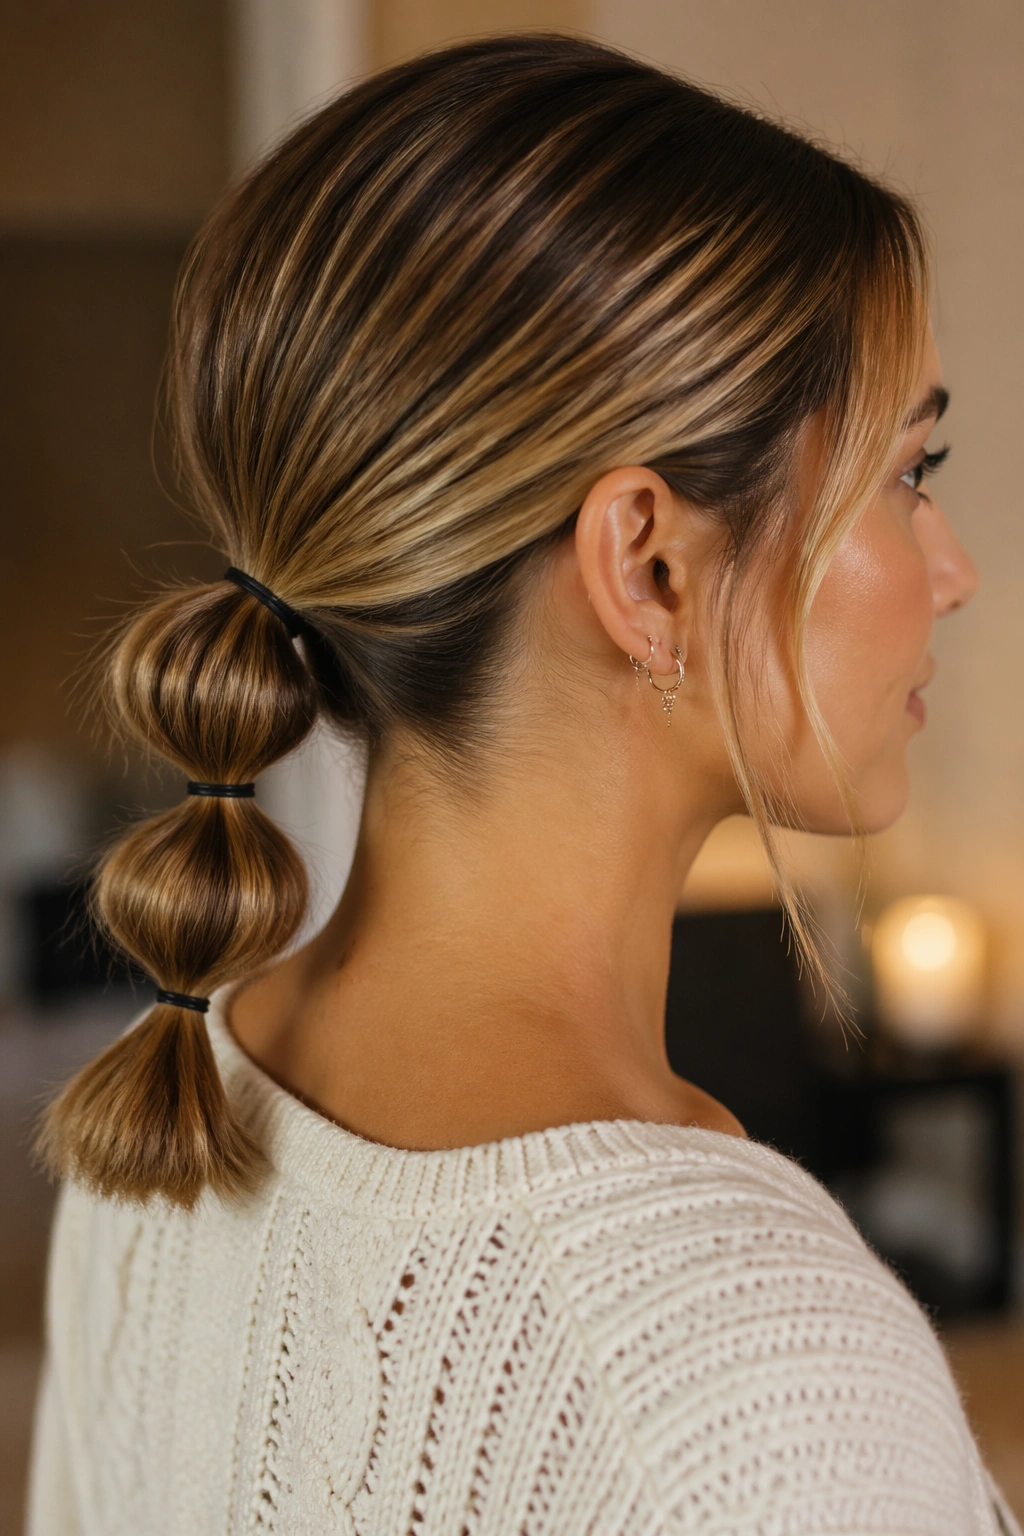
Why does a low bubble ponytail look so polished on a bob? Because it keeps everything anchored where the hair is strongest: right at the nape. The shape stays close to the head, which helps shorter lengths look neat instead of overworked.
This version is especially good if your cut has blunt ends. A clean middle part, a smooth brush-through, and a low tie at the base give you a neat line, then the bubbles add movement without demanding much hair. It is quiet, but not boring. There’s a difference.
Use a touch of gel or smoothing cream at the hairline if you want a sharper finish. If you prefer something softer, leave a few thin pieces around the temples and let them curve naturally. Either way, the low nape placement keeps the whole style grounded.
3. Half-Up Bubble Ponytail
If your ends fall out of a full ponytail, take only the top half. That is the short-hair move most people skip, and it works every time. The top section gives you enough length to build a chain of bubbles, while the rest of the hair stays loose and soft.
How to Fake More Length
- Clip away the bottom section first.
- Gather the crown and upper sides into a ponytail.
- Add 3 to 5 small elastics down the tail.
- Pull each bubble wider than you think you should.
- Let the lower hair stay smooth or lightly waved.
This version is especially good for shoulder-grazing hair and layered lobs. It keeps the style light, which matters when the bottom layers are too short to join the party. My favorite part is the contrast: the top looks styled, the bottom looks easy, and the whole thing feels intentional.
4. Twin Bubble Pigtails
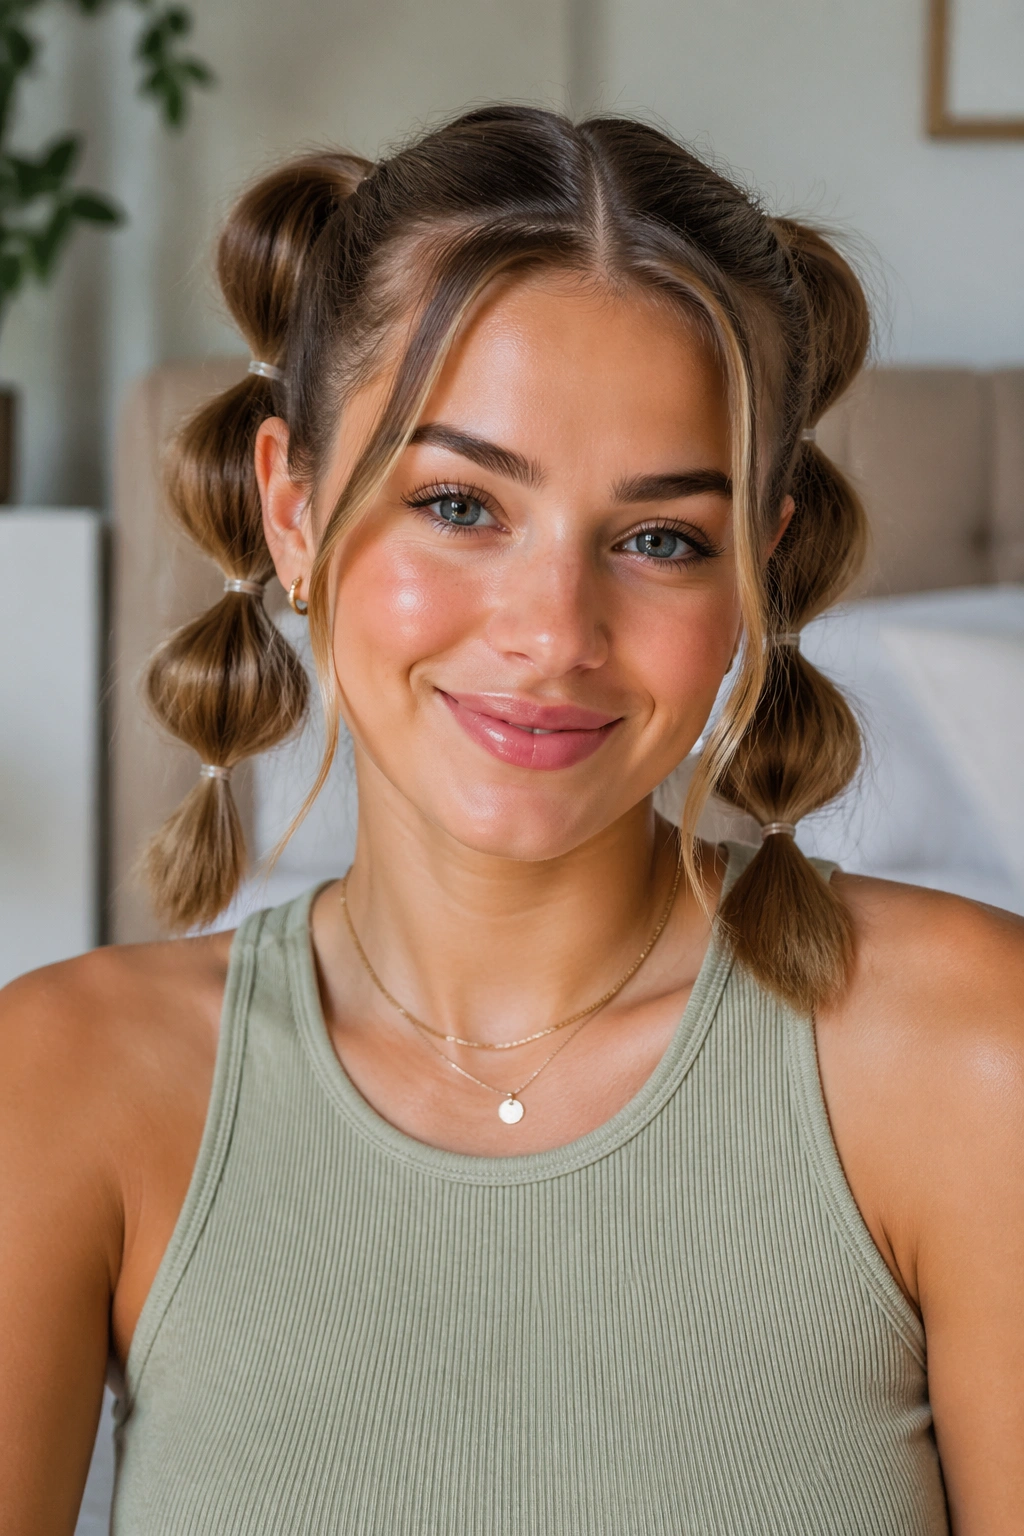
Two tiny bubble ponies can look sharper than one big one. Seriously. The symmetry makes short hair feel playful in the best way, and the style holds well because each side carries less weight. If your hair is thick, this also keeps the whole look from turning bulky at the back.
This one works best when you part the hair cleanly down the middle. Tie each side low near the ears or slightly higher if you want a livelier shape. Then add one or two bubbles per side, depending on length. Don’t overstuff it. Two neat bubbles can look cleaner than four forced ones.
If you want a more youthful finish, keep the parts precise. If you want it softer, tug the bubbles loose and leave a few pieces near the cheeks. Either way, the style gives short hair personality without asking for a long tail.
5. Ribbon-Wrapped Bubble Ponytail
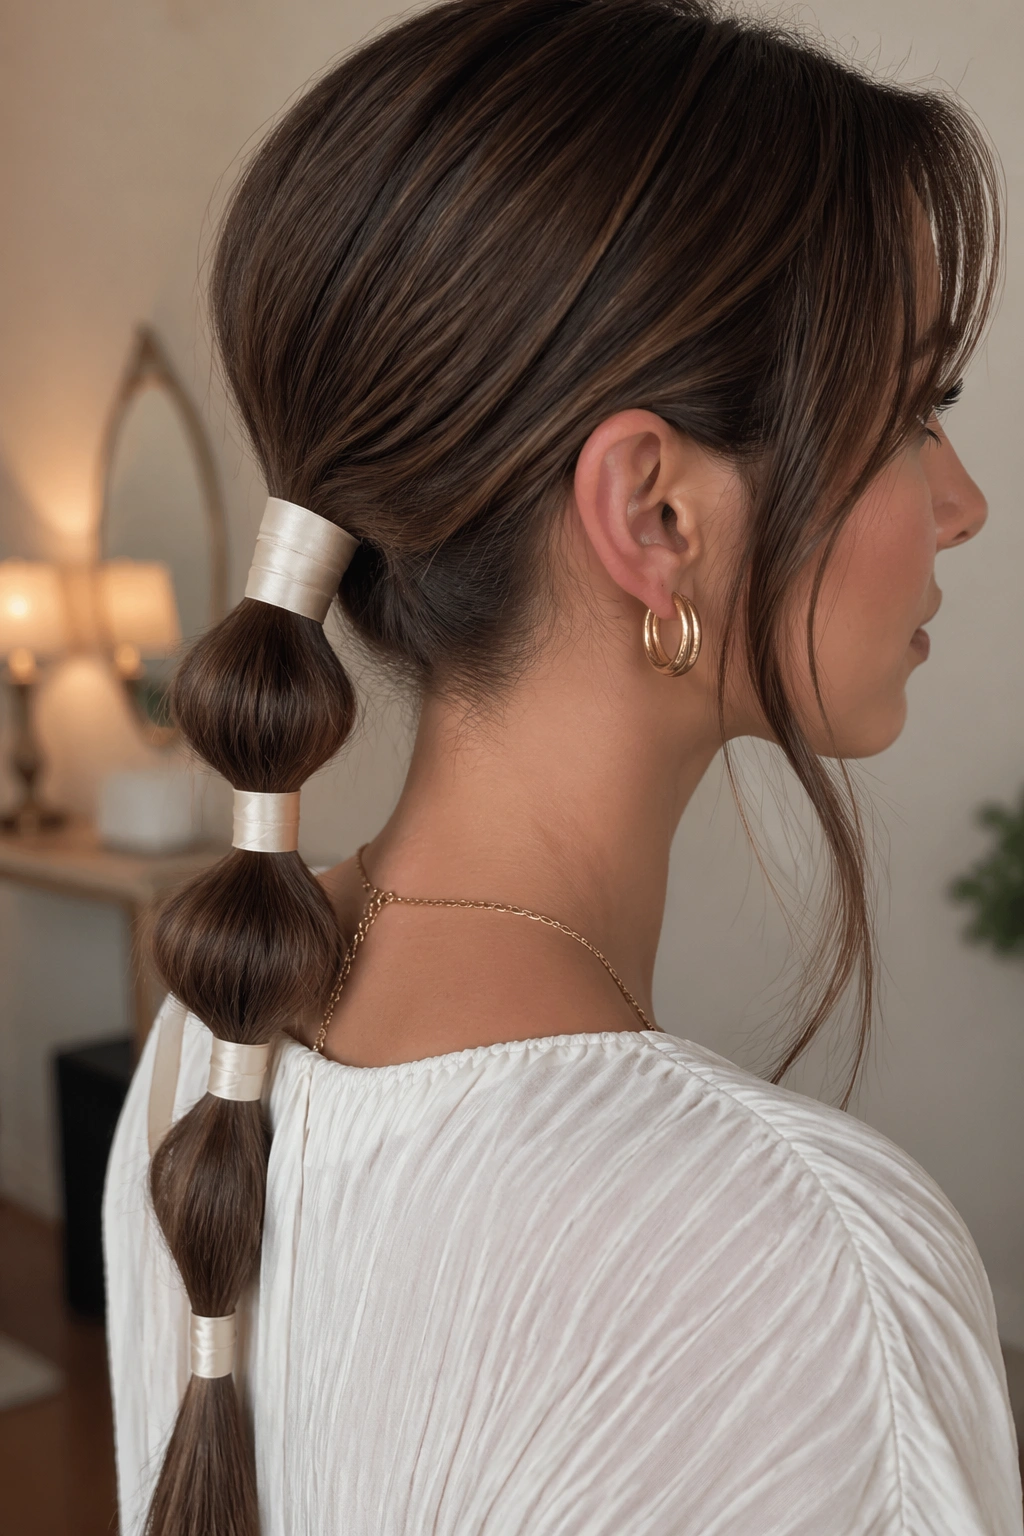
A ribbon changes the mood fast. A plain elastic reads practical; a thin ribbon threaded through the base feels softer, almost old-fashioned in a good way. On short hair, that matters because the style needs a little extra visual weight, and ribbon does that without adding bulk.
I like a satin or grosgrain ribbon about 1/4 to 1/2 inch wide. Tie it around the base first, then wrap it around each section between bubbles if the hair is long enough to allow it. If not, keep the ribbon at the top and let the rest do the talking. There’s no rule that says the ribbon has to touch every bubble.
This version looks especially nice with a side part and a few loose face pieces. The movement feels gentle, not fussy. And when the ribbon color is close to your outfit, the whole look suddenly feels thought through.
6. Side-Swept Bubble Ponytail
A center part is not the only clean line in town. A side-swept bubble ponytail gives short hair a softer angle, and that angle can be kinder to layers that want to fall forward. It also helps if one side of your cut is a little shorter than the other — which happens all the time.
The base sits low and slightly off-center, usually behind one ear or just below it. From there, the bubbles can trail down the same side, so the style feels directional. That visual lean makes the hair look fuller, not thinner, which is the point. I reach for this shape when a blunt bob needs motion.
Skip heavy teasing here. A small lift at the roots and a smooth side part are enough. The charm comes from the line itself. It looks easy, and that’s exactly why it works.
7. Messy Texture Bubble Ponytail
Can a bubble ponytail look undone and still feel finished? Absolutely. The trick is controlled mess. You want texture at the roots, a little bend in the lengths, and bubbles that are pulled unevenly on purpose — not a style that has slipped out halfway through the day.
What to Watch For
A few small things make this version work:
- Start with dry shampoo or texture spray at the roots.
- Pull the bubbles wider on one side than the other.
- Leave 2 face-framing pieces loose if your layers are short enough.
- Tug a few strands out near the ears for softness.
This one is good when your hair has grit and movement already. Freshly washed hair can feel too slippery, so day-two hair often behaves better. The finished look is relaxed, slightly rebellious, and far more forgiving than a sleek pony if your cut has lots of layers.
8. Fine-Hair Bubble Ladder
Fine hair needs a different kind of help. Not more volume, exactly — better placement. A bubble ladder uses smaller, closer elastics so the style does not sag between ties, which is the common problem when short, silky hair tries to hold a round shape.
Start with a low or mid-height ponytail and place the first elastic close to the base. Then keep the spacing tight, around 1 inch apart, and gently puff each section outward. Backcombing the inside of each bubble for two or three quick strokes gives the shape something to hold onto. That tiny bit of friction matters.
This is the style I’d pick for hair that falls flat by noon. It looks neat, it stays put, and it does not require a lot of length to read well. If the bubbles look too small at first, resist the urge to yank. Build them gradually.
9. Twisted-End Bubble Ponytail
What happens when your hair is just long enough for a ponytail but not long enough for a long finish? Twist the ends. That tiny move changes the whole shape, because the last section stops looking like an awkward tail and starts looking like a deliberate finish.
How to Get the Most From It
Work through the bubbles first, then gather the last few inches into a tight twist. You can wrap it around the final elastic or fold it under and pin it flat. Either version keeps the end tidy. If your layers are choppy, this is a good way to stop the finish from fraying.
A fine-tooth comb helps here, but your fingers are useful too. Comb the top smooth, then use your hands to loosen only the bubbles. That contrast keeps the style from looking stiff. There’s something satisfying about a short pony that ends cleanly. It just feels finished.
10. Claw-Clip Bubble Ponytail
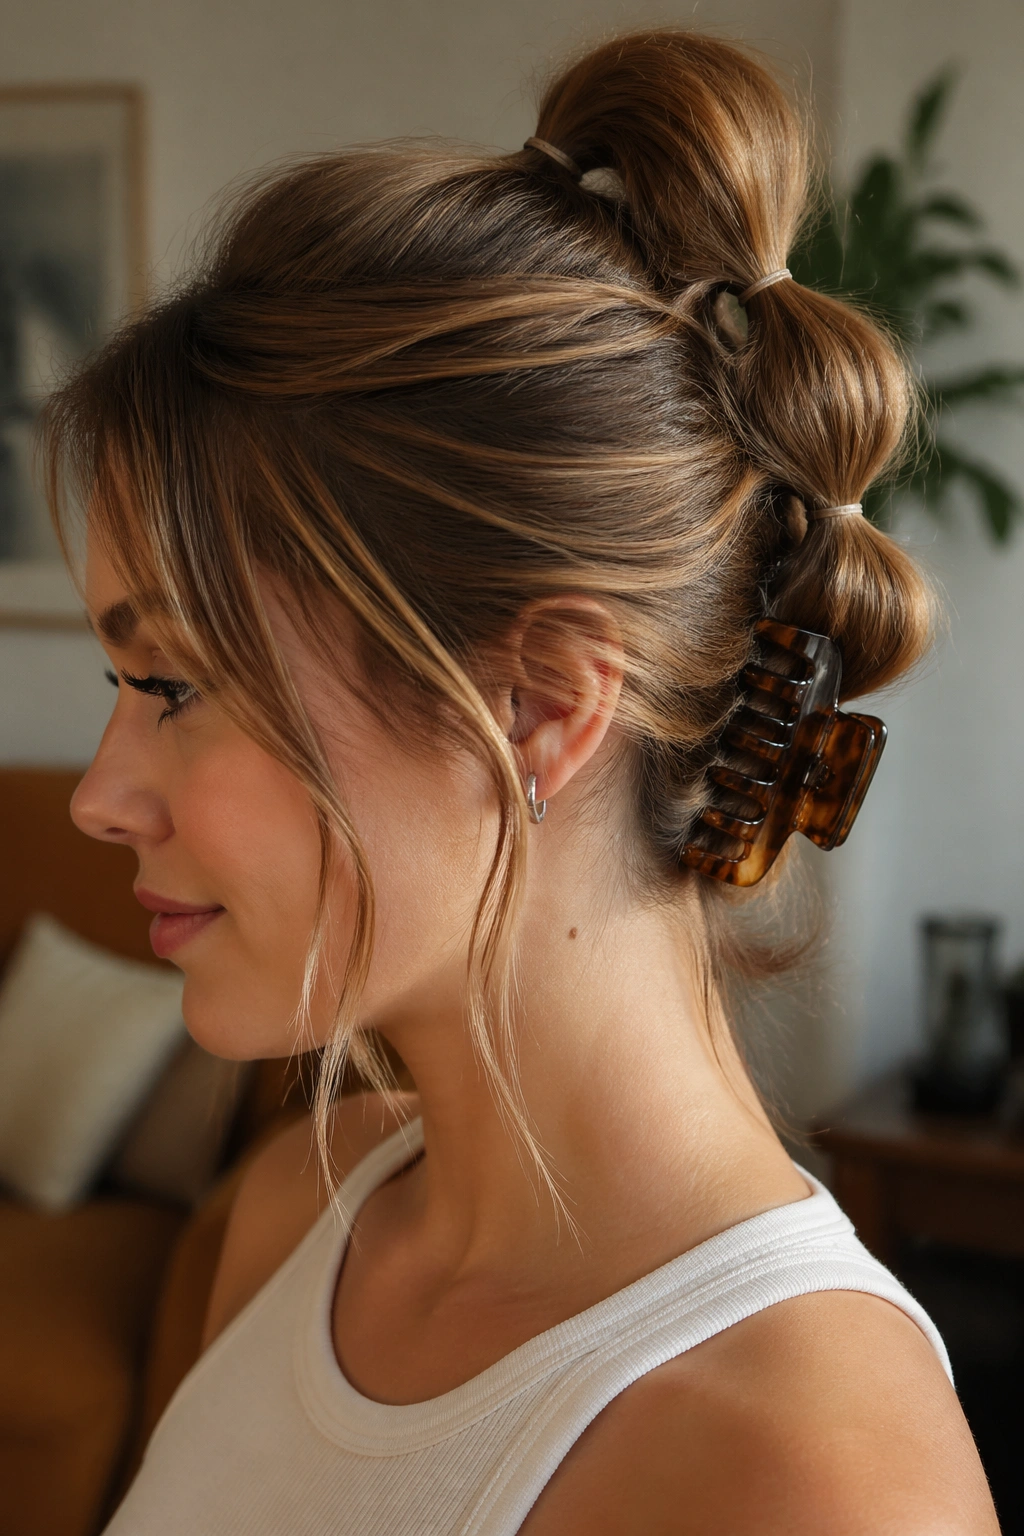
A claw clip at the base sounds small. It is not. On short hair, that extra bit of grip can change the whole shape of the ponytail by keeping the first section lifted before the bubbles even start. Blunt bobs especially benefit from it.
Compared with a regular elastic-only base, the clip gives the hair a little spine. Use the clip to secure the top section first, then tie over it with a small elastic if needed. That double hold makes the pony sit higher and keeps shorter layers from slipping out near the neck. It also gives the style a slightly undone edge, which I like.
Choose a clip with flat teeth if your hair is fine, or a stronger spring clip if your hair is thick. The visual effect is casual but deliberate. And yes, that matters.
11. Sleek Gel Bubble Ponytail
A sleek bubble ponytail is all about clean lines. No fuzz at the hairline, no stray ends at the temple, no halfhearted lifting. You want the surface smooth enough that the bubbles become the feature, not the flyaways.
Start with a pea-sized amount of gel or edge control at the roots, then brush the hair back with a boar bristle brush or a dense paddle brush. Tie the ponytail tightly, then build the bubbles with clear elastics and a careful tug on each section. The shine makes the shape look sharper, especially on straight hair.
This one is good for work settings, dressier outfits, or any day you want a short cut to look more polished than playful. The key is restraint. Too much product makes the hair look wet; too little leaves the style fuzzy. You want smooth, not slicked down like cardboard.
12. Front Mini-Braid Bubble Ponytail
Need something with a little more detail at the front? Add two thin braids near the hairline before you gather the ponytail. They act like frame pieces, and on short hair, that framing matters because the ponytail itself may not have a ton of length to show off.
The braids can be tiny three-strand plaits or narrow twists. Keep them close to the scalp and join them into the ponytail base, then continue the bubbles down the tail. If your cut has layers around the temples, this is a good way to keep them controlled without hiding them completely.
Why It Changes the Look
The front braids add texture where the eye lands first. That makes the rest of the ponytail feel richer, even when the tail is short. I like this version for concerts, parties, or just a day when plain hair feels a little too plain.
13. Curled-End Bubble Ponytail
A little curl at the ends softens the whole style. It keeps the final section from sticking out straight, which can happen fast on short hair. The bubbles look rounder too, almost plush, because the end bends back into the shape instead of hanging off it.
Use a curling wand or flat iron bend on the last 1 to 2 inches of the ponytail after the bubbles are set. You do not need a full curl pattern; a slight curve is enough. If your hair is naturally wavy, skip the hot tool and let the texture do the work. Forced curls can look too polished for this style anyway.
This version feels especially nice with layered cuts. The curls soften the joints between bubbles and make the tail look fuller. Small detail. Big difference.
14. Faux-Hawk Bubble Ponytail
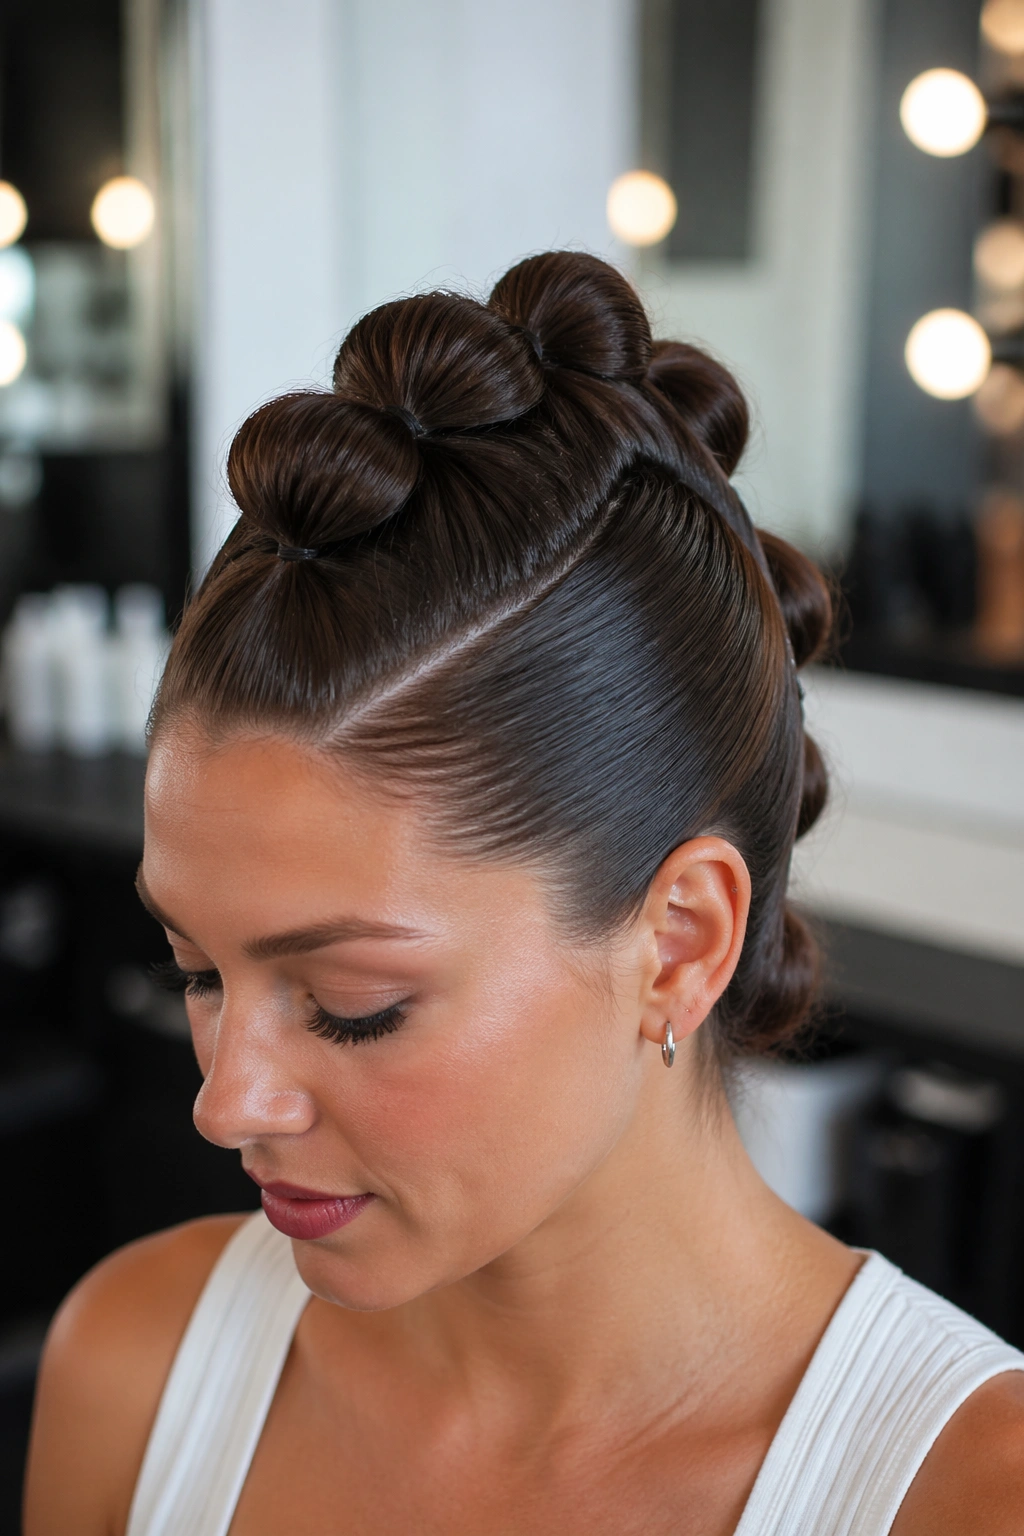
This one has attitude. The faux-hawk bubble ponytail uses a tight center strip from forehead to nape, with the sides brushed up and pinned in so the bubbles sit like a ridge down the middle. On short hair, that narrow shape is helpful because it makes the whole style look intentional, not overloaded.
It works especially well if the sides of your hair are shorter than the top. Slick them down with gel, or pin them tightly behind the ears, then build three or four small bubbles in the center section. The profile ends up stronger than a standard ponytail, which is why it feels a little edgier.
If you want contrast, keep the bubbles compact. If you want drama, pull them wider and leave the ends slightly piecey. Either way, this is the one that gives short hair some bite.
15. Scrunchie Bubble Ponytail
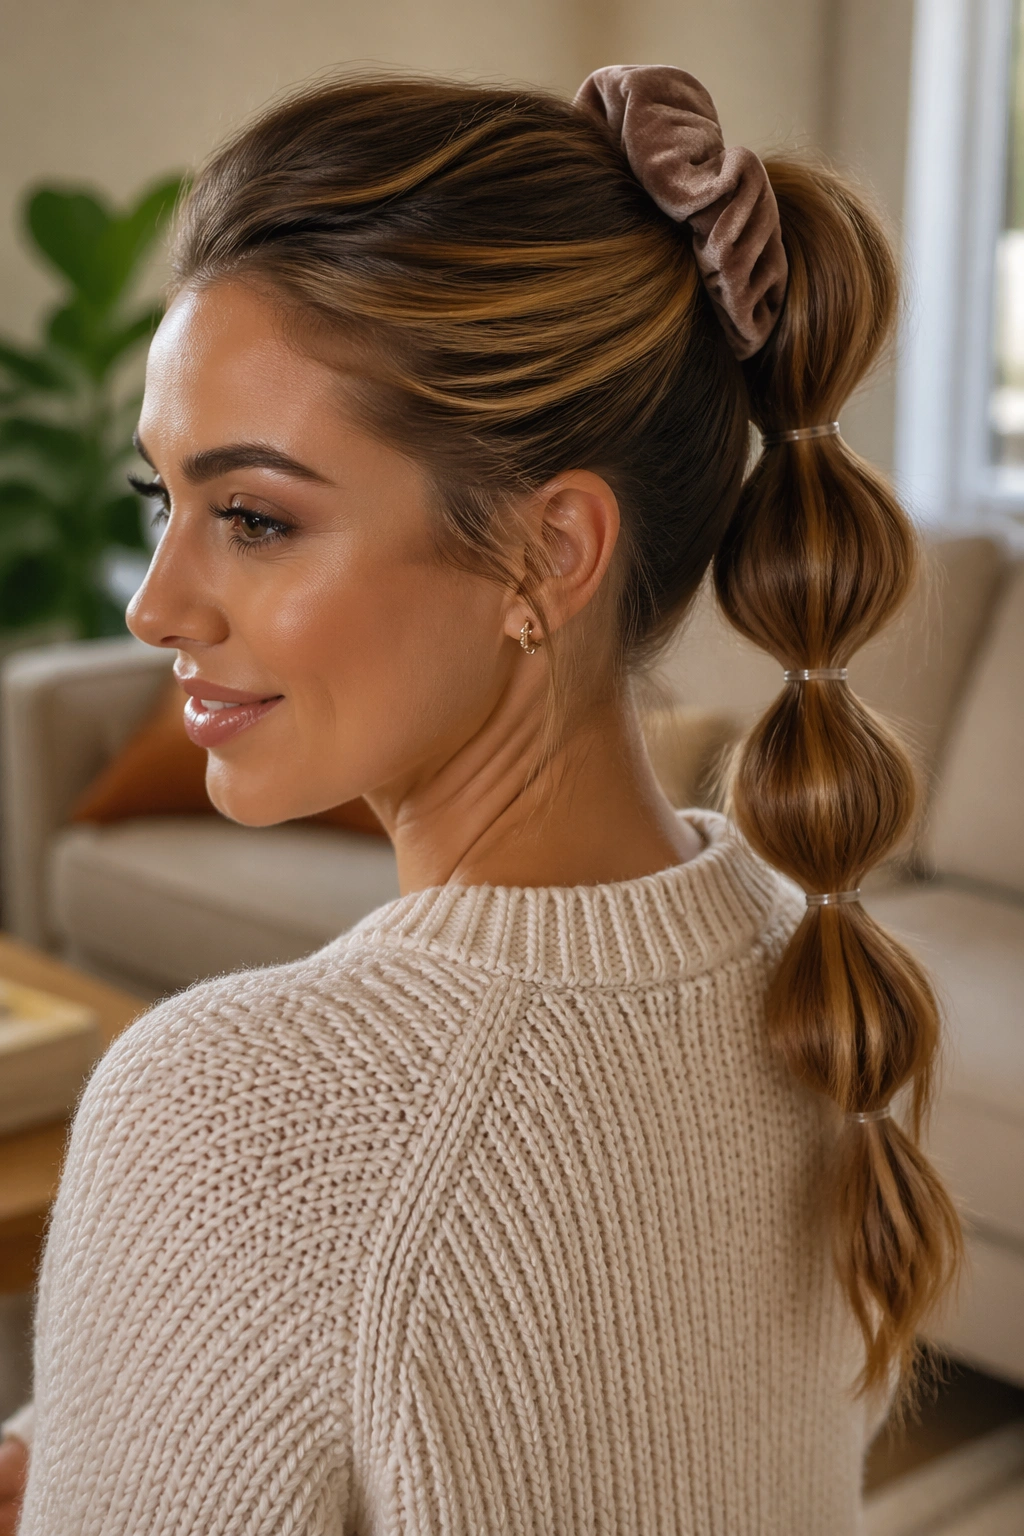
A scrunchie changes the texture of the style in a way a plain elastic never will. It softens the base, adds a little fabric volume, and makes the bubbles feel less severe. On short hair, that can be useful because the cut already has enough sharp edges of its own.
You can use one oversized scrunchie at the base, then clear elastics down the tail. Or you can place smaller scrunchies between bubbles for a more playful look. Velvet, satin, and cotton all read differently, so the material matters. Velvet feels dressier. Cotton feels casual. Satin lands somewhere in the middle.
This version is good when you want the ponytail to look softer around the face and more relaxed overall. It is not the sleekest choice, and that’s fine. It never tries to be.
16. Tucked-End Bubble Ponytail
Sometimes the best move is to hide the ends entirely. If your hair barely reaches the neck or stops right around the shoulders, tucking the last section under the final bubble can make the style look cleaner and more finished.
Use small bobby pins to fold the end under itself, then pin it flat against the tail. A little hairspray on the ends helps them stay tucked instead of springing loose. This is a good fix for layered cuts, because the shorter pieces can disappear into the shape rather than poking out all over the place.
The finish feels neat and controlled. That matters if you like a tidy silhouette. It also works well with collars, jackets, and high necklines, where a dangling tail would just get in the way.
17. Sporty High Bubble Ponytail

A sporty bubble ponytail needs one thing above all else: hold. Pull the hair up high, smooth the sides tight, and use enough elastics that the bubbles stay lifted even if you move around a lot. This is the version that survives errands, gym bags, and long days.
Keep the sections small and even. You do not want huge bubbles here; you want stacked, active-looking sections that stay secure. A touch of dry shampoo at the roots helps the hair grip, especially if it’s freshly washed and slippery. The vibe is practical first, cute second.
I prefer this one when I want short hair off my face without sacrificing shape. It feels awake. That’s probably the nicest way to say it.
18. Romantic Waved Bubble Ponytail
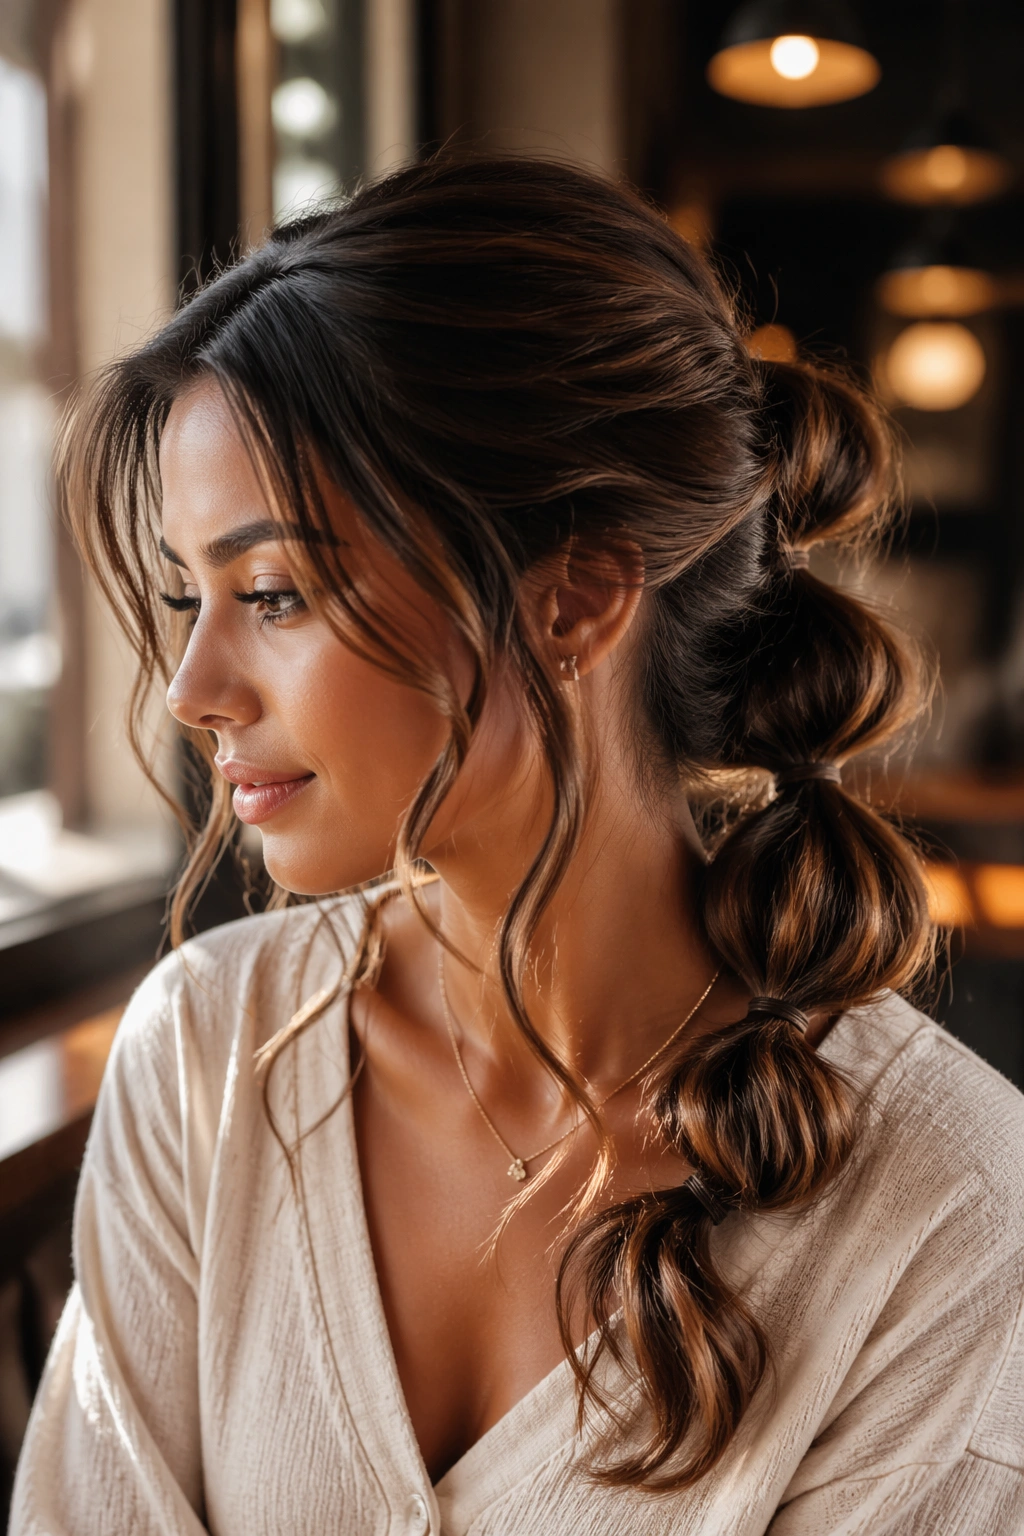
Soft waves make a bubble ponytail feel less rigid right away. The bubbles still show, but the bends in the hair soften the hard line between each section, which is useful on short hair because the style can otherwise tip too far into severe territory.
Set loose waves through the ends before you tie the ponytail, then build the bubbles and pull them open just enough to keep the shape visible. Leave a couple of pieces around the face if your layers allow it. They do not need to be symmetrical. In fact, they usually look better if they are not.
This version works for dinners, photos, or any event where you want the hair to feel gentle without being flat. It is one of those styles that looks like you spent more time than you did.
19. Zigzag-Part Bubble Ponytail
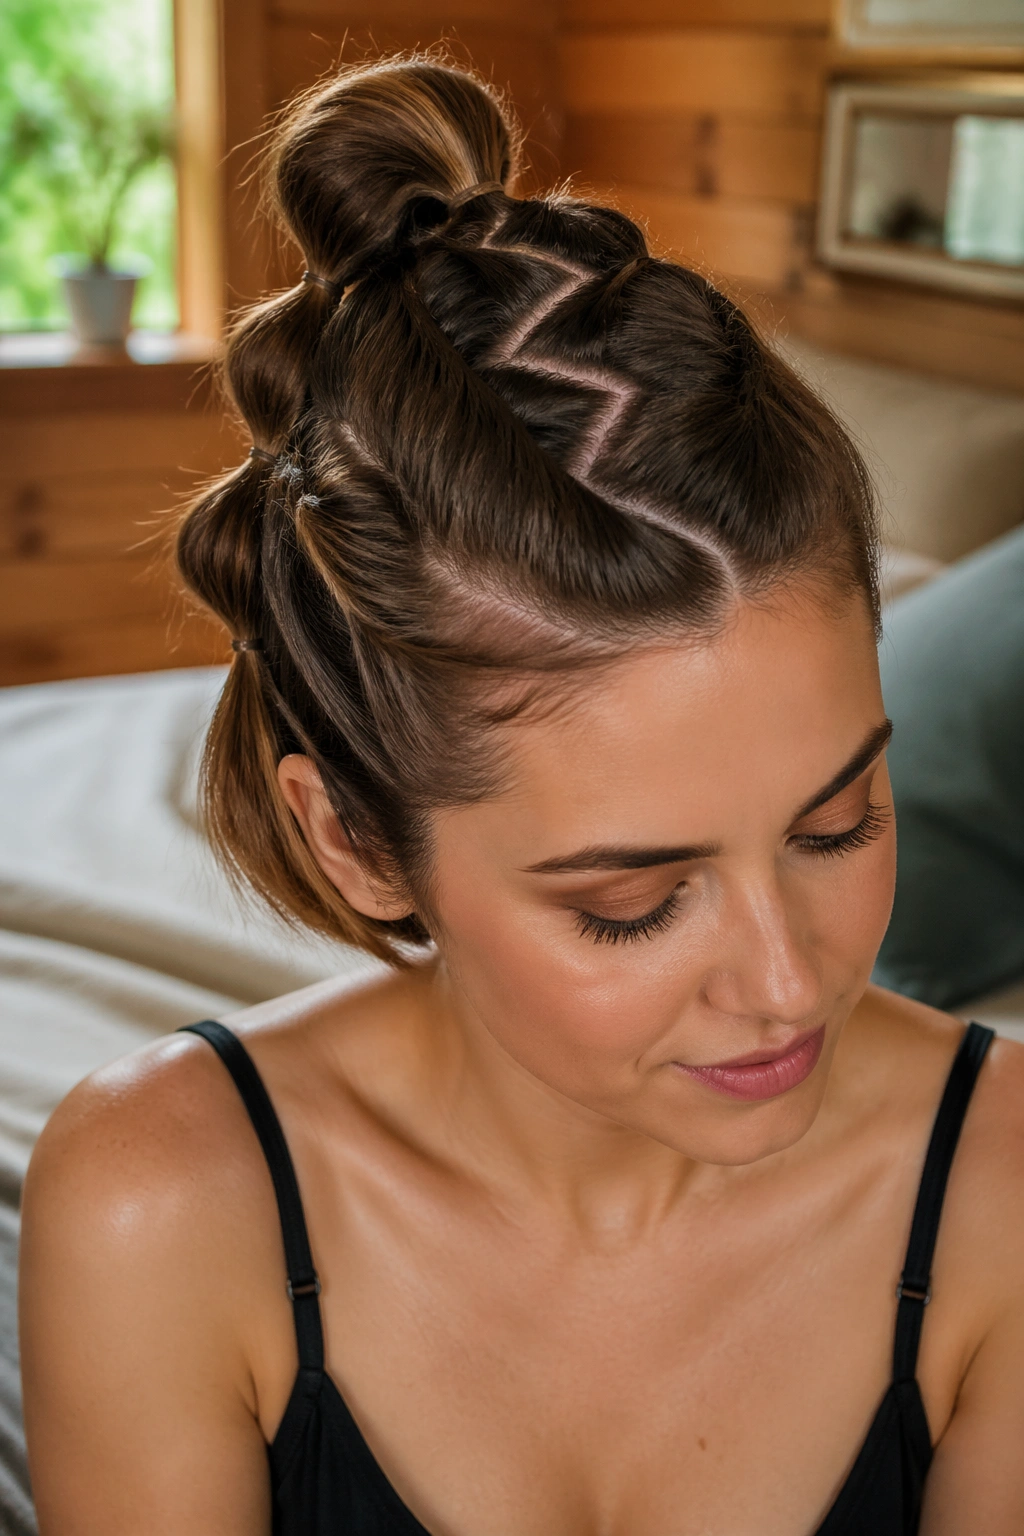
A zigzag part changes the mood fast. Instead of a straight line down the scalp, the part adds a little movement at the top before the ponytail even begins. On short hair, that extra texture near the roots can keep the style from looking too plain.
Use the tail of a comb to draw the zigzag cleanly, then smooth each side back into a ponytail. The bubbles can be low, mid, or high, depending on the shape you want. I like this especially on straight hair, where the part becomes part of the design. It keeps the style from looking overly neat in a boring way.
If your hair is layered, the zigzag also helps disguise uneven regrowth or pieces that want to separate. It is a small detail, but it pulls its weight.
20. Curly-Hair Bubble Ponytail
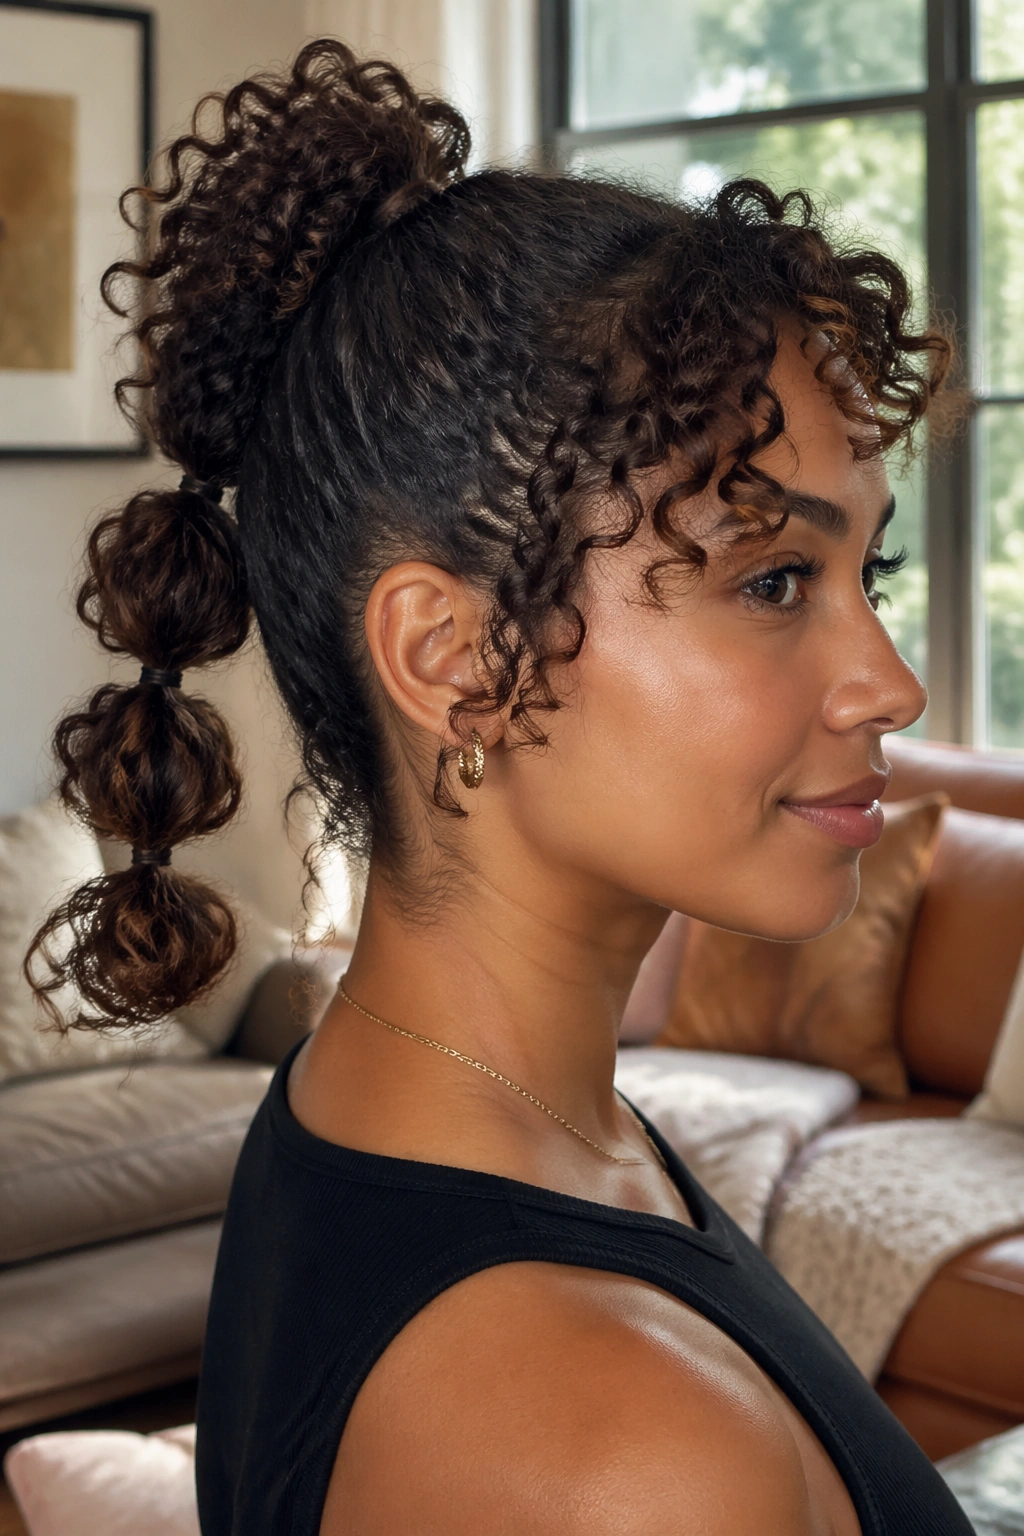
Curly short hair does not need to be forced into a sleek mold. That usually ends badly. Instead, stretch the curls just enough to create ponytail sections, then tie the bubbles around the shape you already have. The curls will do half the styling for you.
Use a moisturizing cream or light gel first so the curls stay defined. Then gather the ponytail loosely and place elastics where the shape feels stable, not where a diagram says they should go. Every curl pattern is different, and that’s fine. The bubbles may look softer and less round than they do on straight hair, but that softness is part of the charm.
This version works best when you let the texture stay visible. If you press the curls flat, you lose the whole point. Leave them springy and the style reads beautifully.
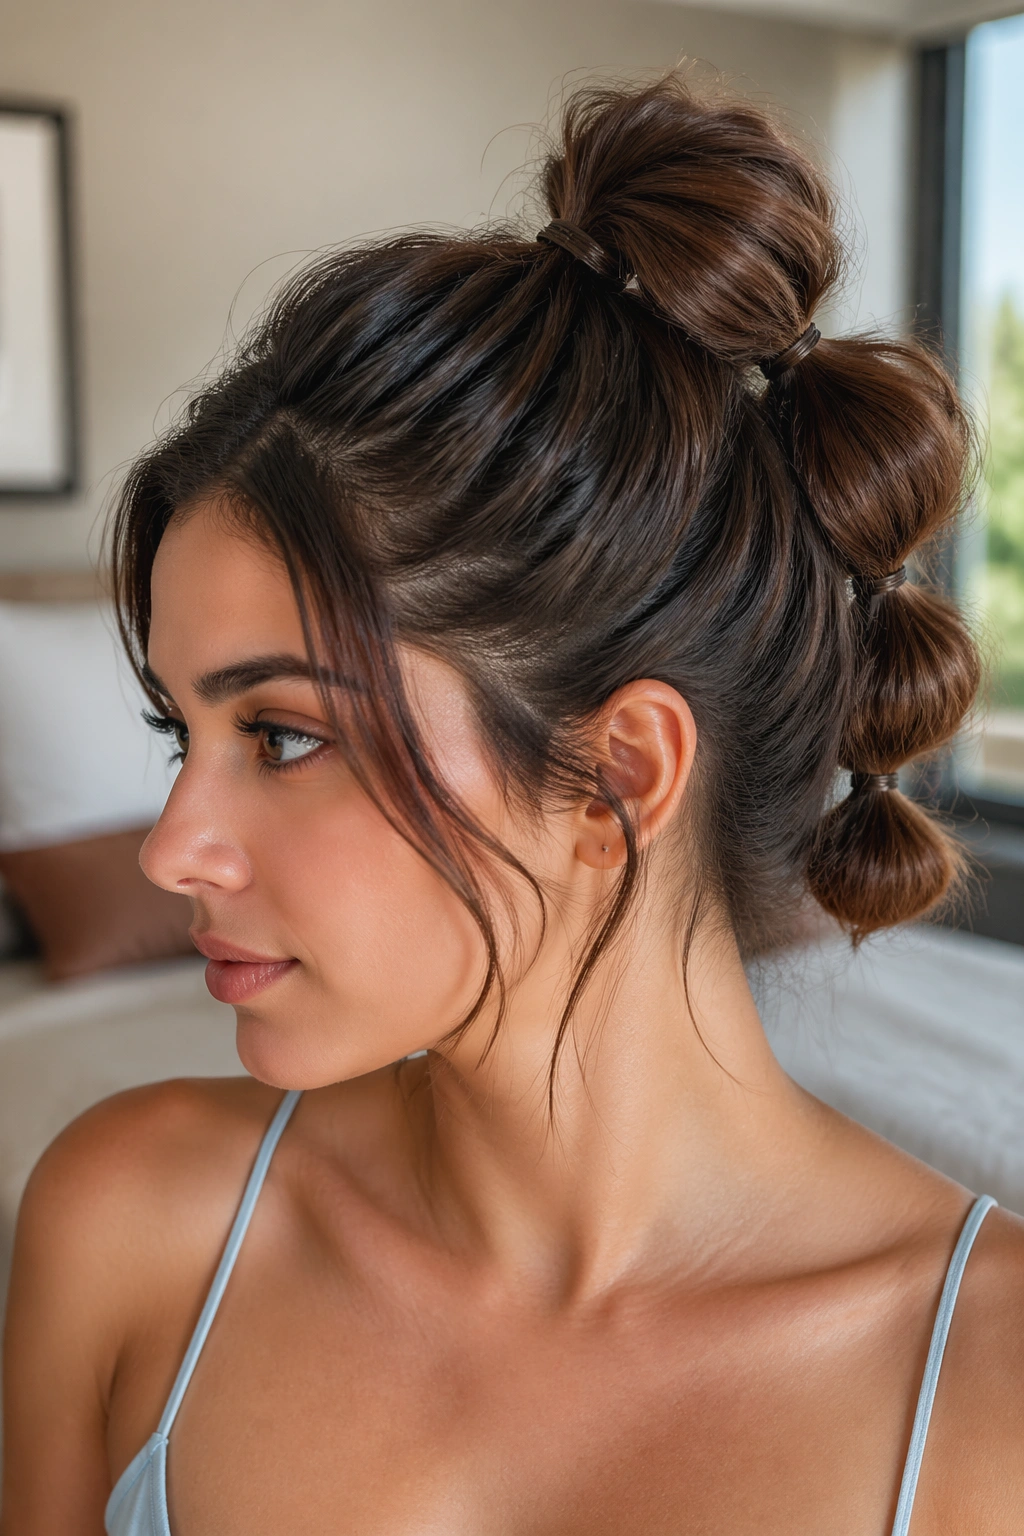
21. Stacked Two-Tier Bubble Ponytail
When one ponytail feels too short, stack two. That is the basic idea here, and it solves a lot of length problems on chin-length and shoulder-length hair. The top ponytail sits a little above the second one, so the eye reads the whole thing as one longer shape.
Secure the first section at the crown or mid-back of the head, then gather the lower section underneath it and blend the two with bubbles. The join disappears more easily than people expect, especially if you gently tug the top sections to overlap. This is one of my favorite fixes for layered bobs that refuse to behave.
It takes a little more pinning than a single ponytail. Still, the payoff is worth it. You get the look of more length without pretending the cut is something it isn’t.
22. Pearl-Accent Bubble Ponytail
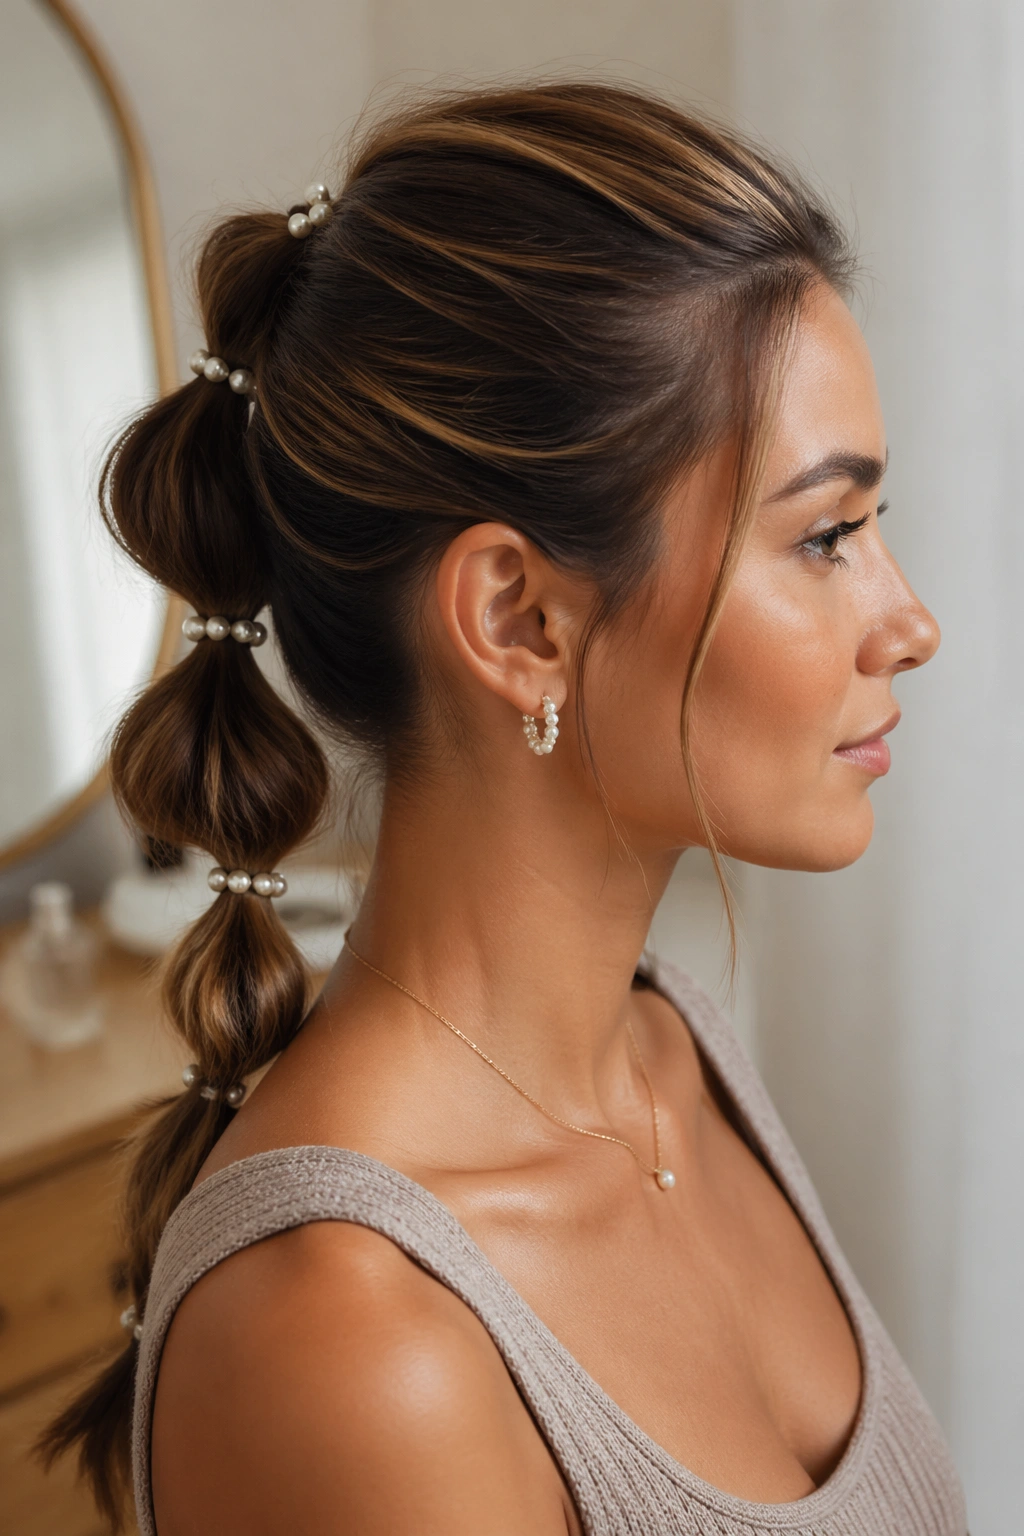
Pearls change the mood without changing the structure. A few pearl pins, tiny pearl clips, or a single string of beads placed between bubbles can make short hair feel dressed up in seconds. The trick is restraint. Too many accents and the style starts to look crowded.
Place the pearls where the bubbles break, not all over the head. That keeps the design readable and stops the front from getting too heavy. If you have a clean low bubble ponytail or a side-swept one, pearls add just enough shine to make the style feel event-ready.
This version is especially nice with smooth hair, because the accessories stand out better against a clean surface. No need to overthink it. One or two accents can do more than six.
23. Braid-Base Bubble Ponytail
A braid base gives short hair extra control right where it needs it. Start with a small three-strand braid or a French braid from the crown to the point where the ponytail begins, then continue the tail as a bubble braid. That combination holds short layers better than a plain tie alone.
The braid keeps the top snug, which matters if your hairline tends to puff up or if the top layers are a little too short to stay in a ponytail on their own. Once the braid ends, you can switch to clear elastics down the tail and pull each bubble open just a bit. It’s a nice hybrid.
I like this for active days and also for dressier looks. The braid base adds structure, and the bubbles keep it from feeling strict. Clean up top, playful at the end. That mix works.
24. Mini Bubble Ponytail for Very Short Hair
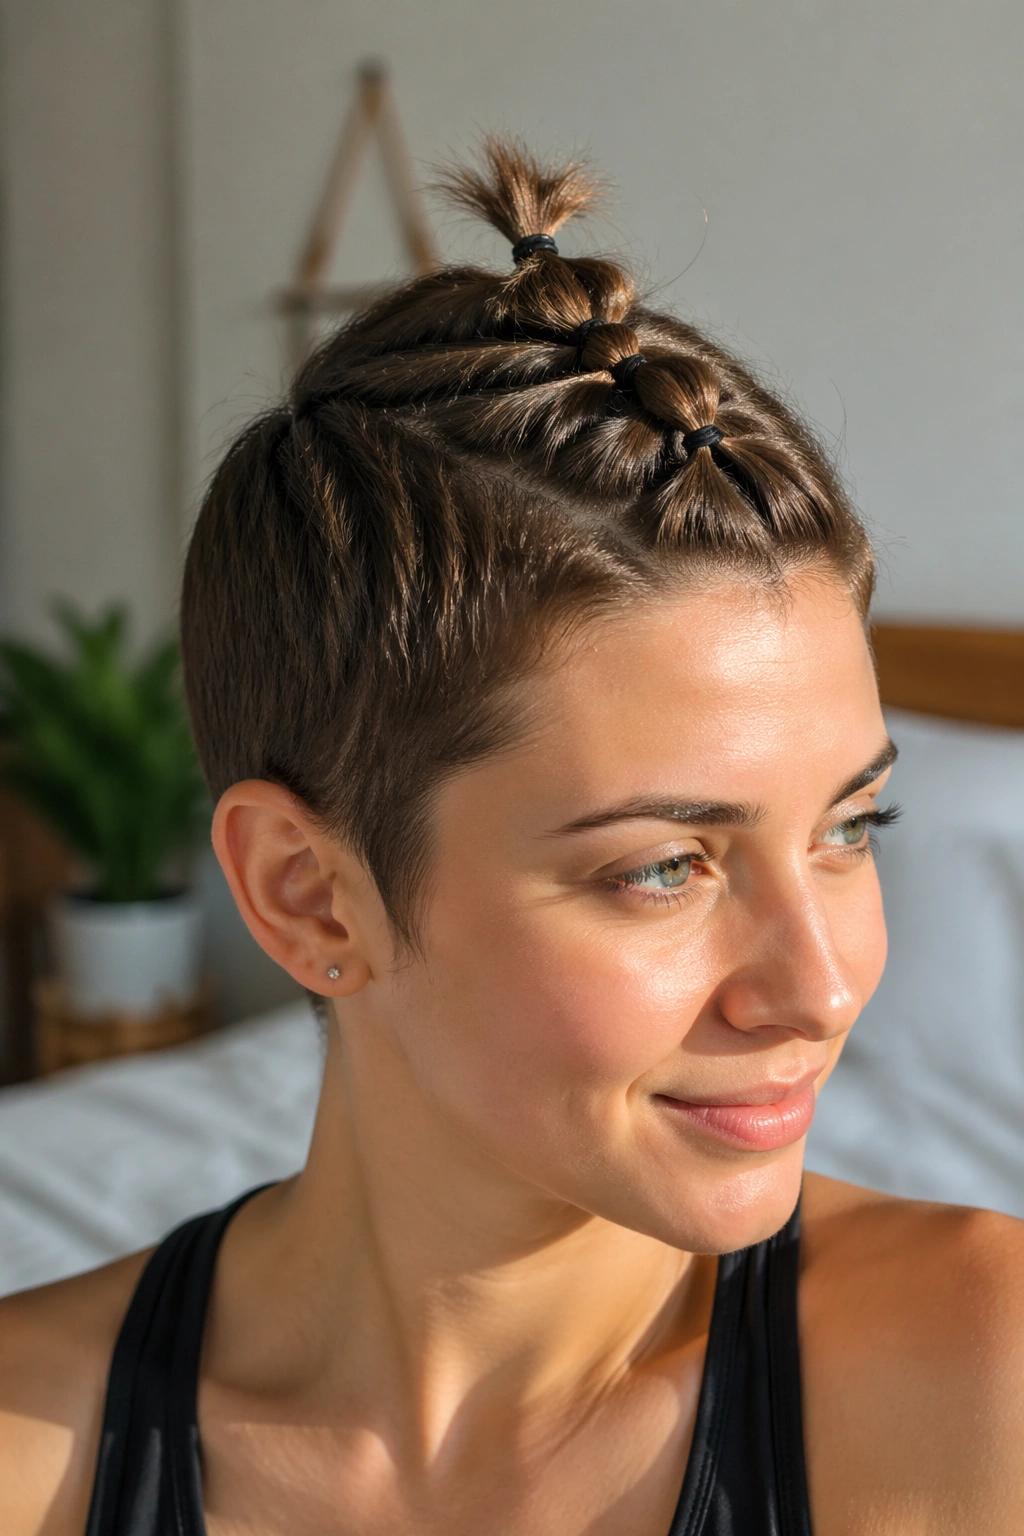
Can a bubble ponytail work on very short hair? Yes — if you scale it down. A mini bubble ponytail uses tiny sections, close spacing, and usually only two or three bubbles, which is enough to create the look without fighting the cut.
Work with the longest section you have, usually at the crown or upper back of the head. Tie it tightly, add one elastic just an inch down, then another if the length allows it. Puff each section carefully. No rough pulling. The goal is a small chain of bubbles that looks deliberate, not a ponytail that is stretching for its life.
This version is especially useful for pixie grow-outs or very short lobs. It gives you something styled while the cut is still in that awkward middle stage. And honestly, that stage can use all the help it can get.
25. Polished Event Bubble Ponytail
For a dressier moment, go polished from root to tip. Smooth the hair, place the base low or mid-height, and make the bubbles even and compact so the whole style reads clean from across the room. Short hair often looks best when it’s neat enough to show the shape, not so loose that the details get lost.
I’d use this version for dinners, weddings, gallery openings, or any day you want your hair to look finished without building a full updo. Keep the elastics hidden as much as possible, tame flyaways with a light gel or spray, and choose one accent — a ribbon, a pin, or nothing at all. Too many extras can muddy the line.
This is the style I keep coming back to. It’s straightforward, it suits short hair instead of fighting it, and it leaves enough room for your cut to still look like your cut. That’s the part people miss.