Cornrows have carried weight for centuries. Maps, messages, identity, survival. And somehow, in all that history, trendy cornrow styles keep finding fresh ways to speak. The braids stay tight to the scalp. The stories change. What counts as fashion-forward one day becomes a foundation another day, and the line between classic and current gets blurry fast. That’s part of what makes this category so rich to write about.
You don’t need waist-length hair to wear these looks. You don’t need fancy tools either. A good rat-tail comb, a jar of edge gel that actually holds, and patience will carry you further than any gadget on the shelf.
Some of these styles take thirty minutes. Some take four hours. A few work best on natural 4C coils with no added hair. Others beg for kanekalon feed-ins.
Pick what matches your hair, your week, your mood.
Where Cornrows Come From and Why They Still Matter
Cornrows predate most of the styles people think of as ancient. Stone carvings in the Sahara show braided hairlines going back about 3,000 years. West African Fulani women have braided tight rows against the scalp long before anyone was calling them “trendy.” Through enslavement, through migration, through decades of beauty standards that told Black women their hair was wrong — cornrows survived because they made sense. They protected fragile strands. They signaled belonging. They carried maps.
That history doesn’t disappear when you sit in the chair at a salon. It’s still in every part line, every feed-in strand, every cowrie shell.
Understanding the roots makes the styling choices feel different. You’re not chasing a trend. You’re adding a chapter.
What You Need Before You Start Braiding
Prep is where most home cornrows fall apart. Not the braiding itself — the prep.
Start on clean hair that was washed within the last week. Not the same day, ideally. A two-day-old wash gives the scalp some natural oils back, which means less slip when you’re braiding.
Tools worth owning before you try any of these styles:
- A rat-tail comb with a fine metal pin end (plastic bends and ruins your parts)
- Edge control that’s thick enough to stand up in the jar without sliding
- A spray bottle with water and a little leave-in mixed in
- Clips or duckbill pins to hold sections out of the way
- A silk or satin scarf for the night
Skip the heavy butters right before you braid. They coat the strands and cause your cornrows to slip and fuzz on day two. A light leave-in or a foam works better.
The Technique That Separates Good Cornrows From Great Ones
Watch a seasoned braider for ten minutes and you’ll notice they aren’t braiding fast. They’re braiding consistent. Same tension, stroke after stroke. Same amount of hair added into each pass. That’s the whole secret, really.
Cornrows use an under-braid technique. Three strands, but instead of going over like a regular plait, each strand goes under the middle. That’s what creates the raised rope look against the scalp. Go over, and you’ve made a flat dutch braid — still pretty, but not a cornrow.
Feed-ins are a separate skill. Small pieces of kanekalon hair get slipped into the braid every few strokes, building up the thickness gradually. A well-done feed-in braid starts pencil-thin at the hairline and ends thick at the nape.
Tight isn’t the same as good. A cornrow that hurts at hour two will hurt for three weeks.
How to Pick the Right Trendy Cornrow Style for Your Hair
Texture, length, density, scalp sensitivity — these matter more than what’s on your mood board.
Fine hair needs bigger sections. Small cornrows on thin hair means you can see scalp between every row, which rarely looks the way people hope. Go medium to large.
Thick 4C coils can hold tiny cornrows beautifully, but they also take longer and require more consistent tension. If your scalp tightens up after one cornrow at the salon, don’t book a full head of micros and expect relief.
Length matters for the ending. Chin-length hair won’t braid all the way down to a tail without extensions. Shoulder length can finish into a low bun or a wrap, but won’t give you the long flowing look unless you add hair. That’s fine. Know your starting point.
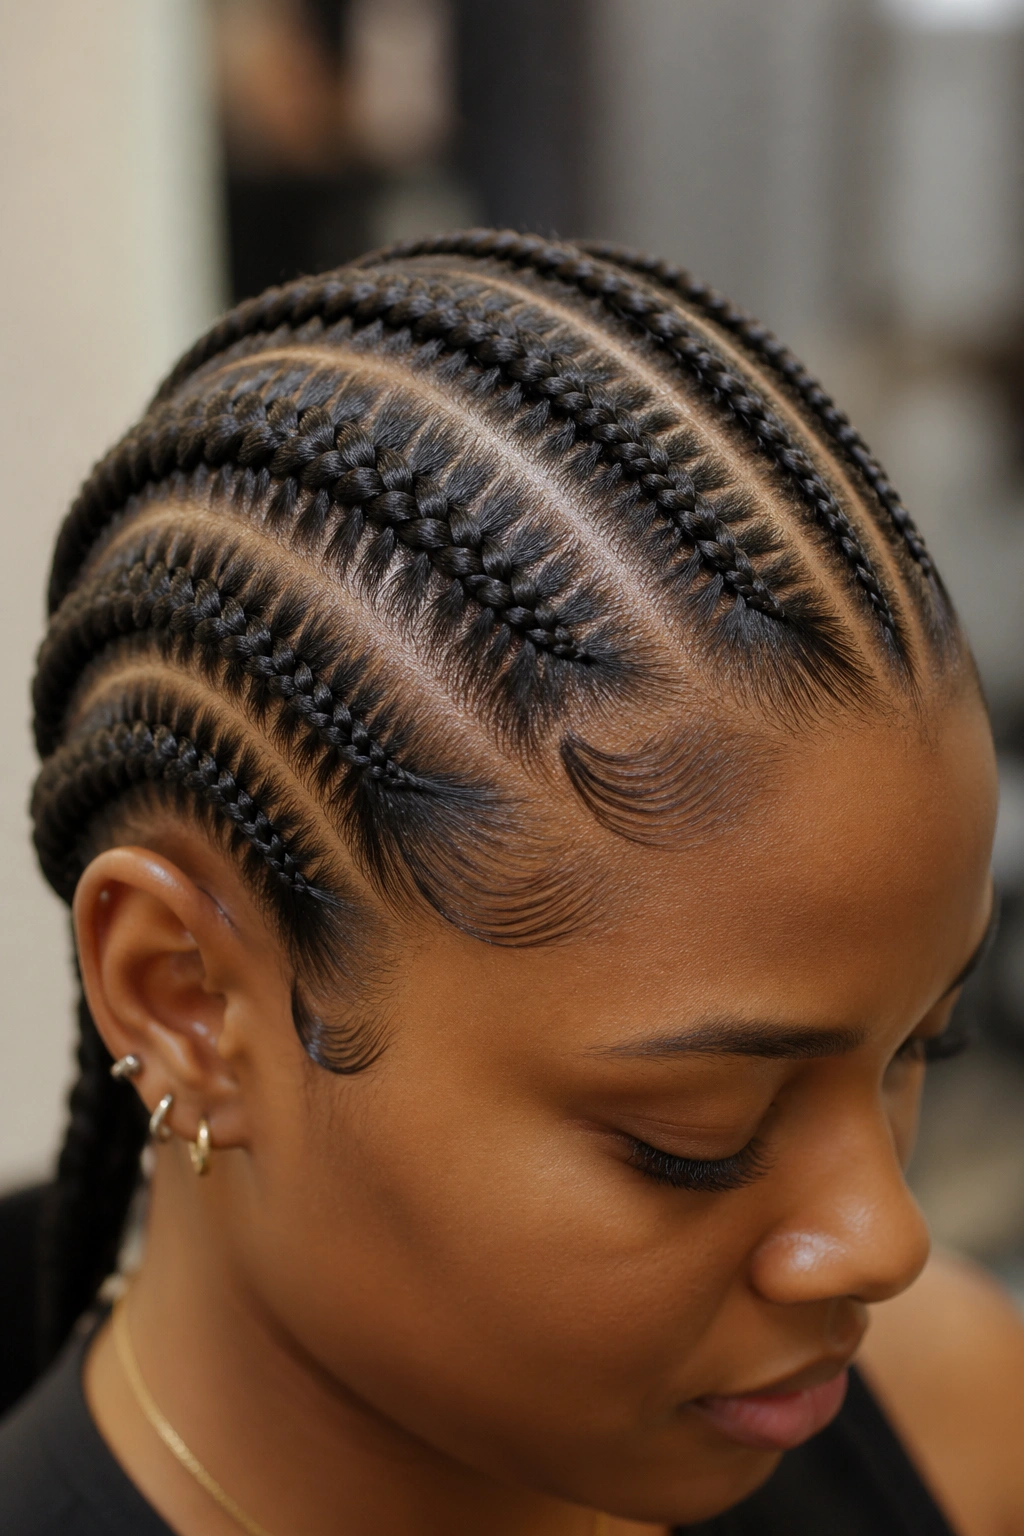
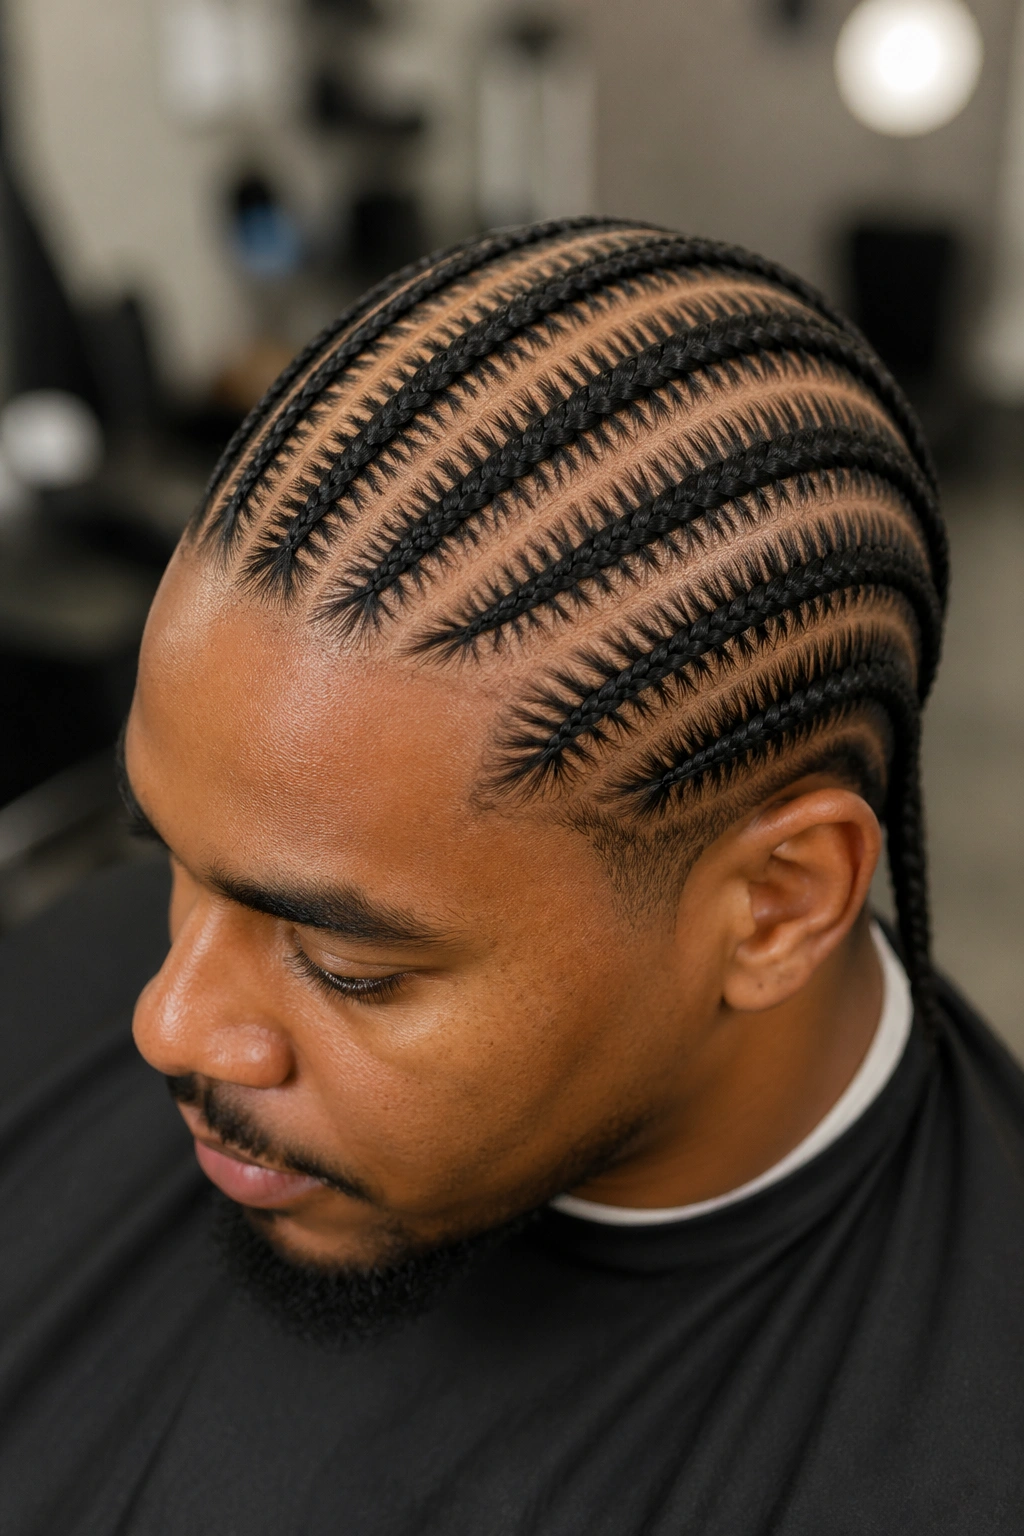
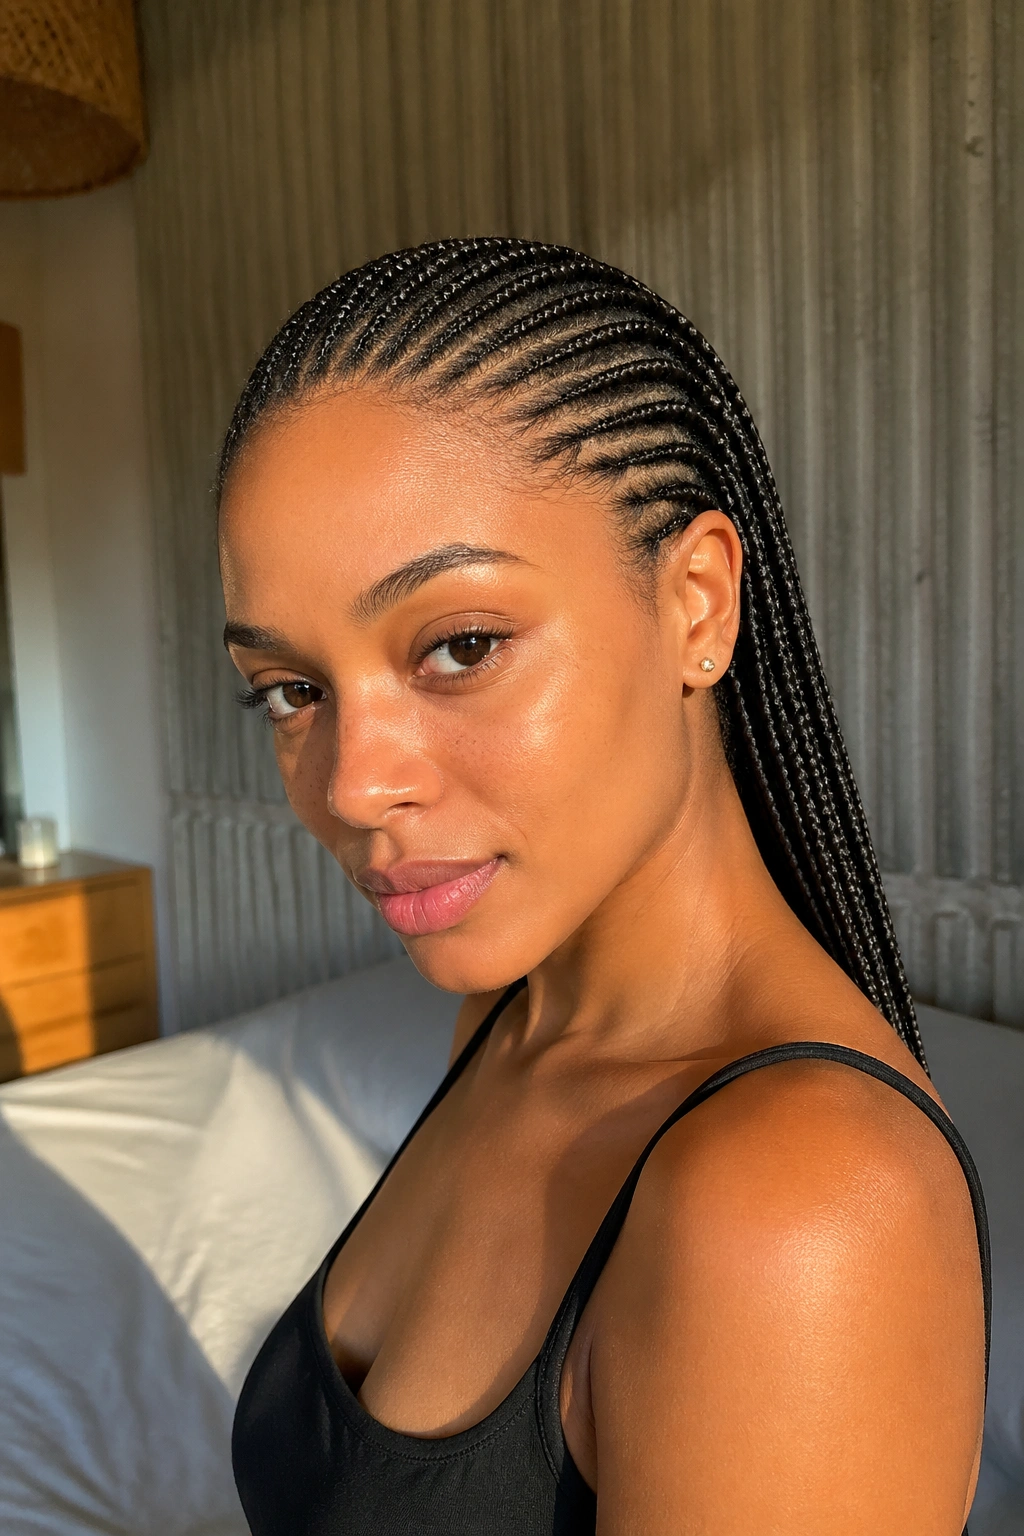
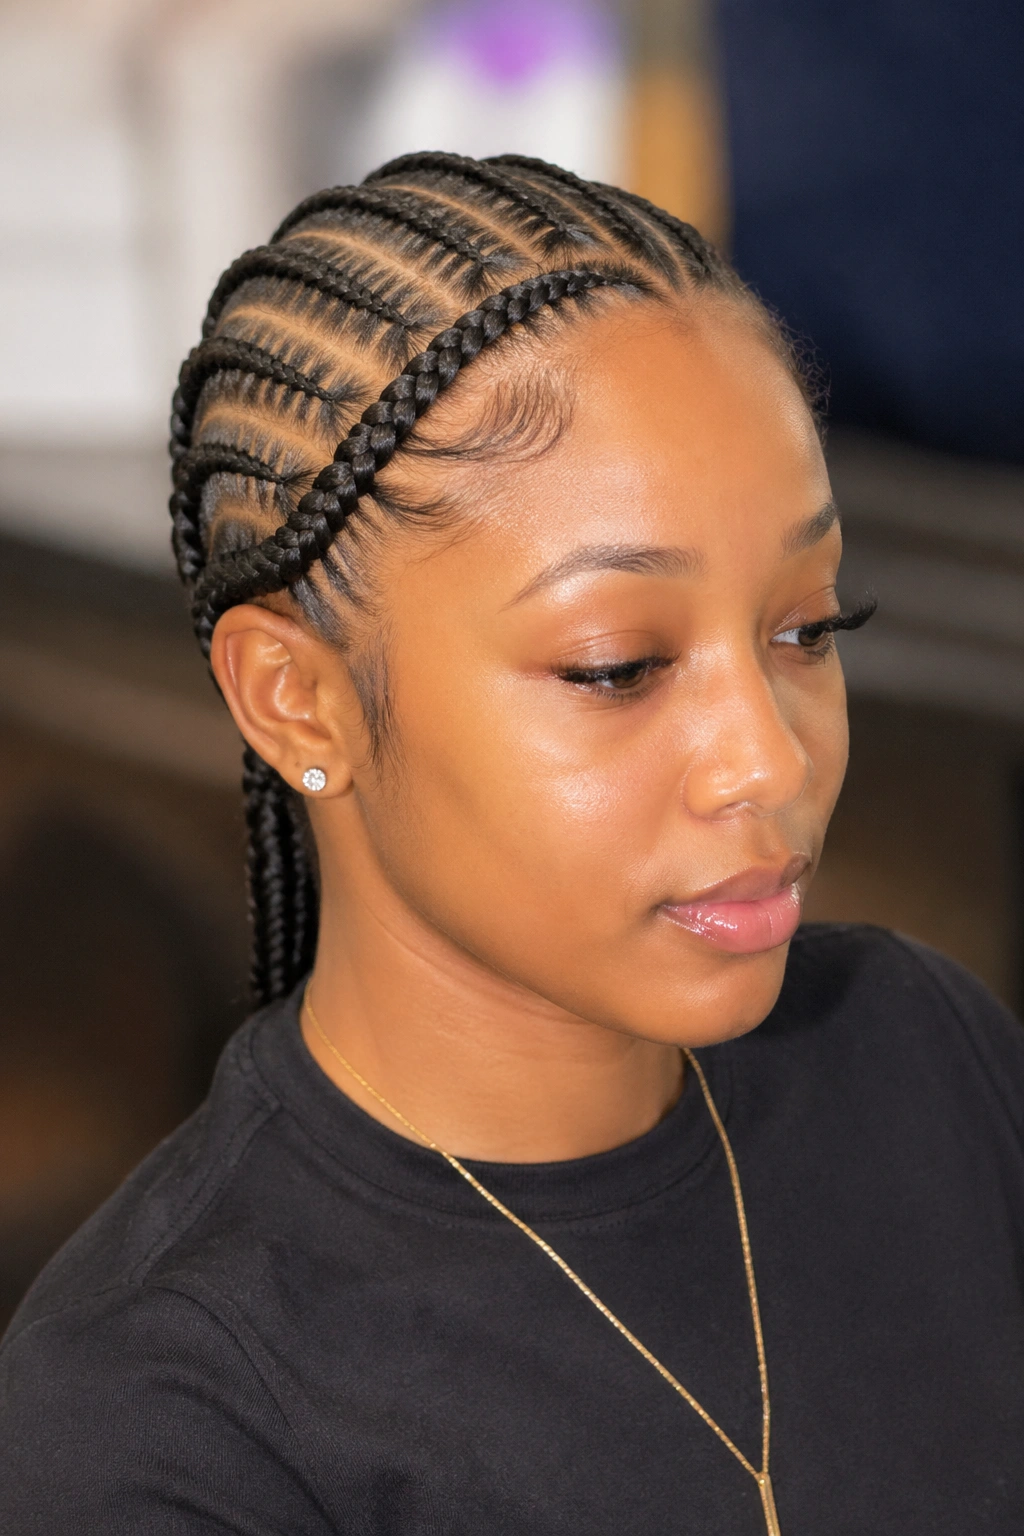
1. Stitch Cornrows Straight Back
Stitch cornrows are the crown jewel of definition. The “stitches” are those small horizontal marks inside the braid that look almost etched, like the braider used a stencil. They show up best on medium-to-large cornrows going straight back with no added hair.
Why Stitches Show Up So Well
- Each pass of the braid is pulled tight and flat before the next stroke
- Smaller sections of hair are fed in at even intervals
- Edge gel is smoothed along every section before braiding, which sets the pattern
Styling tip: For crisper stitches, ask your braider to smooth with a bit of Got2B Glued (or a similar thick styler) rather than plain edge control. The extra hold keeps the stitches from softening on day three.
This style suits most face shapes, but it’s particularly flattering on rounder faces — the vertical lines add length.
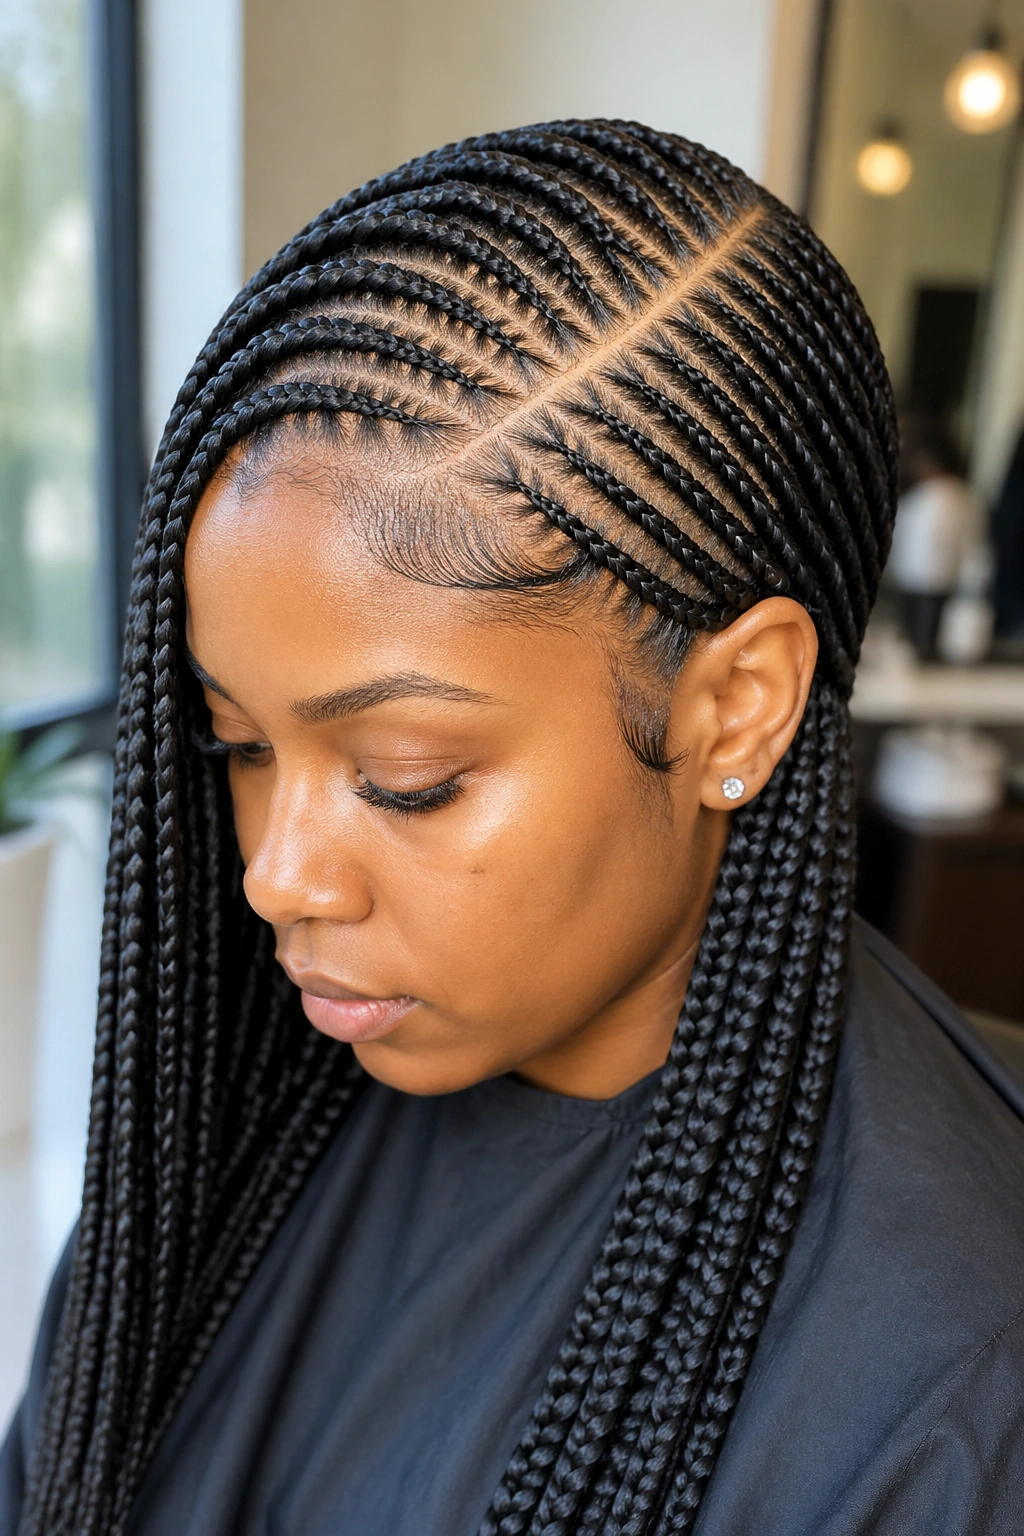
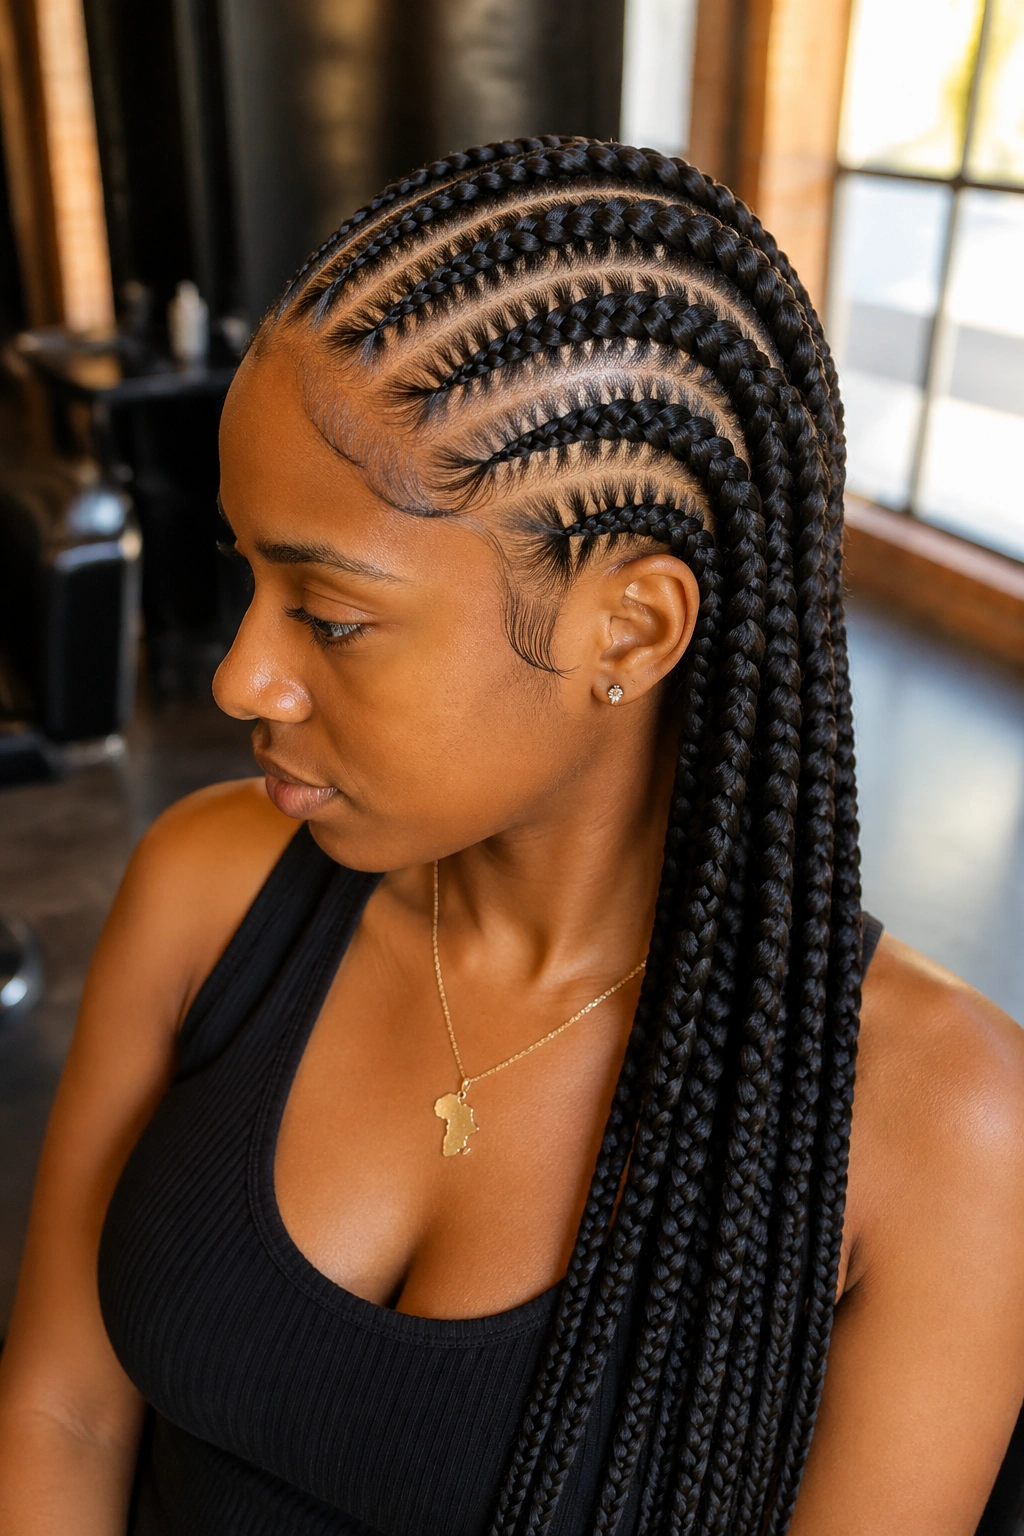
2. Feed-In Cornrows with a Long Side Part
A long side part changes the whole face. It softens sharp angles, adds movement, and creates a natural asymmetry that flat center parts can’t match. Pair that with feed-in cornrows and you’ve got a style that reads dressed-up without trying.
The trick is where the part lands. Too close to center and you lose the effect. Too far to one side and the cornrows on the short side feel cramped. Aim for an inch or so off-center, lined up with the arch of your eyebrow.
Feed-ins stay small at the front and build up gradually toward the ends. This keeps tension off the hairline, which is exactly where most cornrow damage starts. A good braider adds the first piece of kanekalon only after two or three passes of your natural hair — that small buffer matters a lot.
These usually last three to four weeks with proper care.
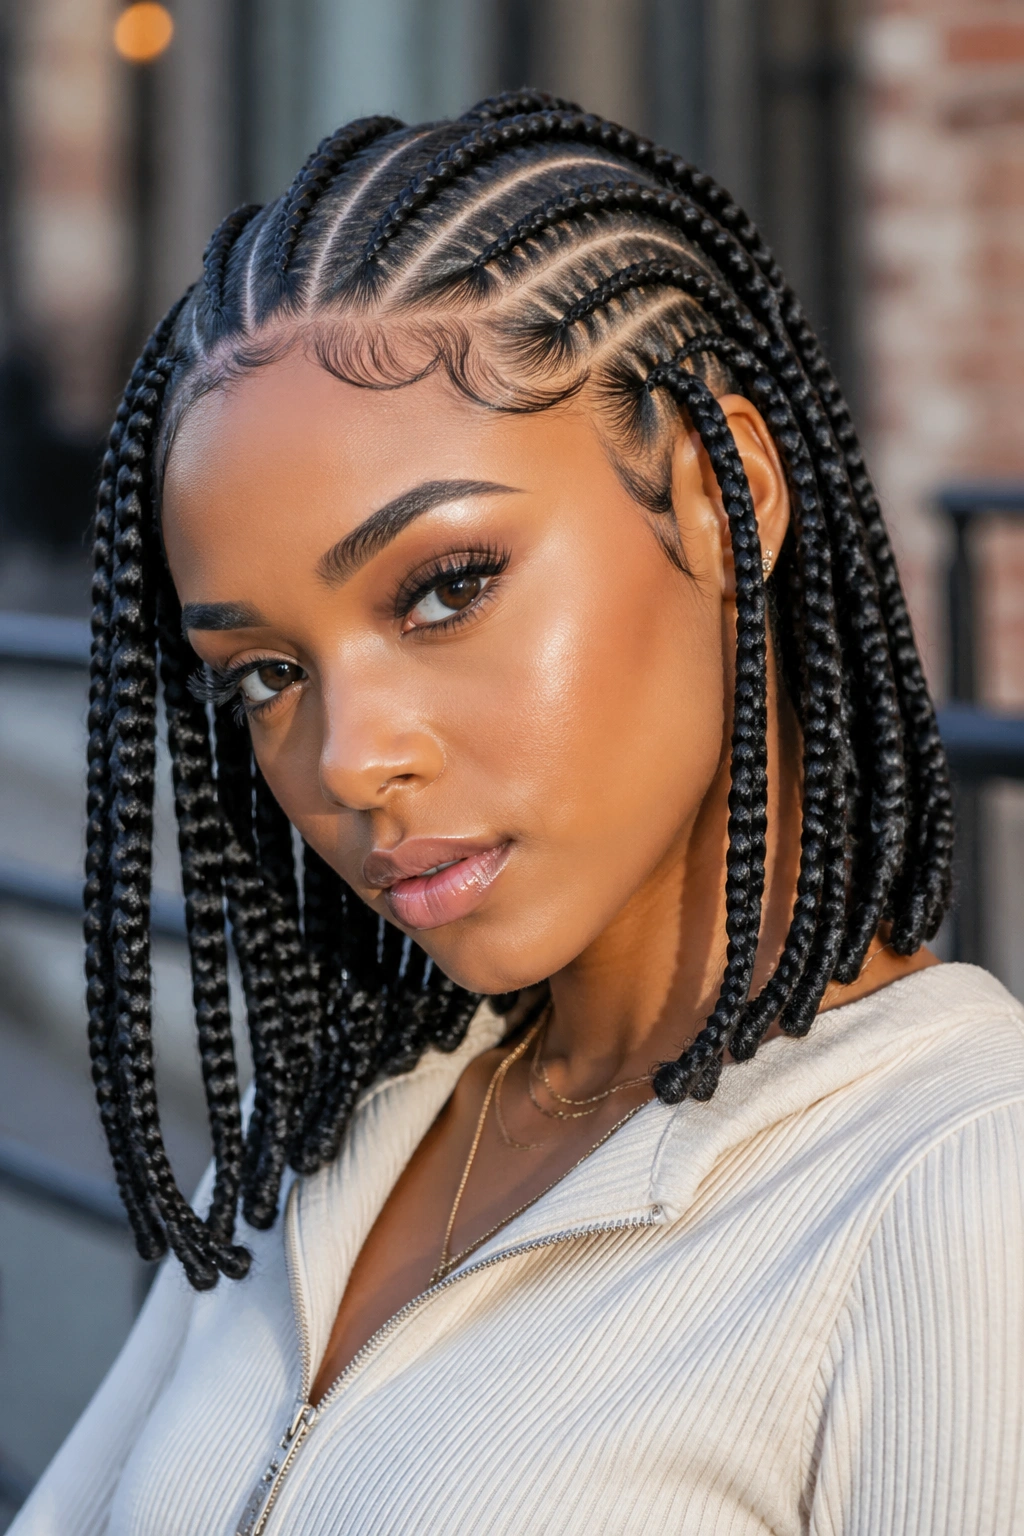
3. Jumbo Lemonade Braids
Lemonade braids go to one side, usually in big chunky sections. Named after Beyoncé’s visual album, they’re curved braids that sweep across the crown instead of running straight back.
The jumbo version uses fewer braids — sometimes as few as five or six across the whole head. Each one is thick, dramatic, and reaches well past the shoulder with extensions.
What Makes It Different
The curve. Straight-back cornrows run in parallel lines. Lemonade braids arc diagonally, following the shape of the head. That arc is what gives the style its motion.
Jumbo sections mean faster install — you can knock out a full head in two hours — but the bigger the braid, the more scalp shows between rows. If that’s not your vibe, stick with medium.
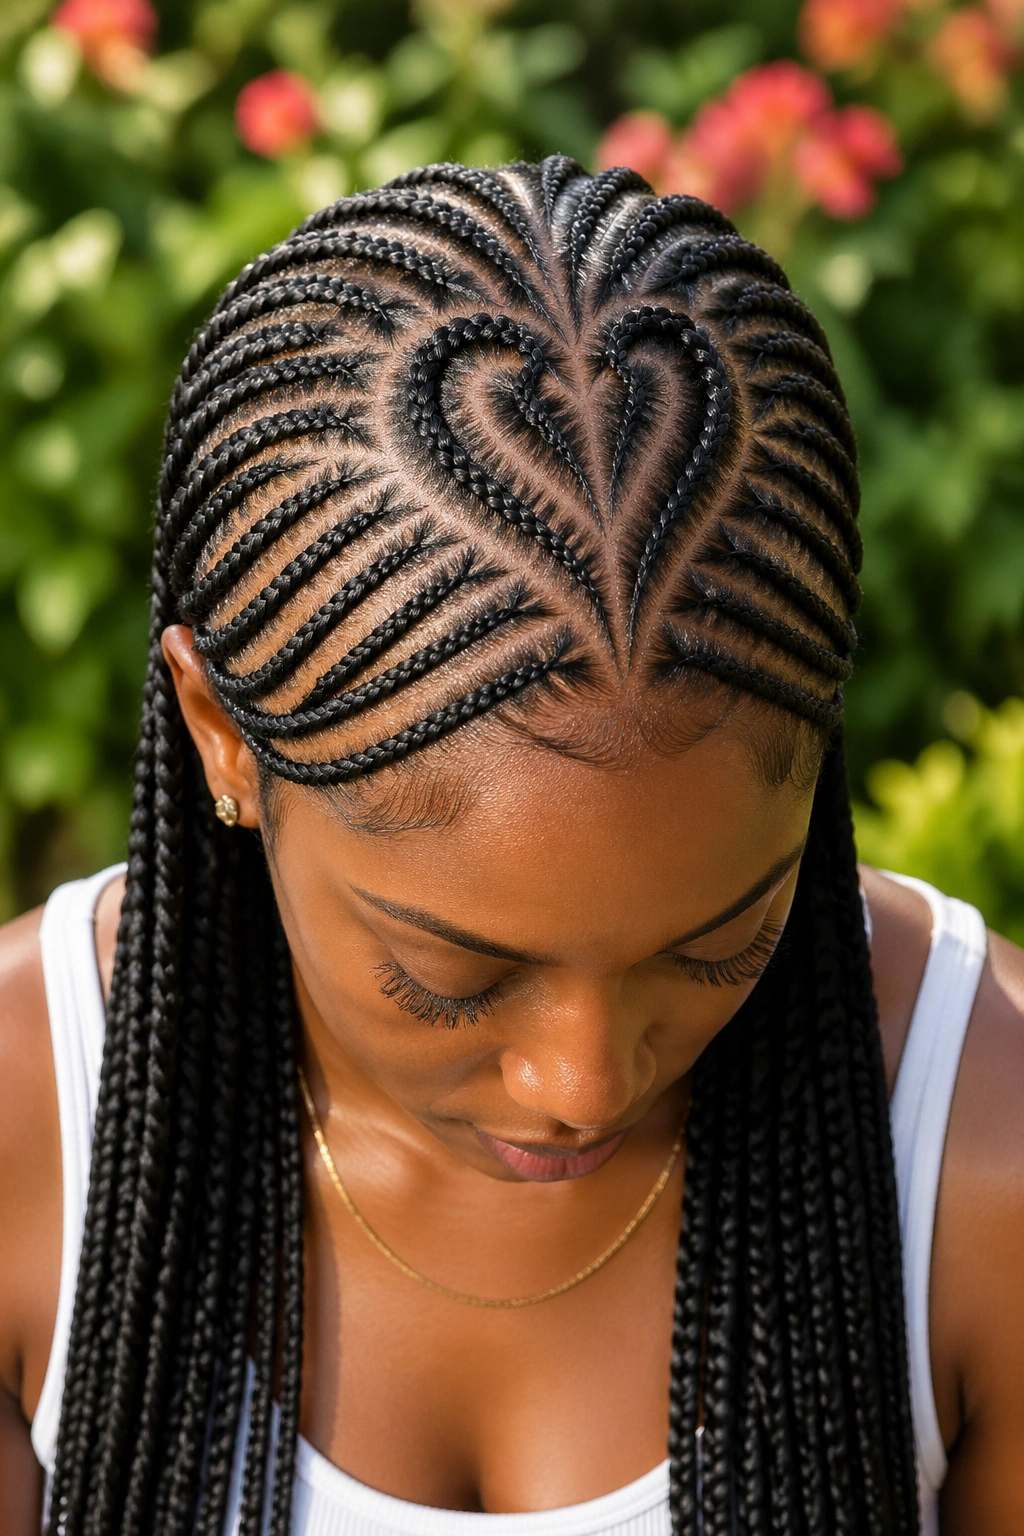
4. Heart-Shaped Cornrows at the Crown
This one’s playful. A heart-shaped parting at the back of the crown, with cornrows fanning out from the point of the heart.
Great for birthdays, weddings, photoshoots, kids who want a little drama. The heart usually sits right at the crown, sized about the width of your palm.
The rest of the head can be straight-back cornrows, feed-ins, or a low bun. The heart is the feature. Everything else supports it.
Your braider needs a steady hand and a light touch with the rat-tail comb — the parts have to be clean or the heart looks lumpy. Ask to see a photo of a past heart-shaped install before booking.
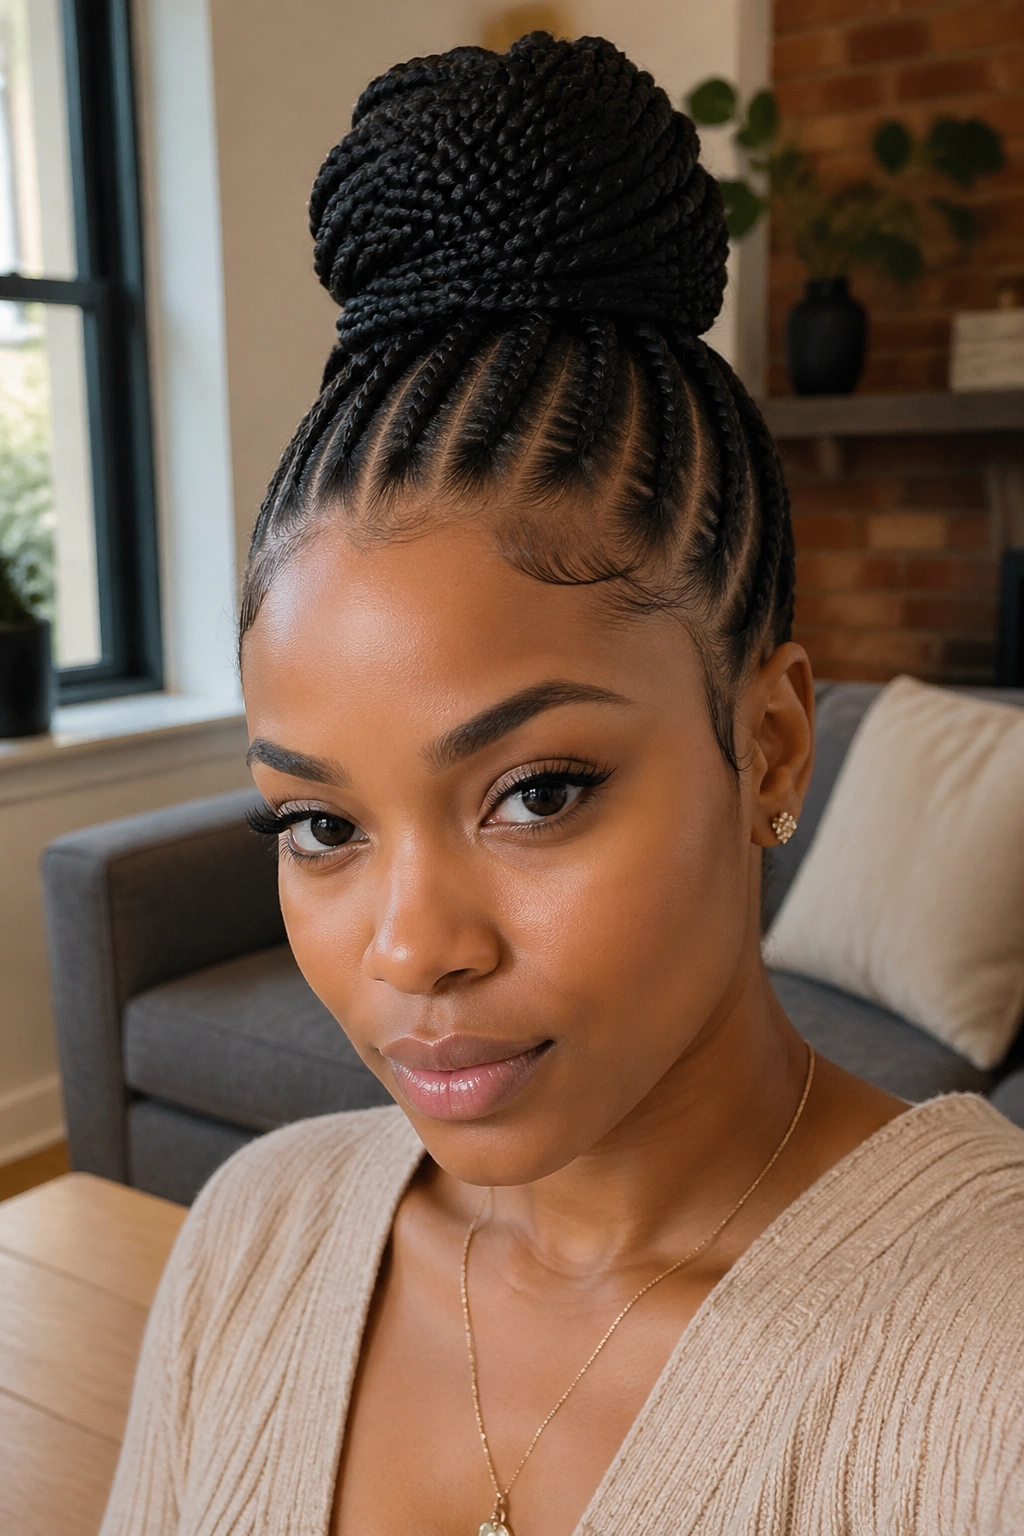
5. Cornrows Into a High Bun
The high bun ending takes a full head of straight-back cornrows from basic to statement. All the cornrows sweep up and gather at the crown, where they get wrapped into a tight bun — either the braids themselves or kanekalon added at the end.
Who This Is For: Anyone with a long face shape who wants to add fullness at the crown. The lift is flattering and draws attention upward.
Anyone with fine edges should ask for lighter tension at the hairline — pulling the cornrows up tight enough to create a high bun can strain the front rows.
Maintenance Notes
- Rewrap the bun every four to five days
- Don’t sleep in the bun — let the cornrows rest flat against your scalp at night
- A silk pillowcase helps if you skip the bonnet
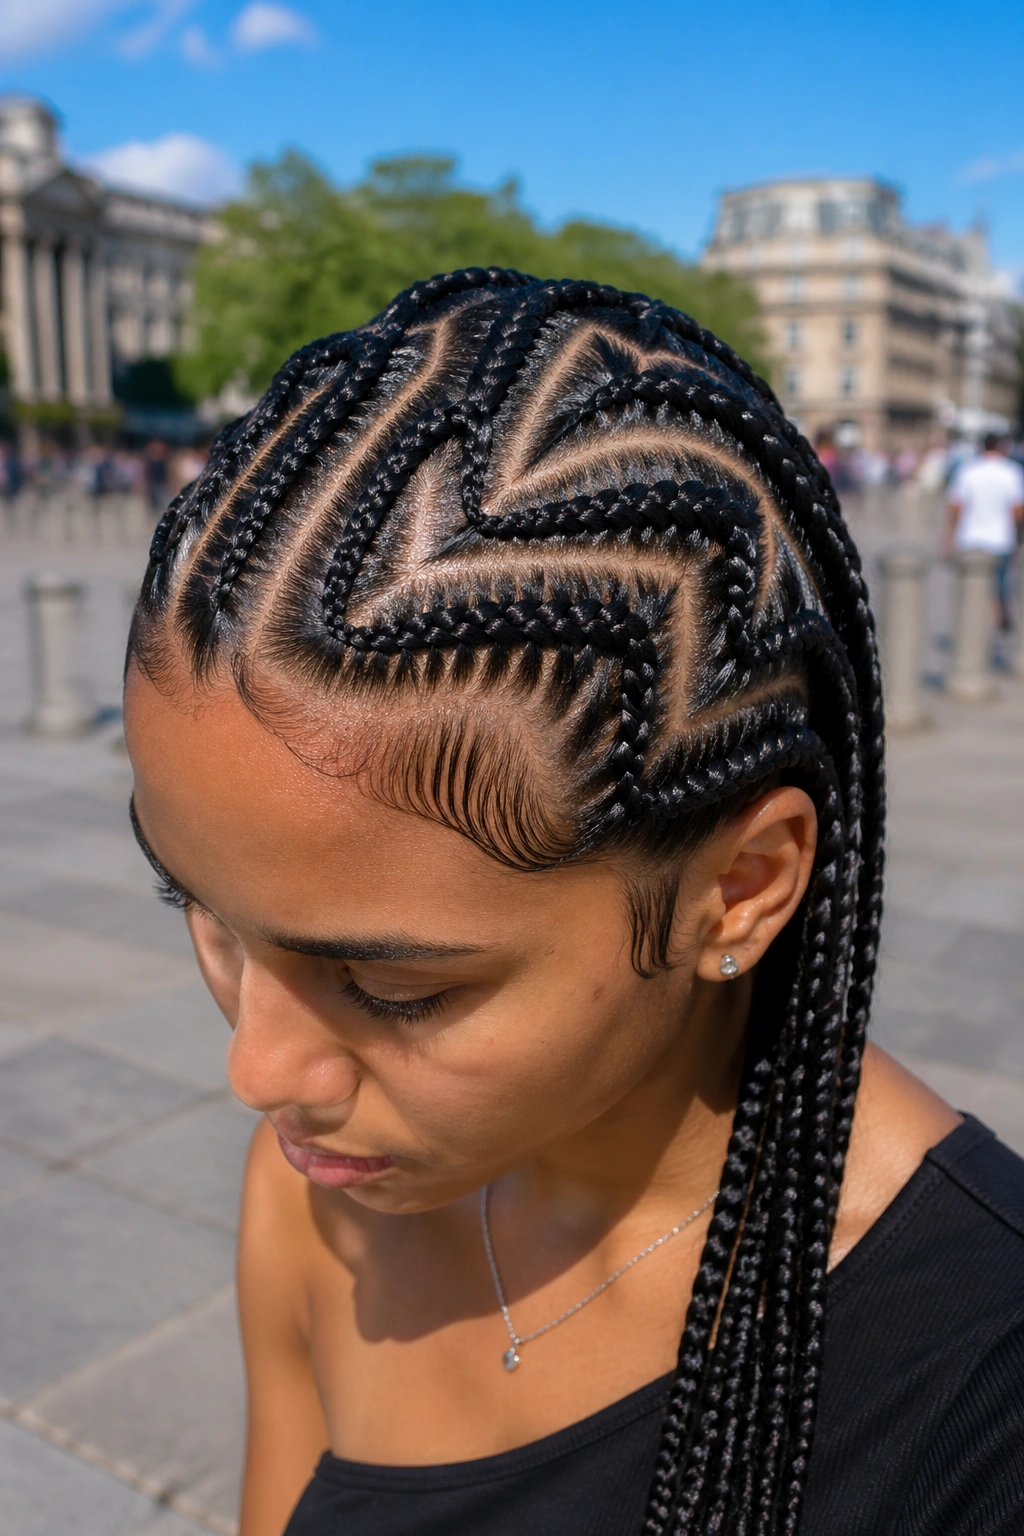
6. Zigzag Parted Cornrows
Zigzag parts turn a standard look into something custom. Instead of straight parallel lines, the parts between each cornrow move in sharp V-shaped angles across the scalp.
The trick with zigzags is the braider needs to plan the whole layout before making any cuts. One misaligned zigzag throws the whole pattern off. Most experienced braiders chalk out the parts first with a white pencil so everything lines up.
These take longer than straight-back cornrows — usually thirty to forty-five minutes more per head. The payoff is a style that photographs well from every angle, which matters if you’re getting them for an event.
Zigzag cornrows hide new growth better than straight parts, so they can stretch another week before looking overgrown.
7. Micro Cornrows All Back
Tiny. Dozens of them. Pencil-thin rows running straight back from the hairline to the nape. Micro cornrows are not for the impatient — a full head can take six to eight hours — but the finished look is clean, sleek, and unusually long-lasting.
Three weeks is the minimum for micro cornrows done well. Five to six weeks is common.
The downside is scalp access. Washing becomes harder because there are more rows of scalp to clean between. A dilution bottle with shampoo and water works better than trying to massage bar shampoo into the roots.
Micros also magnify fuzziness. Any stray hair that wasn’t tucked in shows up loud. Ask your braider to use a small amount of mousse along each section before braiding to tame flyaways from the start.
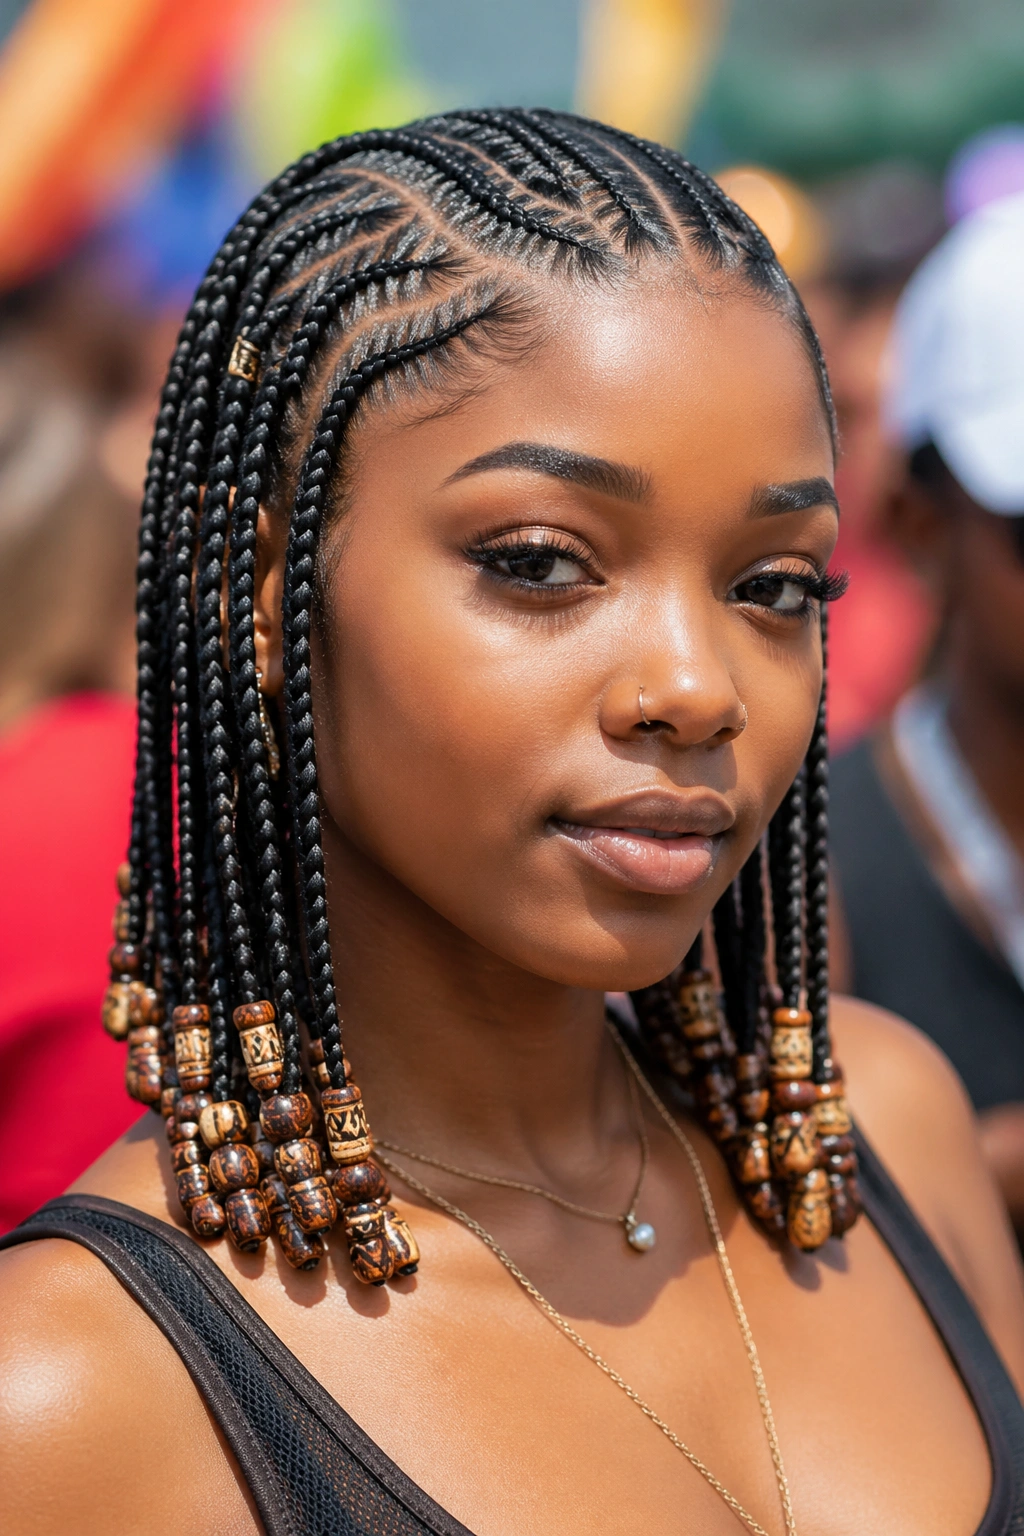
8. Stitch Cornrows with Tribal Beads
How to Use It
- Add beads to the ends of every third or fourth braid, not every one
- Mix two or three complementary colors rather than a single bead type
- Use silicone-tipped bead stoppers instead of rubber bands — they’re gentler on the ends
Tribal beads draw on Fulani and Himba styling traditions. The original versions used cowrie shells, copper rings, and hand-carved wooden beads. Modern plastic and silicone versions are lighter and cheaper, but the cowrie still reads the most authentic.
A full head of stitch cornrows with beads is loud, in the best sense. The sound when they tap against each other as you move is half the appeal.
9. Ghana Braids with a Twist-Out Finish
Ghana braids are cornrows with a feed-in technique that thickens quickly — you start thin at the front and by the middle of the braid, the kanekalon has built up significantly. The ends usually finish in two or three inches of loose hair.
For this version, instead of leaving the ends straight, twist each end into a two-strand twist and roll it onto a flexi-rod overnight. The next morning, you get cornrows that end in defined curls.
It’s a hybrid look — protective at the scalp, styled at the ends. Perfect for events where you want braids but also want some movement around your shoulders.
10. Cornrows with a Side Swooping Braid
One large feed-in braid swoops across the front of the hairline diagonally, then joins the rest of the cornrows running straight back. That one swoop is what turns this style from standard into statement.
The swoop braid has to start at the opposite temple from where it ends. Otherwise, it looks like a thick bang that’s trying too hard. When done right, it sits along the hairline like a crown.
What to Watch For
- The front swoop carries more tension than the rest of the braids. Ask for slack at the very front edge.
- Edge gel will build up fastest at the point where the swoop changes direction. Rinse and reapply weekly, not daily.
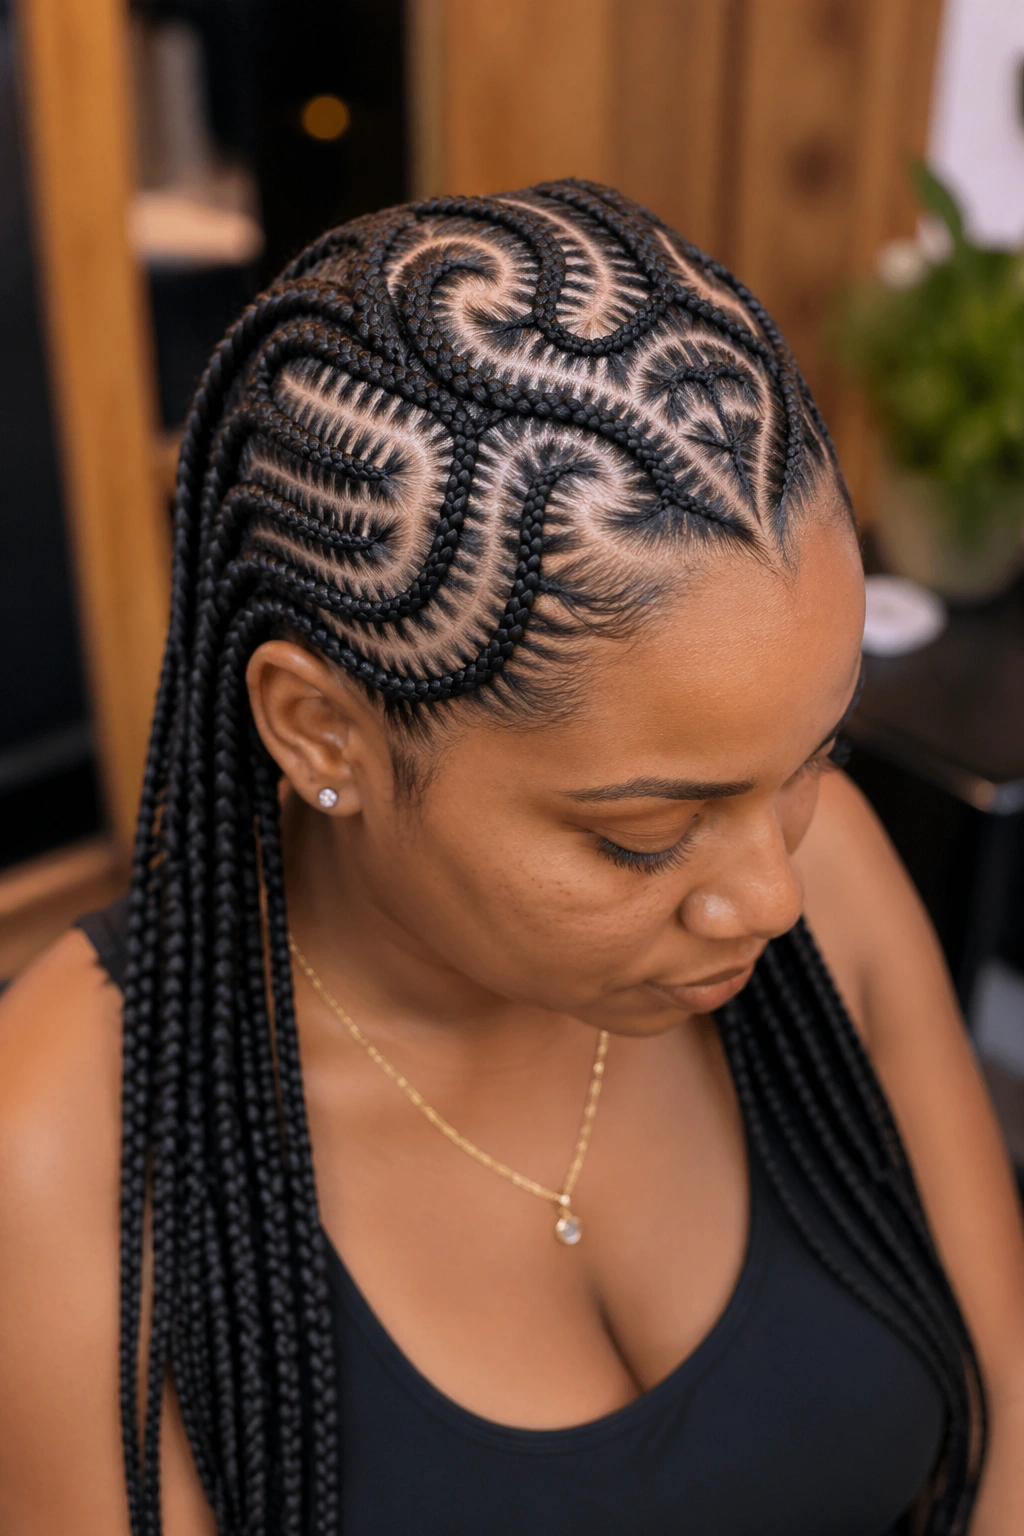
11. Tribal Cornrows with Heart Patterns
A single heart at the crown is sweet. A full pattern of interlocking tribal shapes — small hearts, triangles, or diamonds across different sections of the head — is a whole different piece of hair art.
These are essentially freehand cornrows where the parts themselves form the design. A skilled braider might chalk out the full pattern before starting, spending as much time on the map as on the braiding.
Expect to pay more, wait longer, and tip generously. A full tribal pattern can take a top-tier braider between six and ten hours.
Worth it once in a while, probably not every install.
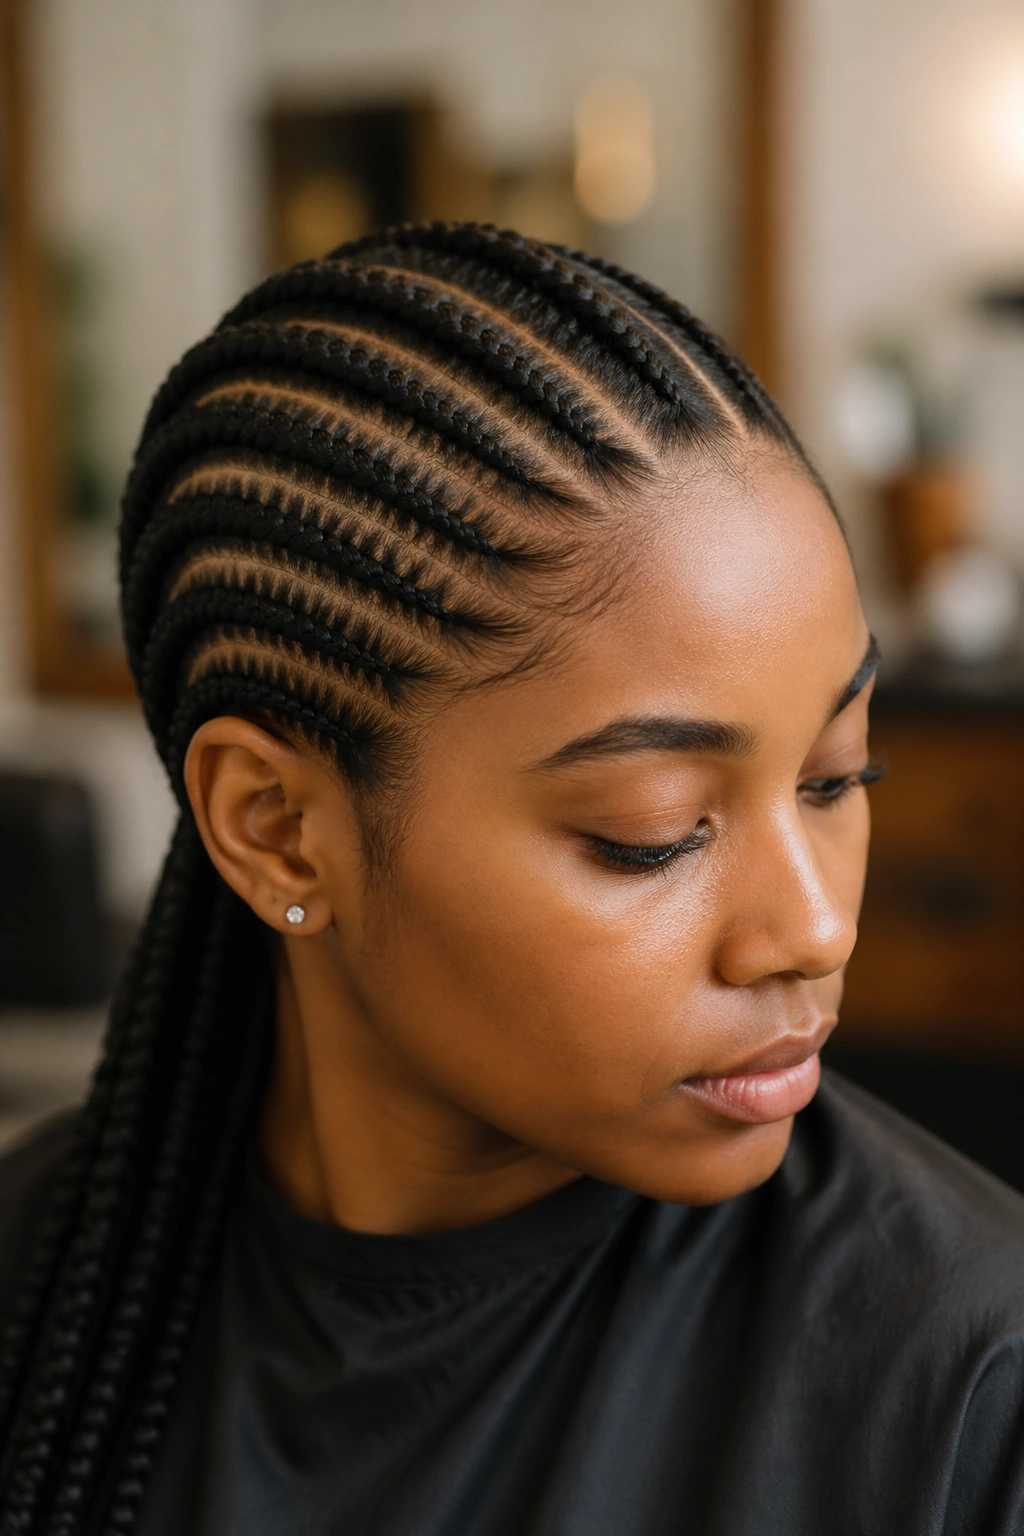
12. Side-Parted Cornrows into a Low Ponytail
Unlike the high bun version, this finish stays quiet. The side part runs long and clean, the cornrows curve gently toward the back, and everything gathers at a low ponytail just above the nape.
Who This Is For: People who want the protective benefits of cornrows without drawing much attention. Offices, weddings where you’re not the main event, quiet weeks.
The braids don’t need to be large. Medium feed-ins work beautifully here. The ponytail can stay braided or be loosened slightly and wrapped with a satin ribbon — the second option reads softer.
13. Cornrows with Beaded Ends Only at the Hairline
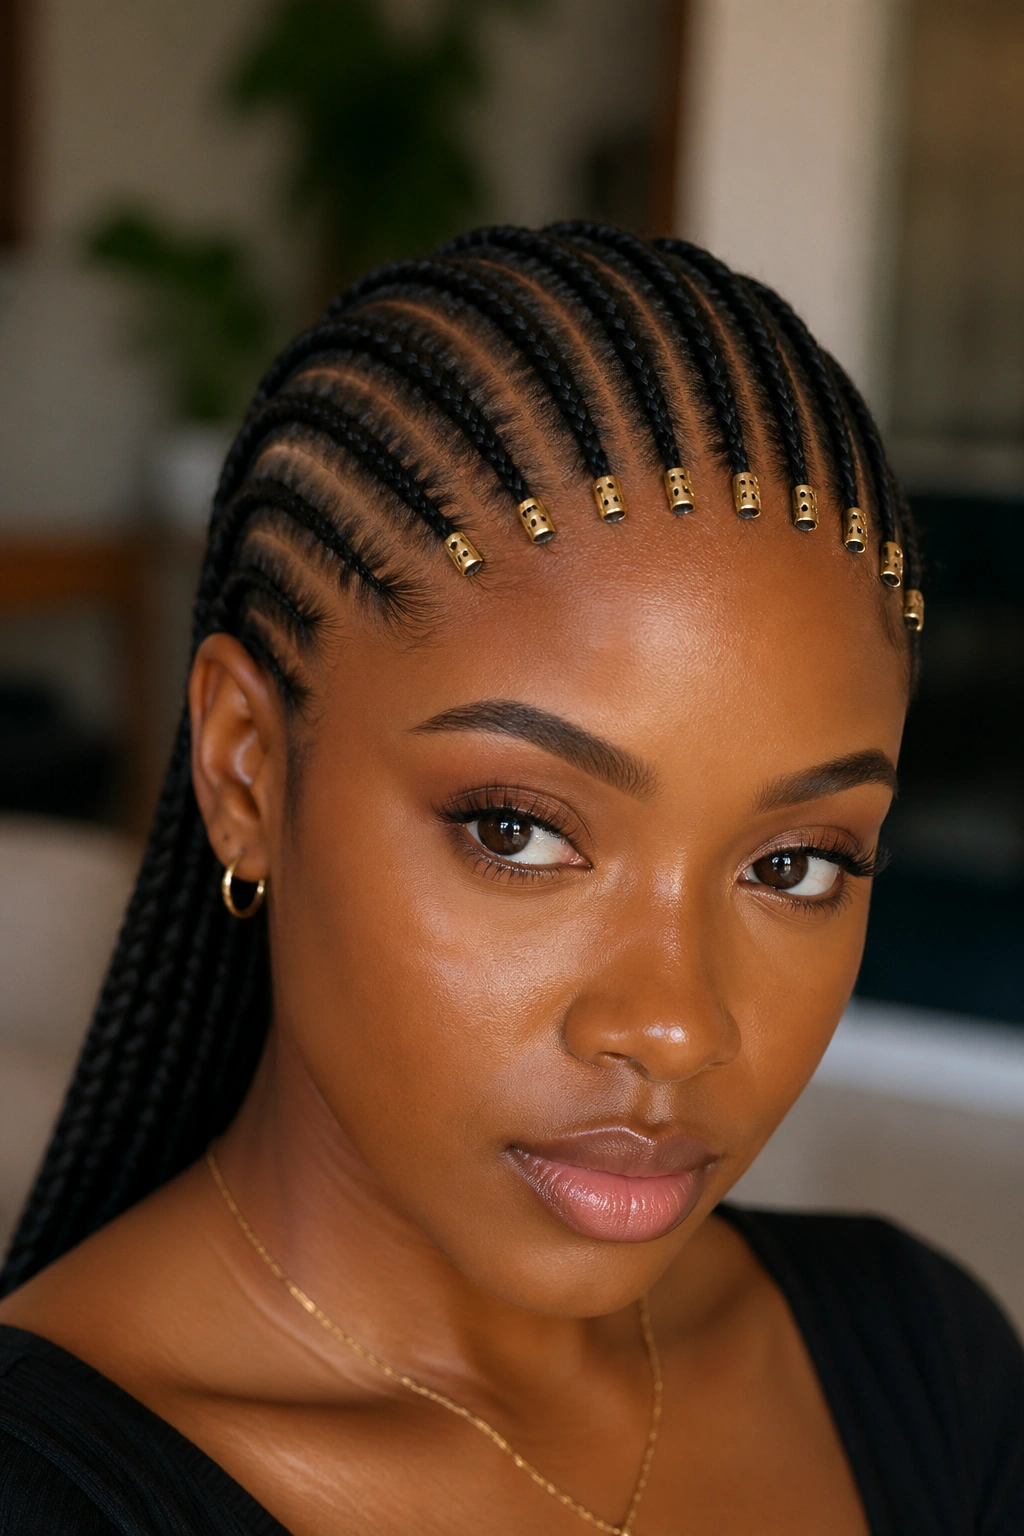
Instead of beading every braid, this version puts small gold or cowrie beads only on the shortest front rows. Two or three beads each, sitting right against the forehead.
The effect is subtle. You catch glimpses of gold when you move. The rest of the cornrows stay clean and untouched.
I’ve worn this to two weddings and a baby shower. Gets compliments every time, and the weight is barely noticeable compared to a full head of beads.
14. Freehand Cornrows in Curved Sections
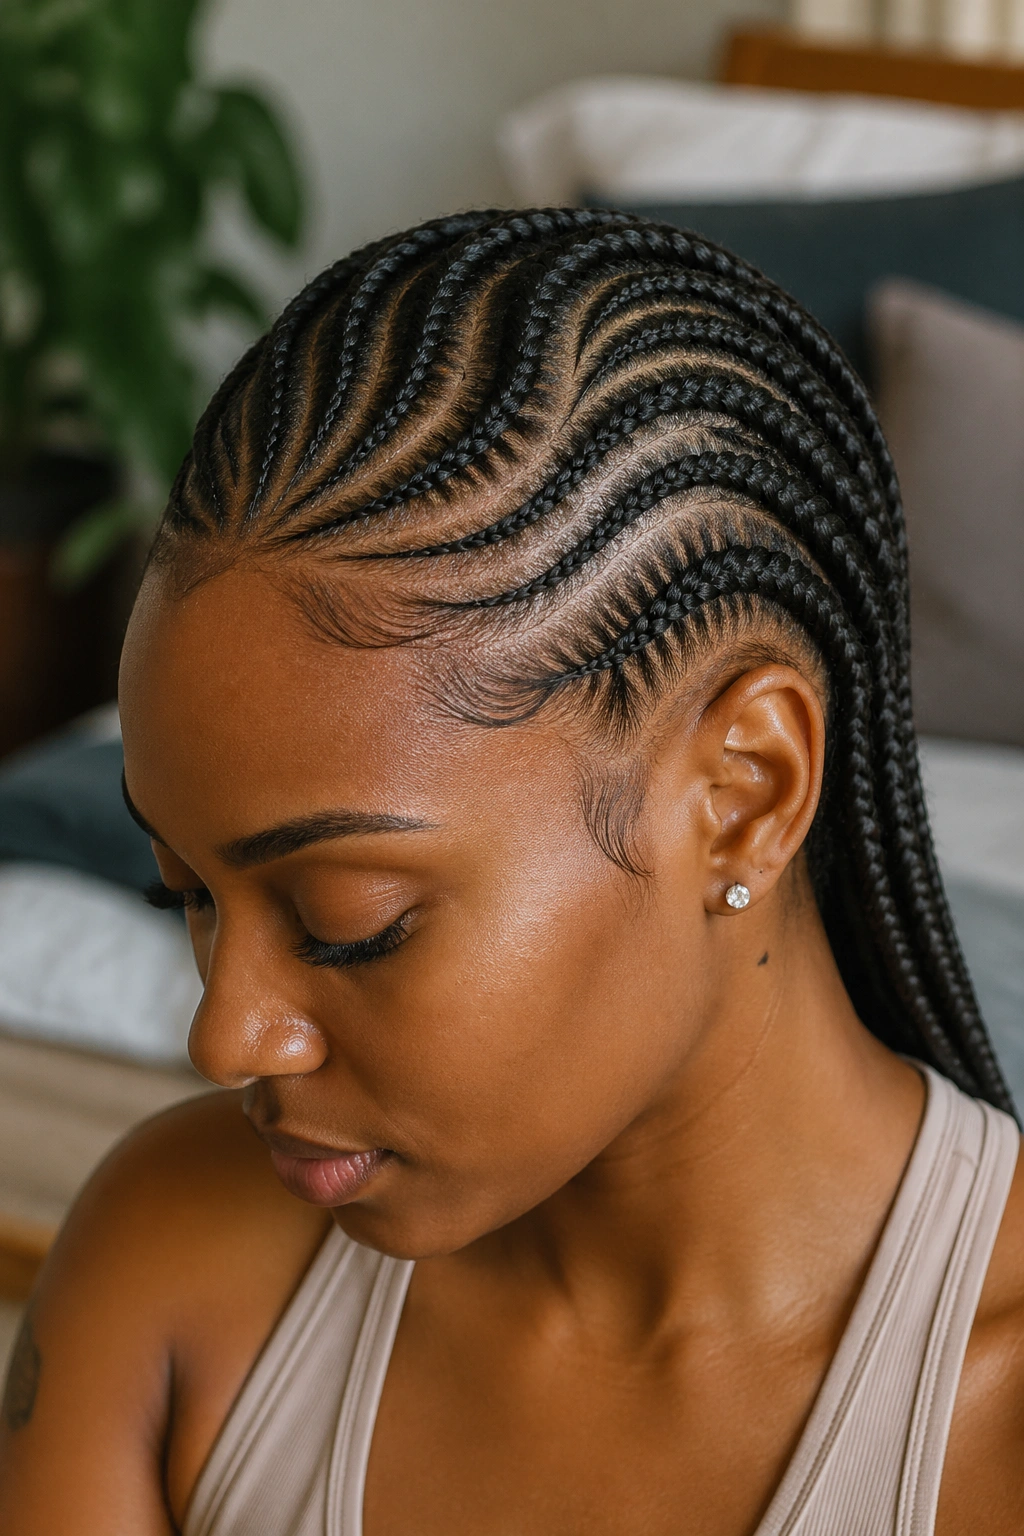
Freehand means no pre-drawn pattern. The braider reads the shape of your head and creates parts as they go, following the natural fall of the hair.
Bold claim: Freehand cornrows fit your head better than any pre-planned pattern.
Because the parts follow the shape of your scalp rather than a geometric idea, the cornrows don’t fight the way your hair wants to lie. That means less lifting at the crown, less stress on the hairline, and often a style that ages better through week two and three.
The trade-off is you can’t really replicate a freehand style exactly. Each install is its own thing. Which is either a plus or a minus depending on how attached you get to a specific look.
15. Cornrow Mohawk
The cornrow mohawk — cornrows running straight up the middle of the head, with the sides braided into smaller cornrows that hug down — reads bold every time.
The middle section can be flat against the scalp all the way through, or it can build up into a faux-hawk shape with some teasing at the crown. For the flat version, the middle cornrows are often bigger and fewer. For the raised version, the braider adds a tiny bit of kanekalon to puff up the center rows.
Side sections usually get tiny cornrows laid flat against the temples. Some people add shaved lines or fades on the sides for a sharper edge. Others leave the sides braided. Both work.
Styling tip: Refresh the shape at night with a silk scarf tied around the sides — not over the mohawk — to keep the middle section from flattening while you sleep.
16. Tribal Braids with Cuffs
Metal cuffs — gold, silver, brass, mixed — add a finished element that beads can’t quite match. They slide up the braid, click into place, and stay put for weeks.
Mix cuff sizes. Tiny ones at the root, medium ones near the middle, one or two statement cuffs near the ends. A pattern feels more intentional than placing them evenly.
Gold reads warmer against darker skin tones. Silver brings out cooler undertones. Brass sits somewhere in between and looks lived-in, almost vintage, which many people prefer for everyday wear.
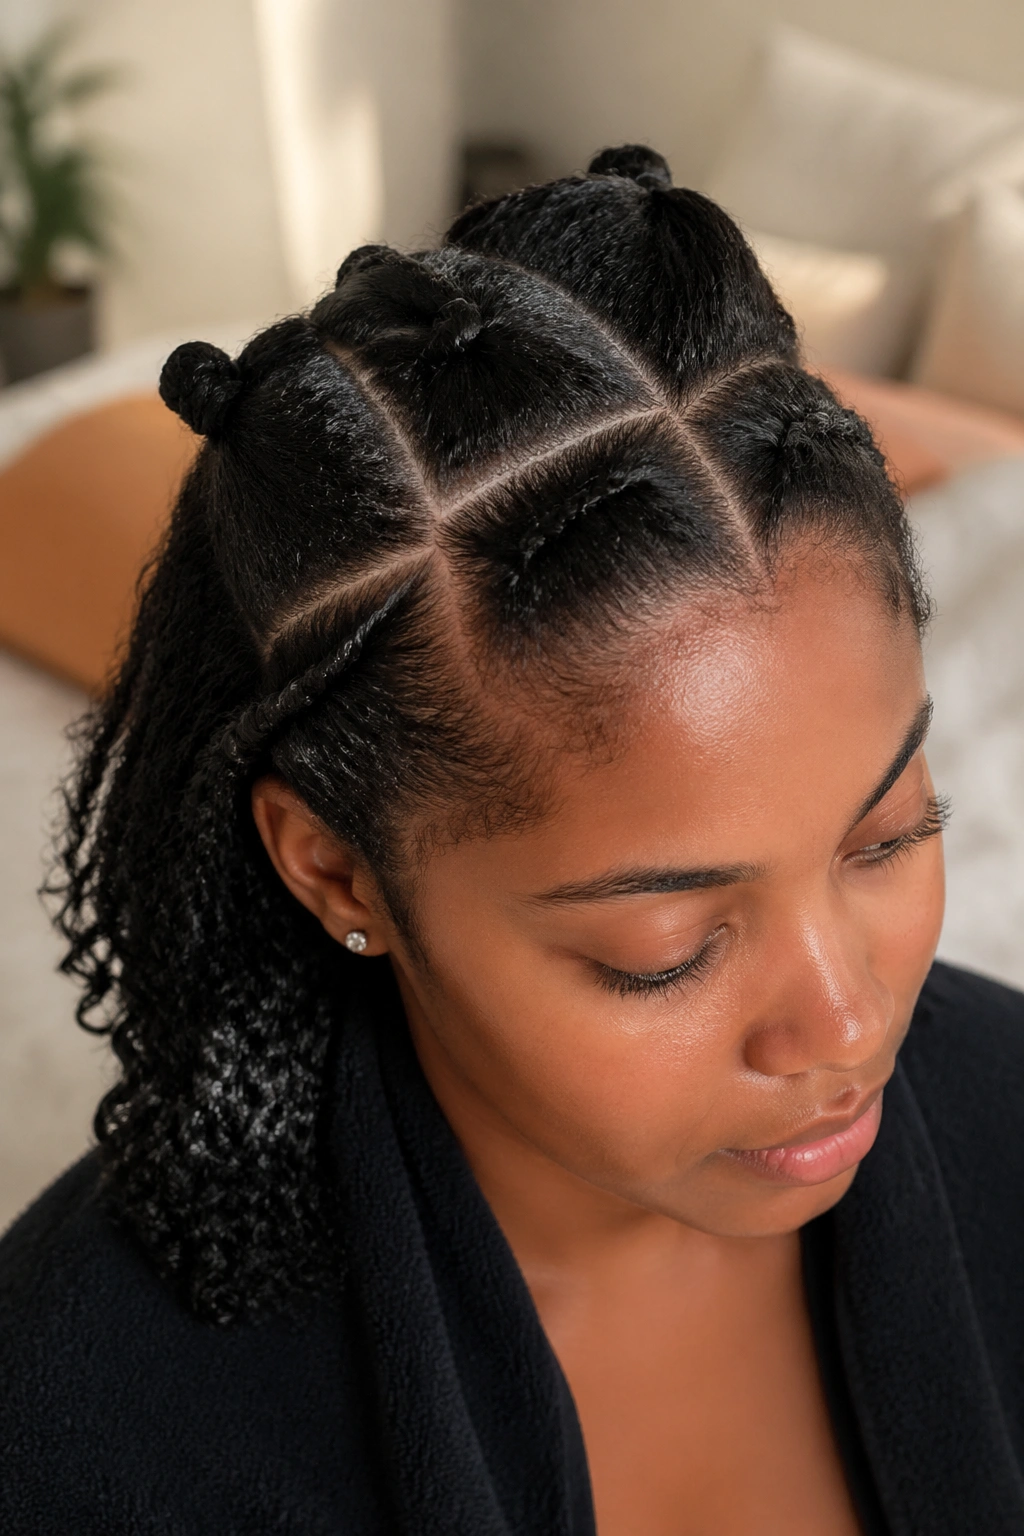
17. Cornrows with a Middle Part and Two Low Buns
Two buns at the nape, one on each side of a center part, with the cornrows running straight down. Deceptively simple. Incredibly pretty.
The parts and the buns have to be symmetrical. Even a quarter-inch off and the whole style looks lopsided. This is where a good braider with a trained eye makes the difference.
Each bun can be wrapped with the braids themselves, or the ends can be left loose and tucked in with bobby pins. Wrapped reads cleaner. Loose reads softer.
Who This Is For: Anyone who finds a single bun too heavy or a single ponytail too flat. Two buns distribute the weight and the visual focus.
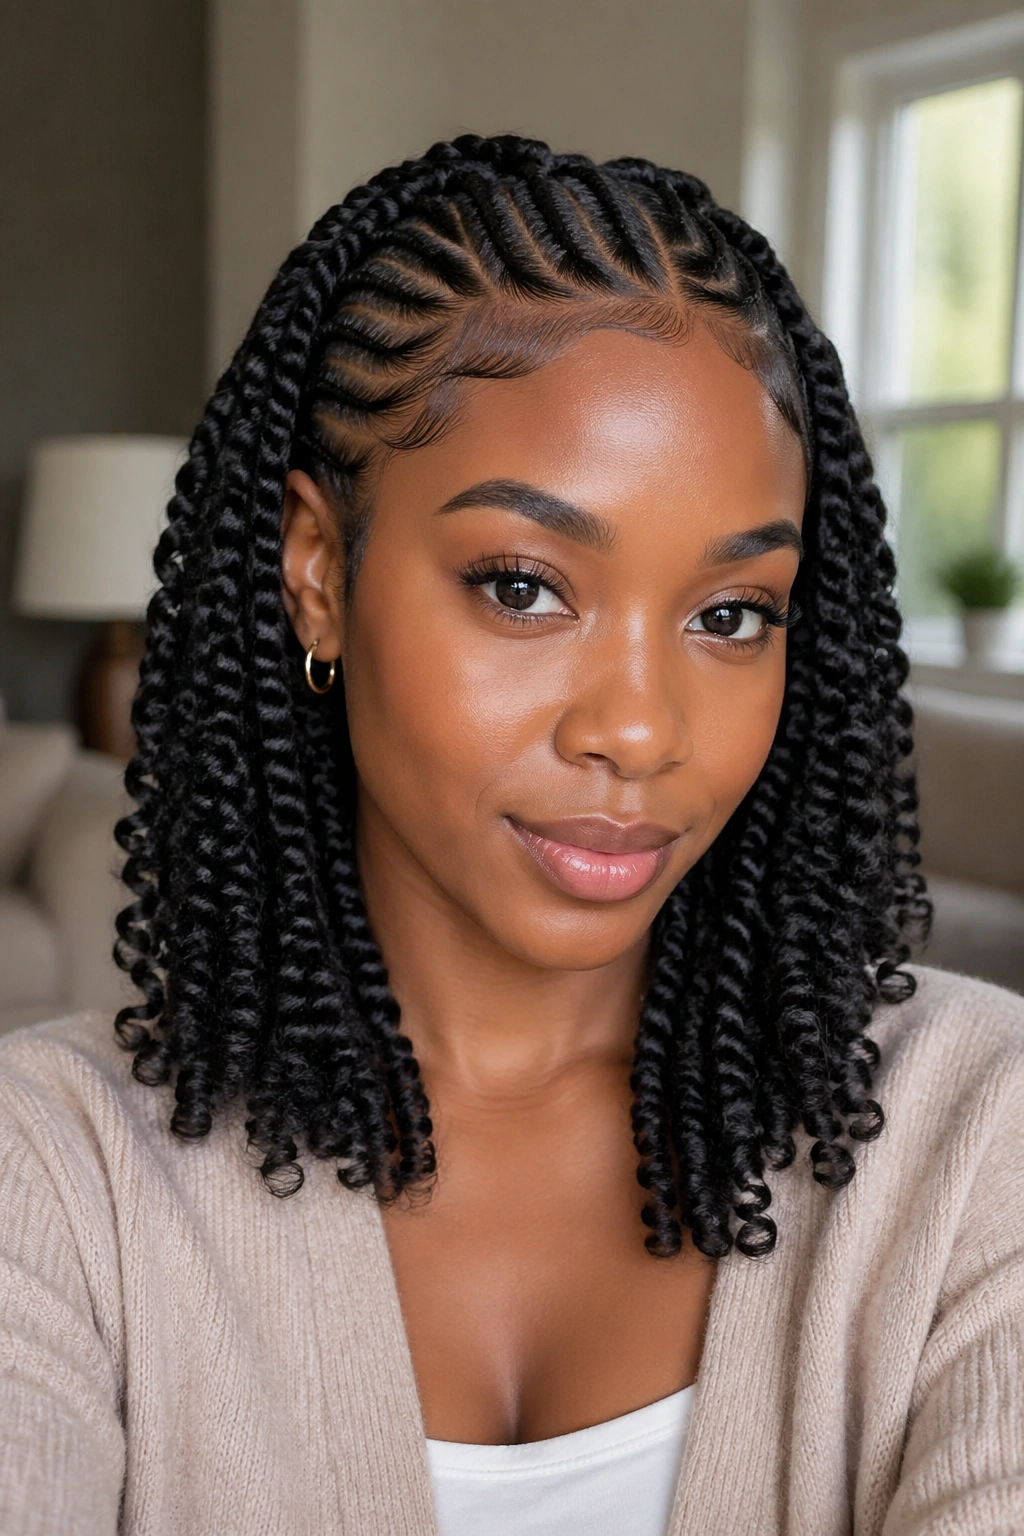
18. Cornrows with Loose Curls at the Ends
Here’s the hybrid look: cornrows laid flat down to the nape, then transitioning into loose spiral curls for the last four to six inches.
The curls come from kanekalon or water-wave braiding hair. The braider stops braiding at the nape, then dips the ends in boiling water (or steams them) to set the curl pattern.
What makes this work is the contrast. Tight, tidy rows against the scalp. Wild movement below. The eye has somewhere to rest and somewhere to play.
What to Watch For
- The curls can tangle where they meet the braids. Oil the transition zone every few days.
- Avoid sleeping directly on the curls. A silk bonnet that covers both the cornrows and the curls is essential.
19. Zigzag Side Cornrows with Open Back
A half-style. Cornrows go only on one side of the head — from the hairline back to the crown — while the rest of the hair stays loose or goes into a defined twist-out on the other side.
The zigzag parts on the braided side echo the movement of the loose hair on the other side. Two different textures, same overall mood.
Great for people who want some protection without committing to a full head of braids. Also lovely for anyone growing out a short cut on one side.
20. Fulani Cornrows with Beads and a Front Braid
Fulani cornrows are the most recognizable Fulani style in Black hair culture. Central braid straight down the middle of the scalp, cornrows on the sides curving gently, often beads or cowries woven through.
This is a heritage style with specific roots in Fulani tradition. Wearing it with intention matters. The braid down the center is the anchor — everything else works around it.
Beads usually sit at the ends of the side cornrows, with one or two larger cowrie shells in the center braid. Gold cuffs work here too, though traditional versions lean toward bone, wood, or shell.
21. Cornrow Crown Braid
A cornrow that starts at one temple, runs along the hairline like a headband, and ends at the opposite temple. The rest of the hair stays loose or gets gathered into a low puff.
The crown cornrow is thick — usually a feed-in braid built up with kanekalon — so it sits raised against the scalp, almost like a laid braid version of a headband.
How to Style It
- Leave the back hair in a soft afro for a natural finish
- Or gather everything into a low loose bun for a dressier version
- Add a small fresh flower at the end of the crown braid for weddings
22. Stitch Cornrows with a Bun at the Nape
A more conservative cousin of the high-bun version. Stitch cornrows go straight back, but instead of sweeping up to the crown, they gather low at the nape into a neat bun.
The low placement makes this one of the most versatile cornrow styles for people who work in formal offices or school environments with stricter hair codes. It reads professional. Sits neatly under hats. Doesn’t catch on collars.
The bun can be small and tight or larger and looser, depending on the drama you want. Smaller reads sharp. Larger reads soft.
23. Cornrows with Colored Kanekalon Peekaboo
Hidden color. Most of the cornrows use standard black or natural-dark kanekalon. But every fourth or fifth braid is woven with a colored strand — burgundy, honey, copper, or even a subtle blue — that only shows when the braids move.
The peekaboo effect beats full-color braids for most people because it doesn’t commit to one dominant color. You get flashes of something unexpected without your whole head reading as “I dyed my hair.”
Pick a color that plays against your skin tone. Warm browns need burgundy or honey. Cooler tones pull off blue-black or deep plum.
24. Short Cornrows with a Shaved Design on the Sides
For people with shorter natural hair or those who love a clean edge: tiny cornrows on the top of the head with shaved sides featuring a geometric pattern.
The shaved design can be almost anything — stars, waves, a single line, intricate tribal shapes. The top cornrows stay small so they don’t compete with the shape on the sides.
Requires regular upkeep. Shaved patterns grow out quickly, so you’ll want a touch-up every two to three weeks to keep the design sharp.
Maintenance Notes
- Moisturize the shaved skin with a fragrance-free lotion to prevent ingrown hairs
- Edge gel the cornrow hairline weekly to keep the contrast clean
- A soft brush, not a hard one, on the shaved sections
25. Cornrows Styled Into a Long Braided Cape
The finisher: cornrows all going down the back, but instead of individual ends, they all combine into one thick braided cape that reaches mid-back or lower.
The cape is a single large braid made from all the cornrow ends plus added kanekalon. It falls down the back like a heavy rope.
This style has serious weight. It looks incredible. It also shifts your posture if you wear it all day — you’ll feel the pull. Ask for less kanekalon in the cape than your braider recommends, at least the first time.
Who This Is For: Events, photos, music videos, times you want an extreme look. Not ideal for an everyday install unless you’re used to the weight.
Keeping Trendy Cornrow Styles Fresh Past Week Two
Most cornrows hit their ugly phase around day ten. The roots start to fuzz up. The gel that held the edges loses its grip. Flyaways appear where there were none before.
This isn’t the braids failing. It’s normal growth.
A mousse refresh handles it. Shake a quarter-sized amount into your palm, smooth it along the length of the cornrows, and re-tie your edges with a fresh coat of gel. Do this weekly from day ten onward and the style reads fresh through week three or four.
Don’t wait until the cornrows look rough to start refreshing. Prevention holds longer than repair.
Scalp Care Underneath All Those Rows
The scalp still needs to breathe, eat, and stay clean. Cornrows don’t change that.
A diluted shampoo in a squeeze bottle is the most practical option. Mix one part clarifying shampoo with three parts water, aim the nozzle at the scalp between each row, and massage gently with fingertips — not nails. Rinse thoroughly.
Follow with a light leave-in spray, not a heavy cream. Heavy products build up fast on braided scalps and cause itching.
Signs your scalp needs attention:
- Tightness that doesn’t ease within 48 hours of install
- Small bumps along the hairline
- Persistent itching that doesn’t go away after washing
If any of these show up, don’t ignore them. Call your braider for a takedown earlier than planned.
Sleeping in Cornrows Without Ruining Them
A silk bonnet is the minimum. Cotton pillowcases pull moisture from the cornrows and snag on the flyaways, creating more frizz.
For longer cornrows, wrap them loosely in a silk scarf before the bonnet goes on. The scarf keeps the length smooth. The bonnet keeps everything contained.
Satin works too. Pure silk holds up better over time and doesn’t warm your scalp the way polyester satin can on summer nights.
When to Take Cornrows Out — and How to Do It Right
Six weeks is the outside limit. Beyond that, matting at the roots becomes a real risk, and the takedown gets harder.
Four weeks is the sweet spot for most installs.
For takedown: unravel each braid slowly from the ends. A small dab of conditioner or oil on each end helps the hair release without snapping. Don’t pull. Don’t rush.
After all braids are out, comb through with a wide-tooth comb before washing. This catches the shed hair that accumulated over the wear and prevents matting in the shower.
Then wash twice — once to clear product buildup, once to actually clean the hair. Deep condition after. Your hair needs the moisture back before you do anything else to it.
Cornrows that get a careful takedown leave your hair healthier than it was at install. Cornrows that get yanked out leave broken ends and tears.
The braids are only half the style. The rest lives in how you take care of the foundation underneath.
Common Mistakes That Shorten the Life of a Good Install

Most cornrow failures aren’t about the braiding. They’re about what happens between the chair and the takedown.
Over-oiling the scalp is the biggest one. A heavy dollop of castor oil every day smells lovely and feels productive, but all that grease sinks into the braid itself, weighs it down, and creates buildup that mats near the root. Once the mat forms, it doesn’t come out without scissors or serious time. A few drops of a light scalp oil — peppermint, rosemary, or a simple jojoba — applied to your fingertips and tapped along the parts is plenty.
Another one: sleeping in the style that you wore during the day. If your cornrows fed into a high bun, don’t sleep with the bun still up. Let the cornrows lie flat against the back of your head overnight. Pulled-up positions for eight hours straight translate into thinned edges and sore spots within a week.
Washing too aggressively causes frizz that no amount of mousse will fix. Scrubbing with all ten fingers tangles the braided sections near the roots. Use fingertips only, and keep the motion small and gentle.
Beyond that, there’s the tension issue. If your cornrows hurt on day one, they’ll still hurt on day three. A skilled braider never needs to pull hard. If yours did, the braids are probably too tight — and you can take an ibuprofen the first night, but don’t leave them in for six weeks if the pain doesn’t ease within two to three days.
Trust your scalp. It knows before your mirror does.
One more thing worth mentioning — the itch phase. Around day four or five, many people hit a window where everything on the head itches relentlessly. This is partly the scalp adjusting to the tension and partly buildup from styling products. A witch hazel spray dabbed along the parts with a cotton ball calms it down fast, without disturbing the braids. A little dab of tea tree oil mixed with water in a spray bottle works too.
If the itching turns into flaking or red patches, that’s a different conversation — time to see a trichologist or take the braids down earlier.