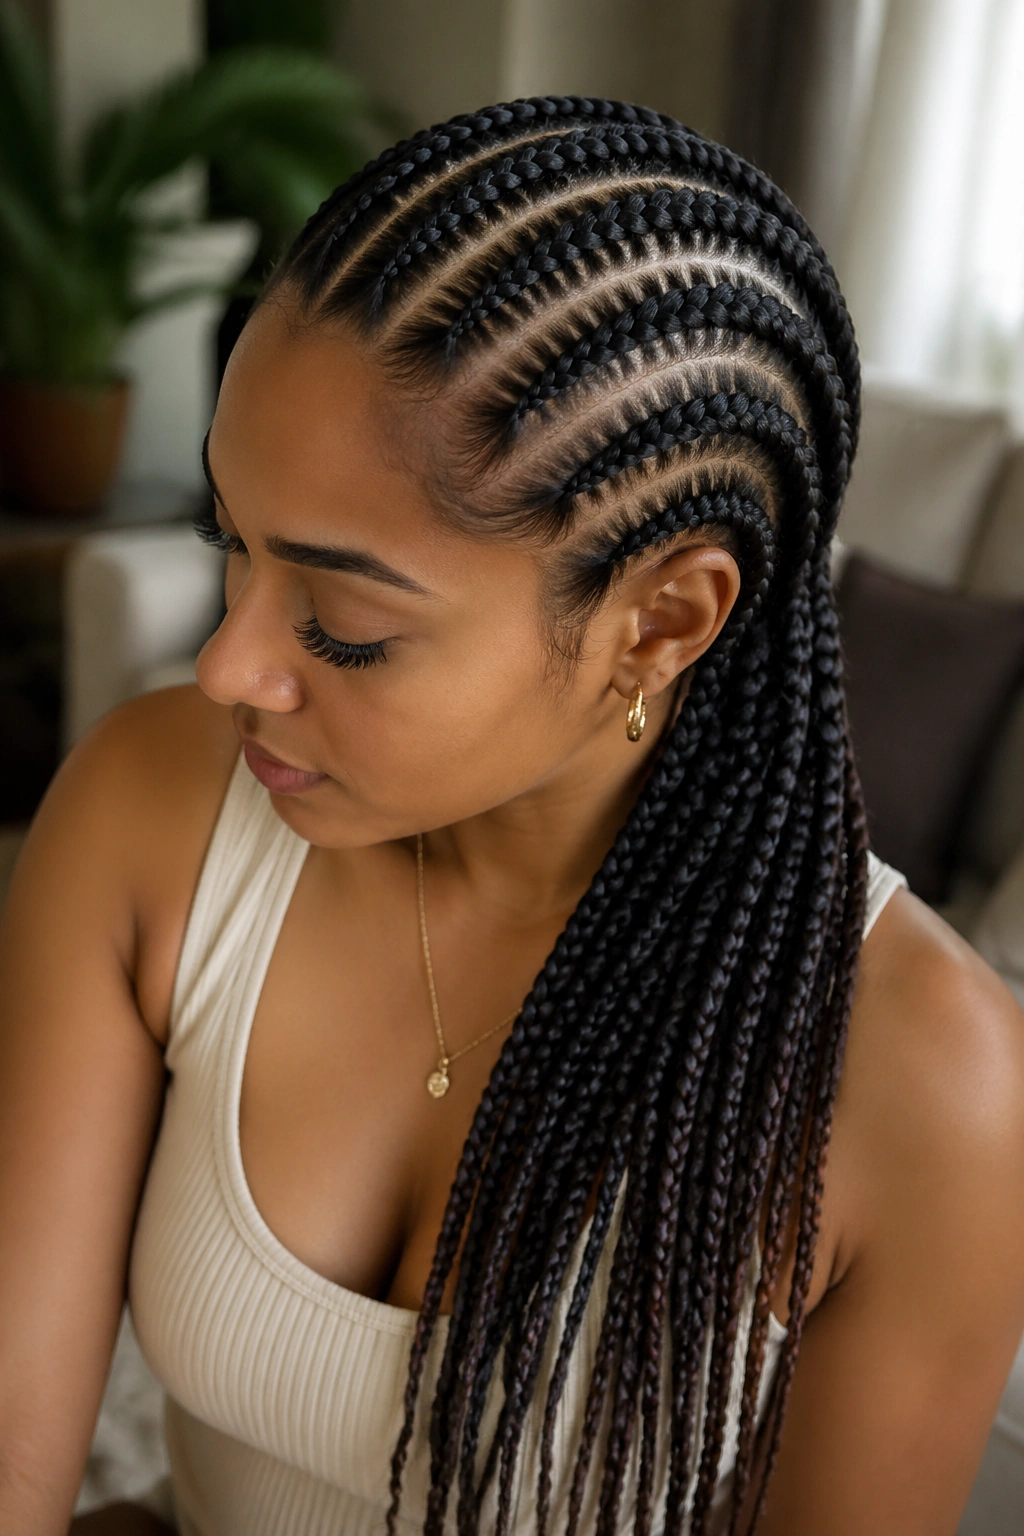
Five braids. That’s the sweet spot, and anyone who’s sat in a braiding chair for hours knows exactly why. Cornrow styles with 5 braids hit a rare balance — wide enough to finish a full head in under two hours, narrow enough to frame the face, and simple enough to pull off without a second mirror. Most protective styling either goes tiny (think micro feed-ins with 30+ rows) or goes bold (three fat braids straight back). Five sits right in the middle. It’s the size that looks intentional without looking fussy.
I’ve worn 5-braid cornrows in every configuration you can imagine. Straight back for the gym. Curved sides for a wedding. Two in front, three in back when I was too tired to commit to symmetry. And the thing I keep coming back to is this — the count matters less than the parting. You can take five cornrows and make them look like a red carpet statement, or you can make them look like you forgot what day it was. The difference is the part work and the tension at the roots.
Five also forgives. If one braid ends up slightly fatter than the others, nobody sees it the way they’d see an uneven row in a dense feed-in set. You get room to breathe. Room to experiment with curves, stopping points, ponytail drops, and accessory placement.
Below you’ll find 20 distinct ways to wear five cornrows. Some are sleek, some are bold, some lean into asymmetry on purpose. Each one is genuinely different — different parting shape, different length, different finish. Before we get to the list, a few things worth knowing if you’re new to this count or thinking about switching from a denser style.
Why 5 Braids Works for So Many Face Shapes
The five-braid layout creates vertical lines that elongate the face without crowding it. Round faces get a slimming effect. Long faces get broken up horizontally when the braids curve or stop at the nape. Heart-shaped faces benefit from the way five rows distribute volume across the crown without piling everything on top.
Compare this to three fat braids, where each row is thick enough to dominate your entire profile. Or eight braids, where the parts fight for attention. Five lets your face stay the focus.
A good braider will sometimes shift the middle braid slightly off-center to match your natural hairline. That tiny adjustment — maybe half an inch — changes everything about how the style sits.
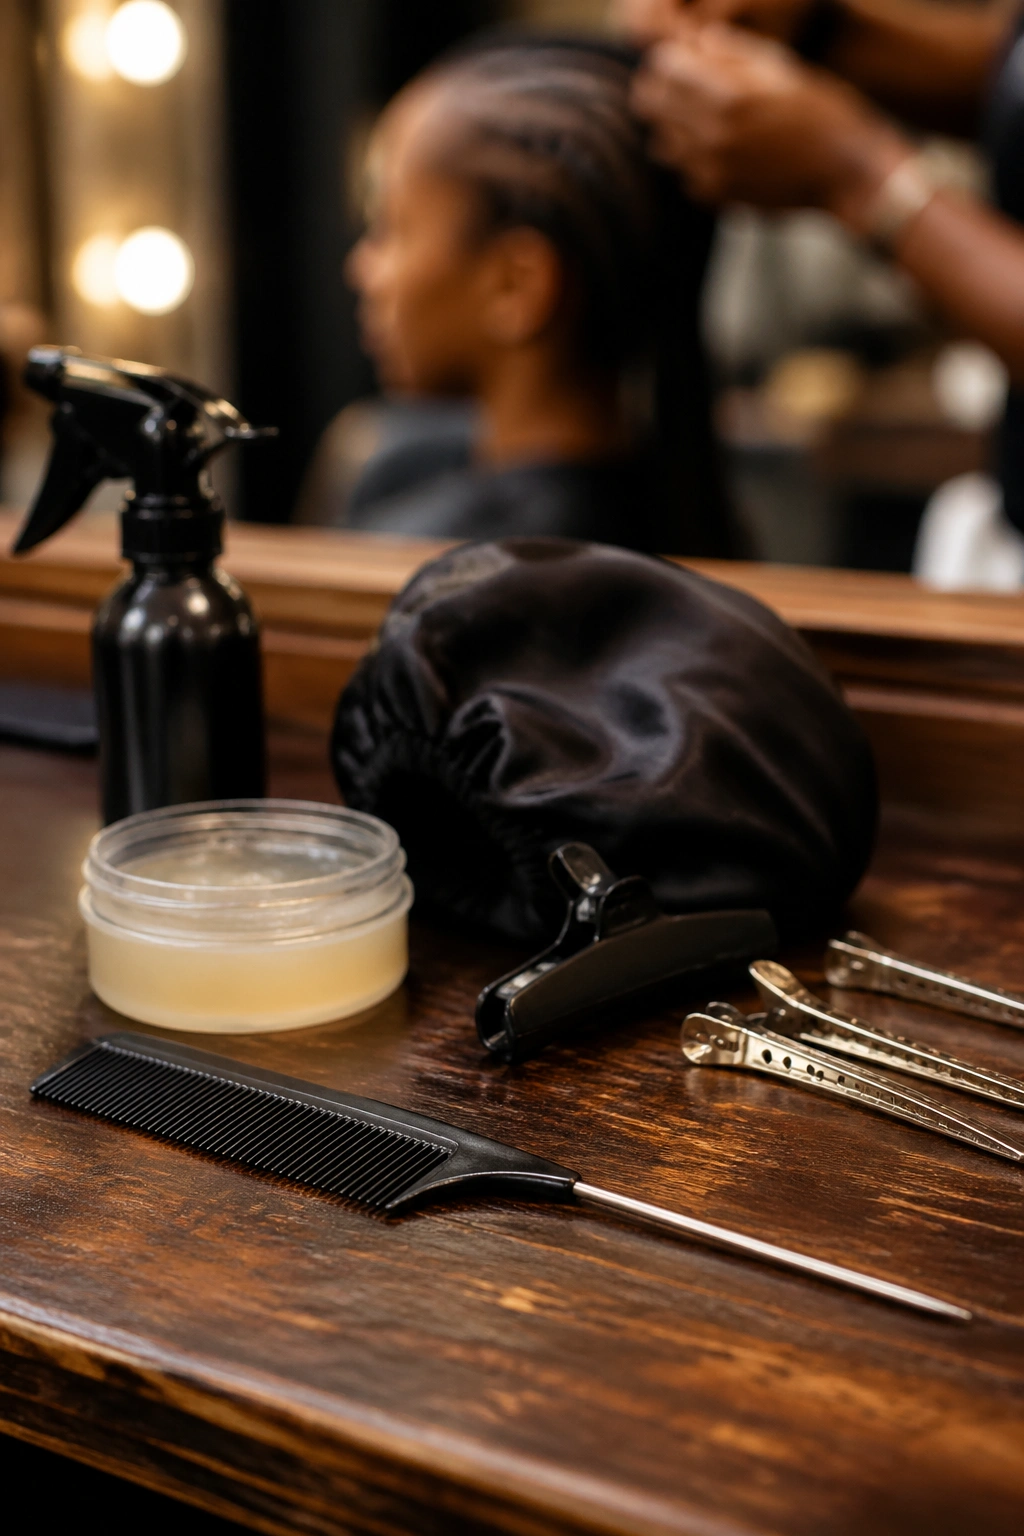
Prep Work That Actually Matters
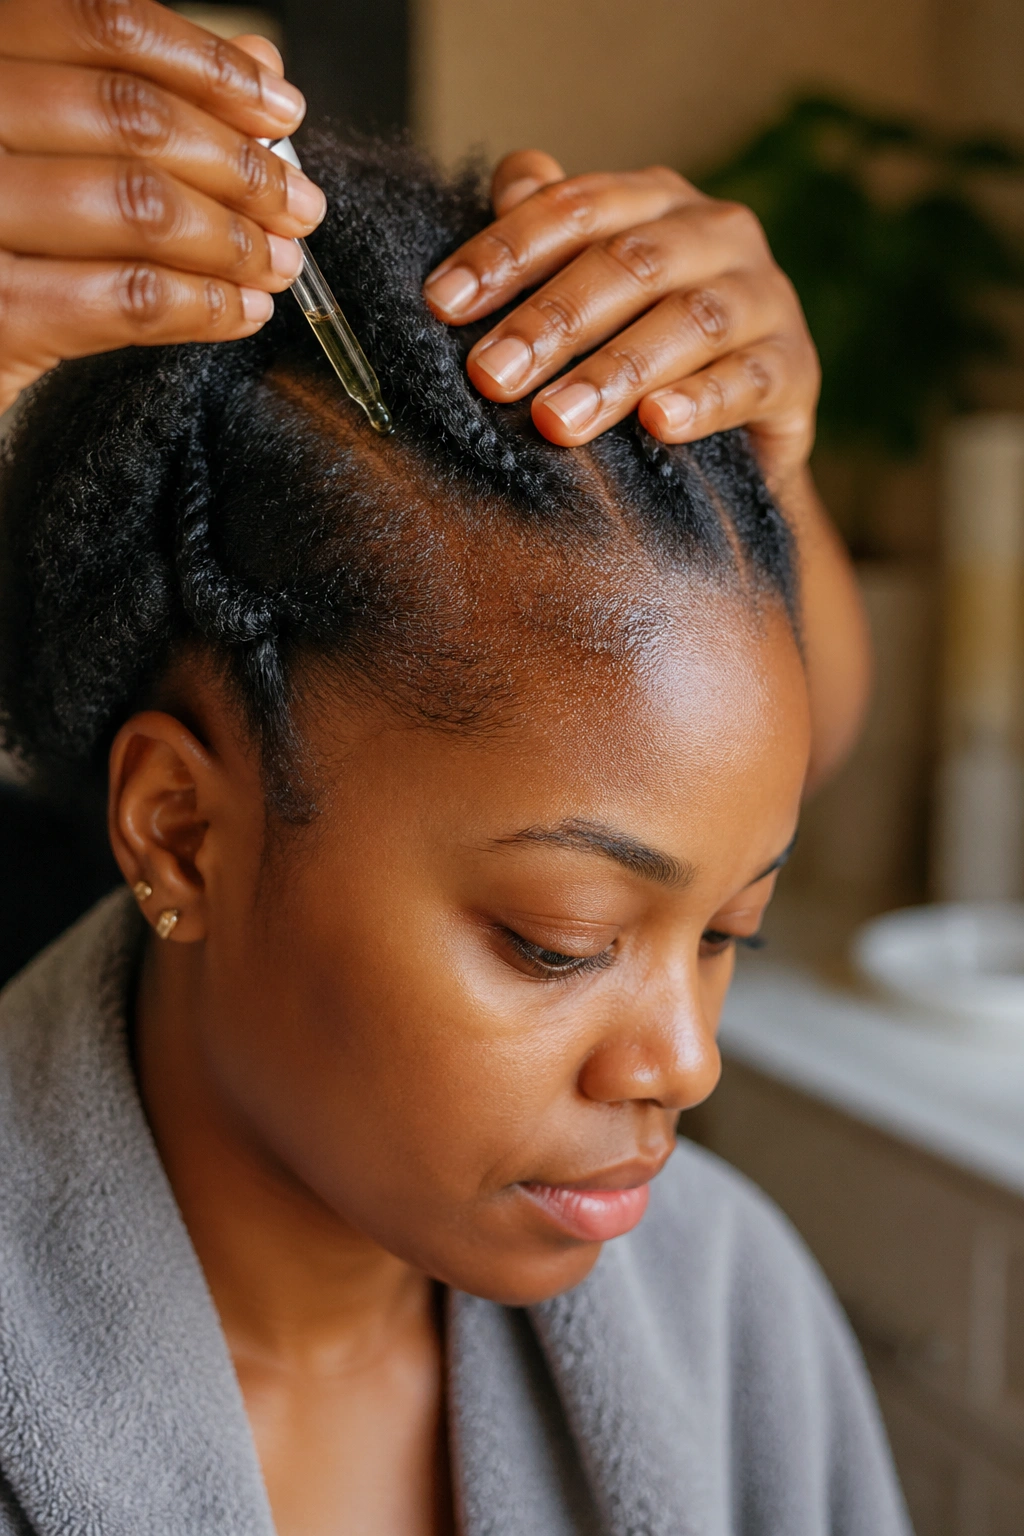
Before anyone touches your hair with a rat-tail comb, a few things need to happen the night before or morning of. Wash with a clarifying shampoo if you’ve had product buildup. Deep condition for at least 30 minutes. Blow-dry on low or stretch with bantu knots — cornrows on damp hair is a recipe for mildew and itchy scalp by day 4.
The scalp should feel clean but not stripped. Apply a light oil — jojoba, argan, or a sweet almond blend — to the scalp only, not the length. Heavy butter on the length makes braids slip during the parting stage.
Skip conditioner leave-in on braid day. Your strands need a tiny bit of friction for the braider to get grip.
Tools Your Braider (or You) Will Need
A proper setup speeds everything up. Five braids might only take 90 minutes, but it’ll take twice that if you’re hunting for the right comb halfway through.
- Rat-tail comb with a metal or sharp plastic tail for clean parts
- Edge control that dries flexible, not cement-hard
- Water spray bottle set to mist, not stream
- Hair clips (the duck-bill kind work best for sectioning)
- Kanekalon braiding hair if you’re adding length — 2-3 packs for a standard set of five
- A satin-lined bonnet for sleep, or a large silk scarf
That’s it. No need for the 30-piece braid kits you see online. Most of that stuff sits in a drawer unused.
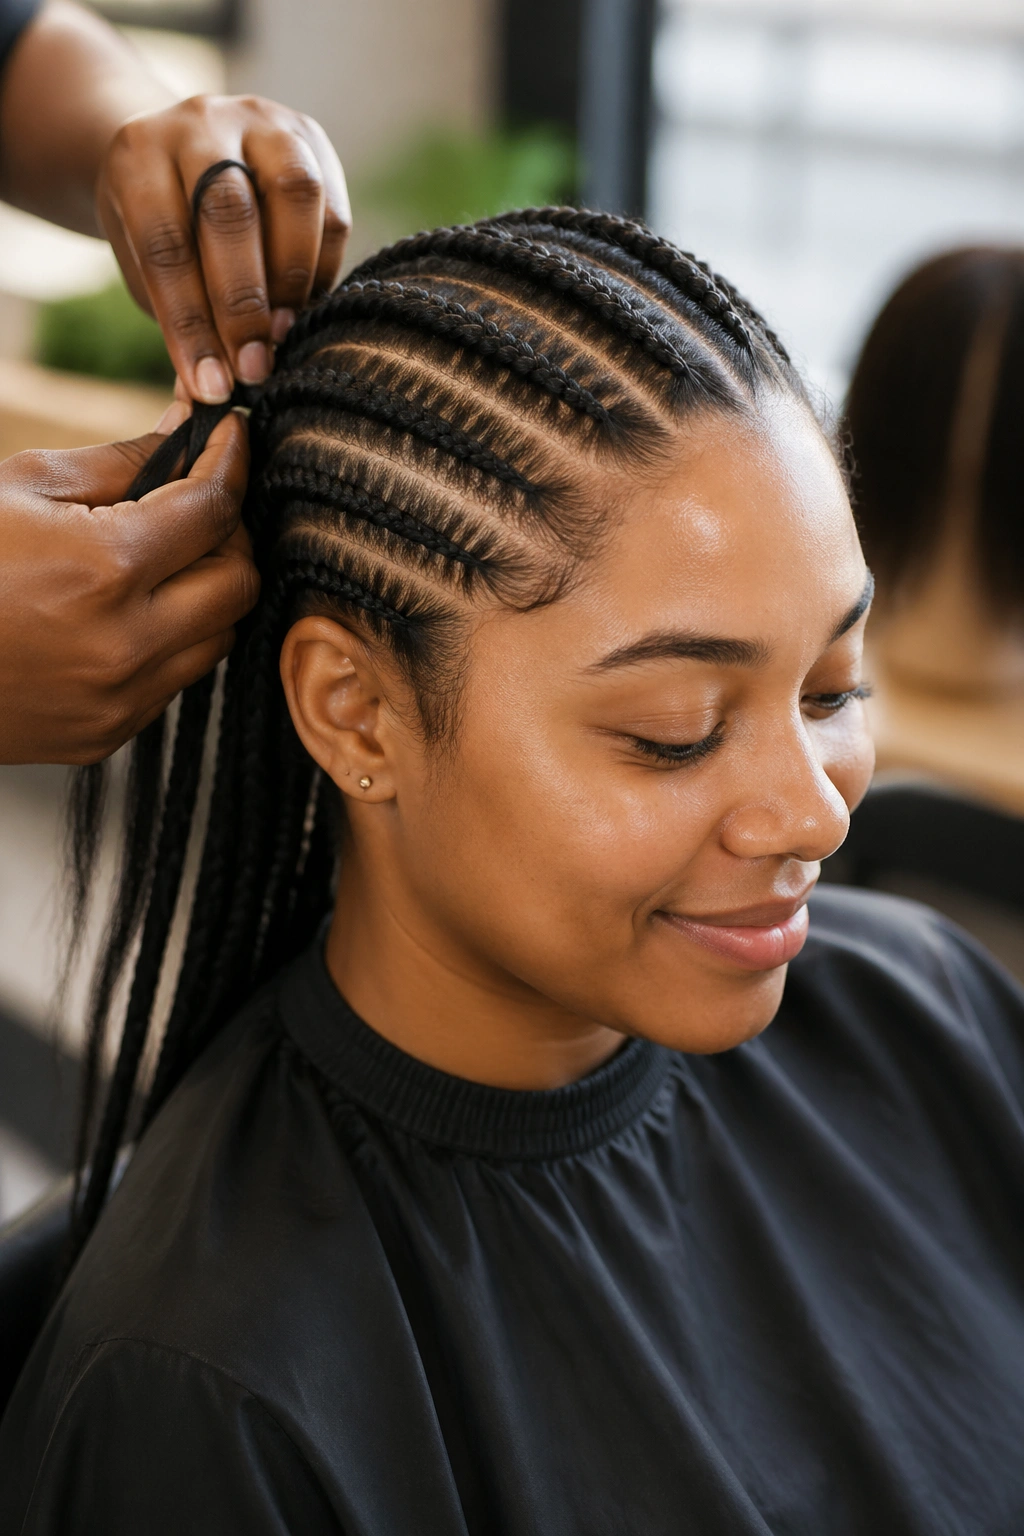
Tension Rules That Prevent Damage
Cornrows that hurt are cornrows that will cause breakage. If you feel a pulling sensation at the temples within the first hour, speak up. A good braider will loosen the front section. The worst damage from braiding comes from tight edges, not tight length — the hair at the hairline is finer and more fragile.
A properly braided cornrow should feel snug but not painful. You should be able to smile without your scalp protesting.
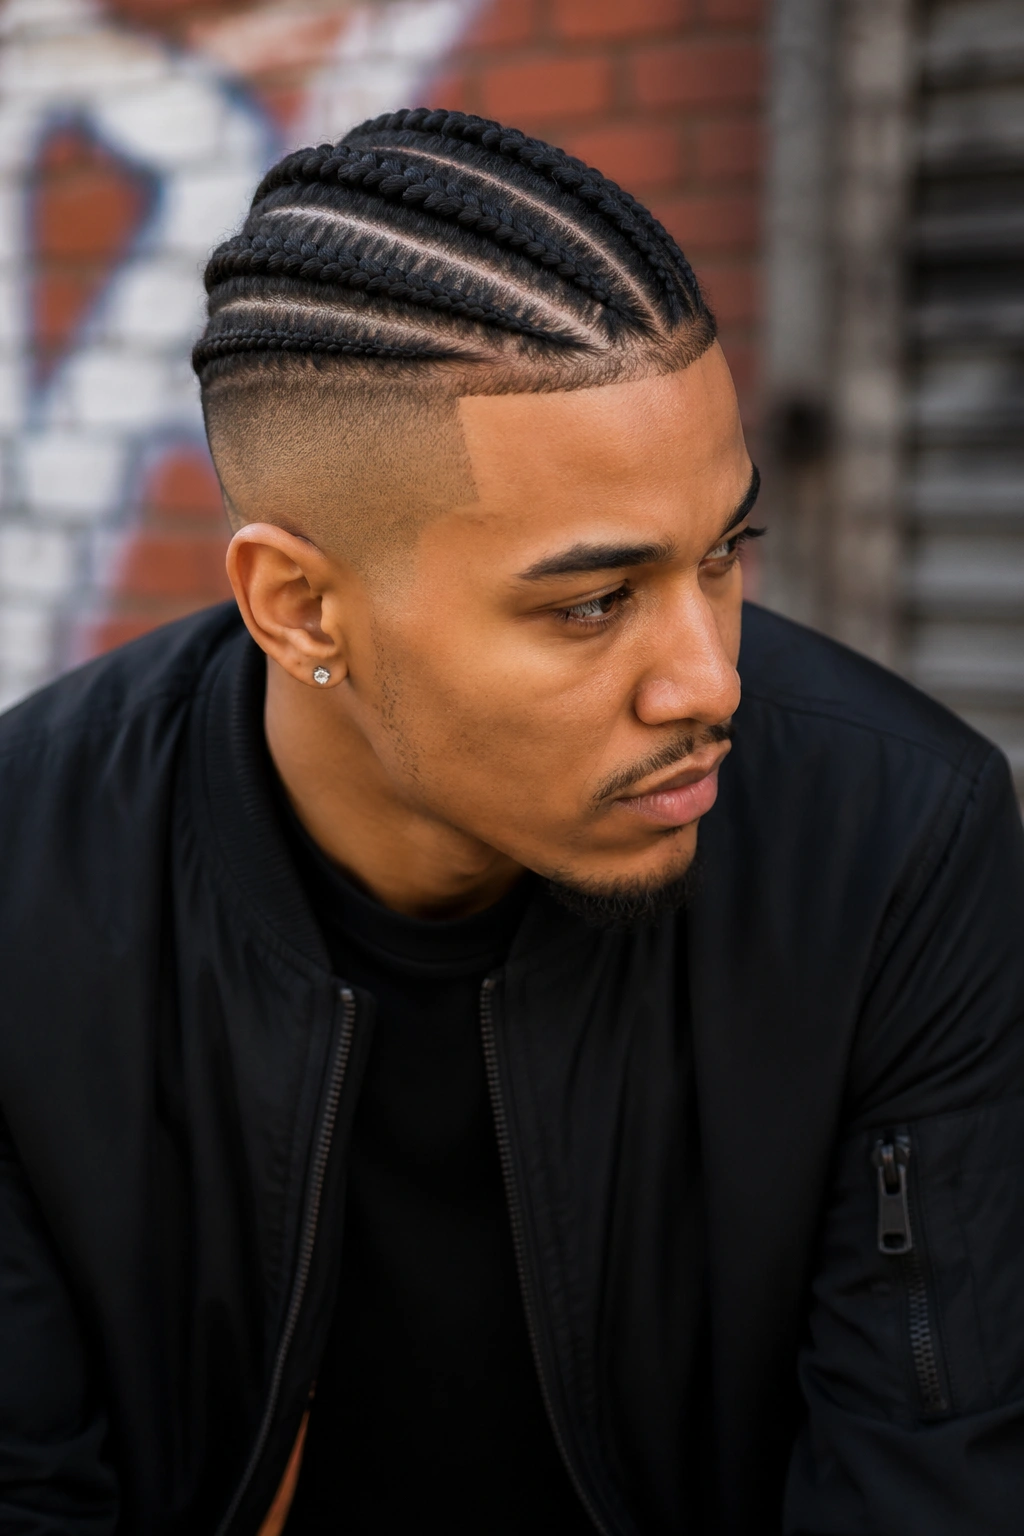
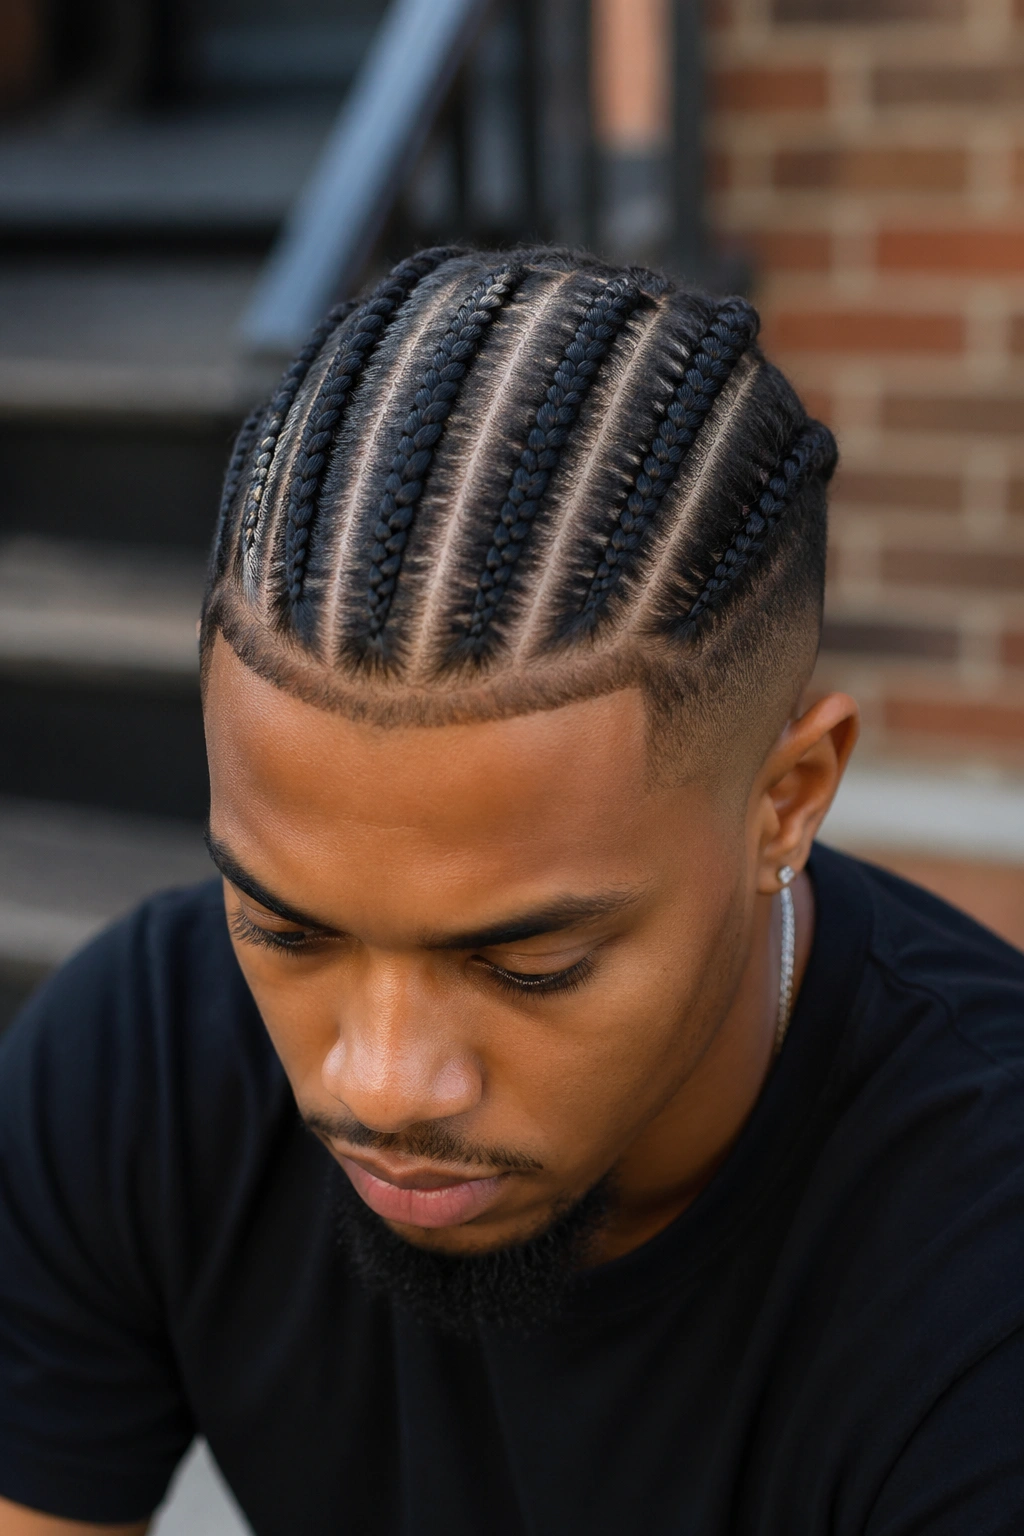
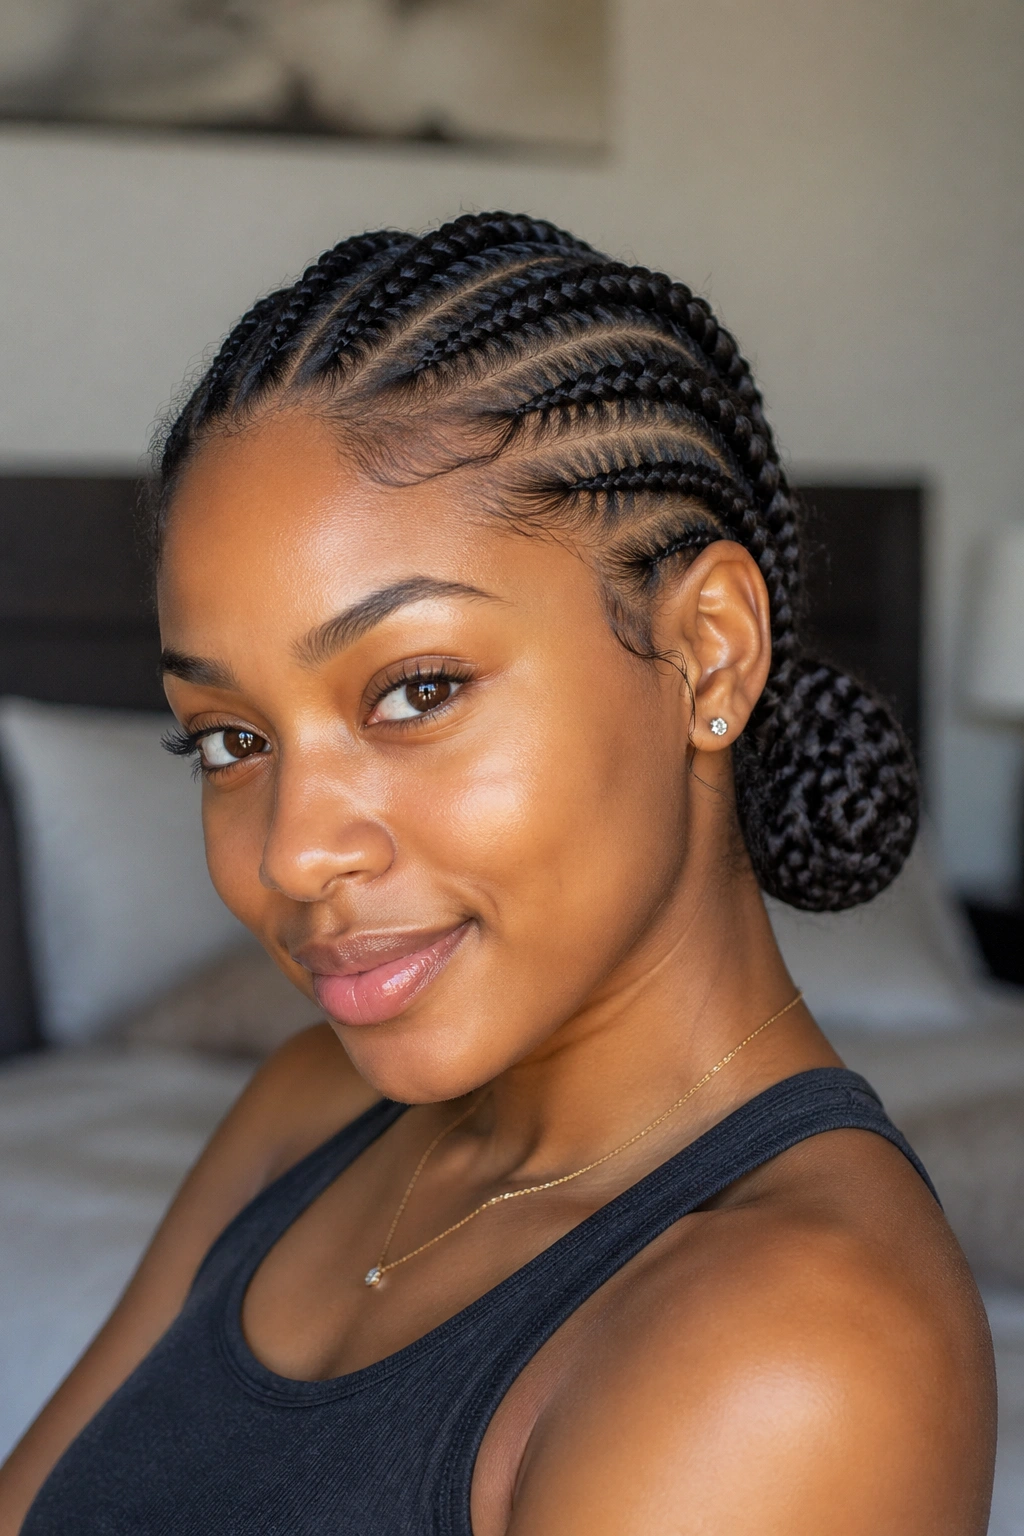
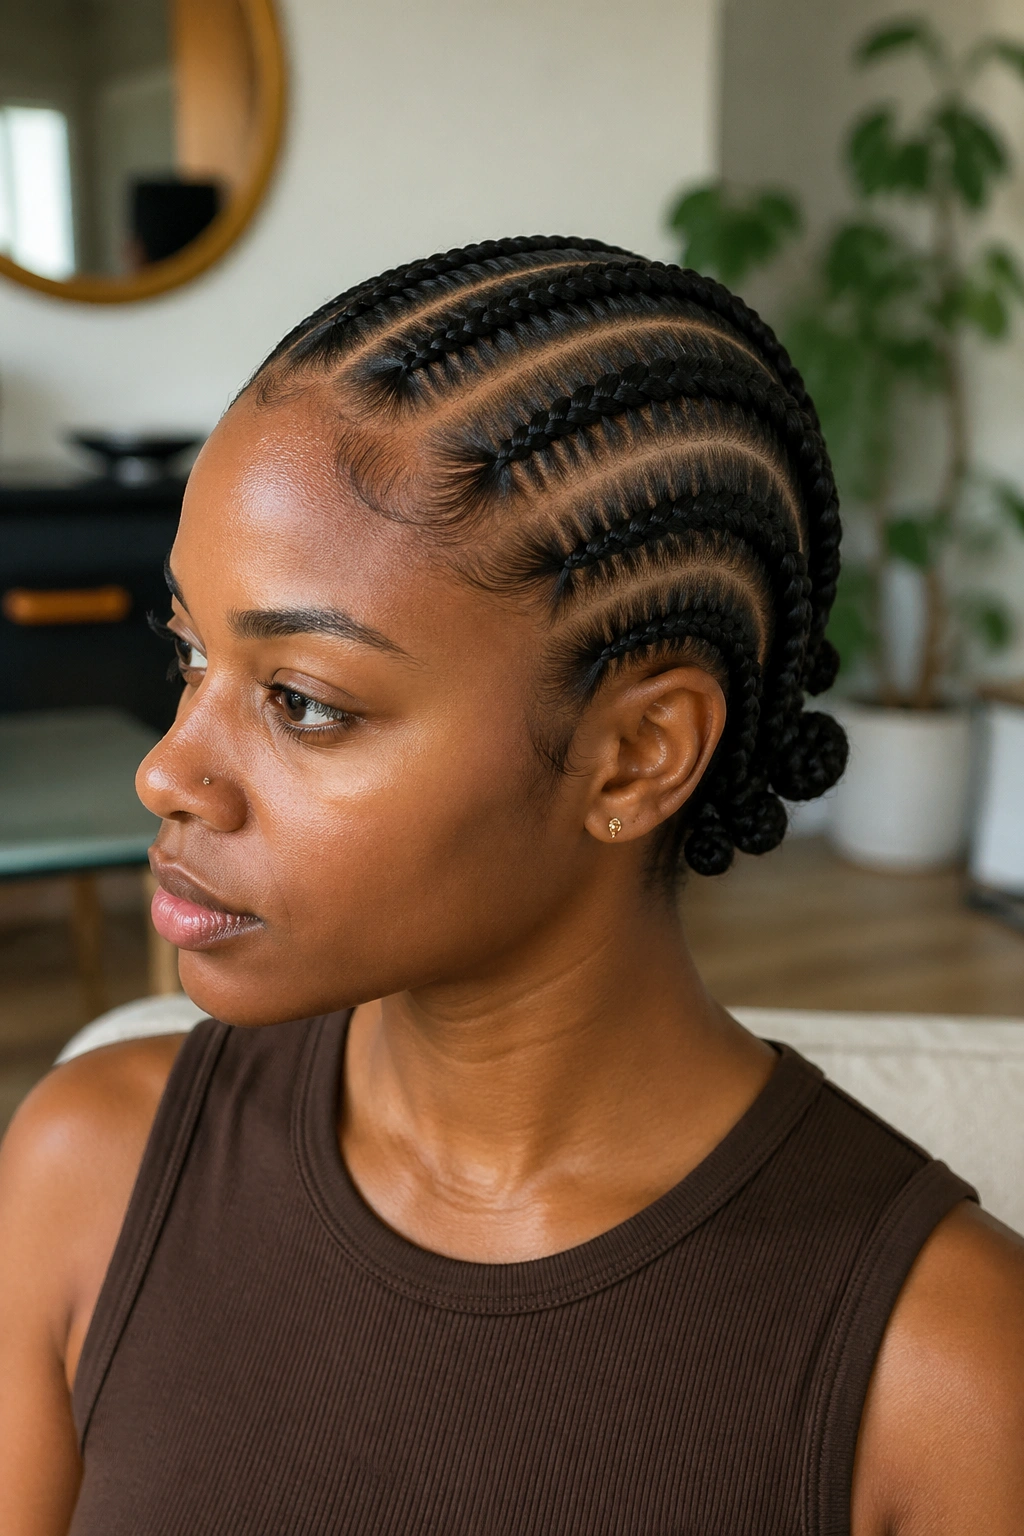
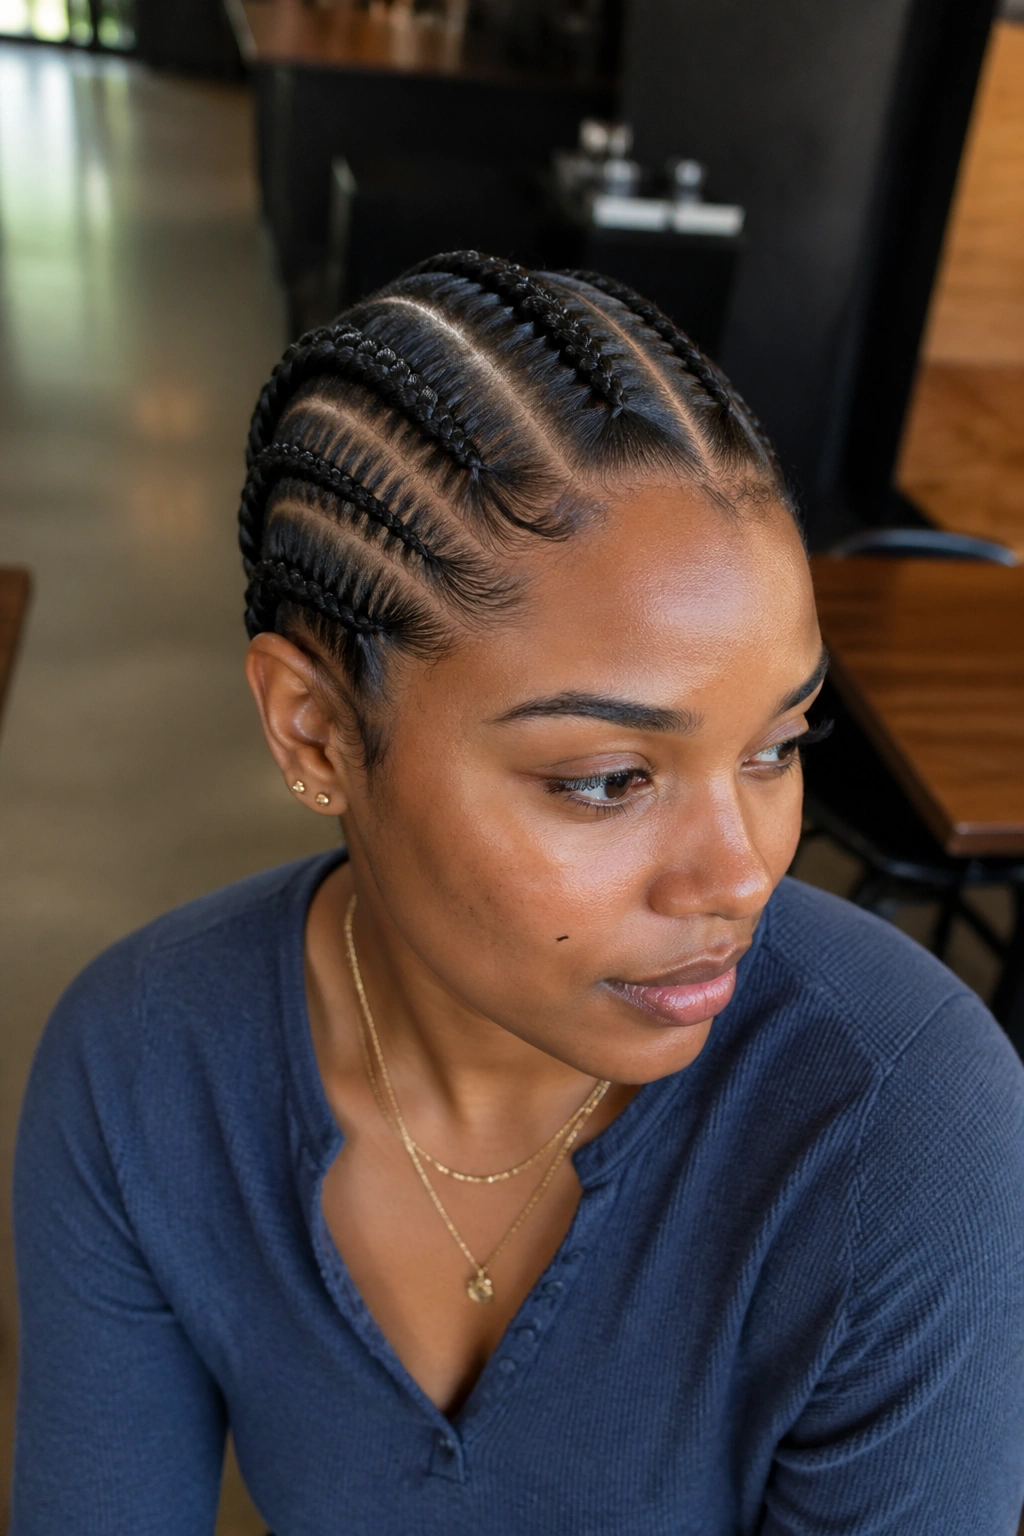
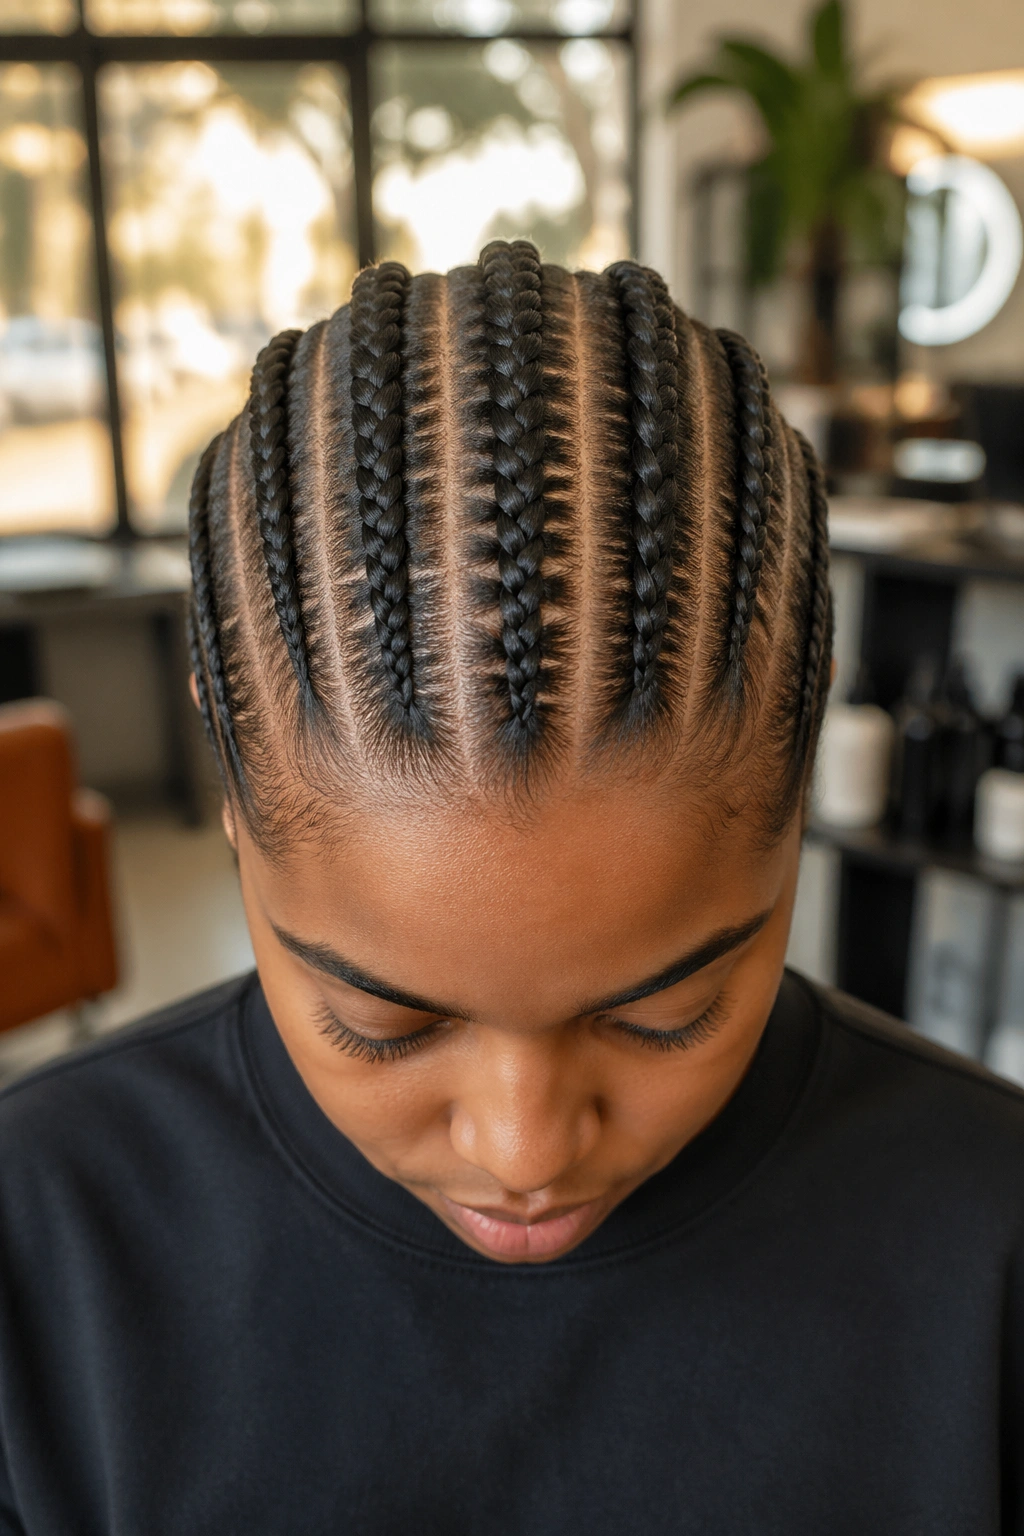
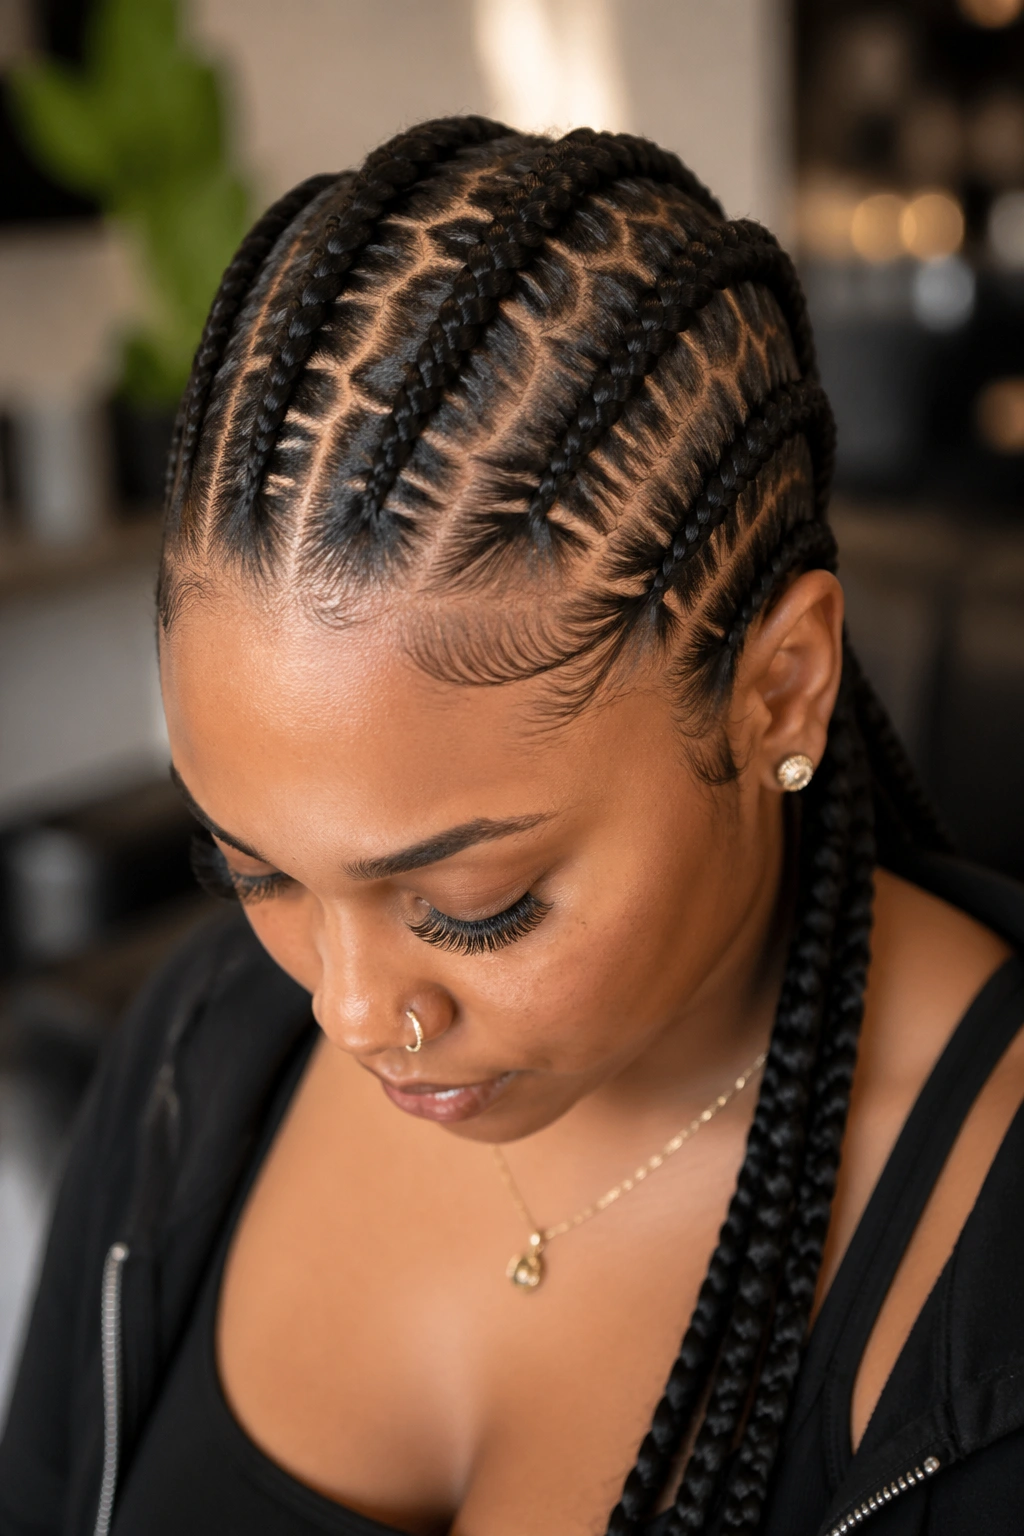
1. Straight Back Classic with 5 Evenly Spaced Rows
The foundation of every cornrow style. Five clean parts running from hairline to nape, evenly spaced across the head, each braid ending in a small tuck or extension. This is the style that looks right no matter what you’re wearing — jeans and a tee, or a silk slip dress.
Why It Works
- Clean geometry flatters every face shape
- Takes 60-90 minutes for a skilled braider
- Lasts 4-6 weeks with proper care
- Works on all hair textures from 3B to 4C
Pro tip: Ask for the middle braid to sit precisely on your center part — any drift and the whole style looks slightly off-kilter.
2. Side-Swept 5 Braids With a Deep Diagonal Part
Unlike the straight-back classic, this version starts with a heavy side part and lets all five braids sweep across the head on an angle. The first braid hugs the temple, and each subsequent braid curves in parallel toward the opposite ear.
Great for softening a strong jawline. The diagonal creates motion and asymmetry that reads as editorial rather than casual. Best for those with medium to long hair since the curved path eats a bit of length.
What Makes It Different
The parts don’t run parallel to each other — they fan out slightly, so the braid at the front is a full inch wider than the braid at the nape. Your braider needs to mark the parts in chalk or with a light edge gel line before starting.
This style tends to last slightly less than straight back (about 3-4 weeks) because the curved tension pulls unevenly as the hair grows in.
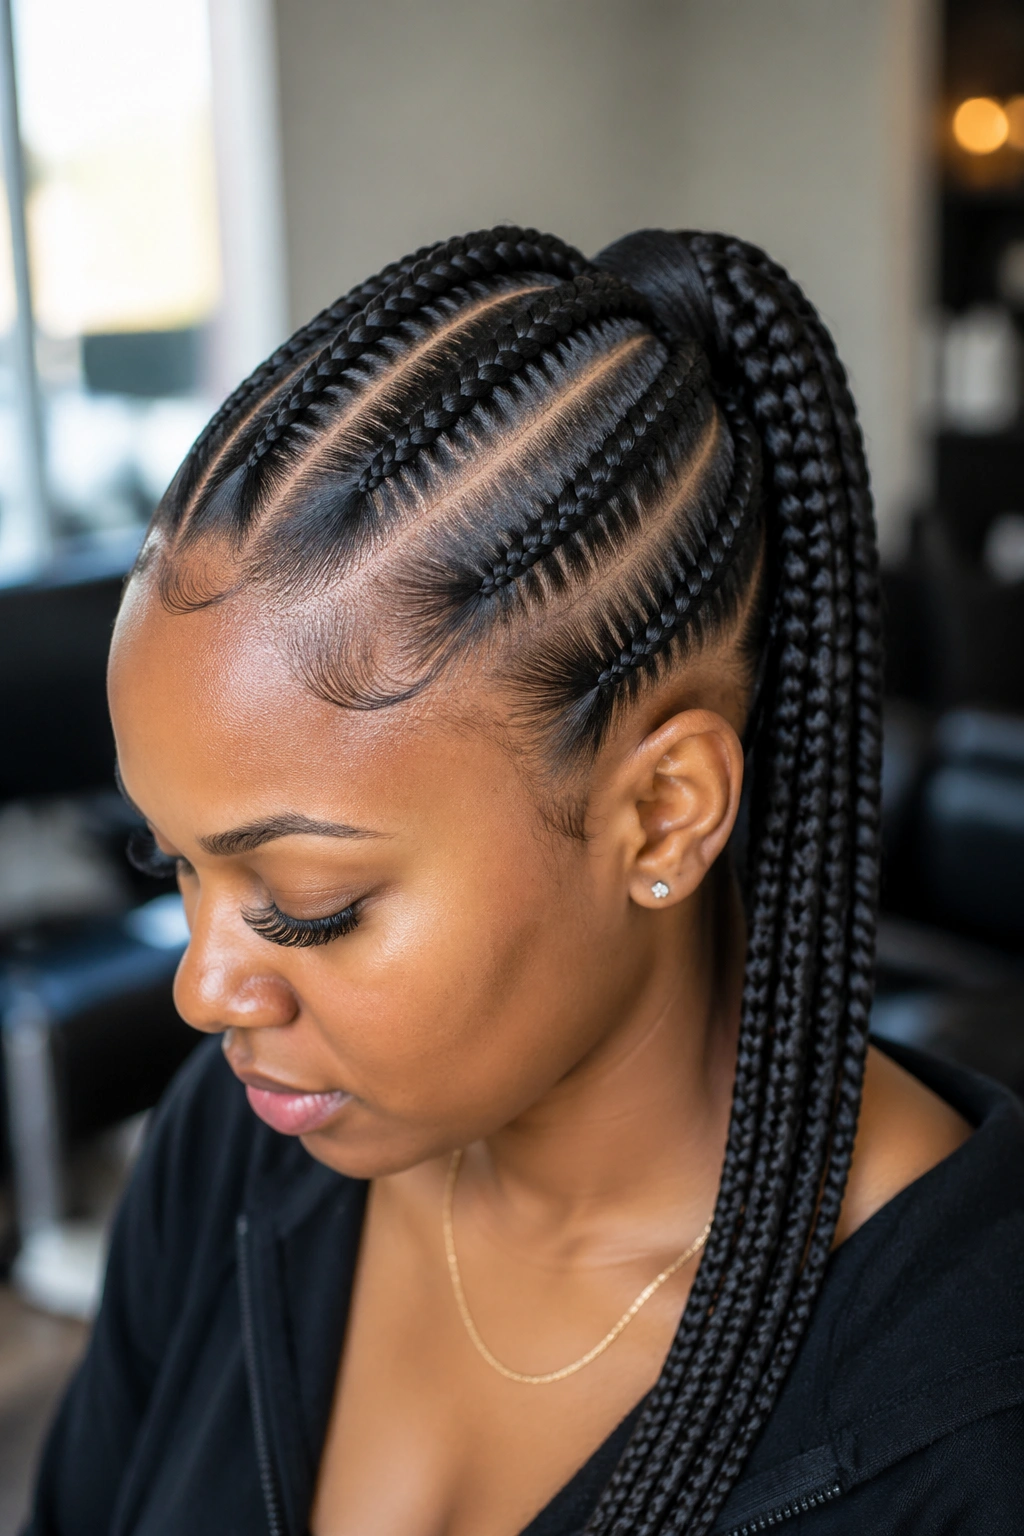
3. Five Cornrows With Two Stopping Mid-Head and Three Going Into a Ponytail
Here’s a layered approach that gives you the look of a half-up, half-down without any loose hair. The two outer braids on each side stop at the crown and tuck under, while the three center braids continue all the way back and gather into a sleek ponytail — real hair or extension.
Why this is worth learning: you get the polish of a full updo with half the braiding time. The tucked-under ends create a subtle bump that adds dimension.
It photographs well. The dropped ponytail catches the eye while the tucked braids frame the face cleanly.
Who this is for — anyone who wants versatility built into one install. You can wear the ponytail up one day, swing it to the side the next, or even split it in two low pigtails for a softer look.
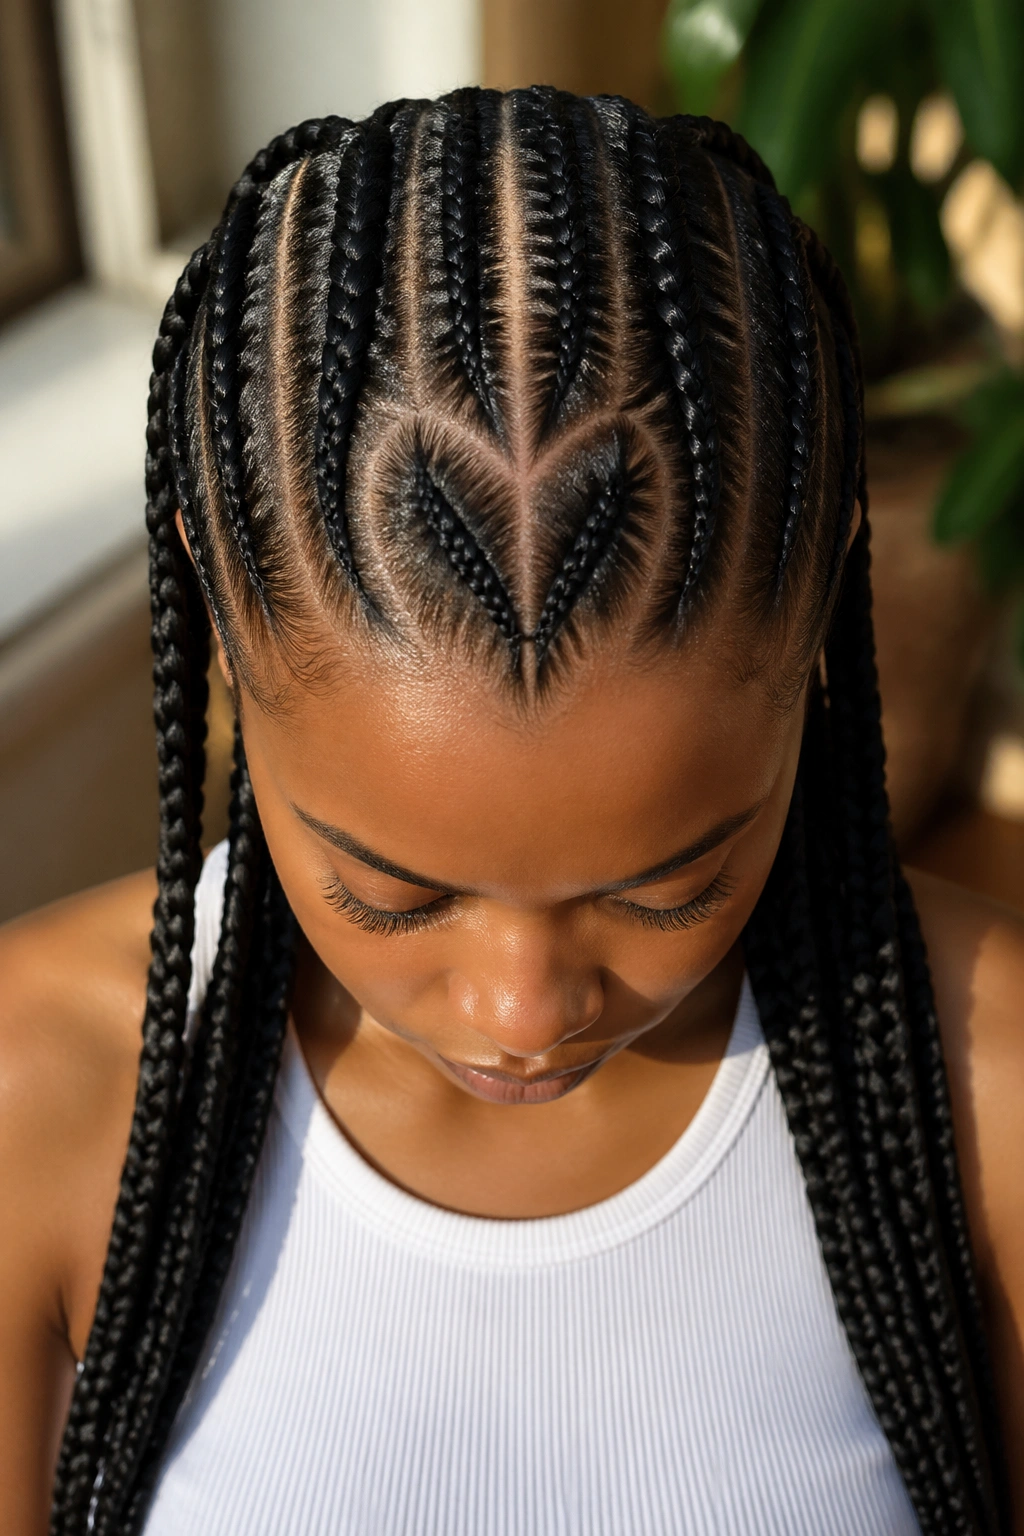
4. Heart-Shaped Part With 5 Braids Flowing Down
A heart-shaped center parting where the two halves of the heart sit right at the hairline. Five braids then emerge from the bottom point of the heart and fan backward. It’s a romantic, almost old-school look that shows up in Yoruba and Igbo cultural styling.
The heart part takes skill. A sloppy heart reads as a lopsided circle, so this is not a first-timer’s job. If you’re DIY-ing, draw the shape with edge gel first and trace it with the rat-tail comb before parting.
Five braids feels right here because three would look too spread out below the heart and seven would crowd the shape.
Styling Tips
- Keep edges clean and defined around the heart outline
- Add small gold cuffs at the base of each braid
- Pair with hoop earrings to balance the visual weight at the crown
5. Zigzag Parts With 5 Braids Straight Back
Five braids running straight back, but the parts between them zigzag instead of running in clean lines. The braids themselves stay straight. Only the negative space between them carries the zigzag pattern.
This is one of those looks that sounds complicated and isn’t, as long as your braider has a steady hand and a good tail comb. Each zigzag should be roughly an inch wide and peak at even intervals.
It adds a graphic element without changing the silhouette. From the front, you see straight cornrows. From the top, you see a pattern that makes people do a double take.
The downside — zigzag parts are harder to keep clean past week two. The points of each zigzag tend to fuzz first.
6. Low and Wide 5 Cornrows That Sit Like a Waterfall
Five cornrows braided loosely enough that they drape slightly instead of lying flat against the scalp. Each braid stays plump and cushioned, finishing in a low-hanging tail that brushes the shoulder blades.
Tension is the key variable here. A braider who’s used to tight installs may need reminding — you want the cornrows to have give. Not loose, but not locked down.
This style pairs beautifully with 4A-4C hair that’s been blown out. The natural volume fills the braid without needing extensions, and the ends can be left as natural fringe instead of tucked.
Expect about 2 weeks of polish before the waterfall effect starts softening into plain cornrows. That’s the trade-off.
7. Five Cornrows with an Undercut Border
A half-shaved side, then five cornrows on the top that all slant away from the undercut. The shaved section usually goes from the temple to just behind the ear, leaving about 2-3 inches of fade before the braids begin.
This one takes commitment. You’re literally cutting hair. But the payoff is a style that can shift from edgy to elegant depending on how you wear the rest.
Who this is for — anyone bored with traditional braids who wants something with real attitude. It photographs exceptionally well from a three-quarter angle.
Growth-wise, you’ll need a barber touch-up every 2-3 weeks to keep the fade crisp. The braids themselves last a normal 4-6 weeks.
8. Mohawk-Style 5 Cornrows Down the Center
Five parallel cornrows running in a narrow strip from forehead to nape, with the sides of the head braided into smaller flat cornrows or left loose depending on preference. The center strip reads as a modern mohawk without the shave.
I like this style because it gives the punk silhouette without the commitment. The flanking braids can be added later if you want more coverage, or kept minimal for a bolder center strip.
Best for longer hair that can tuck into a substantial tail at the back. Shorter hair leaves the mohawk looking stubby at the base.
Who This Is For
- Performers, dancers, athletes who need secure styles
- Anyone with a narrow head shape that suits vertical lines
- People who want statement hair without shaved sides
9. Five Bold Cornrows with Colored Extensions Woven In
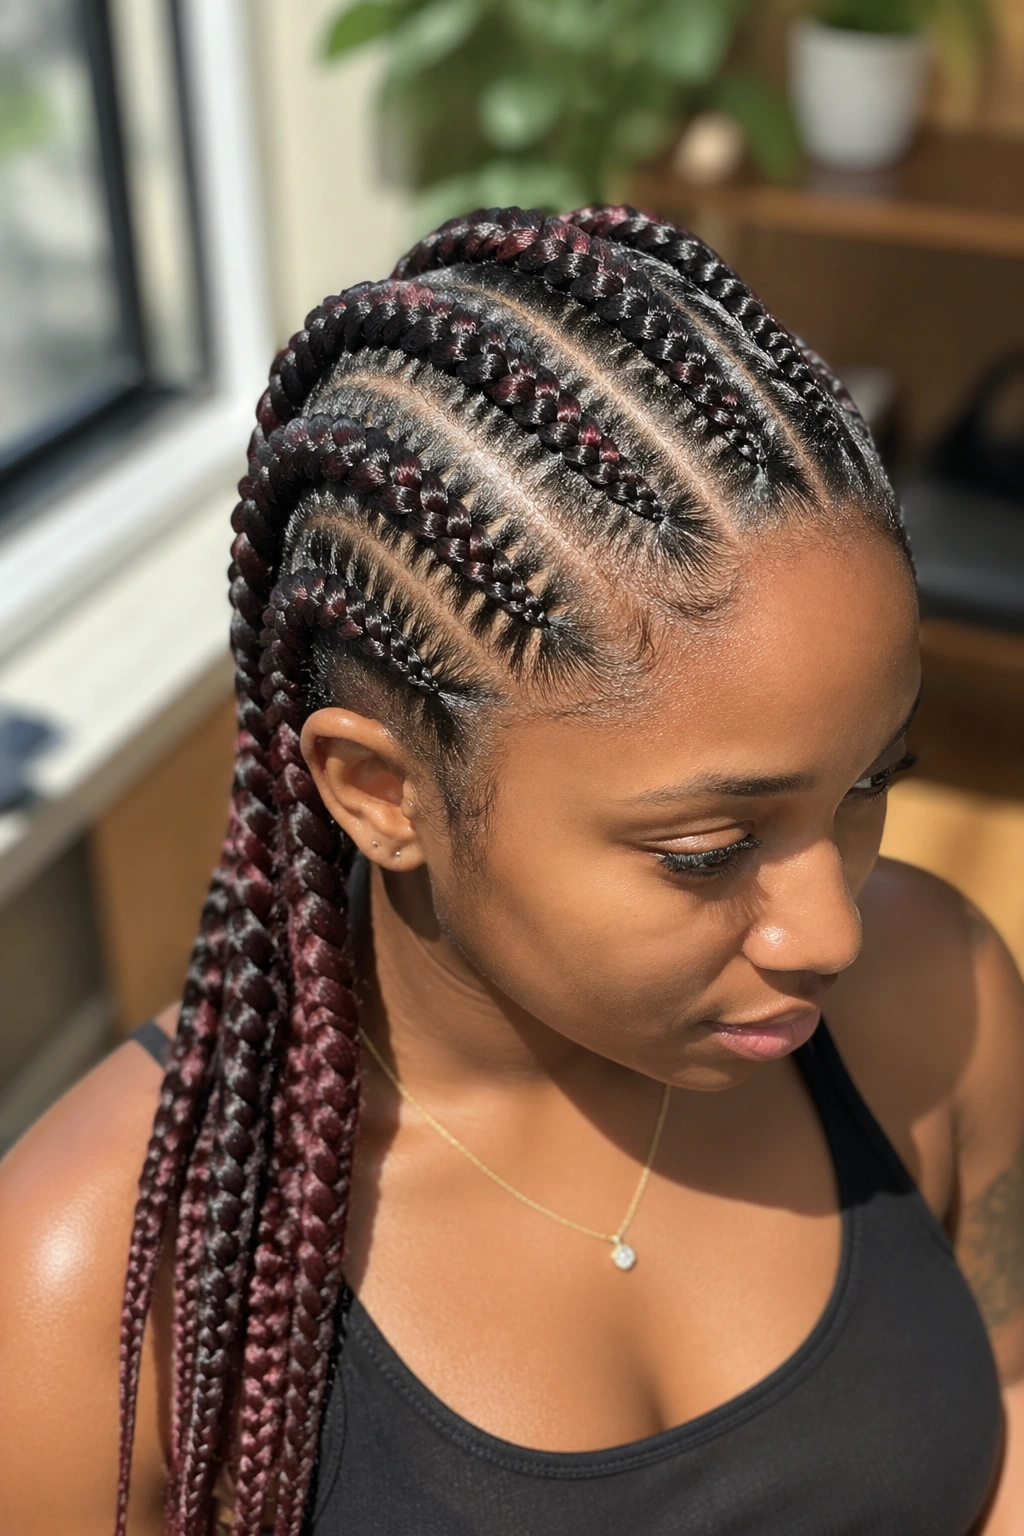
A classic straight-back set of five, but with one or two braids holding a contrasting color — burgundy, honey blonde, or a deep copper. The color only shows in the length, not at the roots, so growth doesn’t disrupt the pattern.
This is the style to pick when you want color without dye. Feed in the colored kanekalon right at the start so the tone carries through the full braid.
A single burgundy braid among four black ones reads as intentional. Two colored braids symmetrically placed (braids 2 and 4 for example) reads as deliberate design.
Color fades a little in sunlight. By week 3, a deep burgundy will have shifted slightly warmer. Plan accordingly if you’re planning a special event.
10. Curved Five Cornrows Ending in a Side Bun
Five cornrows that sweep dramatically to one side, all feeding into a low bun positioned just behind the ear. The curves start at the top of the head and spiral gently toward the gathered point.
The visual effect is motion. Your eye follows the braids across the head and lands on the bun. It works especially well on longer faces because the side placement breaks up vertical length.
How to Style It
Use a fine-tooth rat-tail comb to mark the curve path before parting. Anchor the bun with bobby pins tucked inside the wrap, not across the outside where they’ll show. A silk scrunchie over the base hides any stray hair.
The bun itself can be real hair or a donut form wrapped with the braid ends. A donut form gives a neater shape but costs a bit of authenticity up close.
11. Five Cornrows with Tribal-Inspired Beading
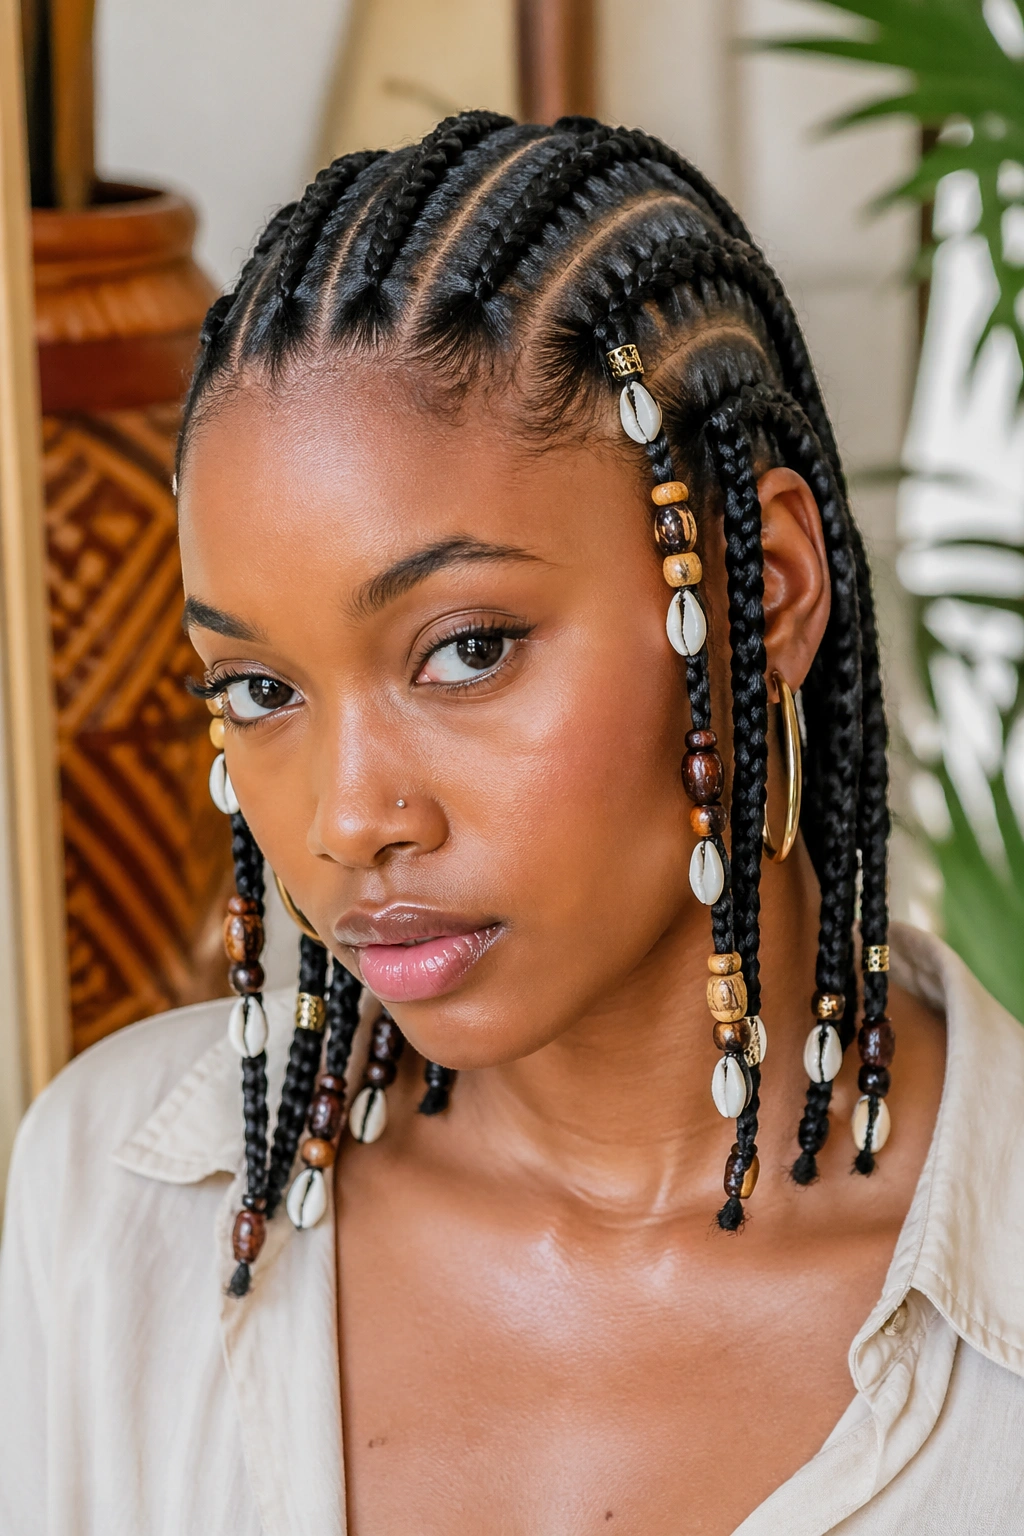
Wooden beads, cowrie shells, or small metal cuffs threaded onto each of the five braids at varying intervals. Not one bead per braid — real tribal styling uses clusters of 3-5 beads at irregular heights, so each braid tells its own story.
Beading adds weight. A full cluster on each of five braids can add half a pound of weight you’ll feel at the roots. Not dangerous, but worth knowing if you’re prone to tension headaches.
Cowrie shells especially carry cultural weight — they’re significant in many West African traditions. Wearing them thoughtfully, not as costume, matters.
12. Five Side-Part Cornrows with Bantu Knots at the Ends
Five cornrows starting from a deep side part, each one finishing in a small bantu knot secured at the nape instead of flowing loose or continuing as extensions.
The bantu knots do double duty. They give the style a sculptural finish, and they stretch the hair — so when you eventually take the braids down, you get a crimped wave pattern underneath.
This works best on hair that’s at least shoulder length when stretched. Shorter hair makes for tiny, barely visible knots.
Expect about 3 weeks before the knots start loosening. A dab of gel at each knot base every few days keeps them compact.
13. Asymmetric Five Cornrows (Three on One Side, Two on the Other)
An unbalanced layout where three braids claim the majority of the head and two smaller braids sit on the opposite side. The deep part that separates them sits off-center by about 2 inches.
Asymmetry is one of those things that either works brilliantly or looks accidental. The difference is confidence in the placement. Your braider needs to commit to the imbalance — no hedging.
What makes this different from a standard side part — the two sides have different braid widths. The three braids are narrower, the two braids are thicker. That visual trick makes the asymmetry read as intentional design.
Best for faces that can handle asymmetric framing. If one side of your face is noticeably different from the other, the balance of this style can either flatter or highlight that.
14. Five Cornrows Going Upward into a Crown-Style Updo

Five cornrows that reverse the usual direction — instead of flowing from crown to nape, they start at the nape and sweep upward, meeting at the top of the head in a crown-style gathered bun.
This one photographs like royalty. It also requires a braider who can cornrow upside down, which is a real skill that not everyone has. If your regular braider doesn’t feel confident, ask around before booking.
Technique note: the braider sits or stands behind and above you, which changes the angle of their hands. Expect the install to take 15-20 minutes longer than a standard set.
The elevated crown adds roughly an inch and a half to your apparent height. Good for formal events, weddings, and anything where you want presence.
15. Five Cornrows with Accent Gold Thread Wrapped Around One Braid

Four standard cornrows and one that’s been wrapped tightly in gold or copper-colored thread from base to tip. The thread creates a shimmer line that stands out without disrupting the set’s overall geometry.
Pick the braid you want to accent carefully. The braid just off-center usually draws the eye best — dead center can look accidental.
Thread wrapping adds about 15 minutes per braid. The thread itself is cheap — under $5 at any craft store — but the labor is the cost.
Water will dull the thread over time, so swim covers are worth it if you’re at the beach or pool.
16. Short 5 Cornrows Ending Just Below the Ears
All five braids stop at ear level, creating a bob-like silhouette. No extensions, no long tails down the back. The ends are sealed with small rubber bands or tucked into the final loop of the braid.
This is the cornrow style for people who hate hair on their neck. It keeps everything compact and high-collared.
It also works as a transition style between longer cornrows and a fresh cut. If you’re planning to go natural again, short cornrows give you the protective styling benefits without committing to length you’ll eventually cut.
Maintenance Notes
- Less weight means less root tension — easier on the scalp
- Shorter braids require more frequent edge touch-ups since they’re closer to the face
- Sleep wrap can be a simple scarf instead of a full bonnet
17. Five Cornrows with Wavy Extensions Left Out at the Ends
Five tightly braided cornrows that transition into loose, wavy extensions for the final 6-8 inches. The cornrow portion gives the scalp protection, while the wavy ends give the illusion of loose hair.
This is a hybrid look. It’s braided where it counts — at the scalp, through the high-tension zones — and loose where it adds softness and movement.
Curl pattern matters here. Loose body waves read more mature. Tighter beachy waves read more playful. Pick based on the mood you’re going for.
The wavy portion needs restyling every few days with a curl refresh spray, which is the trade-off for the softer look.
18. Five Cornrows Criss-Crossing at the Crown
Two of the five braids intersect at the crown of the head before continuing backward. The crossing creates a woven-looking knot at the top, while the other three braids run straight around it.
This is the kind of design detail that tells anyone who knows hair that you invested in a skilled braider. The crossing has to be tight enough to hold shape but not so tight that it distorts the surrounding parts.
Best seen from above — so it works well for styles where the hair sits pulled back and you’re being photographed or seated at eye level in a meeting.
The cross detail adds about 20 minutes to the install.
19. Five Skinny Cornrows at the Front, Widening Toward the Back
A tapered approach where the five braids start thin at the hairline and gradually widen as they move back. By the time they reach the nape, each braid is nearly twice as wide as it was at the start.
The tapering is an optical trick. It makes the forehead look smaller and the crown look fuller, which flatters long face shapes and high foreheads.
Tapering requires feed-in technique — the braider adds small amounts of hair progressively rather than all at once. If you’re using extensions, make sure the kanekalon is distributed correctly from the start.
It also requires a braider who’s done tapered work before. Not every braider has, and a poorly tapered set looks uneven rather than intentionally graduated.
20. Five Cornrows in a Lemonade-Style Side Sweep

Five cornrows sweeping in a single direction from one side of the head to the other, inspired by the layered side-braided looks popularized over the years. The braids curve in parallel, each one slightly shorter than the last, creating a cascading effect on the finishing side.
This is the easiest 5-braid style to DIY once you’ve watched someone do it a few times. The directional logic is simple — every braid goes the same way.
Best for those with a face shape that handles volume on one side. If your facial features are already asymmetric, lemonade-style can play up one side in a flattering way.
The finishing ends usually get braided together or wrapped into a single side ponytail. You can also leave them as individual tails for a looser read.
Maintaining Your 5-Cornrow Style for Weeks Not Days
Five cornrows give you access to some of the longest-lasting styling options in protective hair. Done right, they can last 6 weeks — but only if you commit to maintenance.
Sleep on a satin pillowcase or in a satin-lined bonnet. Cotton will wick moisture out of the braids and cause frizz along the parts within 3-4 nights. A proper bonnet stays on all night without needing readjustment, which matters more than most people realize.
Every 3-4 days, mist the scalp with a mix of water and a light conditioning spray. Don’t saturate — a light mist that evaporates in an hour. Too much water causes mildew and funk, especially at the nape where the skin stays warm overnight.
Oil the scalp weekly with a lightweight oil. Tea tree, peppermint, or a rosemary blend works. Heavy coconut oil or castor oil will sit on the braids, attract dust, and make everything look gray and old.
Touch up edges every 5-7 days with a small amount of gel and a soft brush. Overworking edges is what causes the front of a cornrow set to look ragged by week 3.
The Right Time to Take Them Down
Cornrow braids should not stay in past 6 weeks. Period. After that point, the new growth at the roots creates enough tension and matting to damage the hair when you take them down. The line between “still looks good” and “damaging my edges” is real.
You’ll know it’s time when your edges feel tight when you tie your bonnet, when the parts look fuzzy no matter how much you smooth them, or when you can feel matting at the roots when you try to oil the scalp.
Take them down slowly. Use a generous amount of conditioner and work the braids apart strand by strand. Rushing takedown is the single biggest cause of breakage in protective styling.
After takedown, deep condition immediately. Your hair has been stretched and held in a pattern for weeks. It needs hydration and gentle detangling before you move to the next style.
Picking the Right 5-Cornrow Style for Your Features
Round faces generally look best with vertical cornrow styles — straight back, straight down, or mohawk-style — because the vertical lines elongate the face.
Long faces benefit from horizontal or curved cornrow patterns that break up the length — lemonade-style side sweeps, heart-shaped partings, or styles that end in bold horizontal elements like a low bun.
Heart-shaped faces work well with styles that add volume at the jaw — cornrows that widen toward the back or end in bulky ponytails.
Square faces soften with curved braid paths — zigzag parts, curved sides, anything that avoids harsh vertical lines parallel to the jaw.
Your natural hair density matters too. Fine 4A hair works best with feed-in cornrows that add visual volume. Dense 4C hair can handle natural five cornrows without extensions and still look full.
Mistakes That Shrink Your Cornrow Lifespan
Washing too early. If you shampoo within the first 48 hours of install, the braids haven’t fully set, and you’ll get frizz and loosening. Wait at least 5 days.
Skipping a bonnet because “it’s only one night.” One night is how mornings of fuzz get started. The cotton pillowcase wins every time you fall asleep without protection.
Touching your hair compulsively. Every time you run your fingers along a braid or pull at a tail end, you’re loosening the weave at the root. Hands off.
Using too much gel at install. Heavy gel looks slick on day 1 and white-flaky by day 4. A pea-sized amount per braid at the hairline is plenty.
Leaving them in too long. Six weeks is the ceiling. Not a soft recommendation — a hard limit.
Five cornrow braids are a style that rewards the prepared. Prep the hair, pick the parting, pick a good braider, sleep on silk, and you can stretch one install into more than a month of easy mornings. Miss those steps and you’ll be redoing braids every 2 weeks wondering why they didn’t last.