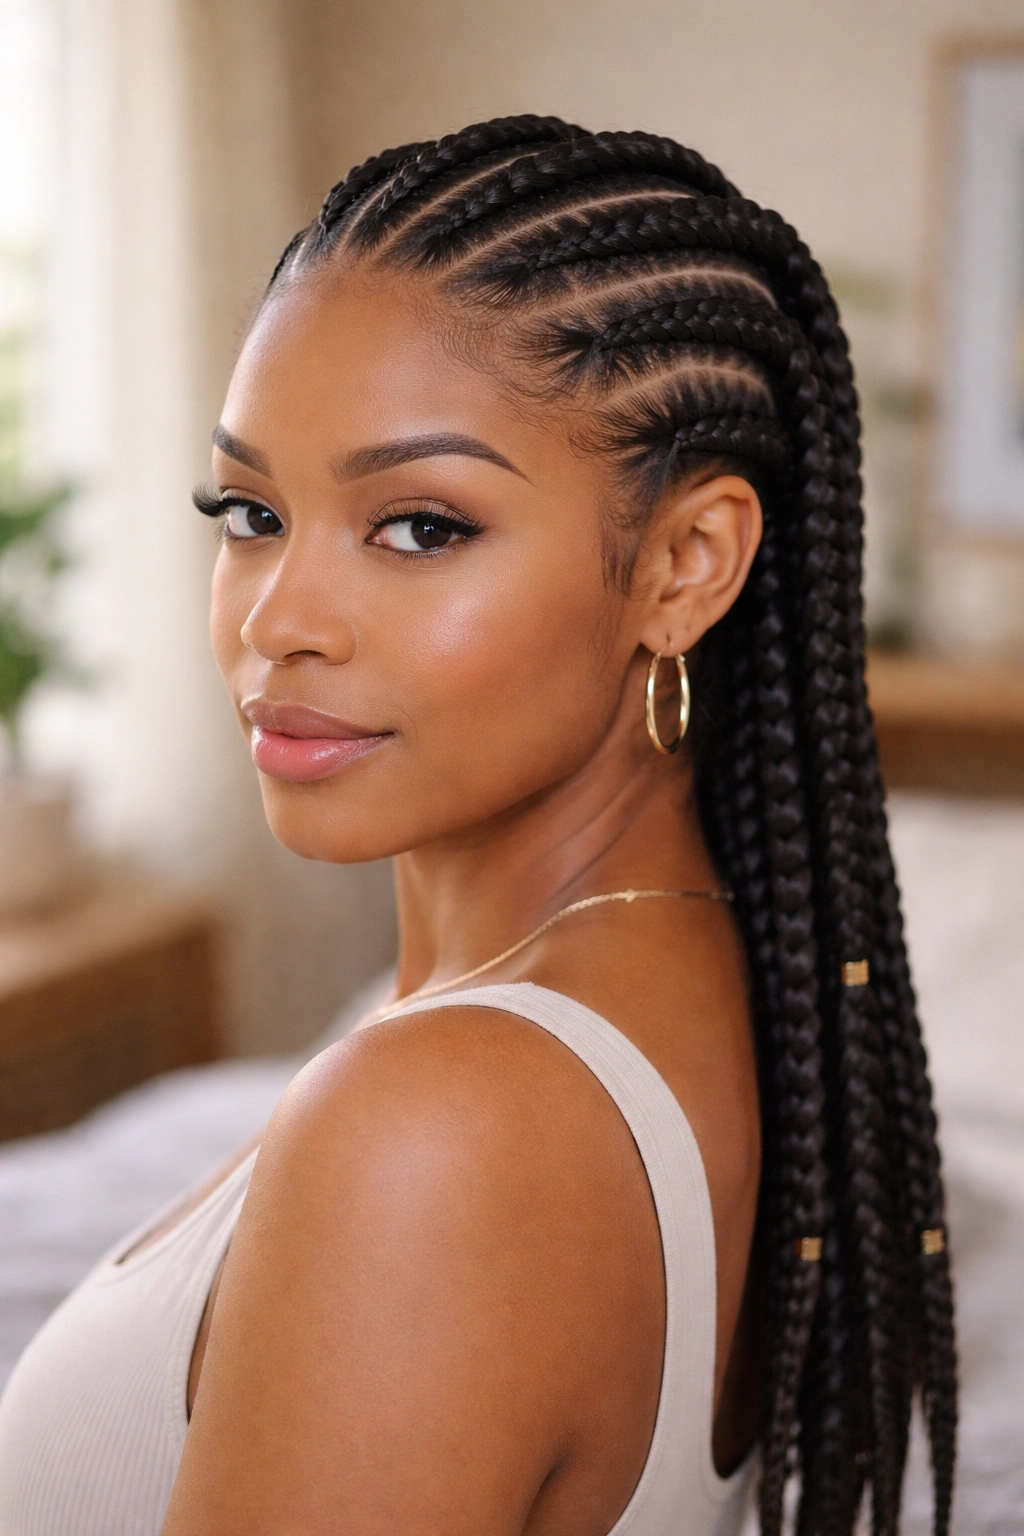
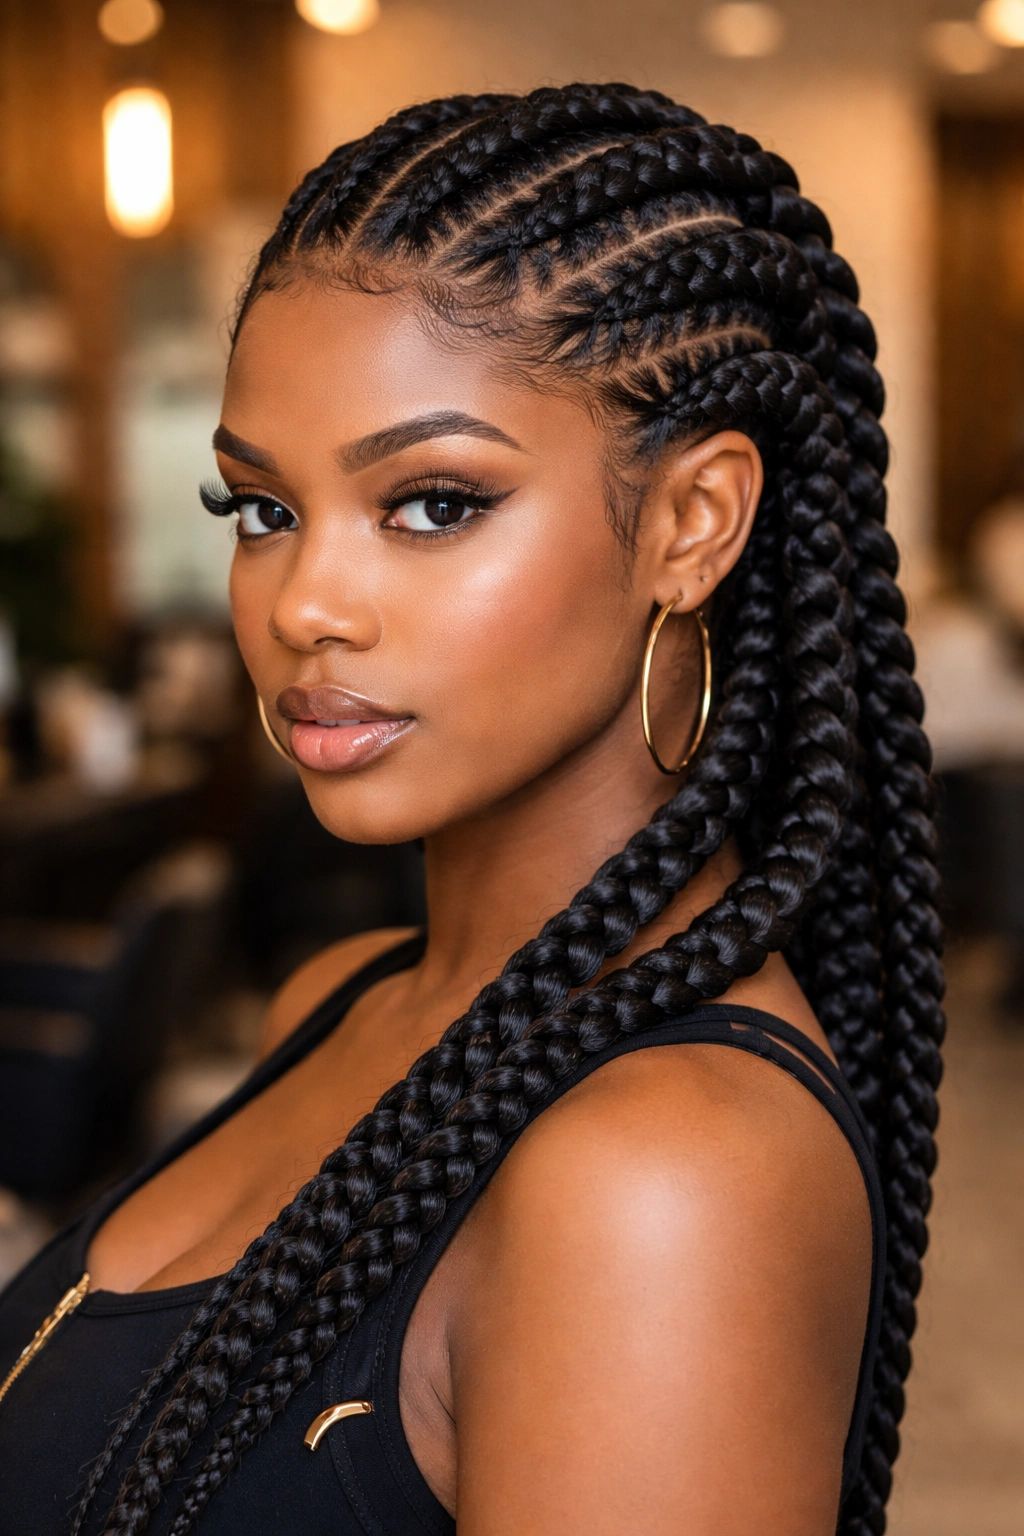
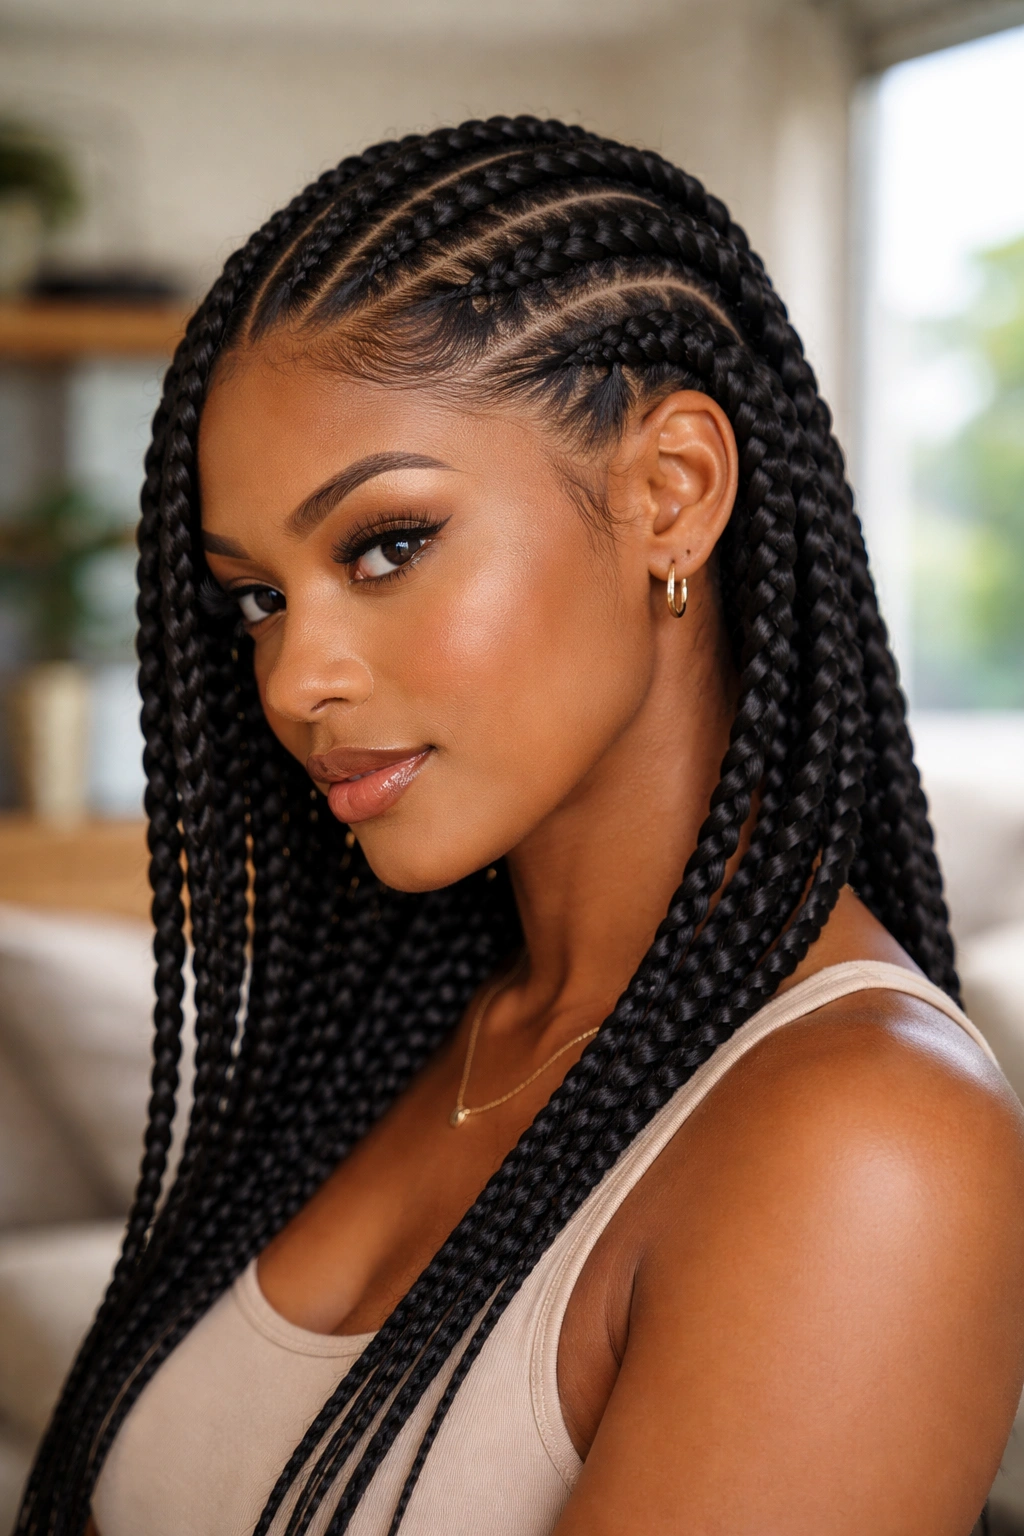
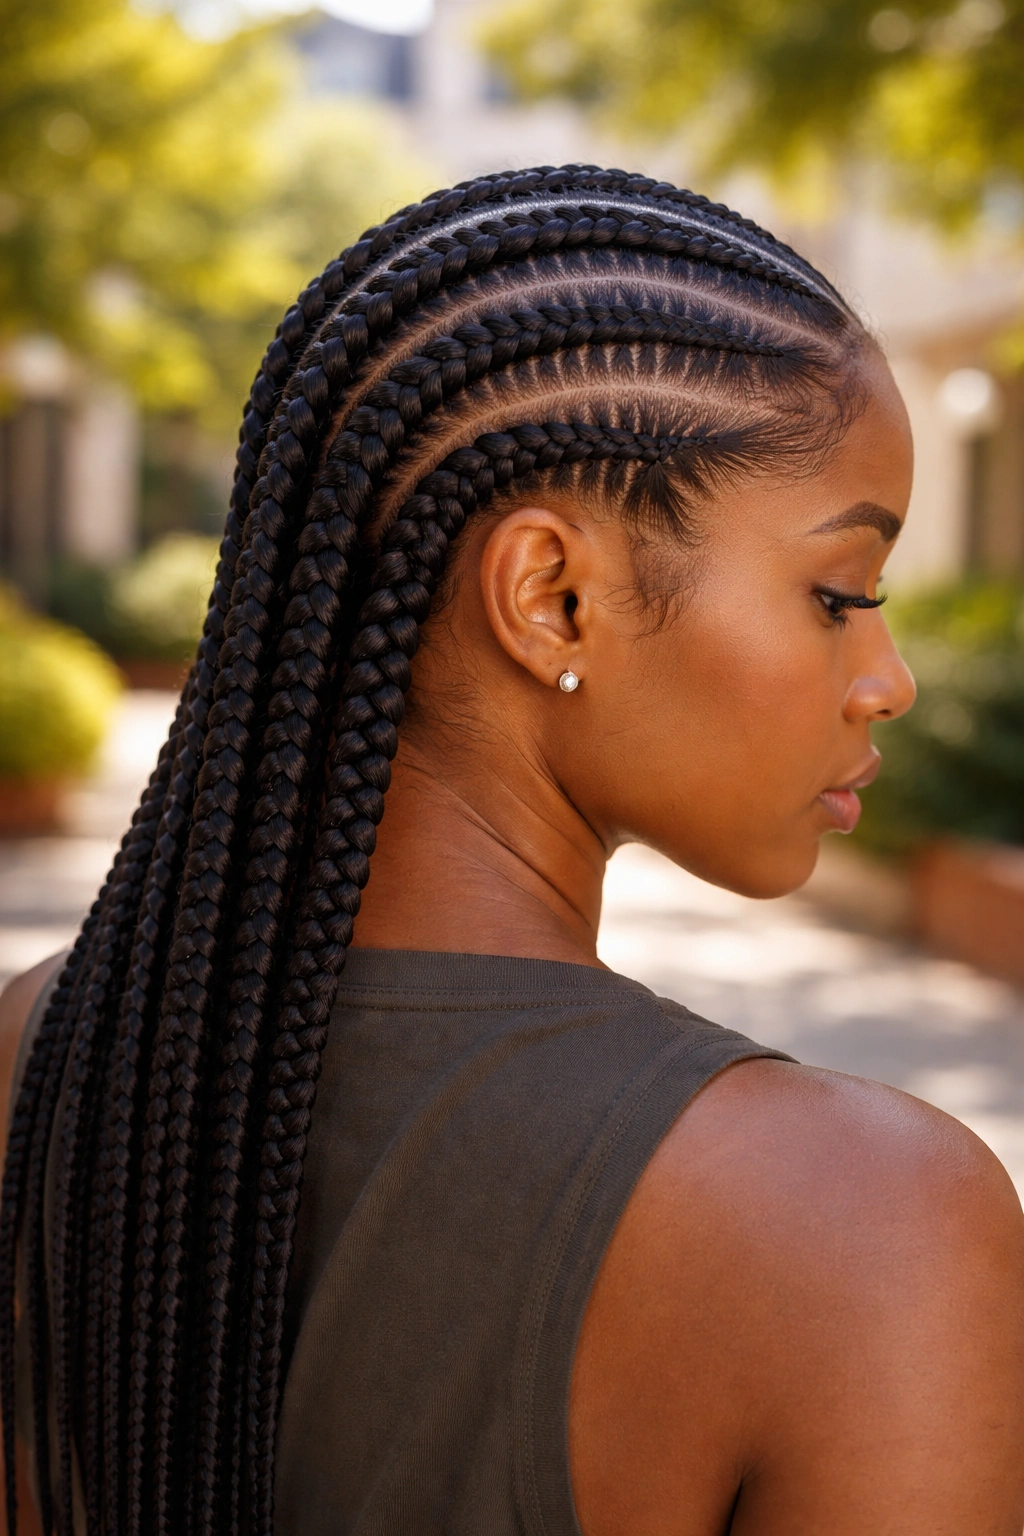
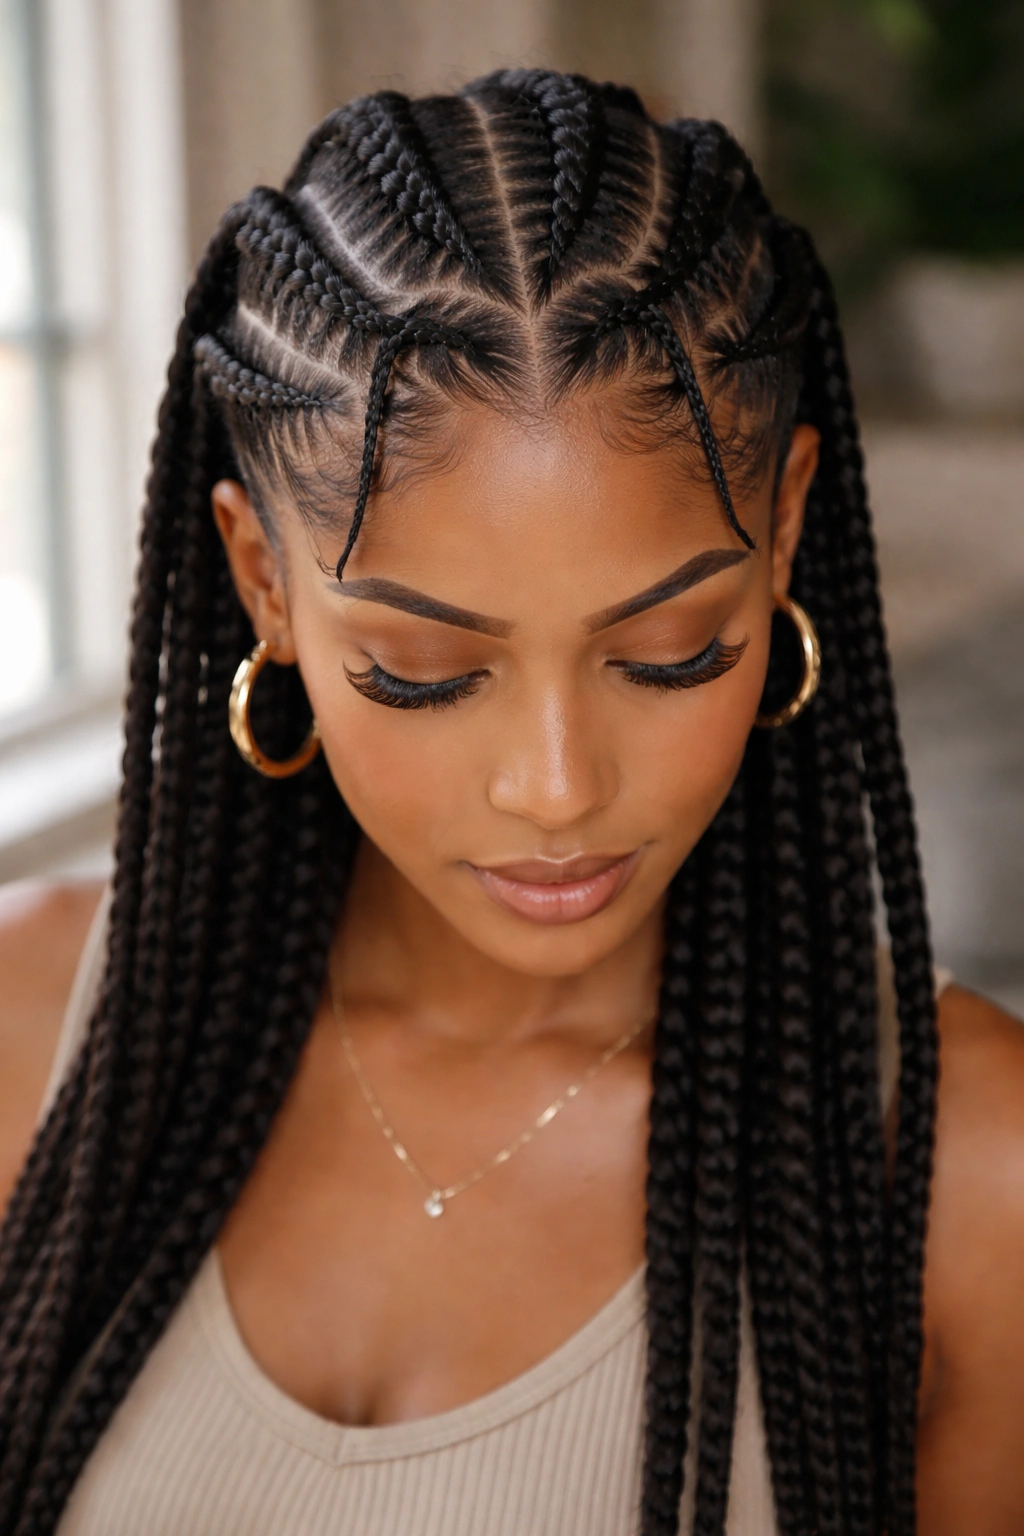
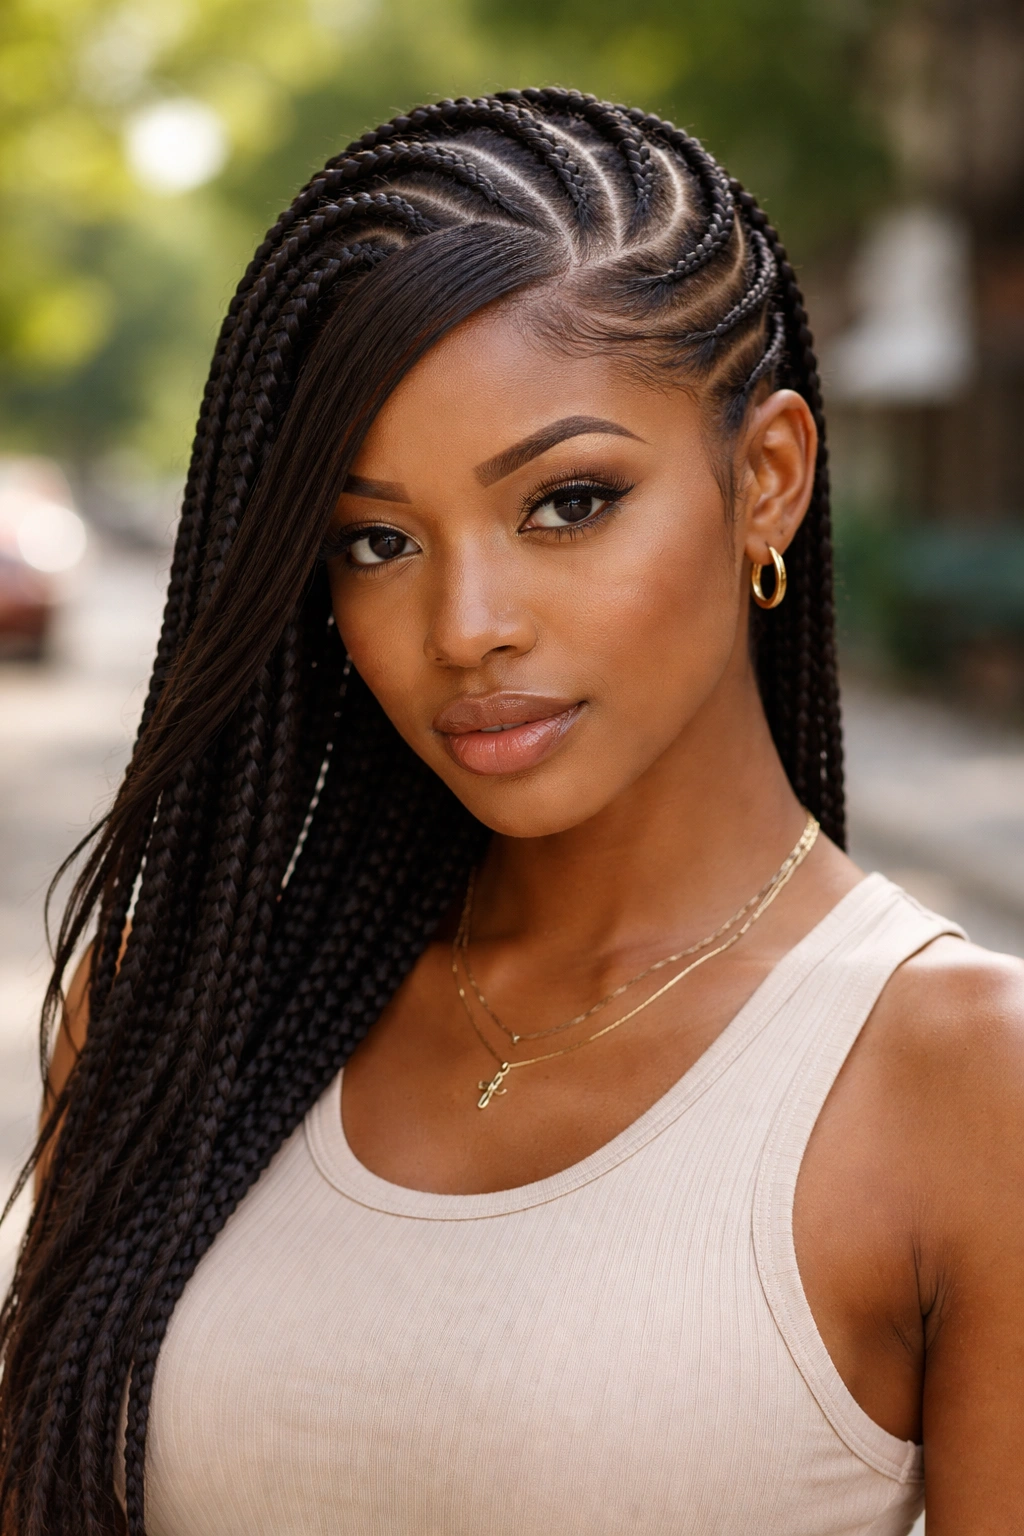
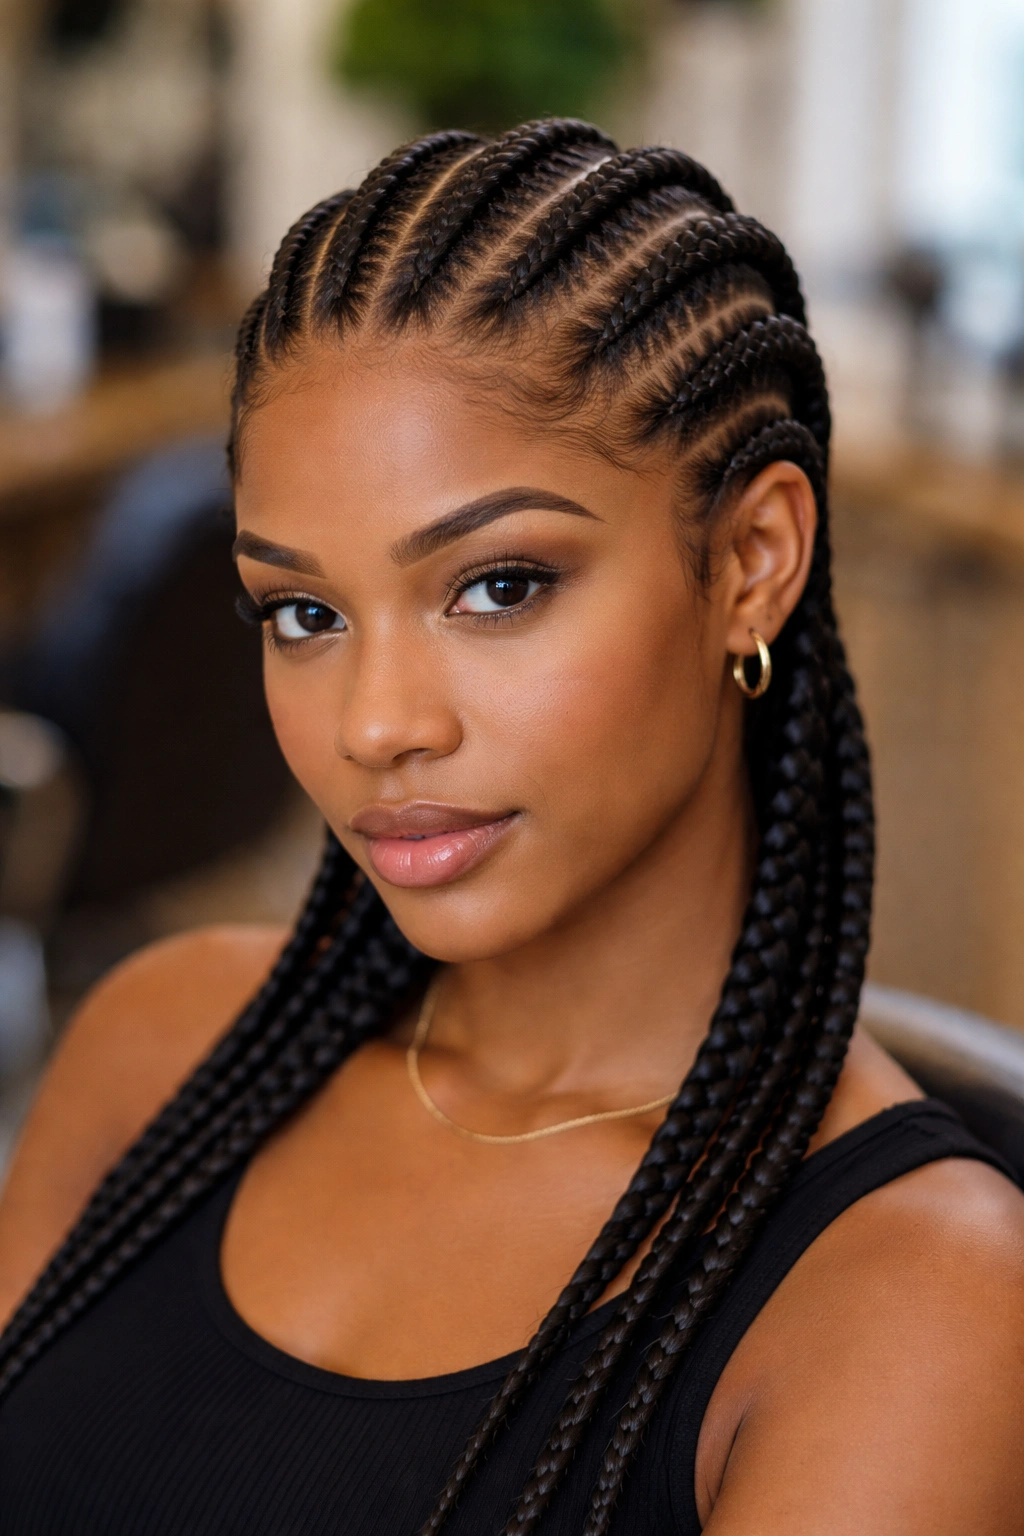
Six braids. That’s the sweet spot between the classic five that barely covers the scalp and the eight-plus that starts feeling crowded at the nape. Cornrow styles with 6 braids hit a balance most stylists quietly swear by — enough sections to play with geometry, few enough to braid in under two hours on Type 4 hair. You get clean parts, visible scalp lines, and room to thicken each braid with kanekalon if you want the look to stretch longer than a week.
I learned the six-braid math the hard way. My first set was seven, and the crown section refused to sit flat. My second was five, and the thickest one at the top kept loosening by day three. Six gave every braid enough scalp real estate to anchor properly without leaving any one of them strained.
What follows is 22 distinct takes on this layout — straight-backs, curved partings, angled fronts, mixed widths, accessories, and a few combinations you won’t see cycled on every tutorial channel. Some take 90 minutes. Some take five hours. Pick based on your patience and your install rhythm.
Why Six Braids Specifically
Six is a structural number. It divides the head into two parallel rows of three — or three pairs of two — which means your braider isn’t fighting asymmetry the whole install. The crown gets two braids, the sides each get two, and the back gets two. Or you mirror that pattern. Either way, weight distributes evenly across the scalp instead of pulling on one spot.
There’s a practical reason too. Six braids can be thickened with medium amounts of hair added in without each braid turning into a rope. A rope-thick cornrow sits awkwardly against the head and tends to lift at the base within days. Six moderate braids sit flatter.
Tension distributes across the whole scalp, not the hairline. That matters more than most beginners realize. Fewer braids = more hair per braid = more weight pulling from each anchor point. More braids = thinner sections = sharper parts but also more sections to redo when frizz starts.
Parting Tools You Actually Need
A rat-tail comb with a fine-tooth end. Not optional. Your parts won’t be straight without one, and wavy parts on a six-braid install look worse than on a 20-braid install because there’s nowhere to hide them.
Clips — at least eight. You’ll be holding sectioned hair out of the way while you braid each row, and hairbands slip.
Edge control with a firm hold. Something that dries without flaking. If you swipe a finger through the jar and it pulls away cleanly without stringing, that’s the texture you want.
A spray bottle filled with water and a few drops of leave-in. Dry hair snaps. Damp-but-not-wet hair braids tight without breaking.
Satin scarf for the night your install is fresh — before you even think about a bonnet. The scarf wraps flat and keeps the front section from fuzzing on the pillow.
Prepping the Hair First
Wash with a clarifying shampoo two days before your install. Not the day of. You want product buildup gone, but you also want the natural scalp oils back. A freshly washed scalp braided same-day tends to itch within hours because the hair is too slippery to grip.
Deep condition. Fifteen minutes under a plastic cap with body heat is enough — you don’t need a hooded dryer unless your hair is especially dry.
Blow dry or stretch. Shrunken hair is harder to part cleanly. I’ve done cornrows on completely natural coils and the parts are never as sharp. A tension blow-dry on low heat, or a good overnight braid-out stretch, gets you smoother sections without heat damage.
Moisturize with a lightweight leave-in the morning of the install. Heavy butters under cornrows trap moisture in the wrong way and cause mildew smell by week two.
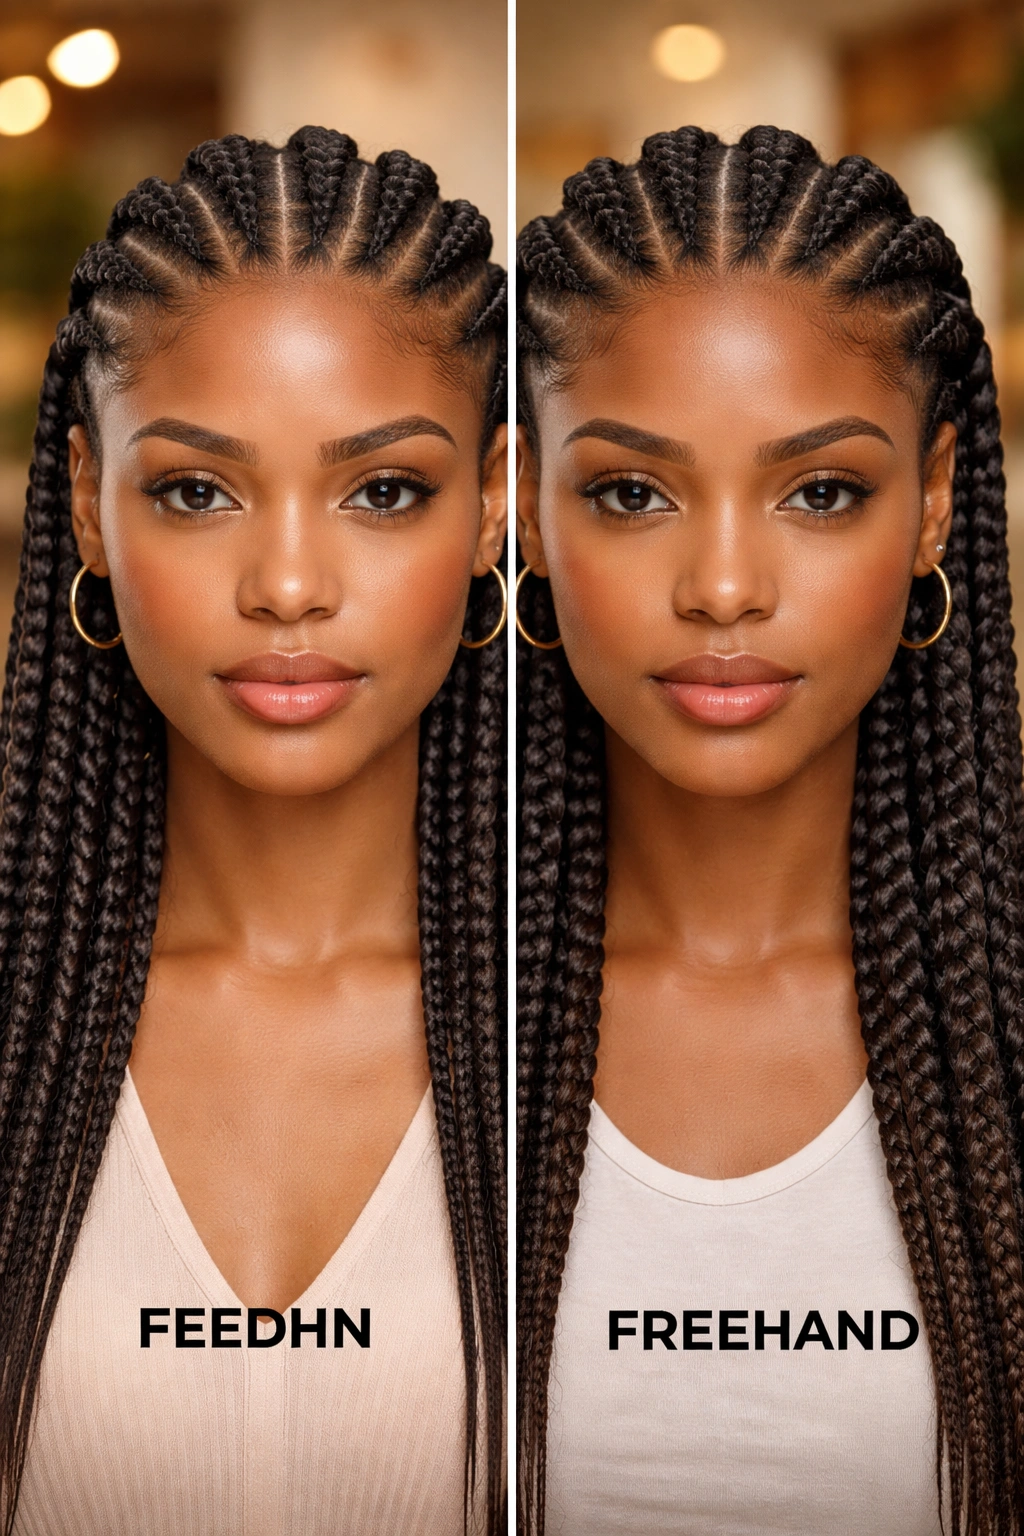
The Difference Between Feed-In and Freehand on Six Braids
Feed-in means you start with your own hair only at the hairline, then gradually add extension hair as you braid toward the back. The braid starts thin and thickens naturally. This is the cleaner look for six-braid styles because it doesn’t leave a blunt knot at the front.
Freehand with extensions means you clip extension hair in from the jump. Looks thick immediately but shows a bump at the hairline on day one.
Your own hair only — no extensions — gives you a true cornrow that can last 1-2 weeks comfortably. Perfect if your hair is mid-length or longer.
For most six-braid installs, feed-in gives the cleanest result. The front section matters because six braids can’t hide a bad hairline.
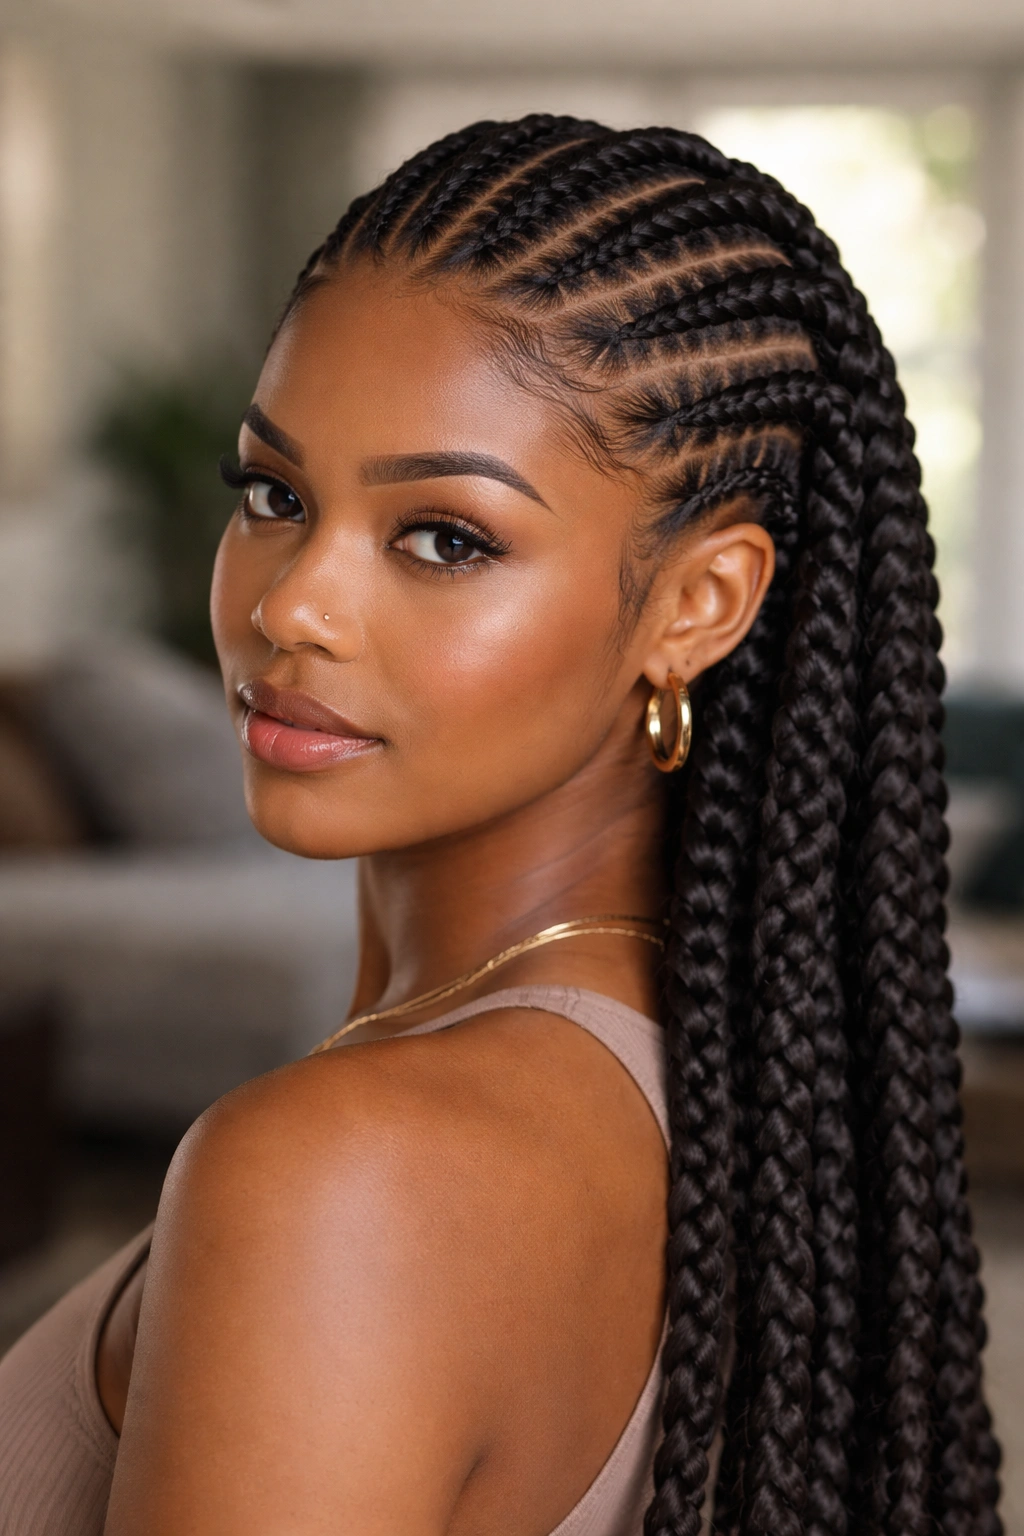
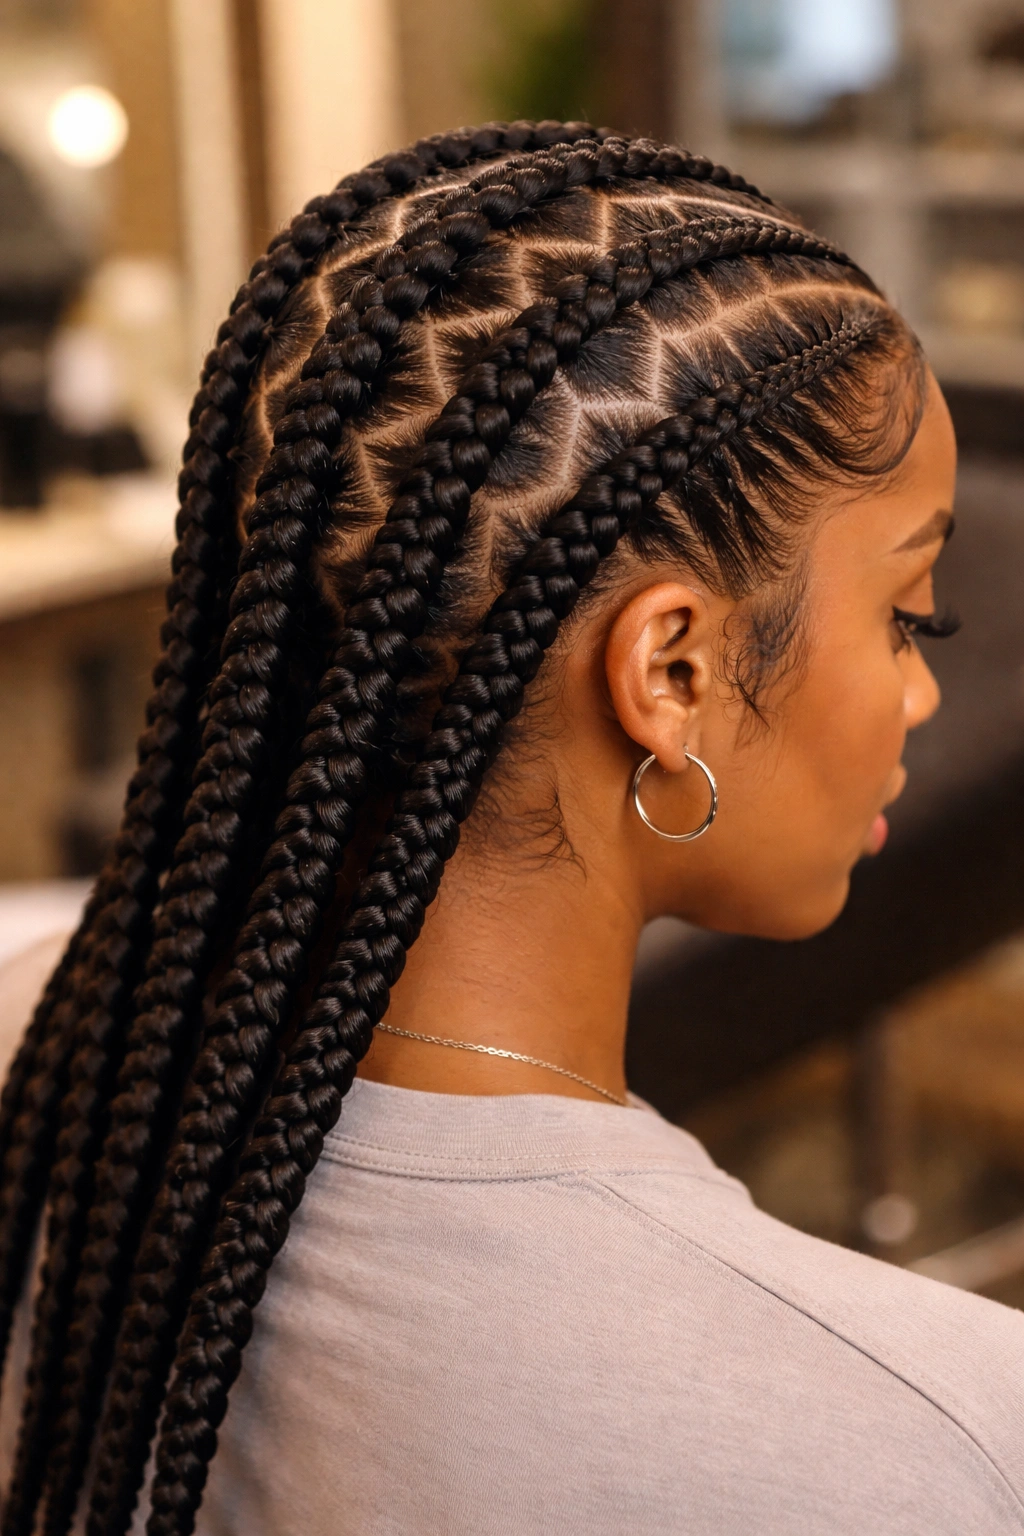
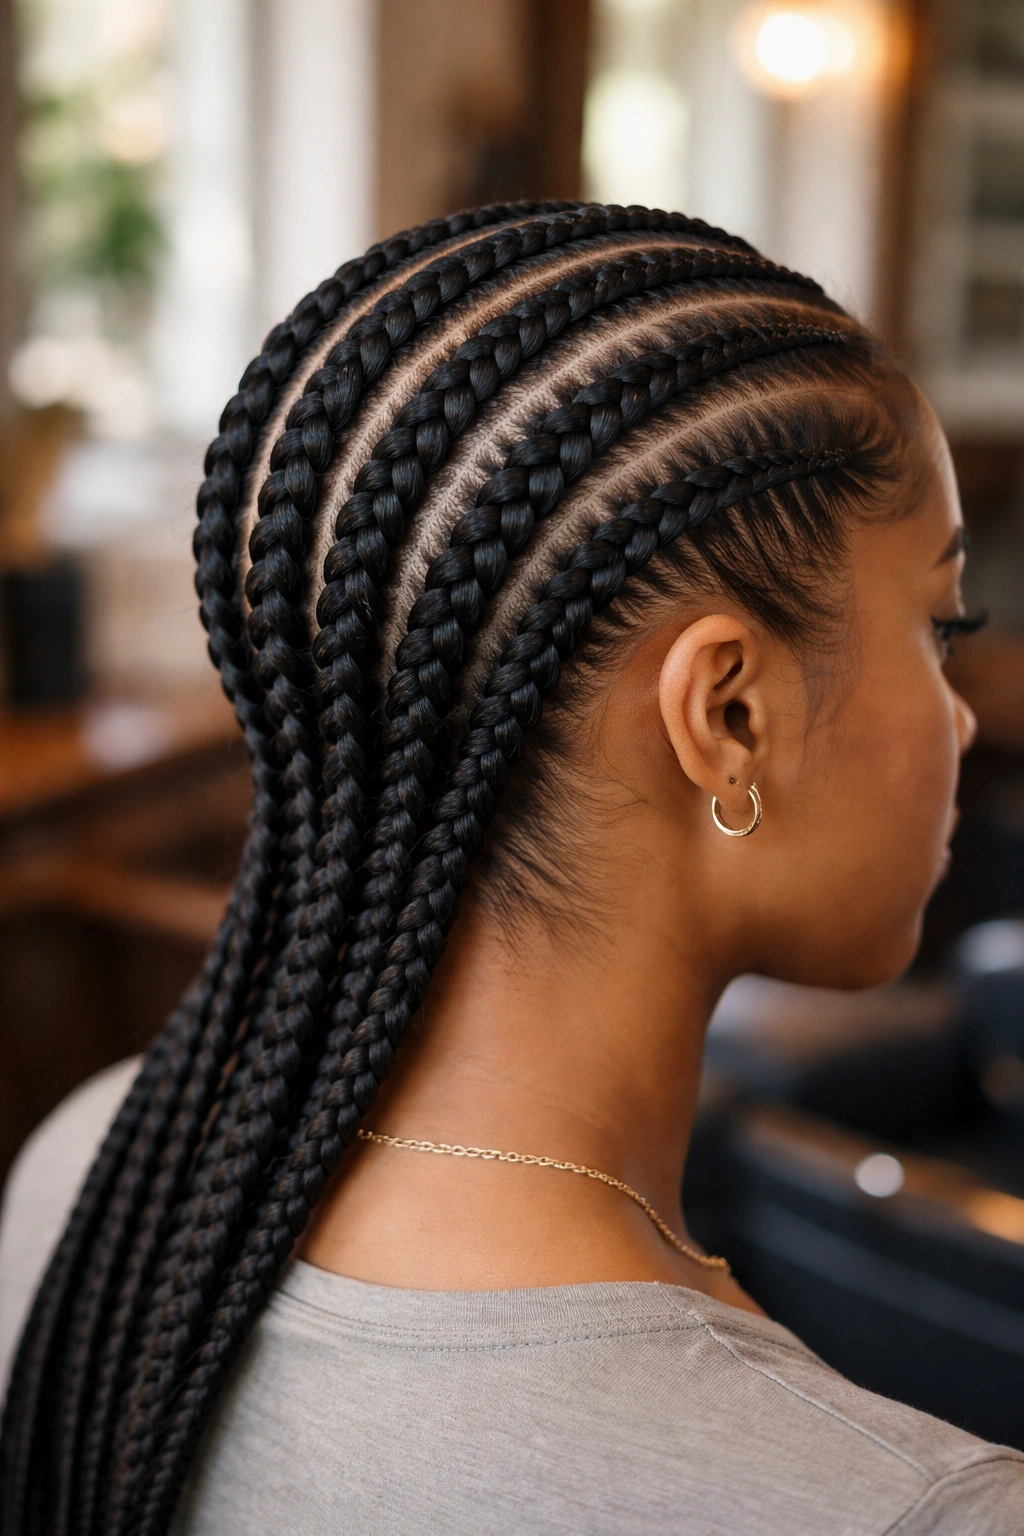
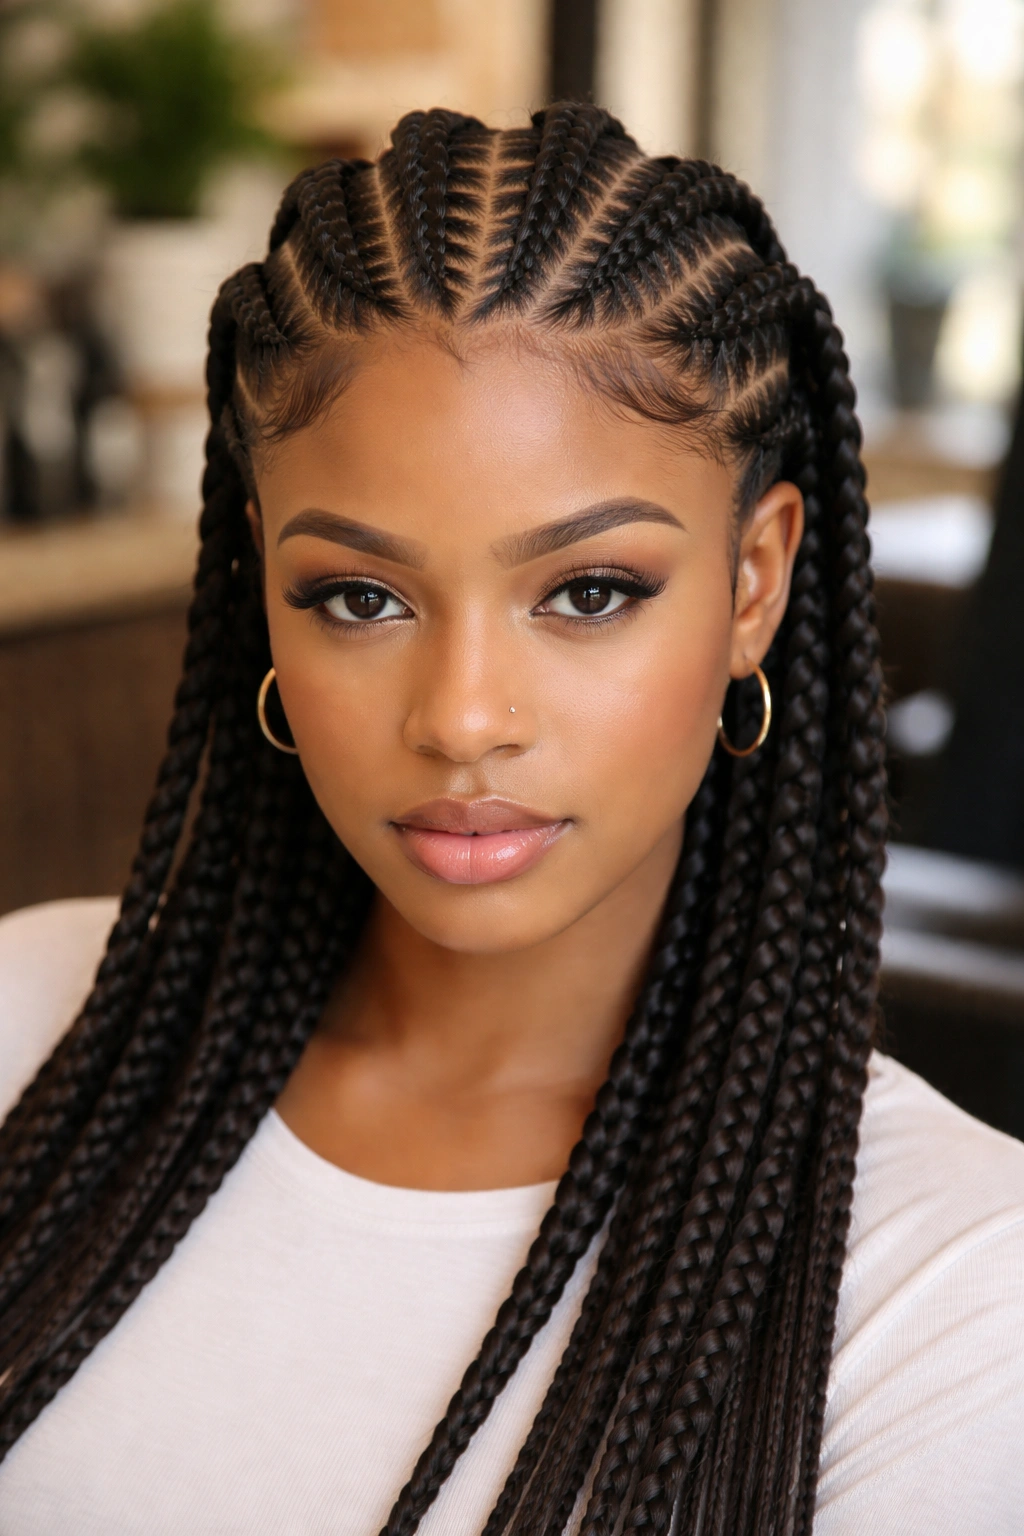
1. Classic Six Straight-Backs
The foundation. Six evenly-spaced cornrows running from front hairline to the nape, all parallel, all the same width. If you get this one right, everything else in this list is a variation.
Why It Works
Six straight-backs read as intentional without being flashy. They sit close to the scalp, they don’t require precision geometry, and they suit any face shape. The width is the only variable — I’d aim for each braid to sit about 1 to 1.5 inches wide at the widest point.
- Part from the center forehead straight back to the nape first
- Split each half into three even sections — that’s your six
- Braid under-hand, starting tight at the hairline and easing slightly by the crown
- Leave the ends loose or dip them in hot water if you used kanekalon
The edges sell the style. Plain six straight-backs with rough edges look unfinished. Edges laid in soft curves — not sharp geometric swoops — elevate a basic install to something you’d wear out.
2. Six Braids With Center Zigzag Part
Unlike the straight-back where the center part is a clean line, this version zigzags the middle. Three zigzag points from forehead to crown, then the part straightens out to the nape. Each half still gets three braids, but the entry point plays with the eye.
The zigzag is cut with a rat-tail comb — no scissors, no shaving. You’re just redirecting the part every inch or so.
Who this is best for: anyone who wants a six-braid install to feel a little less uniform without adding complicated patterns elsewhere. It reads as detailed from the front but blends into plain straight-backs from behind.
The technique is easier than it looks. Hold the rat-tail comb flat against the scalp and draw the part in short diagonal strokes, alternating direction every inch. The key is keeping each zigzag angle consistent — if one points sharply and the next one barely angles, the part looks drunk.
Best worn with a light edge control and the front braids pulled slightly forward at the hairline to frame the face.
3. Six Curved Braids Following the Hairline
What if the braids didn’t start at the forehead? This style begins each braid along the natural curve of the hairline — from temple to temple — so the braids emerge parallel to your face shape rather than perpendicular to it.
The three front braids curve back following your hairline’s natural arc. The three back braids start at the crown and run straight to the nape. The two sections meet at the crown with a subtle angle shift that adds movement.
How to Style It
- Map the hairline curve with a white eyeliner pencil before parting (wipes off easily)
- Use smaller sections at the front, wider sections at the back
- Keep tension light at the temples — this area frizzes fastest in curved styles
- Finish with a satin-lined bonnet every night for the first week
The curve gives a softer overall silhouette than straight-backs. Rounder face shapes especially benefit because the curved lines draw the eye inward rather than elongating vertically.
4. Six Braids With Beaded Ends
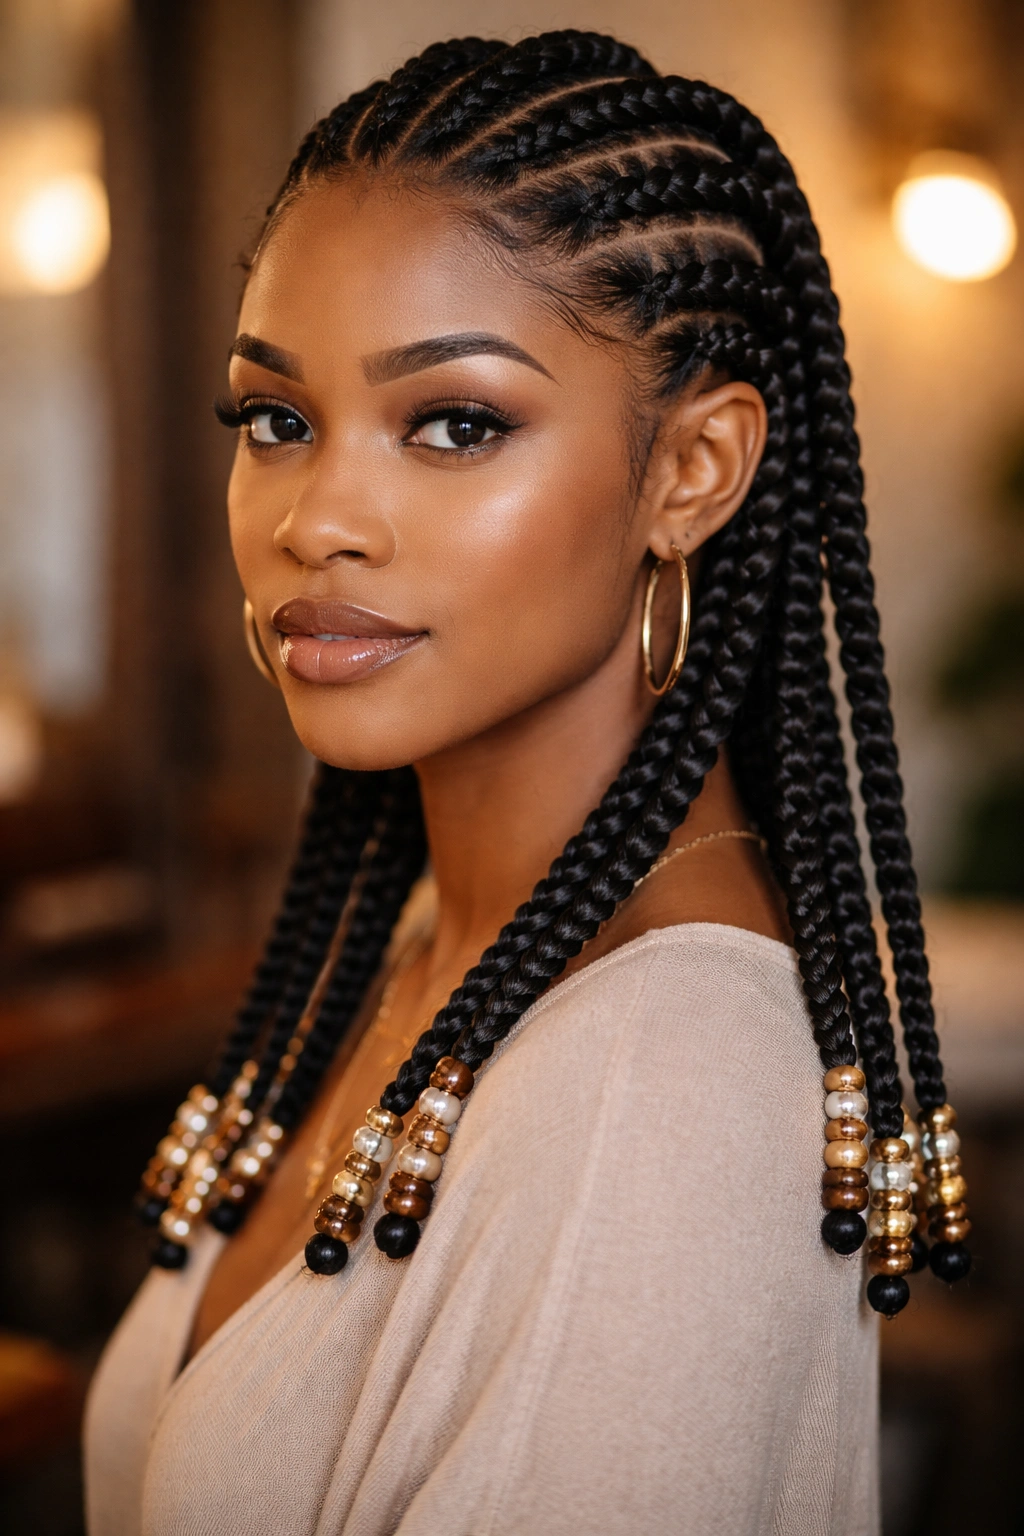
Bold claim: beaded ends are the single fastest way to turn basic cornrows into statement cornrows without changing the braid pattern itself. Six braids with wooden or acrylic beads at the tips transform a Tuesday install into something you’d wear to a wedding.
The beads should be heavy enough to weigh the braid ends down slightly — this keeps the braids from flipping or curling up at the ends — but not so heavy they pull on the scalp. Wooden beads in the 10mm to 14mm range hit the right balance. Acrylic is lighter but shinier.
Thread the beads on before you finish the braid. Use a thin crochet hook or a beading needle. Slide 3-5 beads per braid up to where you want them, then knot the hair below the last bead, or add a small rubber band to prevent slipping.
The sound is something nobody warns you about. Six braids with five beads each is thirty beads clacking softly when you move your head. Some people love it. Some people find it distracting by day two. Test with fewer beads first if you’re unsure.
5. Six Braids With Two-Toned Kanekalon
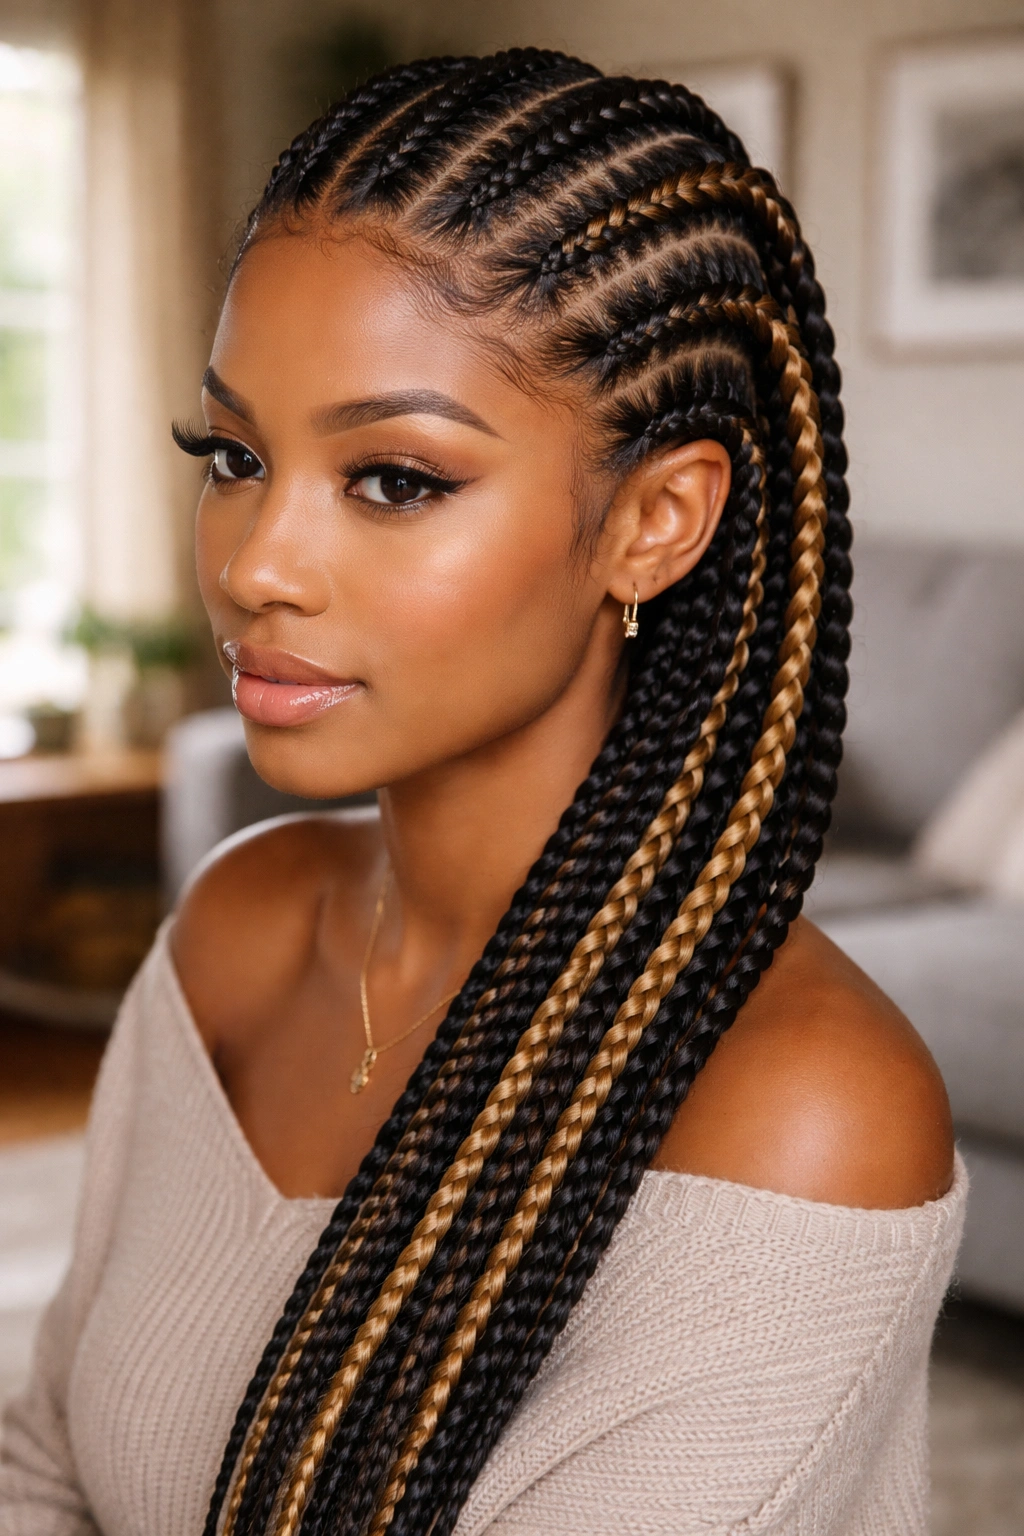
Two colors woven into six braids reads as styled without trying hard. The usual approach is a base color (your natural tone or close to it) with a contrast color blended in on three of the six braids — usually alternating, or the three in the back.
Popular combos that actually work: black base with honey blonde highlights, dark brown with burgundy, jet black with a single streak of silver on one center braid.
The Catch
Two-tone requires kanekalon blending before the install starts. You take a small piece of color A and a small piece of color B, hold them at the root, and twist them together into a single strand before feeding into the braid. Skip this step and the colors sit in rigid stripes instead of blending.
Color placement matters. Highlights on the front two braids frame the face. Highlights on the back two braids show movement when you turn your head. Highlights running through all six look muddy.
Start subtle. 70% base color, 30% accent color is a flattering ratio on most skin tones. 50/50 reads as costume.
6. Six Jumbo Feed-In Cornrows
Six jumbo cornrows are the fastest six-braid install you’ll ever get. Each braid is thick — closer to 2 inches wide — which means fewer sections, less time, and a bolder overall look. Install time: 90 minutes on average, compared to 3+ hours for smaller six-braid variations.
Kanekalon gets fed in gradually so the braids thicken from the hairline back. By the nape, each braid is noticeably fatter than at the start. This is the style you see on runways and in editorial shoots because the scale photographs well.
Drawback: jumbo braids pull harder at the scalp. If your edges are fragile, scale back the amount of extension hair and keep the front section lighter.
7. Six Braids With Curved Side Parts
Scenario: you want six braids but the idea of six parallel lines feels too rigid for your face shape. Side parts fix this. Three braids start from a deep side part that swoops across the forehead, then flow down and back. The other three mirror on the opposite side, starting about 2 inches behind the first three.
The mechanism is visual imbalance that balances itself. The eye follows the diagonal parts rather than settling on the horizontal symmetry of straight-backs.
- Deep side part starts 2 inches left of center
- Three braids angle from the part down to behind the ear
- Three more start from the back of the first three and continue to the nape
- Tension is lighter on the side braids, tighter on the back braids
Best for oval and heart-shaped faces. Round faces can pull it off with the part even deeper (about 3 inches off-center) for a more elongating effect.
8. Six Thin Braids With Four Thick Braids
This entry breaks the even-width rule deliberately. Instead of six uniform braids, you do six thin cornrows on the crown and sides, plus four thicker jumbo braids in the back. Total braid count stays at six but half are fine and half are bold.
Wait — that’s ten braids total. You’re right. This style is technically a hybrid. The six-braid count applies to the fine cornrows only; the thick braids count as a separate back section. I’m including it because it’s commonly referenced as a “six-braid style” in braider talk.
The visual effect is dimension. Six fine cornrows up top give intricate detail, and the thick back braids provide weight and movement. It’s a solid option for anyone who wants styling versatility — pull the thick braids up into a low bun or let them hang.
9. Six Braids Gathered Into a High Ponytail
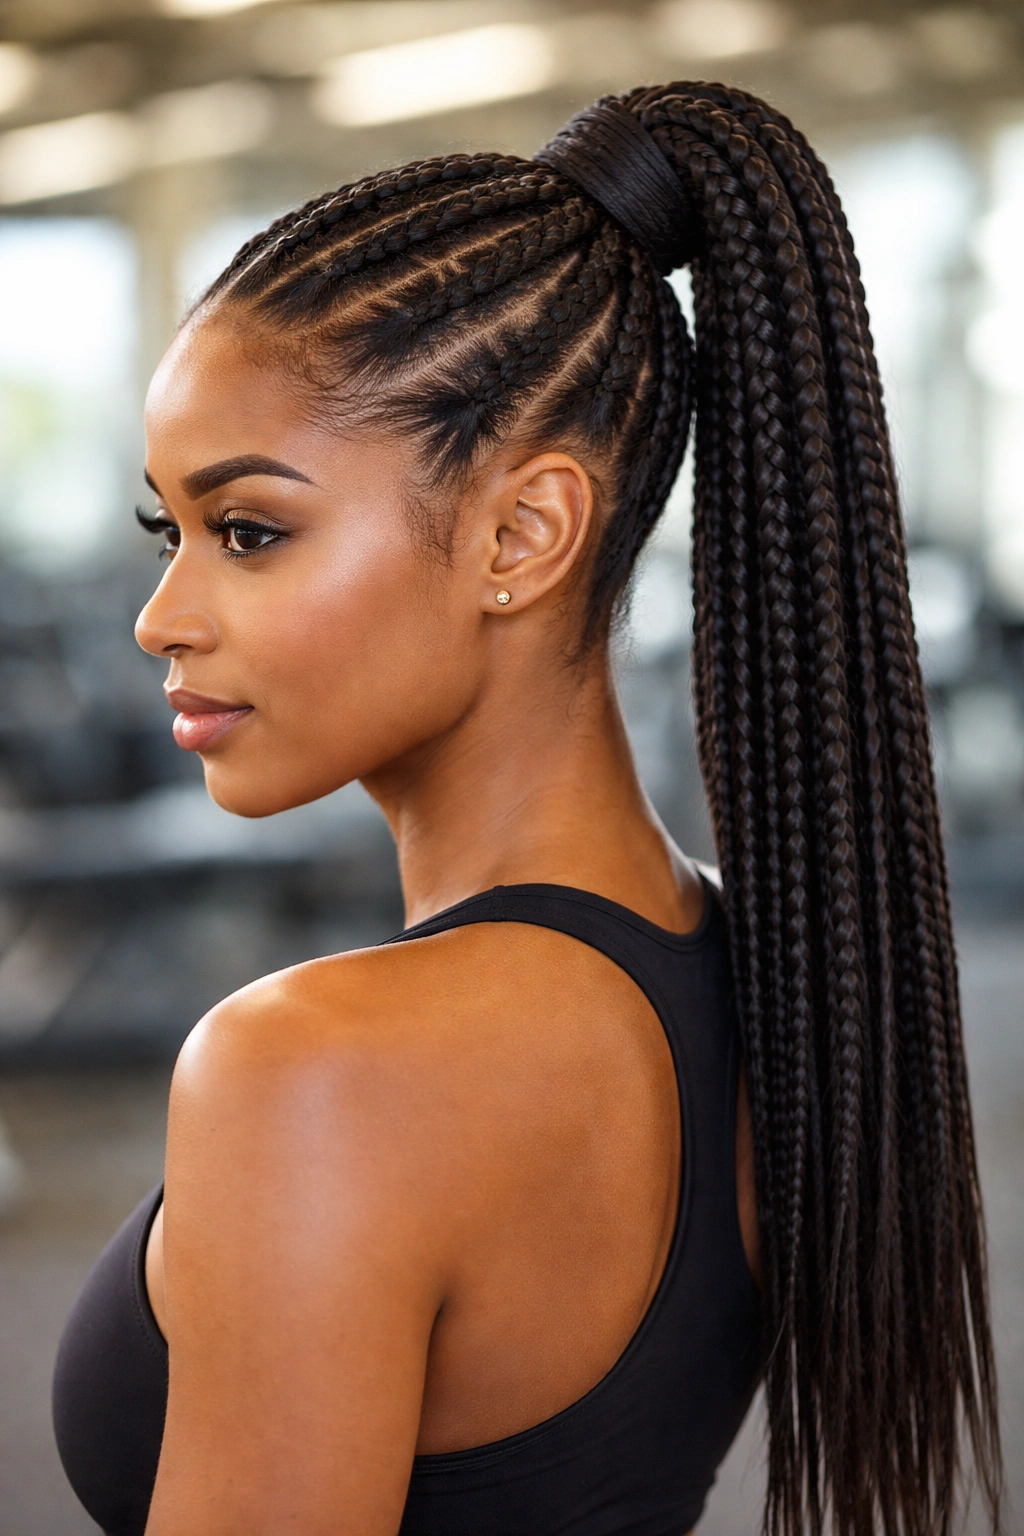
Six long cornrows braided to about shoulder length, then gathered at the crown and wrapped with a hair tie covered in kanekalon. The ponytail sits high — about where you’d place a cheerleader ponytail — and the braids fan slightly because there are only six of them.
Who This Is For
- Anyone with thick hair who wants to show braid length
- Workout days when you need hair completely off the neck
- Events where you want polished without heavy styling time
The ponytail position matters. Too high and the tension pulls on your hairline. Too low and the effect flattens. The sweet spot sits about 2 inches above the crown, at the highest point of the head when viewed from the side.
Wrap with kanekalon rather than elastic alone. Elastic creates a bump. Kanekalon wraps smoothly around the base and hides the tie.
10. Six Braids With Zigzag Partings Between Each
Every part between the six braids is a zigzag instead of a straight line. The effect is busy up close and geometric from a distance. Not for anyone who wants subtle.
The zigzag amplitude should be small — about half an inch from peak to trough. Deeper zigzags make the head look uneven and the braids look wavy.
Each zigzag needs to match the others. Five parallel zigzag parts on a six-braid layout means your braider has to maintain consistent angle and frequency across all five. It’s a slow install. Plan for 4+ hours.
Worth it if you want something nobody else at the cookout is wearing. Not worth it for a quick protective style before a trip.
11. Six Cornrows With Tribal Stitch Details
Tribal stitch is the horizontal dividing line you see braided across cornrows — it looks like a small perpendicular braid crossing over the main braid at intervals. On six braids, stitch details every 2-3 inches add texture without changing the overall structure.
The stitch is made by taking a small piece of extension hair, looping it around the braid, and braiding it back in for about half an inch before continuing. Repeat every few inches.
Why It Works
Plain cornrows can look flat in photos because there’s no contrast between braids and scalp. Stitch details create small shadow lines that give the braids dimension.
- Place stitches at consistent intervals across all six braids
- Use slightly darker kanekalon for the stitches if you want visible contrast
- Don’t overcrowd — more than 4 stitches per braid starts looking cluttered
12. Six Cornrows With Heart-Shaped Center Part
The part runs from forehead to the crown in a heart shape, then splits into two straight lines down the back. Three braids fall on each side of the heart. The heart itself is subtle — more of a rounded dip than an obvious cartoon heart — but it’s unmistakable up close.
This takes a skilled braider. The heart must be symmetrical, the dip at the top must be smooth, and the lines must transition cleanly into the straight part below the crown. Most freelance braiders can do it if you show a reference photo.
Pair with small beads at the ends or leave plain. Heart parts pull attention on their own.
13. Six Cornrows Ending in Curls
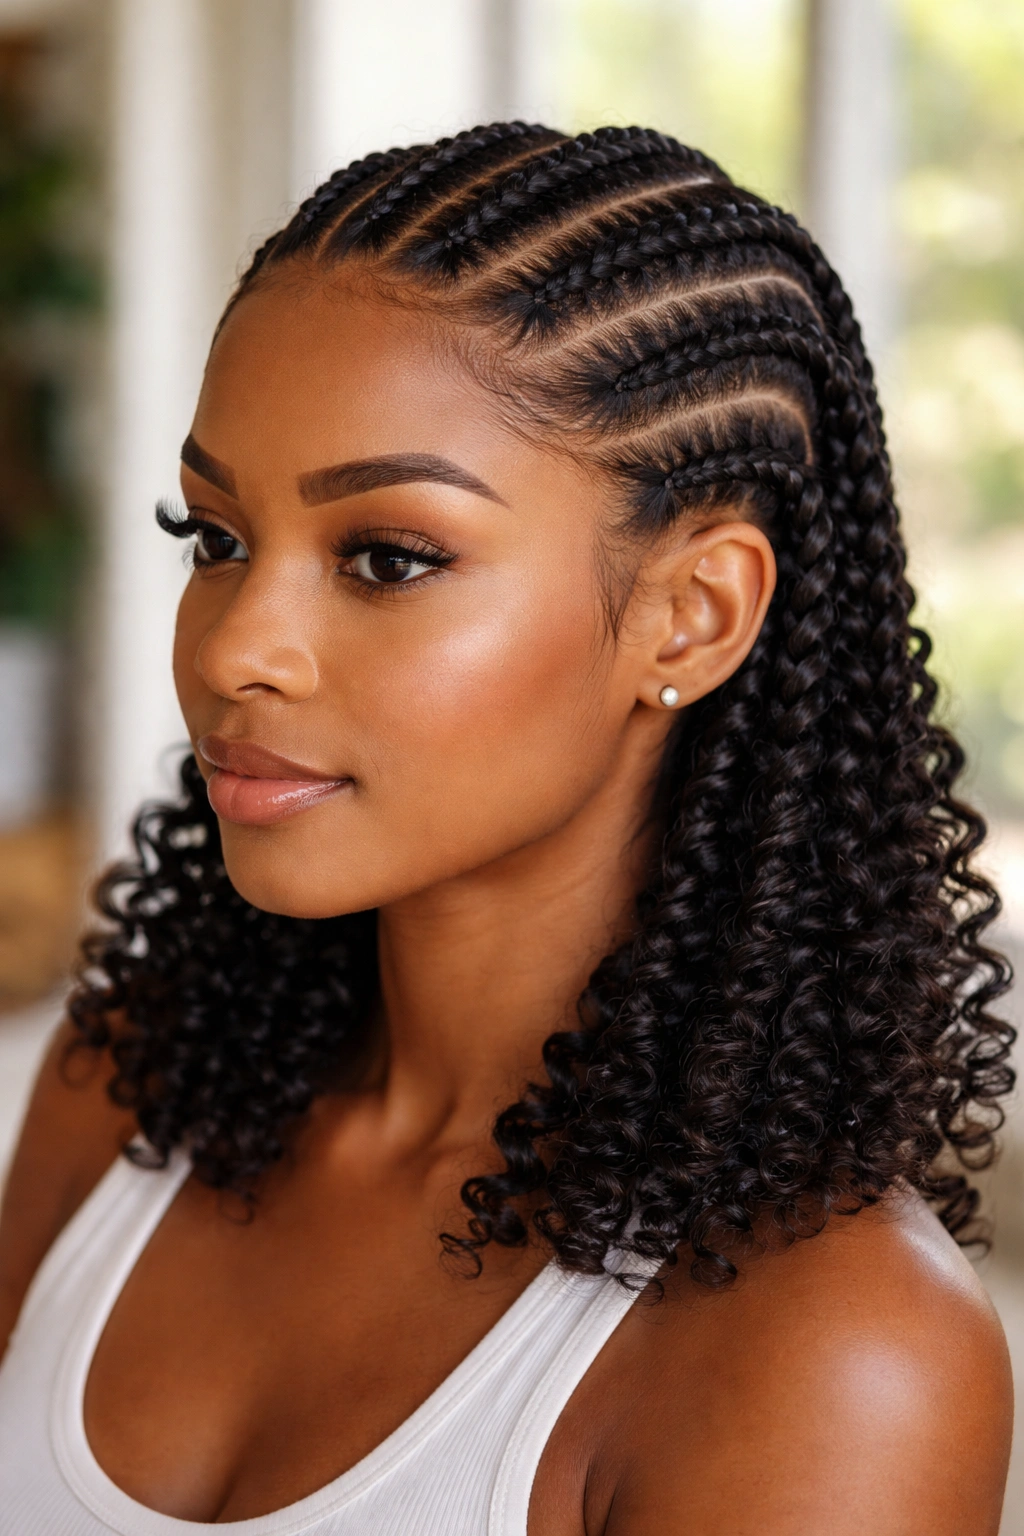
Six braids cornrowed to about the ear, then released into curls for the remaining length. The curls come from the kanekalon being left uncornrowed and then dipped in hot water or twisted and set.
The ratio to aim for: braid about 60% of the length, curl the remaining 40%. Shorter braided portion reads as beachy and playful. Longer braided portion reads as polished.
The curls need to be defined before the install is finished. Once the braids are complete, take each loose end, twist it into a two-strand twist, and dip the twist in hot water (around 180°F) for 10 seconds. Release the twist after it cools. You get ringlets that hold for a week or more.
14. Six Cornrows With Asymmetrical Side Swoop
Five braids on one side and one on the other. Or four and two. The asymmetry forces the eye to one side of the head, which elongates the face and creates drama.
What Makes It Different
Most six-braid styles split evenly down the middle. Asymmetrical side-swoop cornrows deliberately break that symmetry. The part sits low on one side — about 3 inches off-center — and the majority of the braids flow across the crown from the heavier side to the thinner side.
This suits anyone with strong facial features who wants the hair to complement rather than compete. It also works well on faces with asymmetry, because the asymmetrical braid pattern balances out the face’s natural tilt.
The tricky part is the transition zone at the back. Braids starting at wildly different points converge somewhere near the nape, and that convergence needs to look intentional. A skilled braider will taper the braids as they meet rather than letting them bunch.
15. Six Cornrows With Thread Wrapped Ends
Wrapped ends instead of beads or loose tips. Colored embroidery thread or yarn wound tightly around the last 3-4 inches of each braid, tied off with a small knot.
The colors can match your kanekalon or contrast sharply. Thread is cheaper than beads, lighter, and doesn’t clack.
Thread wrapping takes about 5 minutes per braid once you have the rhythm. Hold the braid vertical, start from the top of the wrap area, and wind the thread downward in tight overlapping rotations. Tie off with a double knot and trim excess.
Drawback: thread fuzzes up after a week. You’ll need to re-wrap once during a two-week install or just snip the wraps off and wear plain ends the second week.
16. Six Cornrows With a Single Accent Braid
Five plain cornrows and one accent braid that stands out — maybe it’s woven with a different color, has beads the others don’t, includes stitch detail the others skip, or is braided in reverse.
The accent braid typically sits at the center front, where it catches attention first. Or on the deep side of a side-part install.
The rule of thumb: the accent should be different enough to read as intentional, not so different it looks like a braiding mistake.
17. Six Cornrows in a Halo Pattern
All six braids start at different points around the head and converge at the crown, where they’re pinned into a halo circle. The effect is a woven crown of braids sitting flat on top of the head with no loose ends visible.
This is an updo-style cornrow layout that works for weddings, graduations, or any occasion where a more formal look matters.
The Catch
The braid ends must be long enough to reach the crown and tuck under neatly. Short hair can’t pull this off without extensions. Feed-in kanekalon gives you the length you need; freehand usually doesn’t.
- Start each braid at the hairline edge (one at each temple, one at the nape, etc.)
- Braid upward or inward toward the crown
- Pin ends under the halo with U-pins, not bobby pins (U-pins disappear better)
- Spritz with a light hairspray to set any flyaways
18. Six Cornrows With Front Pompadour Detail
The front section is teased or pinned upward into a small pompadour shape, and the remaining length is braided into six cornrows running back from the pompadour base.
The pompadour uses your own hair only — no extensions — and gets held in place with a combination of edge control and small bobby pins. Only about 2 inches of hair in the front gets used for the pompadour.
This style blends natural texture with braided structure and tends to photograph well because the pompadour adds height where plain cornrows stay flat.
19. Six Cornrows Finished in a Low Bun
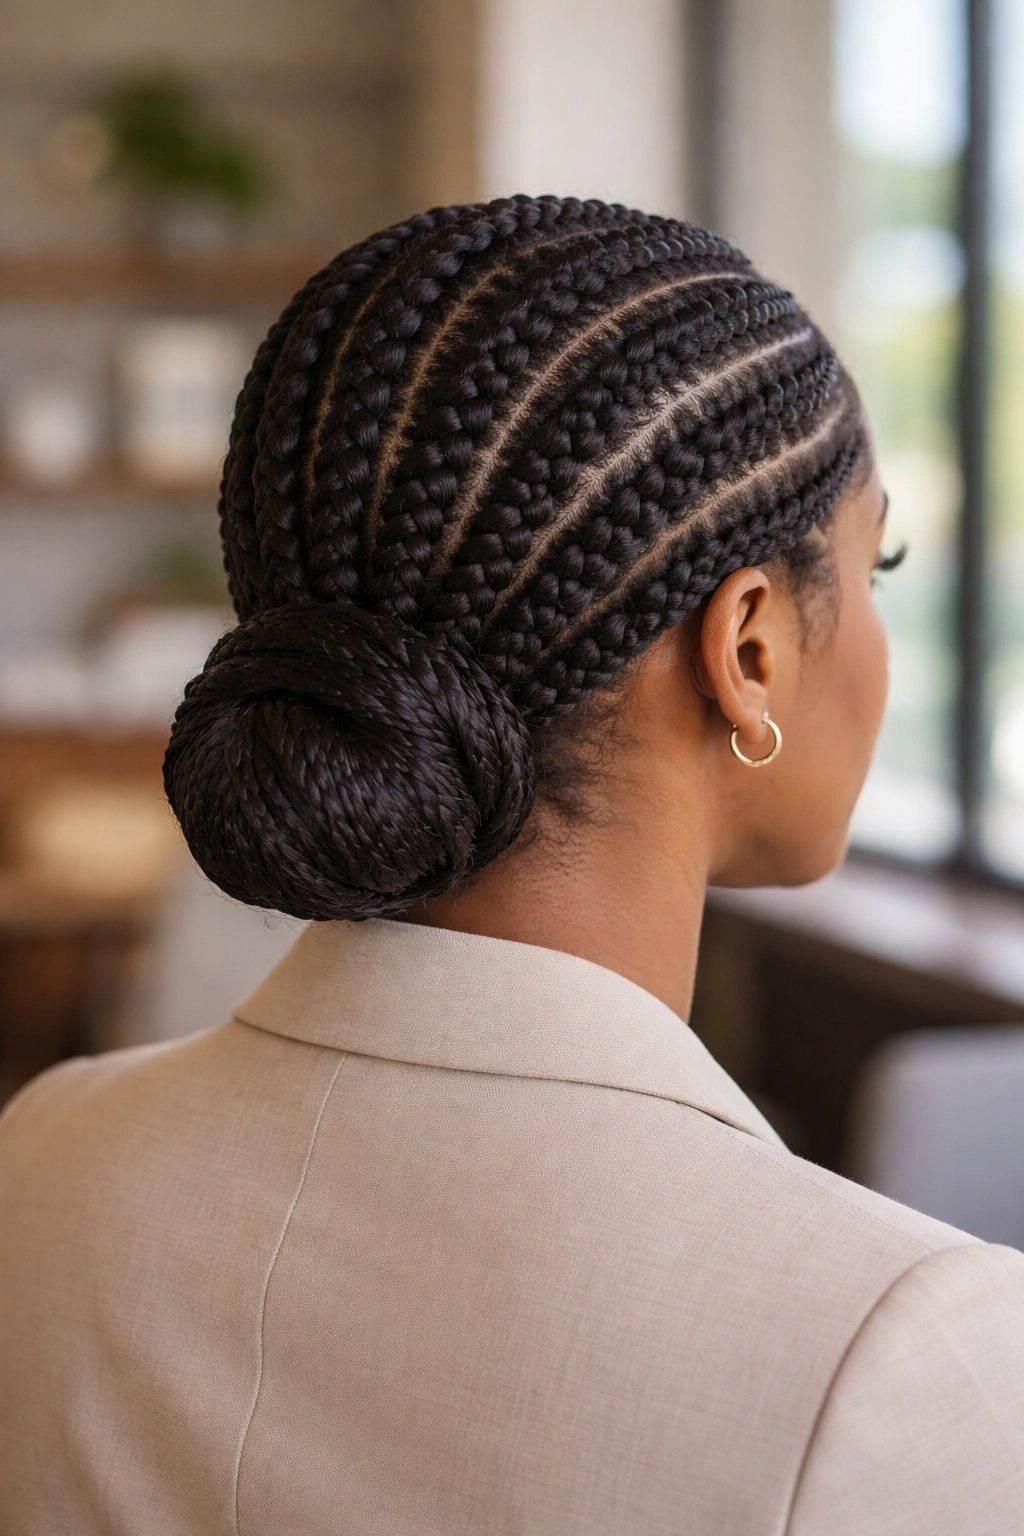
Six braids cornrowed to the nape, then gathered and twisted into a low bun at the back of the neck. The bun sits just above the base of the skull and is pinned flat with U-pins.
The bun should be substantial — about the size of a tennis ball — because six braids’ worth of hair is a lot of volume to gather. If the bun looks small, the braids are probably too thin to begin with.
This is the style I wear to work meetings. Professional, tidy, completely off the neck, and if anyone asks, I say I did it myself (I didn’t, but the braider gets enough credit elsewhere).
20. Six Cornrows With Color-Blocked Sections
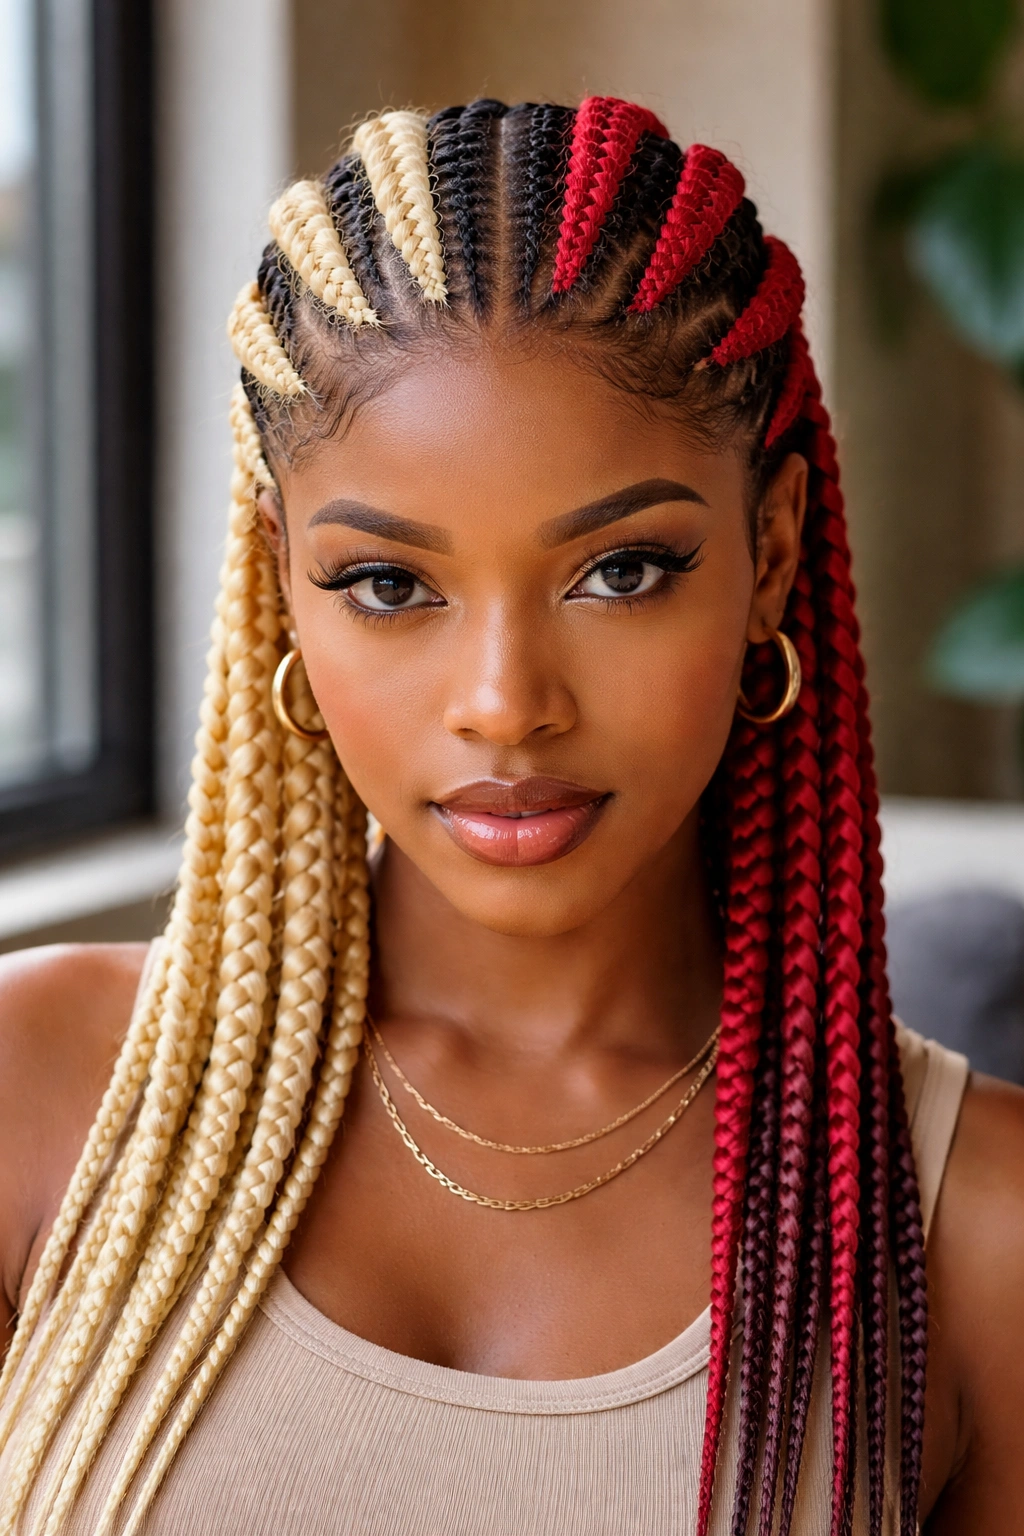
Three braids in one color, three in another. Not blended — blocked. The left half of the head is one color, the right half is another.
Combinations that work: black and honey blonde, dark brown and burgundy, natural and auburn. Colors that are too close look like a mistake; colors that are too far apart look costumey.
The contrast point sits at the center part. A clean center part with sharp color division reads as intentional; a wavy center part with color bleed looks unfinished.
21. Six Cornrows With Beaded Accessories at Roots
Instead of beads at the ends, beads at the base of the braids. Small hair cuffs or gold rings slid over each braid at the root, sitting against the scalp.
The cuffs need to be wide enough to pass over the thickest part of the braid — typically 6mm to 10mm inner diameter — and should sit flat without pinching.
Styling Tips
- Use 2-3 cuffs per braid for a balanced look
- Match metal tones (all gold or all silver, not mixed)
- Slide cuffs on before the braid is fully tightened so they stay snug
- Rotate cuffs every few days to prevent scalp indentation in one spot
22. Six Cornrows With Curved Nape Design

Standard six-braid install everywhere except the nape, where the last 2-3 inches of each braid curve into a subtle pattern — a crescent, a wave, or a shallow swirl.
The nape design is visible when hair is up or in a ponytail. When the braids hang down naturally, the design hides. It’s a secret detail that shows only in certain positions.
This requires braider skill. The curve at the nape means the final inches aren’t braided in straight lines — the braider has to redirect the braid’s direction while keeping tension even and the kanekalon flowing smoothly. Not every braider can do it well, so ask for a reference before committing.
Day-One Maintenance
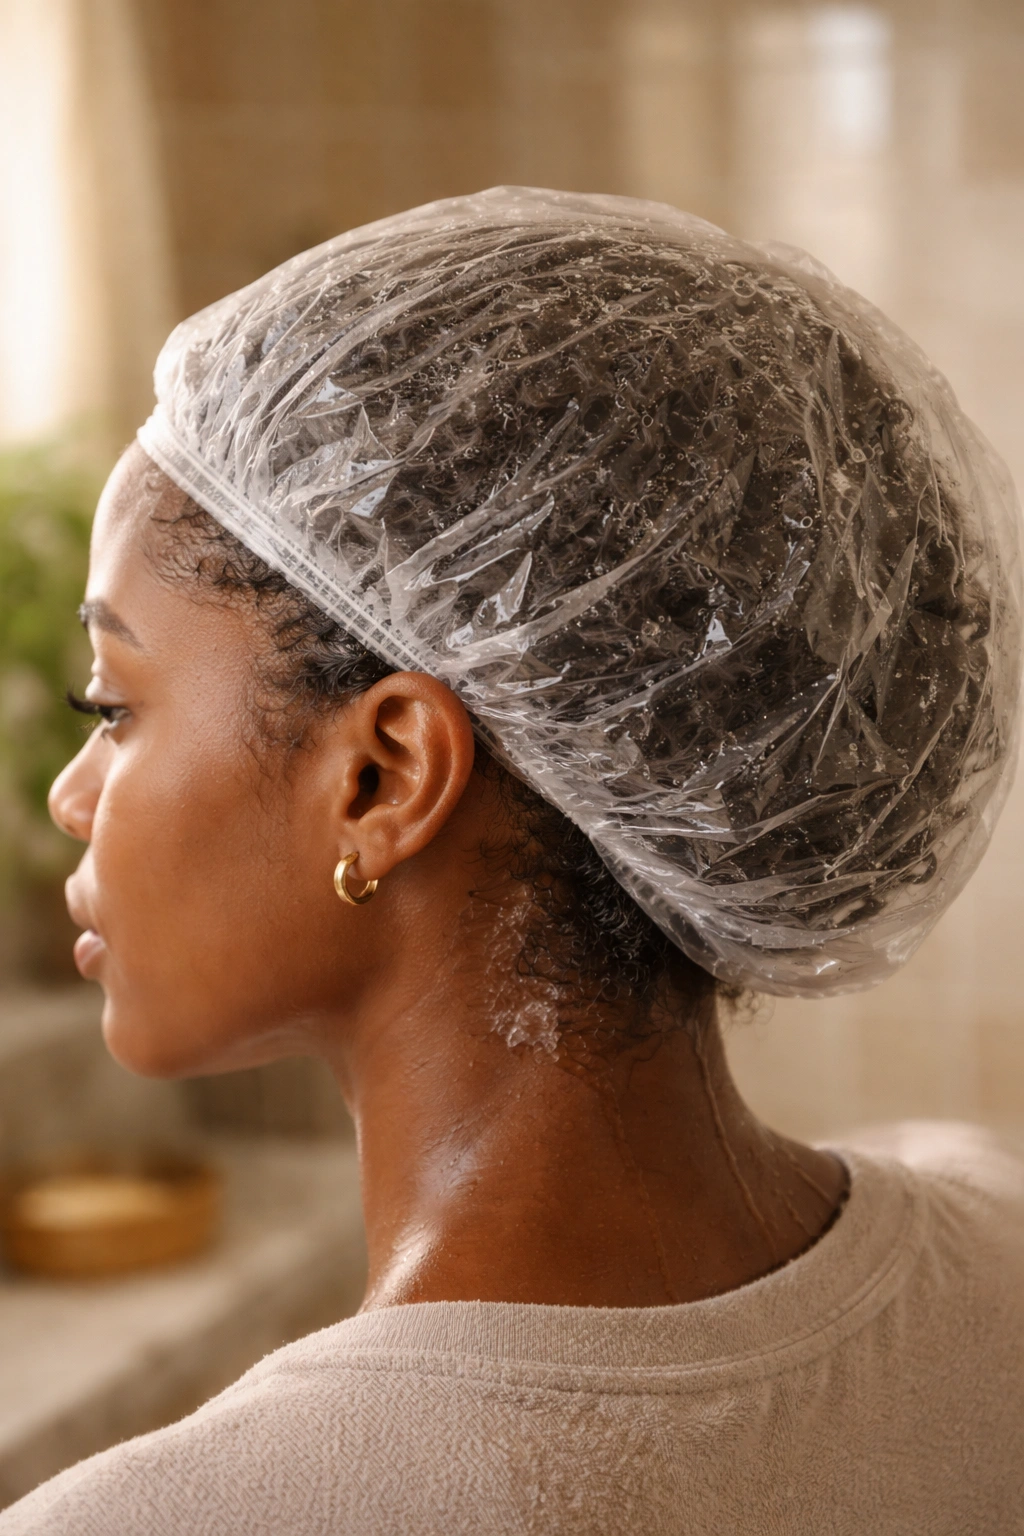
The first 24 hours after a cornrow install set the tone for how long the style holds. Avoid washing. Avoid heavy product. Avoid sleeping without a scarf or bonnet.
Use a light hair oil on the scalp only — not the braids themselves. Oil on the braids attracts lint and dust, and kanekalon doesn’t need it. A few drops of jojoba or argan oil massaged into the scalp between the braids keeps itch away without greasing the style.
If your scalp feels tight the first night, you can gently loosen tension by massaging small sections with a bit of rosemary oil. Don’t pull on the braids themselves — you’ll break the anchoring at the root. Just work into the skin.
Keeping Edges Healthy Under Six Braids
Edges take the most tension in a six-braid style because the front two braids are anchored right at the hairline. Prevention starts at install. If your braider pulls the edges so tight you feel a sharp pinch, say something immediately. Tight edges aren’t a sign of a good install — they’re a sign of scalp damage in progress.
Between installs, give edges a break. Two weeks of cornrows, then one week without any tension style. That rhythm preserves the fragile edge hairs far better than back-to-back protective styles.
Use a growth serum with castor oil, peppermint, or rosemary on edges twice a week. Apply at night before bed, massage in for 30 seconds, and don’t rinse. Tie down with a silk scarf — satin works, silk is better for edges specifically.
If you notice thinning or breakage at the edges after a style, stop protective styling entirely for a month. Wigs, headwraps, or wash-and-gos only. Edges regrow with rest, not with more styling.
Takedown Without Breakage
Rushing takedown is how most cornrow breakage happens. Plan an hour for six braids — longer if kanekalon was used.
Start by spraying each braid with a mix of water and conditioner. The conditioner softens the wrap and loosens tangles. Wait 5 minutes for the mix to soak in.
Unbraid from the ends up, never from the roots down. Use your fingers, not a comb, to unravel the plait. If you hit a tangle, stop and work conditioner into the knot with your fingers before continuing. A wide-tooth comb comes in only after the braid is completely unraveled.
Once all six braids are out, do a pre-shampoo oil rinse. Warm coconut or olive oil, work through the hair, let sit 15 minutes, then shampoo twice — once with a clarifying shampoo to remove all product buildup, once with a moisturizing shampoo to restore the cuticle. Deep condition for 20 minutes.
Don’t style the hair that day. Let it rest in two loose braids overnight. Style the next day after a fresh moisturize session.
When Six Braids Aren’t the Right Call
Six braids work for most hair types and face shapes, but they’re not the answer for every scenario. If your scalp is sensitive or recovering from a previous tight install, skip the six-braid layout entirely and go for 10-12 smaller cornrows instead — the tension spreads across more anchor points.
If your hair is under 4 inches long everywhere, feed-ins work better than trying to cornrow your own hair only. Six freehand cornrows on short hair come out uneven and loosen fast.
If you’re going to a humid climate for a beach vacation, consider wigs or twist-outs instead. Humidity frizzes cornrow parts within days, and fresh install photos on day three don’t hold up.
For anyone with a history of alopecia, traction-related hair loss, or recent chemical treatments — please check with a trichologist before committing to any protective style, six-braid or otherwise. Hair that’s been through stress needs recovery time that no protective style replaces.
Six braids done right feel like a reset. Scalp calm, hair protected, styling time cut to almost nothing for a week or two. That’s the whole point of the layout. Get the install tight but not painful, keep the edges rested, sleep on satin, and you’ll find yourself reaching for this layout again and again.