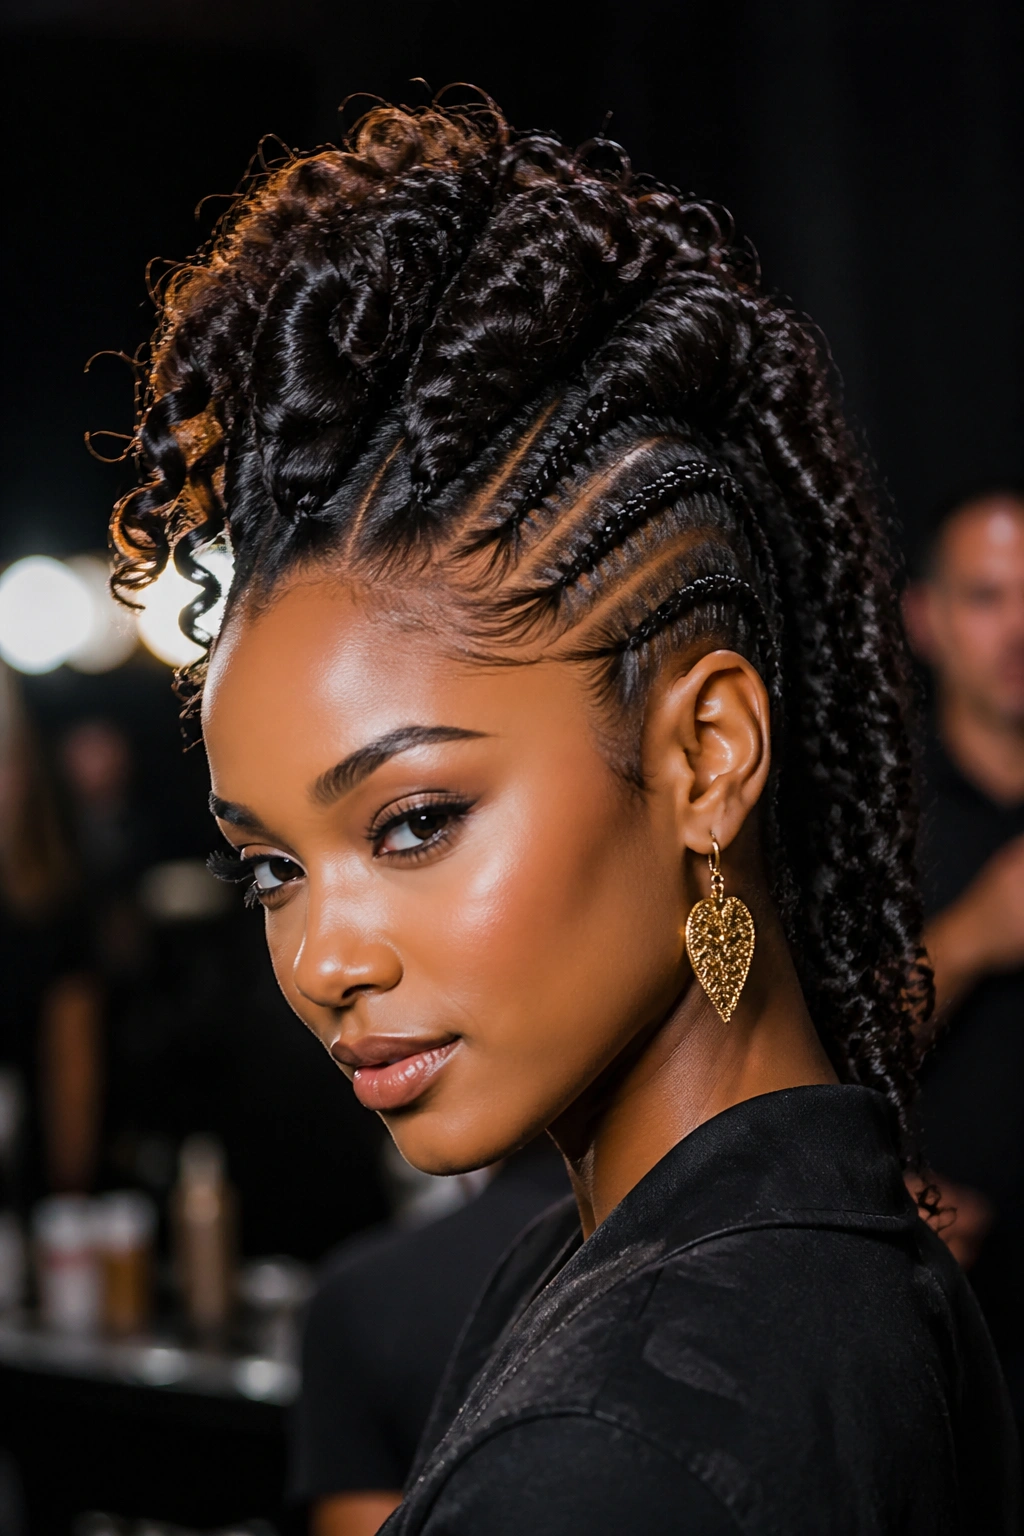
Cornrow updos sit in a strange sweet spot. They’re protective enough to tuck your ends away for weeks, sculptural enough to photograph like a crown, and practical enough to survive a gym session, a wedding, and three days of rain without flinching. For natural hair especially — 4A, 4B, 4C, coily, kinky, all of it — the updo version of a cornrow does something few other styles manage. It respects the texture. It gives the scalp room to breathe. And it pulls the weight up and off the neck so you don’t feel like you’re wearing a helmet by the end of day one.
I’ve been writing about textured hair for years, and cornrow updos still show up as one of the most reliable answers when someone asks me what to wear for a long event or a hot stretch or a week with no time to detangle. The updo part matters. Not because it’s fancier — because it changes the physics. When the braids go up and pin into place instead of hanging, tension spreads differently, sleep is easier, and the finish reads polished even when you didn’t think about it for three days.
The 22 styles below aren’t interchangeable. Each one leans on a different parting pattern, a different placement, a different finishing choice. Some lean sculptural, almost architectural. Some lean soft — the kind of updo where the braids curve into a low nest at the nape and flyaways are encouraged, not fought. Pick based on your face shape, your hair length, the event on your calendar, and honestly, how much patience you have on the day of install.
First, the groundwork.
What Makes Cornrow Updos Different From Regular Updos
A regular updo on relaxed or looser-textured hair usually involves teasing, pinning, and spraying something flexible into place. Cornrow updos work on a completely different logic. The style is built into the braid itself — the direction, the curve, the way each row feeds into the next — and the “up” part is engineered from the scalp outward.
That changes the prep. It changes the longevity. It changes what you can and can’t adjust mid-install.
Once the cornrows are laid, you commit. You can reshape the tail ends — tuck, coil, pin — but the base pattern is locked. Which is why natural-hair updos benefit from a rough sketch before the comb ever touches your scalp. Some people use a finger to draw the intended path. Some people screenshot a reference. Either way, plan the shape before you divide the first section.
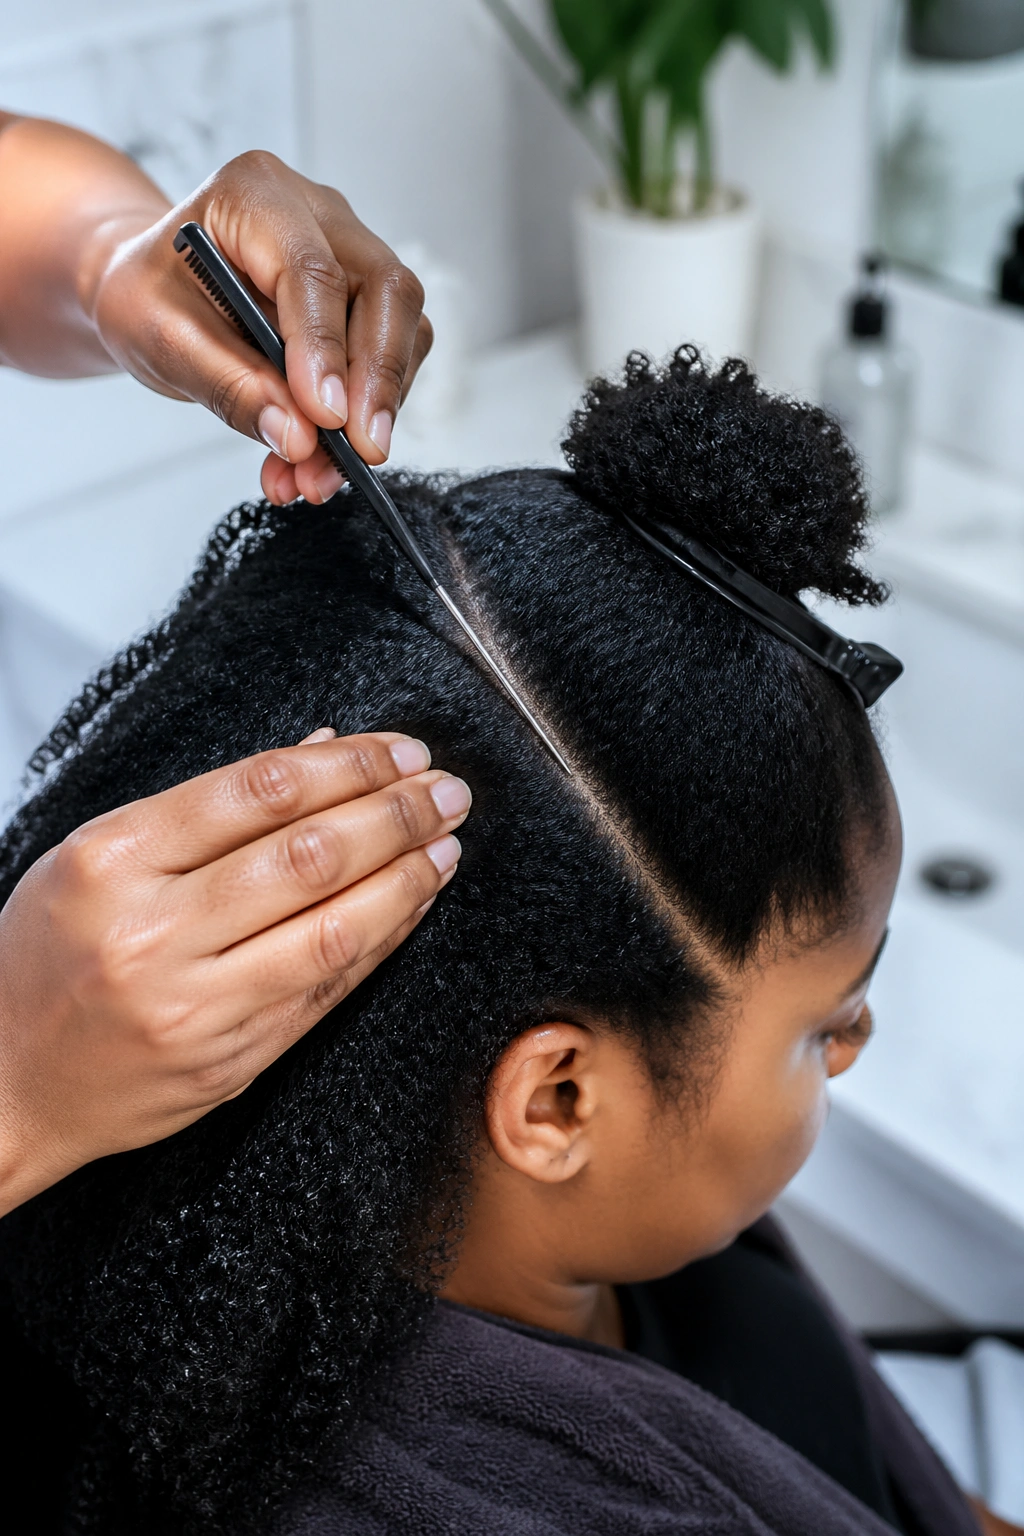
Prep Before You Braid
Skip this and the style won’t sit right no matter how clean the technique is.
- Wash day matters. Start with a clarifying shampoo if you’ve had product on your scalp for more than a week. A gentle co-wash alone leaves residue that weakens braid grip.
- Deep condition for a full 20-30 minutes. Cornrow installs put mechanical stress on every strand. Moisture buffers that stress.
- Blow-dry on low heat or stretch with banding/braid-out overnight. Shrunken hair is harder to part cleanly and makes cornrows lumpy.
- Section in quarters before you start. It stops you from losing the plot halfway through.
Also — and this is personal — I’d skip heavy butters for the day of install. They slip. Braids slide off the scalp and you get that raised, loose look within hours. A light leave-in and a thin edge gel works better.
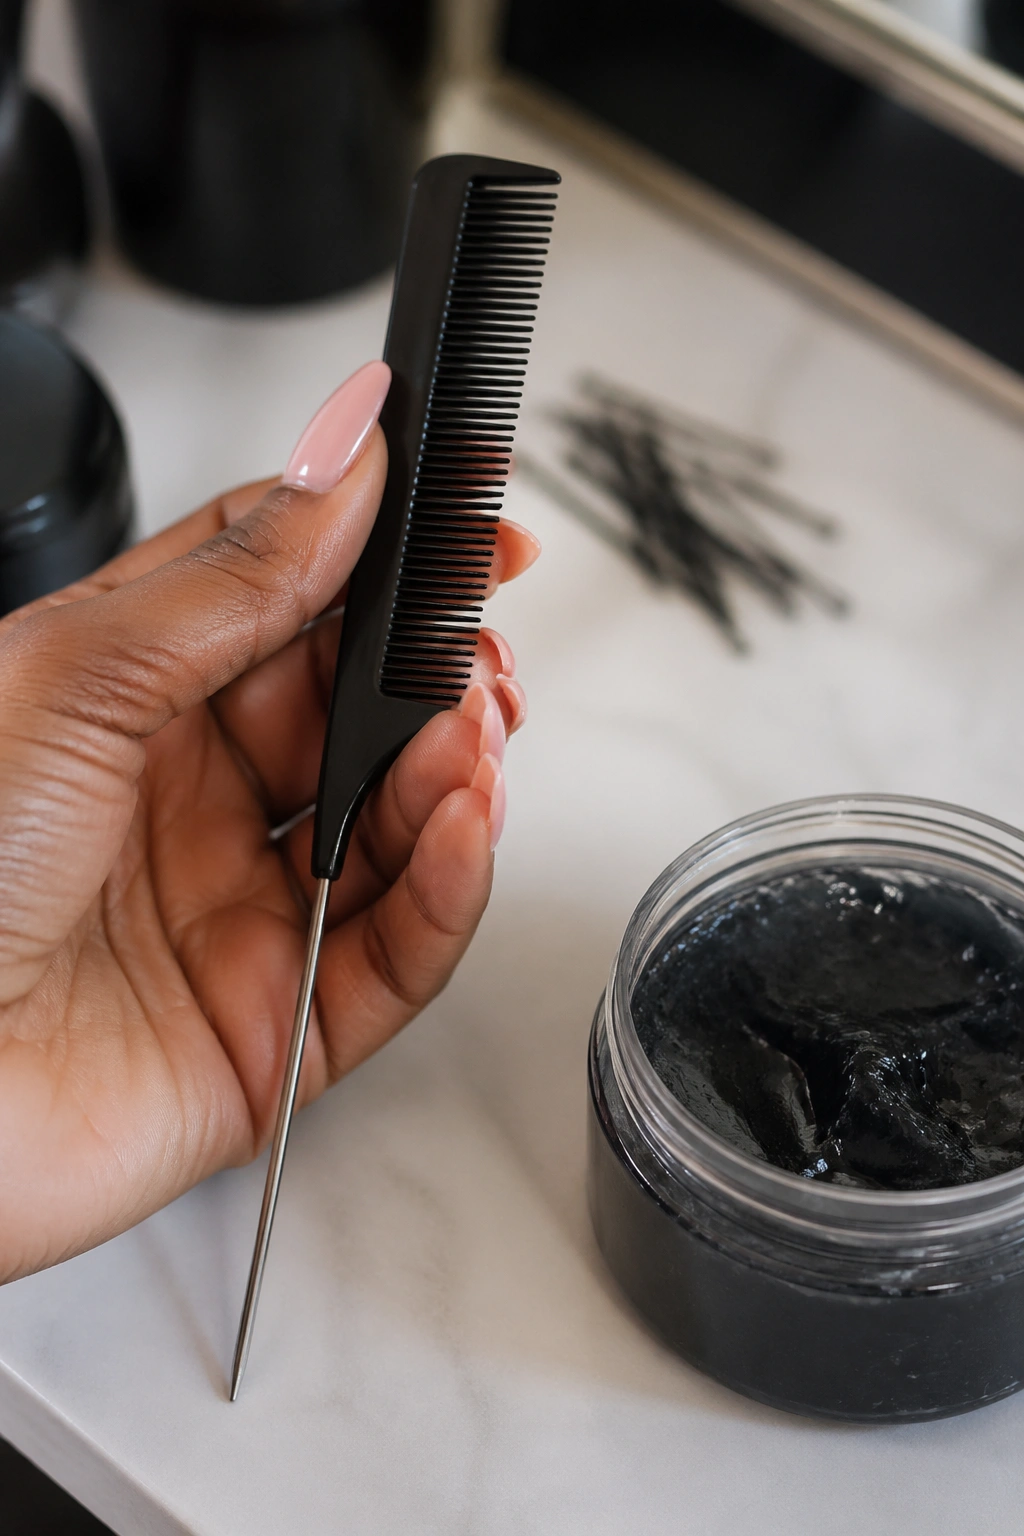
Tools That Actually Change the Result
A rat-tail comb with a sharp metal or plastic pin for parting. Two mirrors — one handheld, one wall-mounted — positioned so you can see the back of your head. Small rubber bands for temporary sectioning (remove before pinning up). Edge gel with real hold, not just shine. Bobby pins in the closest match to your hair color, and hairpins (the U-shaped ones) for the bulkier tuck points. A spray bottle with water and a tablespoon of leave-in conditioner mixed in. Finally, a satin scarf for the moment you finish — you’ll want to lay edges and wrap.
That’s the kit. You don’t need more. Fancier tools don’t fix a bad parting job.
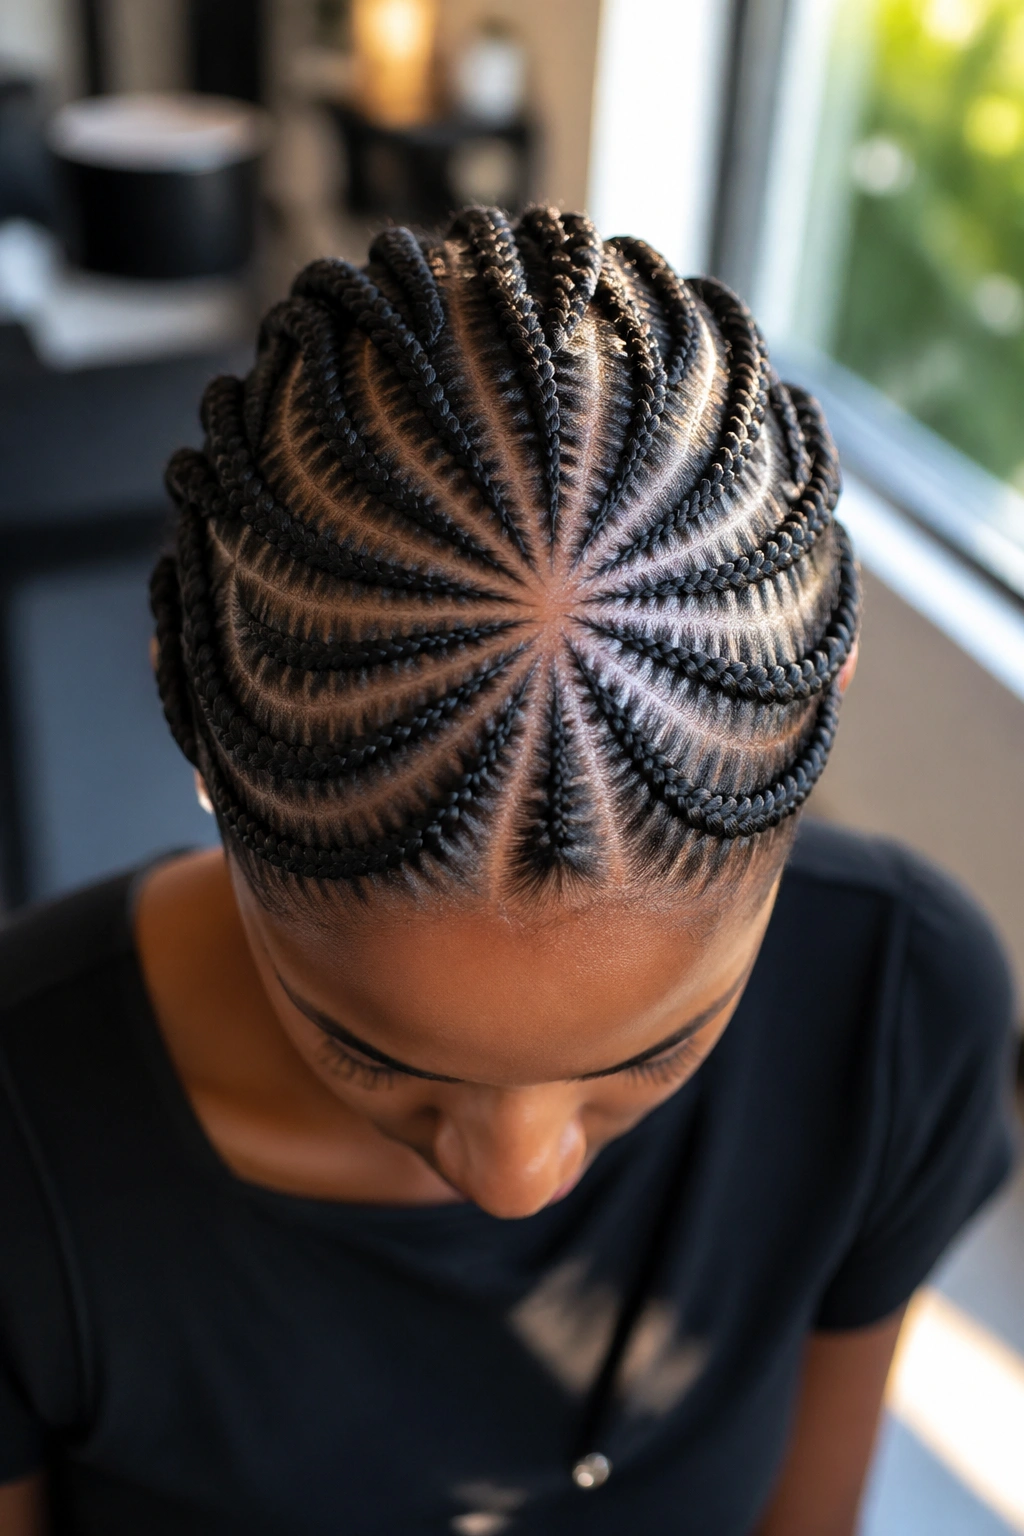
Parting Patterns That Unlock the “Up” in Updo
Every cornrow updo is really a parting story. The braids themselves are just the medium. What decides whether the finished style looks crown-like or messy-casual or sleek-and-sculptural is the pattern you carve before braiding begins.
Four patterns do most of the work: all-back rows that converge at a nape bun, radial rows that spiral from a center crown, side-swept rows that collect into a side bun or twist, and geometric rows that zig or zag before meeting at a point.
Pick the one that matches the shape of your face. Round faces lengthen nicely under a high crown pattern. Long faces balance under a side-swept approach. Square faces soften under soft radial curves.
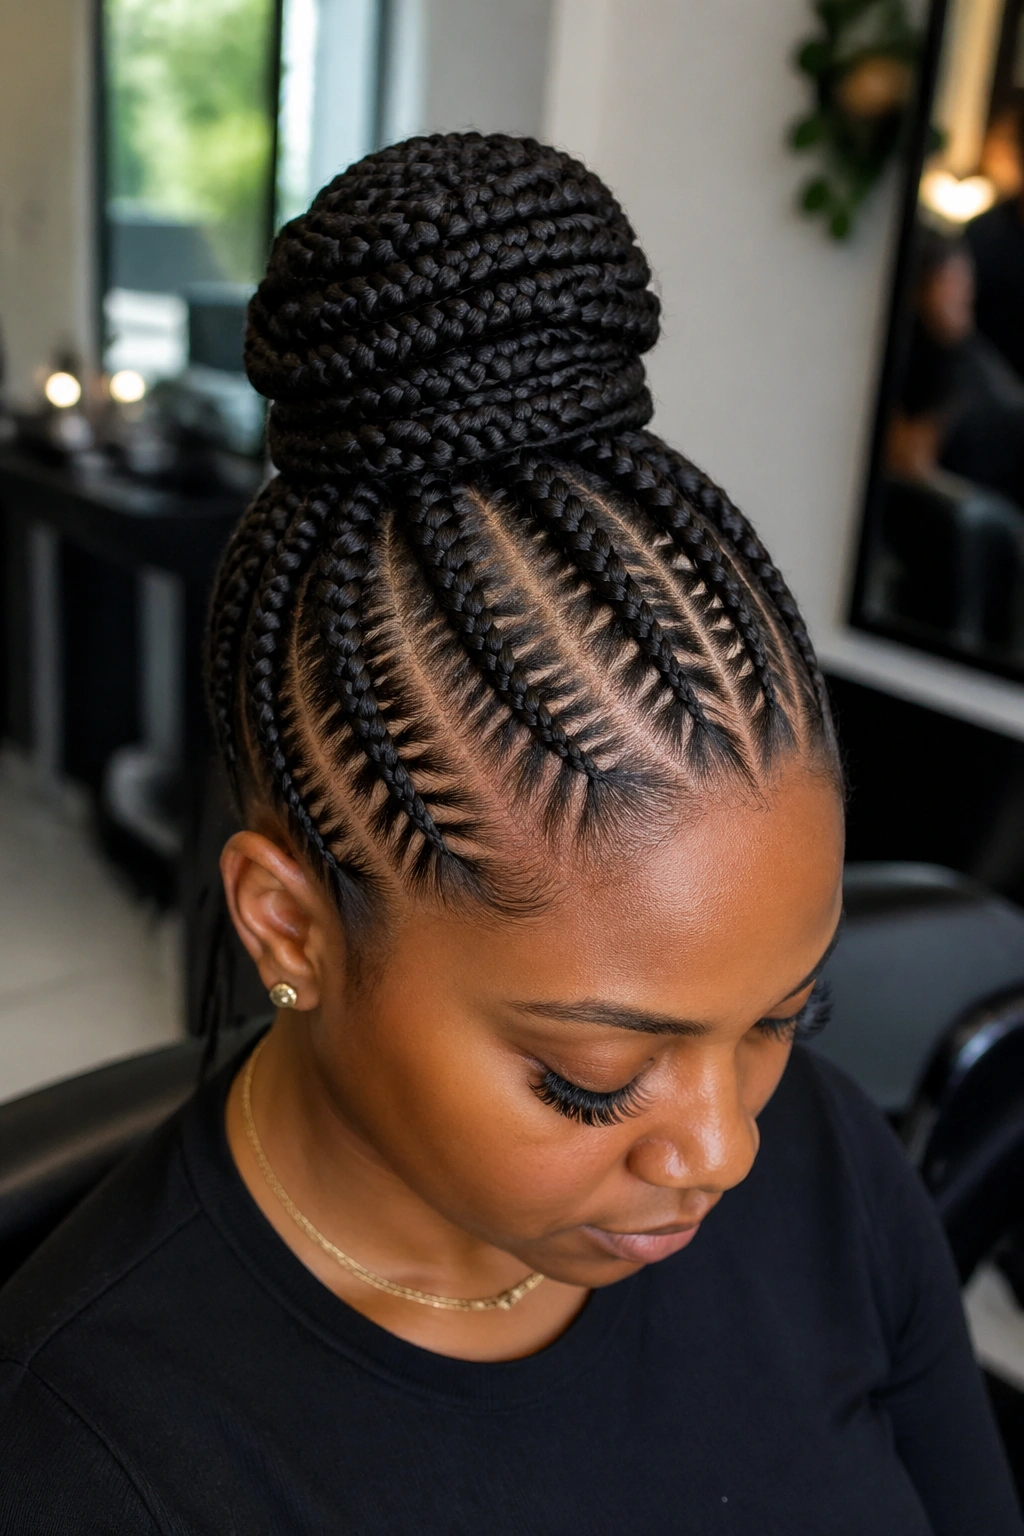
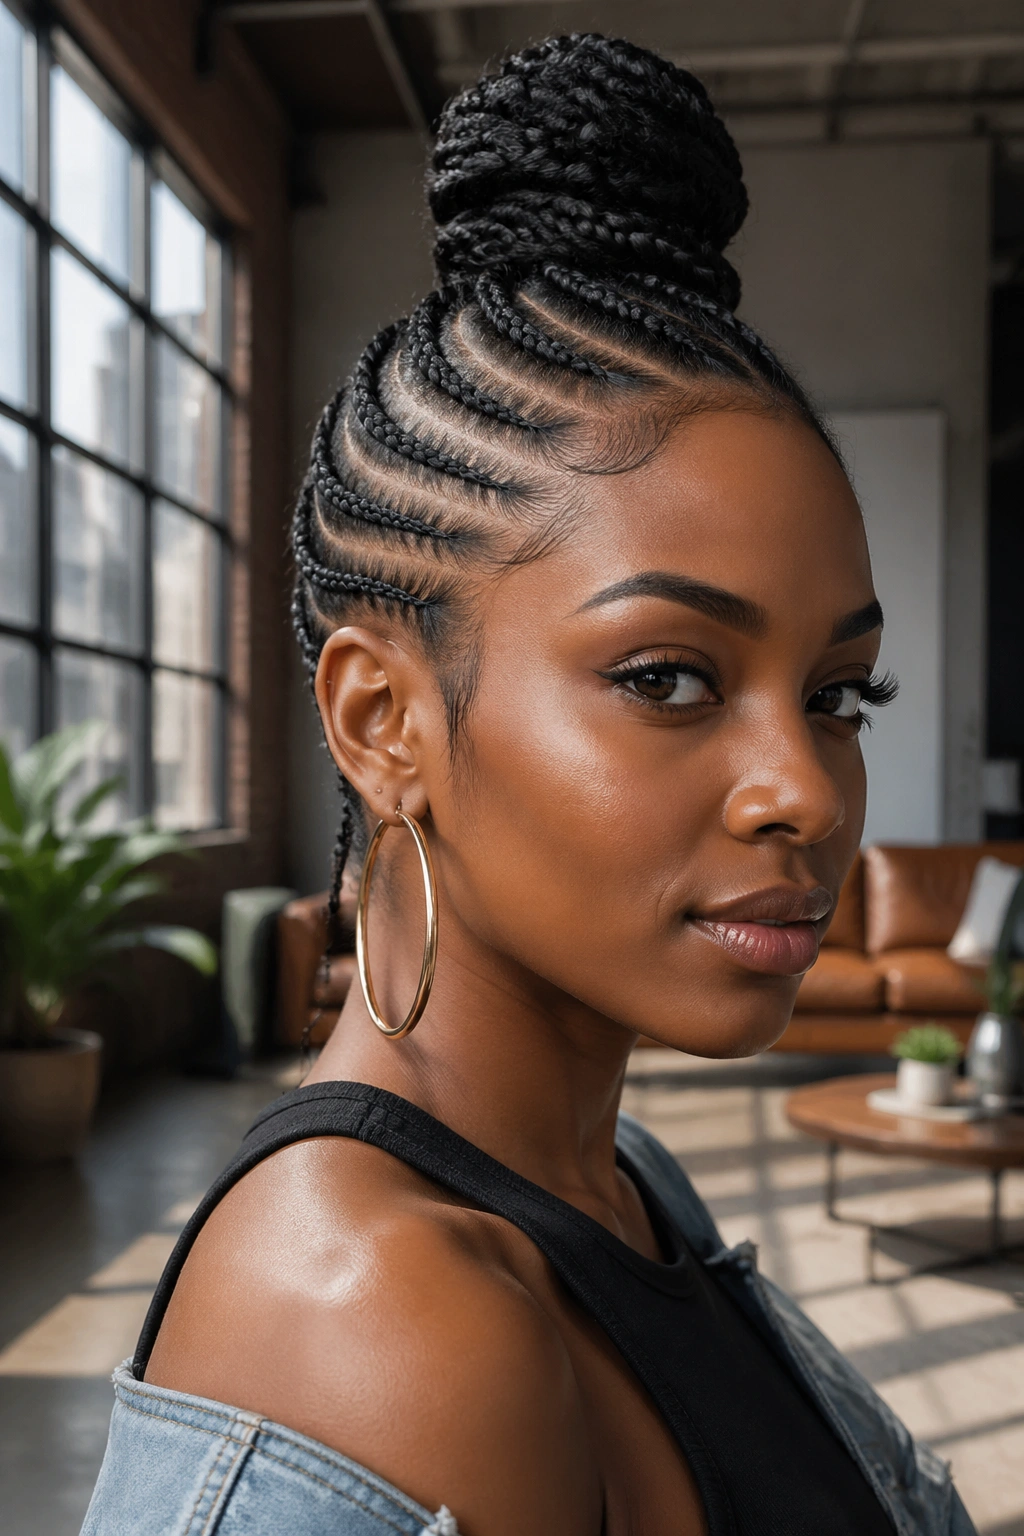
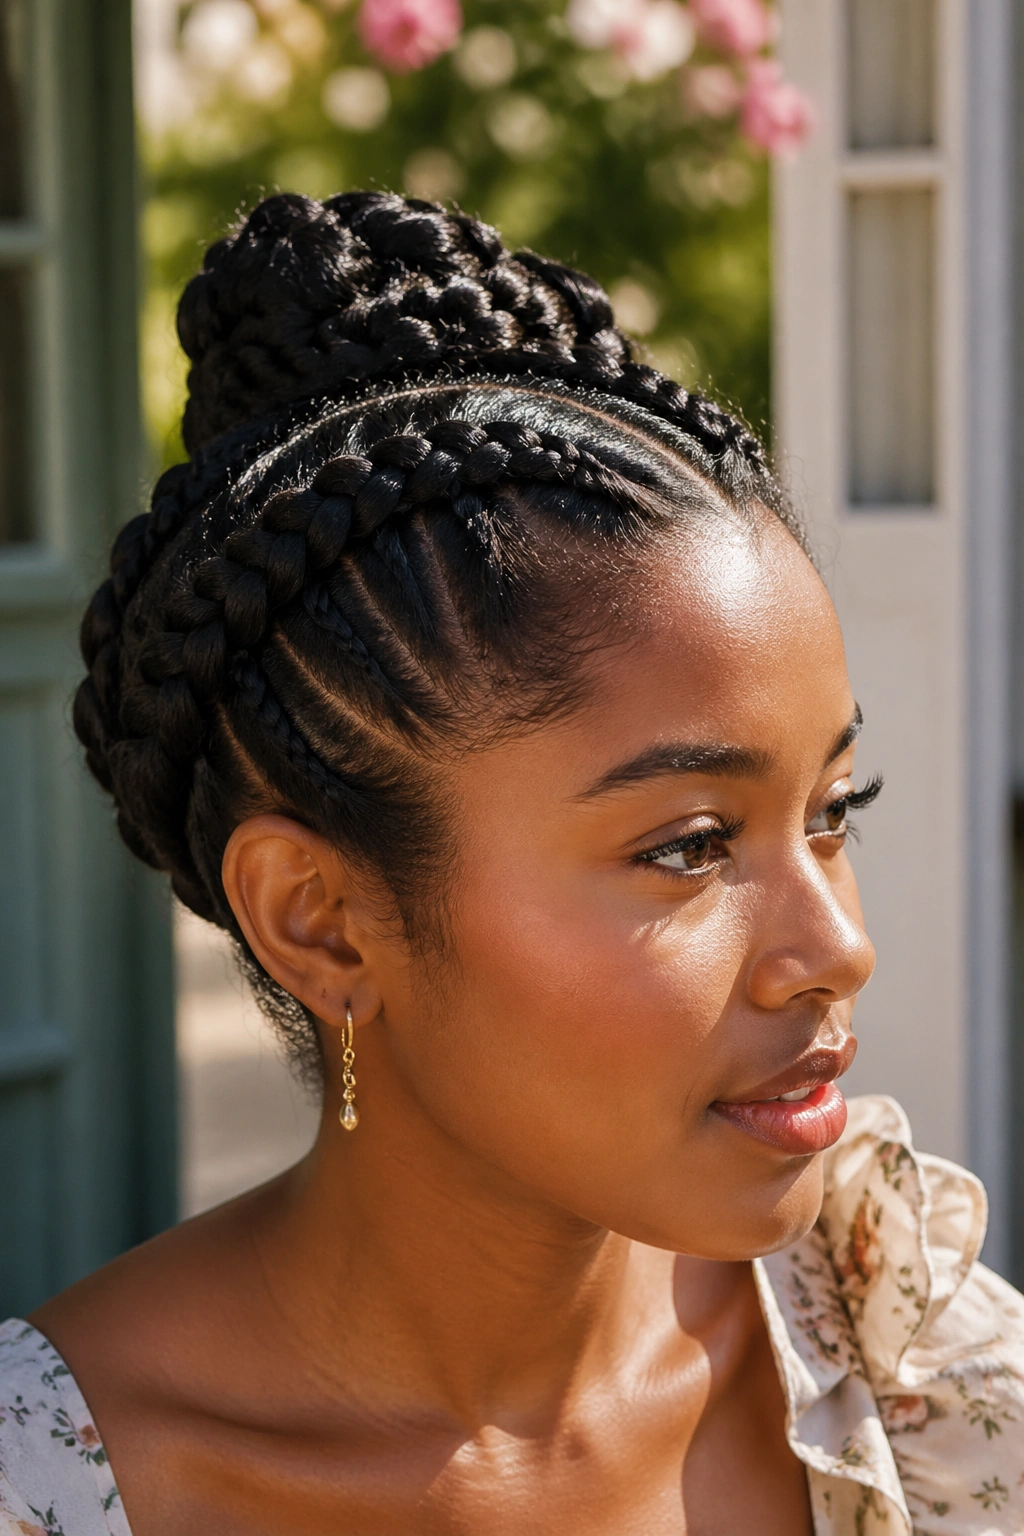
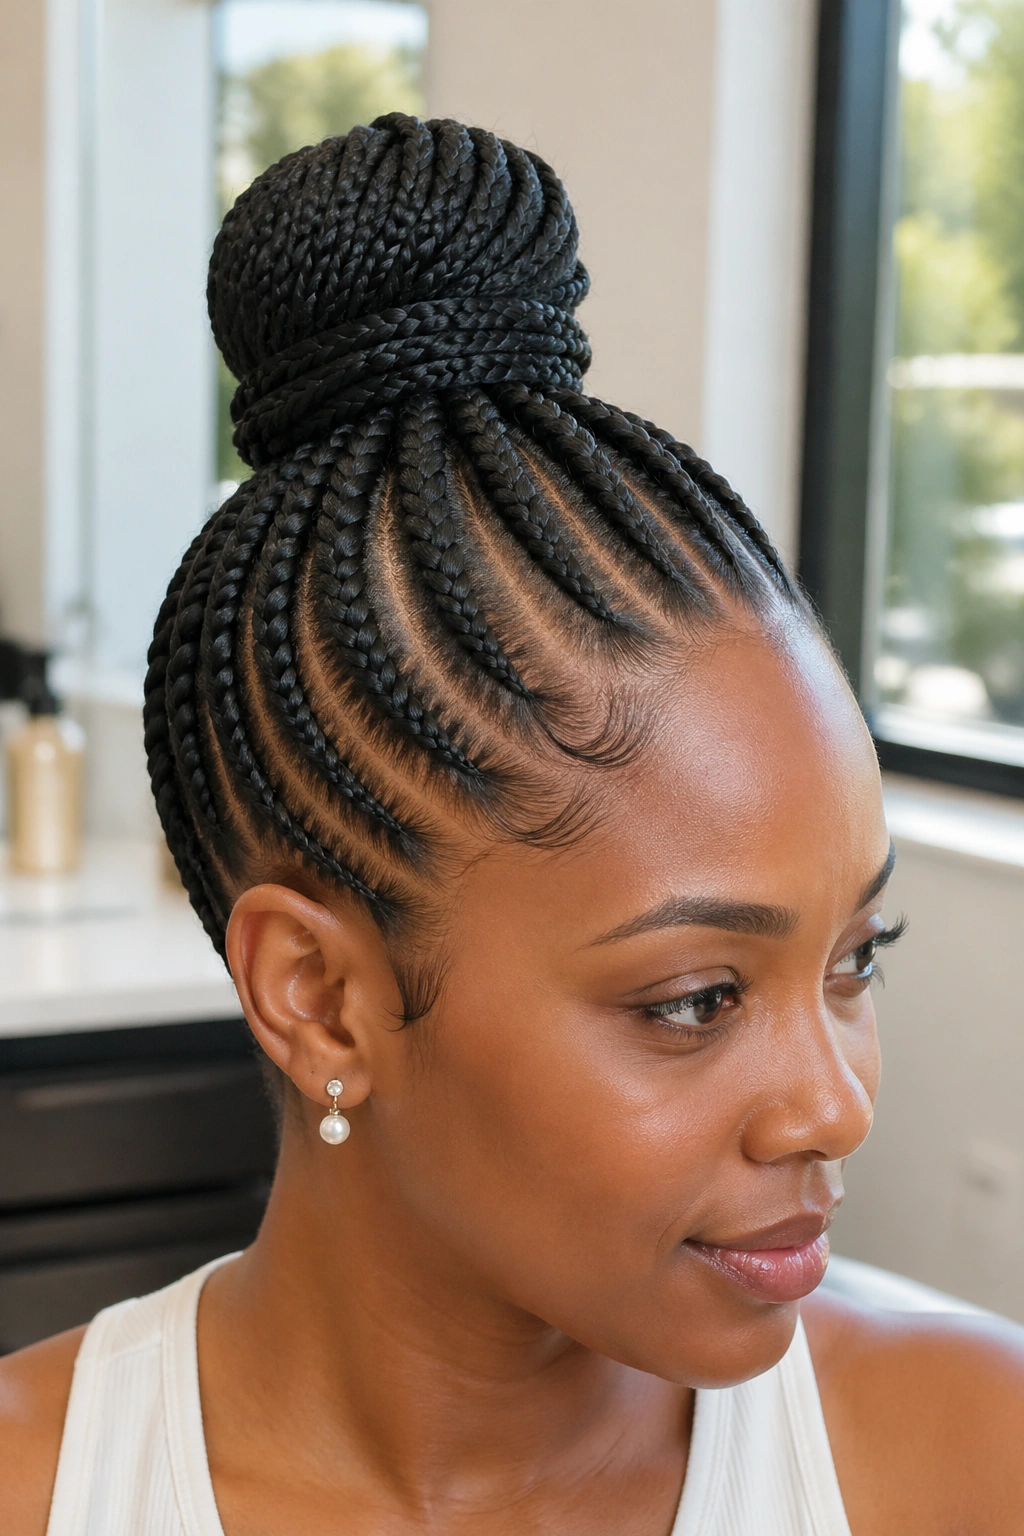
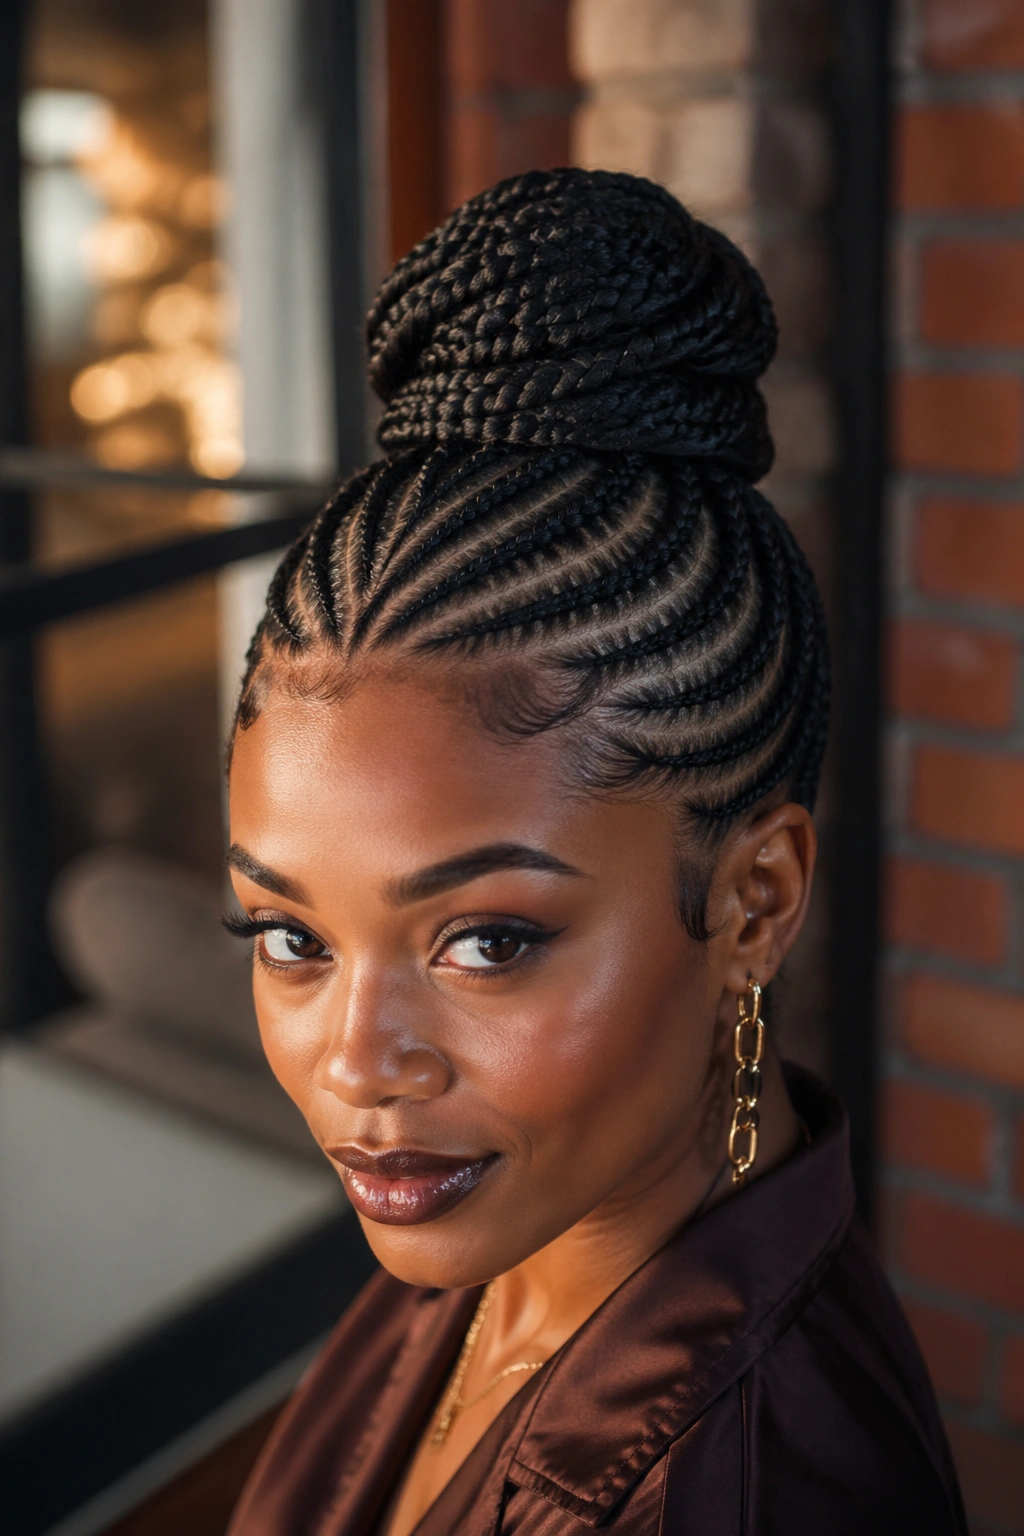
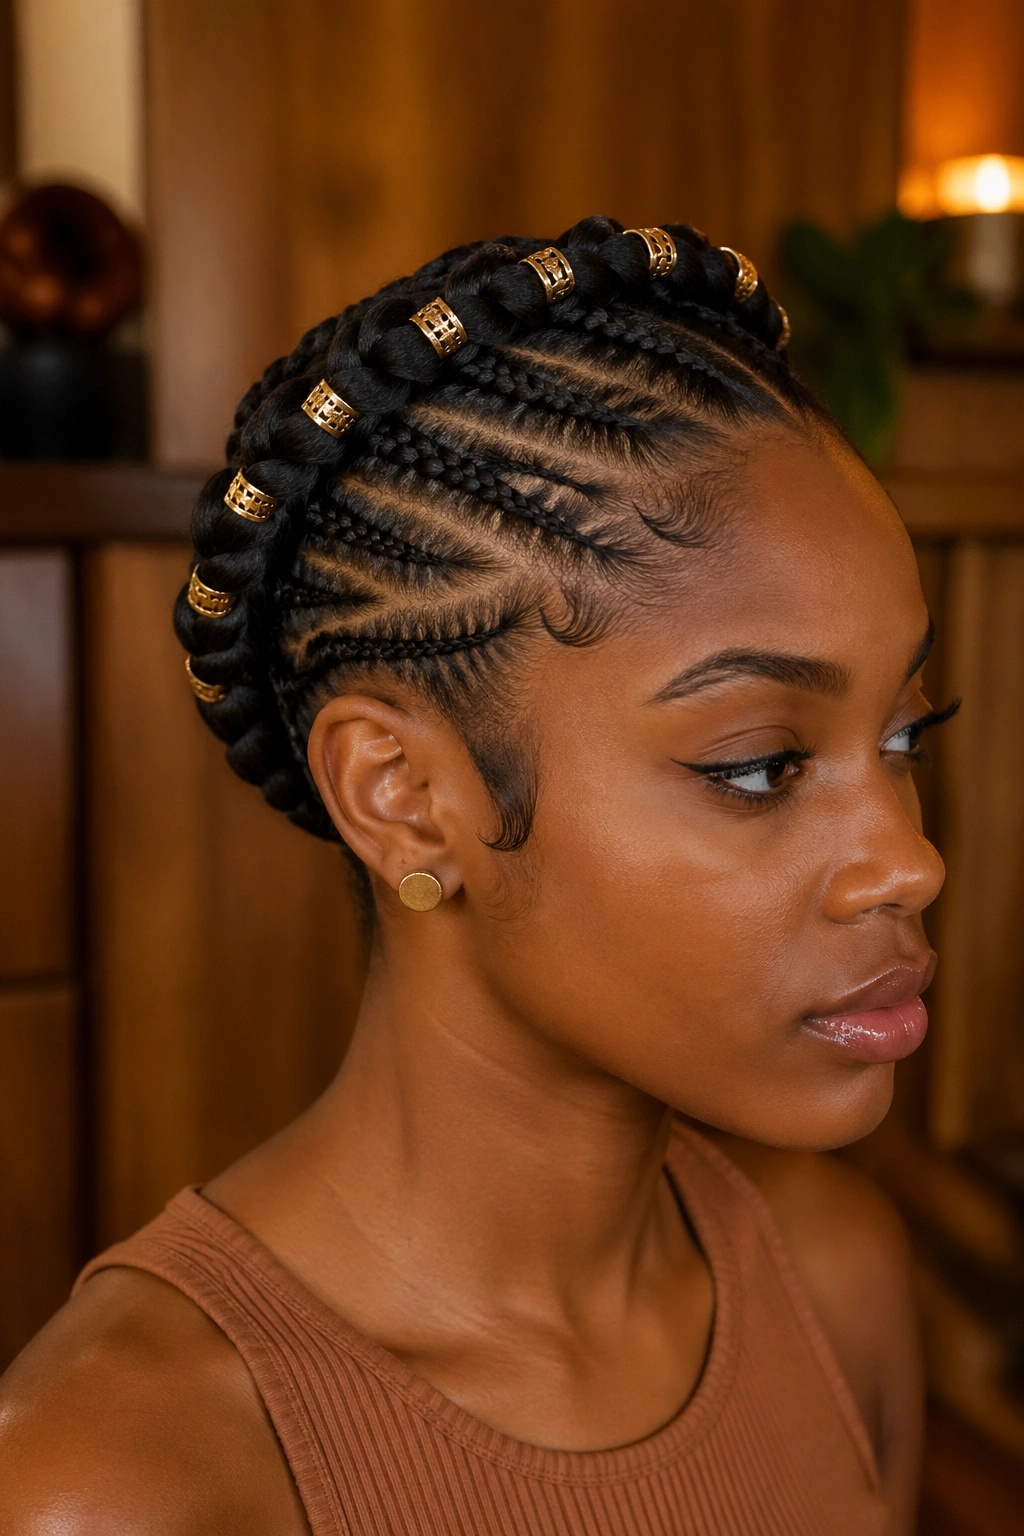
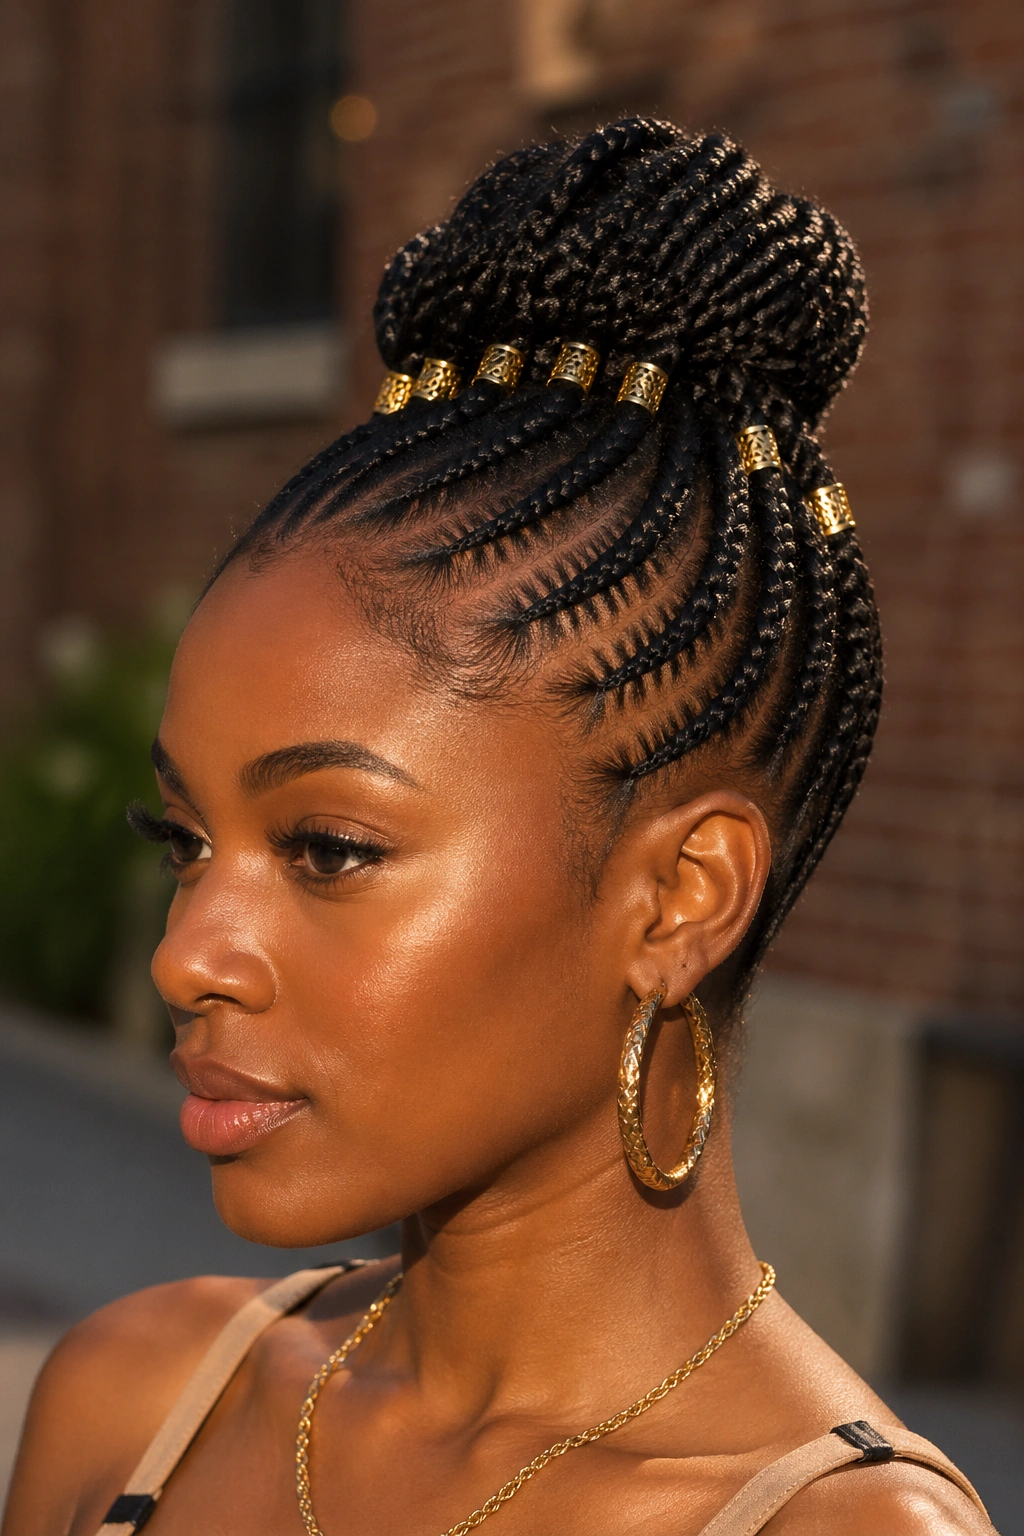
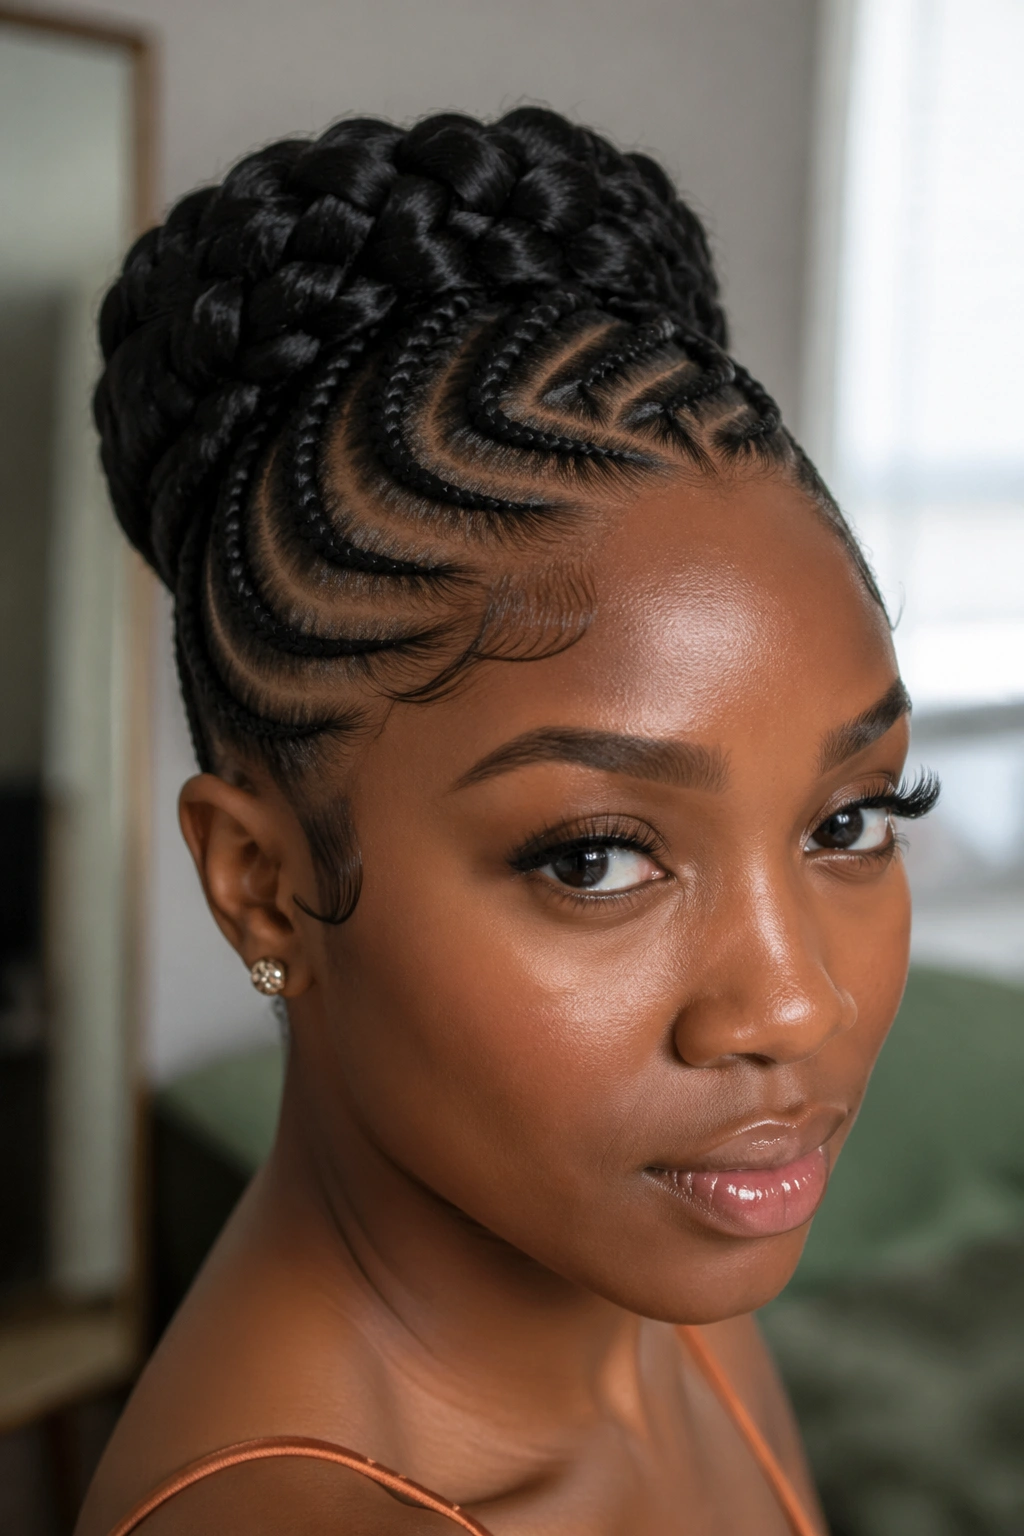
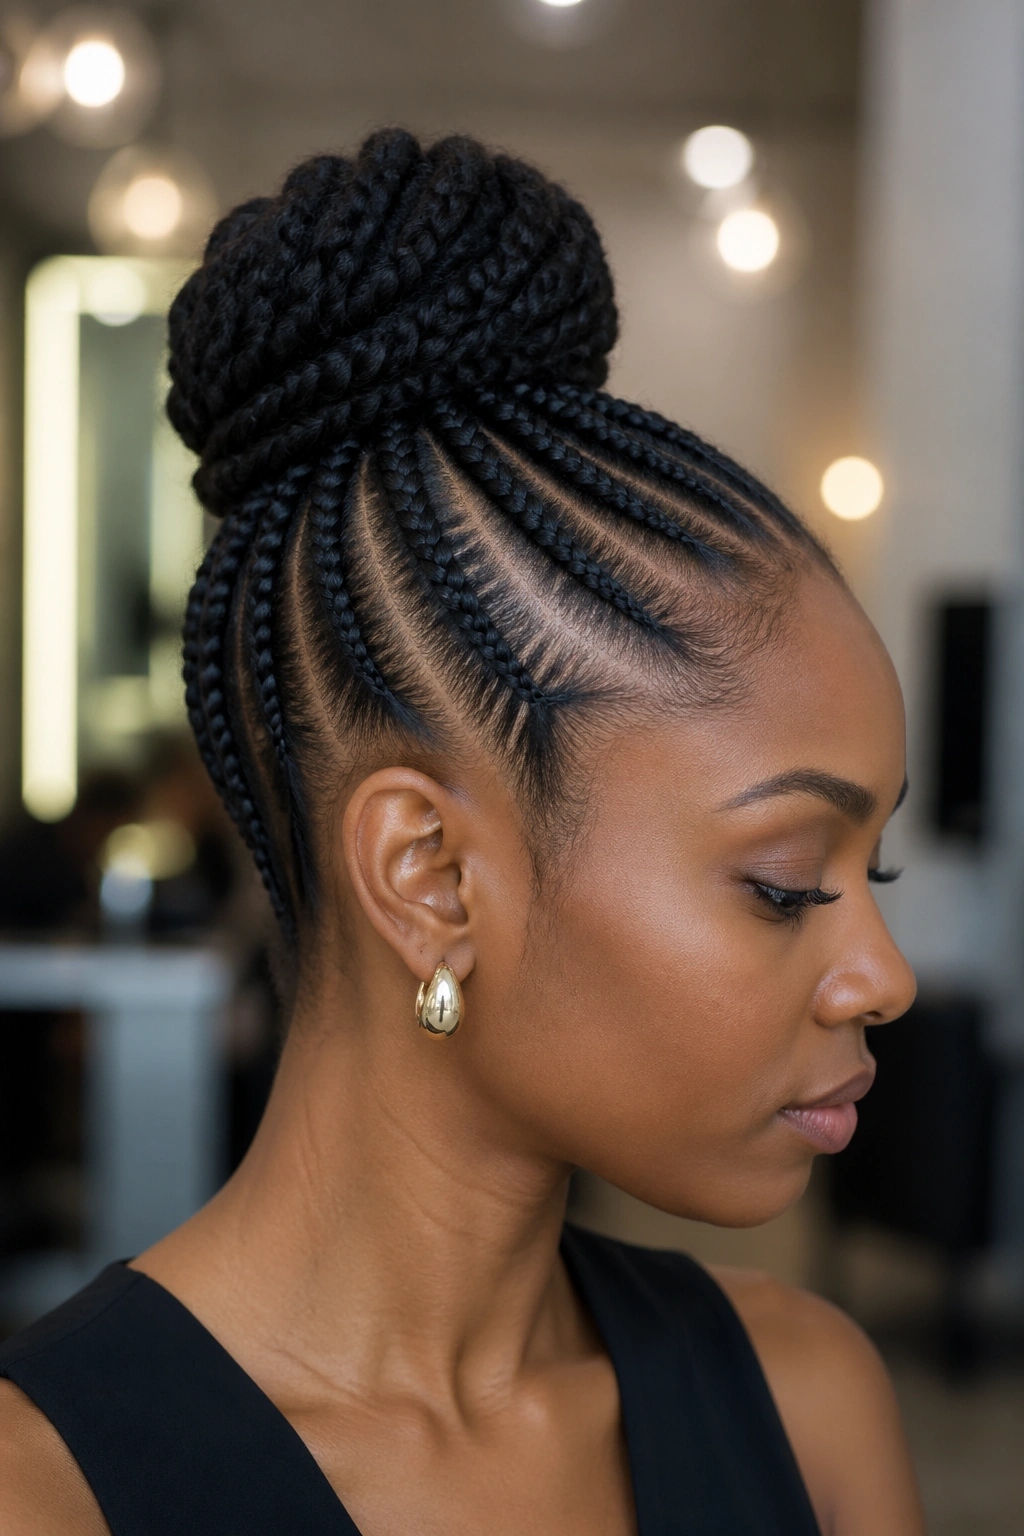
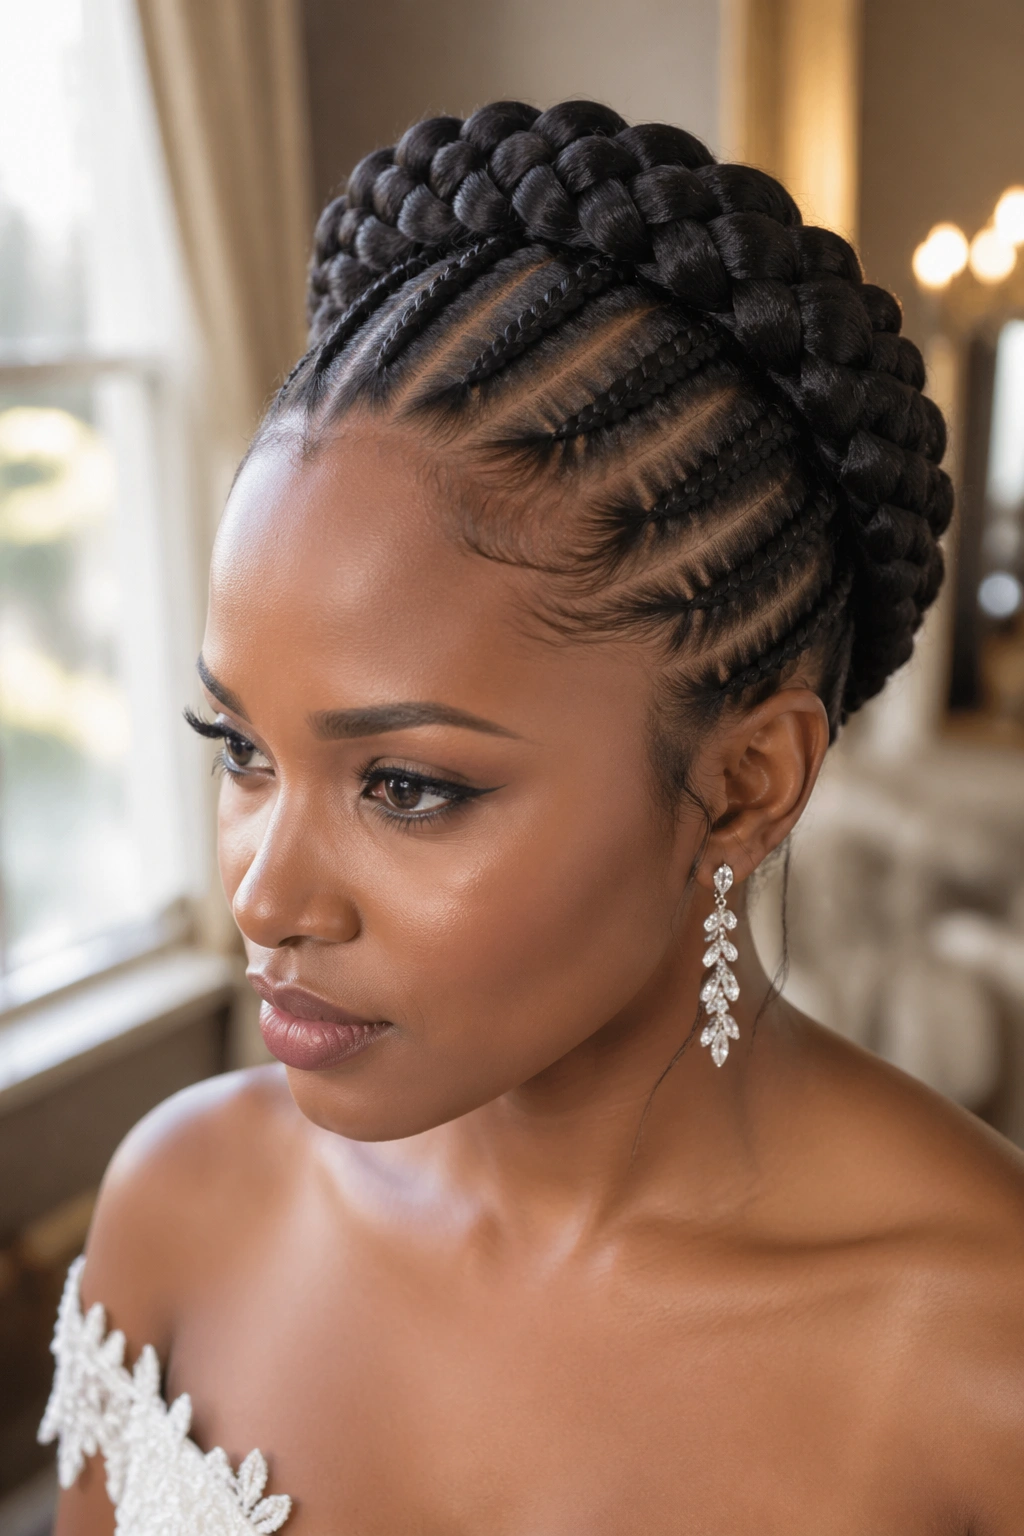
1. High Crown Cornrow Bun on 4C
The classic for a reason. Six to eight cornrows travel from the hairline upward and backward, meeting at the crown where they’re coiled into a firm, rounded bun. The silhouette is regal. It lifts the face. It photographs at any angle.
Why It Works on Natural Hair
- The tension is distributed across multiple rows, not concentrated on a single ponytail base.
- The ends of each braid get tucked into the bun, so there’s no loose hair to frizz.
- The crown placement elongates shorter necks in photos.
Stylist tip: If your natural hair is shorter than shoulder-length, add a small amount of kanekalon (feed-in, not a full weave) to the last third of each braid so the coil has enough material to form a full bun.
2. Side-Swept Low Bun With Feed-In Rows
Unlike the symmetrical crown style, this one pulls visual weight to one side — left or right, whichever side of your face you prefer to show. The rows sweep diagonally across the head and pool into a low, almost napkin-folded bun above the opposite ear.
The diagonal sweep is what makes it work. Straight rows look flat at a side angle. Curved rows have dimension. When the feed-in starts small at the hairline and gradually thickens as the braid travels back, the finished shape gets a kind of sculpted, tapered quality you can’t get from uniform thickness.
Feed-in matters here because natural hair alone — particularly 4B or 4C — tends to produce a shorter, fluffier braid. Adding hair in stages keeps the braid smooth and gives you enough length to twist into a real bun rather than a stub.
It’s best for people who don’t love their hairline showing straight-on. The side sweep softens the front.
3. Halo Cornrow Wrap
A single cornrow (or two stacked for thickness) traces a full circle around the head like a wreath. Everything not in the halo is either tucked underneath or wrapped into the halo itself. The result looks like a crown made of hair.
This one’s technical. Really technical. The path has to be perfectly even or the halo tilts and you’ll see the flaw from every photo angle. I’ve seen this style go wrong more than almost any other — the back section droops, or the braid thickens unevenly, and the illusion collapses.
But when it works — when the halo sits level and the ends feed into themselves invisibly — it’s one of the most striking updos in the category. Wedding-worthy. Gala-worthy. Best on mid-length to long natural hair that’s been stretched, because the braid needs consistent material all the way around.
4. Zig-Zag Crown With Stacked Bun
The Parting Is the Star
Most cornrow updos use straight lines. This one uses zigzags — sharp, even, V-shaped parts that run from the hairline to the crown before the braids start. It takes longer to part (expect 45 extra minutes for a careful job) but the finish is unmistakable.
- Zigzag widths should stay consistent — 1.5 to 2 inches from peak to peak is a good range.
- Each V should mirror the one beside it for symmetry.
- The braids themselves stay classic — small to medium cornrows in the standard flat style.
Quick note: Use a rat-tail comb with a firm pin and part each zigzag BEFORE you braid a single row. Trying to zigzag as you go produces wobbly, inconsistent lines.
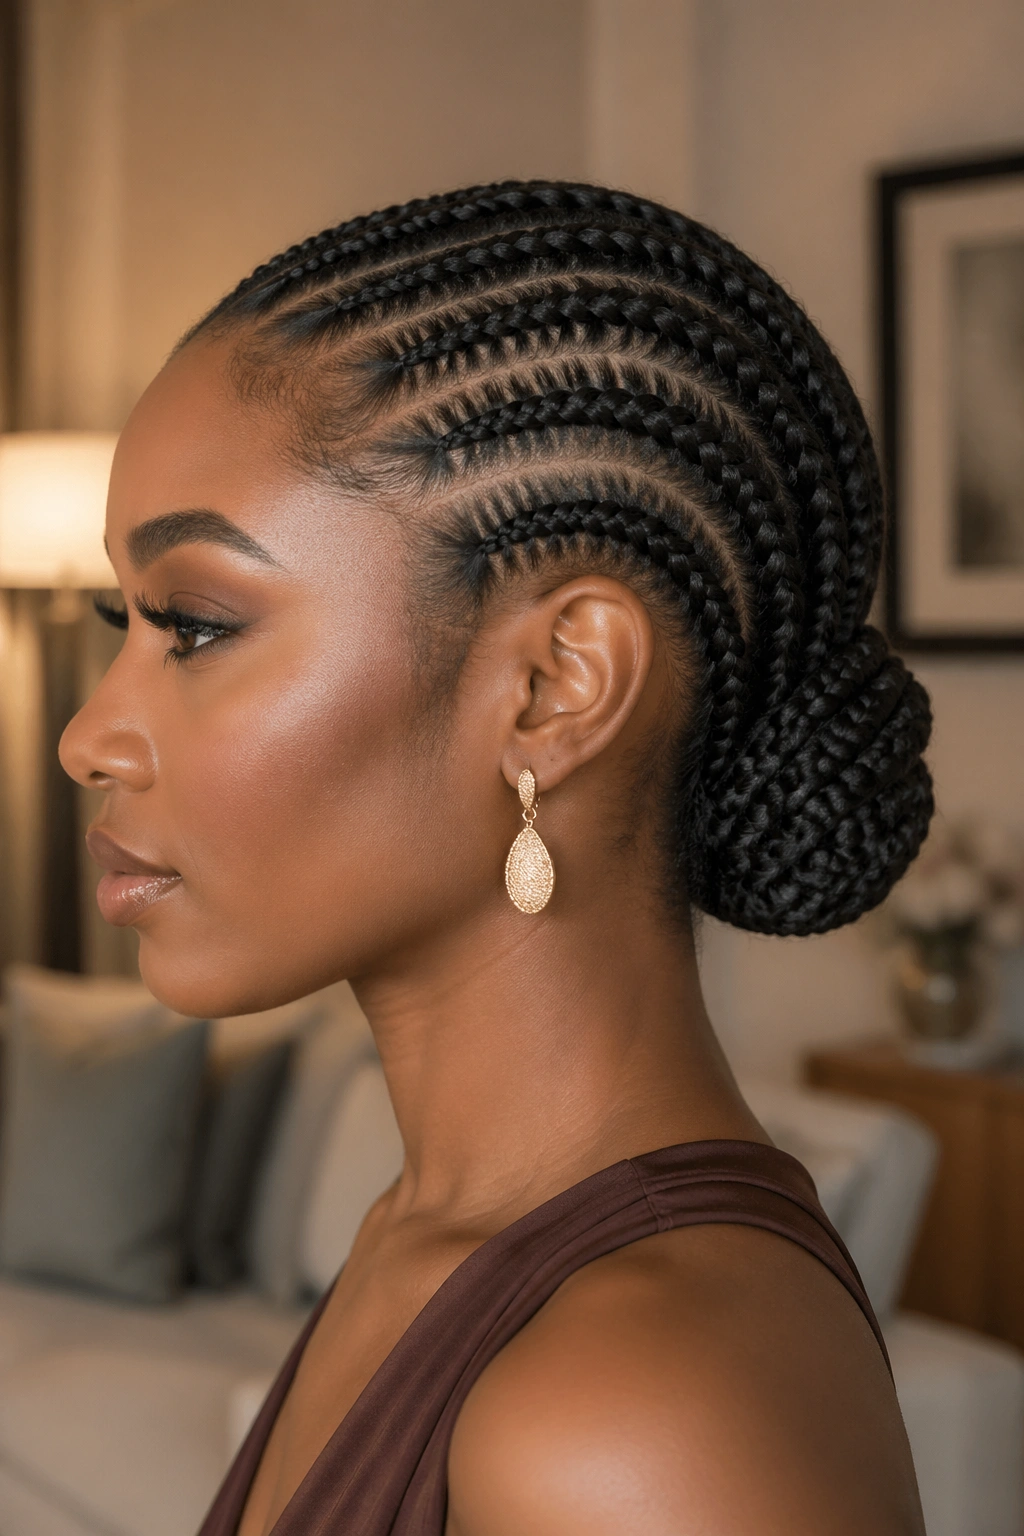
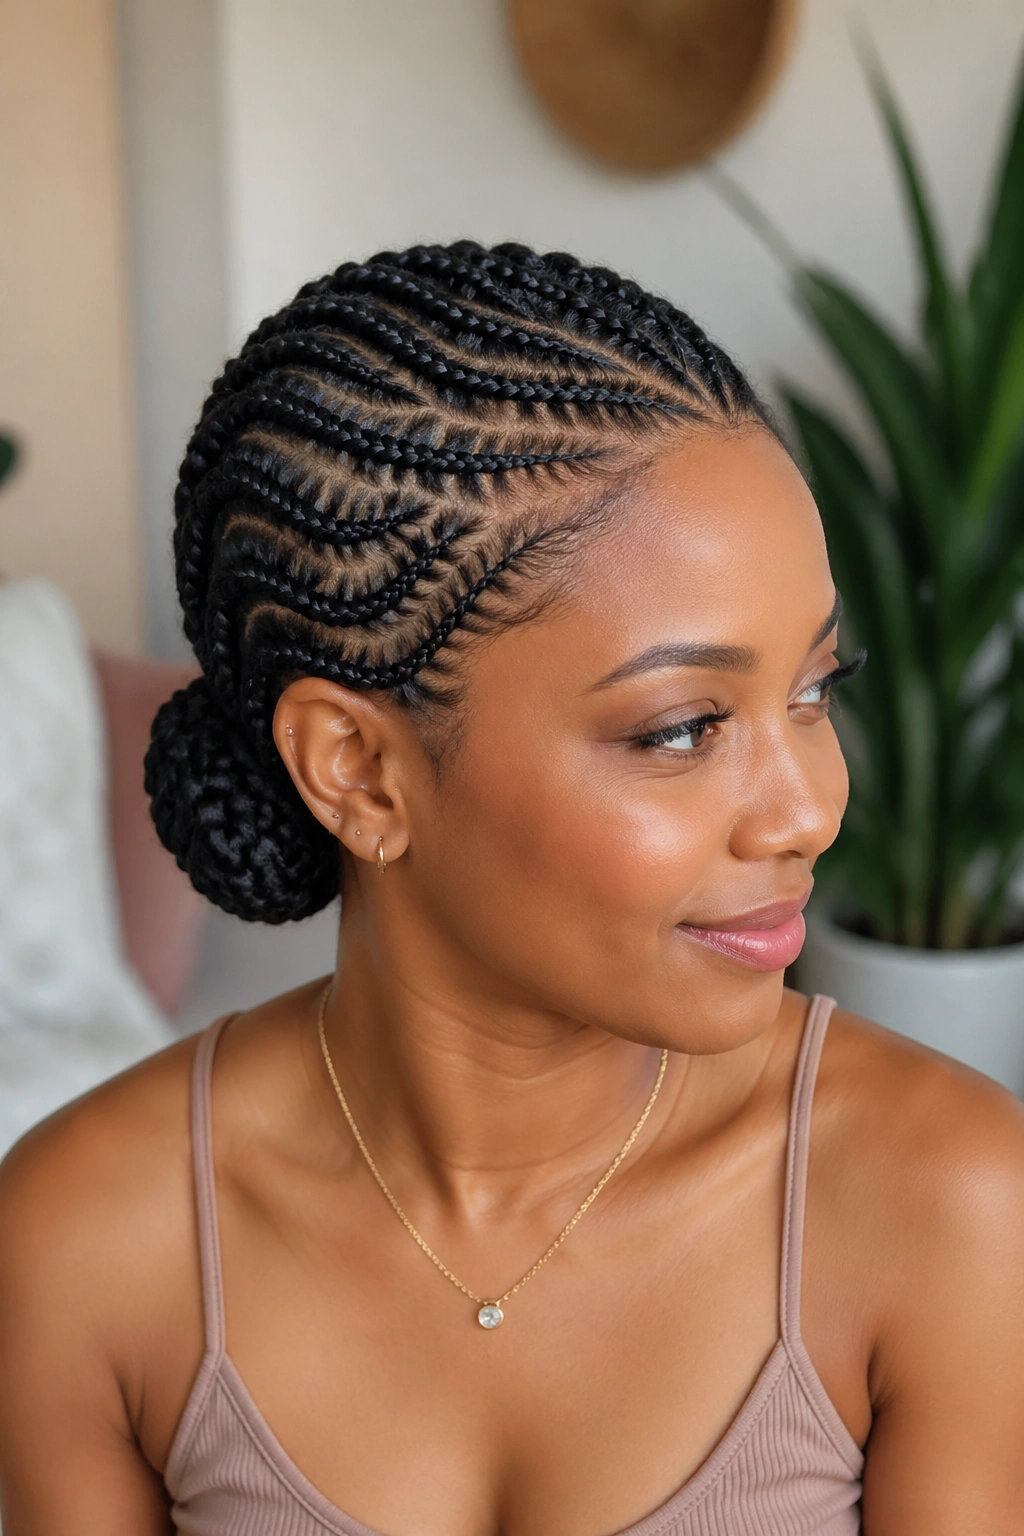
5. Low Curved Bun With Three Feed-In Rows

Three thick feed-in cornrows — that’s it. They curve down the head like long commas and meet at the nape where they form a low, flat, oval bun that sits against the neck.
What I love about this one is the restraint. Most cornrow updos try to do a lot. This one does almost nothing and still looks expensive. The curve of the braids suggests movement. The low placement is flattering on almost everyone. And the oval bun reads more sophisticated than a round coil.
Works for long days. Doesn’t snag on collars. Excellent for office settings where you want protective without announcing it.
6. Mohawk Cornrows With Top Knot
Rows on both sides of the head are braided tightly toward the center, leaving a strip at the top unbraided. The top section is then gathered into a high, rounded knot.
The contrast is the point. Tight, close-to-scalp sides against a loose, rounded top creates visual rhythm. It also makes the style feel more styled than protective — though the cornrowed sides are doing protective work.
Good for people who want edge without cutting anything. The mohawk illusion is all parting.
7. Fulani-Inspired Cornrow Updo With Beads
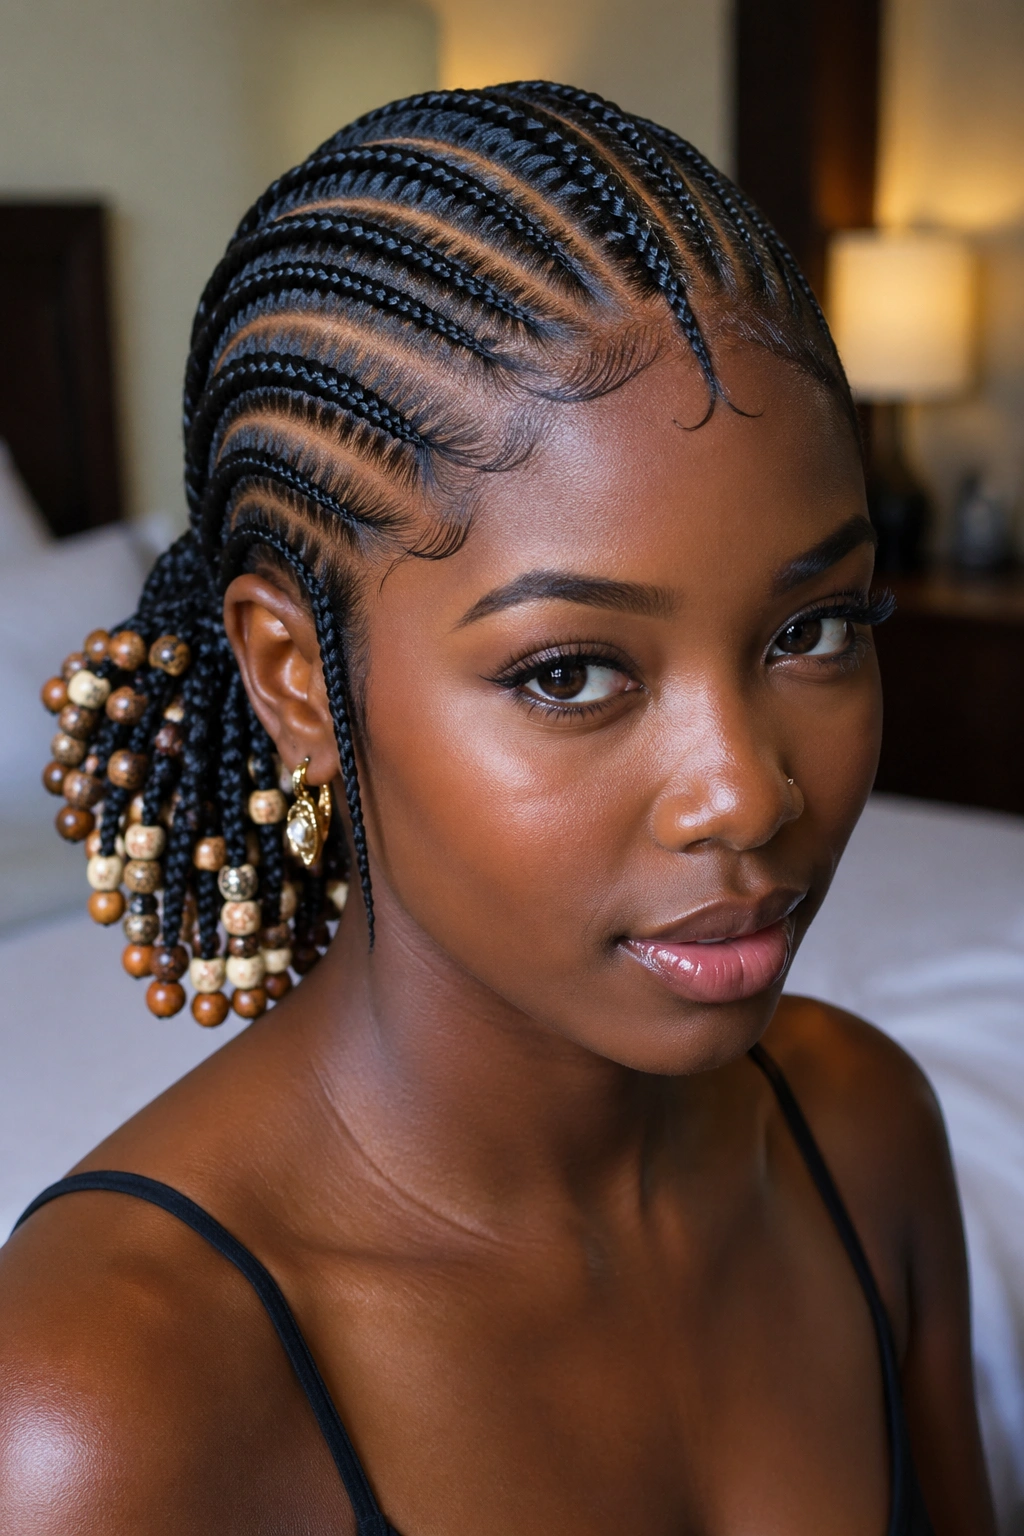
Originally drawn from Fulani styling tradition, this version pulls a center cornrow down the middle of the head while side cornrows curve in toward it. The ends get decorated with beads — wooden, brass, cowrie — and the whole thing gets pinned into a low side gathering.
The beads aren’t decoration only. They add weight to the braid ends, which helps them sit flat when pinned. The finished updo reads rooted, specific, cultural. If you’re drawn to heritage styling, this is one of the most adaptable entries to the updo category.
Pin the beaded ends carefully — beads can slip out of a loose pin and roll across the floor at the worst possible moment.
8. Jumbo Cornrow Basketweave Updo
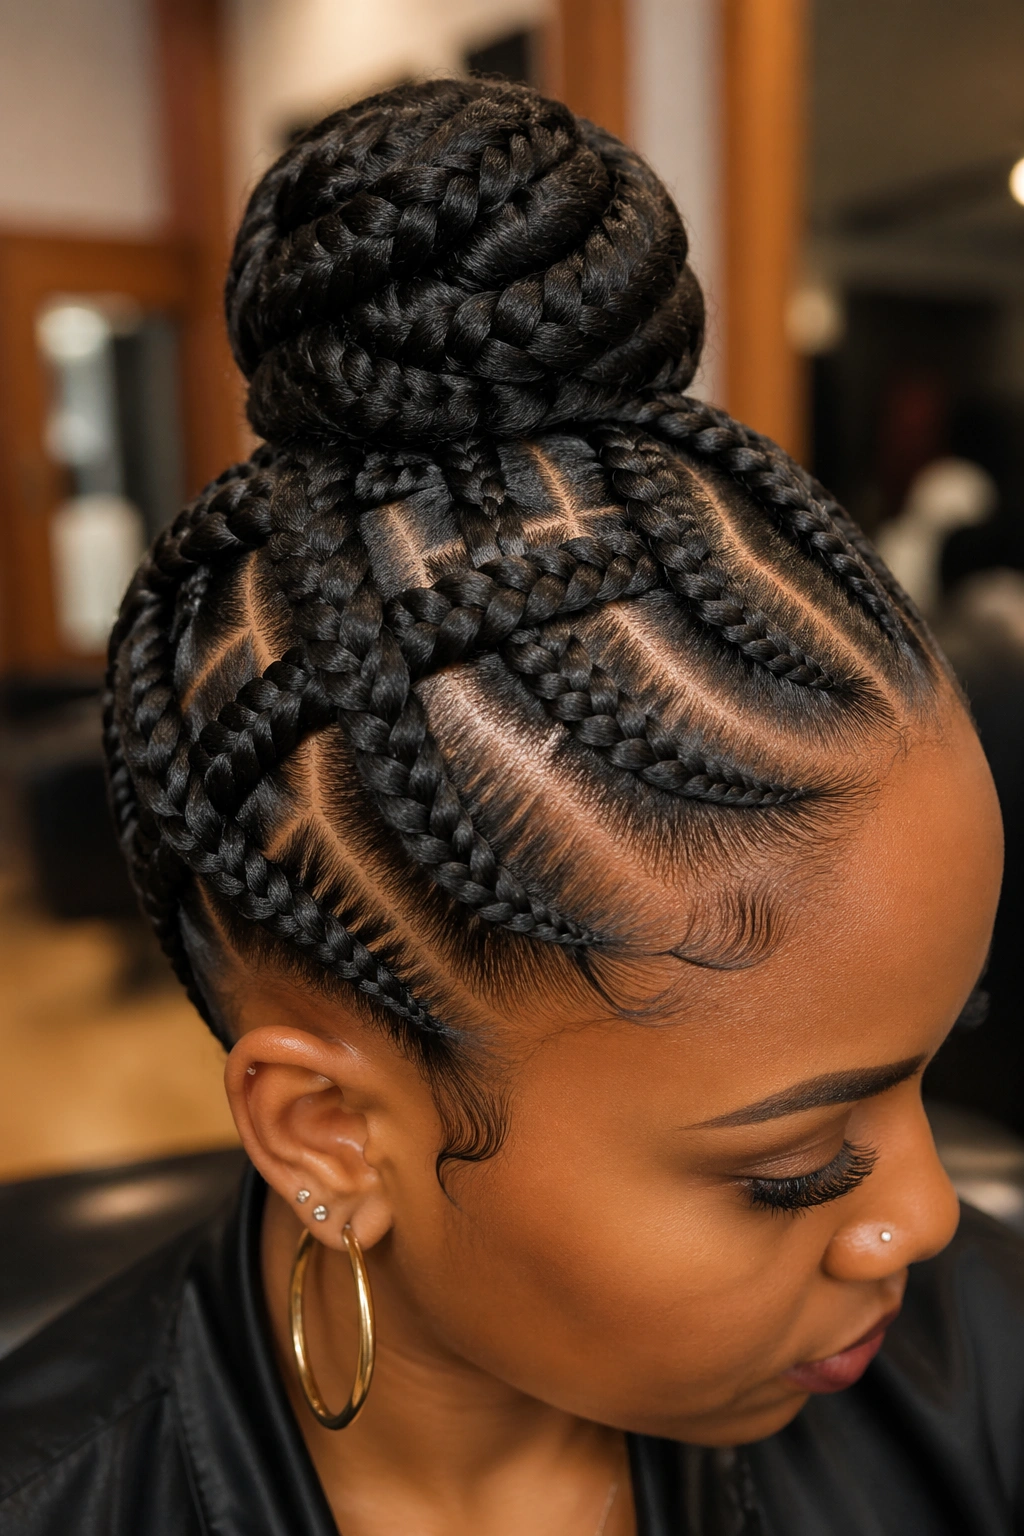
Two to four jumbo cornrows running horizontally across the top get woven over and under two to four jumbo cornrows running vertically up the back. The intersecting pattern creates a basket-weave effect before everything meets at a central point where it’s coiled into a thick, loose knot.
This one takes real planning. You can’t freehand a basketweave — you’ll end up with uneven intersections and a confused pattern. Draw it on paper first. Mark the intersection points on your scalp with a pencil eyeliner before parting.
When it’s done well, the style looks architectural. Worn as a statement, not a staple.
9. Soft Milkmaid Cornrows
What Makes It Different
Two thick cornrows run along each side of the head and meet at the top — or near the top — where they’re crossed and pinned. The look is pastoral, gentle, almost fairytale.
Milkmaid updos usually get done with two-strand twists or loose braids. Doing them with cornrows makes the style hold longer and sit flatter. The curve of the cornrow against the side of the head is more elegant than loose braids because every strand is tucked.
Best for: soft, romantic occasions. Weddings you’re attending, not hosting. Garden events. Any setting where you want femininity without froth.
10. Cornrow Ponytail Updo With Wrapped Base
The cornrows converge at a high ponytail point, but instead of leaving the tail loose, the tail itself gets wrapped around the base to form a disguised bun. A single cornrow from underneath the ponytail gets pulled up and wrapped around the base to hide the elastic.
That detail — the hidden elastic — is what makes the style feel elevated instead of gym-casual. Any cornrow ponytail can be turned into this updo with an extra five minutes at the end.
For 4C natural hair especially, the wrapped base trick disguises any point where the braid base isn’t perfectly clean. Covered is covered.
11. Flat Twist Meets Cornrow Hybrid
One side of the head wears flat twists. The other side wears cornrows. They meet at the center back where they gather into a low bun.
The texture contrast is the whole point. Flat twists have a chunkier, ropier profile than cornrows. Splitting the head into two textures creates dimension on a head that would otherwise be flat from the side.
- Flat twists on the heavier/fuller side of your face.
- Cornrows on the lighter/side you want to minimize.
- Bun placement dead-center, not off to one side.
12. Stitch Cornrow High Bun
Stitch cornrows (sometimes called ridge cornrows) use a stacked, segmented look — each section visible as a little ridge running up the braid. The stitch effect takes longer and requires more precise sectioning, but the visual payoff is significant.
Stacked into a high bun, stitch cornrows create a style that looks like it was draped rather than braided. The ridges catch light. The bun reads intentional. Photographs show depth you can’t fake with smooth cornrows.
Stitch cornrows also hold longer in my experience — the segmented tension keeps each stitch locked rather than letting the whole row loosen at once.
13. Chunky Cornrow Faux Hawk
A handful of thick cornrows — maybe four to six — run upward toward the center of the head where they’re gathered and allowed to fall in a small, almost exaggerated plume. Sides of the head get shaved-look thin cornrows going in the opposite direction.
Unlike a full mohawk updo, the plume at the top isn’t bunned. It’s displayed. The braids are pinned upward but the ends stay loose — curled with a wand or left natural for volume.
Best for: performers, photoshoots, statement nights. Not a subtle style.
14. Heart-Shaped Cornrow Part With Bun
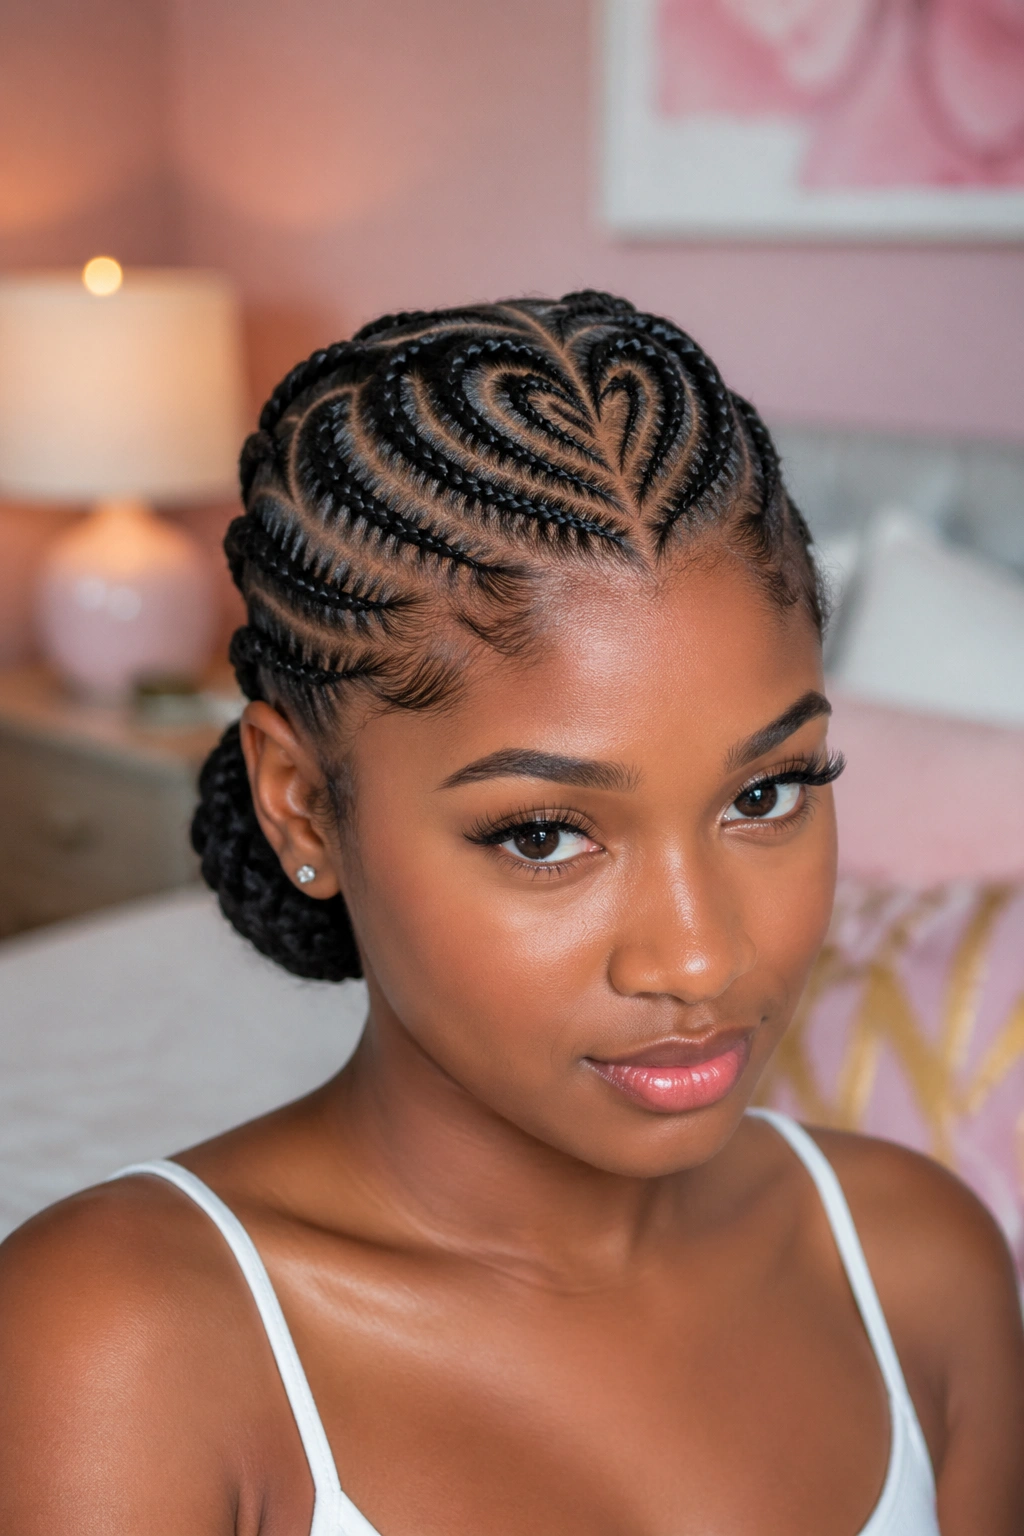
The parting forms a heart shape at the crown of the head. Cornrows feed into the heart’s center point and exit at the nape where they form a low, soft bun.
This one’s a love-it-or-leave-it. The heart shape reads playful, even flirty. If that’s not your aesthetic, skip. If it is — especially for Valentine’s content, birthday shoots, or any softer-themed event — it’s a style that photographs with narrative built in.
The heart lines have to be clean. A sloppy heart looks like an accident. Spend the time on the parting.
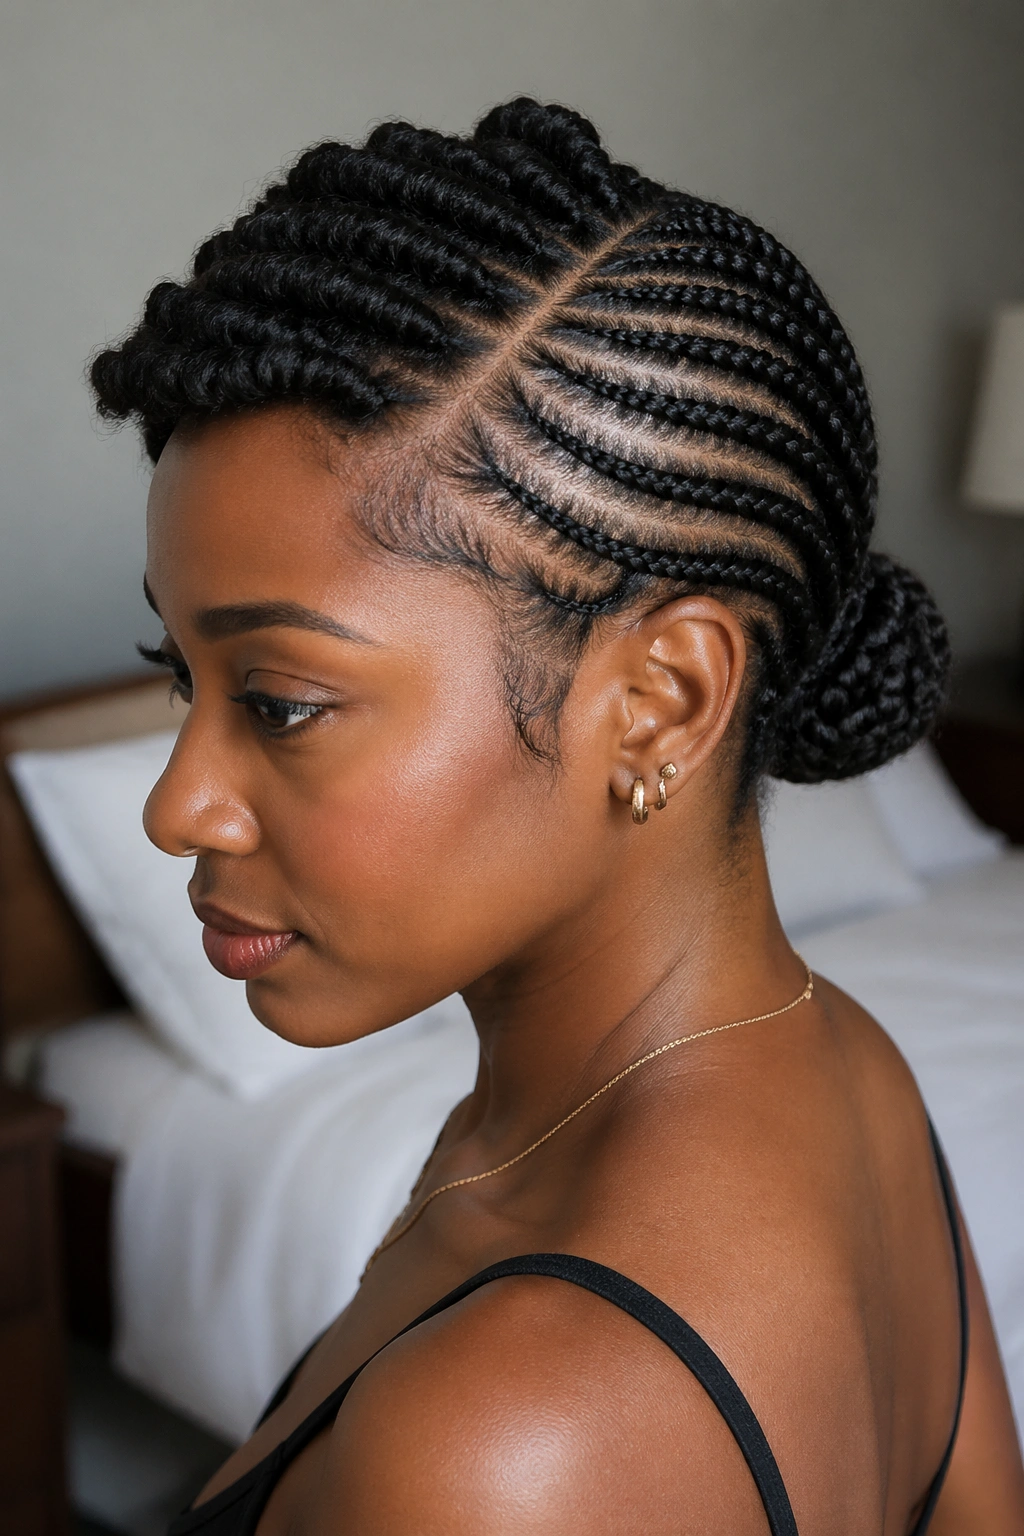
15. Diagonal All-Back Rows Into Loose Nape Nest
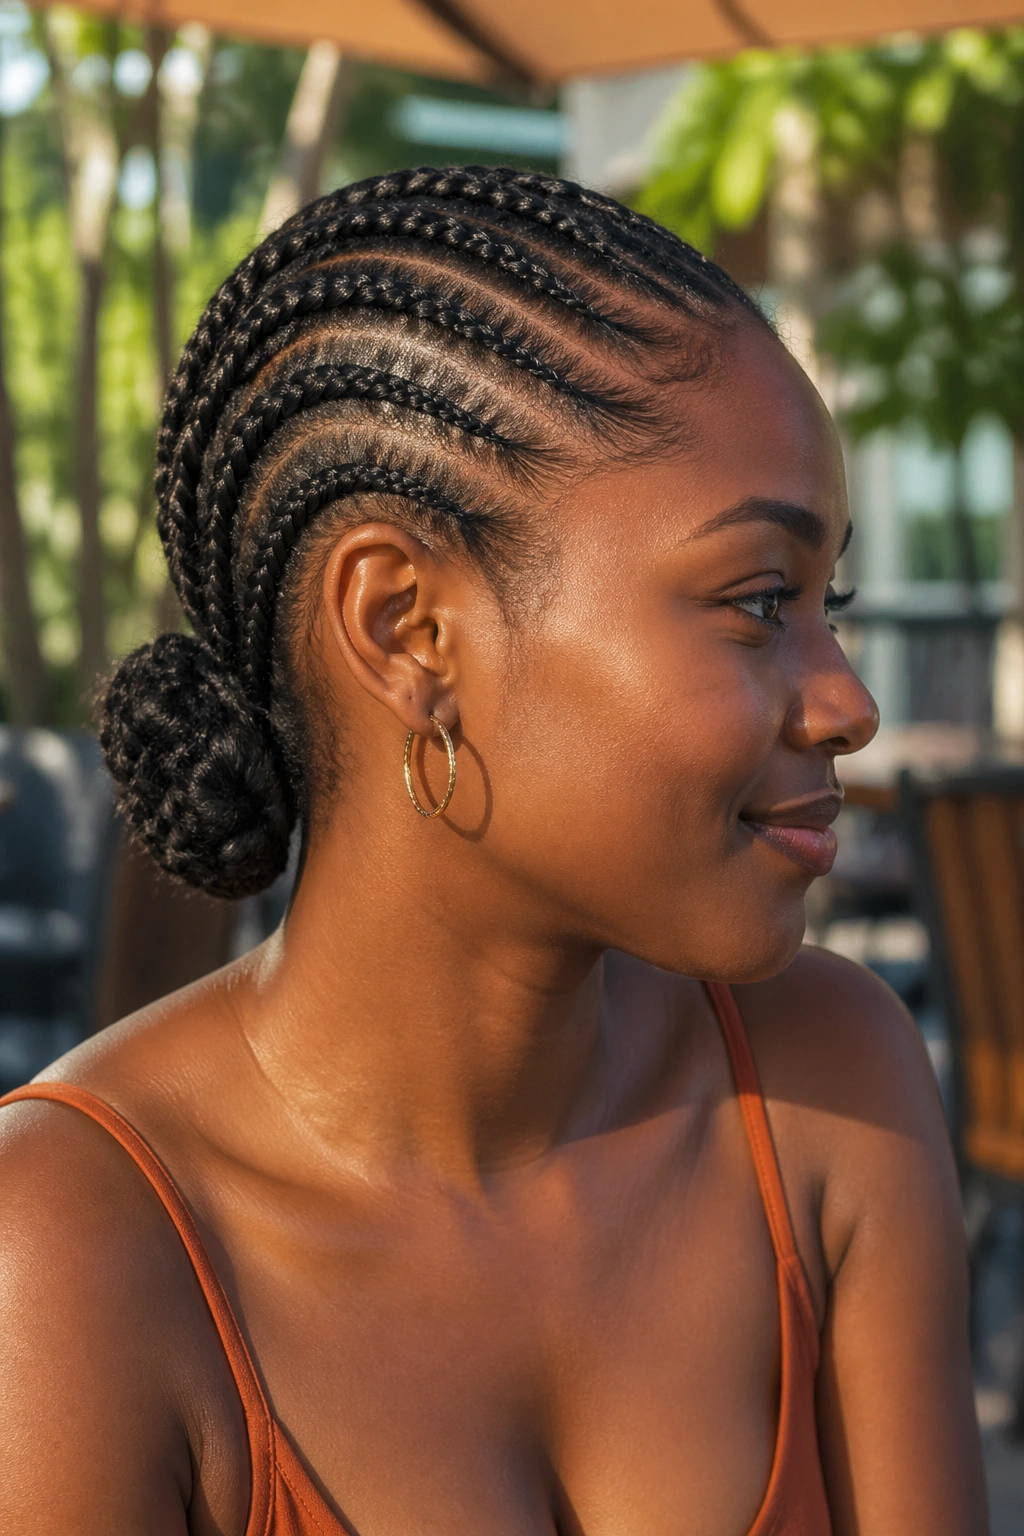
Where standard all-back cornrows run straight from hairline to nape, this version runs all rows diagonally — about 30 degrees off vertical. The ends meet at one corner of the nape where they tuck into a loose, almost spilled nest rather than a tight bun.
The diagonal changes the visual rhythm. Straight rows look regimented. Diagonal rows look styled. The loose nest at the end keeps the finish soft — not every updo has to end in a polished coil.
Good for: casual but intentional looks. Brunch. Creative workplaces. Outdoor events where wind won’t ruin anything because there’s nothing tight to disturb.
16. Cornrow Crown With Curly Tail Out
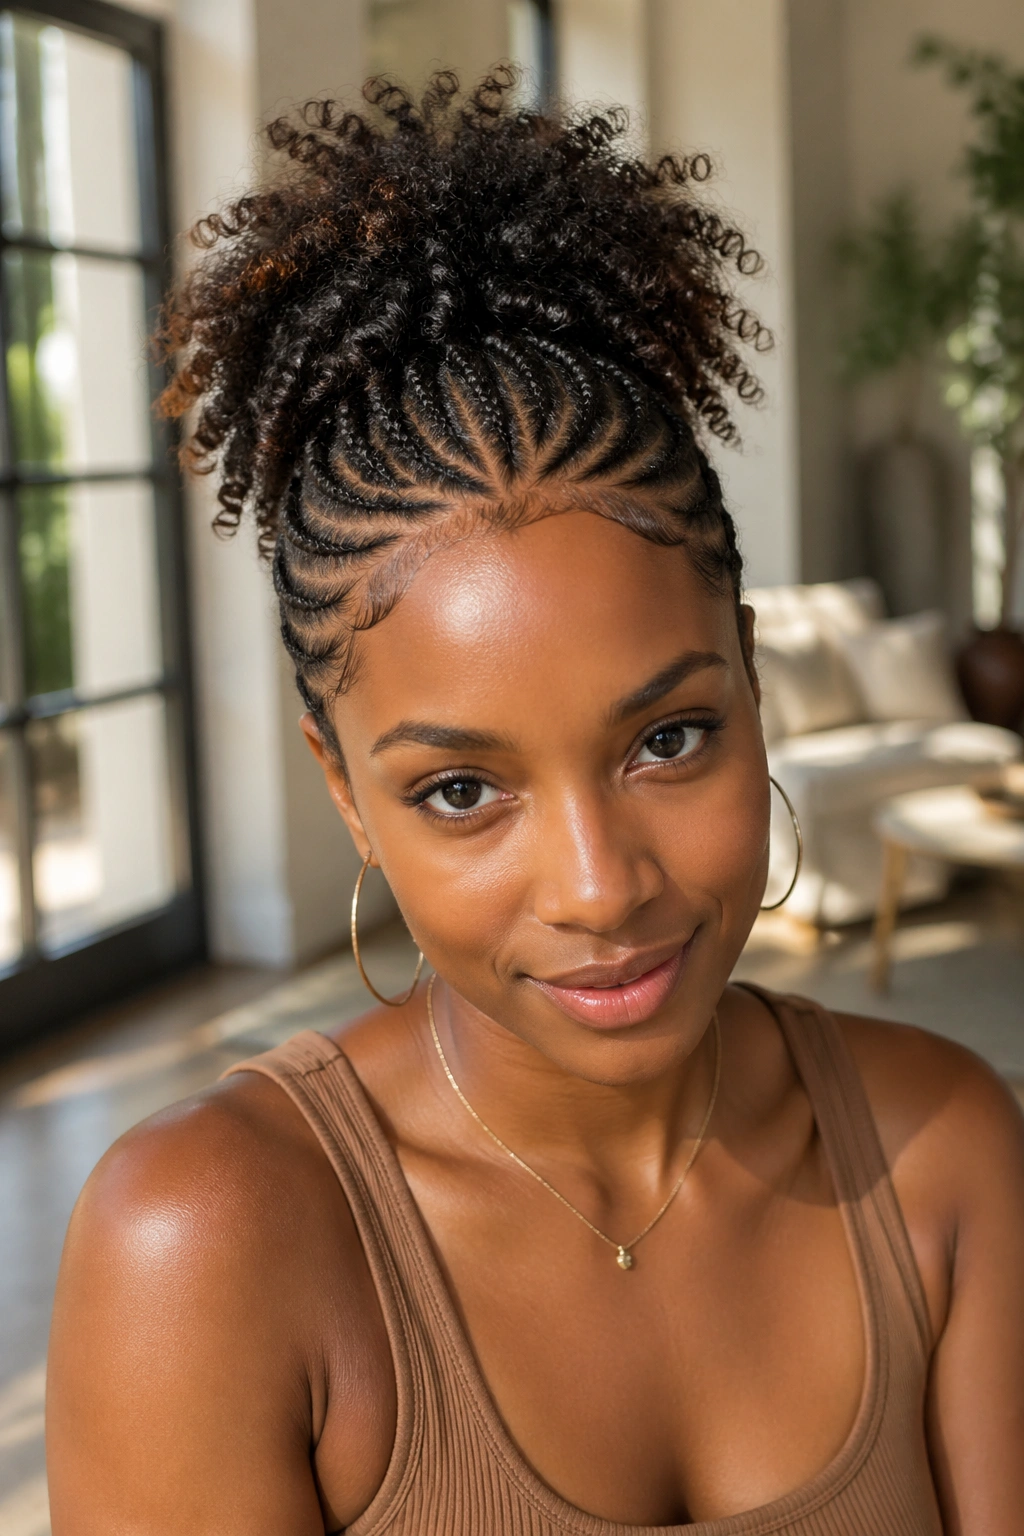
Cornrows from the hairline travel back and meet at the crown where they’re gathered and secured — but instead of tucking the ends, the ends get styled into a curly afro puff or wand-curled section that sits atop the cornrow base.
The contrast is what makes it work. The cornrow base is structured and protective. The puff on top shows off natural texture. You get both — the protective styling of cornrows and the visible celebration of your natural curl pattern.
This style also lets shorter natural hair shine. Even 4-6 inch natural hair pulls a decent puff when the base is cornrowed tight and the ends are moisturized and defined with a curl cream.
17. Beaded Cornrow Crown Braid
Similar to the halo style, but decorated throughout with small beads threaded onto the braid itself. Tiny wooden beads, glass beads, or brass rings spaced every inch or so along the length of the cornrow that traces the crown.
The beads transform the style from understated to ornate. They also add audible motion — the soft click of beads against each other as you move. Some people love that sensory dimension. Some people find it distracting. Try it once to know which camp you’re in.
Beaded styles require extra care during sleep. A satin bonnet large enough to contain the beads without crushing them is non-negotiable.
18. Low Swoop Cornrow Chignon
Four to six cornrows sweep low across the head — not straight back, but almost horizontally — before gathering at a low side chignon. The swoop is dramatic. The chignon is understated.
- Cornrows stay small and uniform — jumbo sizes would overpower the low placement.
- The chignon is flat and wide rather than rounded.
- A side part at the hairline emphasizes the swoop direction.
A practical thought: this style works beautifully with formalwear because the chignon sits below where most high collars and necklines draw the eye. Wear it with turtlenecks, boat necks, or high-necked evening gowns without the braids competing.
19. Cornrow Bun With Scarf Wrap
The cornrow updo is finished as a high or mid bun, then a silk or satin scarf is wrapped around the base of the bun — sometimes tied in a bow, sometimes tucked flat. The scarf isn’t covering the cornrows; it’s accenting them.
Scarf colors matter. Neutral scarves (cream, black, rust) let the cornrows speak. Bright patterned scarves (African wax print, silk florals) make the updo read as a head-wrap-meets-braid hybrid.
This is one of my favorite options for people transitioning between work looks and evening looks. Pop the scarf on for dinner. Take it off for the day.
20. Cornrow Updo With Gold Cuffs
Instead of beads, this version uses metal cuffs — gold, rose gold, brass, silver — threaded onto specific braid ends and pressed closed. The cuffs sit where the cornrows meet the updo, catching light at the most visible points.
Cuff placement is the art. Two cuffs evenly spaced on either side of the bun base reads symmetrical and clean. An asymmetric cluster of three cuffs on one side reads edgy. Scattered cuffs through all the braid ends reads over-styled — use restraint.
Cuffs also let you decorate without committing. Beads have to be threaded before the braid is finished. Cuffs clip on after, and come off in seconds.
21. Cornrow Pompadour With Hidden Bun
Cornrows at the front sweep upward into a lifted pompadour shape. The rest of the cornrows at the back gather into a low bun that sits hidden beneath the pompadour’s volume.
The pompadour is what people see. The hidden bun is what secures the style.
This is structurally one of the harder updos to pull off without a stylist. The pompadour height needs filler — either kanekalon woven in at the base or a hair donut tucked underneath the cornrows before they’re pinned into the lift. Without filler, the pompadour collapses within hours.
Best for photo shoots and formal events where you know a pro is handling install.
22. Elegant Low Cornrow Chignon With Hair Accessory
A simple set of all-back cornrows — six to eight small feed-ins — gathered at the nape into a classic chignon. A single hair accessory (a pearl pin, a vintage clip, a fabric flower, a tortoiseshell comb) placed at the base of the chignon as the finishing touch.
The style itself is restrained. The accessory does the talking. This is the updo I’d pick for corporate events, milestone birthdays, galas where you want your hair to look considered without shouting.
Low cornrow chignons also sit well under hats — if there’s any chance of outdoor formalwear involving a hat, this is the safest cornrow updo for it.
Maintenance Between Install and Takedown
An install holds longer when you treat it right at night.
Satin or silk bonnet, large enough to cover the updo without crushing it. If the bun is too big for a standard bonnet, use a large silk scarf tied loosely rather than compressing the shape with something too small.
Scalp moisture matters. A lightweight scalp oil — jojoba, grapeseed, argan — applied every 3-4 days with a dropper directly to the parts keeps the scalp from drying out and cracking. Don’t overdo it. Heavy oils on the braid itself make the style slip.
Avoid water for the first 48 hours. After that, you can refresh by misting with a diluted leave-in conditioner mix — more spray bottle, less product.
Scalp Care Under Cornrow Updos
Updos sit close to the scalp, which means any buildup, flaking, or dryness gets trapped. A weekly diluted apple cider vinegar rinse (1 tablespoon ACV in a cup of water) sprayed along the parts and blotted with a microfiber cloth handles buildup without soaking the braids.
For itch — which is the most common complaint — peppermint or tea tree oil diluted in a carrier oil gives fast relief. Apply with a dropper to the parts, not the braid length.
If the scalp starts to feel tight in the first 24 hours, that’s tension, not buildup. Hot compresses (a warm, damp towel pressed gently against the scalp for 5-10 minutes) can ease the pressure. Persistent pain means the install was too tight and a professional should evaluate.
Takedown Without Damage
Set aside real time. A full cornrow updo takedown done carefully takes 1-2 hours. Rushed takedowns break hair.
Start with a heavy, slip-rich conditioner or an oil-based detangler worked into each braid from tip to root. Let it sit 10-15 minutes before unpinning.
Unpin the updo shape first. Lay the braids flat. Then unravel each cornrow from the tail toward the scalp — the opposite direction from how it was braided. Fingers work better than combs for this stage. A comb pulls and breaks.
Once all cornrows are down, detangle in sections under running water with a wide-tooth comb. Do not dry-detangle. Wet detangling with conditioner saves strands you didn’t know you’d shed.
Choosing the Right Style for Your Face and Hair
Face shape first. Long faces balance under low buns and side placements. Round faces elongate under high crowns and vertical parting patterns. Square faces soften under diagonal and curved lines. Heart-shaped faces carry low chignons especially well.
Hair length second. Shorter naturals (4-8 inches) do best with styles that incorporate feed-in extensions for the bun portion — you need material to coil. Mid-length (8-14 inches) opens up the full range. Long naturals (14+ inches) can carry any updo but also benefit from styles that use the extra length — like wrapped buns where the tail does decorative work.
Occasion third. Everyday protective — go simple, low, and classic. Formal events — go crown, halo, or beaded. Photo-heavy events — go sculptural, with strong parting and defined lines.
Common Mistakes That Ruin Cornrow Updos
Parting in a hurry. A rushed parting job shows up in every photo and can’t be fixed without redoing the install. Spend the time upfront.
Too much product. Cornrow updos rely on friction — the grip between the braid and the scalp. Heavy butters and oils sabotage that grip. Use light leave-ins and minimal edge gel.
Tension spikes at the hairline. Front cornrows that pull too tight lead to breakage, bumps, and the early stages of traction alopecia. If you feel sharp pain in the first hour, loosen before the style sets.
Pinning the bun with too few pins. An updo bun needs anchoring in 4-6 places minimum, spaced around the base. Two pins in one spot and nothing on the other side guarantees a sagging bun by hour six.
Sleeping without proper coverage. One unprotected night on a cotton pillowcase can lift edges that took an hour to lay. Satin bonnet or silk pillowcase — pick one.
Ignoring the scalp. Cornrow updos are only as healthy as the scalp underneath. Weekly cleansing, regular moisturizing, and honest listening to what your scalp is telling you decides whether your next install goes in on healthy ground or stressed, tender skin.
Get those pieces right and a cornrow updo isn’t just a style — it’s a multi-week wardrobe that works as hard as you do.