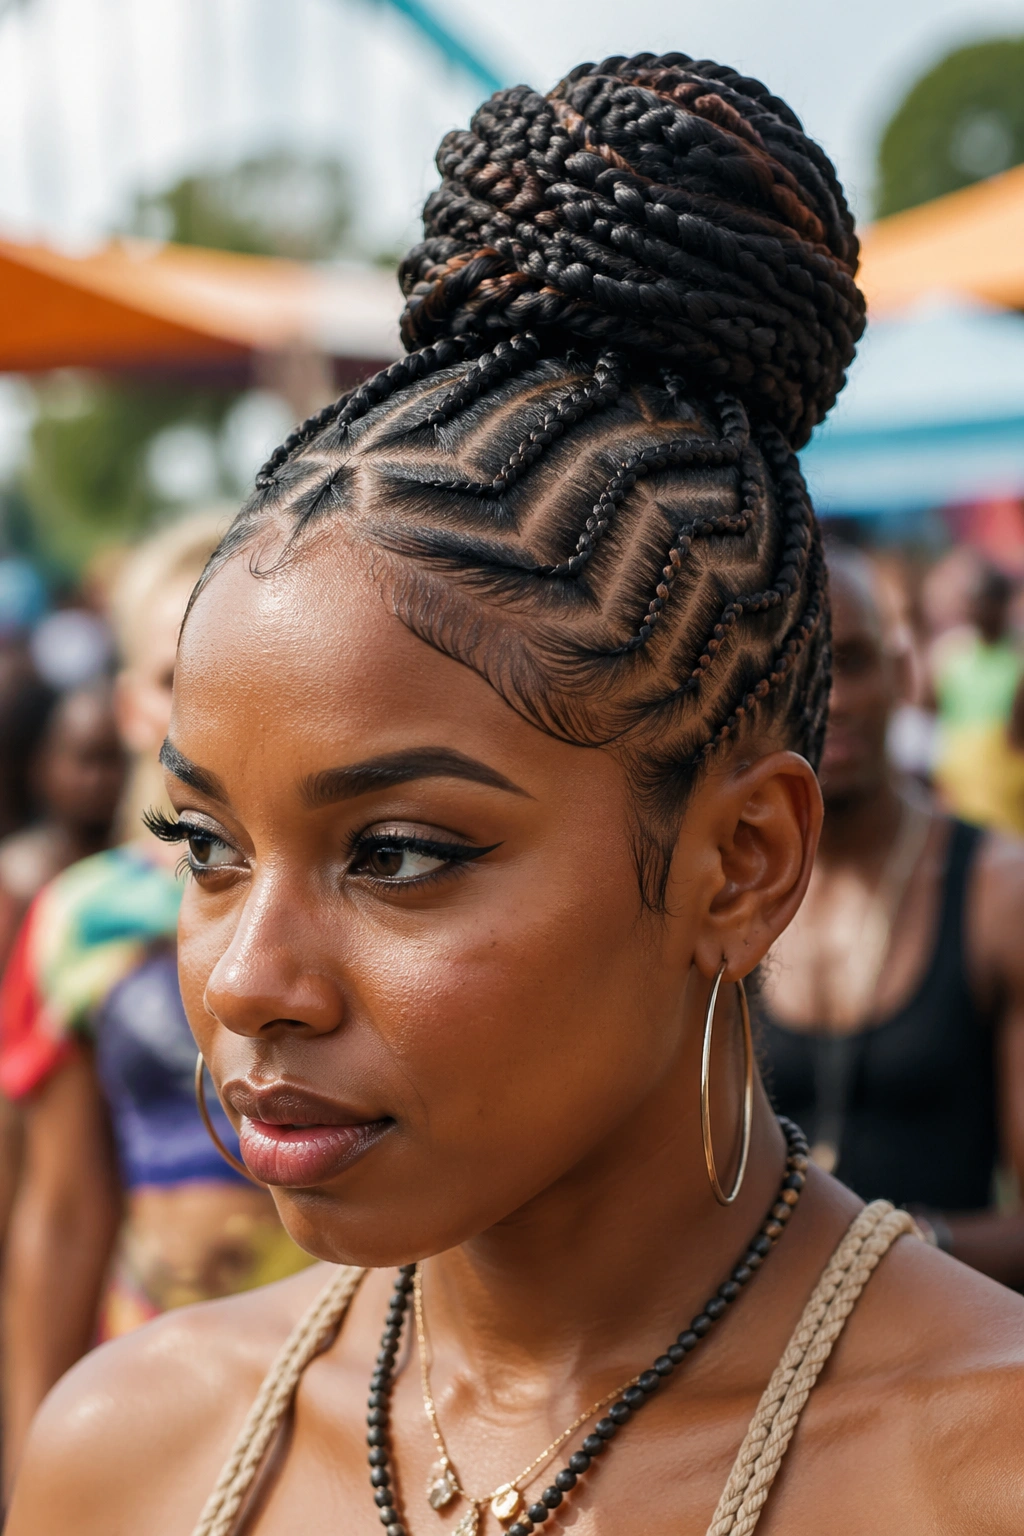
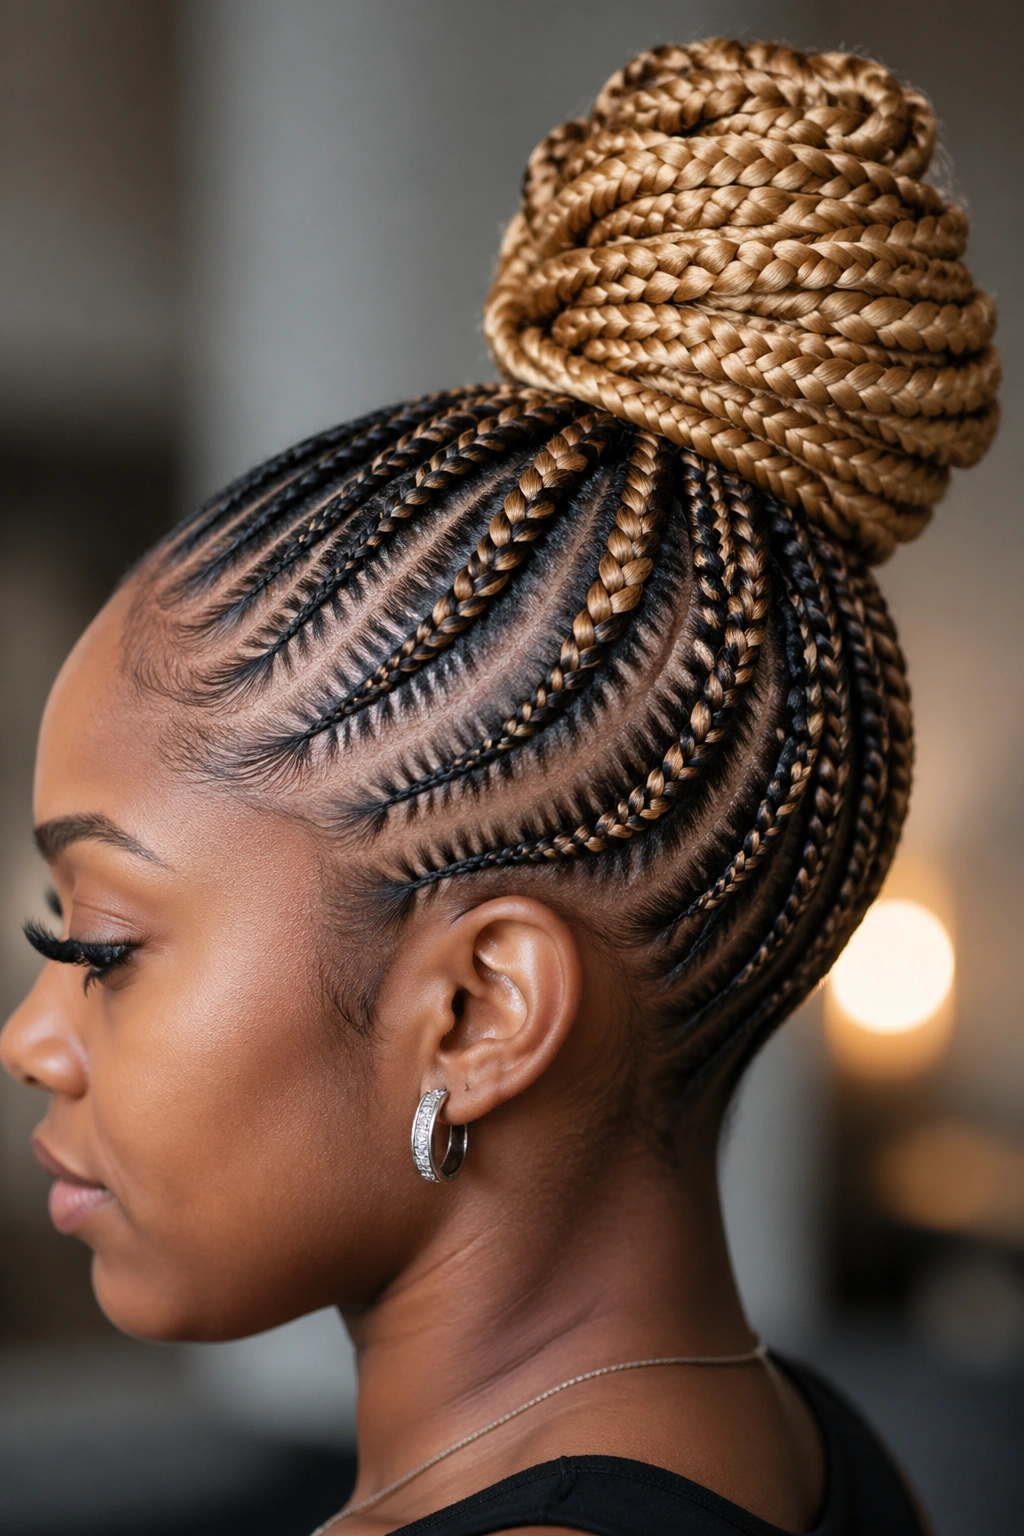
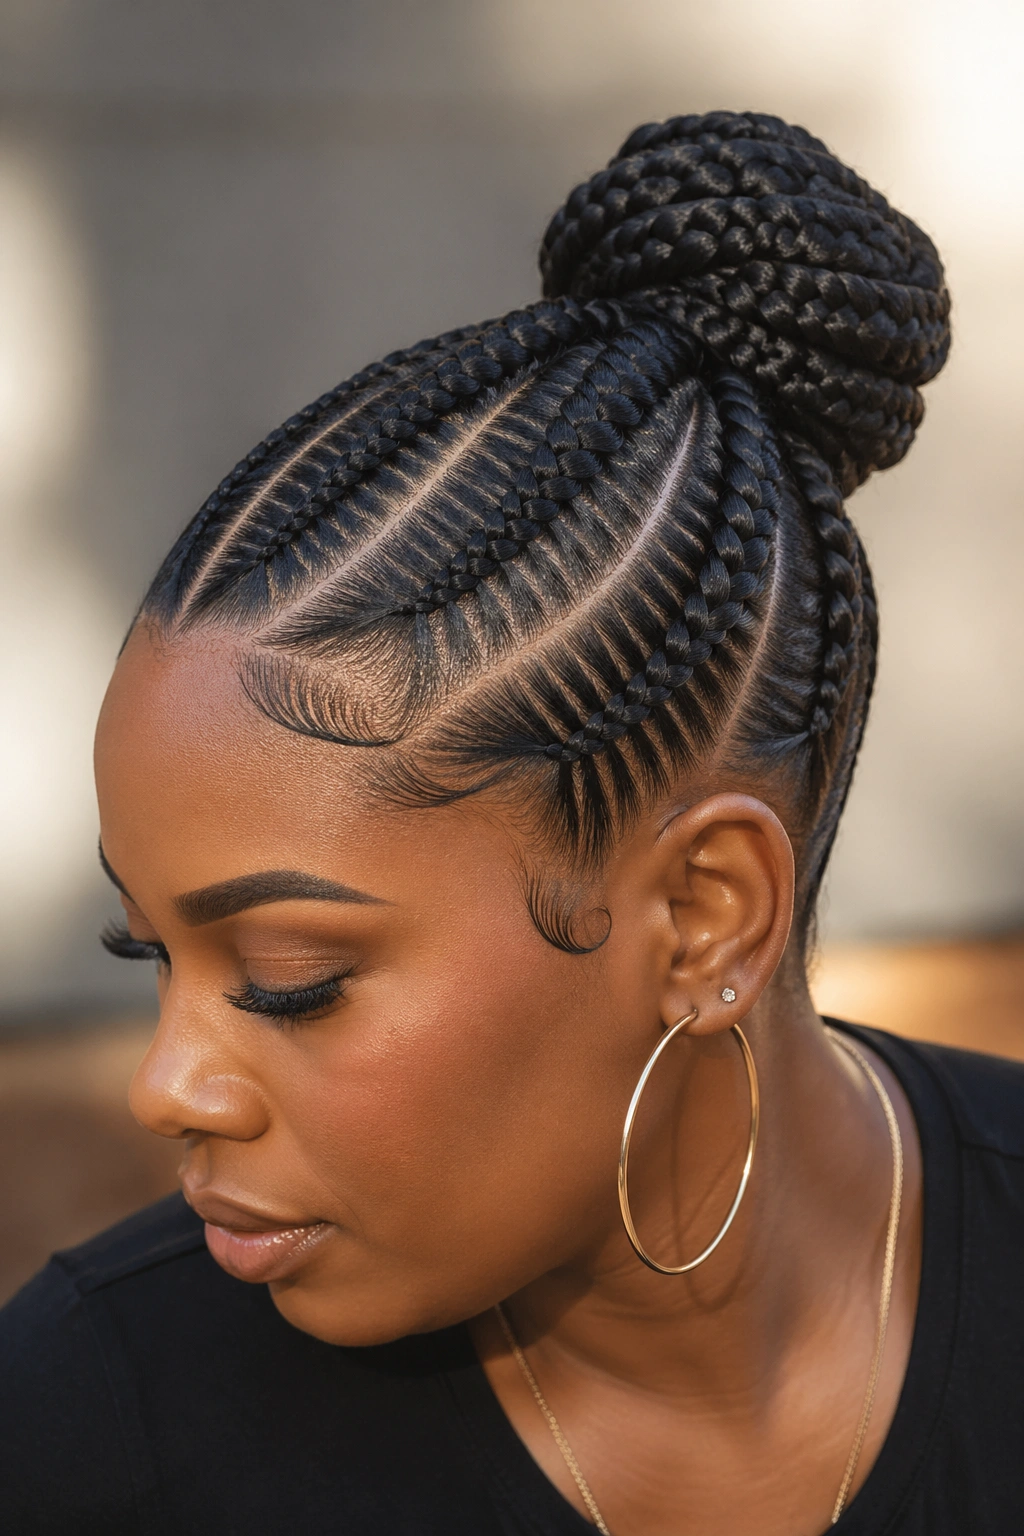
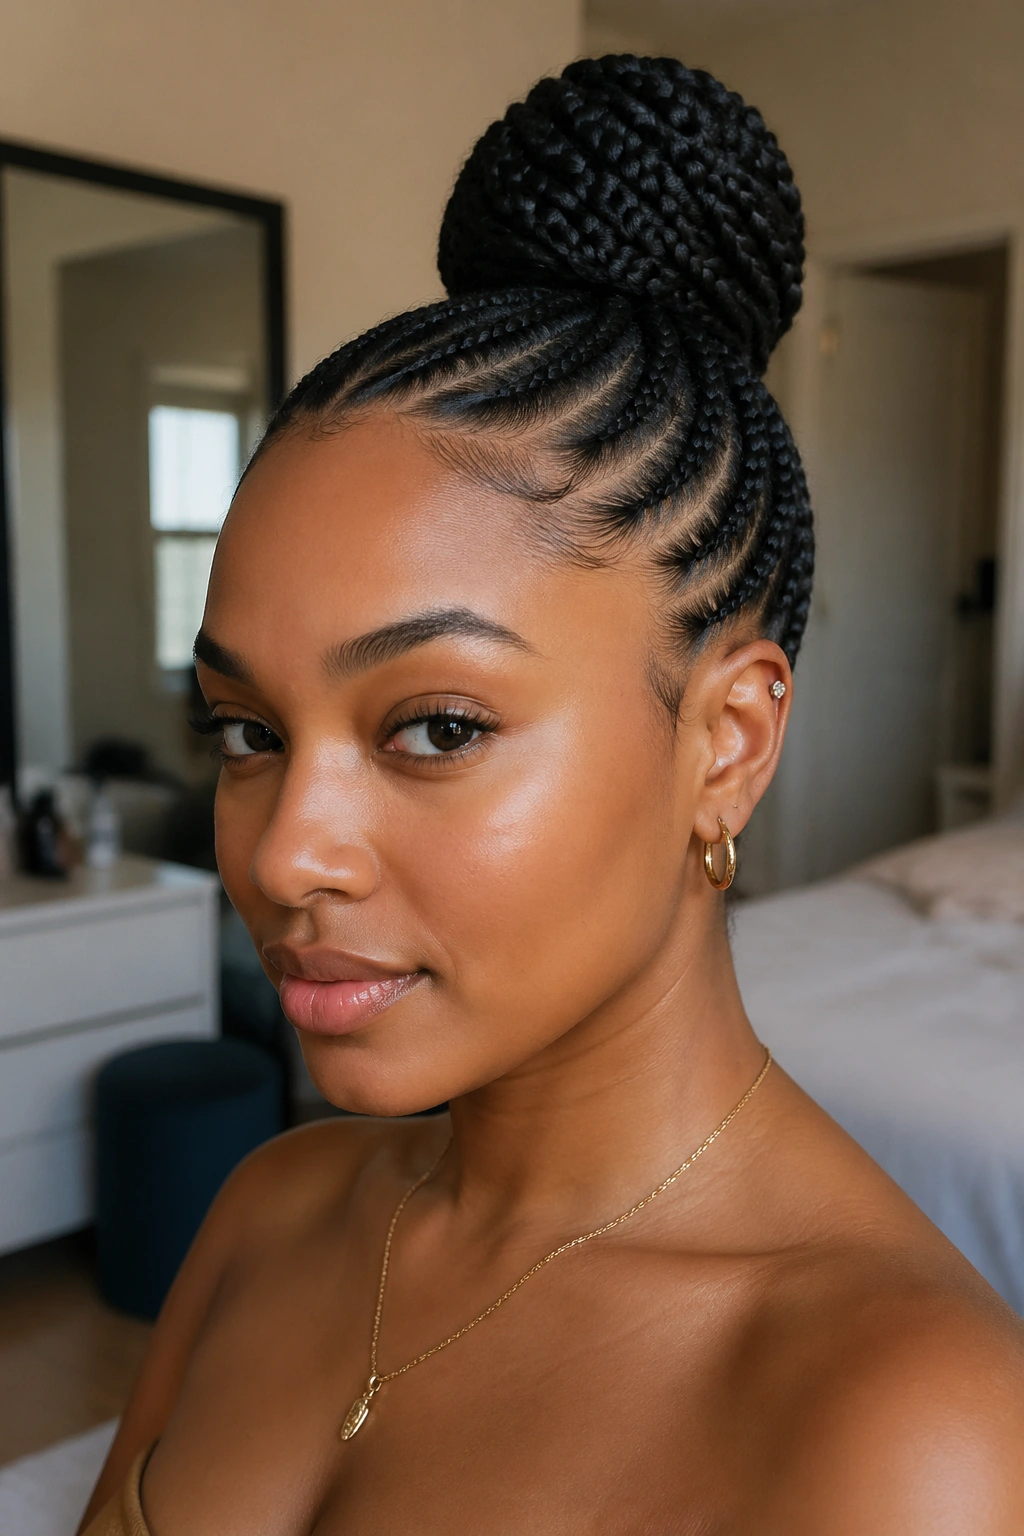
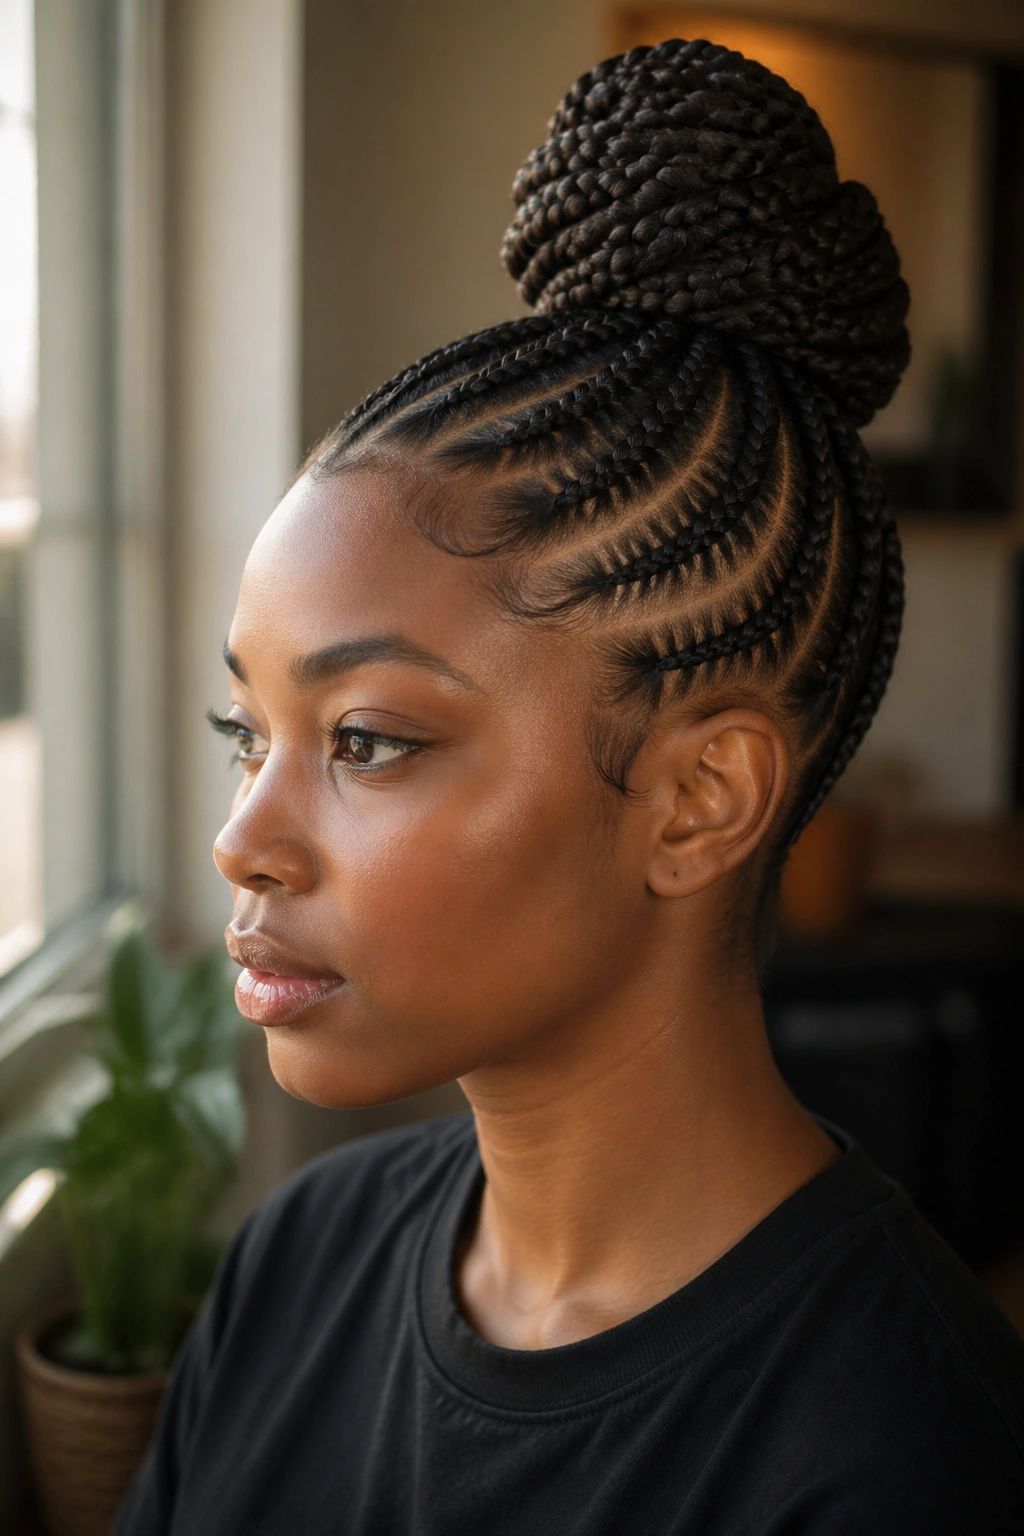
Feed-in cornrows paired with a bun are what I reach for when I want my hair up and out of the way but still want the look to feel finished. The braids themselves lie tight against the scalp, and the loose ends gather into a sculpted shape at the back, crown, or side of the head. That combination gives you the grip of a protective style with the polish of an updo, and it holds up through humidity, workouts, and sleep in a way that freehand buns never do. Feed-in cornrow bun styles have earned a permanent spot in my rotation because they genuinely deliver on both fronts.
The appeal is practical before it’s aesthetic. A feed-in cornrow bun tucks your ends away, shields the most fragile part of your hair, and buys you one to three weeks of wear depending on how carefully you maintain it. The bun itself can be big, small, sleek, messy, high, low, doughnut-wrapped, or wrapped in wet-look extensions — which is why the category holds so many variations without ever feeling samey.
Why the Feed-In Method Changes Everything About a Bun
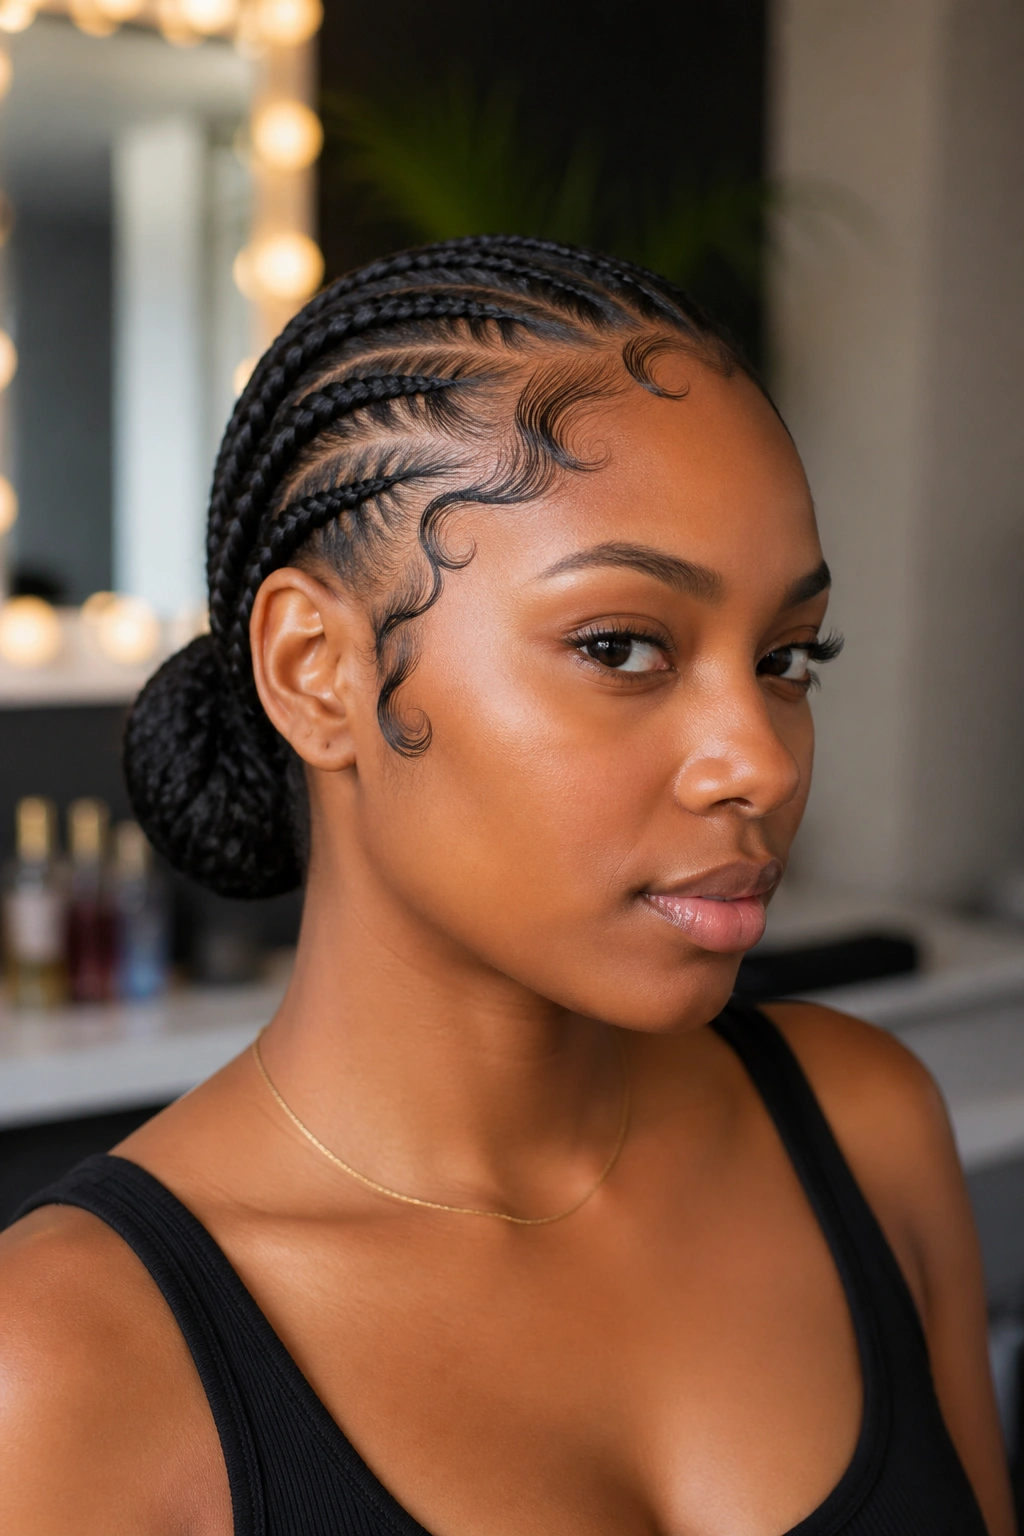
Feed-in cornrows differ from standard cornrows in one specific way. Instead of gripping a thick wad of kanekalon at the start of the braid, you begin with your natural hair and add tiny slivers of extension every half-inch or so as you go down. That progression creates a braid that looks impossibly thin and flat at the hairline, thickens gradually, and never pulls the edges. The result is less tension, less breakage, and a braid that actually blends into the scalp instead of sitting on top of it.
When that braid gets pulled into a bun, the flat base matters even more. A sleek bun needs a sleek foundation. Bumpy, thick starts at the hairline translate to a lumpy finish at the crown, and no amount of edge control saves that. Feed-ins give you the smoothness the silhouette needs.
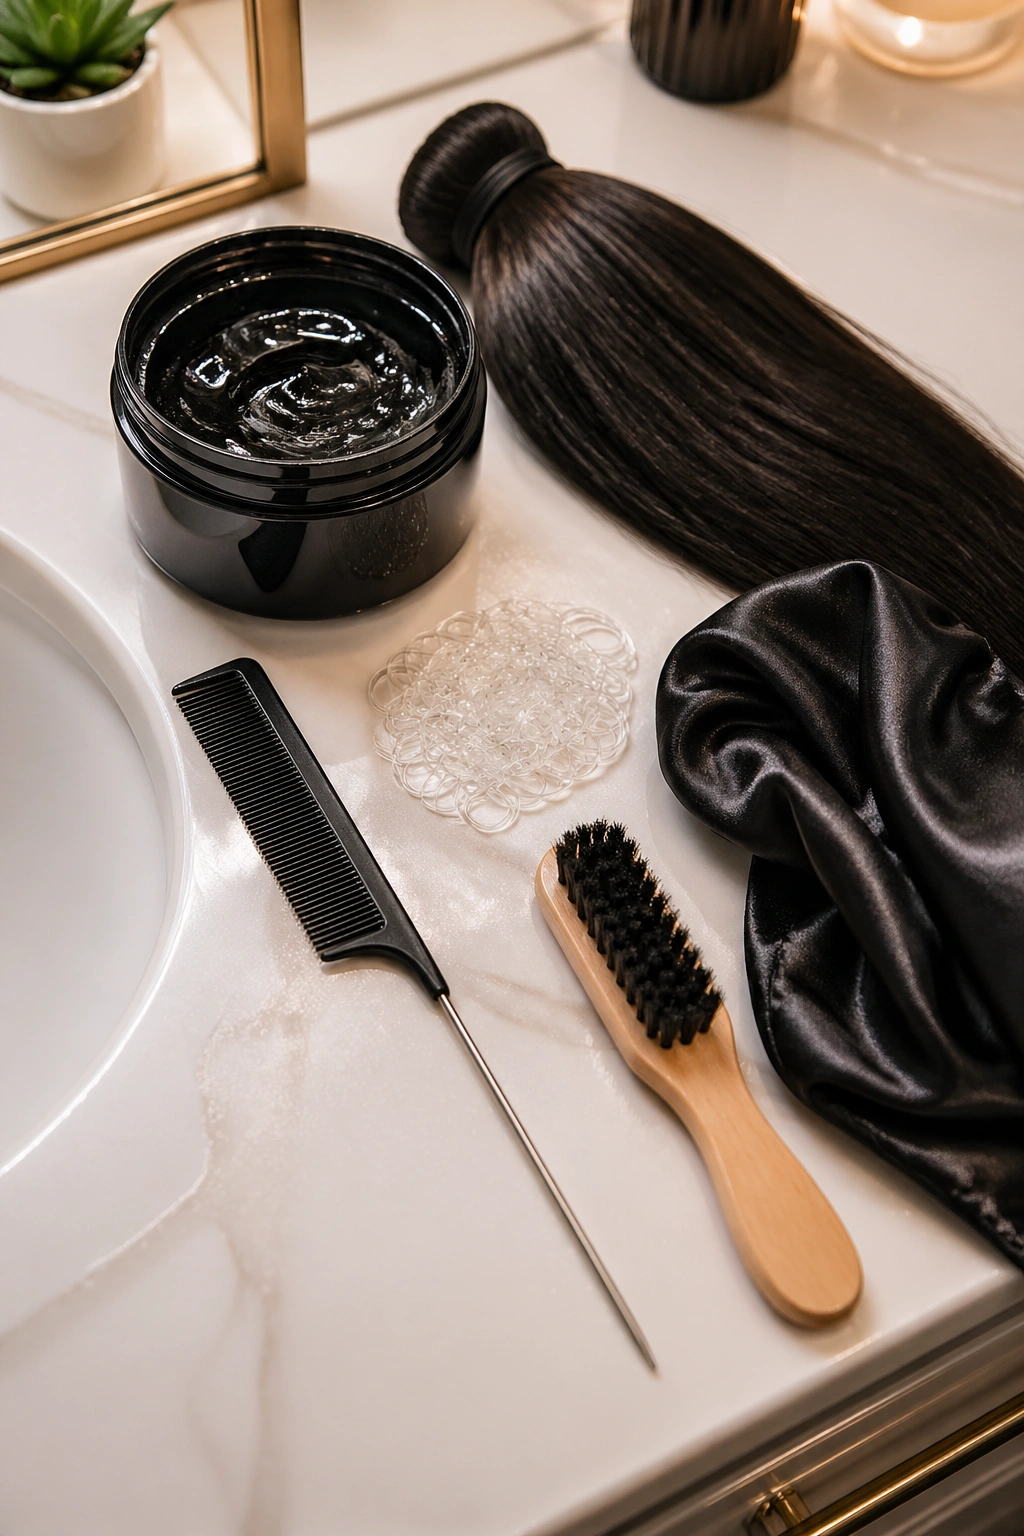
The Tools That Actually Matter
You don’t need a full salon setup, but skipping the basics costs you in finish quality. Here’s what I keep on the counter before I start.
- A rat-tail comb with a metal tip — plastic tips bend and snap on thick 4C hair.
- A jar of edge gel that’s thick enough to stand up in the container, not runny.
- Kanekalon hair pre-stretched, trimmed into graduated lengths for the feed-in.
- Rubber bands (small clear or black) for securing tails before the bun.
- Hot water in a kettle if you’re sealing ends.
- A soft-bristle brush for smoothing baby hairs.
- A satin scarf for laying edges during set time.
Tip: Pre-stretched hair makes a real difference. Untreated kanekalon has a slight crimp near the top that creates fuzz at the base of the feed-in. Pre-stretched lays flat from the first stitch.
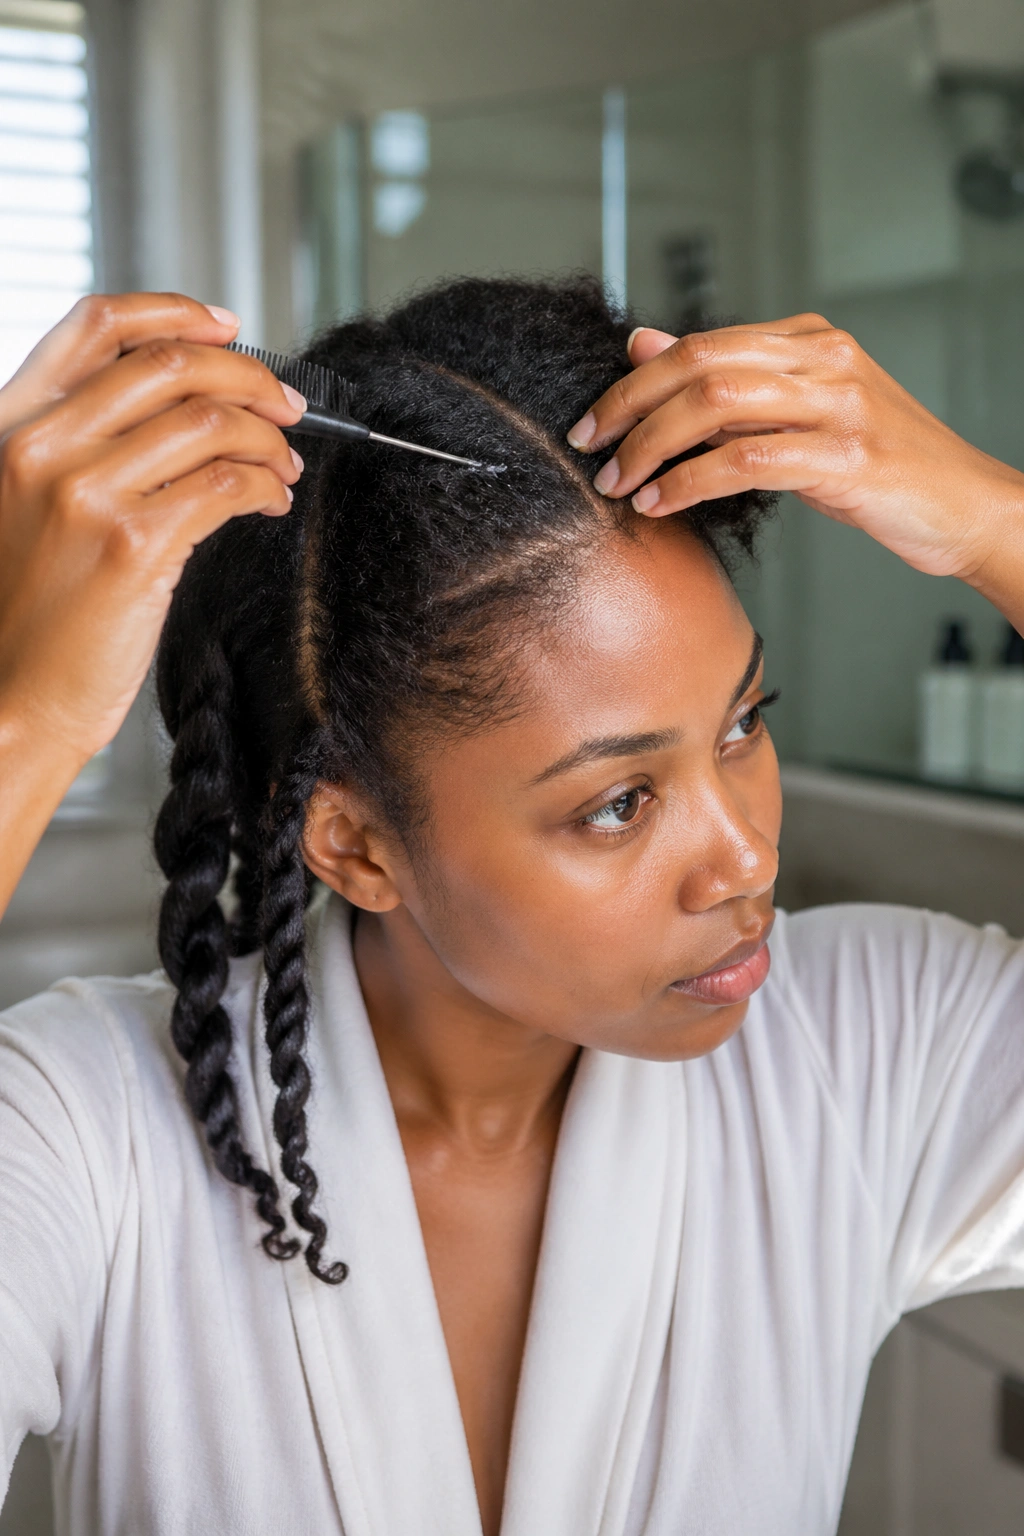
Prep Work That Pays Off Later
Going into a feed-in style with tangled, dry hair is a setup for a rough take-down two weeks later. The night before, I wash with a sulfate-free shampoo, deep condition for 30 minutes with heat, and air-dry to about 80% before stretching the hair with loose twists or a blow-out on cool. The goal is clean, moisturized, manageable hair — not hair loaded with heavy products that will flake under the braid.
Morning of, I part clean sections with the rat-tail comb, smooth each one down with a light leave-in, and only apply edge gel at the hairline where I actually need hold. Gel inside the braid makes it crunchy and cuts lifespan.
How Long a Feed-In Bun Really Lasts
Honest answer? Seven to fourteen days if you sleep with a satin bonnet and don’t sweat heavily every day. Push to twenty-one days only if the style was installed tight but not brutal, you wrap nightly, and you refresh the bun every third day. After that, the hairline starts to fuzz, the bun loosens, and the whole thing reads worn rather than worn-in.
I pull mine down at the fourteen-day mark most times. The scalp needs the breather.
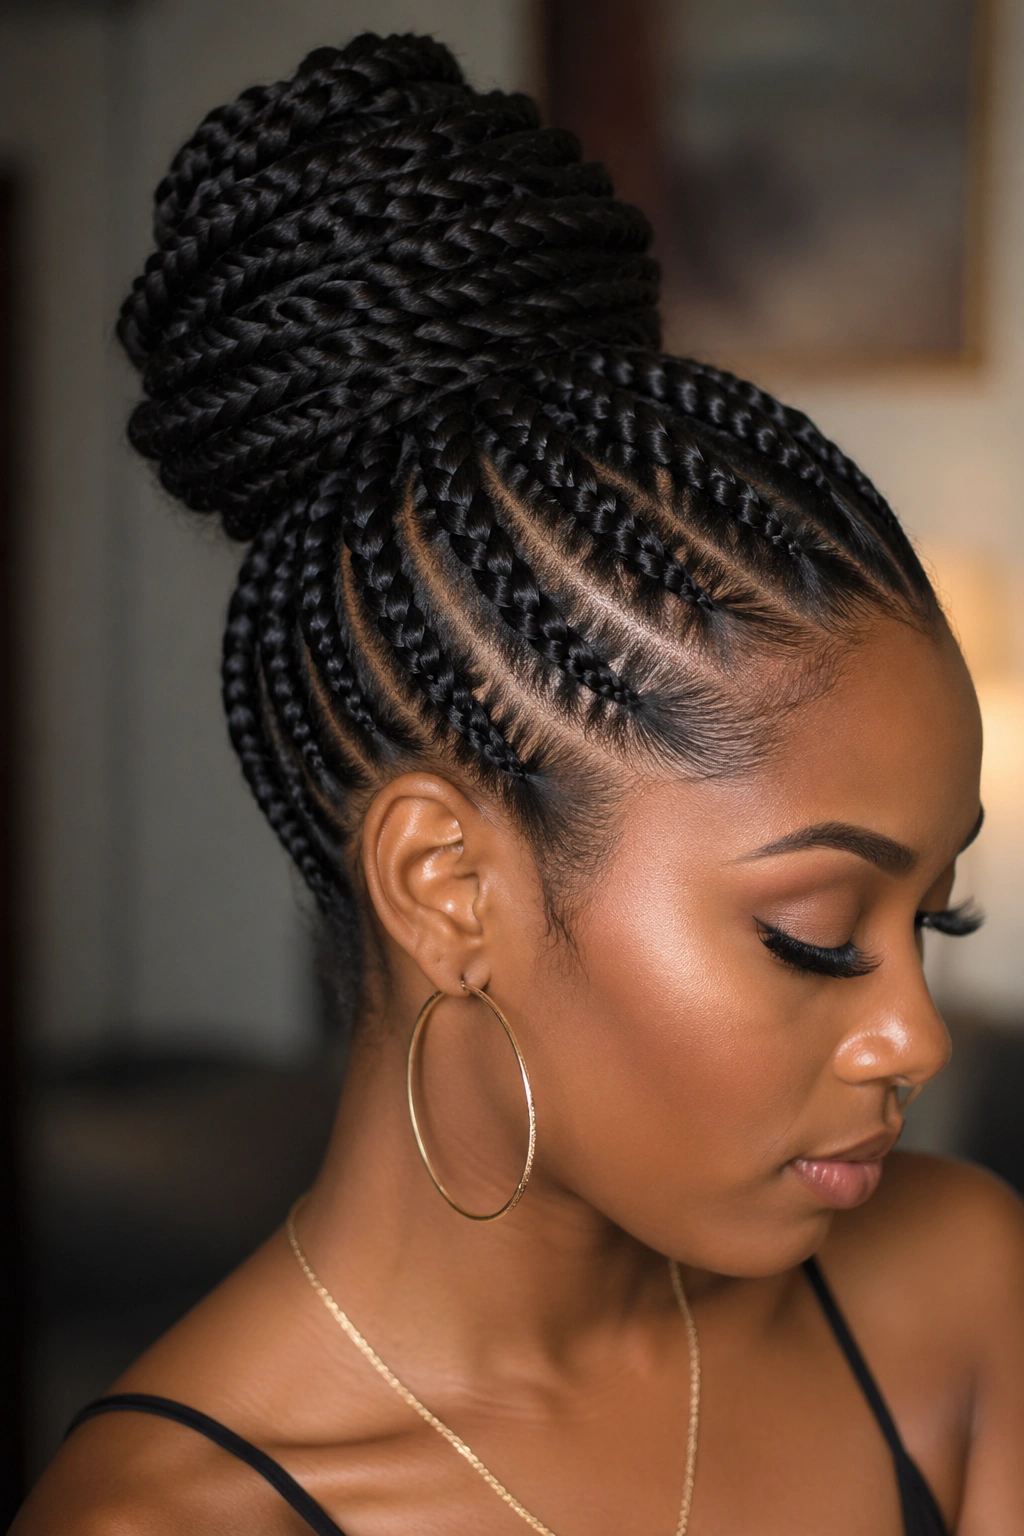
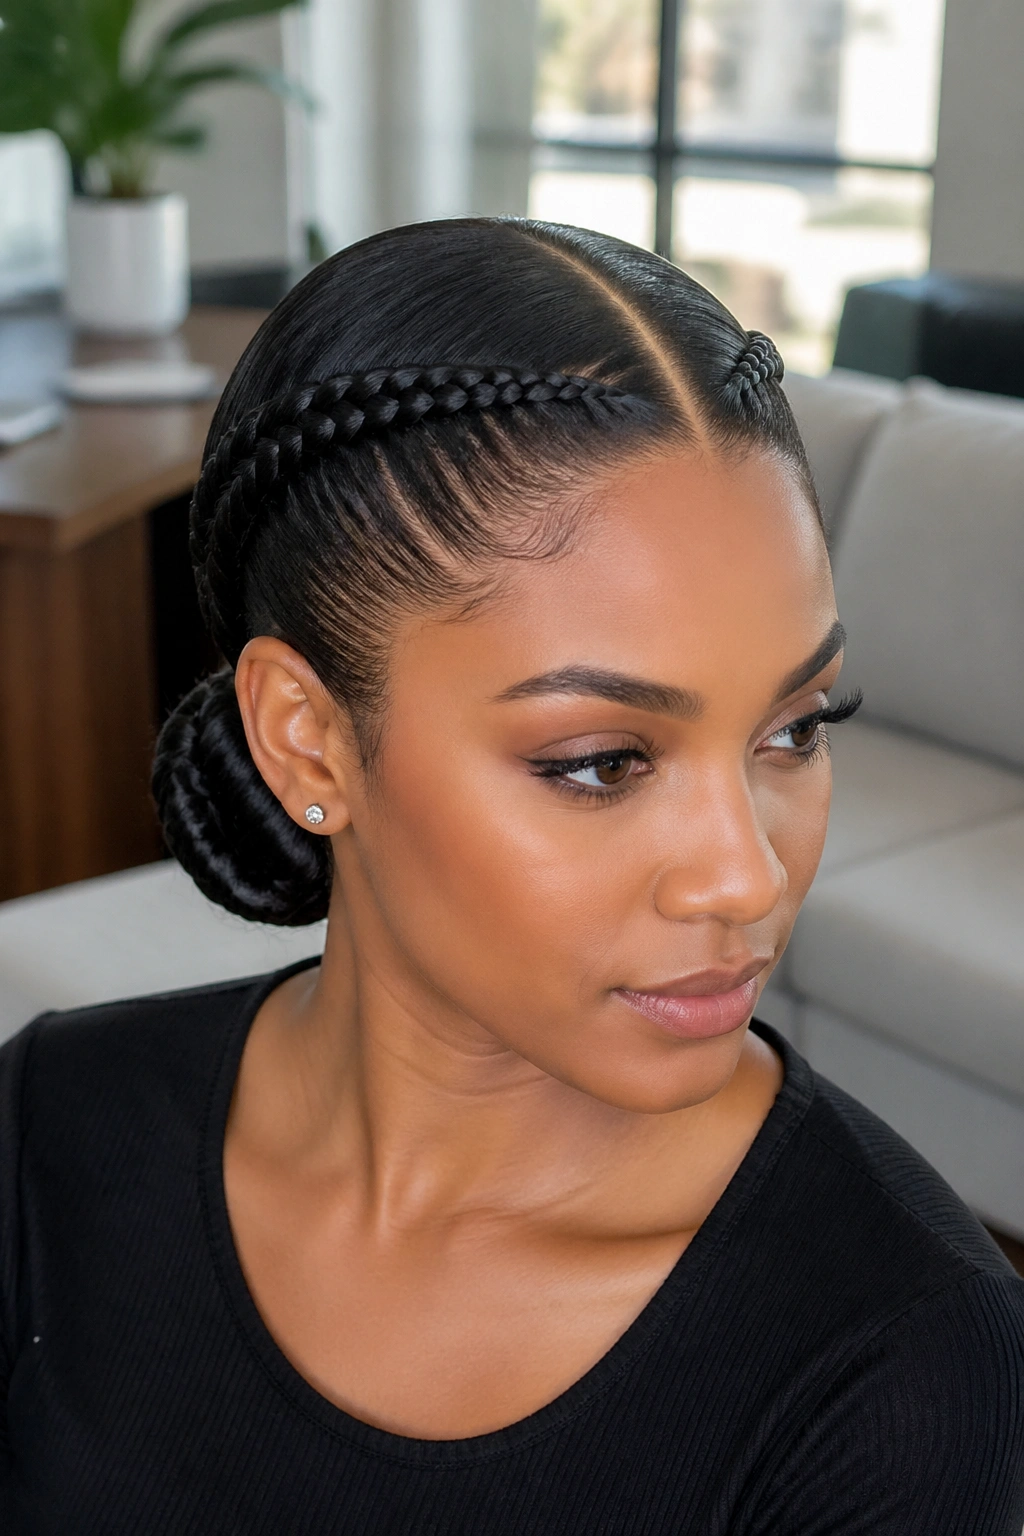
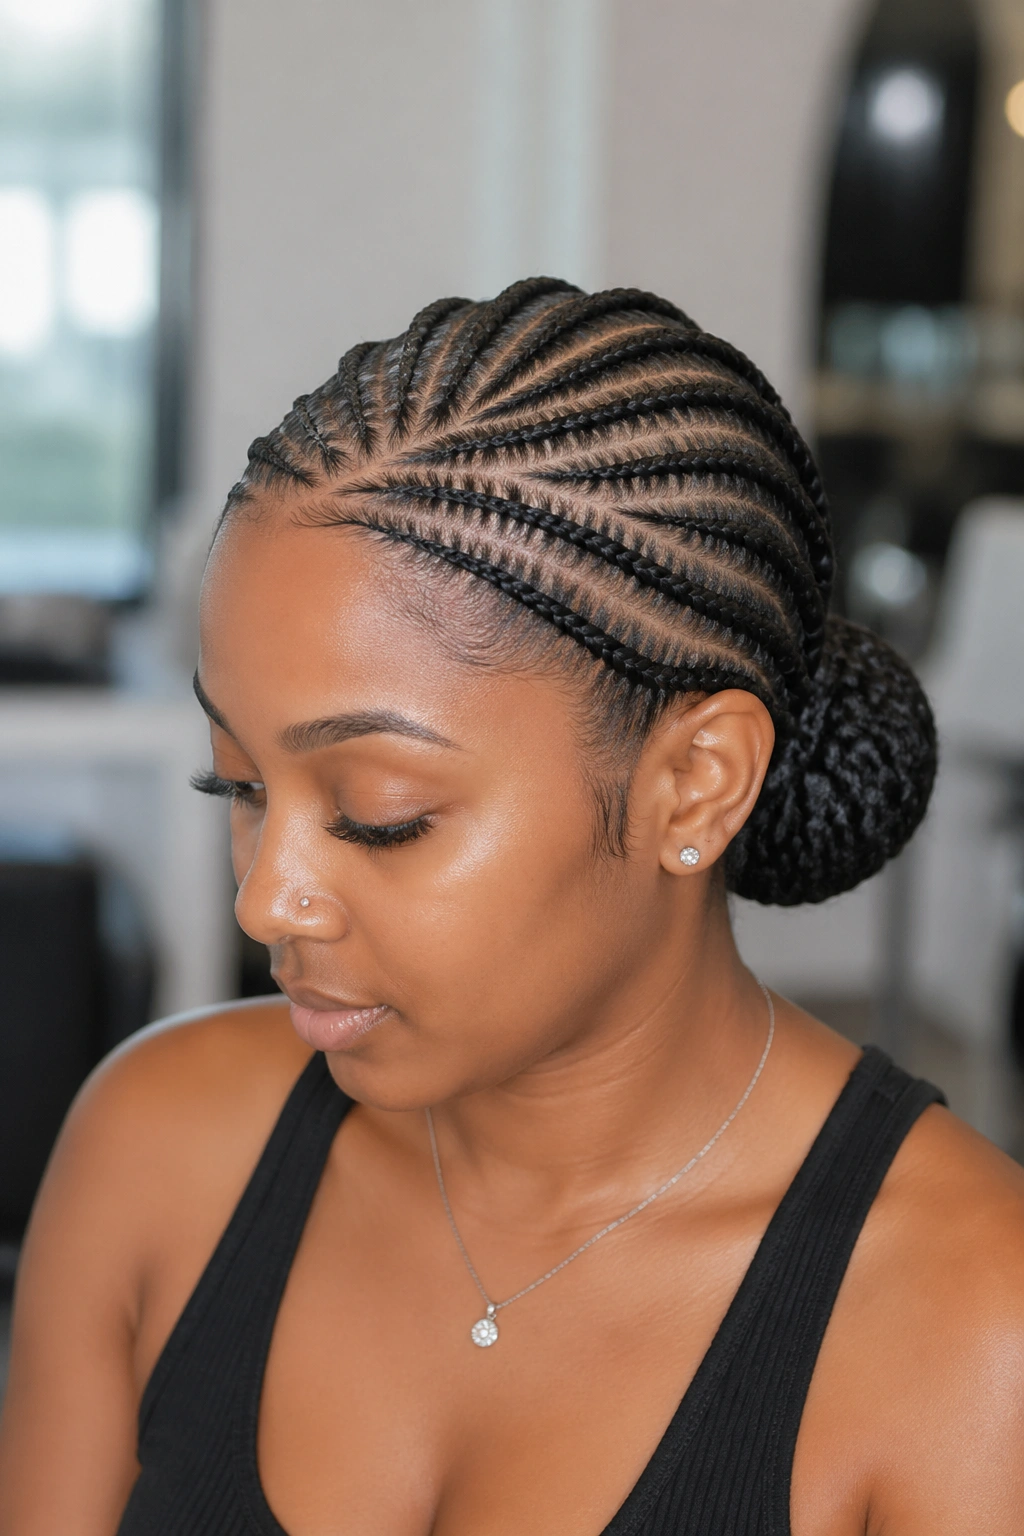
1. Sleek Low Bun with Center Part
Two clean feed-ins run from the center part straight back, meeting in a low, tight bun at the nape. The whole look photographs like a ballerina bun — smooth surface, sharp parting, nothing out of place. It’s the cornrow bun I recommend to anyone who wants to test the style without committing to anything bold.
Why It Works
The center part is so clean it does most of the visual work. You don’t need added accessories, statement edges, or volume anywhere. Two braids down the back, ends gathered low, wrapped tight.
- Best for: corporate environments, interviews, weddings where you’re a guest.
- Install time: roughly 1.5 to 2 hours.
- Lasts: 10-14 days with nightly wrap.
Tip: Use clear gel on the part itself, not just the edges. Runs a razor-sharp line down the scalp.
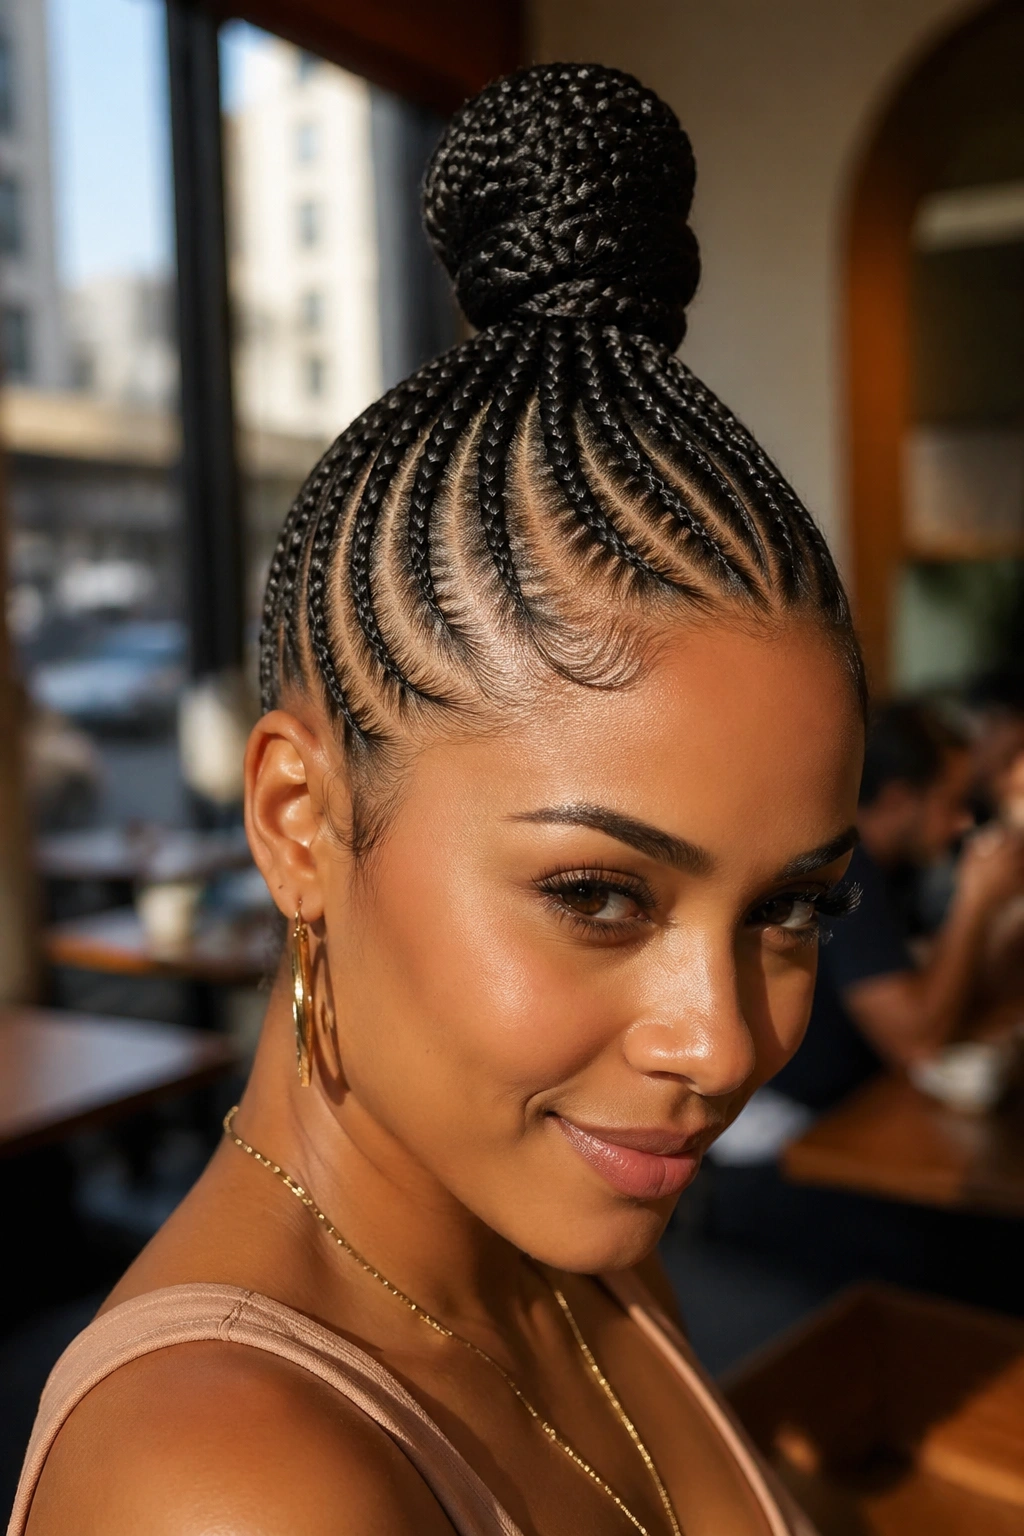
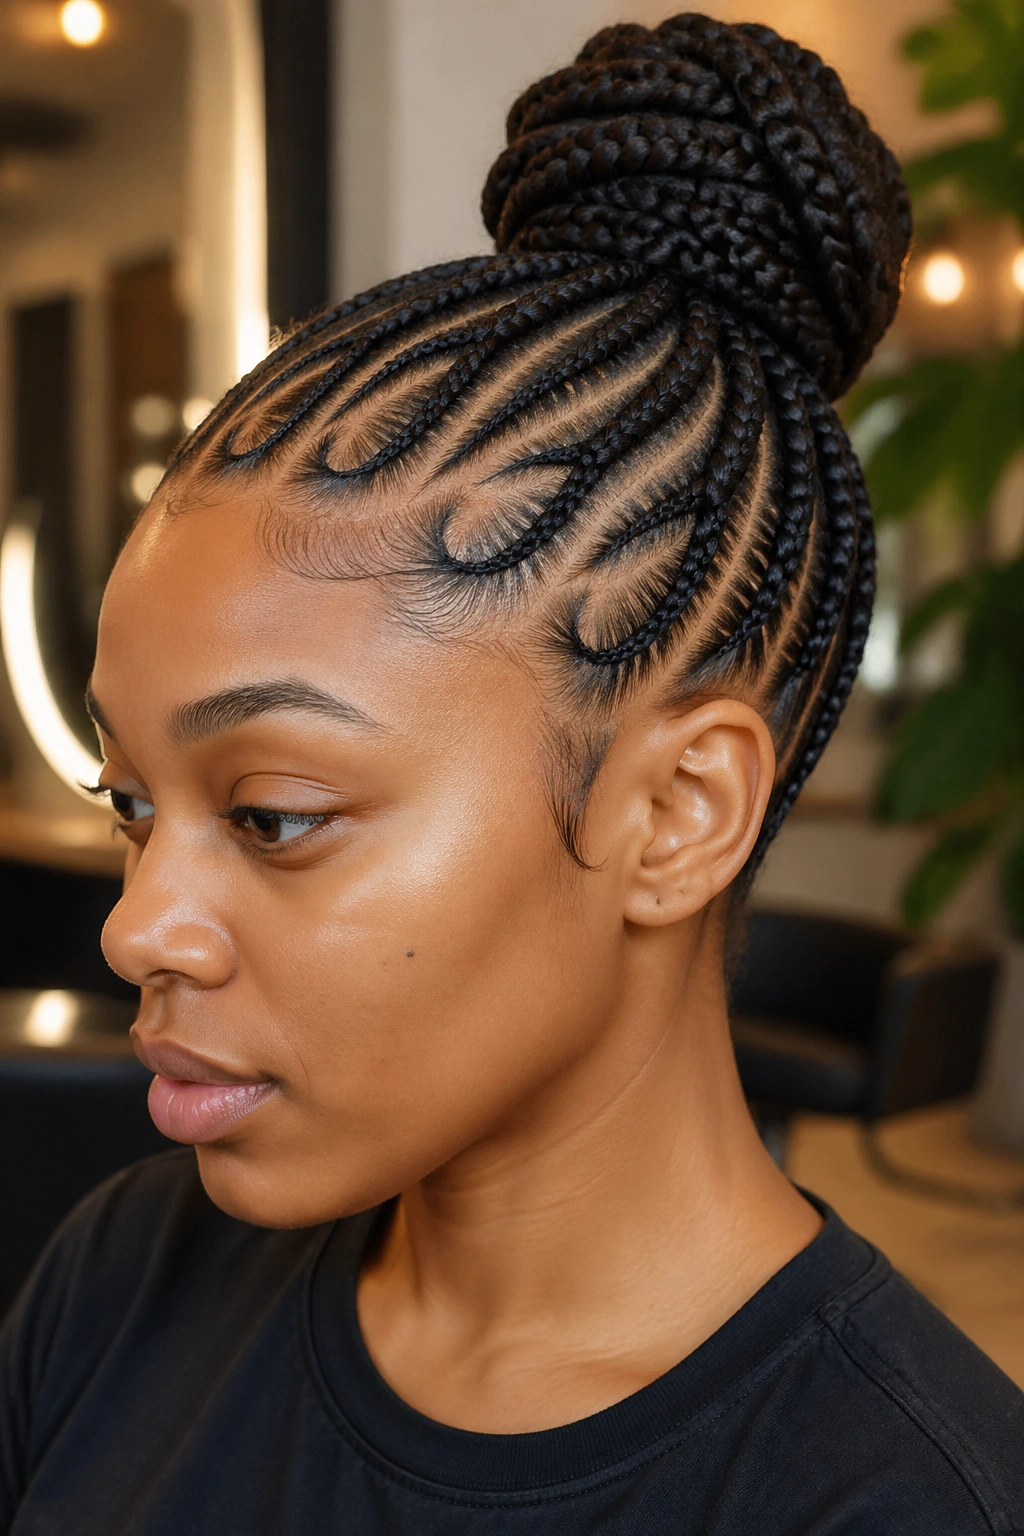
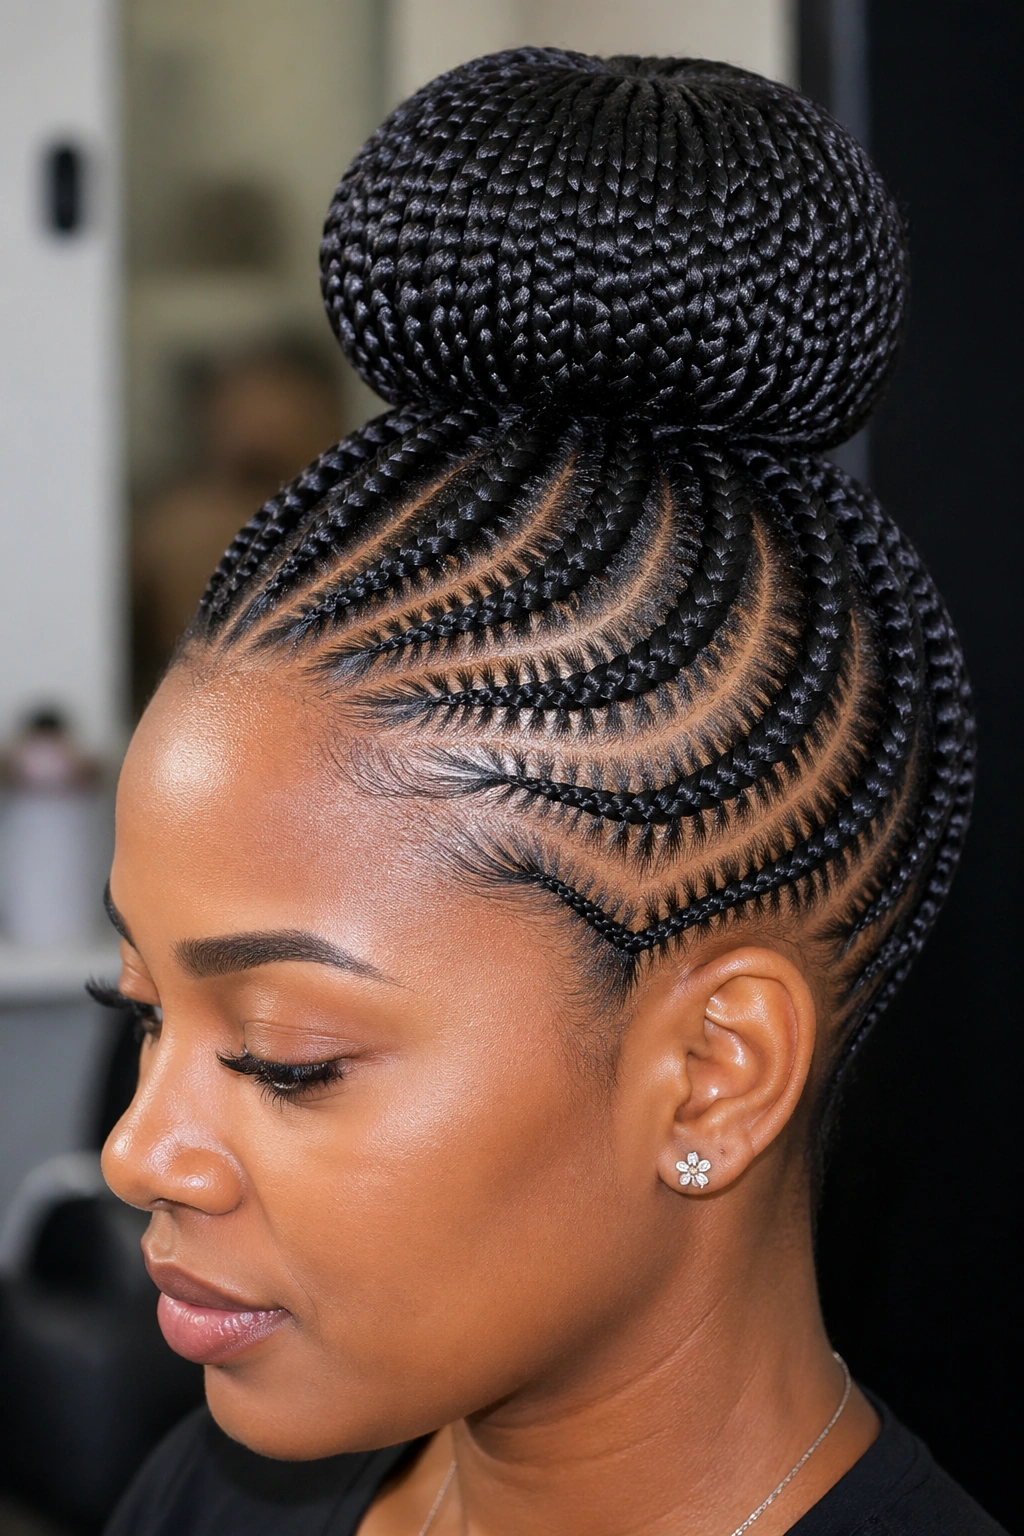
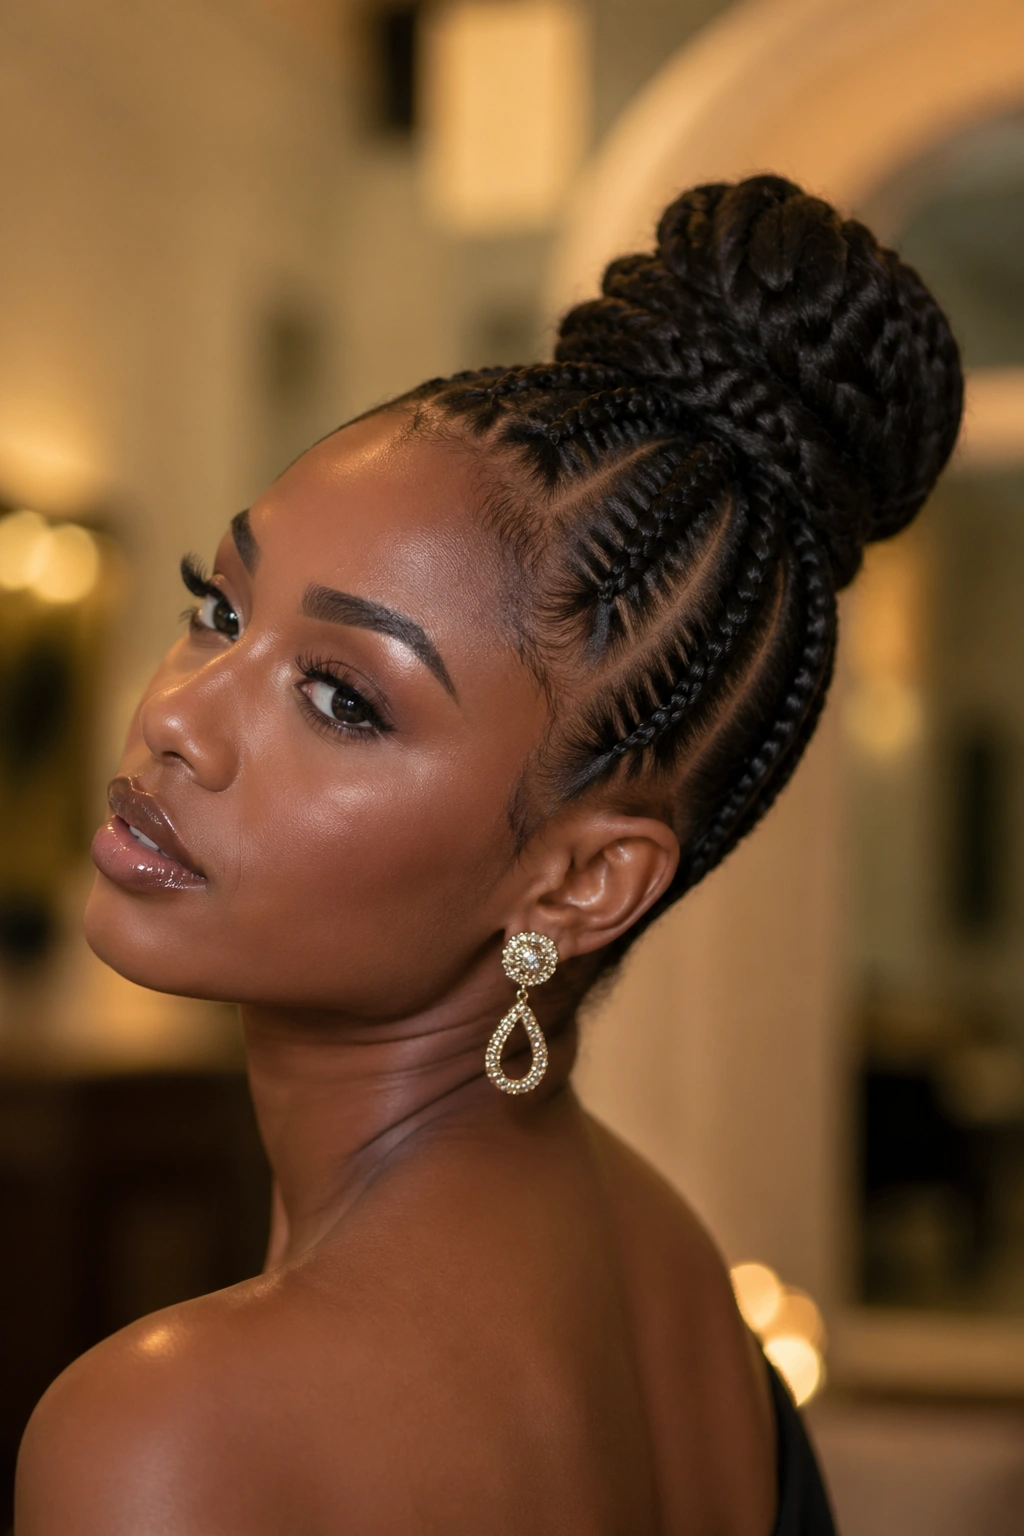
2. Crown Bun with Five Feed-Ins
Here the bun sits high, right at the top of the head, and five feed-in braids fan up from the hairline to meet at the base of the bun. The silhouette is dramatic and elongates the neck — good for formal events, bad for low ceilings.
The technique sounds simple, but five braids converging at one point is where novice braiders slip up. If the braids aren’t parted with identical spacing across the forehead, the whole bun tilts.
A crown bun this high puts constant upward tension on the edges. If your hairline is thinning or your temples are sensitive, skip it. If they’re healthy, it’s one of the most elegant options in the category.
Every time I’ve worn this one to a wedding, three people have asked where I got it done. It reads luxe without being loud.
3. Side-Swept Bun with Asymmetric Parts
What happens when all the feed-ins sweep toward one side of the head? You get a bun that sits low and off-center, usually behind the right ear, with the parts curving from the left hairline across the crown in asymmetric arcs.
The visual interest here is the parting pattern, not the bun itself. Some parts curve like scythes; others run almost straight with a slight diagonal. The finish is modern without being trendy.
How to Style It
- Part the hair with a diagonal section across the forehead, roughly from left eyebrow to right ear.
- Install 6-8 feed-ins all angled toward the back-right.
- Gather the tails, wrap them over a bun form or donut, and pin.
- Lay edges on both sides, heavier on the side the braids sweep from.
Tip: Asymmetric styles read best with a deep side part at the hairline. A shy part gets swallowed by the rest of the hair.
4. Jumbo Messy Bun with Curly Ends
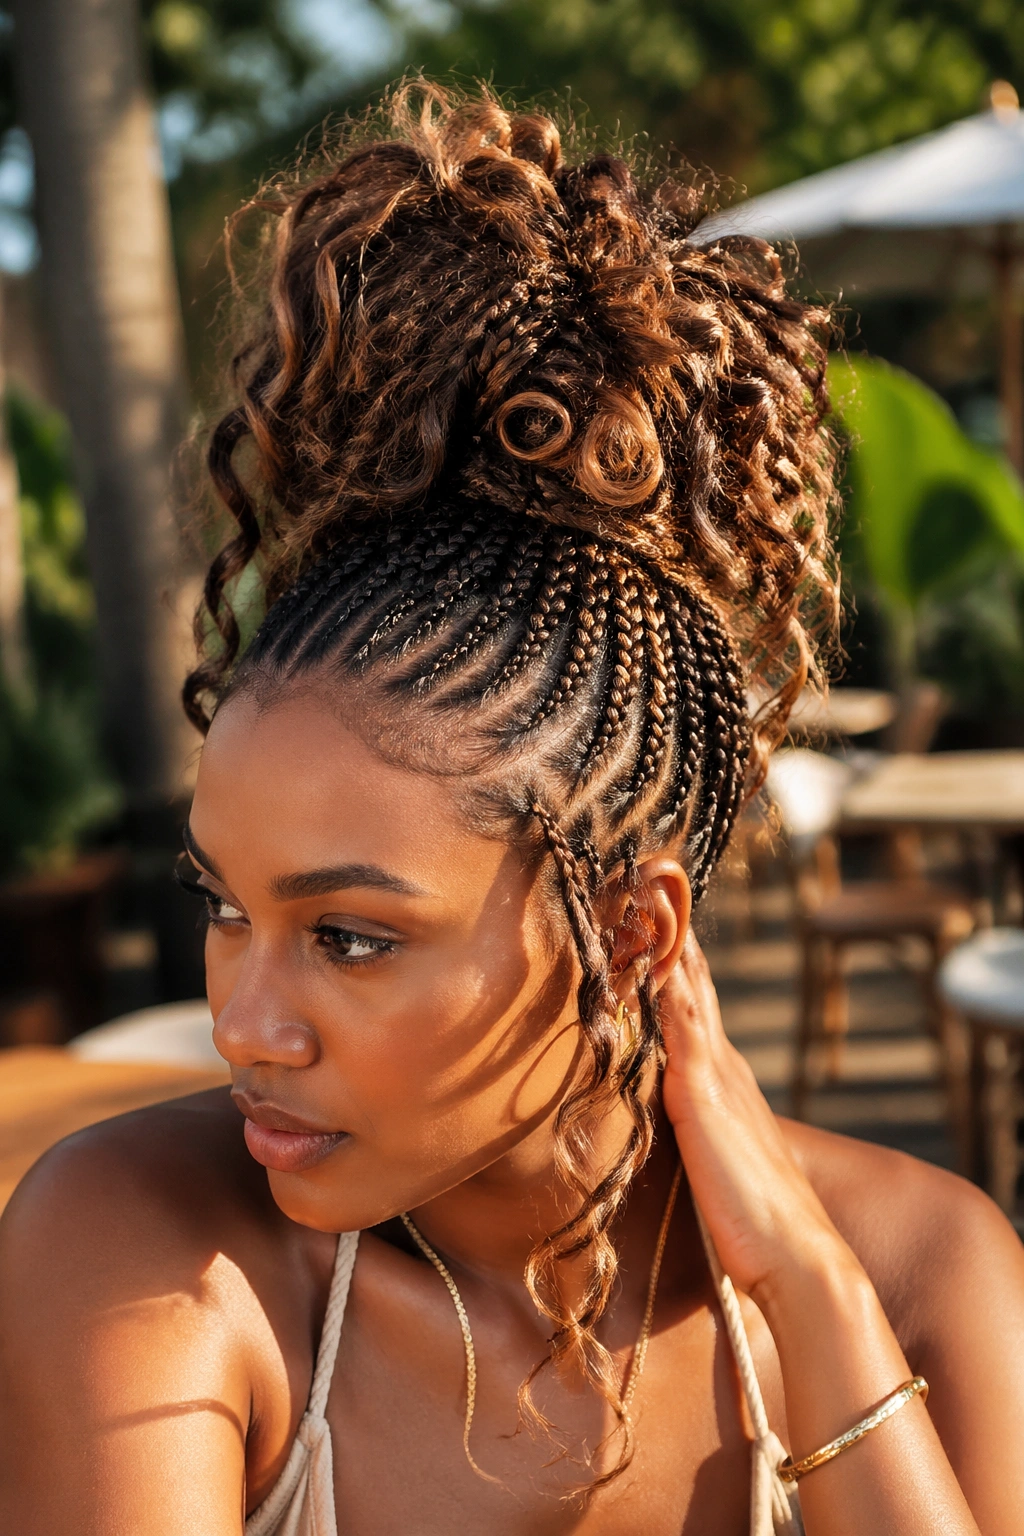
Unlike the sleek versions, this one leans into texture. The feed-ins still lie flat, but the bun itself is loose, oversized, and formed from dipped ends that have been curled with flexi-rods or perm rods.
What’s different: the ends aren’t wrapped around a base at all. They’re pinned in a loose cluster, left to spill, and styled as if they’re your own curls piled on top.
Best for: weekend wear, brunch, outdoor events, beach-adjacent trips where humidity will wreck a sleek finish anyway.
I’d pick this one over a sleek bun nine times out of ten in summer. The curly pieces catch movement that flat buns can’t.
5. Double Bun with Two Feed-In Sections
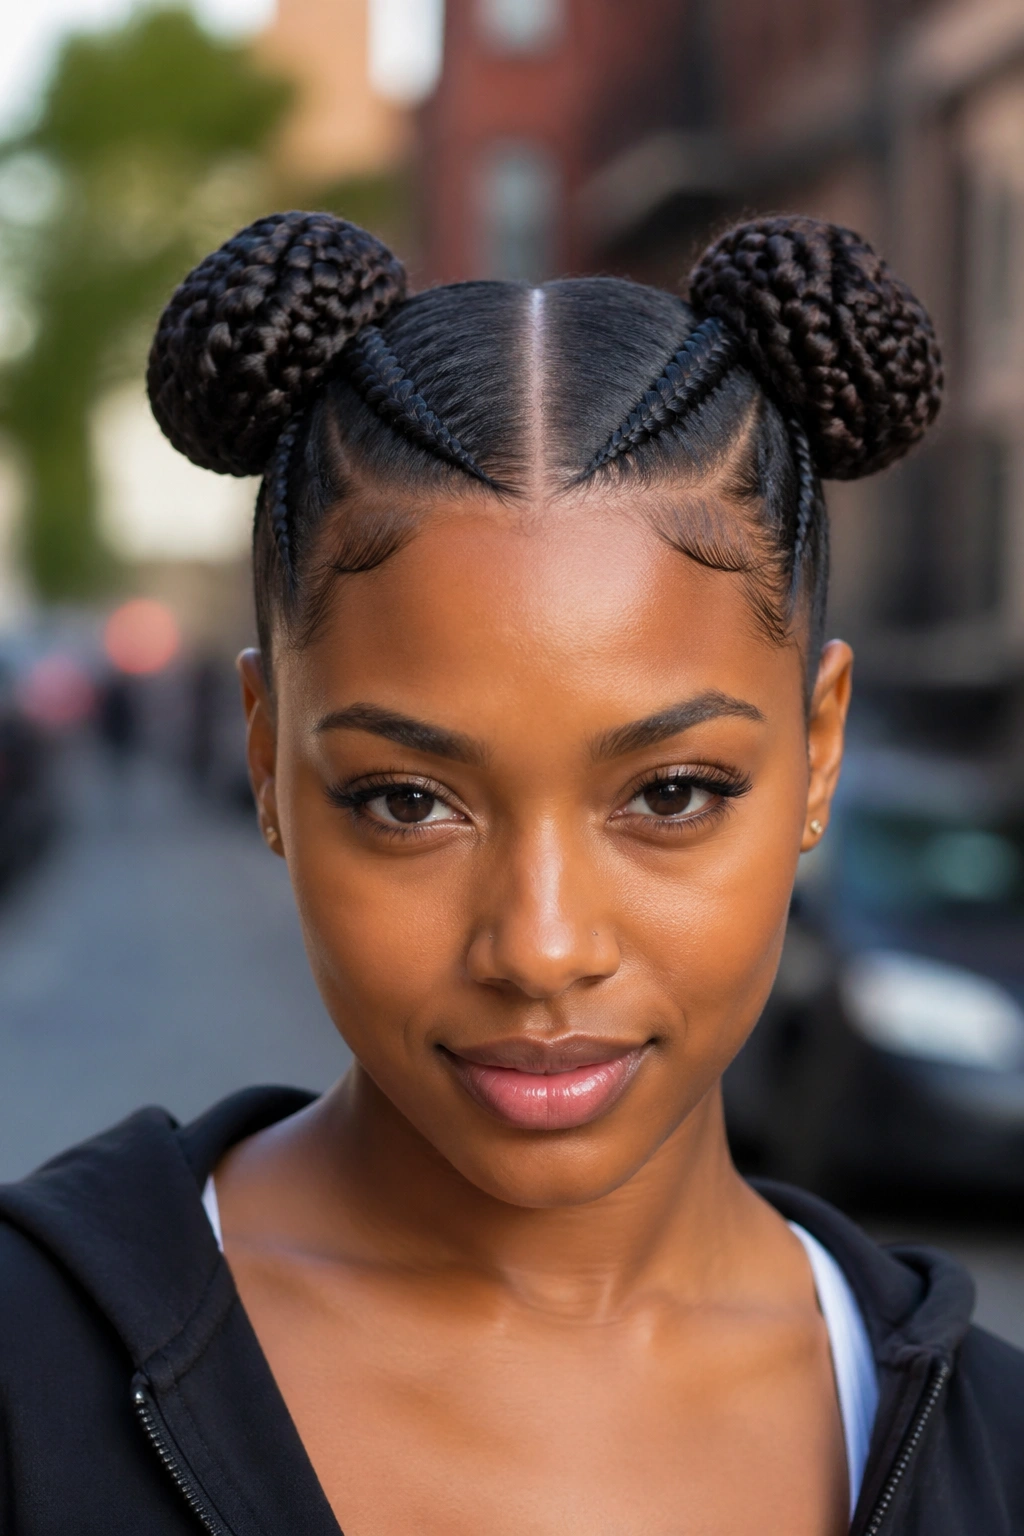
A scalp part straight down the middle divides the head into two territories. Each side gets 4-5 feed-ins pulled into a separate bun, one on each side of the crown. The result looks like space buns but with the control of cornrowed roots.
Kids love this style, and grown women wearing it to festivals have made it a recurring favorite. The key is matching the two buns in size and height. Lopsided double buns turn into costume rather than style.
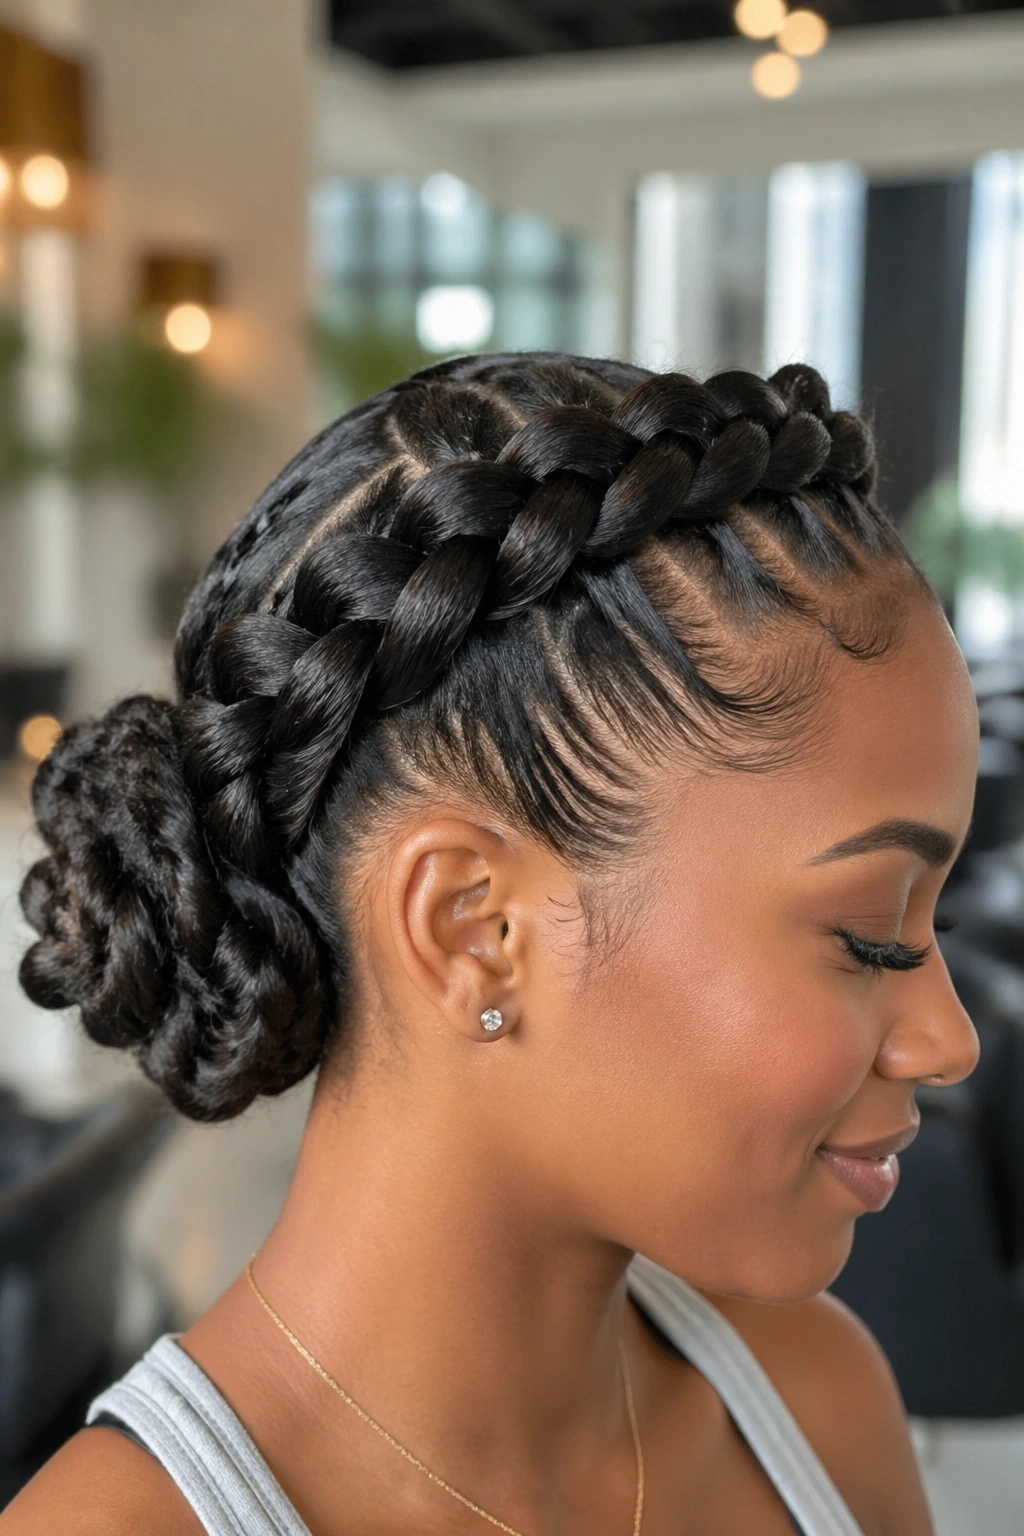
6. Low Chignon with Curved Feed-Ins
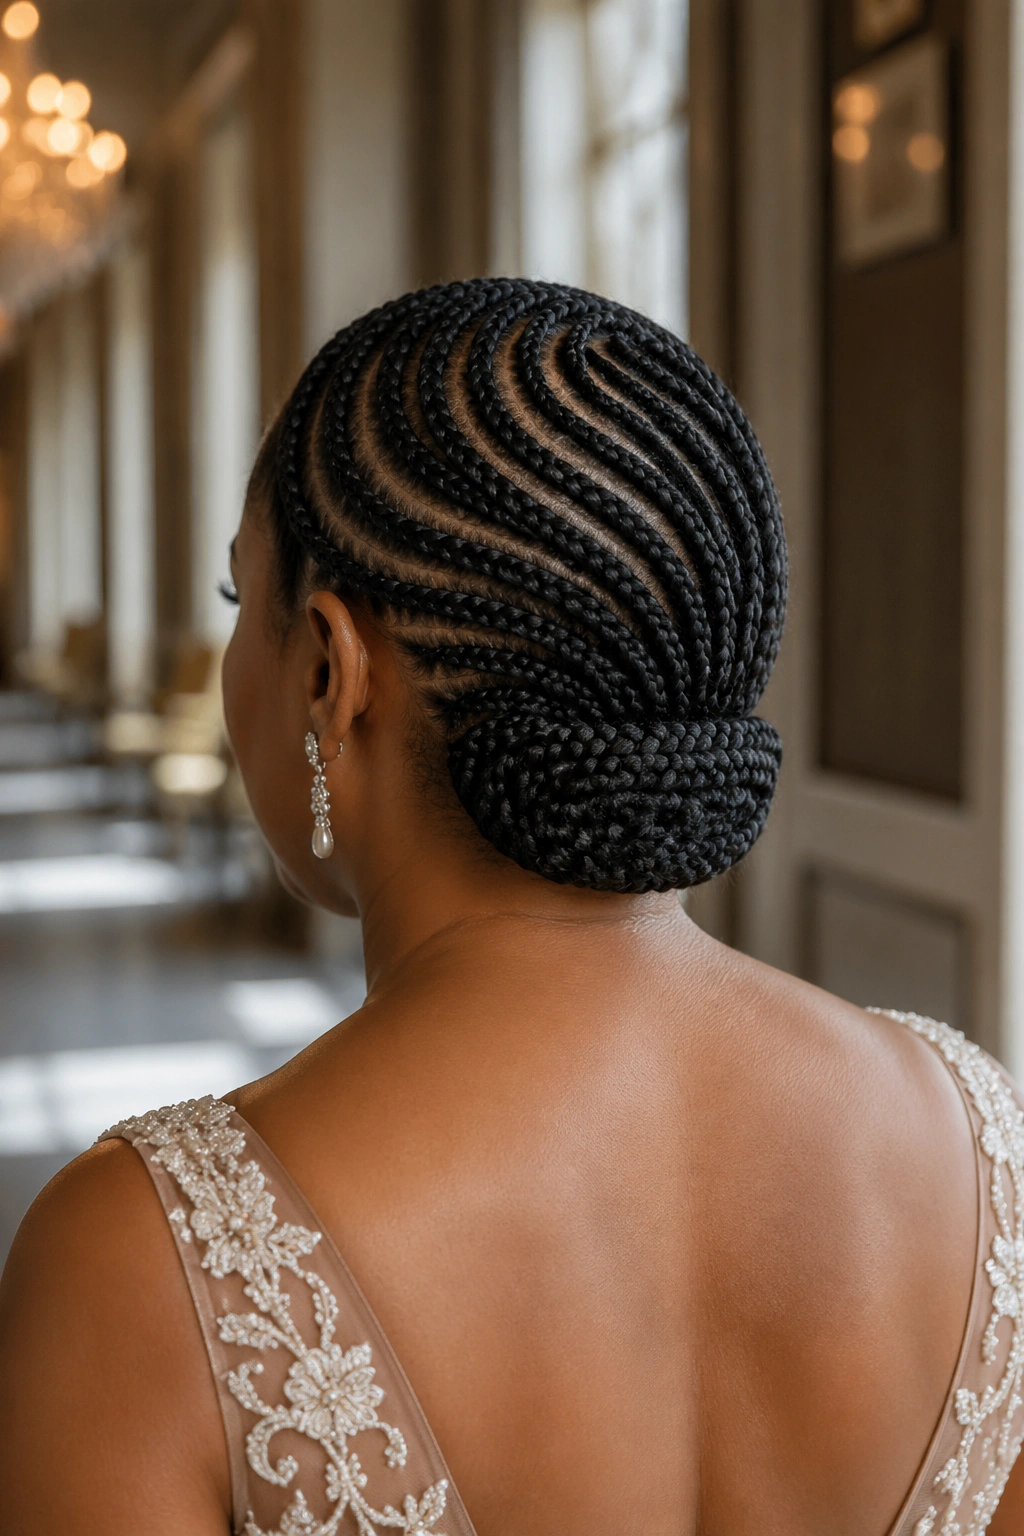
A chignon sits at the nape and wraps into a flat, folded knot rather than a round ball. Feed-ins curved gently from the hairline toward the nape feed the chignon with clean lines.
What Makes It Different
Most cornrow buns finish in a round shape. A chignon finishes flat. That translates to a silhouette that reads more bridal, more mature, more intentionally restrained. If you’ve ever watched a ballet dancer’s bun and wondered how to get that exact shape with cornrows, this is it.
- Works best on medium-to-long natural hair plus extensions.
- Needs a mesh bun form (not a doughnut) to shape the flat fold.
- Holds up well under a veil or tiara if you’re wearing it to a wedding.
Tip: Finish with a fine hairspray rather than gel on the bun itself. Gel leaves a visible cast.
7. High Top Knot with Stitch Braids Up Front
The front of the hairline gets stitch braids — the kind with visible horizontal lines between each cornrow — while the back of the braids feed into a tall, narrow top knot. The contrast between precise stitches up front and the soft knot on top gives the look depth.
Stitch braids are their own technique. If you haven’t seen them in person, picture each cornrow broken up by tiny crosswise bumps every half inch, creating a ribbed texture. Paired with a simple bun, they pull all the attention.
And the top knot itself? Keep it narrow. Wide top knots fight with the stitched texture below.
8. Bun with Tribal Parts
Tribal parts are the zig-zag, curved, or geometric partings that replace the standard straight lines between cornrows. A bun built on a foundation of tribal parting immediately reads as a cultural statement — not trend, not costume, rooted in long traditions of West and Central African hair.
The bun itself can be anything — high, low, sculpted, casual. What makes the look is the parting.
Going this route means sitting for a braider who knows what they’re doing. Tribal parts aren’t forgiving. One wavy line that should be straight, or vice versa, and the entire pattern feels off.
Worth the extra time. Worth the extra money. These are the styles that get stopped on the street.
9. Bun with Beaded Accents at the Parts
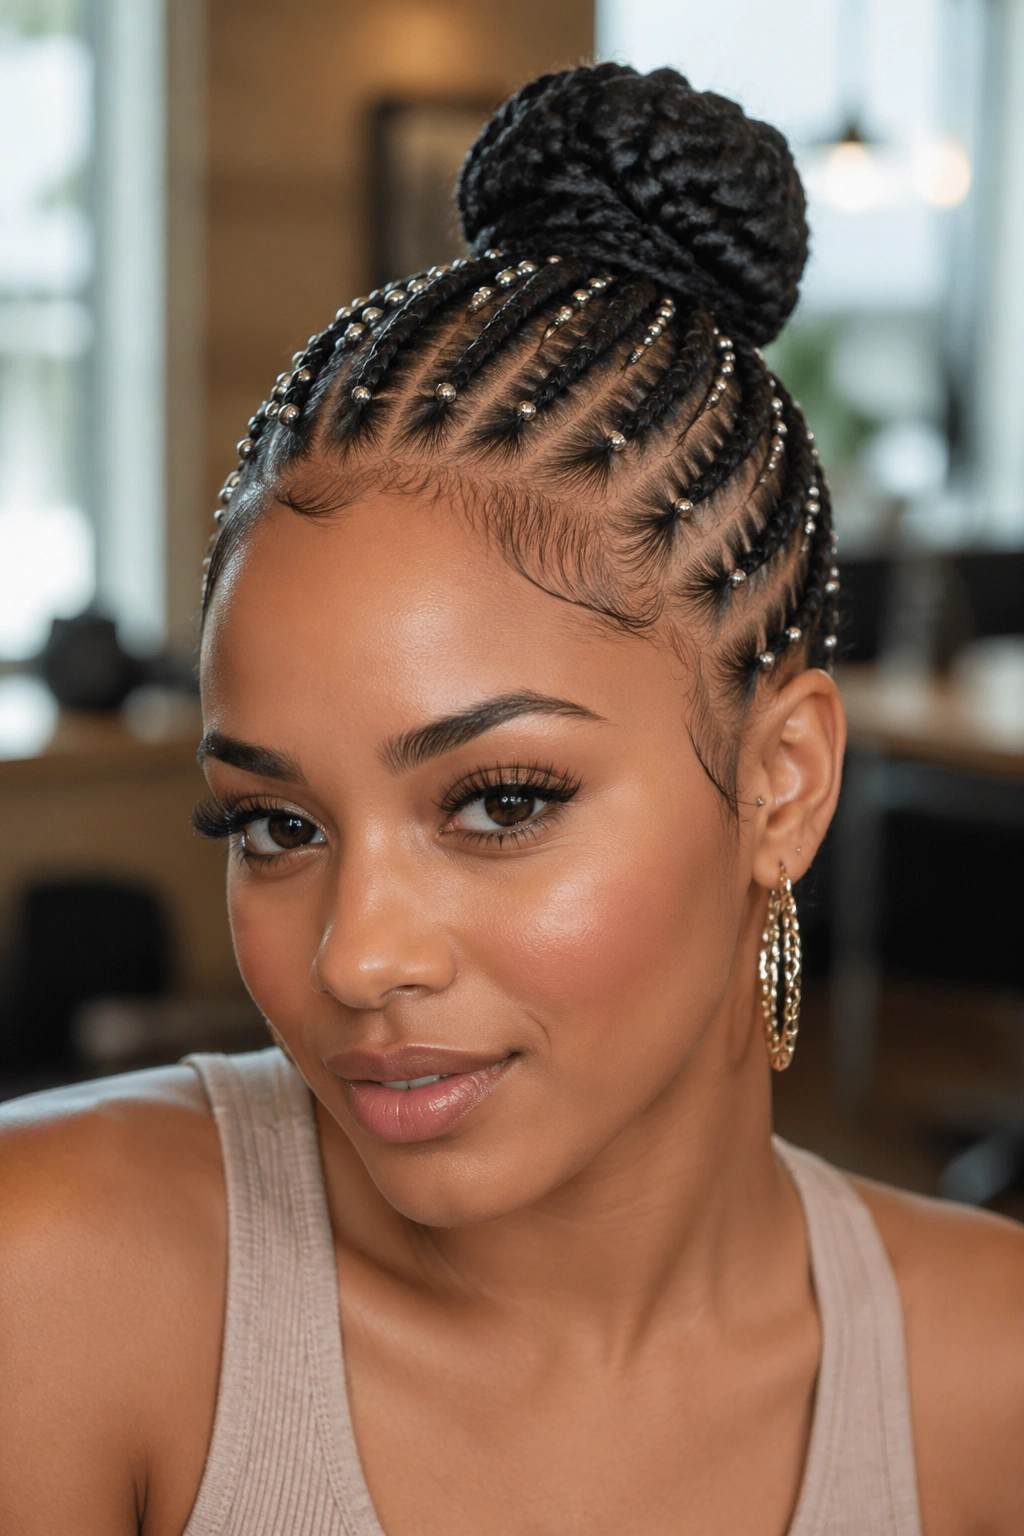
Small wooden or metallic beads threaded onto the feed-ins — not the bun itself — catch light along the parts. The bun stays clean and sleek, letting the beads do the decoration.
Bead size matters. Pebble-sized wooden beads read grounded and traditional. Small silver beads read minimal and modern. Skip anything gaudy or colored plastic — it ages the whole look.
Threaded six to eight per braid, spaced evenly, finished with a knot or a crimped stopper.
10. Low Bun with Heart-Shaped Parting
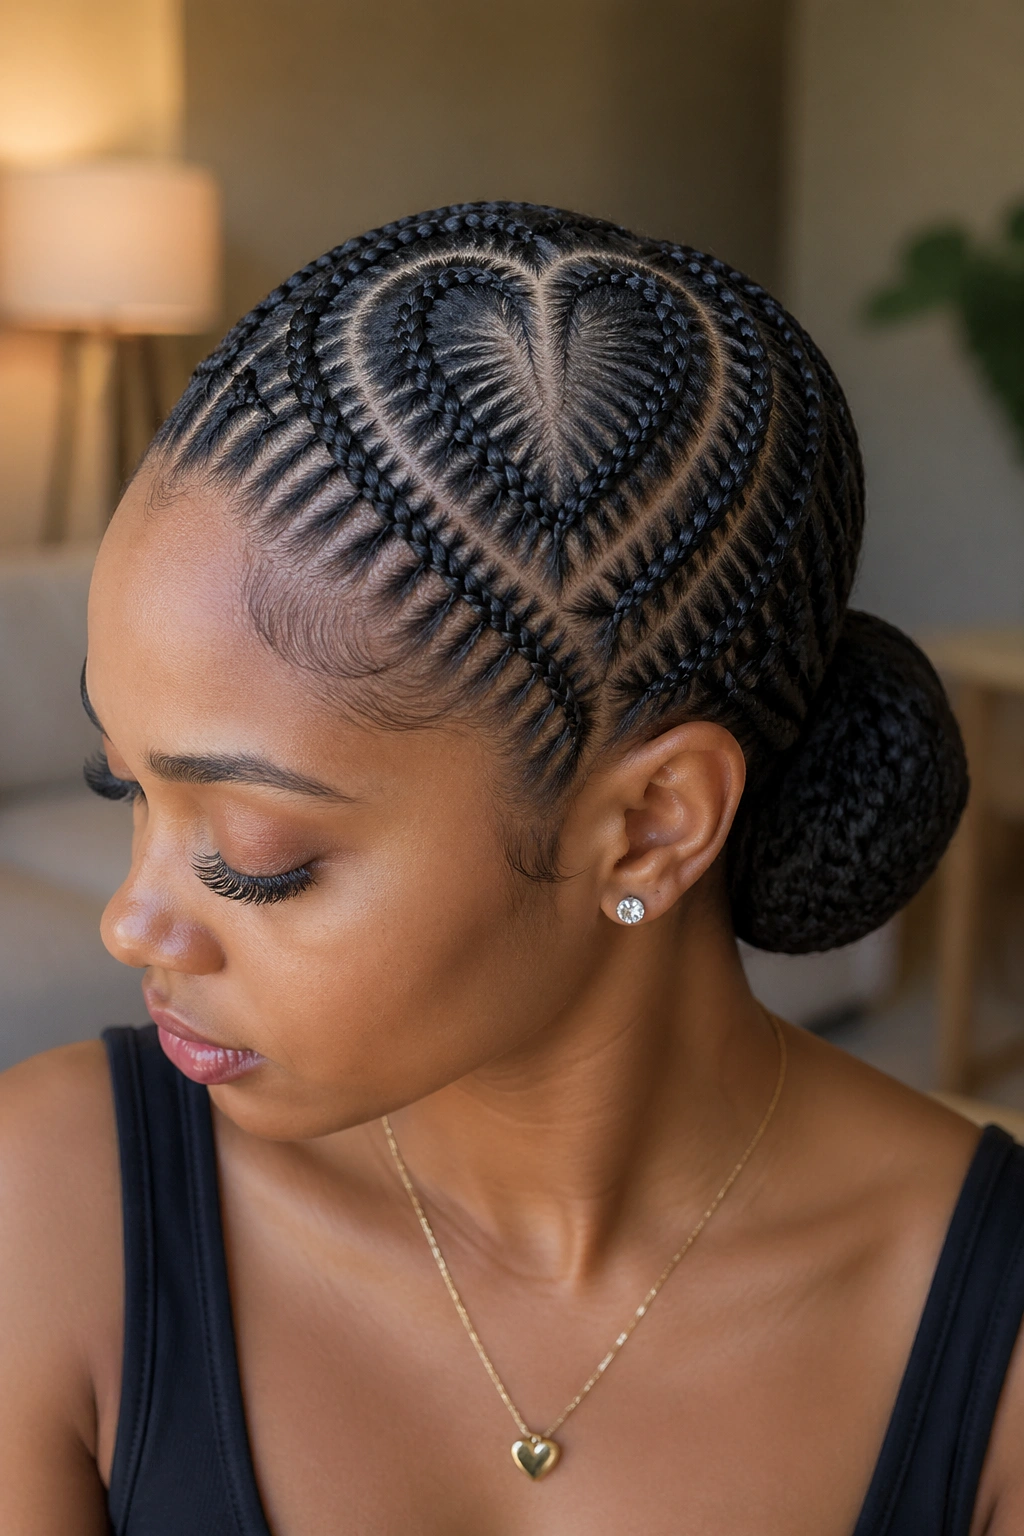
Two feed-ins from the forehead curve outward, meet in the middle of the crown, and form the top of a heart shape. The rest of the braids feed down into a low bun. The heart is the signature.
Who This Is For
Anyone wearing the style for a date, a birthday, a photoshoot — anything where a small romantic detail works in your favor. It’s not an everyday style unless your job is in fashion, art, or entertainment.
The heart needs to be precise. Freehanded, it looks like a lopsided pear. Use a tail comb and trace the curve with gel before braiding to keep the line honest.
11. Half-Up Bun with Feed-Ins on Top
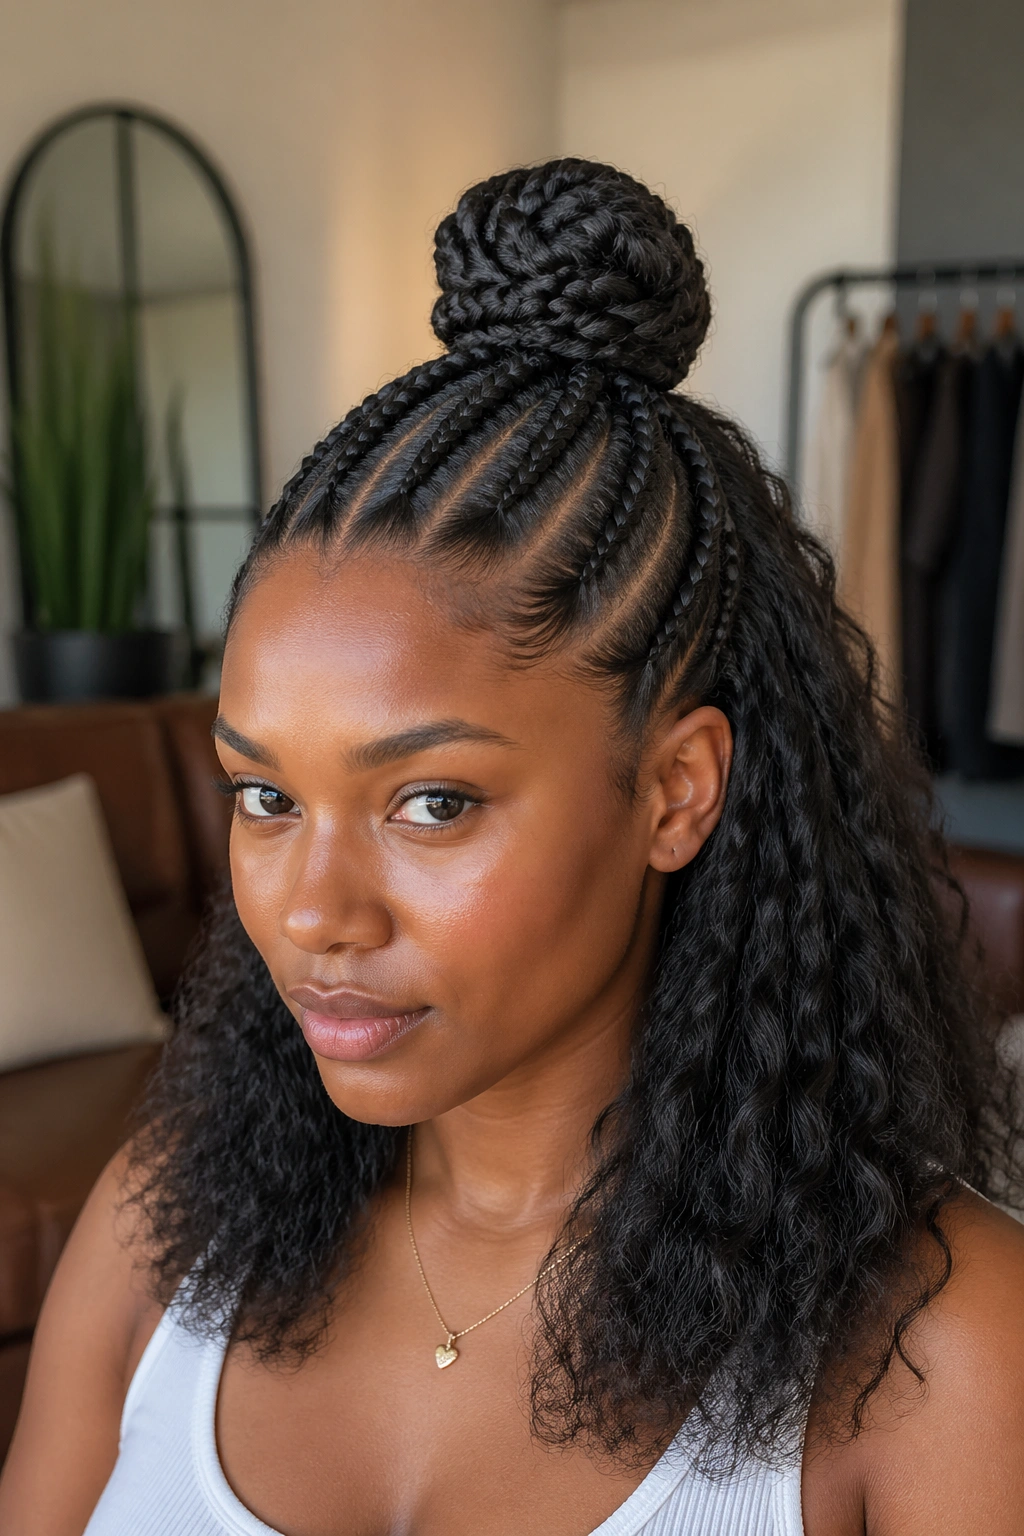
The top portion of the head gets 4-5 feed-ins pulled into a bun at the crown. The bottom half of the hair — whether braided, left loose in a wig, or blended with a clip-in — hangs free below.
This is the hybrid. Half protective style, half statement. I wear this one when I want the aesthetic of a bun but don’t want to commit a full head to cornrows.
Blending the bottom half matters. If your loose hair doesn’t texture-match your feed-ins or your extensions, the transition reads sloppy. Kinky straight or 4C-textured bundles work with natural hair best.
12. Sculpted Bun with Swooped Baby Hairs
Dramatic baby hairs are their own art form. Swooped, swirled, flicked, finger-waved — they frame the face in ways a bun alone can’t. Paired with simple feed-ins and a modest bun, the baby hairs become the loudest element of the look.
Use a small edge brush, not a toothbrush. Toothbrushes pull too much hair and blow out the baby hair line. A proper edge brush moves individual strands with precision.
And set them. Tie a satin scarf around the hairline for 15 minutes after laying. Then release. The hold lasts hours longer than gel alone.
13. Bun with Pumpkin-Seed Parts
Pumpkin-seed parts are oval-shaped sections at the hairline that taper to points on each end. Each oval gets its own feed-in, and the braids flow back to a common bun. The pattern resembles seeds scattered along the hairline — hence the name.
This one rewards a patient braider. Pumpkin seeds are among the harder parting patterns because each oval has to mirror the one beside it.
Installed well, the hairline reads as artwork. Installed poorly, it reads as messy.
14. Bun with Gold Thread Wrapping
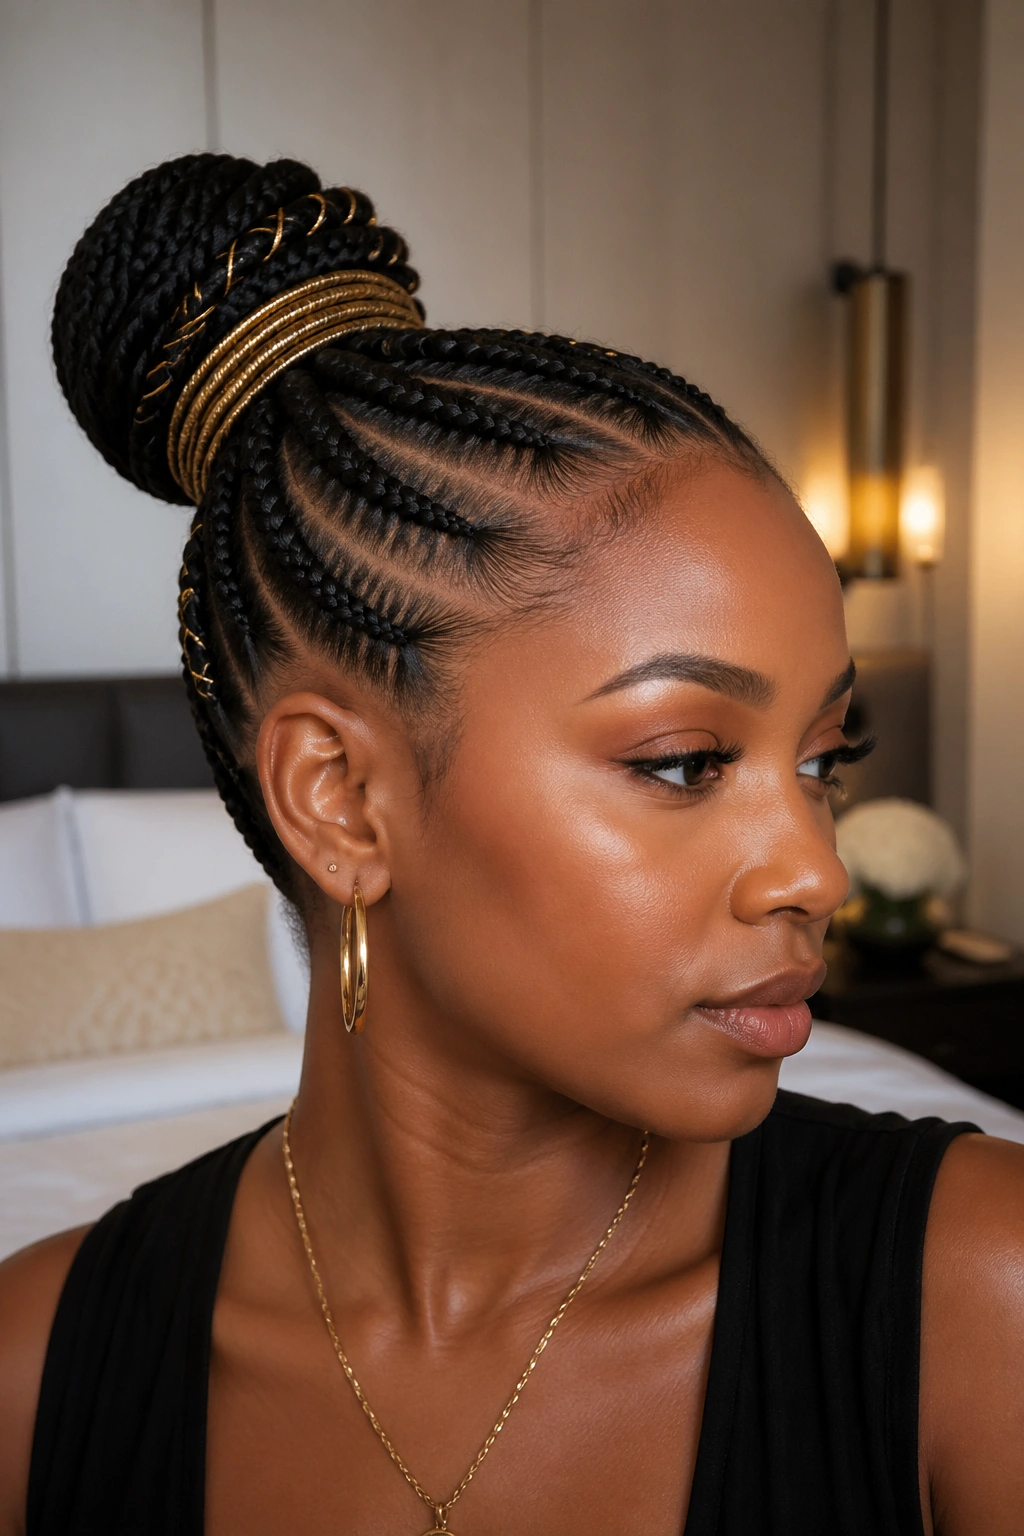
Metallic gold thread wrapped around select feed-ins or the base of the bun itself adds a shimmering accent without adding weight. The thread comes in spools at beauty supply stores for under five dollars.
Wrapped every inch along a braid, it creates a ribbed, coiled look that plays with light as you move. Wrapped only at the base of the bun, it becomes a hair ornament rather than a braid detail.
I’d pick the base-of-bun placement nine times out of ten. Less maintenance. Cleaner finish.
15. Crown Braid Bun
Instead of all feed-ins running backward, some curve around the crown of the head like a halo before joining the bun. The visual effect is a braid that wraps the head — a crown — with a bun anchored off-center at the back.
The wrap itself adds height where other cornrow buns stay flat. Good for round face shapes that want length.
Can be done with as few as four braids if two of them are thicker and do the crown work.
16. Feed-In Bun with Ombre Kanekalon
The kanekalon used in the feed-in transitions from the natural hair color at the roots to a lighter shade — honey, caramel, copper — toward the ends. When the bun forms, the outside of the bun is the lighter color while the inside stays dark.
The Catch
Ombre extensions aren’t always sold pre-blended. You sometimes have to blend two shades yourself at the cornrow point, which adds install time. Buy pre-ombred bundles whenever possible — the gradient looks more natural.
- Honey over black reads warm and soft.
- Copper over black reads loud and playful.
- Ash brown over black reads subtle and grown.
Tip: Don’t go more than two shades lighter at the tips. The gradient starts to look cartoonish past that.
17. Low Side Bun with Three Thick Feed-Ins
Just three feed-ins, each thicker than standard, all sweeping to one side of the head where they meet in a low side bun behind the ear. The minimalist approach wins on faster install time and a cleaner silhouette.
Three braids means three parts across the whole head. Make them count. Each part should be evenly spaced and run in a smooth curve toward the bun side.
This is my go-to when I want cornrows but I’m sitting in my own chair doing it. Three feed-ins takes me about 45 minutes solo. Eight takes all afternoon.
18. Doughnut Bun with Wrapped Kanekalon
A mesh doughnut bun form sits at the crown or nape. The feed-in tails wrap the doughnut fully, hiding it completely so the bun looks entirely braided. Extra kanekalon gets wrapped over gaps to smooth the surface.
What separates this from a standard bun: the shape is perfectly round, uniform, and large. No flat spots, no bumps. It’s the sculptural look that modeling shoots and editorial styling use for good reason.
Install the doughnut BEFORE you start wrapping. Trying to slide a bun form under already-wrapped hair wrecks the shape.
19. Twisted Updo Bun
After the feed-ins are done, the tails aren’t left loose or coiled into a bun. They’re twisted against themselves in pairs first, and then the twisted lengths are gathered into the bun. The surface of the bun reads as rope-like rather than flat.
- Best for medium-length natural hair with shoulder-length extensions.
- The twisting adds about 15 minutes to the install.
- Lasts as long as a standard feed-in bun, maybe a day or two less.
The twisted surface catches light differently. If your event has stage lighting or heavy photography, this shows up better than a flat bun.
20. Bun with Reverse-Braided Feed-Ins
Standard cornrows use an under-hand braiding motion, which pushes the braid flat against the scalp. Reverse cornrows — also called Dutch cornrows — braid over the top instead, so the braid lifts off the scalp in a raised, ropey line.
Reverse feed-ins are bolder visually. They’re also slightly harder on the edges because the lifted braid creates more tension at the start.
Gathered into a bun, the raised braids frame the bun in distinct lines, almost like spokes on a wheel. Reads editorial without much effort.
21. Feed-In Bun with Curly Fringe
Instead of smoothing the very front of the hairline flat into a braid, you leave a small curly fringe free — either natural curls or a clip-in — and let it bang across the forehead while the rest of the hair goes into feed-ins and a bun.
The curly fringe softens a severe bun. Good for face shapes that need length in the forehead broken up.
But the fringe has to blend. A clip-in that doesn’t texture-match your own hair looks like a wig piece, not a fringe.
22. Double-Wrapped Bun with Accent Braid
A feed-in bun sits at the nape. A single thin accent braid, braided separately with a contrasting color or a wrapped string, circles the base of the bun like a decorative belt. The accent braid is pinned flat, not tied.
Who This Is For
Anyone who loves one detail done well more than five details fighting for attention. The accent braid is the only ornament — no beads, no gold thread, no extra parting drama. Just one clean ribbon of contrasting braid around a clean bun.
It’s the style I recommend for photoshoots where the outfit is already busy. The hair needs to be finished but quiet. This does both.
Maintenance That Actually Keeps the Bun Looking Fresh
The first 48 hours decide how long a feed-in bun lasts. Sleeping flat on a cotton pillowcase, scratching the scalp with nails, or redoing the bun multiple times on day one — any of those shortens the lifespan by days.
Night one, tie the edges with a satin scarf and sleep on a satin pillowcase or wrap a bonnet. No exceptions. Cotton absorbs moisture and frizzes the finish by morning.
A light mousse or braid sheen sprayed lightly three times a week keeps the braids from going ashy. Keyword: lightly. Overspraying builds flakes in the bun.
Scalp Care Under a Feed-In Bun
Your scalp keeps working under the braids. Oil it — but strategically. Heavy oils clog the part lines and attract dust; light oils soak in without residue.
Jojoba, argan, and grapeseed work well. Coconut is too heavy for parts, better saved for the ends. Apply with a dropper or applicator bottle directly onto the part line twice a week.
If the scalp itches outside of that routine, try diluted apple cider vinegar in a spray bottle — one tablespoon to a cup of water. Lifts buildup without stripping. Keeps the itch at bay.
Takedown Done Right
Pulling a feed-in bun out hastily is where most of the breakage happens. The process should be slow, oil-heavy, and detangle-aware.
- Step 1: Saturate the braids with a conditioning oil spray.
- Step 2: Remove the bun pins and any rubber bands at the tails.
- Step 3: Unravel each braid slowly from the tip upward.
- Step 4: Finger-detangle in sections BEFORE combing.
- Step 5: Wash immediately with a clarifying shampoo, then deep condition twice.
That whole process should take an hour or two. Rushing it to fifteen minutes costs hair every time.
Common Mistakes That Wreck the Style
Installing the braids too tight is the cardinal sin. If your scalp feels hot or tingling within the first hour of install, that’s damage in progress — not “it settles.” Ask the braider to loosen the front two right away.
Using too much gel in the braid body, not just at the roots, causes flaking by day three. Gel is for holding edges and parts — not the whole braid.
Washing the bun too hard. Dilute shampoo in a bottle and spray it at the scalp only, massage gently, rinse in the shower with low pressure. Aggressive scrubbing frizzes the feed-ins and shortens the style by a week.
Leaving it in past three weeks. Yes, people do it. Yes, it leads to matting, breakage, and sometimes traction damage at the hairline. Three weeks max. Two weeks is safer.
Picking the Right Feed-In Bun for You
Face shape matters more than people admit. Round faces benefit from height — a top knot or a crown bun. Oval faces work with almost anything. Long faces soften with low buns and curly fringes. Square faces round out with side buns.
Lifestyle is the other filter. If you’re in the gym six days a week, skip the sleek low bun — sweat frizzes the hairline within days. Go for a messy bun or a wrapped curly-end bun instead. Those absorb movement better.
Budget decides how elaborate you can go. A simple two-braid low bun done solo costs the price of edge gel and a bag of kanekalon. A tribal-parted, stitched, beaded, accent-braided masterpiece from a salon runs hundreds. Both look good. Pick the one your wallet and patience can handle.
The last filter: how you feel in it. Some people love attention; some don’t. Pick the style that matches how loud you want to be that week. There’s no wrong answer.