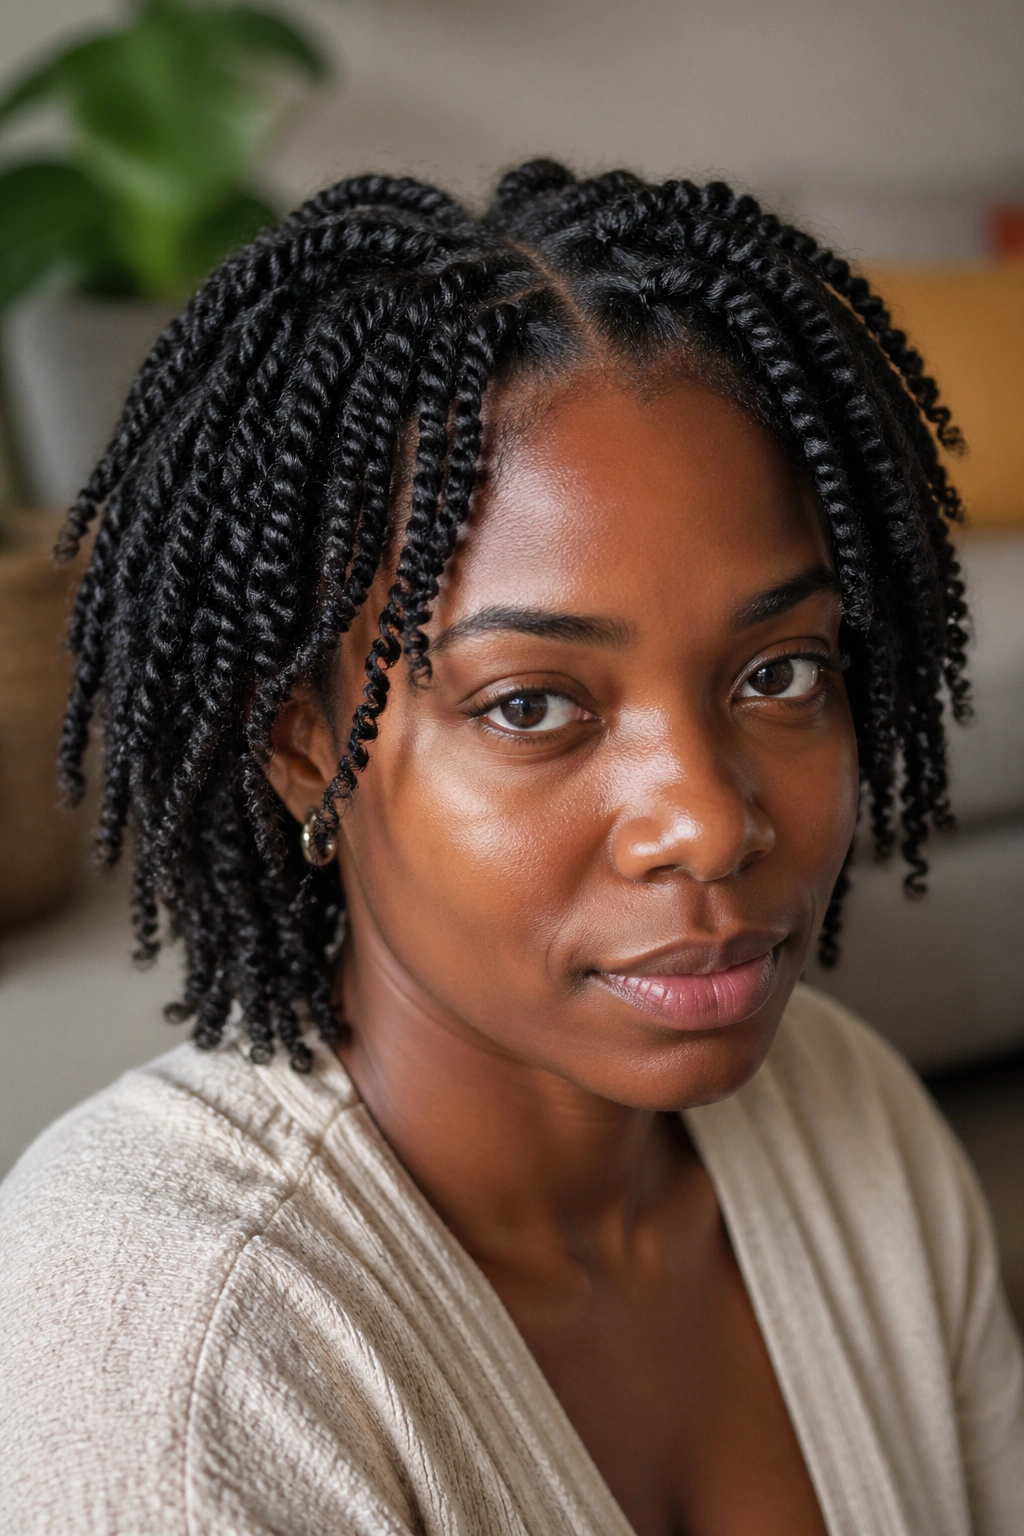
Perm twist styles for afro hair have become one of the most requested looks in natural hair spaces, and for genuinely good reasons. The style delivers a textured, loc-adjacent look with coily, rope-like twists that hold their shape for weeks — without requiring you to start a full loc journey, without chemical processing, and without the commitment that scares many people away from the styles they actually want. If you’ve been circling around perm twists and haven’t pulled the trigger yet, this breakdown should settle it either way.
The term “perm rod” in this context is a naming convention, not a chemistry reference. No perm chemicals are involved. The name comes from the tool — small, flexible rods used to shape the hair into a specific coiled pattern. Perm twist styles combine this technique with two-strand twisting to create a result that’s tighter, more defined, and longer-lasting than a standard twist.
What Perm Twists Actually Are — And What They Aren’t
Perm twists are achieved by either: two-strand twisting the hair around a perm rod and letting it dry, or braiding hair with extension hair while incorporating the perm rod twist technique to create a more defined, coily result. The variations in method produce different final looks — some looser and more spiral, some tighter and more loc-like.
What they are not: a loc style. Perm twists can be undone. They can be re-twisted, taken down after a few weeks, and the hair underneath is intact. They’re also not the same as Senegalese twists or Marley twists, though they’re often confused — Senegalese twists are smooth and rope-like without the coily texture; perm twists have a distinctly kinky, textured surface that mimics natural afro coils much more closely.
The key characteristic is the surface texture. Perm twists look like they grew naturally from the scalp. That’s the whole point.
Hair Type Compatibility — Who Gets the Best Results
Perm twists work on almost every afro hair type, but the results differ depending on your natural curl pattern. Type 4 hair — particularly 4B and 4C — gets the most seamless result because the natural coil pattern blends with the twist texture almost perfectly. The installed twist looks like it’s continuous with the natural hair rather than sitting on top of it.
Looser curl patterns (4A and some 3C) can still achieve beautiful perm twists, but the transition between natural root growth and the installed twist may be more visible as the natural roots grow in. This isn’t a dealbreaker — it’s just something to manage with a root re-twist as needed every three to four weeks.
For any hair type, the hair should be healthy enough to hold the twist without breaking at the root. If there’s significant breakage or thinning at the hairline or part lines, get those areas stabilized before installing a full perm twist style.
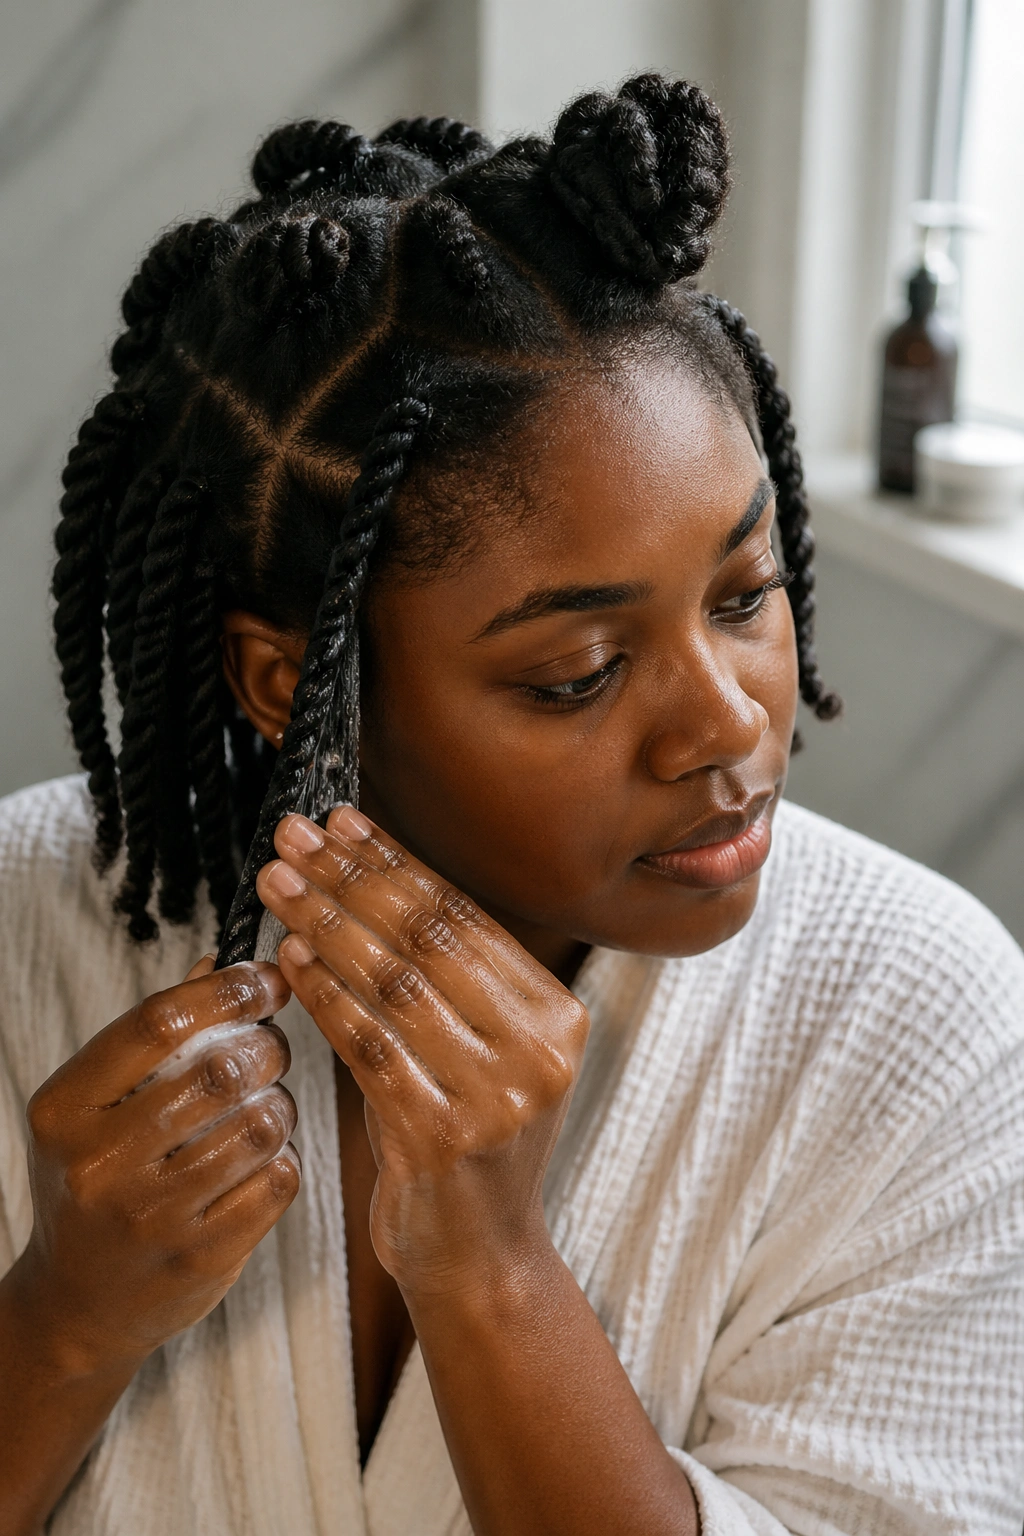
Product Preparation Before Installation
The right products make the difference between perm twists that last four to six weeks and ones that start unraveling at the roots in week two. Here’s what you actually need.
A holding butter or braiding gel is essential — this is applied to each section before twisting and is what keeps the twist from loosening over time. Look for a product with some grip but not a hard finish. Eco Styler gel, Cantu twisting cream, or a dedicated loc gel all work well. The product should feel slippery between your fingers but leave a slight tackiness when dry — that tackiness is what locks the twist in place.
A water-based leave-in conditioner applied to each section before the holding product ensures the hair stays moisturized within the twist. Without it, the hair dries out inside the twist and begins to feel brittle after a few weeks.
And a light oil — jojoba, sweet almond, or argan — for finishing and for ongoing scalp maintenance throughout the wear period.
How Long Perm Twists Actually Last
Done correctly on properly prepped hair, perm twists last four to eight weeks. The range is wide because longevity depends on how the twists are installed, how the hair is maintained during wear, and how fast the individual’s hair grows.
The growth at the root is usually what ends the style — as new growth comes in, the root area becomes less defined and the twist appears to have shifted away from the scalp. A mid-wear root re-twist — going back and re-twisting just the first inch or two at the root without redoing the full twist — can extend the style another two to three weeks.
Sleeping with a satin bonnet every night is non-negotiable for longevity. Friction on a cotton pillowcase loosens the surface of each twist and creates frizz that can’t be reversed without re-twisting.
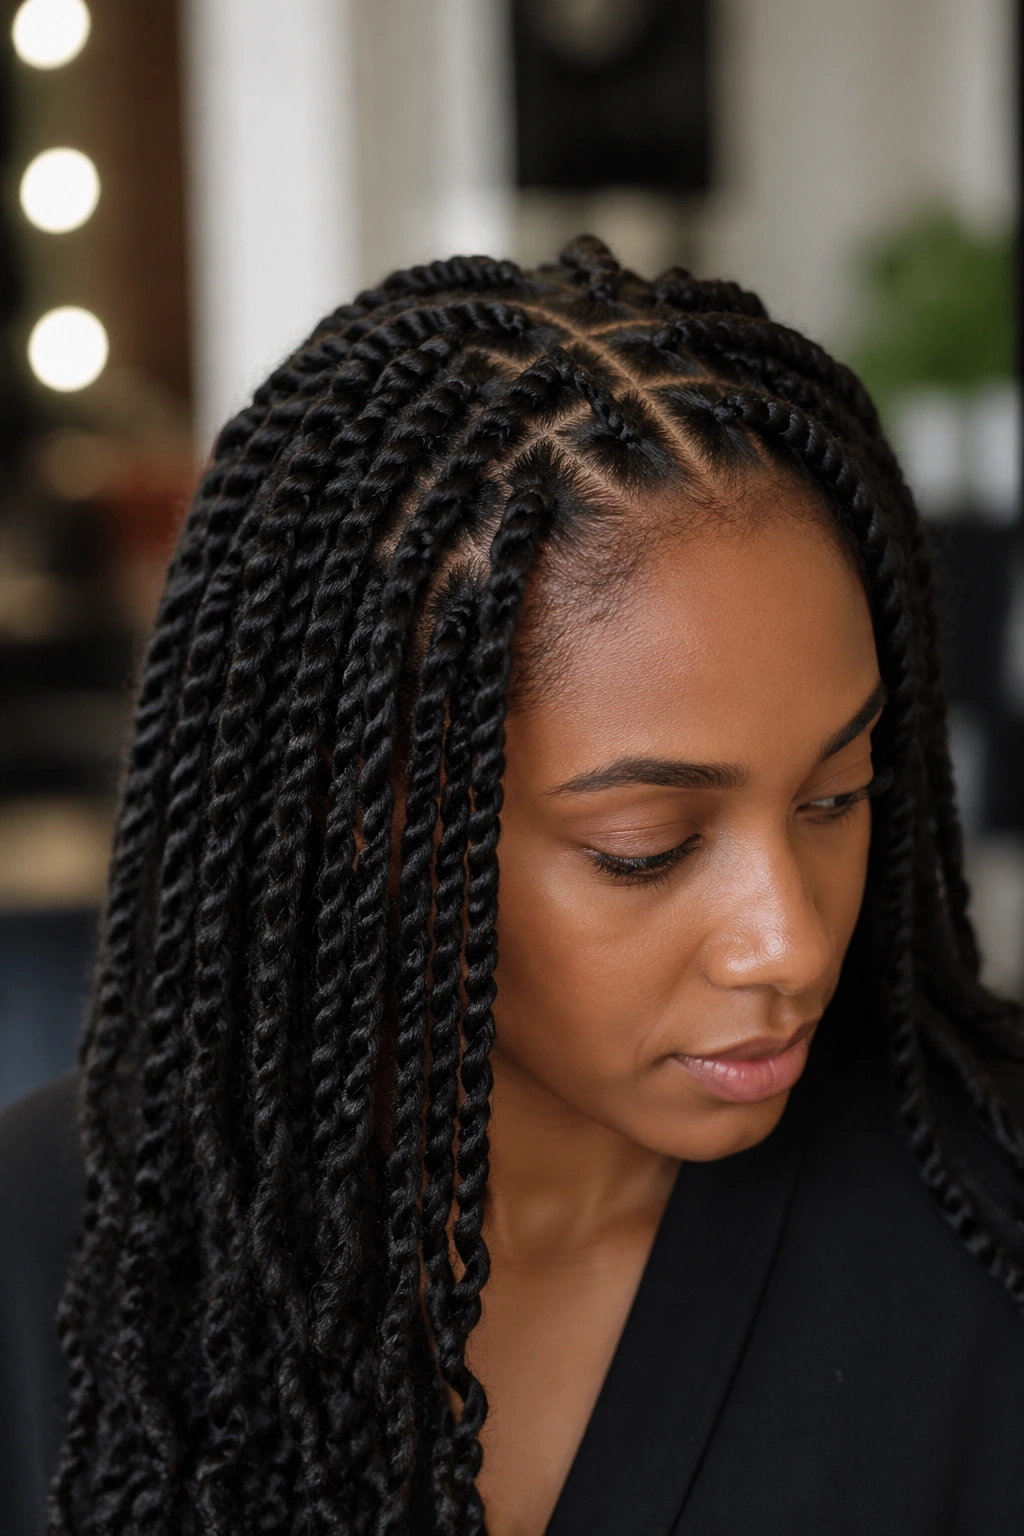
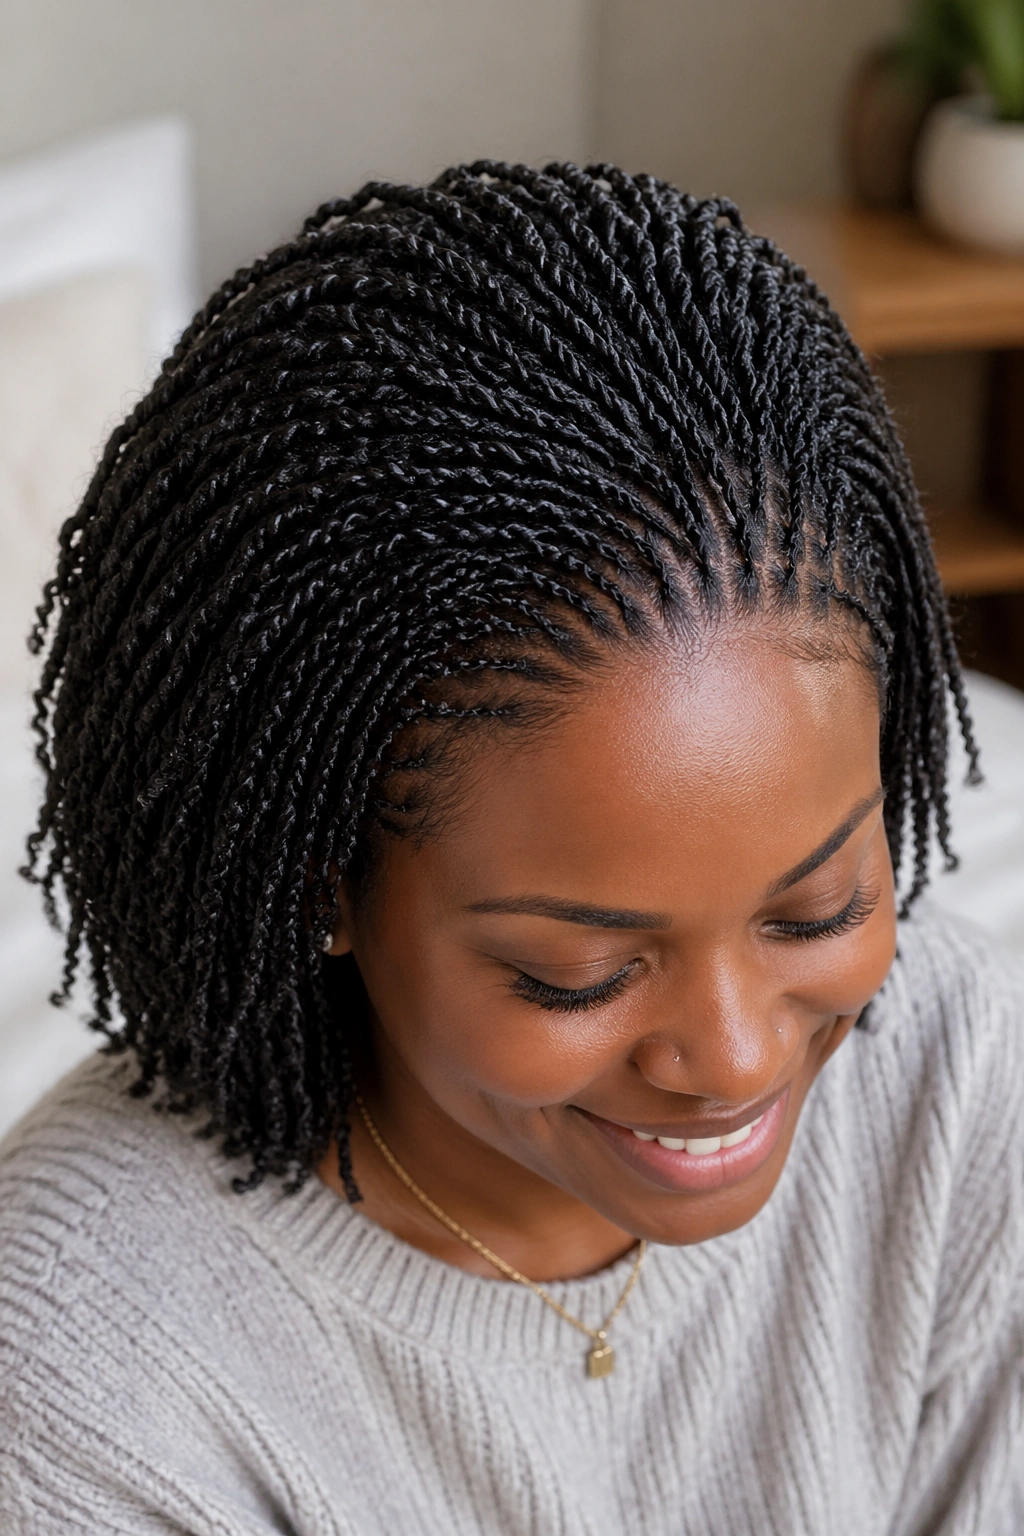
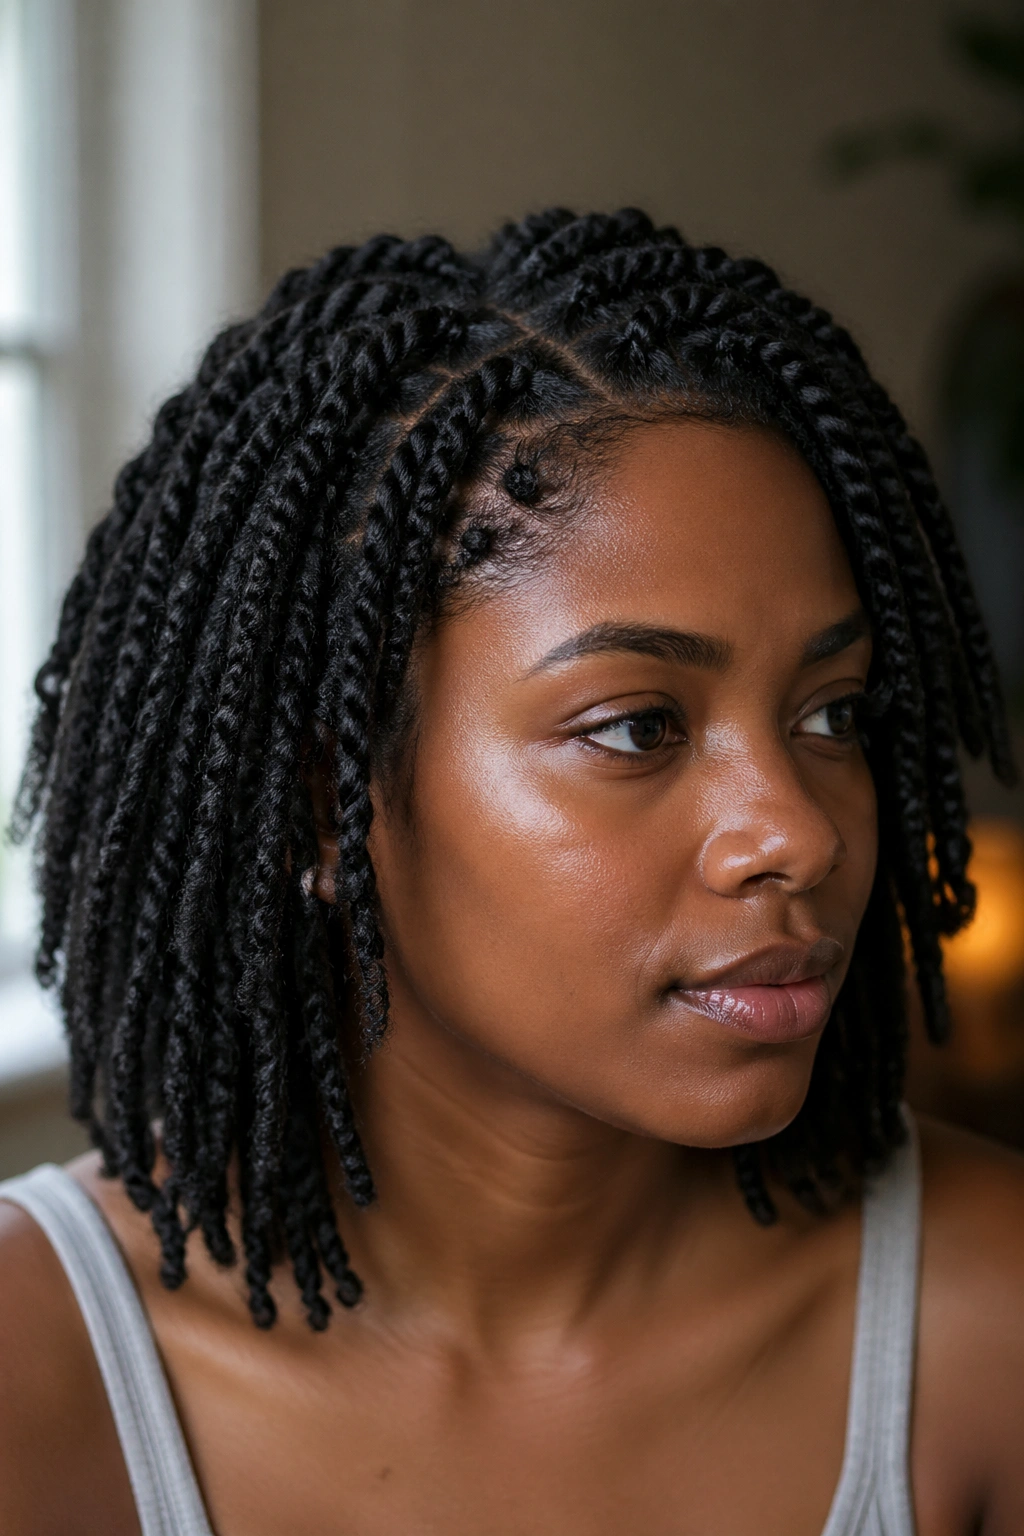
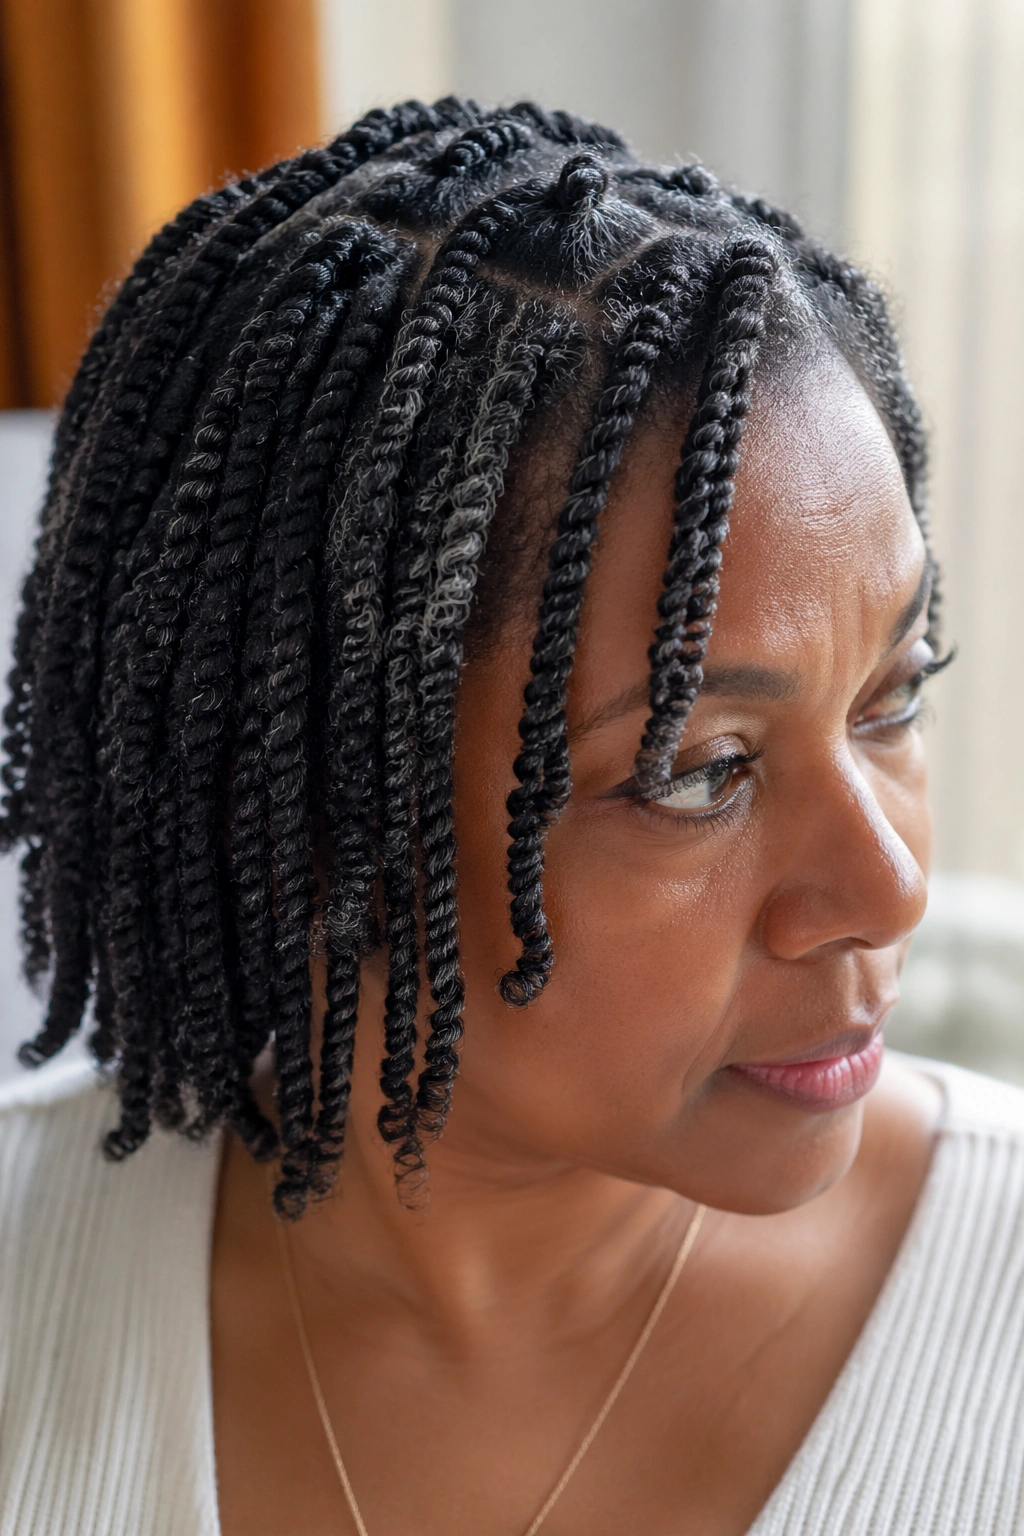
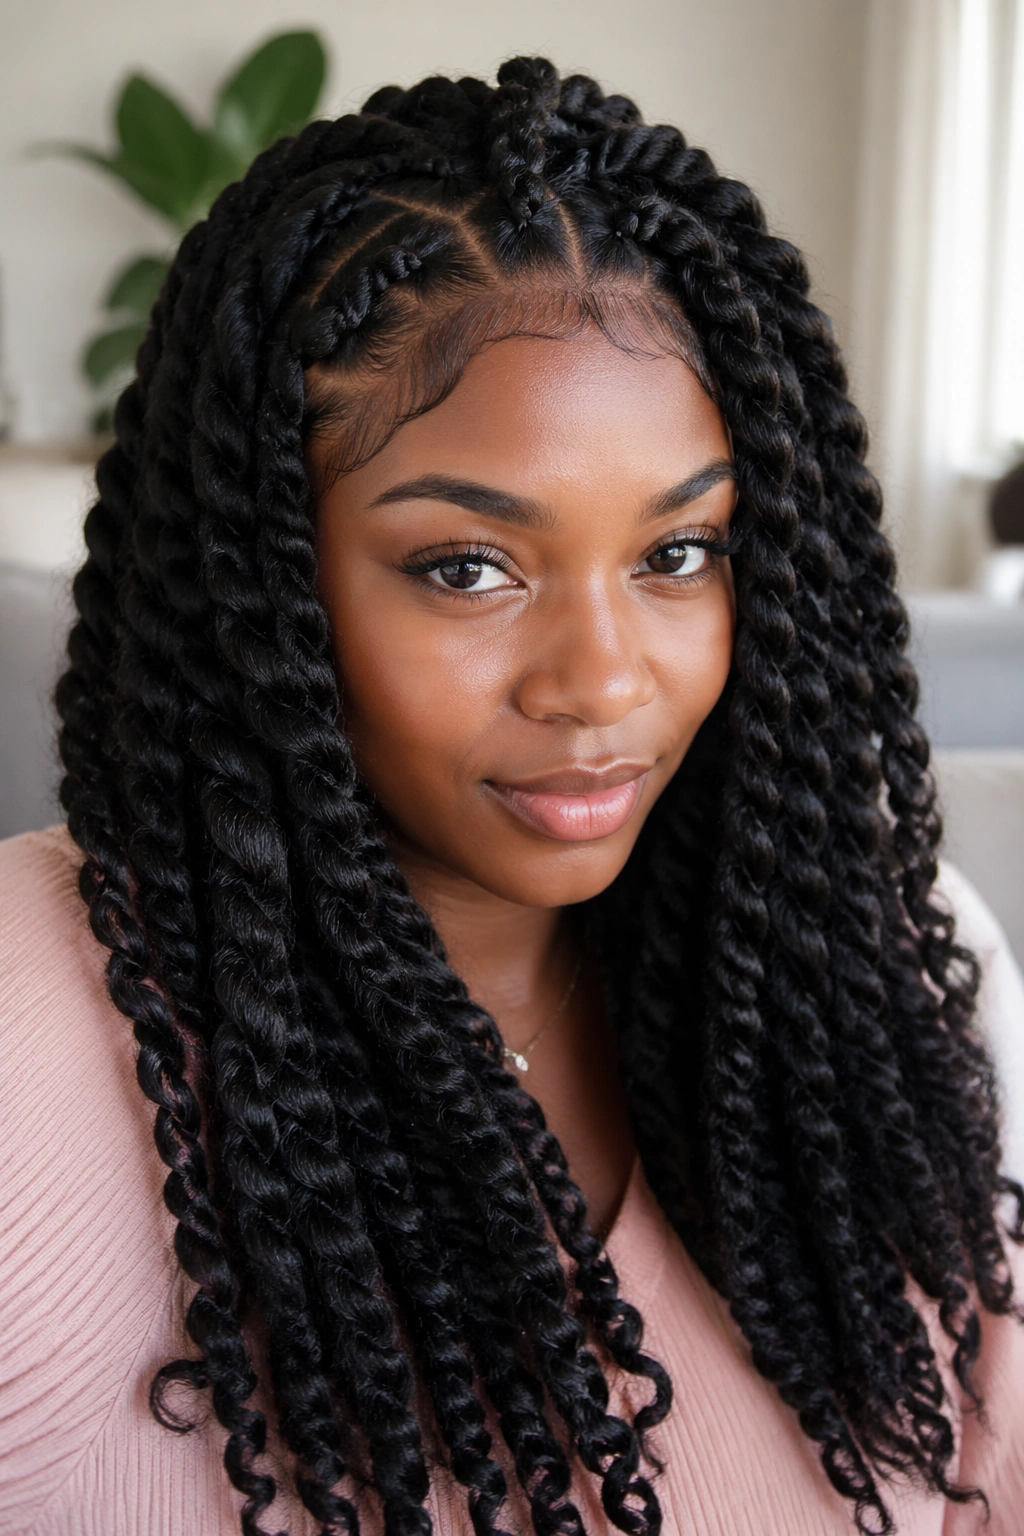
1. Classic Perm Twist — Natural Color
The foundational style. Natural hair, two-strand twisted with holding product applied throughout, secured with a small perm rod at the tip during the drying process to seal the end into a tight coil. Once the rods are removed after complete drying, the twist has a defined tip that tapers into a small spiral.
Why It Works
The perm-rod tip is what differentiates a classic perm twist from a standard two-strand twist. Without the rod, twists end in a blunt, split tip that unravels readily. With the rod, the tip curls under itself and stays sealed for weeks. That single detail significantly extends the style’s durability.
This works on all 4-type hair. The natural color version is particularly beautiful on grey-streaked hair — the twist pattern shows the color variation along each section.
Tip: Use a perm rod size that creates a tight coil without being so small it takes hours to work through the ends. Jumbo perm rods produce a looser, less defined tip; small rods produce a very tight curl. Medium rods are the standard starting point.
2. Jumbo Perm Twists — Bold and Full
Chunky, large-section perm twists where each twist is roughly the width of a finger — significantly thicker than the classic installation. The overall effect is fuller and more voluminous, with fewer twists creating a bold, statement silhouette.
Fewer sections means a faster install — a full head of jumbo perm twists can be done in two to three hours rather than the five to six that smaller twists require. The tradeoff is that larger twists can unravel more easily at the root since each section is heavier, and they tend to create less definition than smaller twists.
Who this is for: Women who want the perm twist look with maximum volume and minimum install time. Jumbo perm twists look particularly striking on natural hair with high density — the volume each twist contains is genuinely impressive when the style is freshly installed.
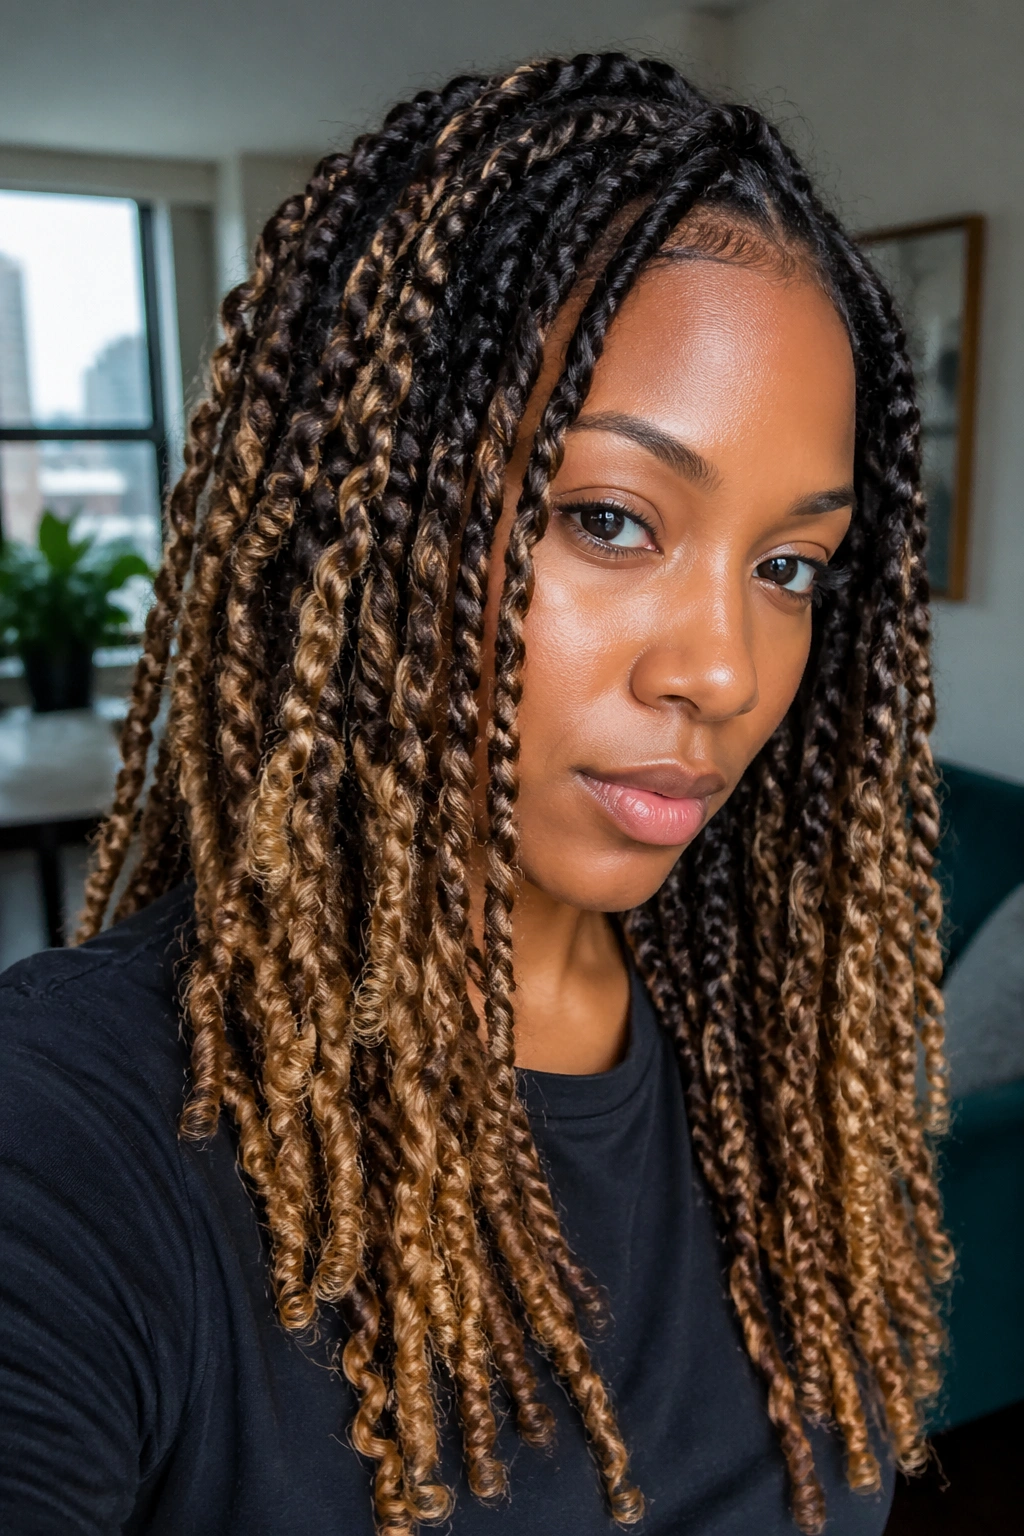
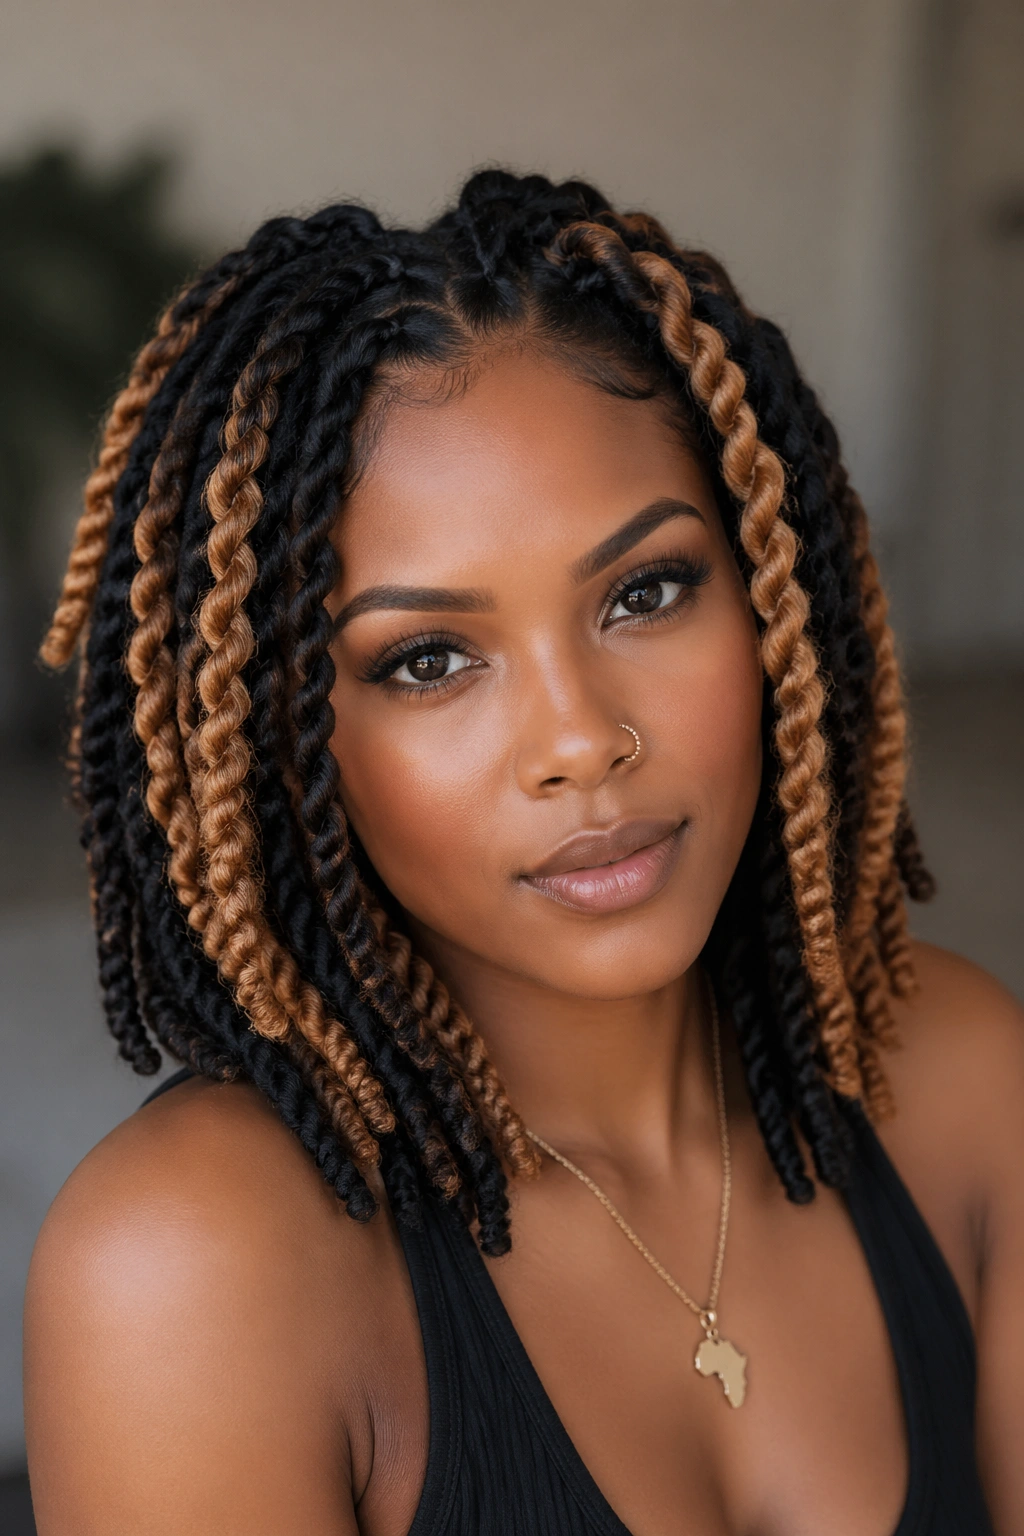
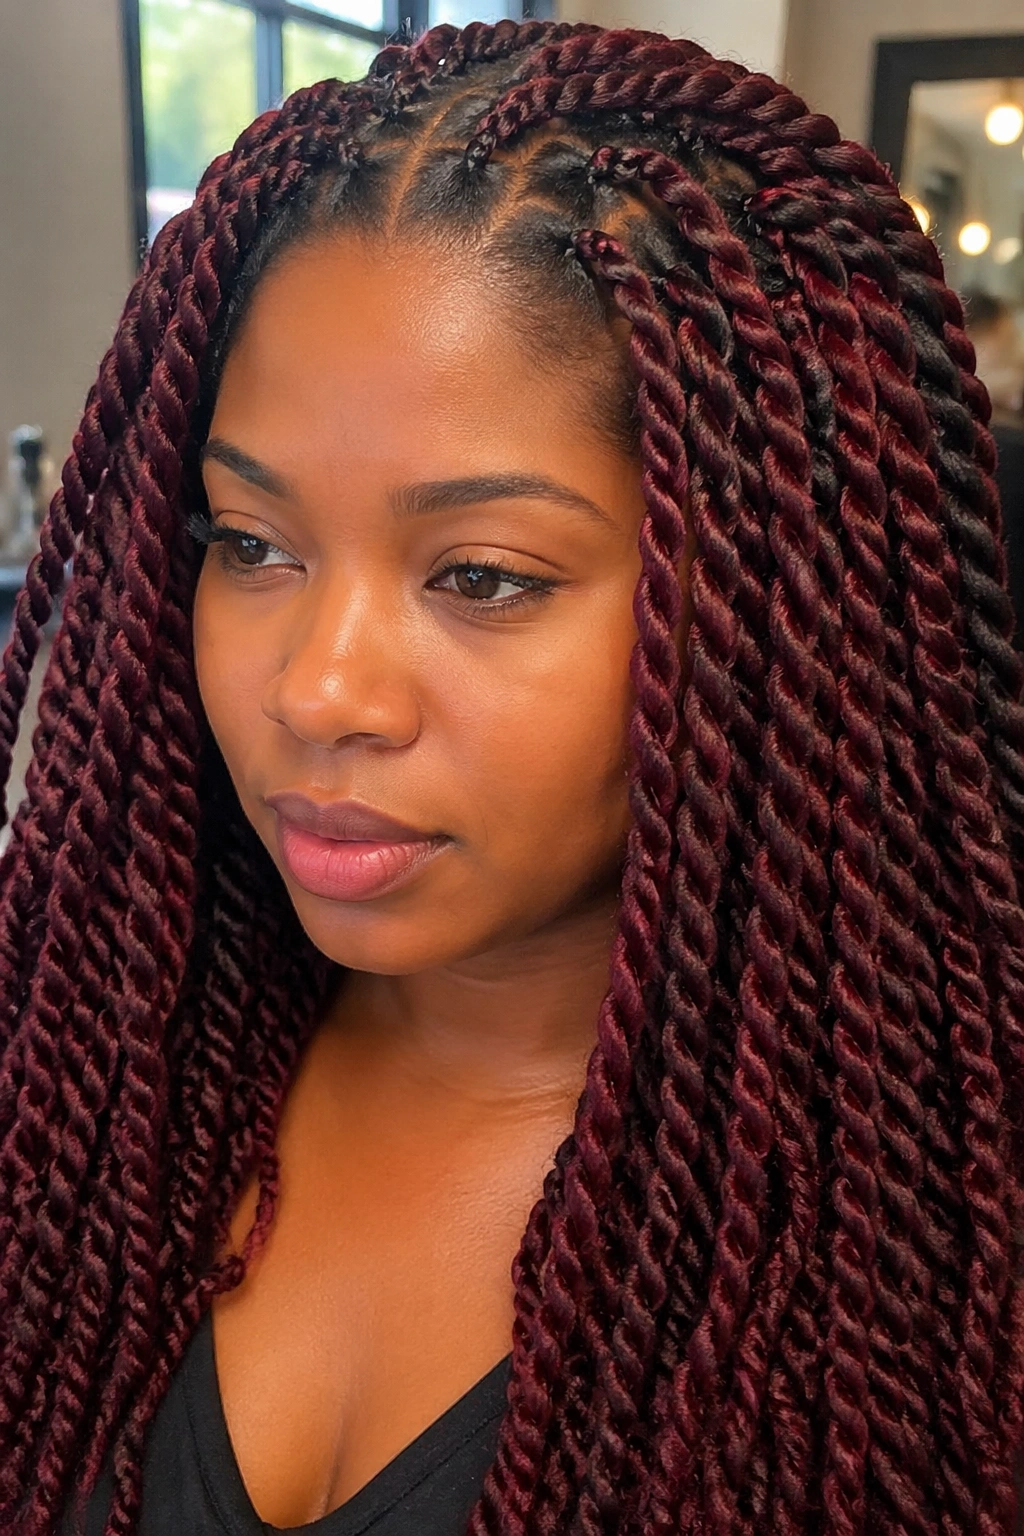
3. Perm Twists With Color Extension
Two-strand twists that incorporate colored extension hair — a strand of kinky twist hair in burgundy, auburn, honey blonde, or any other accent — alongside the natural hair from the root. The color runs continuously through the full length of each twist, creating a two-toned effect that reads differently from clipped-in color or surface-only coloring.
Unlike coloring your natural hair, extension color is temporary and damage-free. When you take the twists out, your natural color is intact. This makes it a genuinely risk-free way to experiment with color on afro hair, especially for people who’ve been curious about warm tones but not ready to commit to a chemical process.
Choose an extension color that’s one to two shades warmer than your natural color for a subtle, dimensional look, or go fully contrasting for something bold.
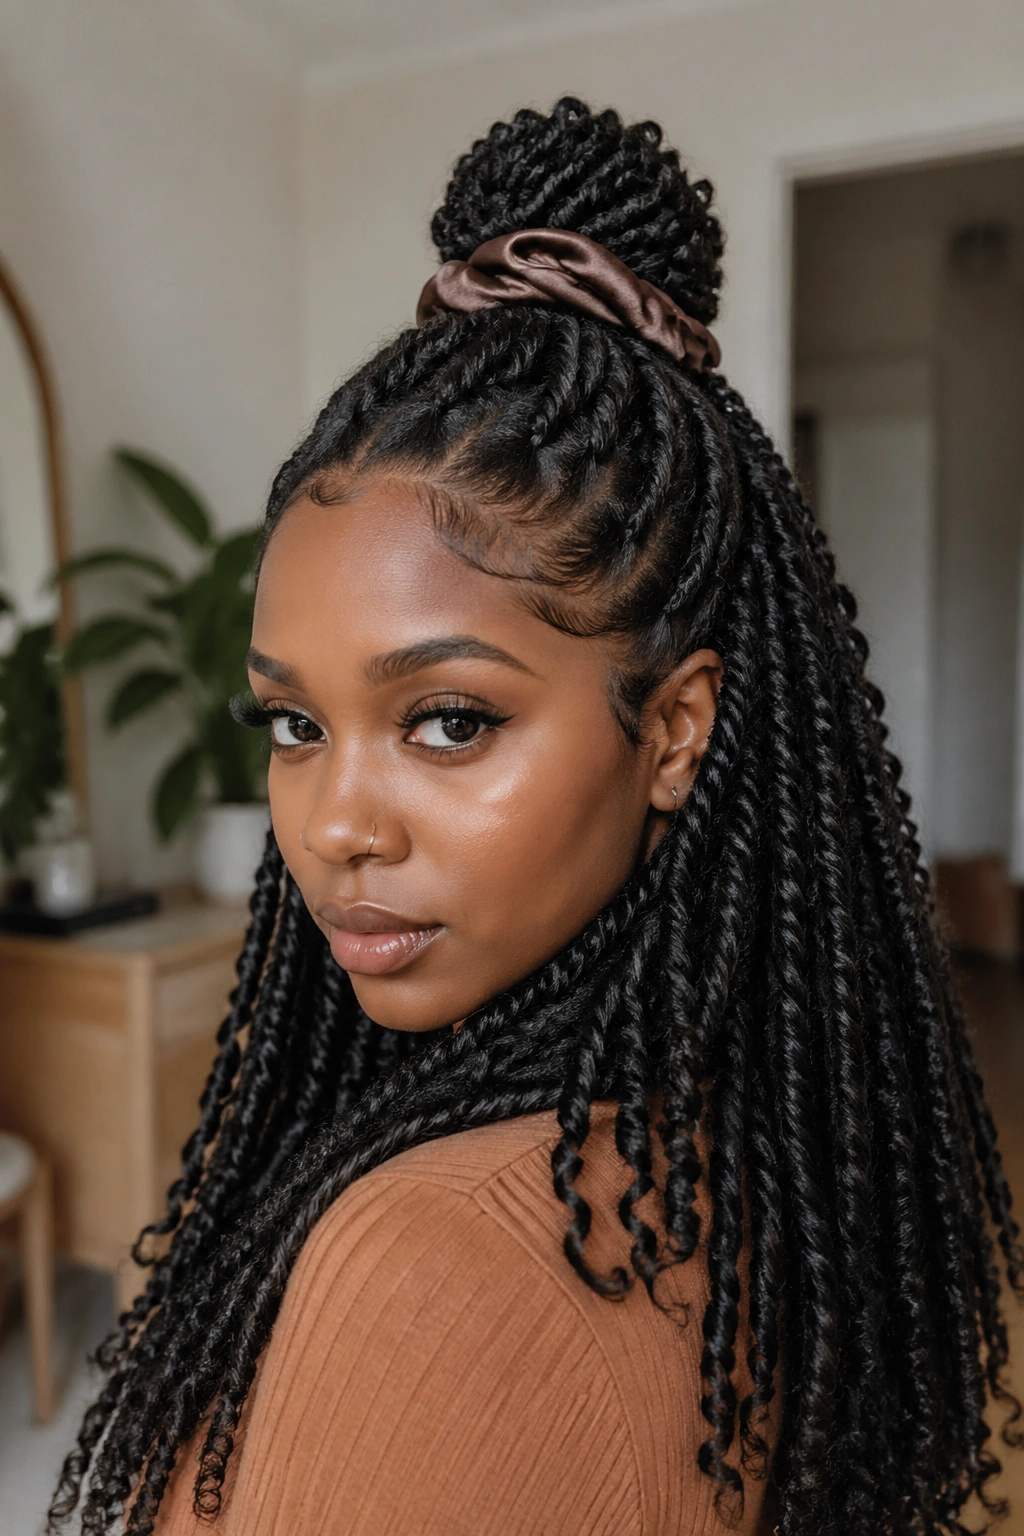
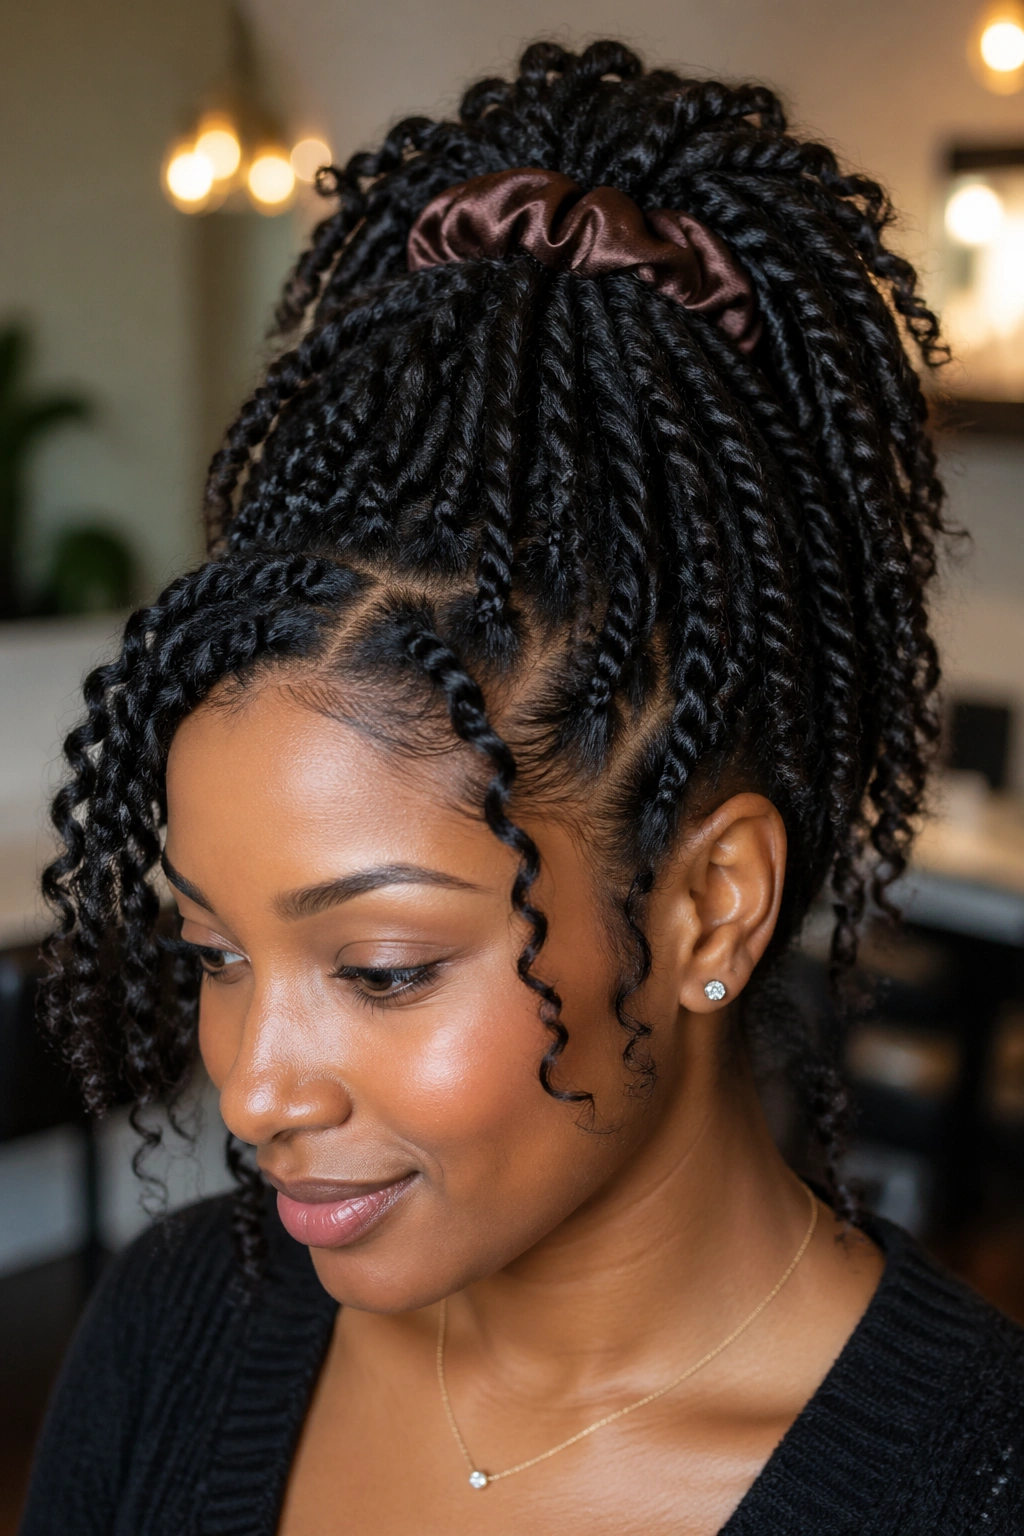
4. Perm Twist Updo — Gathered at the Crown
All the installed perm twists gathered into an updo at the crown — not restyled, not braided, just gathered loosely and secured with a satin scrunchie. The twists fall in a cascade from the crown, some caught in the scrunchie and some loose around it.
The beauty of perm twists as an updo is that you get all the benefits of a bun or puff silhouette without losing the textural detail of the twists. Each individual twist is still visible within the gathered mass. The result is more interesting than a standard bun and more polished than a loose puff.
This is the everyday versatility advantage of perm twists over free natural styles — you can change your silhouette completely in thirty seconds just by gathering.
5. Half-Up Perm Twist Style
The top half of the perm twists gathered at the crown, the bottom half hanging free. The gathering point sits at roughly the midpoint of the head — not a high ponytail, not a nape gather, but directly at the center of the back.
The gathered upper section creates a slight puff or gathered mass at the crown. The free lower section falls in its natural twist form. The contrast between the gathered structure at the top and the free movement at the bottom creates visual interest that a fully up or fully down look doesn’t have.
Practical detail: Use a soft, satin-covered scrunchie for the upper gather. A tight elastic or rubber band will create a dent in the twists that doesn’t resolve easily. The scrunchie holds without creasing.
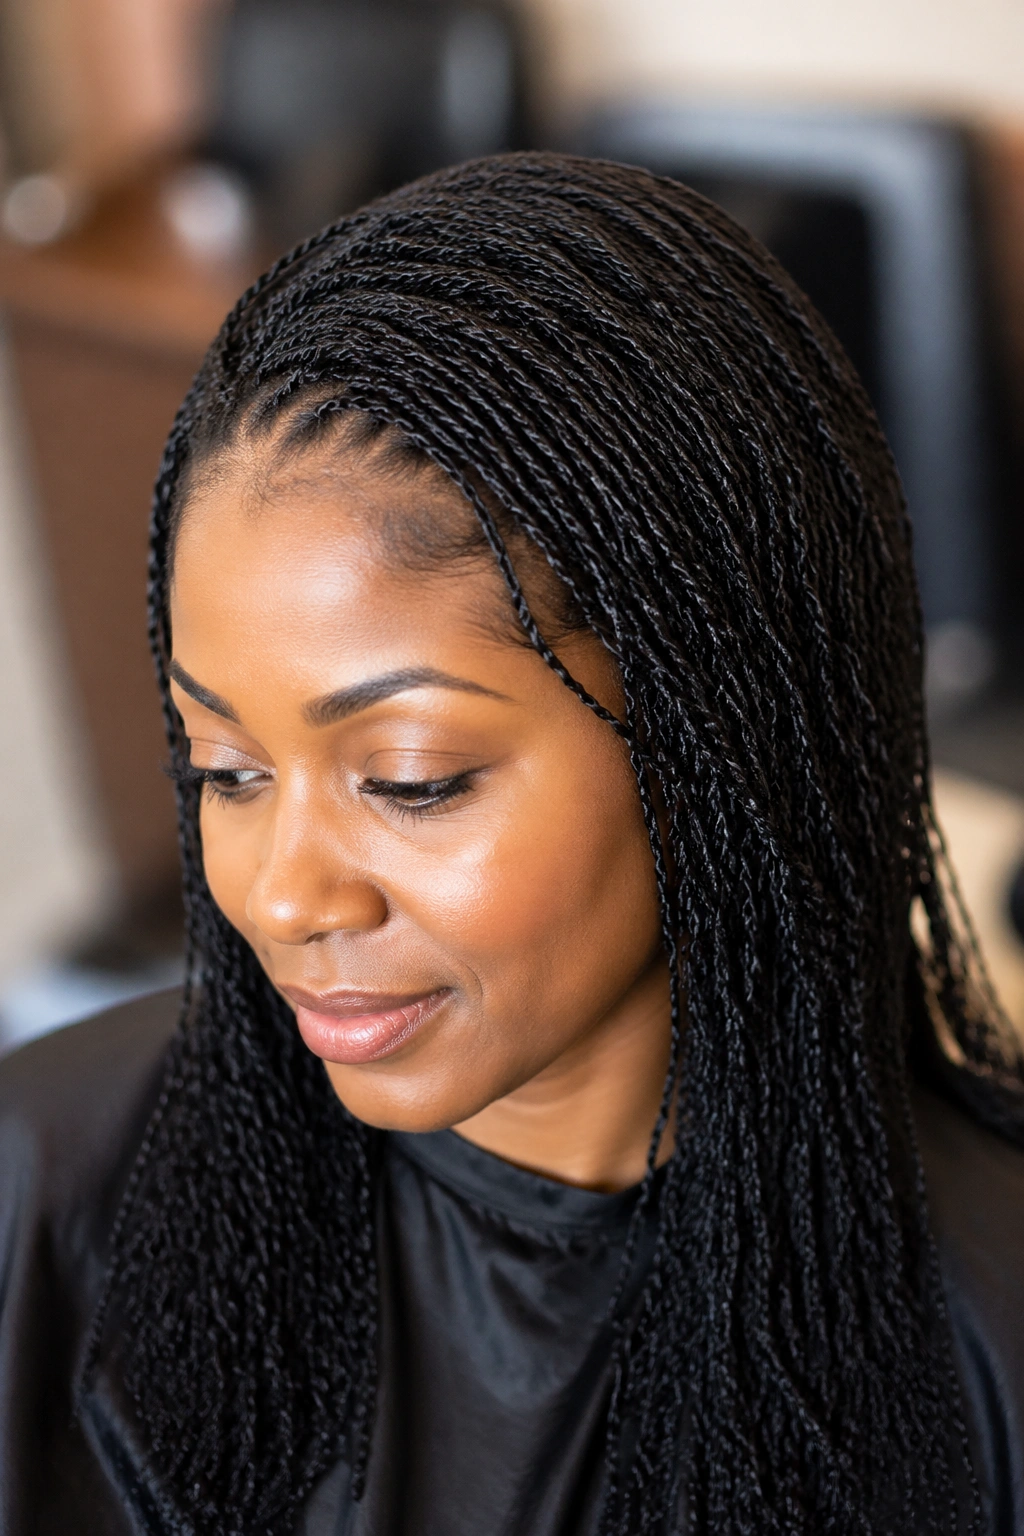
6. Knotless Perm Twists — Tension-Free Installation
Unlike standard perm twists that begin with a knot at the root where extension hair is attached, knotless perm twists start with natural hair only, adding extension hair gradually a half-inch to an inch from the scalp. The result: no tension knot pressing against the scalp, no bumps at the root, and no stress point where the heaviest part of the install begins.
What Makes It Different
The knotless method is gentler on the hairline and scalp, particularly important for women with thinning edges or sensitive scalps. The tradeoff is installation time — knotless takes longer per twist because the technique is more gradual. But the reduction in scalp stress is real, and for people who’ve experienced tension pain or hairline thinning from knotted installations, it’s worth the extra time.
Ask your stylist specifically for knotless if this is important to you — not all stylists offer it by default.
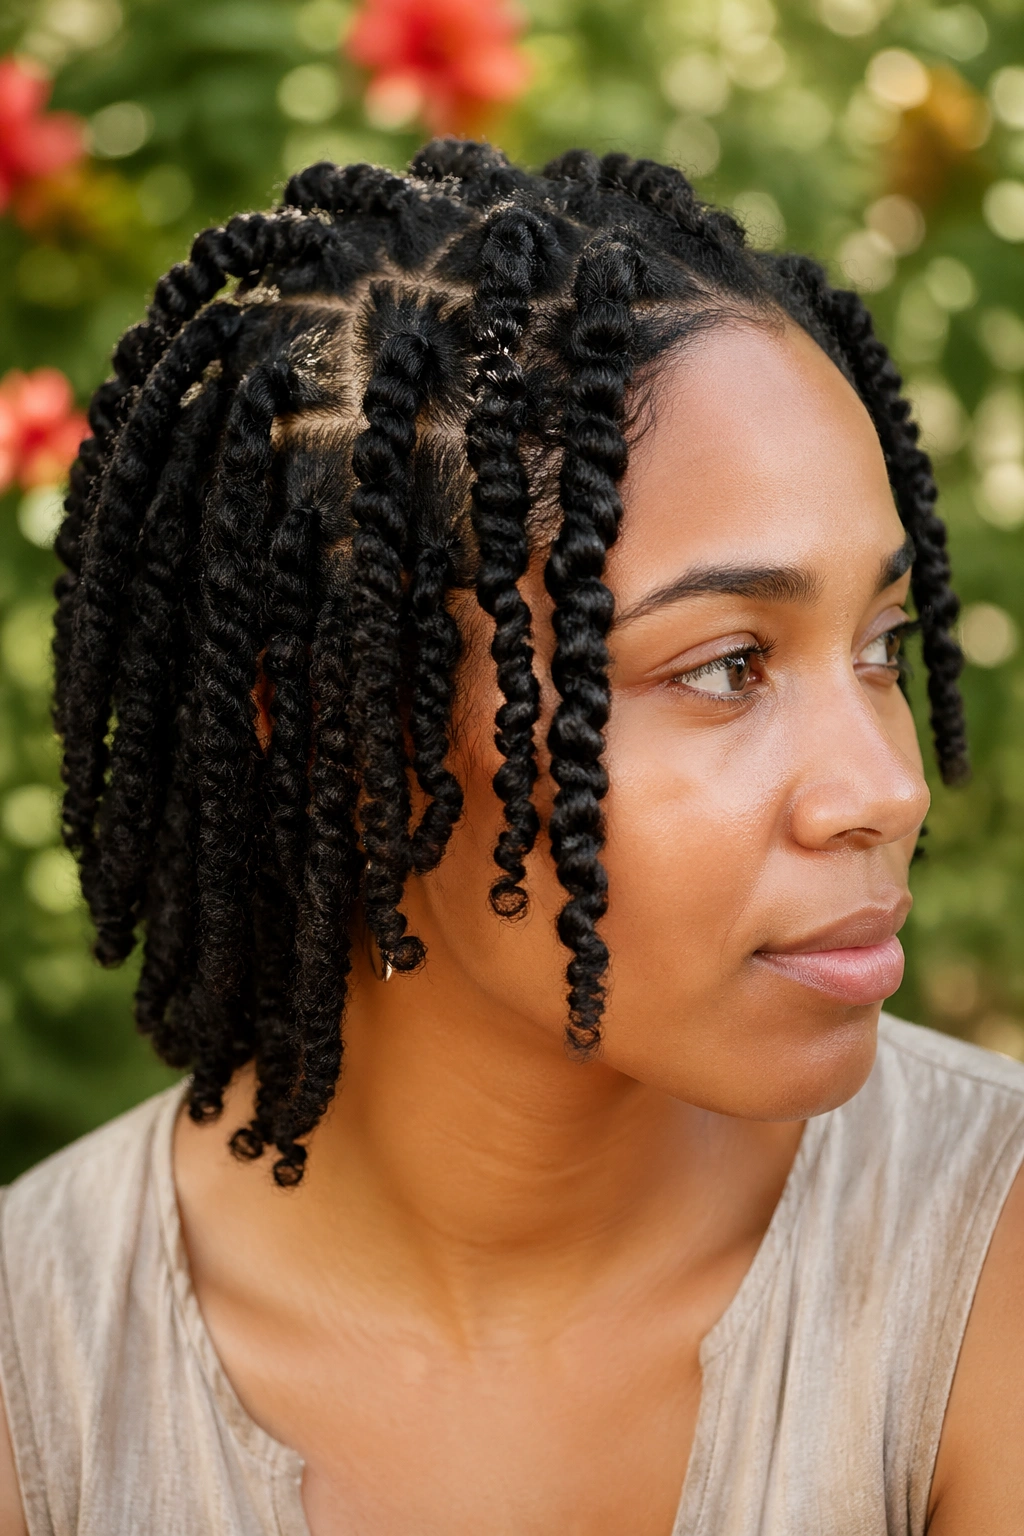
7. Short Perm Twists — Twa Length
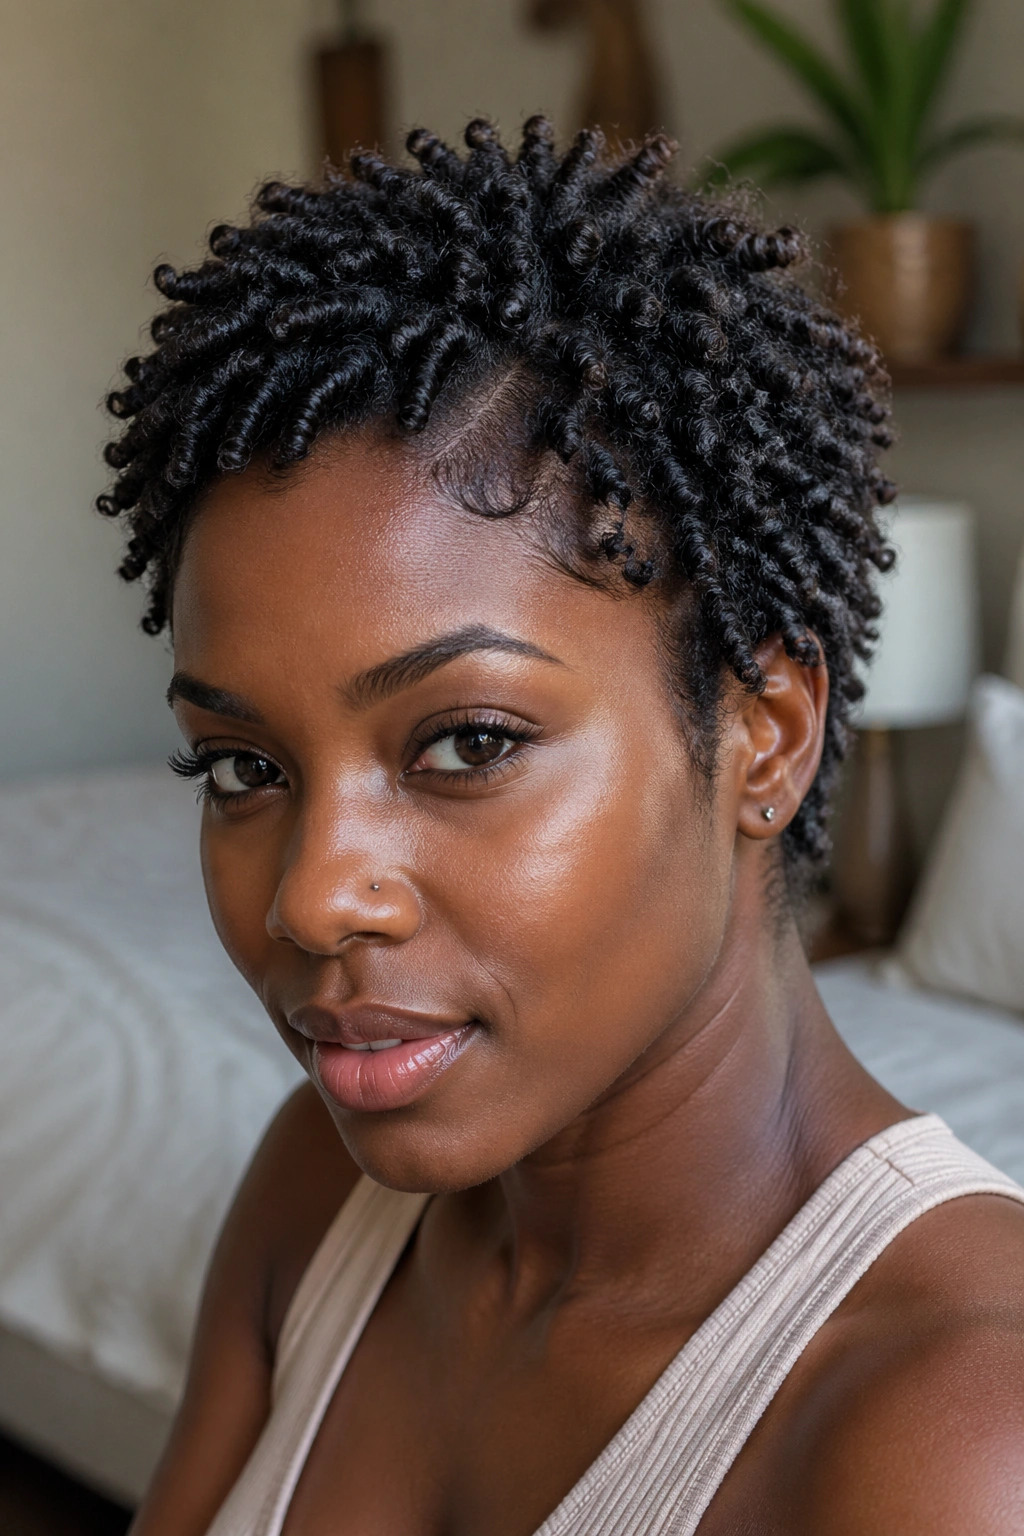
Perm twists on a teeny weeny afro or short natural hair — two to three inches of length. At this length, the twists are compact, neat, and close to the scalp. The coiled perm rod tip at each end creates a small, deliberate curl that finishes the twist cleanly.
This is underused. Many people assume perm twists require length, but short perm twists are a distinct, graphic look with their own appeal. The tight spacing of the twists on a short twa creates a dense, textured surface that looks like a sculptural pattern.
The maintenance is the same as longer twists — satin bonnet, regular scalp moisture, and a root re-twist if needed after a few weeks. The style’s proximity to the scalp makes it particularly durable against frizzing.
8. Perm Twists With Curly Ends
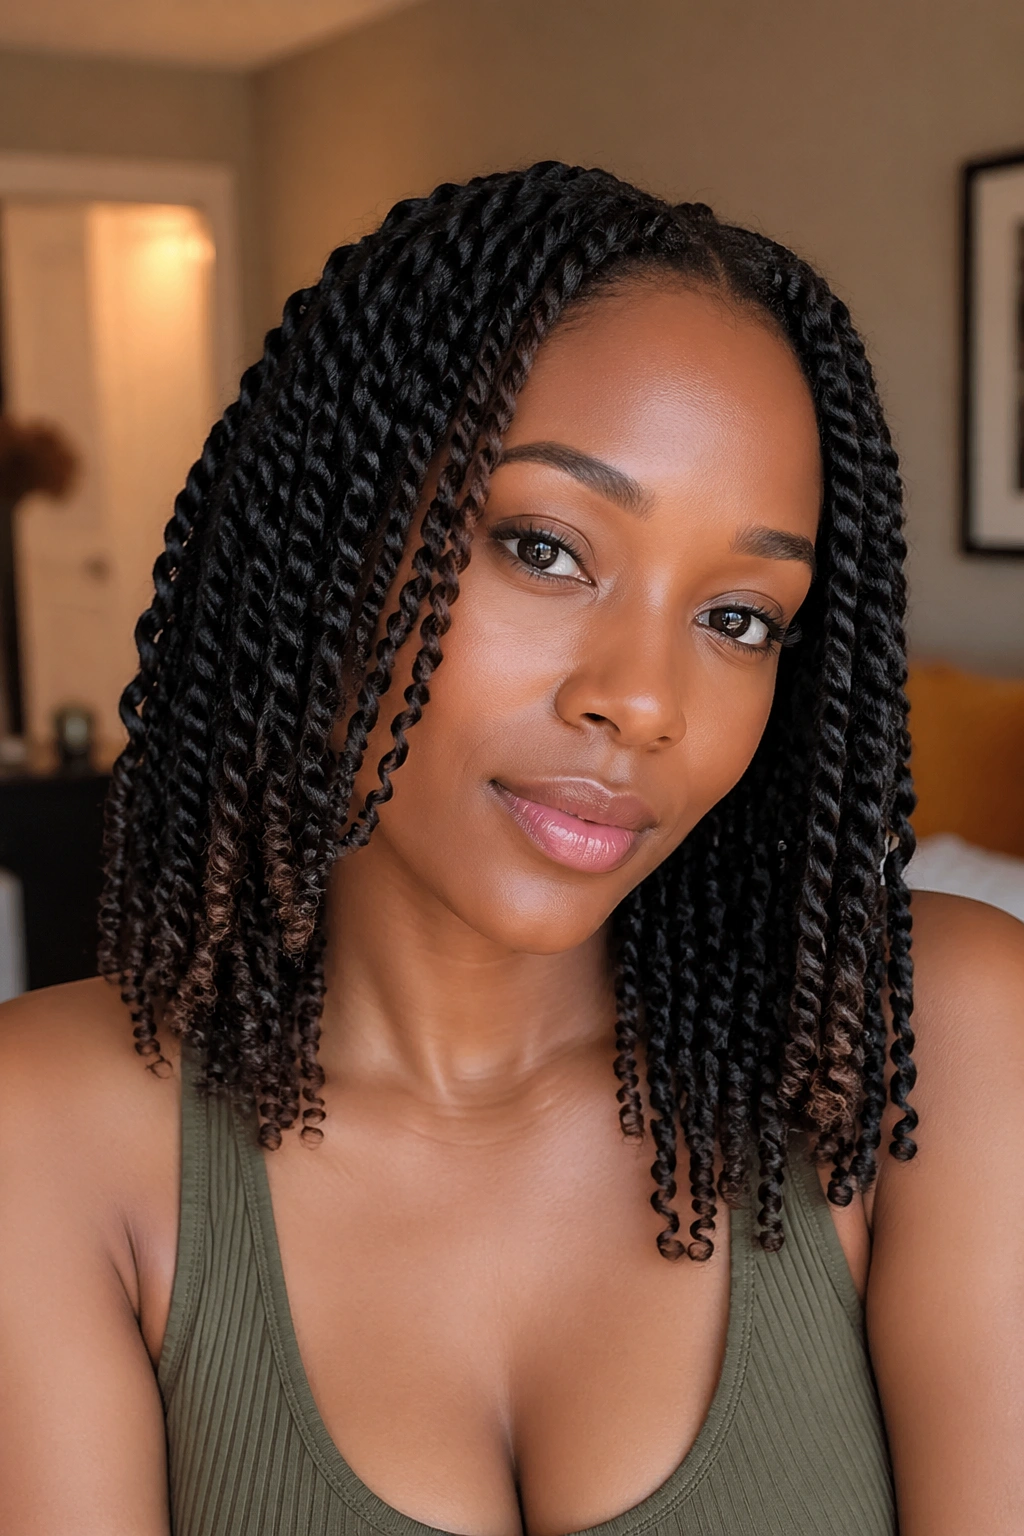
Perm twists where the natural hair at the tips is left out of the extension portion and allowed to coil freely at the end of each twist. Instead of a uniform extension from root to tip, the last inch or so of each twist is pure natural hair in its natural curl pattern.
The result is twists that have a tiny, freely coiling afro tip — a detail that’s both distinctive and beautiful, and that signals clearly that the style is rooted in natural hair rather than completely covered by extension.
This works best on 4A and 4B hair where the natural curl at the tip is tight enough to stay defined. On looser patterns, the free natural tip may not coil as cleanly.
9. Side-Part Perm Twist Layout
Standard perm twists, but with the parting following a strong side part rather than a centered pattern. The twists on each side of the part run in slightly different directions — following the part line — which creates a different visual rhythm than straight-back or centered parts.
A strong side part changes the entire silhouette of a perm twist installation. One side has more volume, the other shows the part clearly. The asymmetry reads as deliberate and styled.
Unlike centered perm twist patterns that are fairly symmetrical, the side part creates an angular, more fashion-forward look that works particularly well with dramatic earrings and strong makeup.
10. Perm Twist Lob — Shoulder Length
Perm twists installed to hit just at or below the shoulder — the twist equivalent of a lob. At this length, the twists move freely with your head, fan out when you turn, and create a full, natural silhouette without the weight and management concerns of very long installs.
This is the most versatile length for perm twists. Short enough to be manageable; long enough to gather into a bun or half-up. The shoulder length also means the tips of the twists are often visible against your clothing — the perm rod curl detail at each tip is visible and adds polish.
For women trying perm twists for the first time, this is a good entry length to understand how the style moves and what maintenance it actually requires.
11. Perm Twists With Gold Cuffs
Standard perm twists with gold, silver, or mixed metal cuffs slid onto random twists at varying heights. Cuffs — small, open metal rings designed for hair wear — click shut around a section of the twist and stay in place without any adhesive.
The cuffs add a decorative, editorial quality to a perm twist style without requiring any restyling. They can be placed at the root for one effect, at mid-length for another, or at the tip — right at the perm rod curl — for a finishing accent. Mix sizes and metals for something more complex; keep them uniform for something cleaner.
Cuffs are genuinely easy to remove at the end of the style’s wear period. They don’t tangle, don’t bond to the hair, and don’t require tools to take off.
12. Freeform Parting Perm Twists

Perm twists installed without deliberate geometric parting — the sections are taken organically rather than in measured squares or triangles. The result is twists that vary slightly in thickness, start at slightly different angles, and create a more natural, less precisely structured surface.
The frank advantage: Freeform parting is faster. It doesn’t require the meticulous rat-tail comb work that precise parting demands, and for home installation, it’s significantly more achievable without a second pair of hands. The resulting style still looks beautiful — just differently structured than a grid-parted install.
Some people prefer the freeform look on purpose, because it more closely resembles the way natural locs form on unmanipulated hair.
13. Perm Twists Into Braided Crown
All the perm twists gathered and woven into a braided crown at the top of the head — the twists themselves become the material of the crown braid rather than the twist strands being unraveled. The crown braid sits at the top and back of the head while the remaining twists fall free below.
This is a creative use of the install that creates a completely different look without taking the style down and starting over. The twist texture within the crown braid is visible and interesting — much more textured than a crown braid made from straight or wavy hair.
Holds for a day or two as a braid before needing to be re-gathered.
14. Ombre Perm Twists — Dark Root to Light Tip
Extension hair that transitions from a dark color at the root to a lighter color at the tip, blended by alternating strands within each section. The ombre effect runs along the length of each twist individually — each twist has its own color gradient from root to end.
Installing ombre perm twists requires slightly more preparation — separating the dark and light extension hair into a pre-blended mix for each section takes time during the setup. But the result is a color effect that doesn’t exist in nature and reads as completely intentional.
The most effective ombre combinations for afro hair: black to brown, dark brown to caramel, burgundy to auburn, dark brown to bronze. Extremely light colors (platinum, ash blonde) against very dark natural hair can look unnatural at the root transition.
15. Sisterlocks-Inspired Perm Twists
Very fine perm twists — each section roughly pencil-width or smaller — installed across the entire head. The density and scale mimic the look of Sisterlocks without the permanent commitment. More than fifty individual twists on a full head, each one fine enough to move independently.
How to Get the Most From It
The install time is significant — a full head of fine perm twists can take eight to ten hours, even in a professional salon. The result, however, is unlike any other perm twist style: the density creates a full, heavy, loc-like mass that moves as a unit while still having individual strand detail up close.
For women who want the aesthetic of thin locs without the commitment, this is the closest alternative. Maintenance is the same as any perm twist style, but the fine sections require particularly careful re-twisting at the root to avoid matting where sections grow close together.
16. Perm Twist Hawk — Center Ridge Gathered
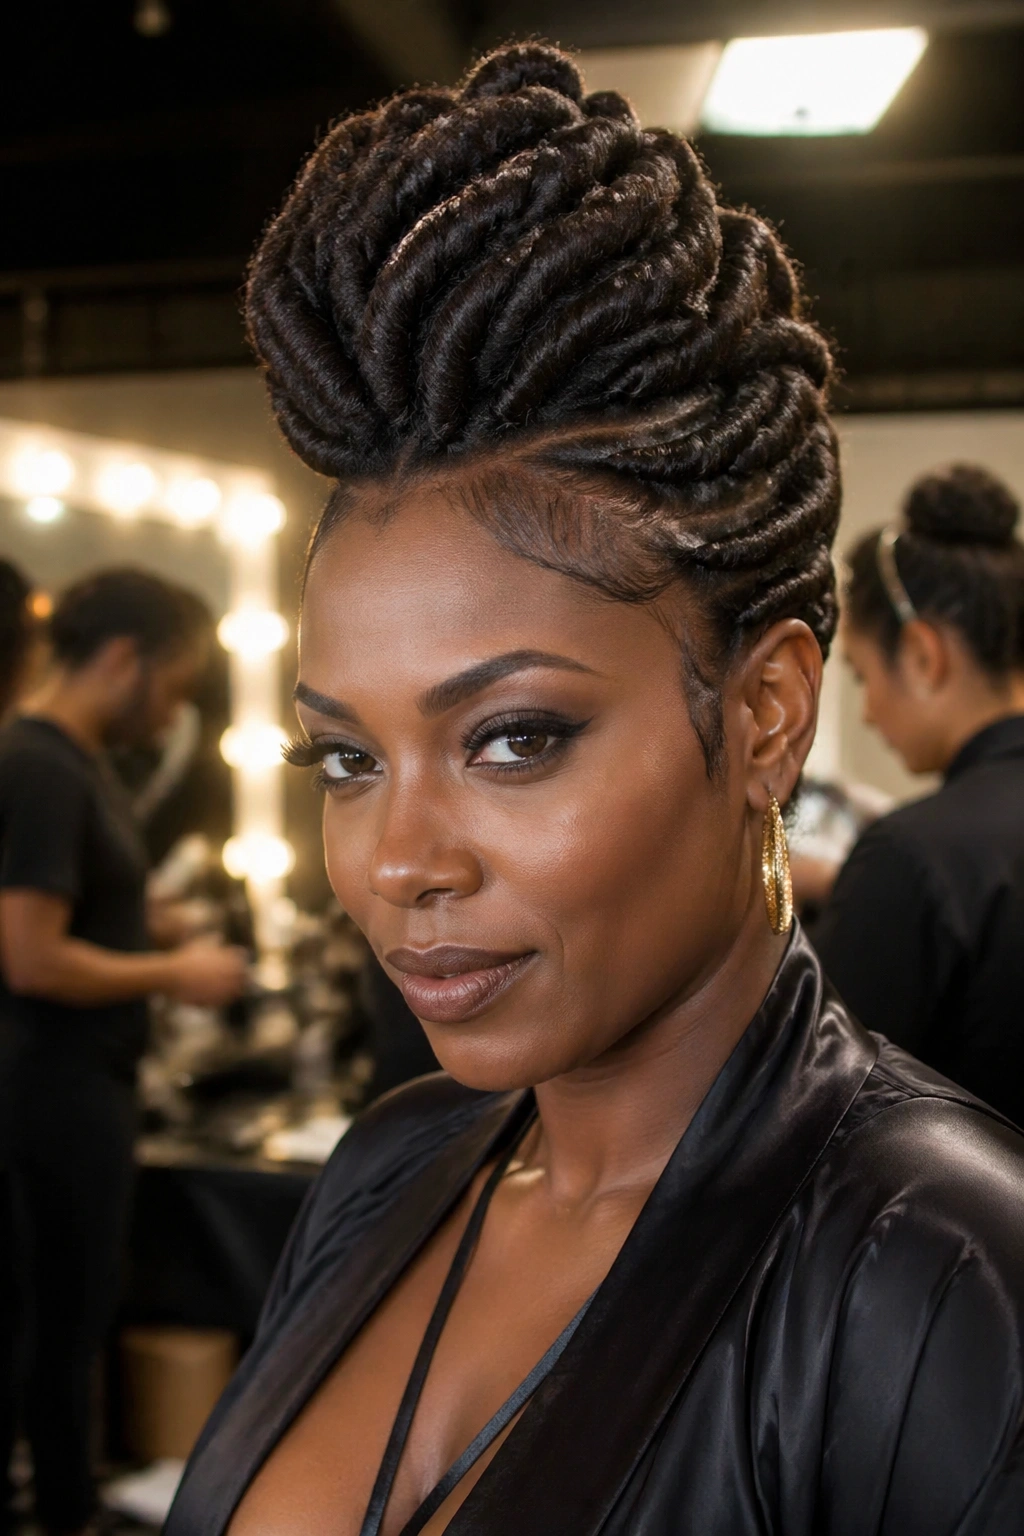
All the installed perm twists gathered so the center section runs in a ridge from front to back — a faux hawk silhouette using the twists as the material. The side twists are swept inward and pinned at the center, while the center twists stand tall as a ridge of texture.
This is the most dramatic styling option for an existing perm twist install. It works best on longer twists — at least shoulder length — where the sweeping and pinning can create real height and structure without the twists being too short to pin convincingly.
The silhouette is striking and deliberate. Wear it for an event or a night out; it’s not an everyday configuration.
17. Wrapped Perm Twist Bun
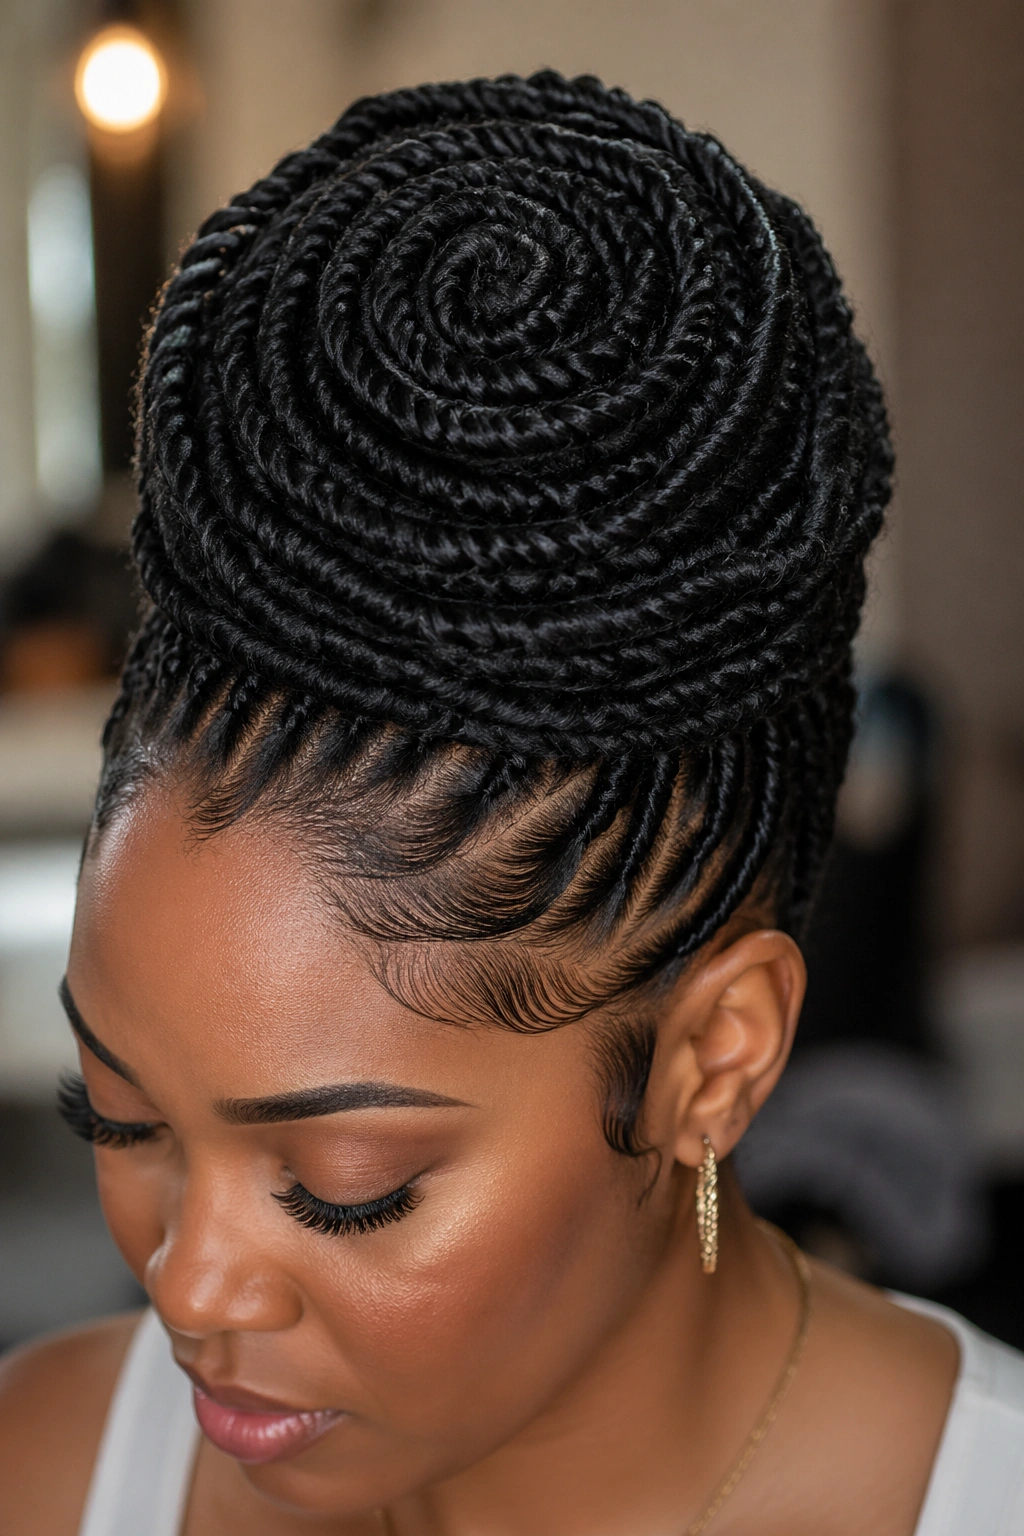
A perm twist bun where the twists are wrapped around a central point — not stuffed in, but actually wound — creating a spiral pattern visible on the surface of the bun. Start with a single twist at the center and wrap each subsequent twist around the previous in a tightening spiral, pinning as you go.
Unlike a standard gathered bun where the internal structure is random and the surface is whatever the exterior twists happen to show, a wrapped bun has a deliberate pattern — concentric rings of twists visible from any angle. It reads as artistic and intentional in a way that takes an extra five to ten minutes to execute.
Secure with pins at each wrap layer, not just at the perimeter.
18. Mini Perm Twists — Dense and Detailed
Perm twists installed in sections smaller than a pencil diameter — fine, detailed, and dense. The difference between mini and standard perm twists is significant in the final look: mini twists create a more uniform, loc-like surface with less individual strand movement and more mass.
At this density, the style is a long-term commitment — mini perm twists last longer than larger sizes because the finer strands lock together as growth continues, extending the style’s coherent appearance beyond the point where standard twists would start to look unraveled.
Re-twisting the roots on mini perm twists requires patience and precision. A fine-tip rat-tail comb and plenty of holding product per section keep the refresh manageable.
19. Two-Tone Perm Twists — Bold Contrast
Two different colors of extension hair installed alternately across the head — not blended within single twists, but alternating entirely: one dark twist, one light twist, dark, light, across the whole installation. The contrast between the two colors creates a pattern that’s visible from across the room.
Who this is for: Women who want color impact without subtlety. Two-tone perm twists are a statement, full stop. The alternating color pattern requires no design beyond the install itself — the color layout is the design.
Works in any combination: black and burgundy, brown and blonde, dark natural hair color and a vivid accent. The bolder the contrast, the stronger the visual effect.
20. Perm Twists With Edge Design
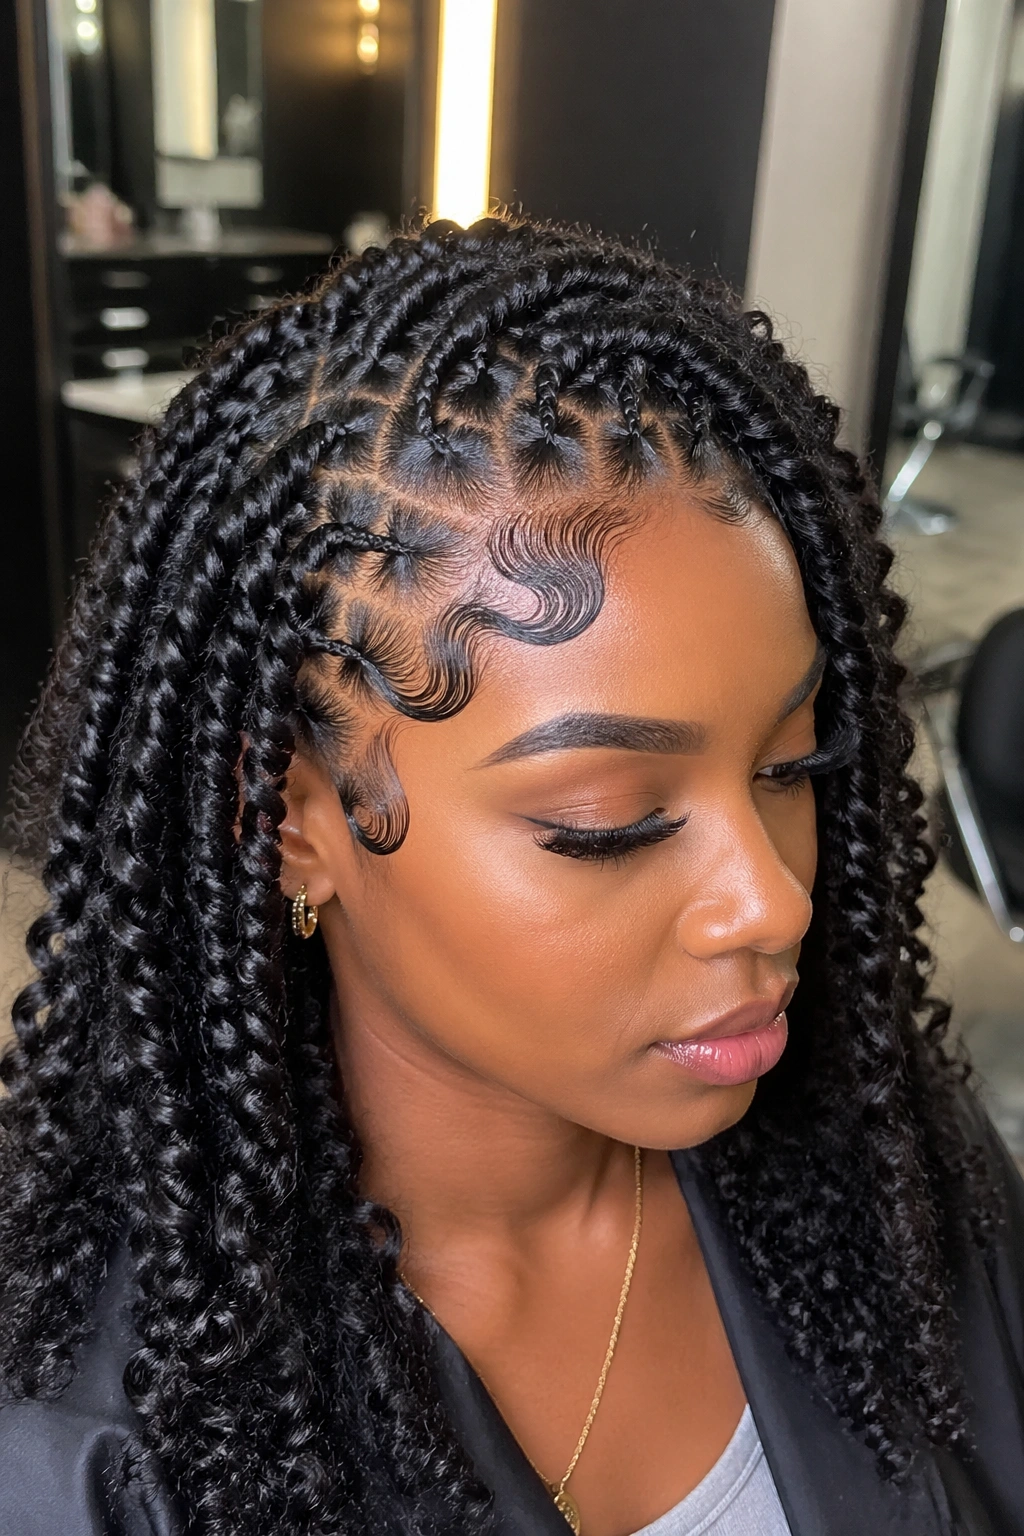
A standard perm twist installation, but with the edges styled into a deliberate design — curves, swirls, or simple wave patterns laid flat with edge gel against the hairline. The edge design creates a decorative frame for the perm twists, adding a layer of detail at the hairline that the twists themselves can’t provide.
Edge designs are temporary — they last one to two days before the edges need to be reset. But for a special occasion or an event, the combination of perm twists above and an edge design at the hairline creates a complete, polished look.
Simple designs — a single symmetrical swirl on each side of the part — are achievable with a soft brush, edge gel, and a bobby pin to hold curves in place while they set. More complex designs may require a professional.
21. Perm Twist Ponytail — All Up
All the perm twists gathered into a high ponytail at the crown — not a bun, but a true ponytail where the twists fall freely from the gathered point rather than being contained. The gathered base sits at the very top of the head, and the full length of every twist cascades downward from it.
The silhouette is dramatic from the side and from behind — a tall gathering point with a full fall of textured twists below. From the front, the exposed scalp and edges read as clean and graphic.
Practical note: The weight of all the twists gathered at a single point creates stress on that section of hair. Use a very soft, wide scrunchie to distribute the tension across as much hair as possible rather than a narrow elastic that bites into the hair. Wear the ponytail configuration for a day at a time rather than all week.
22. Boho Perm Twists — Loose and Layered
Perm twists installed in sections of varying size — some thick, some thin — creating an intentionally irregular, bohemian texture rather than the uniform grid of a standard installation. A few loose strands of natural hair are allowed to escape the twists deliberately, adding to the free-spirited quality of the look.
The boho approach is not accidental — it’s a deliberate styling choice that requires more planning than it looks. Choose your section sizes with intention: clusters of fine twists alternating with one or two chunky ones, with natural hair sections between them, creates a layered, dimensional result.
This is the perm twist for people who find perfectly uniform installs too structured and want something that looks more like it happened naturally.
Maintenance That Actually Protects Your Hair Underneath
The hair underneath your perm twists is doing what hair does — growing, shedding some strands, potentially drying out if not properly moisturized. The risk with any long-term protective style is that the “protective” label becomes an excuse to ignore the hair entirely.
Every week, mist your scalp lightly through the parted sections of the twists with a diluted leave-in or a water and oil mix. Let it absorb. Massage your scalp gently with your fingertips — not enough to disturb the twist pattern, just enough to stimulate circulation and work the moisture in.
If you notice buildup at the scalp or the twists starting to smell — which can happen if sweat and product accumulate — don’t wait for an installation change to wash. You can wash perm twists in place. Dilute your shampoo in water, apply it to the scalp through a spray bottle or squeeze bottle, massage gently, and rinse thoroughly. Let the twists dry completely before sleeping.
Taking Down Perm Twists Without Damage
The takedown matters as much as the install. Rushed takedowns cause more mechanical damage to afro hair than almost any other single event in a natural hair routine.
Cut any twisted-in extension hair if extensions were used — don’t try to unravel extension material, it catches and breaks natural hair. Once the extension portion is removed, unravel each natural twist from the tip upward, holding the base firmly. As you unravel, apply a small amount of conditioner or detangling spray to each section. Do not rush. A good takedown on a full head of perm twists takes ninety minutes to two hours, which is the appropriate amount of time.
After all twists are out, your hair is likely tangled at the shed hair points — normal hair sheds 50-100 strands daily, and in a perm twist install, shed hair stays within the twist rather than falling away. This is not damage; it’s accumulation. Detangle on saturated, conditioned hair with a wide-tooth comb, working from ends to roots, section by section.
Follow immediately with a deep conditioning session. The hair has been enclosed for weeks — a thorough moisture treatment is both reward and restoration.
Choosing the Right Extension Hair for Perm Twists
Not all extension hair produces the same result in a perm twist install, and the difference shows immediately in the final look. The most commonly used extension material for perm twists is kinky twist hair — a pre-kinked, synthetic fiber that closely mimics the texture of 4C natural hair. It blends seamlessly with most afro curl patterns at the root, and the surface texture complements the coily, rope-like appearance of the twist itself.
Marley hair is another option. It’s slightly coarser and less uniform than standard kinky twist hair, which gives the finished perm twists a rougher, more natural-looking surface — closer to what actual locs or very mature twists look like. Some people prefer this; others find it harder to manage at takedown.
Cuban twist hair — a loopier, springier fiber — produces a slightly different result: the twist has more bounce and a more open texture. It’s a good choice for jumbo or chunky perm twists where the voluminous quality of the curl matters more than surface texture detail.
What you should avoid: straight synthetic braid hair, which has no texture and produces a perm twist that looks smooth and artificial at the surface. The whole point of perm twists is the kinky, coily texture that makes them look like natural hair — using the wrong extension fiber undermines that entirely.
Buy extension hair in a weight that matches your natural hair’s density. Overly heavy extension packs loaded onto fine natural hair create stress at the root regardless of installation technique. A good rule: if your natural hair is fine, use less extension hair per section, not more.
Scalp Care During the Wear Period
Scalp health doesn’t take a break because your hair is in a protective style. In fact, the enclosed environment of a perm twist install — especially with dense or fine twists that sit close together — means the scalp gets less air circulation than it does with free natural hair. Sweat, buildup, and dryness can accumulate more quickly.
Set a weekly reminder to tend to your scalp. Use a dropper bottle or a spray bottle with a narrow nozzle to get product between the twist parts and onto the scalp itself rather than just onto the surface of the twists. An oil blend — jojoba and tea tree work well, roughly ten drops of tea tree to an ounce of jojoba — delivers moisture and has mild antimicrobial properties that reduce odor and itching.
Massage your scalp with your fingertips for about two minutes each session. Don’t press hard enough to shift the twists; just enough to stimulate circulation and work the oil in. The sensation should feel good — a gentle, targeted pressure that leaves your scalp feeling refreshed rather than sore.
Itching is a signal, not something to push through. Persistent itching usually means buildup or dryness. Address it with a scalp wash rather than scratching, which can cause micro-abrasions on the scalp and worsen the problem.
Styling Perm Twists for Different Occasions
One of the most practical things about a perm twist install is how many different looks you can pull from the same set of twists without any additional time or product investment. The base style — the twists as installed — is appropriate for most everyday settings. From there, the styling options branch widely.
For work: gather all the twists into a low bun or a wrapped updo. The gathered silhouette reads as professional and intentional in virtually any workplace. Add a simple gold or pearl accessory at the gather point and you’ve elevated the look without any effort.
For a social event: wear them fully loose and use a wide-tooth comb or your fingers to separate slightly, adding a small amount of oil to give the surface a sheen. Loose, full, and textured reads as confident and fashion-forward in social settings.
For formal occasions: the wrapped crown bun described in the style entries above is the move. Alternatively, gather the twists into a high, full updo and secure deliberately so the texture of the individual twists is visible in the updo shape.
For the gym or during activity: a high pineapple or a loose bun keeps the twists out of your face. Don’t stress about the twists looking perfect after a workout — they’re protective specifically because they can take some wear and recover.
The versatility is the selling point. You’re not locked into one look for four to six weeks. You’re locked into the same installation with a full wardrobe of styling options available anytime.
What Perm Twists Look Like Over Time — A Realistic Timeline
Week one: the freshest, tightest, most defined the twists will ever look. The tip curls are crisp, the surface texture is uniform, and the parts are clean. This is the window to wear the style fully loose and appreciate the detail.
Week two to three: the twists have settled. Some root loosening may begin, especially along the perimeter. The tips are still intact. The overall shape is slightly softer and more lived-in — which many people prefer to the very fresh look.
Week four to five: significant root loosening is common, particularly if the hair grows quickly. This is when a mid-wear root re-twist makes the most difference. The middle and tip sections of each twist are still fine; only the first one to two inches at the root needs attention.
Week six and beyond: the style is reaching its natural limit. New growth is significant and the base of each twist looks noticeably different from the installed portion. At this point, most people opt for takedown rather than another round of root re-twisting. Some, particularly with finer twists that lend themselves to maturation, may choose to keep them longer — but this carries the risk of the twists starting to combine at the roots, which can make takedown more difficult.
Respect the timeline. Getting more weeks out of a style by ignoring what the hair is clearly telling you creates more problems at takedown than the extra weeks are worth.