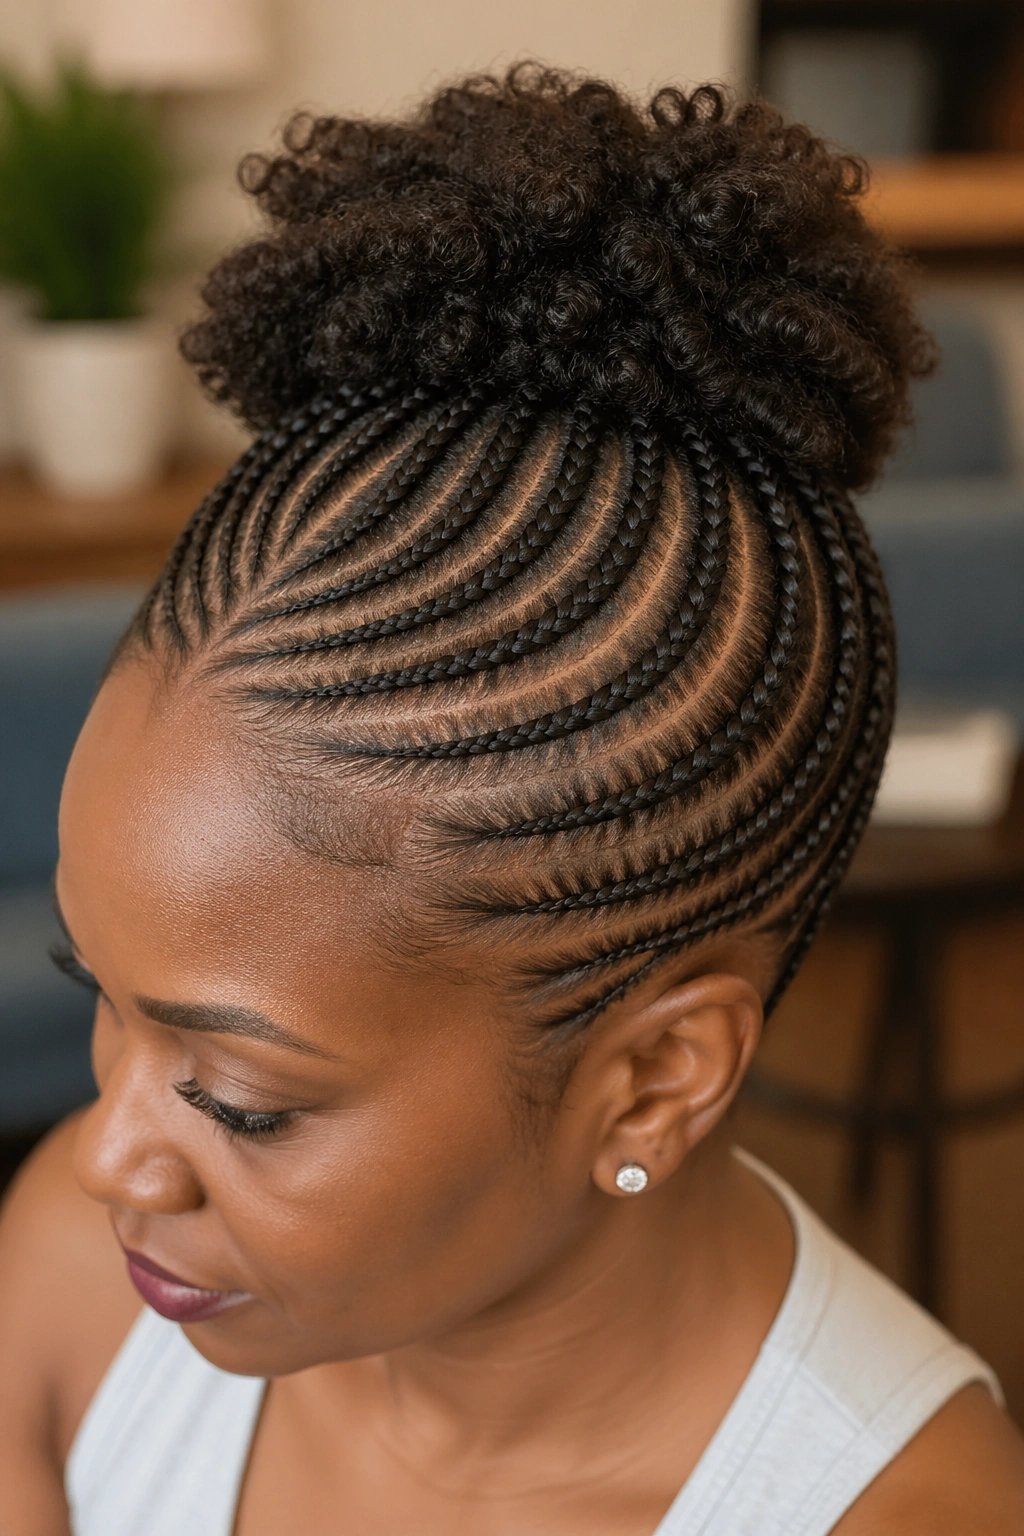
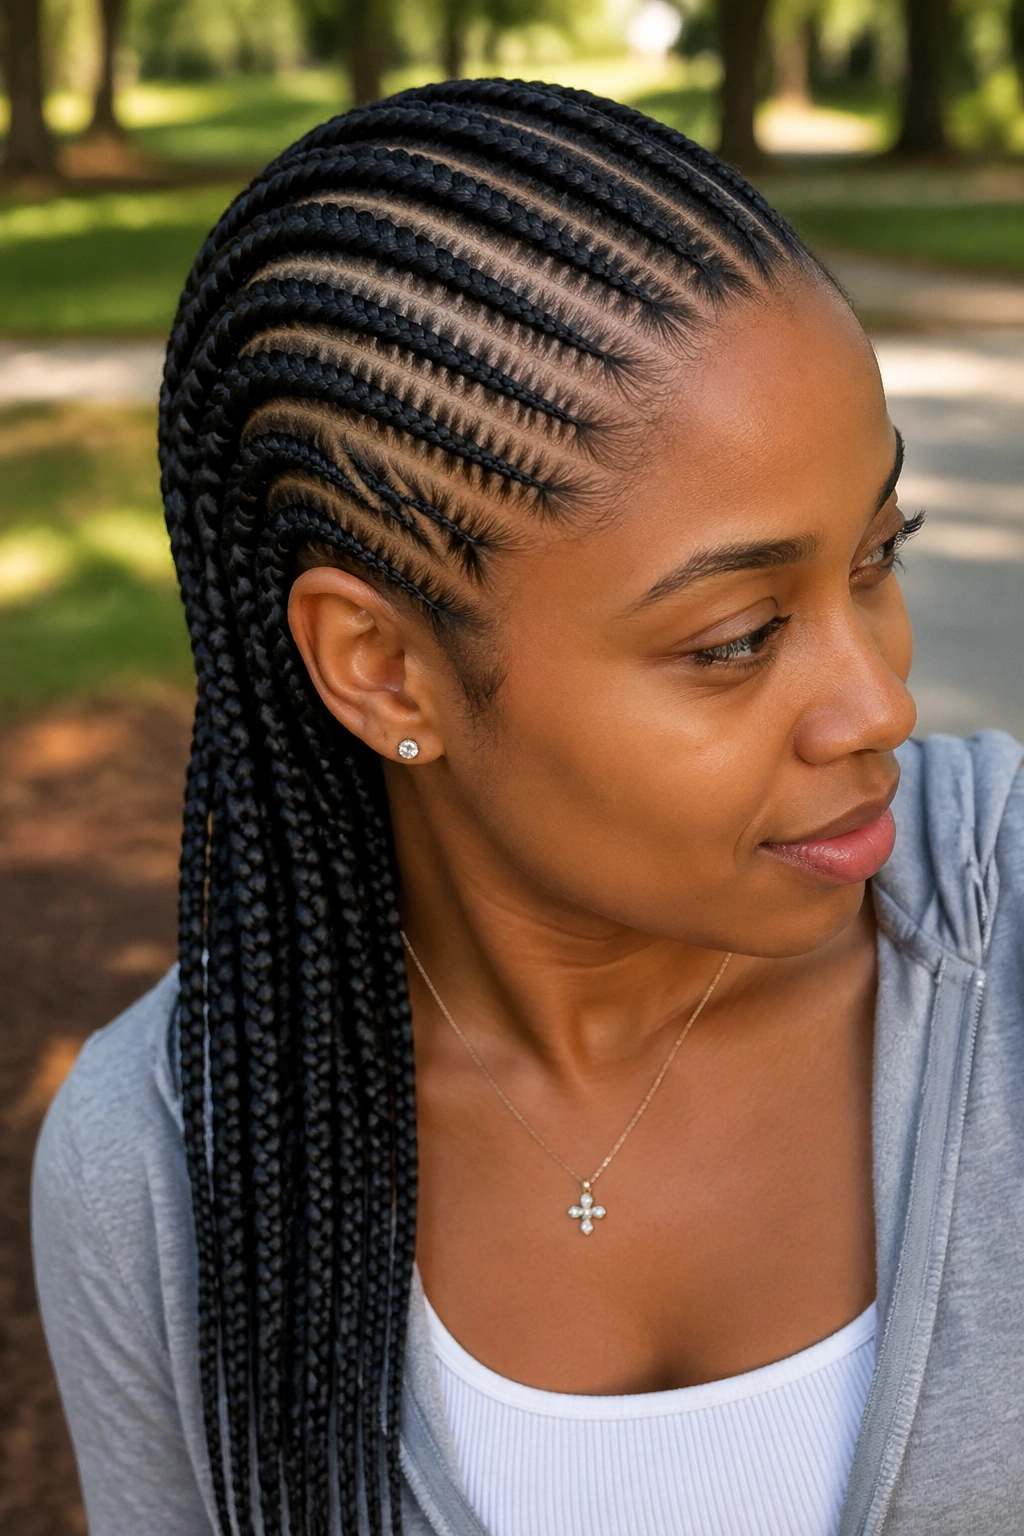
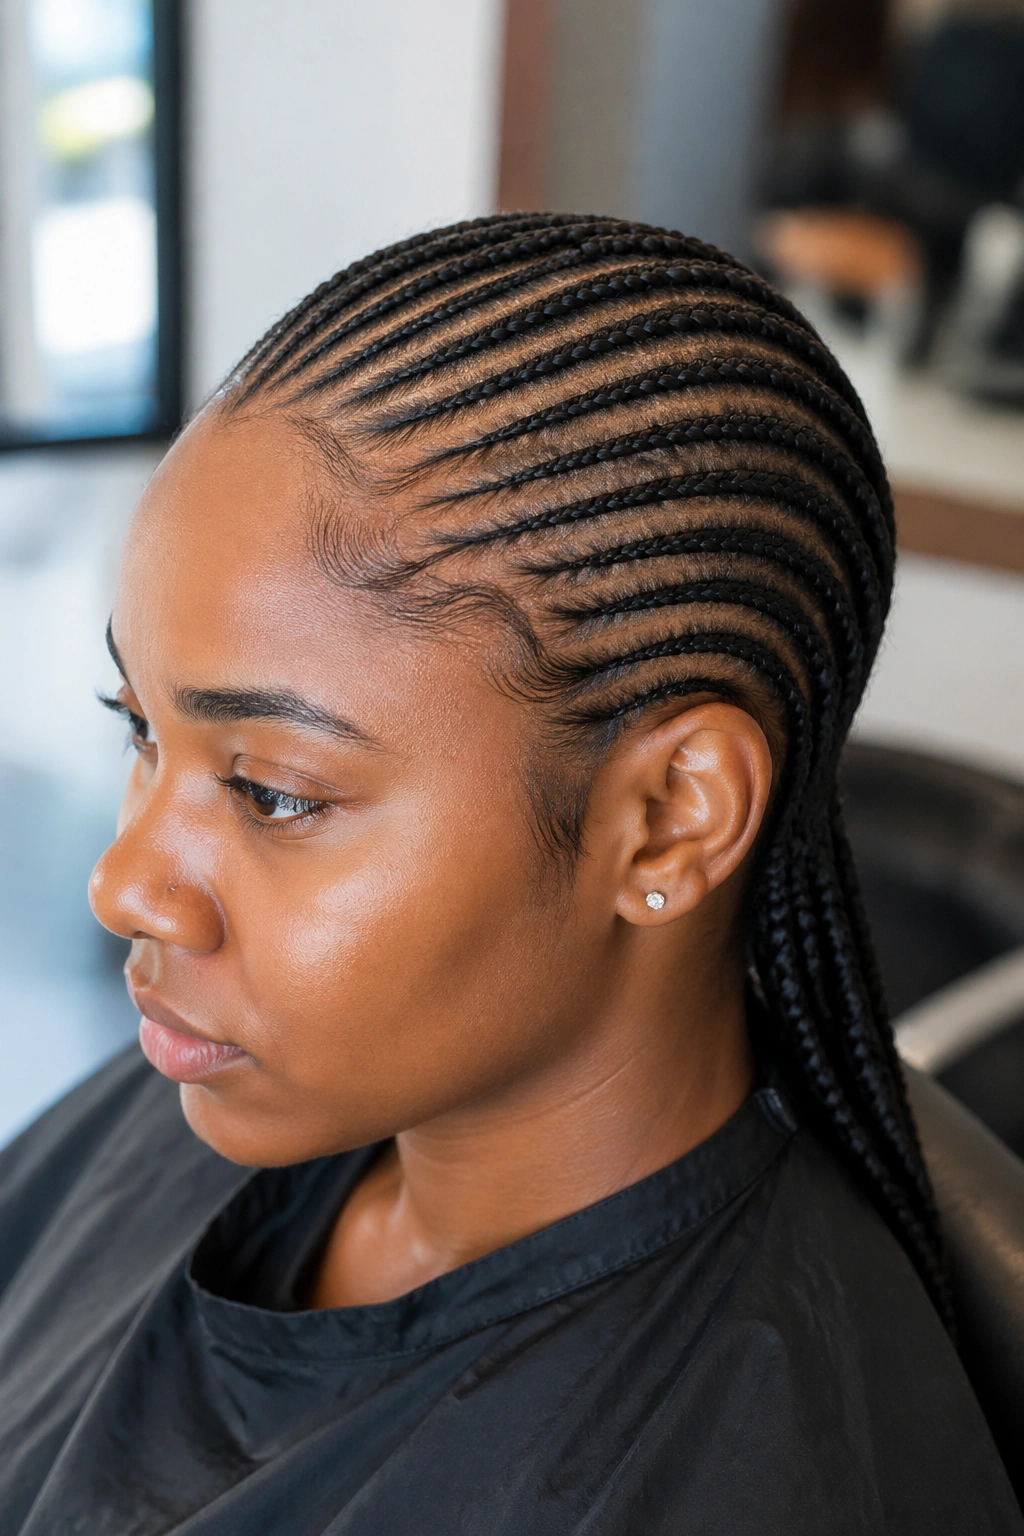
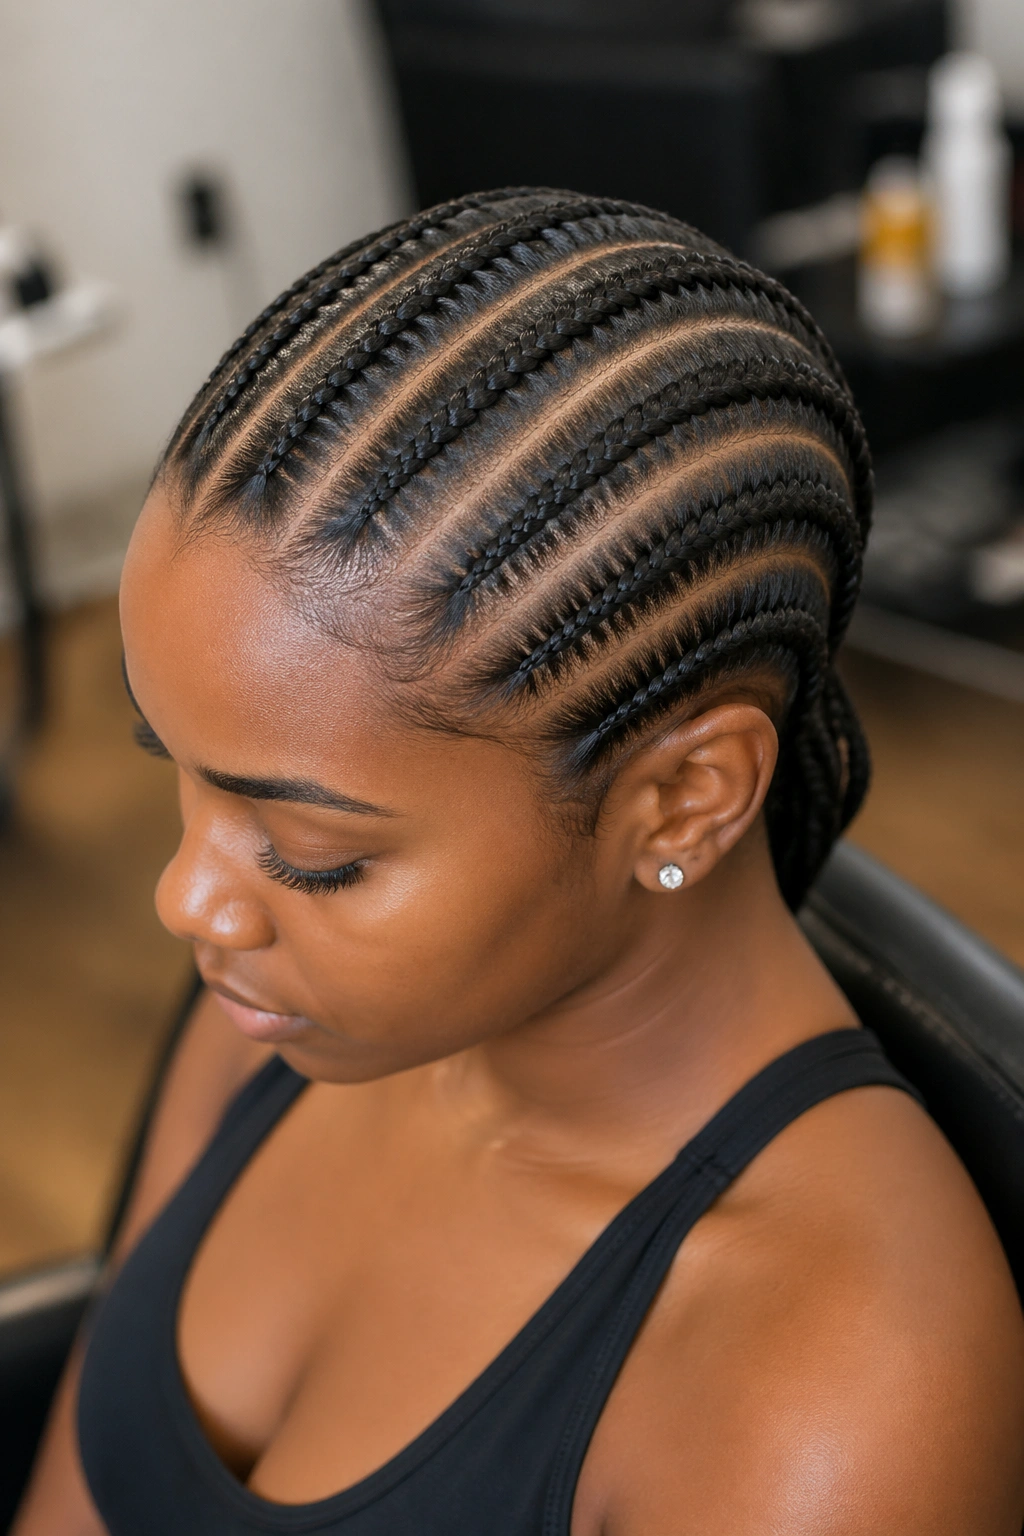
Small stitch cornrows changed how I think about protective styling. The first time I sat through a set, I watched the braider work in sections so narrow the parts looked drawn with a pen. Six hours later I had a head full of tight, defined rows that stayed sharp for almost four weeks. That precision is the whole point. Small stitch cornrow styles give you detail you just can’t get with a regular braid pattern, and once you wear them, bigger cornrows start to feel a little unfinished.
This walkthrough covers twenty-two small stitch cornrow looks worth sitting still for. Each one has its own angle, whether that’s the parting, the finish, or how the ends are handled. And because small stitches put real demand on your scalp and your patience, you’ll find the prep notes, the pitfalls, and honest opinions folded in throughout.
What Small Stitch Actually Means
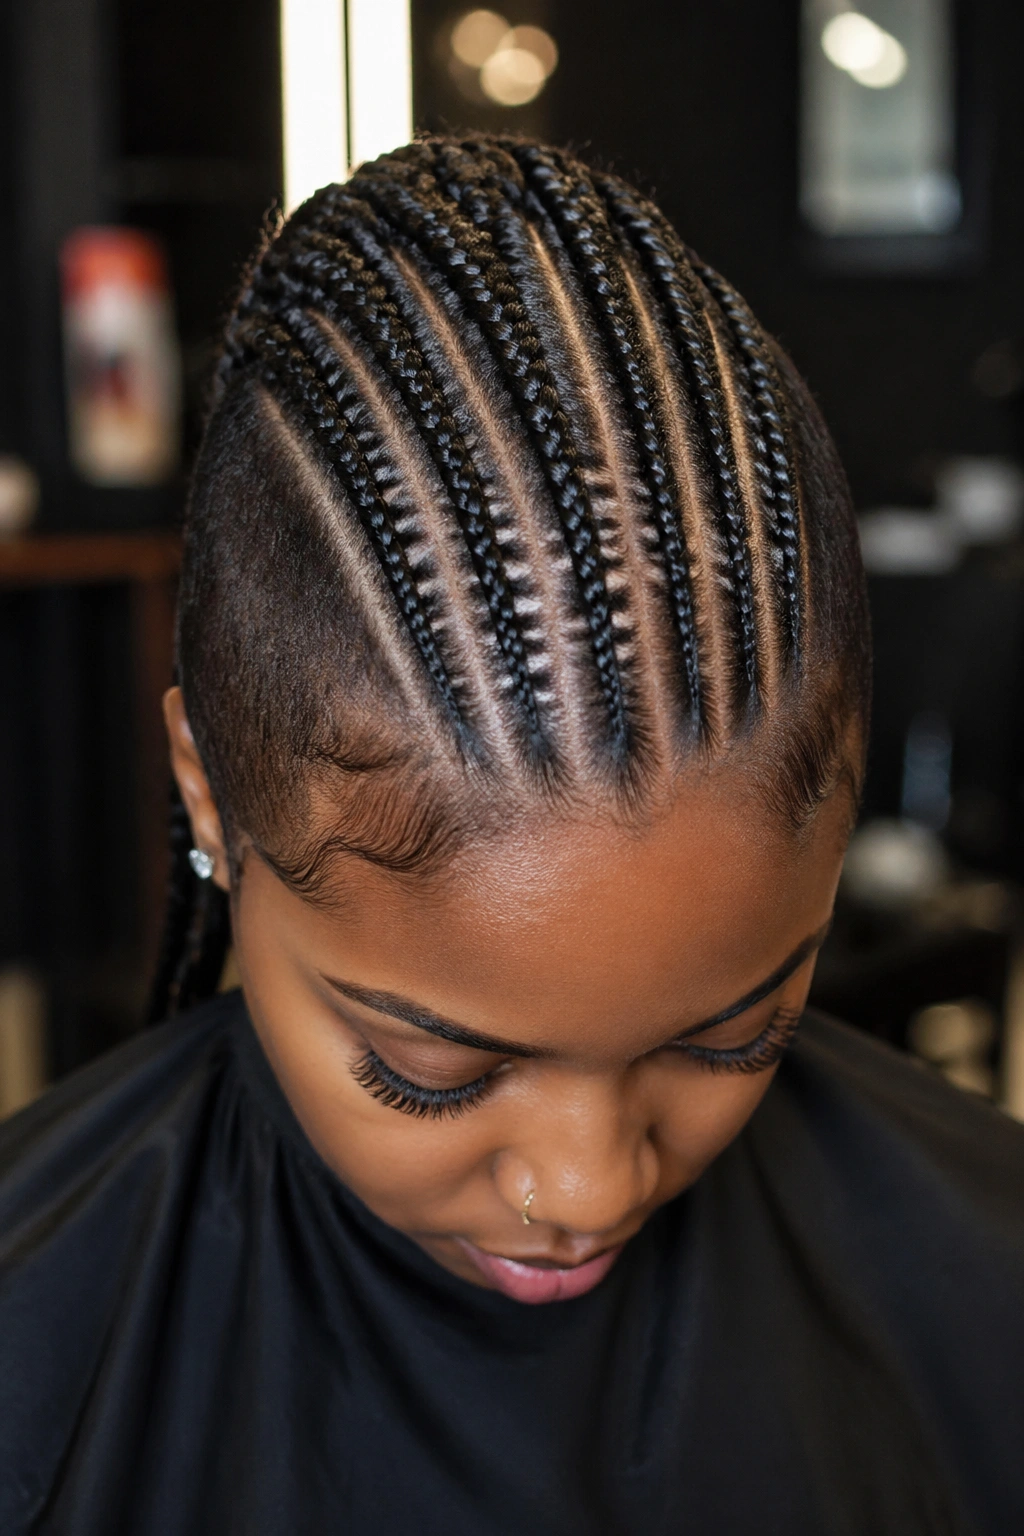
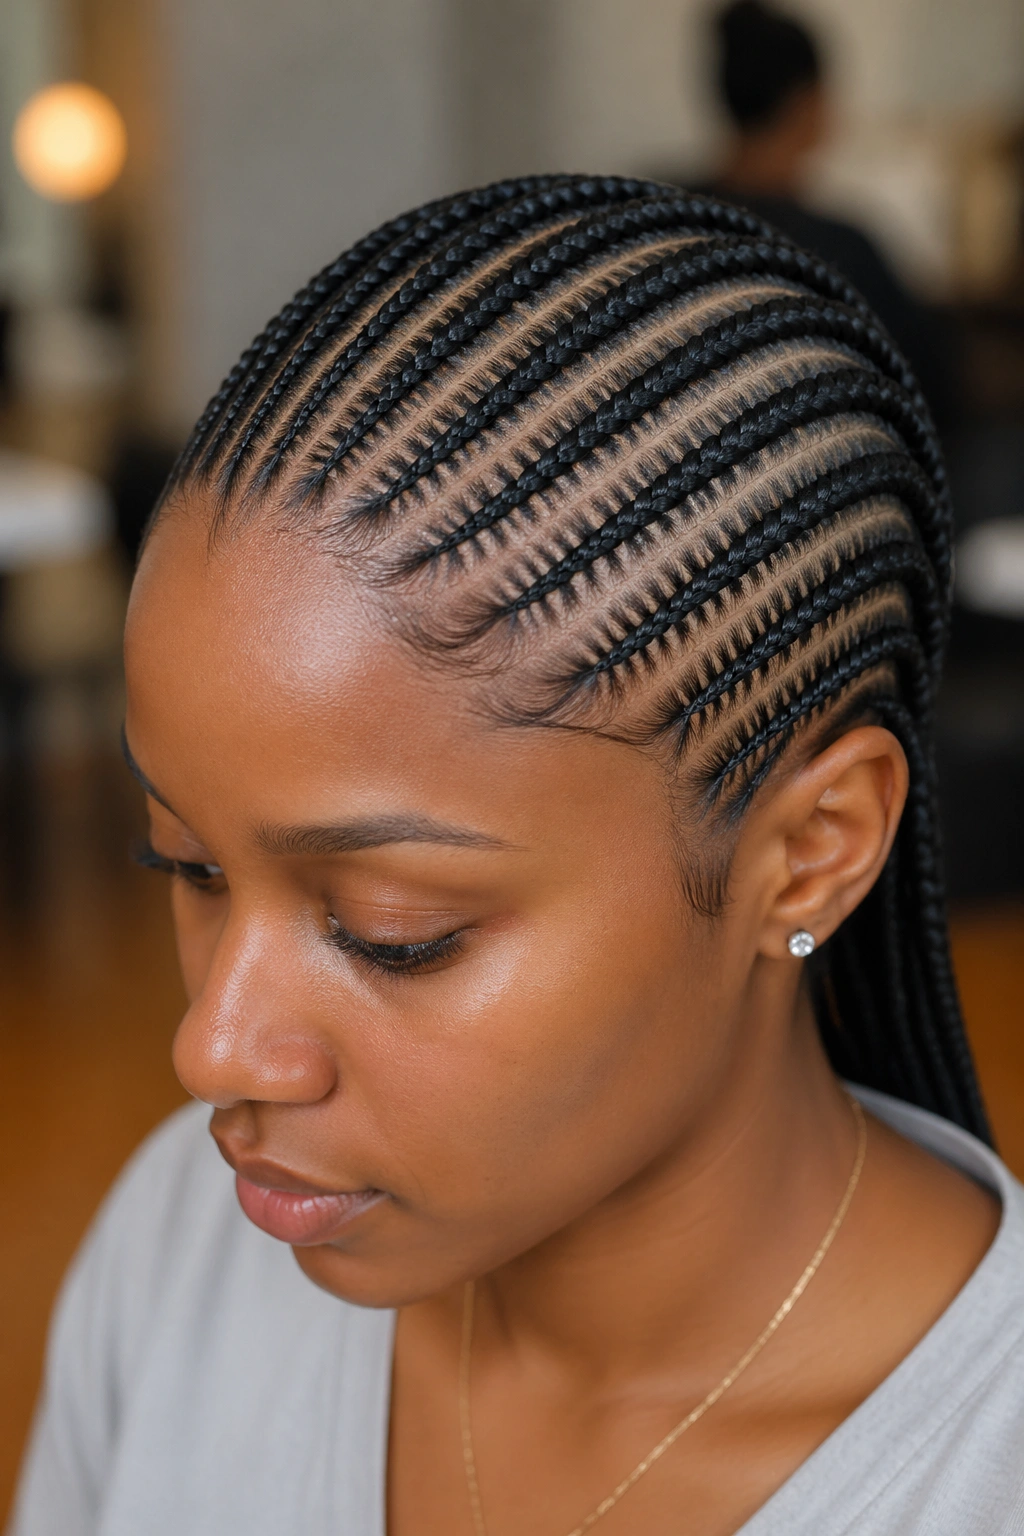
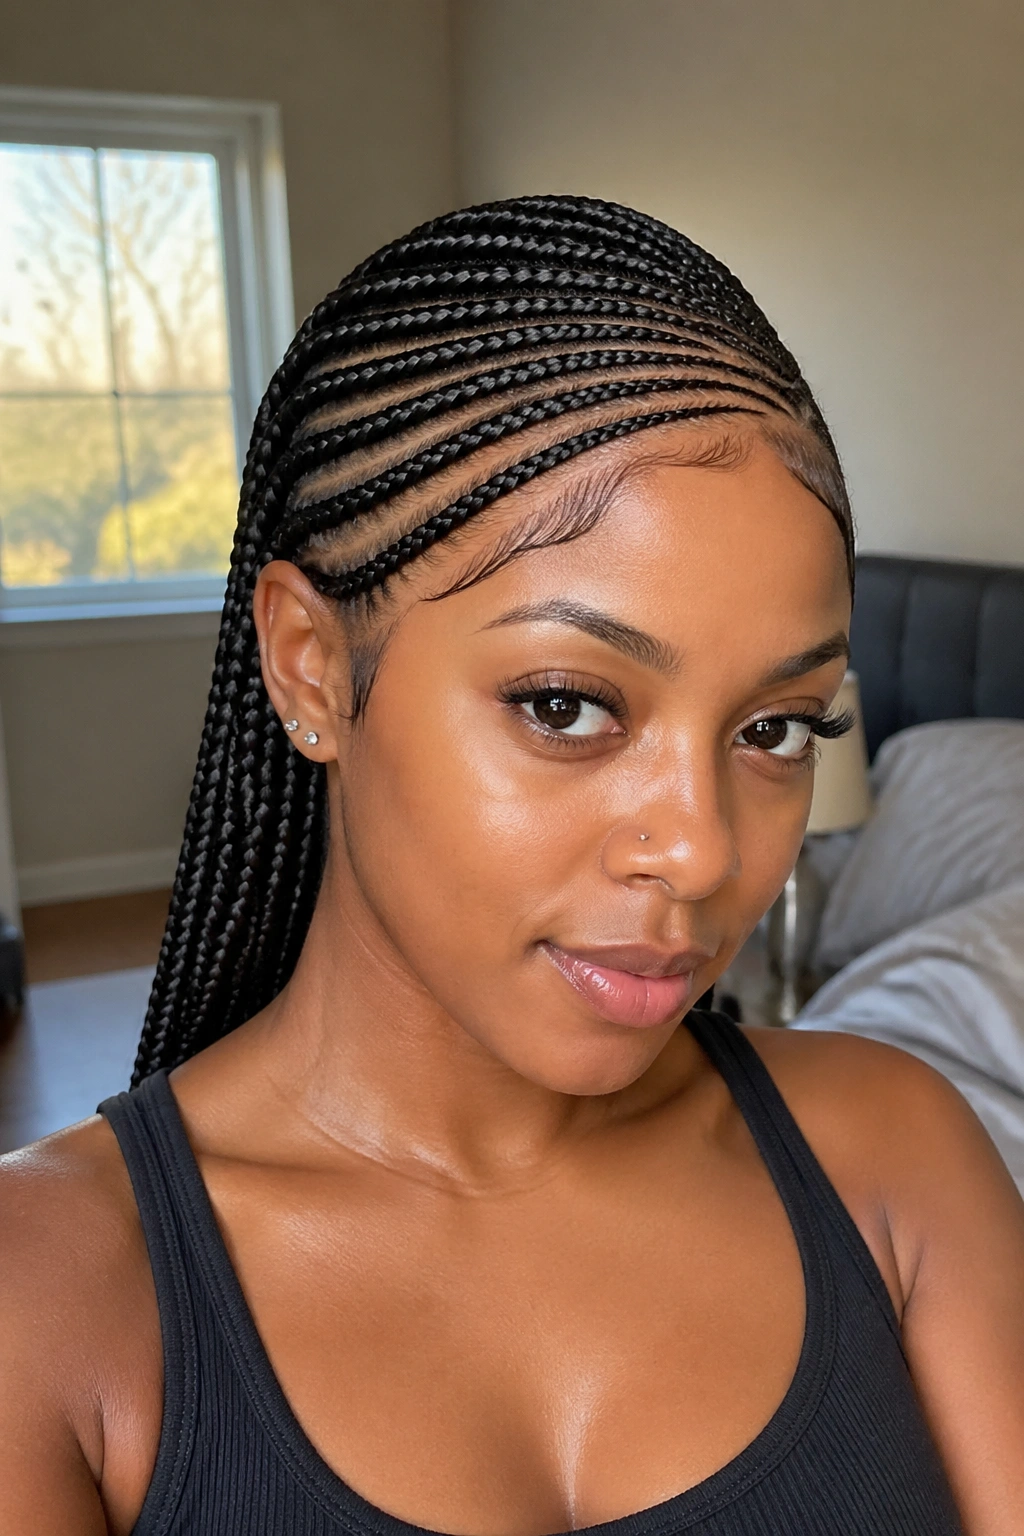
The stitch count is what sets this technique apart. A standard cornrow takes about 3 to 5 stitches per inch. A small stitch cornrow runs closer to 8 to 12 stitches per inch, sometimes tighter. Each pickup is shallower, each weave narrower. The braid lies flatter because there’s less bulk per stitch. You end up with rows that look carved instead of laid.
It’s not just about looking neat. The extra stitches distribute tension more evenly across the scalp, which means fewer pain points at the hairline. But that only holds up when the braider uses light pressure. A tight small stitch cornrow is brutal. A balanced one feels almost feather-light.
Why People Choose This Technique
The finish reads as high-effort even when the style is simple. That matters. A straight-back small stitch set with no extras still photographs sharp, still turns heads. You don’t need beads, colors, or complicated patterns to make a statement.
Longevity is the other draw. A well-executed small stitch install holds its shape for 3 to 5 weeks with basic maintenance. Larger cornrows start fuzzing at the parts by week two. Small stitches keep their definition longer because the hair has less room to shift.
And the scalp impact is honestly kinder. More stitches mean less pull per stitch. That’s the opposite of what most people assume.
What to Know Before You Sit Down
Book extra time. A full head of small stitch cornrows takes 5 to 8 hours depending on length, density, and how elaborate the pattern is. Tell your braider exactly what you want before they start — specify stitch size, whether you want feed-in or natural ends, and how you’d like the edges styled.
Eat something before. Bring water. Bring a charger. Take a bathroom break at the halfway mark whether you need one or not, because your legs will thank you later.
Prep Your Hair the Night Before
Clean hair grips better. Wash with a clarifying shampoo, then follow with a moisturizing conditioner. Let it air-dry overnight in loose twists so it’s stretched but not stiff. Skip heavy butters — they gum up the braider’s hands and leave residue between stitches. A light leave-in and a small amount of oil on the ends is enough.
Detangle completely. Any knots still in your hair when the cornrows go in will end up as tangled knots when they come out. Work from the ends up with a wide-tooth comb, then switch to a rat-tail for parting.
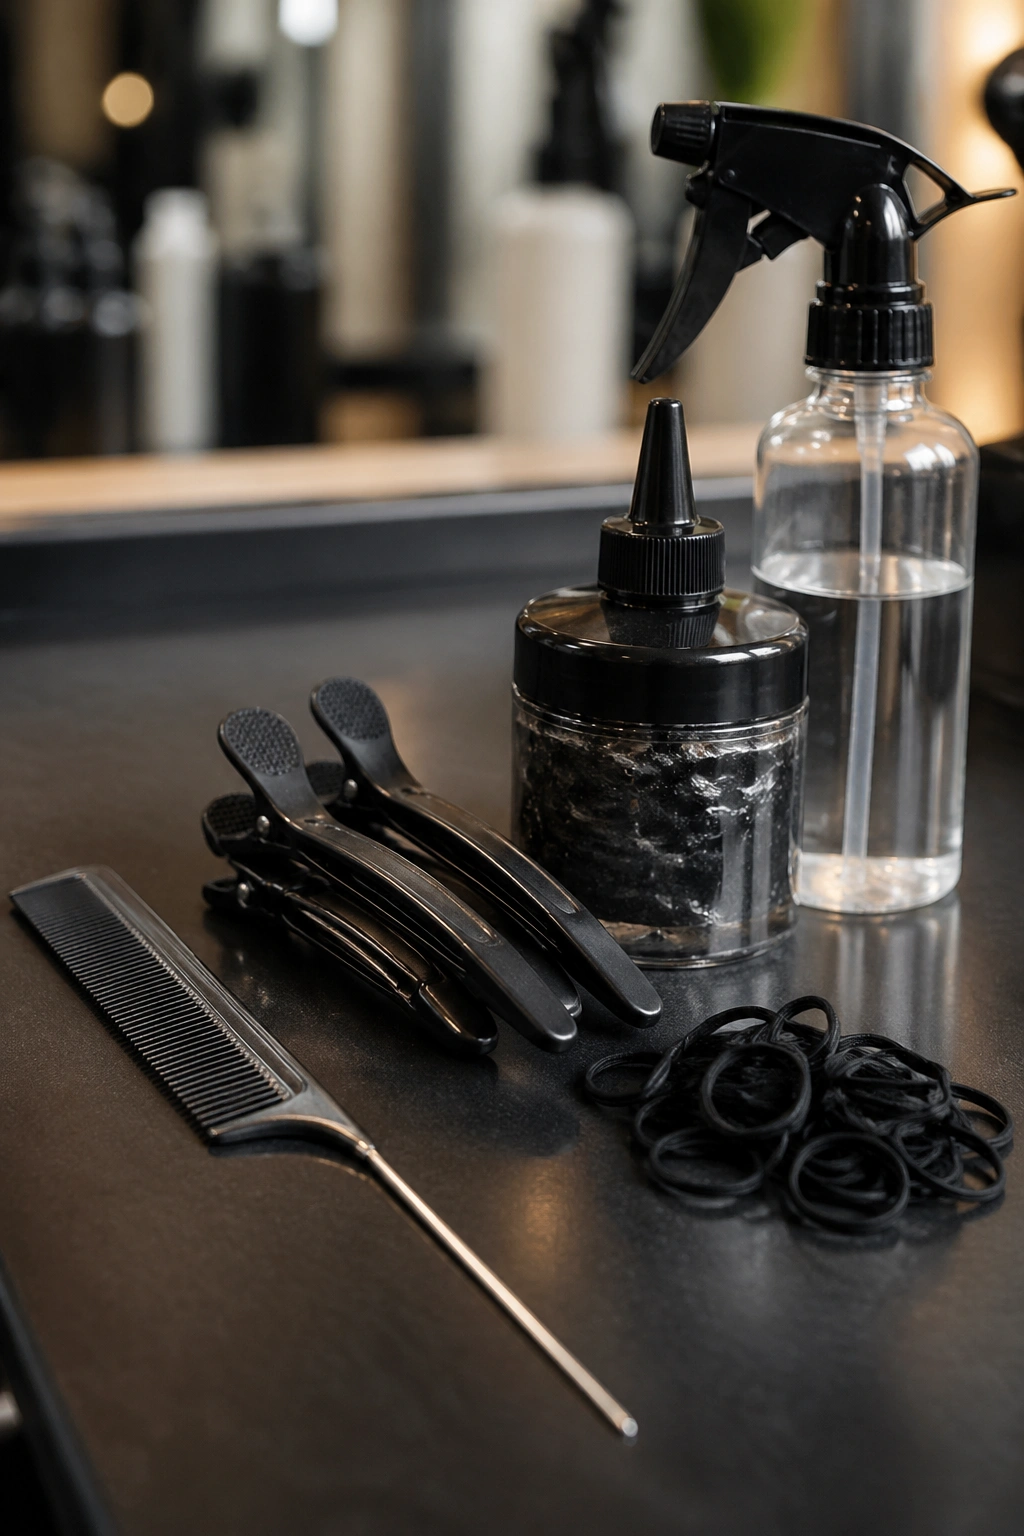
Tools That Make the Difference
- Rat-tail comb with a metal pin, not plastic, for sharp parts
- Duckbill clips to section off the hair you’re not braiding yet
- Edge gel with a light hold — stiff gels crack by day three
- Spray bottle with water and a teaspoon of leave-in
- Small elastic bands, preferably silicone-coated, for finishing ends
Skip the heavy waxes. Skip the brush with boar bristles. Small stitch work needs clean tension, not product buildup.
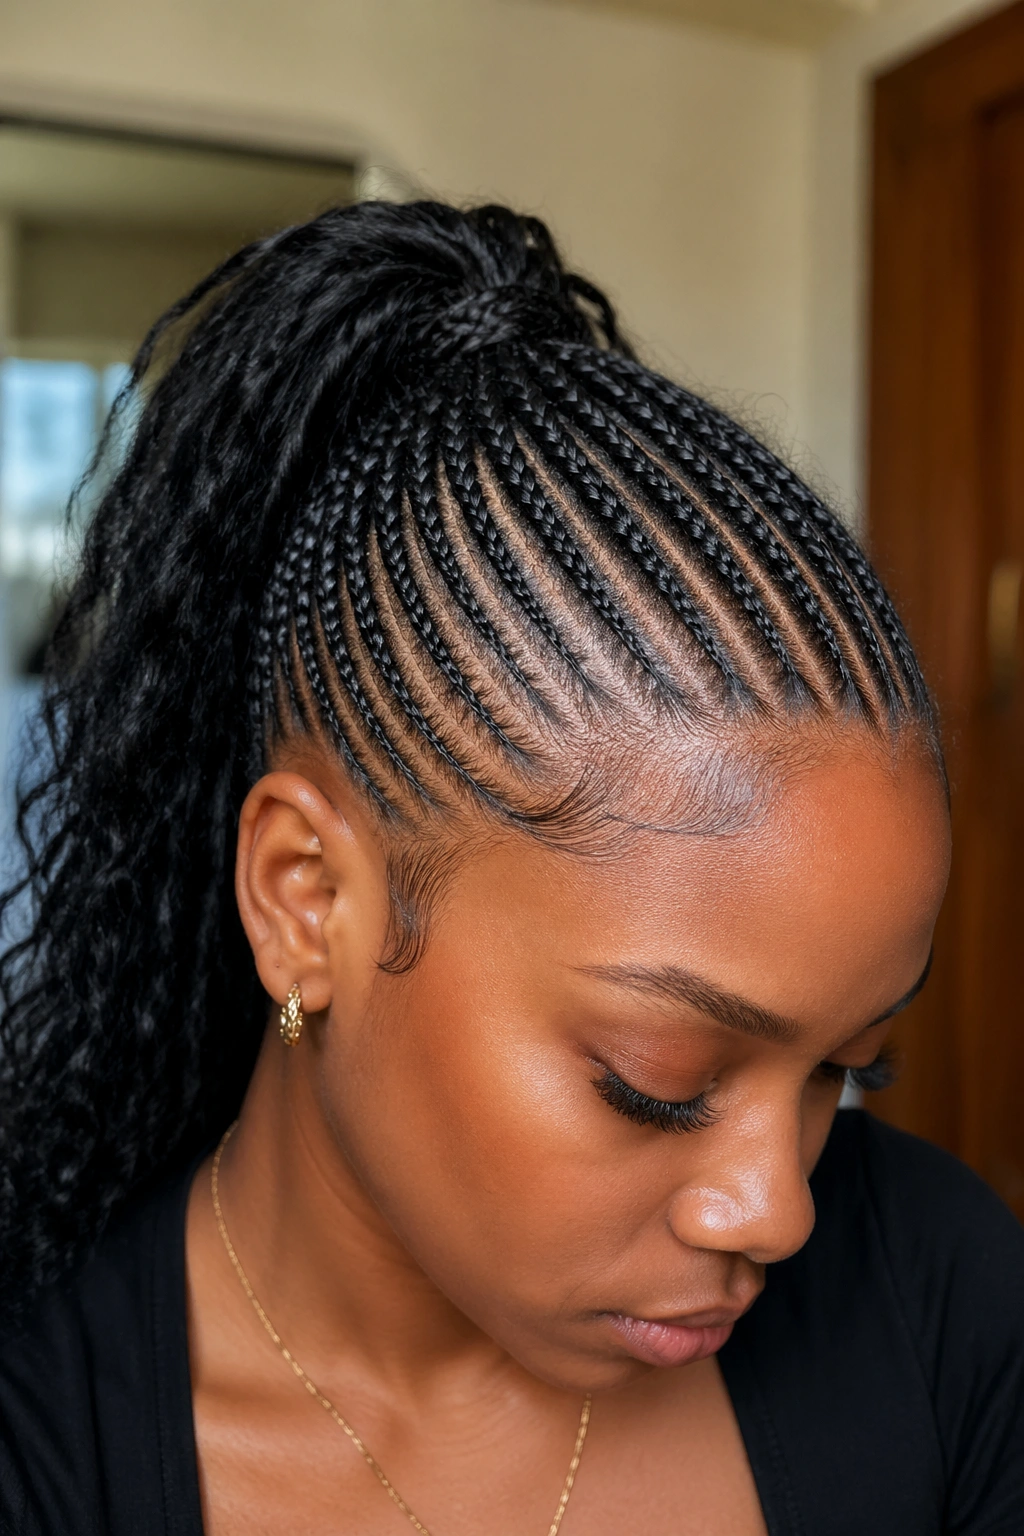
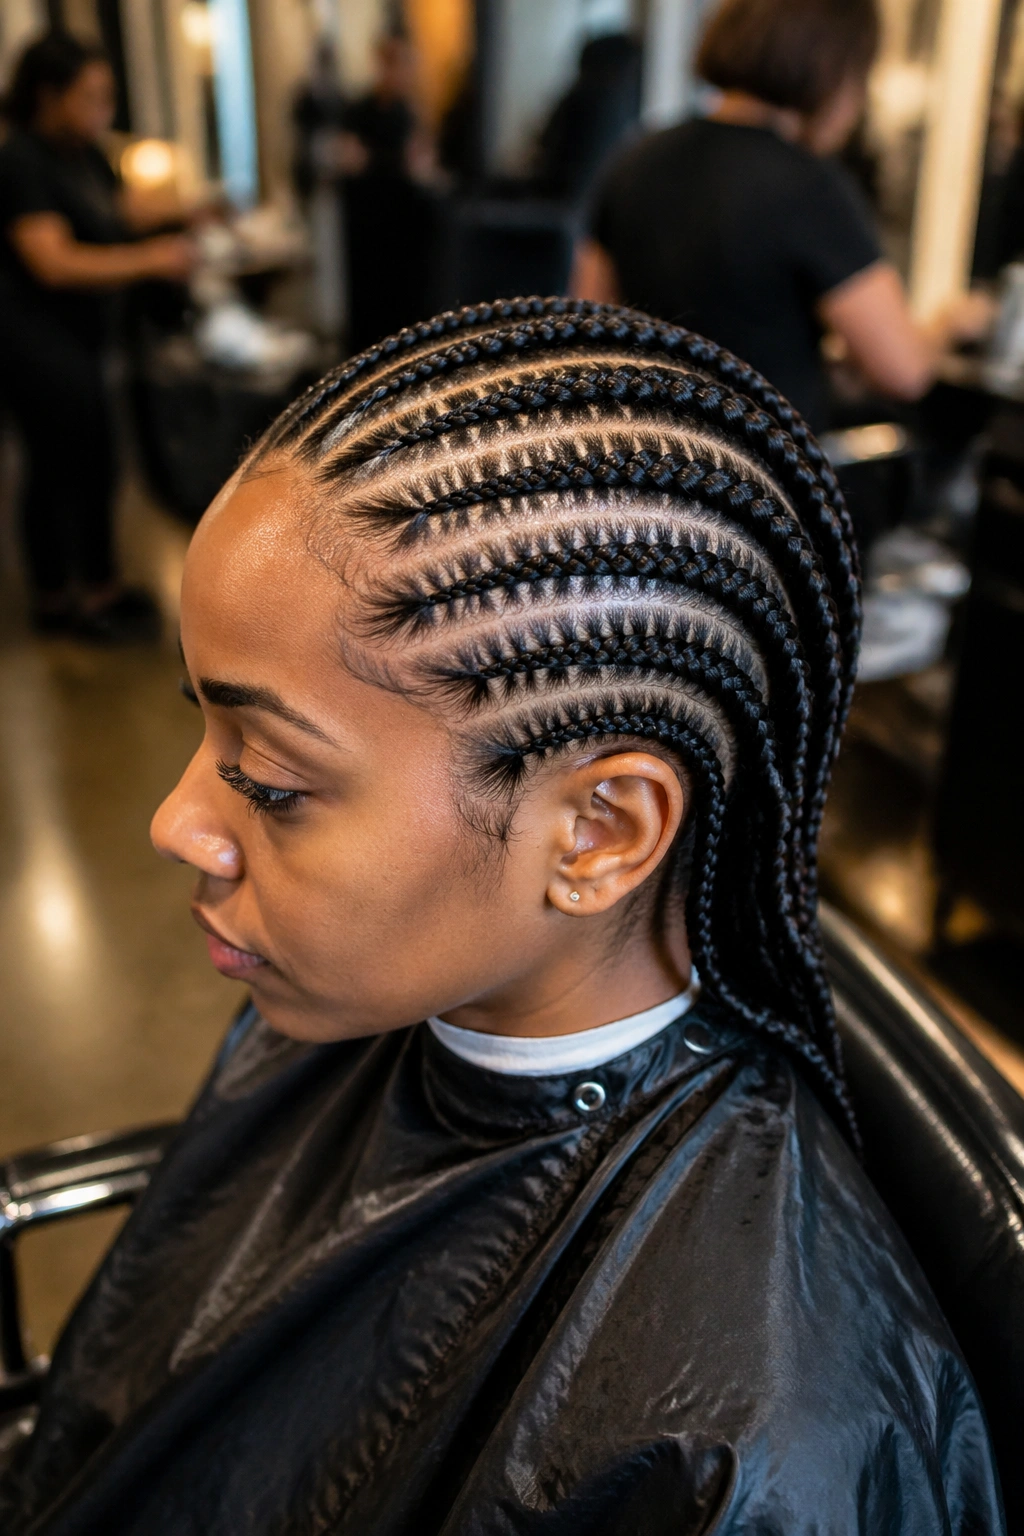
1. Classic Straight Back Small Stitch
Why It Works
The straight-back pattern is the foundation every small stitch style builds on. Six to eight rows running from hairline to nape, no detours. When done in small stitch, each row looks like a tightly wound rope.
- Sections should be roughly half an inch wide for balanced density
- Stitches stay tight against the scalp through the crown, then slightly looser toward the nape
- Ends can be left loose, dipped in hot water, or sealed with a clear elastic
Tip: Have the braider count your rows before starting. Seven rows is the sweet spot for most head sizes — five feels sparse, nine feels crowded.
2. Lemonade Side Sweep
Side-swept cornrows crossing over the crown have been around forever, but the small stitch version hits different. The diagonal lines look like carved waves because the stitch size makes every curve crisp.
The pattern starts at the right temple, angles across the forehead, then curls down the left side. The sweep creates a natural frame that softens a sharp jawline without hiding the face. People with high foreheads tend to love this one for that reason alone.
What trips people up is the transition where the braid changes direction. If the braider keeps the same angle through the full cornrow, the sweep looks wooden. A small rotation at the curve keeps it fluid.
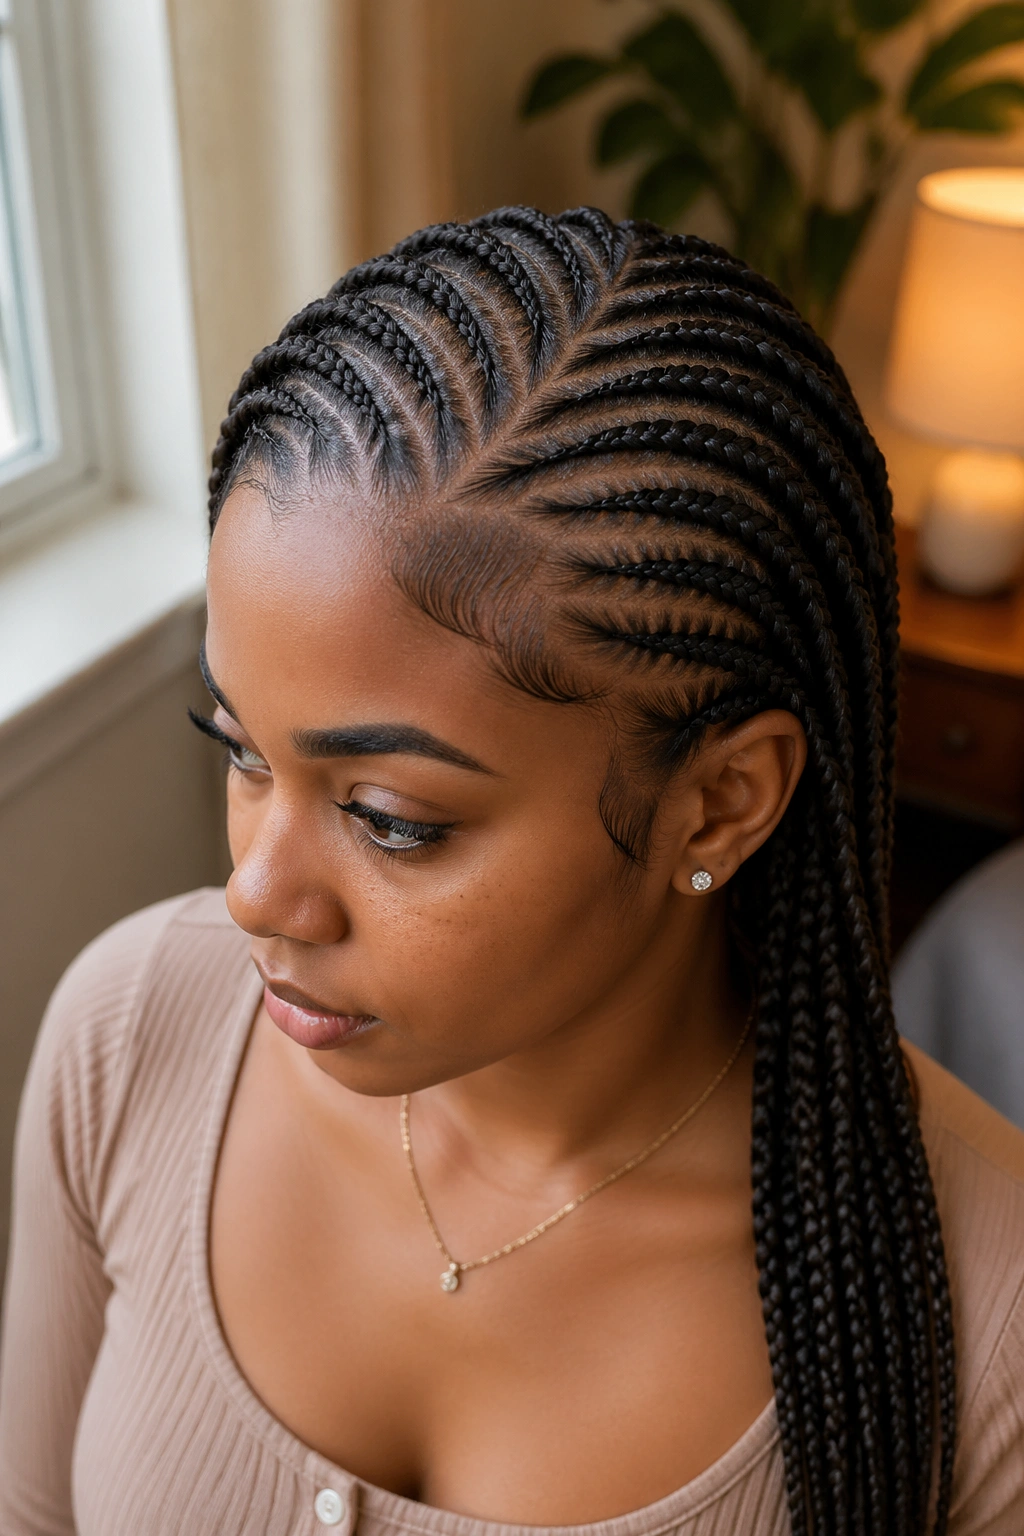
3. Zigzag Part Down the Middle
What happens when you swap a straight middle part for a sharp zigzag? The whole head reads younger. The angles catch light differently than a straight line, so the crown looks like it has more movement even though the braids themselves are flat.
Two to three zigzag points work best. More than that starts to look busy. The points should be evenly spaced — usually one at the hairline, one at the crown, one at the occipital bone if you want a third.
How to Style It
Have the braider draw the zigzag with the rat-tail before starting any cornrows. Once it’s mapped, the stitches lock it in place. Trying to zigzag mid-braid never works cleanly.
4. Crown Halo with Small Stitch Rows
Picture a ring of cornrows circling the top of your head like a crown. The halo style takes small stitch down to a new level of precision because the braids have to curve perfectly without bunching or flaring. This is where an experienced braider earns their fee.
The outer cornrows run from the hairline inward, meeting at the crown in a central point or tucked bun. The inner section can be left loose as a puff or braided smaller and pinned.
It photographs well from every angle, which is rare. Most cornrow styles have a “good side” — this one doesn’t.
5. Side Part with Cascading Rows
The single deep side part creates instant asymmetry. Small stitch cornrows flowing from that part in gentle curves make the whole head look tilted toward the lifted side. The effect is flattering on round face shapes because the vertical line elongates.
The trick is parting depth. A shallow side part looks timid. A deep one, around 4 to 5 inches off-center, gives enough space for 5 to 6 cornrows to cascade before meeting the opposite ear. Anything less and the style feels cramped.
Some stylists add one or two curved stitches that break pattern, almost like a signature flourish near the temple. That detail separates a good install from a great one.
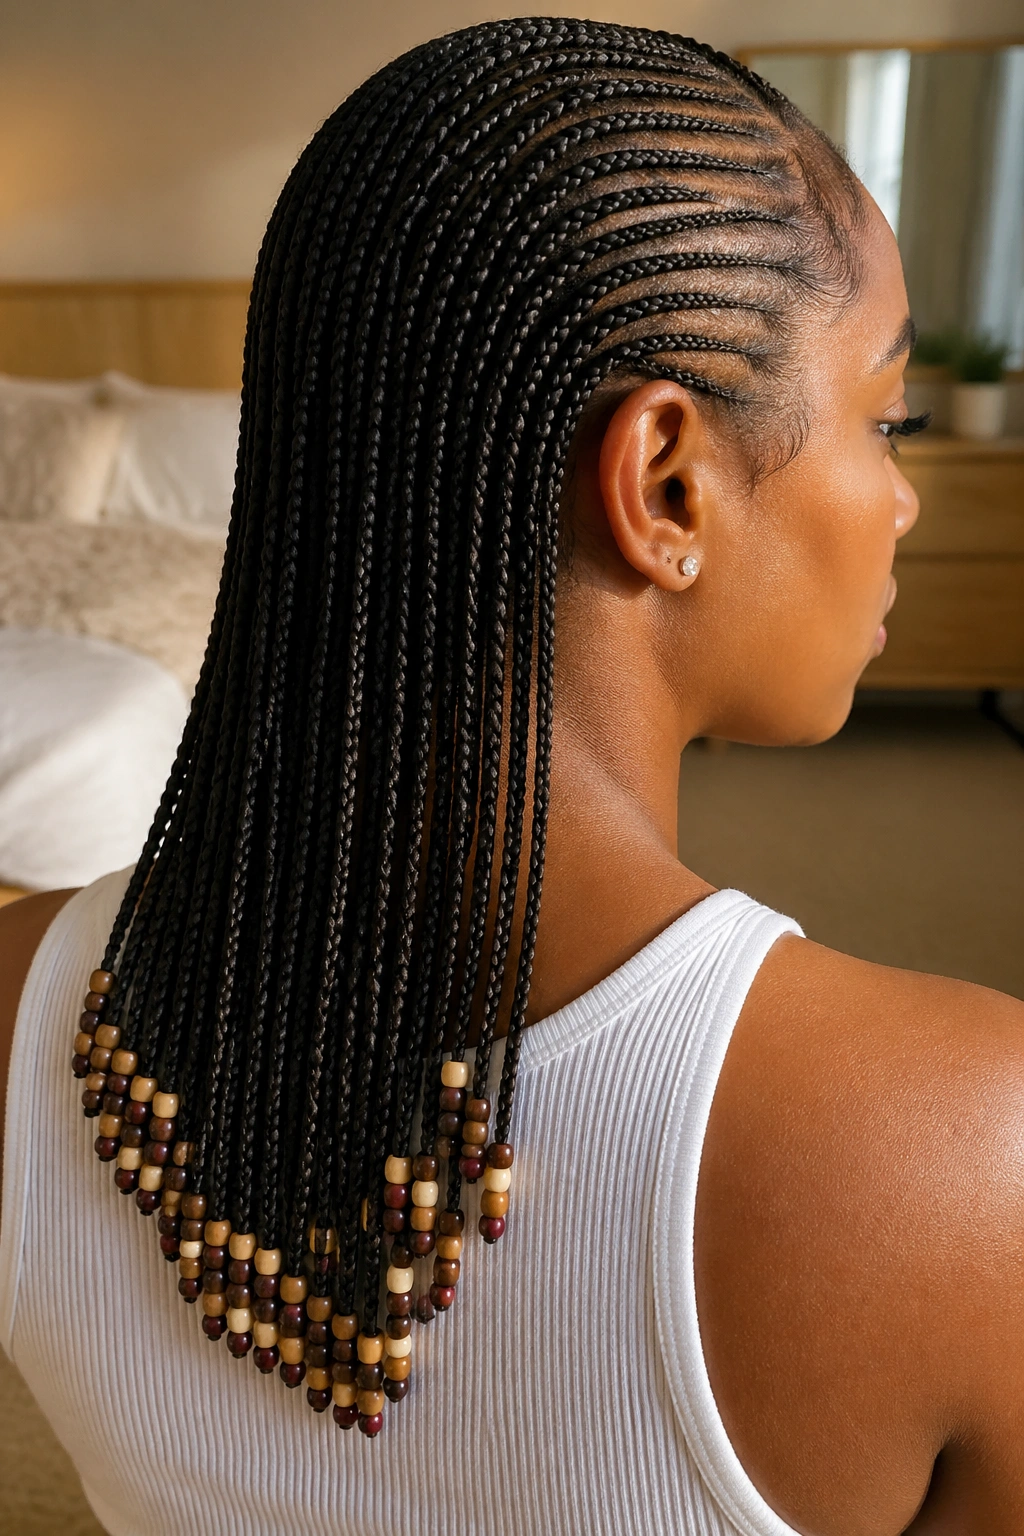
6. Micro Stitch All Back with Beaded Ends
What Makes It Different
Micro stitches are the smallest version — 12+ stitches per inch. Paired with wooden or glass beads at the ends, the weight pulls the braids down in a way that accentuates every stitch.
- Beads should be small, 6 to 8 mm, to match the scale of the braids
- Mix two or three bead colors for depth without looking cluttered
- Use silicone bands under the beads to prevent slippage
Tip: Clear beads read cleaner on textured braids. Colored beads pop more on single-color installs.
7. Two-Layer Cornrow Cascade
A two-layer look stacks one set of small stitch cornrows on top of another. The top layer runs front-to-back in a standard pattern. The bottom layer, usually on the sides or nape, runs in a different direction, often diagonal.
The layers create visual depth. When you turn your head, the second set shows through the first in sections. It’s a detail people notice without always identifying why the style looks so rich.
Not every head shape suits it. If your nape is short, the lower layer looks squished. Works best on medium to long hair.
8. Heart-Shaped Crown Part
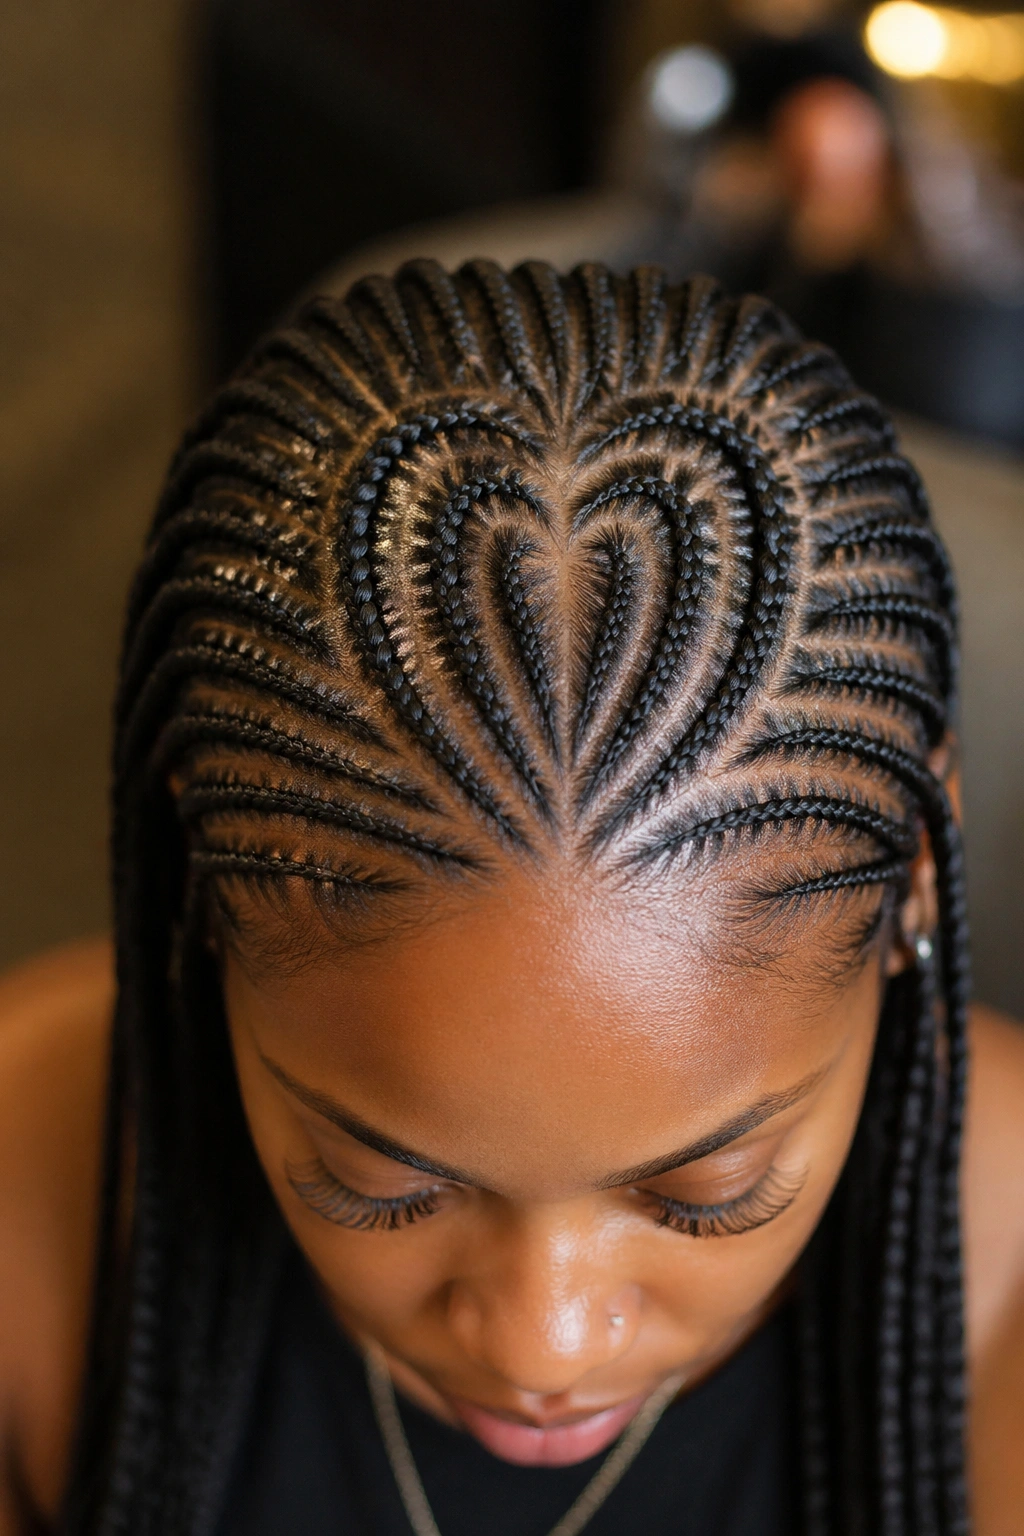
Here’s a question — can a parting pattern look like a shape without reading as costumey? Yes, when it’s done small stitch style. A heart-shaped part at the crown creates a subtle focal point that catches attention only when someone looks closely.
The heart sits flat, about 3 inches wide, at the top back of the head. Cornrows radiate outward from it in all directions. You can only see the shape from above, which makes it feel like a secret.
How to Wear It
Pair this with a low bun or loose cascade. Up-do styles show off the heart better than styles that hang down and cover it.
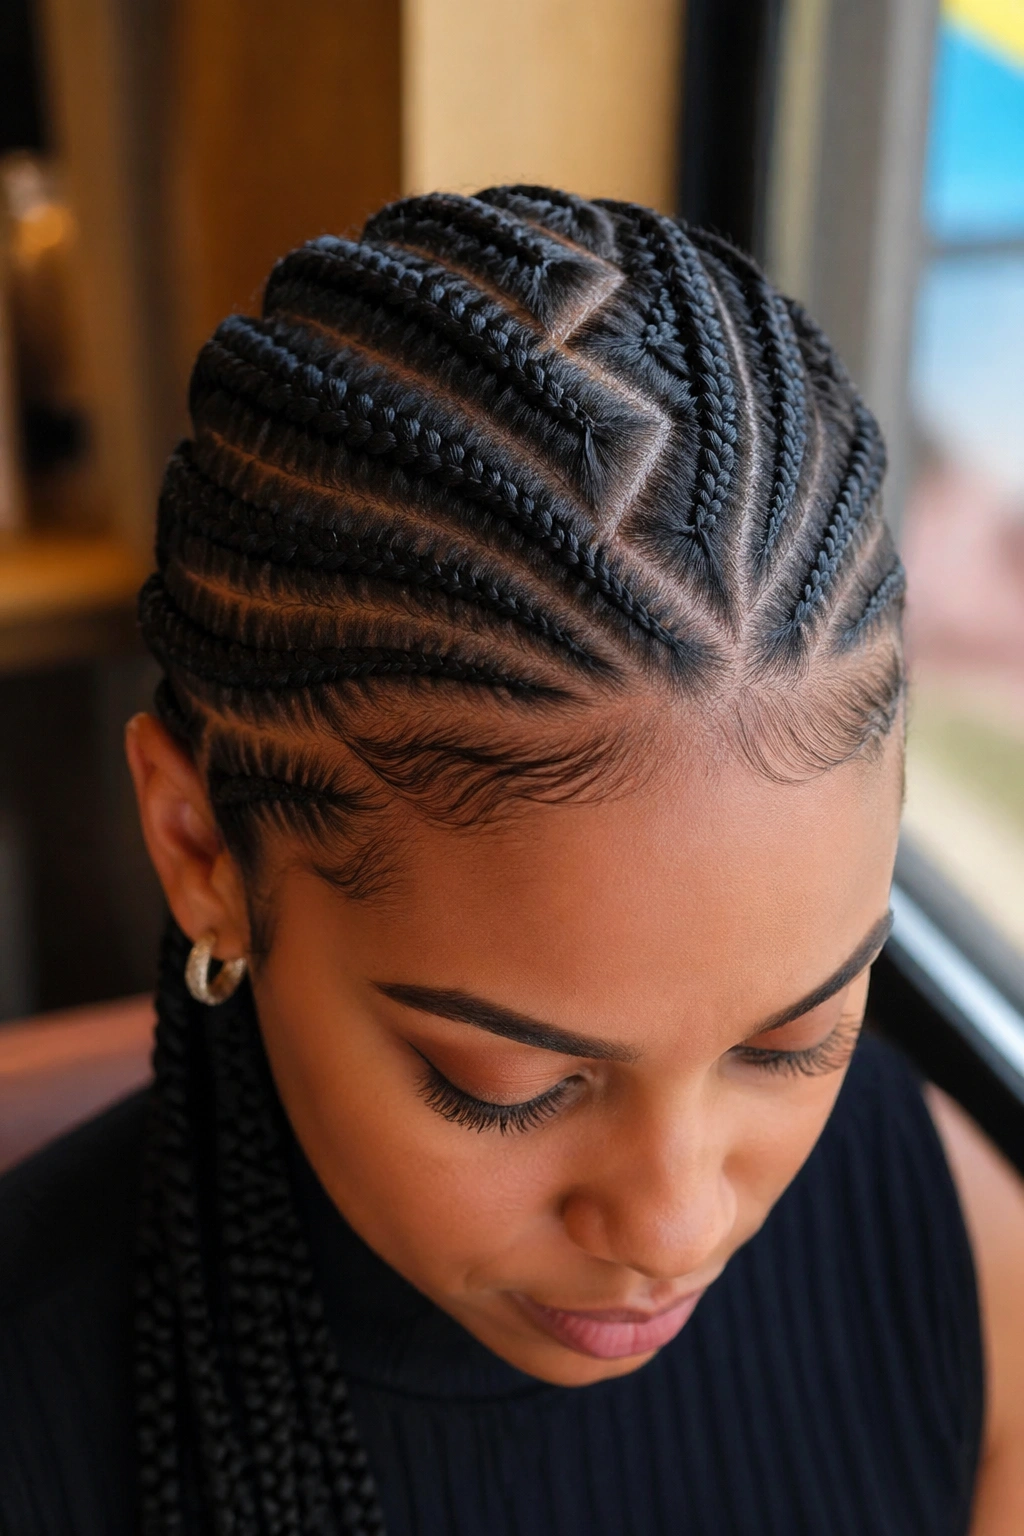
9. Freestyle Geometric Sections
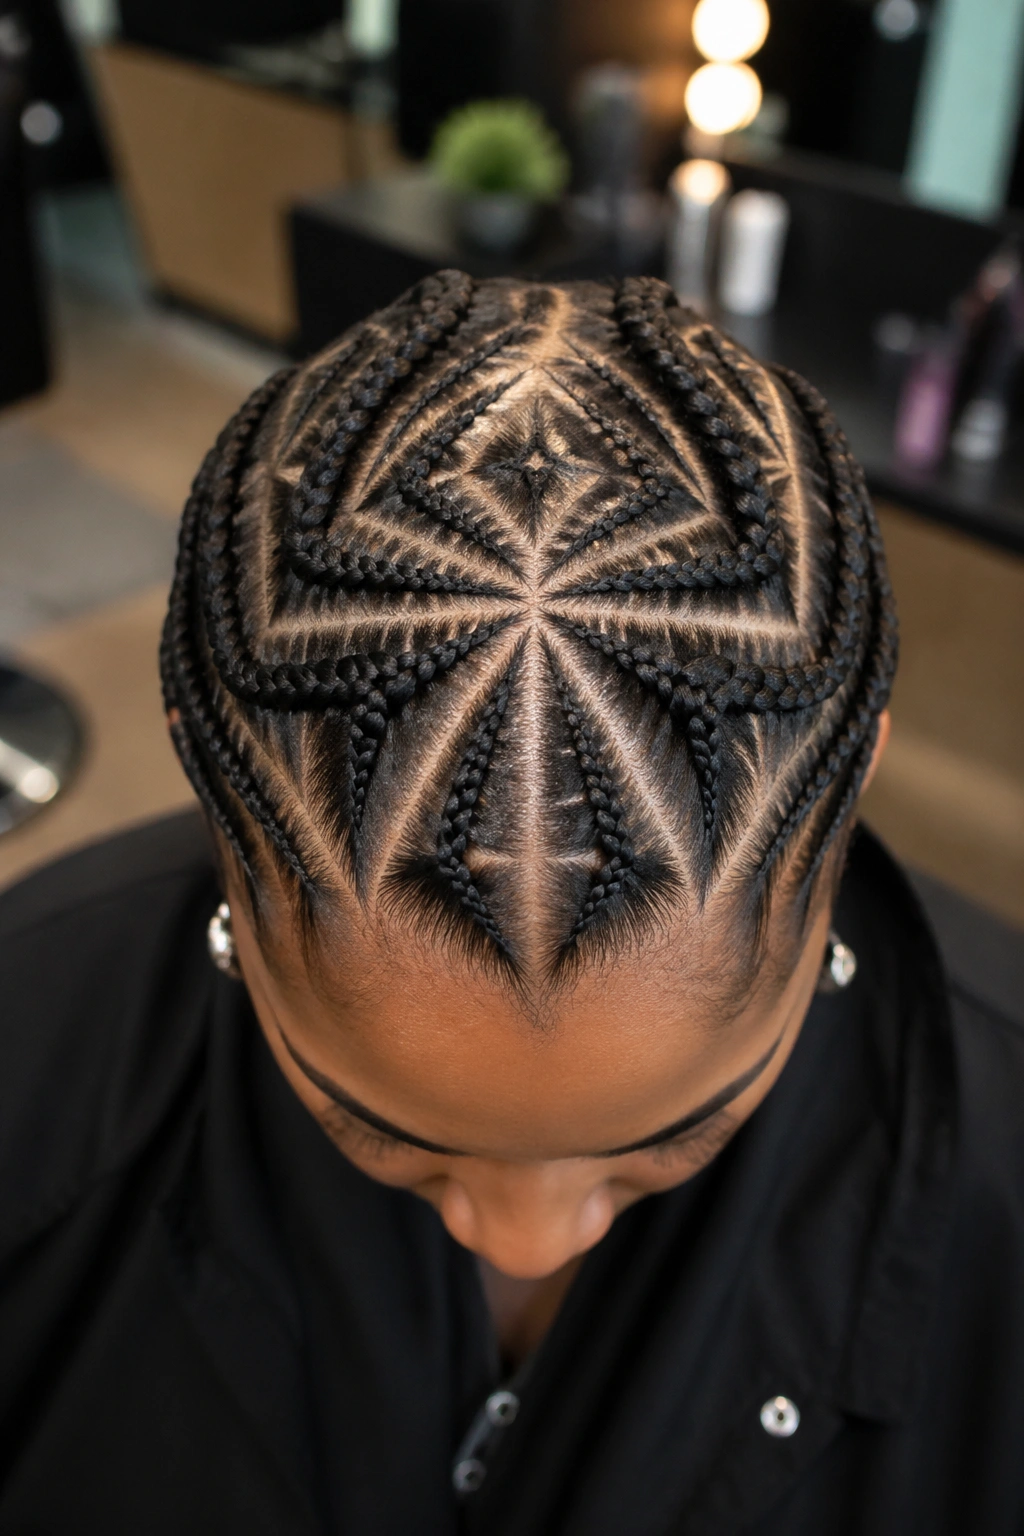
Geometric parting leans into angles and shapes — triangles, diamonds, kites. Small stitch cornrows within each section emphasize the geometry because the braid lines match the straight part lines. The whole head becomes a pattern.
Three or four shapes is the ceiling. Past that, the look crosses into chaos. A common combination is two large triangles at the front, a diamond at the crown, and straight sections at the nape.
Book extra time for this. A geometric install takes 1 to 2 hours longer than a standard pattern because of the parting work.
10. Side-Swept Fringe Braids
The swept fringe style takes the front section and turns it into a small cluster of cornrows angling across the forehead. The rest of the head can be in matching small stitch or left loose in a puff. This one is a favorite for people who want the look of bangs without cutting their hair.
The fringe section usually involves 3 to 5 cornrows. Each should be about a quarter-inch wide at the hairline, tapering slightly as it crosses. Leaving a thin cornrow loose at the front edge softens the hard line.
Scalp care here matters more because the fringe pulls on the most delicate hair — the baby hairs and the fine strands along the forehead. Ease up on tension at the hairline.
11. Curved Spiral Pattern
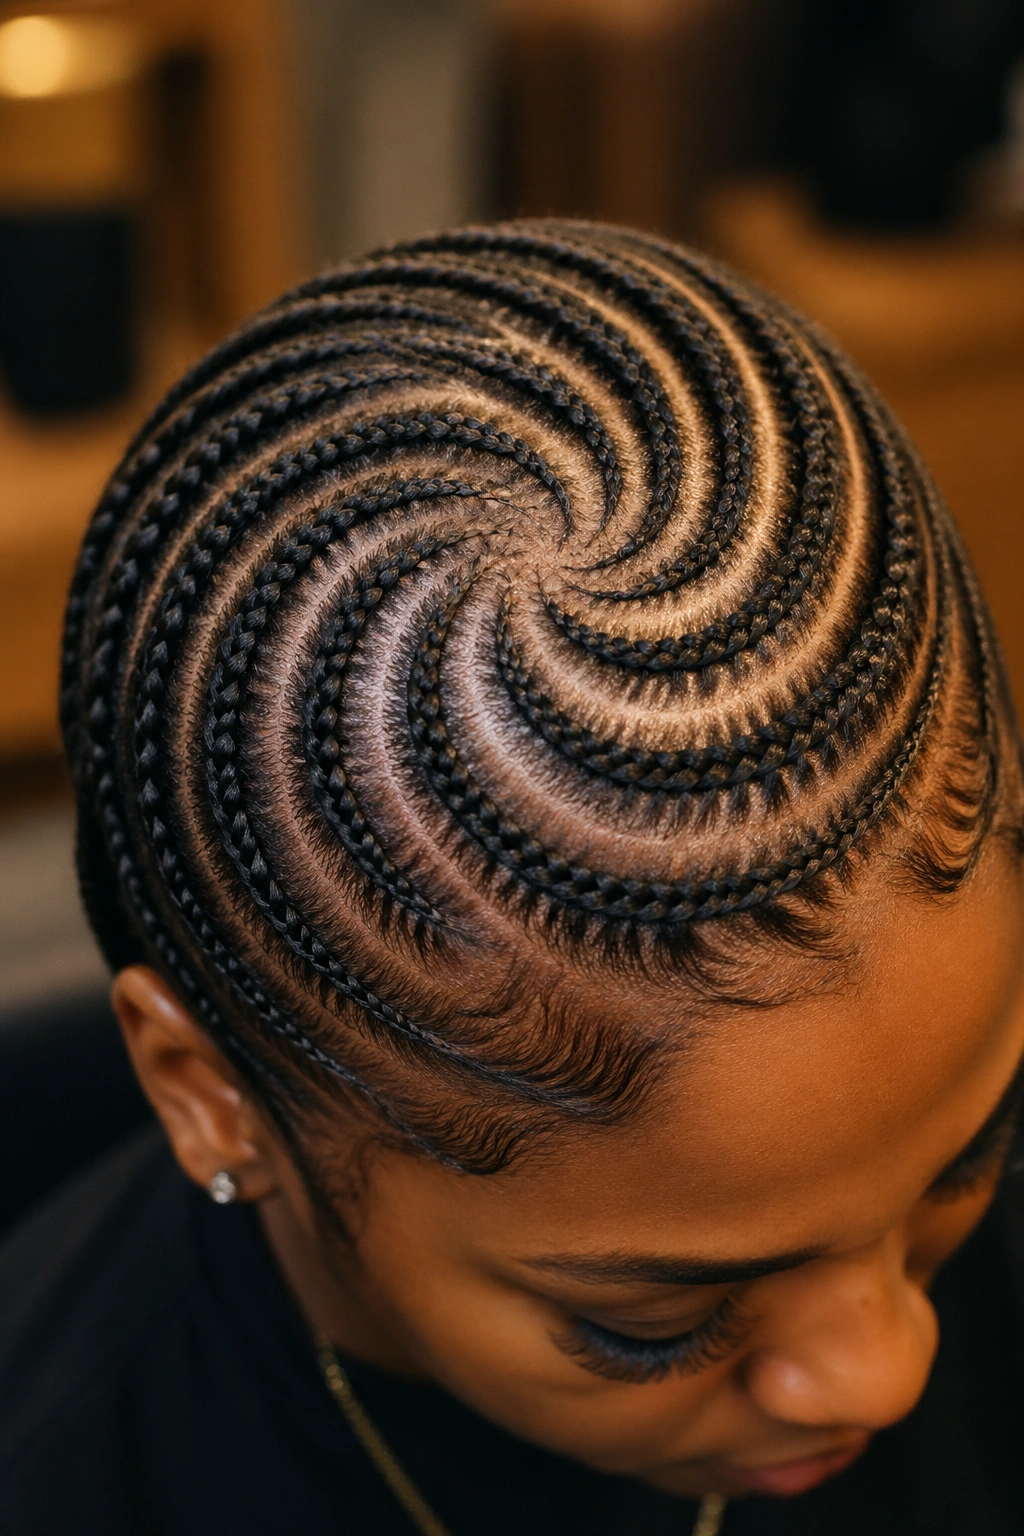
Spiraled cornrows wind from one point outward, usually starting at the crown or temple. The small stitch version needs a braider who can maintain even tension on a continuously curving path. Tough skill. Worth it.
The spiral can be tight, making 3 to 4 full rotations, or loose, making just one long curve. Tight spirals look bolder. Loose ones photograph softer. Neither is better — it’s a mood choice.
One detail to watch: the center of the spiral tends to look like a small knot. Leaving a little texture exposed there reads more natural than trying to braid it down completely.
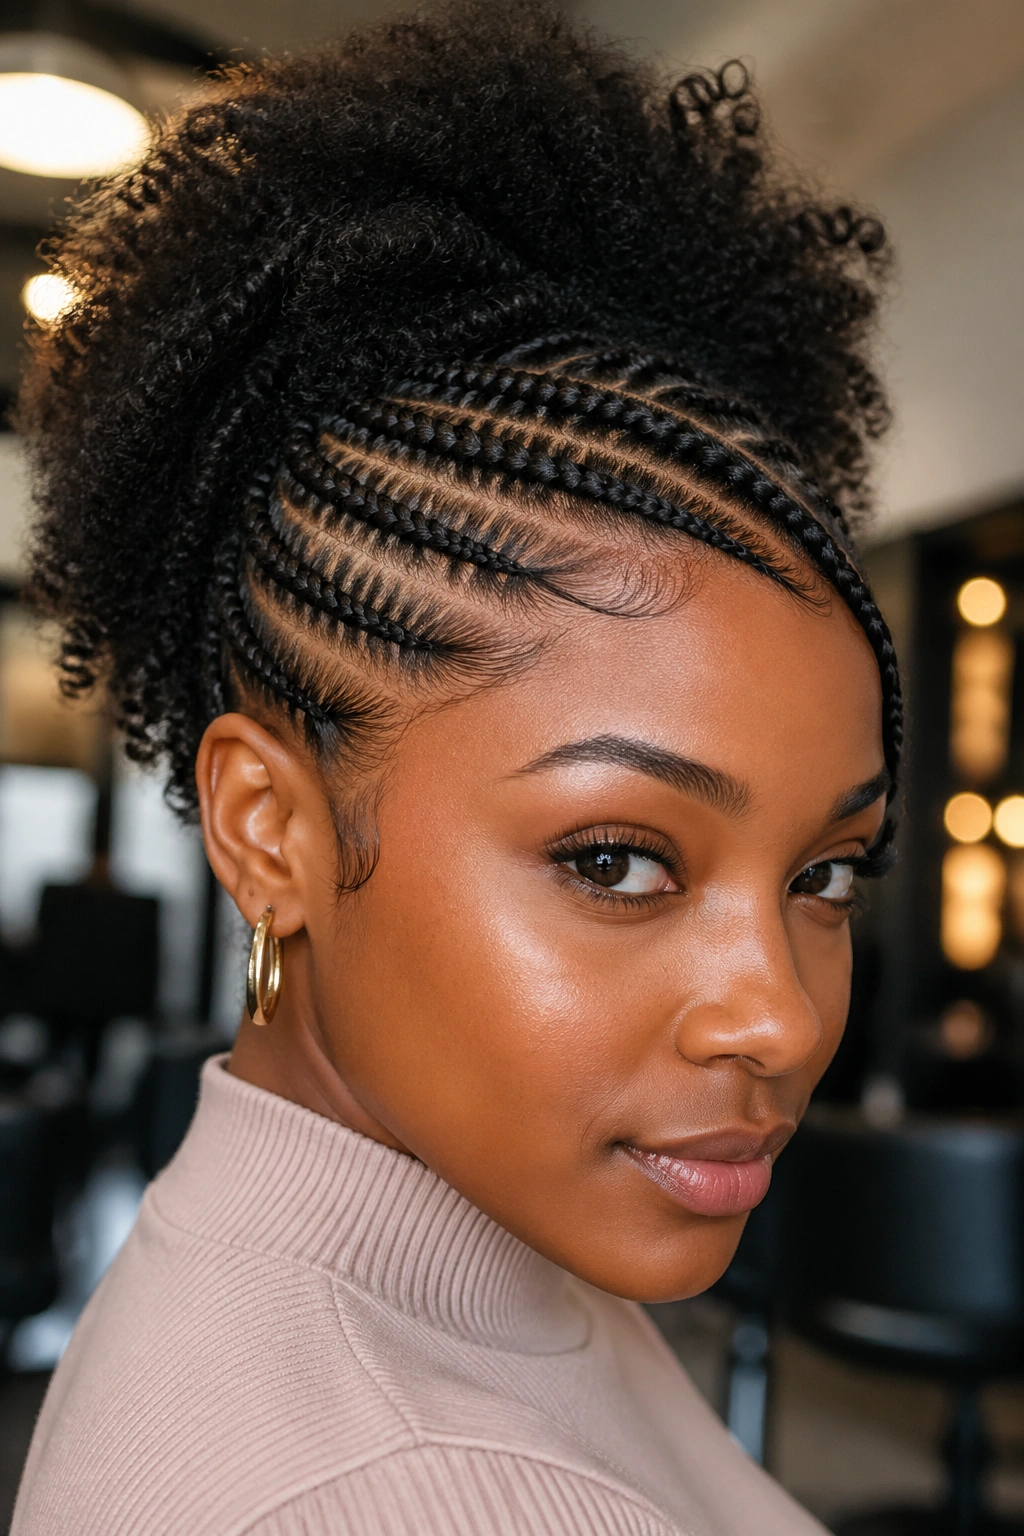
12. Half-Up Small Stitch Ponytail
The front half gets cornrows, the back half gets pulled into a ponytail. Simple concept, but small stitch turns it into a style. The contrast between the braided front and the free back creates motion the hair moves with.
Six to seven rows across the front is standard. The rows converge at the crown where the ponytail starts. Ends of the cornrows tuck into the ponytail base and disappear.
For added polish, wrap a section of the ponytail hair around the elastic to hide it. Pin with bobby pins that match your hair color.
13. Mohawk-Inspired Center Strip
A strip of small stitch cornrows running down the center of the head with the sides braided shorter or left faded creates a mohawk silhouette without a fade cut. The strip is usually 3 to 4 inches wide, holding 5 to 7 cornrows.
The side sections can be micro-braided, flat-twisted, or simply slicked down with gel. Whatever creates contrast with the raised center strip. Some people add accent cornrows on the sides that run perpendicular to the center strip — those break up the blocks.
It’s a bold look. It’s not subtle. Don’t pick it if you want something that fits into every setting — this one demands its moment.
14. Afro-Inspired with Braided Border
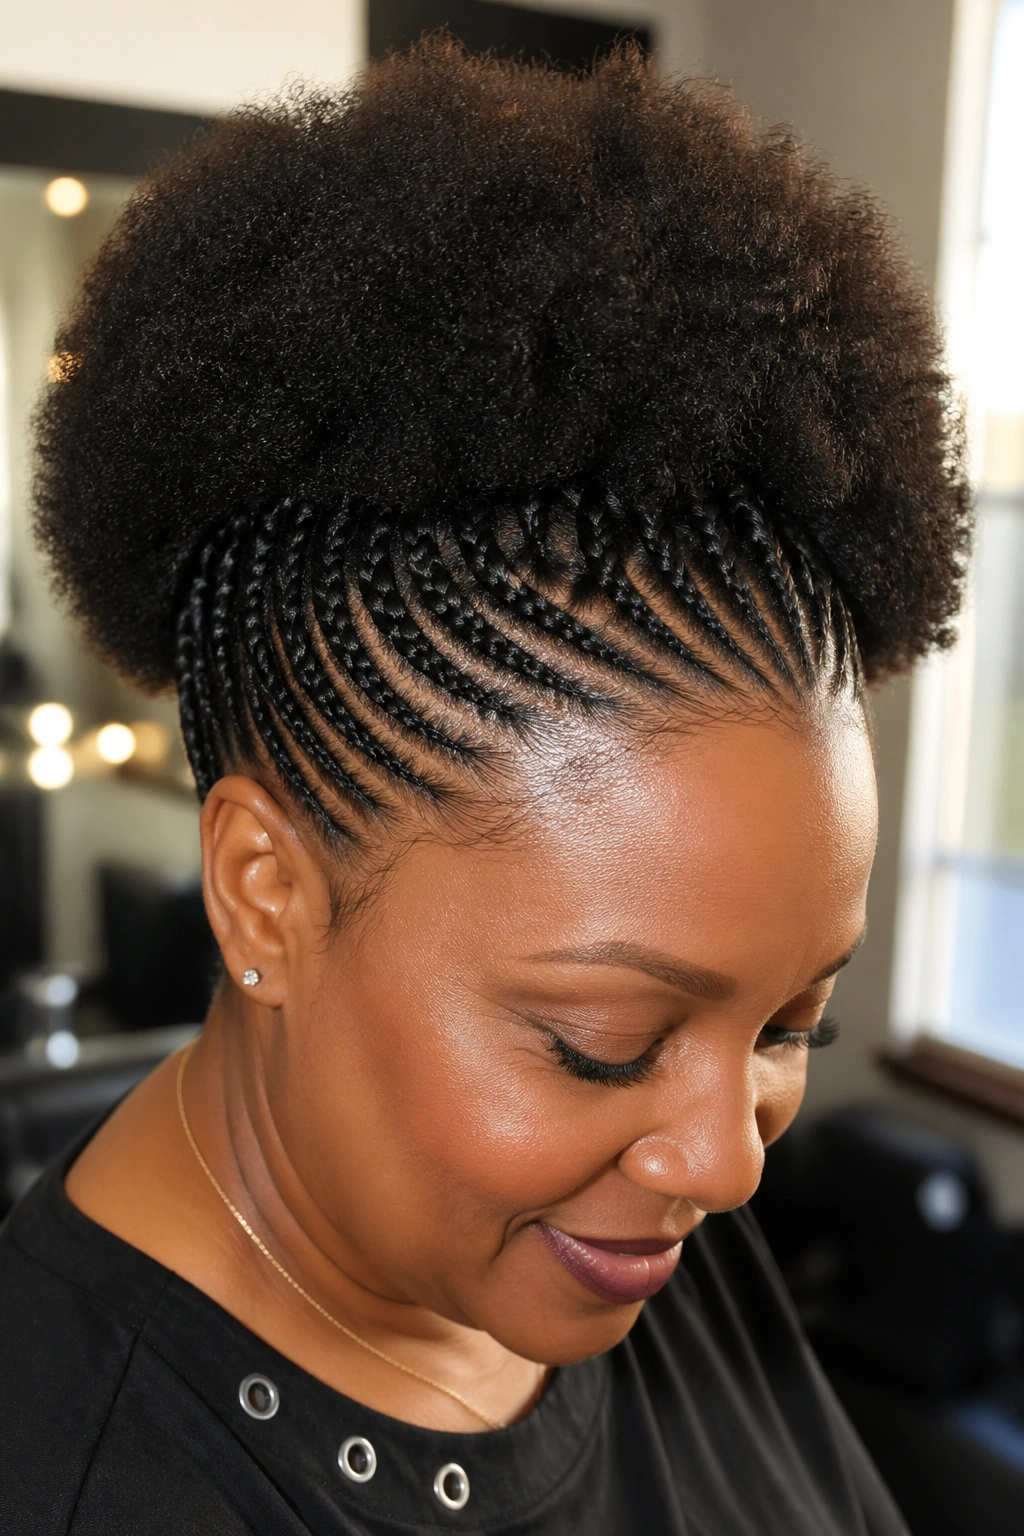
Why It Works
A natural afro sits on top, while a border of small stitch cornrows rings the crown. The contrast between volume and flatness is the draw. Your hair looks sculpted because of the sharp line where the braids end and the afro begins.
- Cornrows should be 2 to 3 inches deep from the hairline
- The transition needs a clean parting between braided and free sections
- Use a gel with strong hold at the border to prevent frizz creeping into the afro
Tip: Spritz the afro with water and oil daily to keep the contrast looking intentional, not neglected.
15. Two-Color Ombre Small Stitch
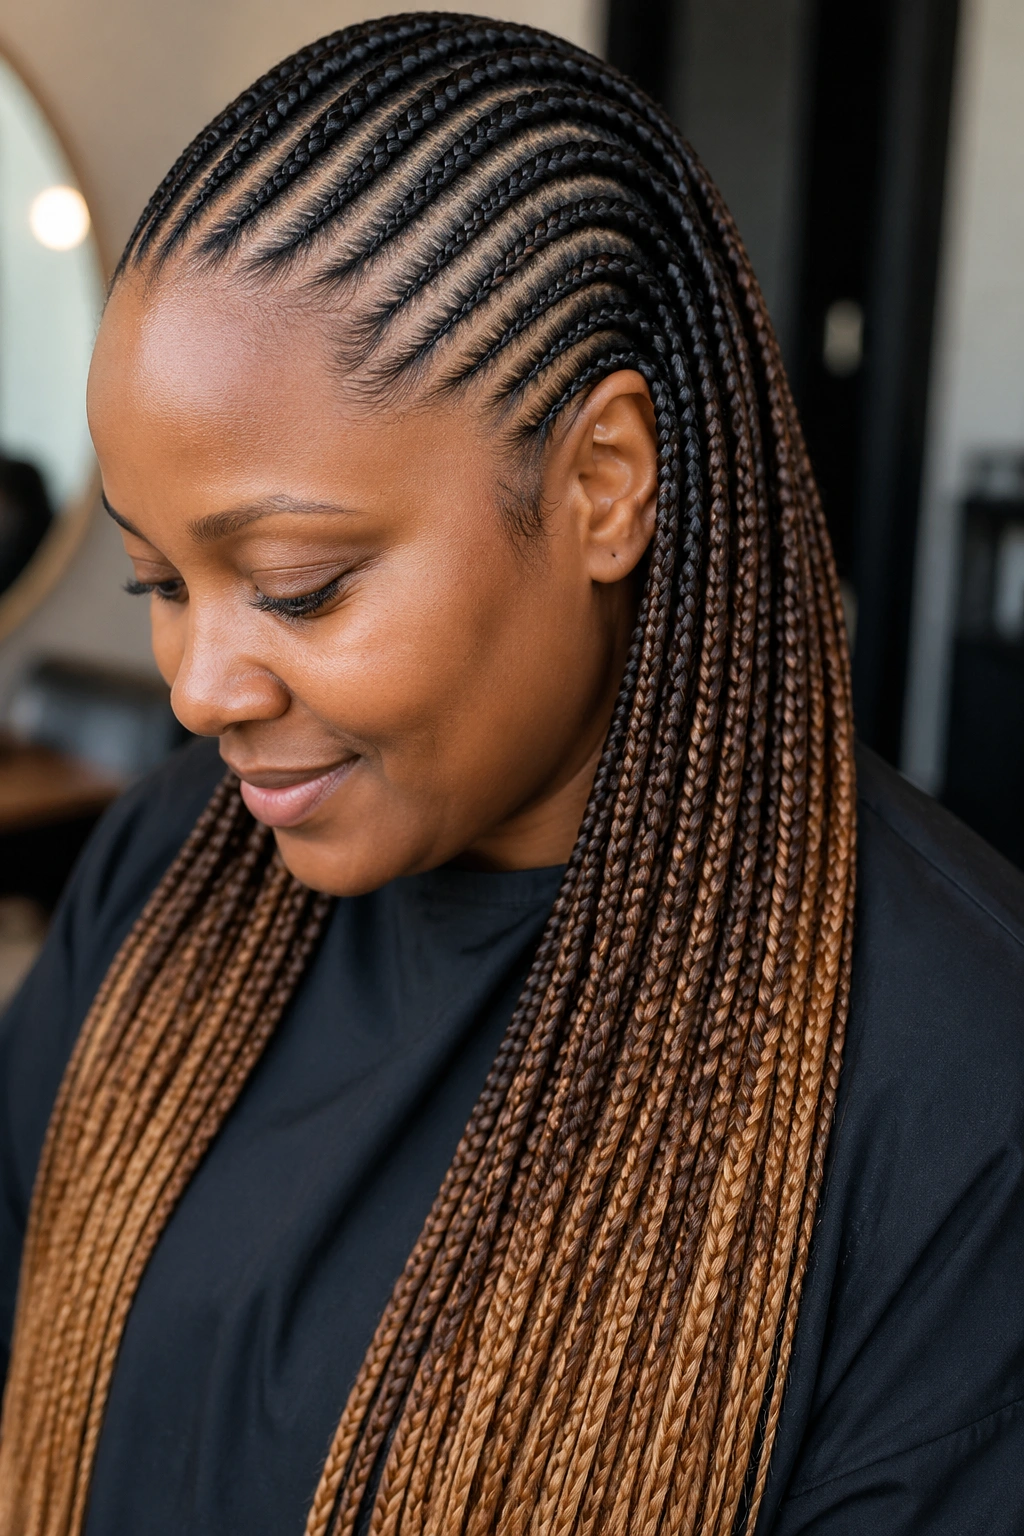
Ombre braids transition from one color at the root to another at the ends. With small stitch cornrows, the color change reads in every stitch. The effect is like a gradient painting rather than a flat color block.
Natural black to caramel works for most skin tones. Black to auburn adds warmth without shocking. Skip neon unless you’re committed — bright colors in small stitch stay visible long after the style starts to age.
The ombre is easier with added hair, which means feed-in. Natural hair alone doesn’t give you enough length in most cases for a convincing fade.
16. Starburst Part at the Crown
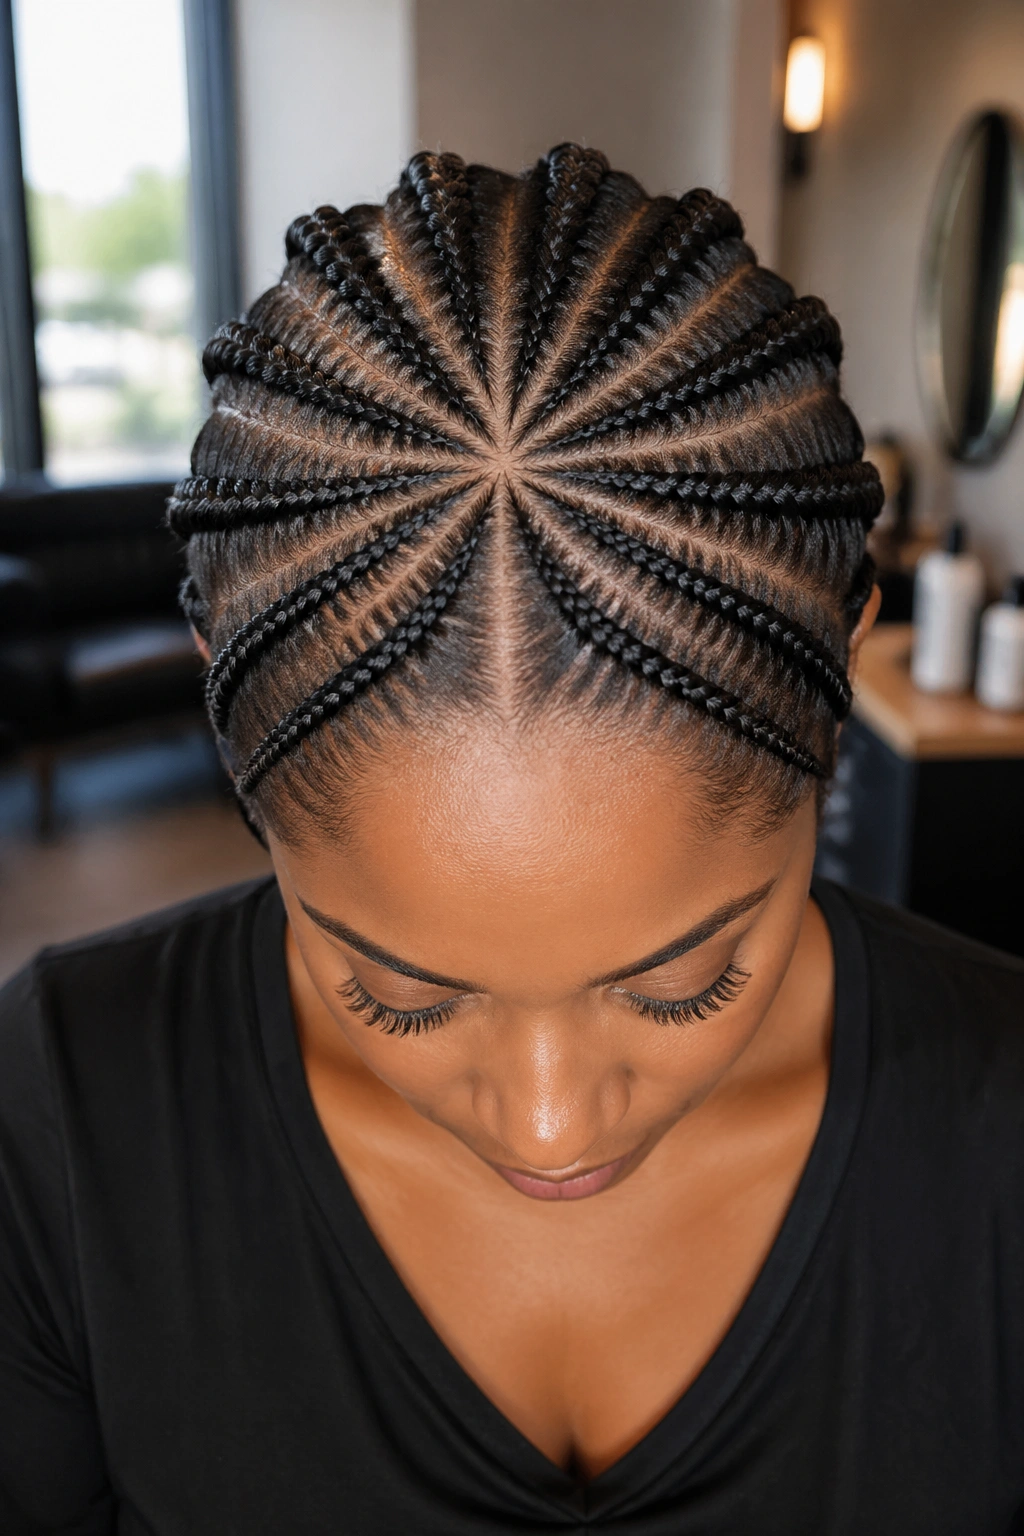
A starburst is a parting pattern where multiple cornrows radiate outward from a single point, usually at the crown. Small stitch makes the radiating lines more distinct. From above, it looks like light streaking out.
Six to eight points is typical. Each point becomes a cornrow that travels out toward the hairline or the nape. Where the ends land determines the overall shape — clustered low, or spreading wide.
The center point is the fussy part. Hair there is often sparser, and getting the starburst to launch cleanly takes patience.
17. Side Cornrows with Loose Back
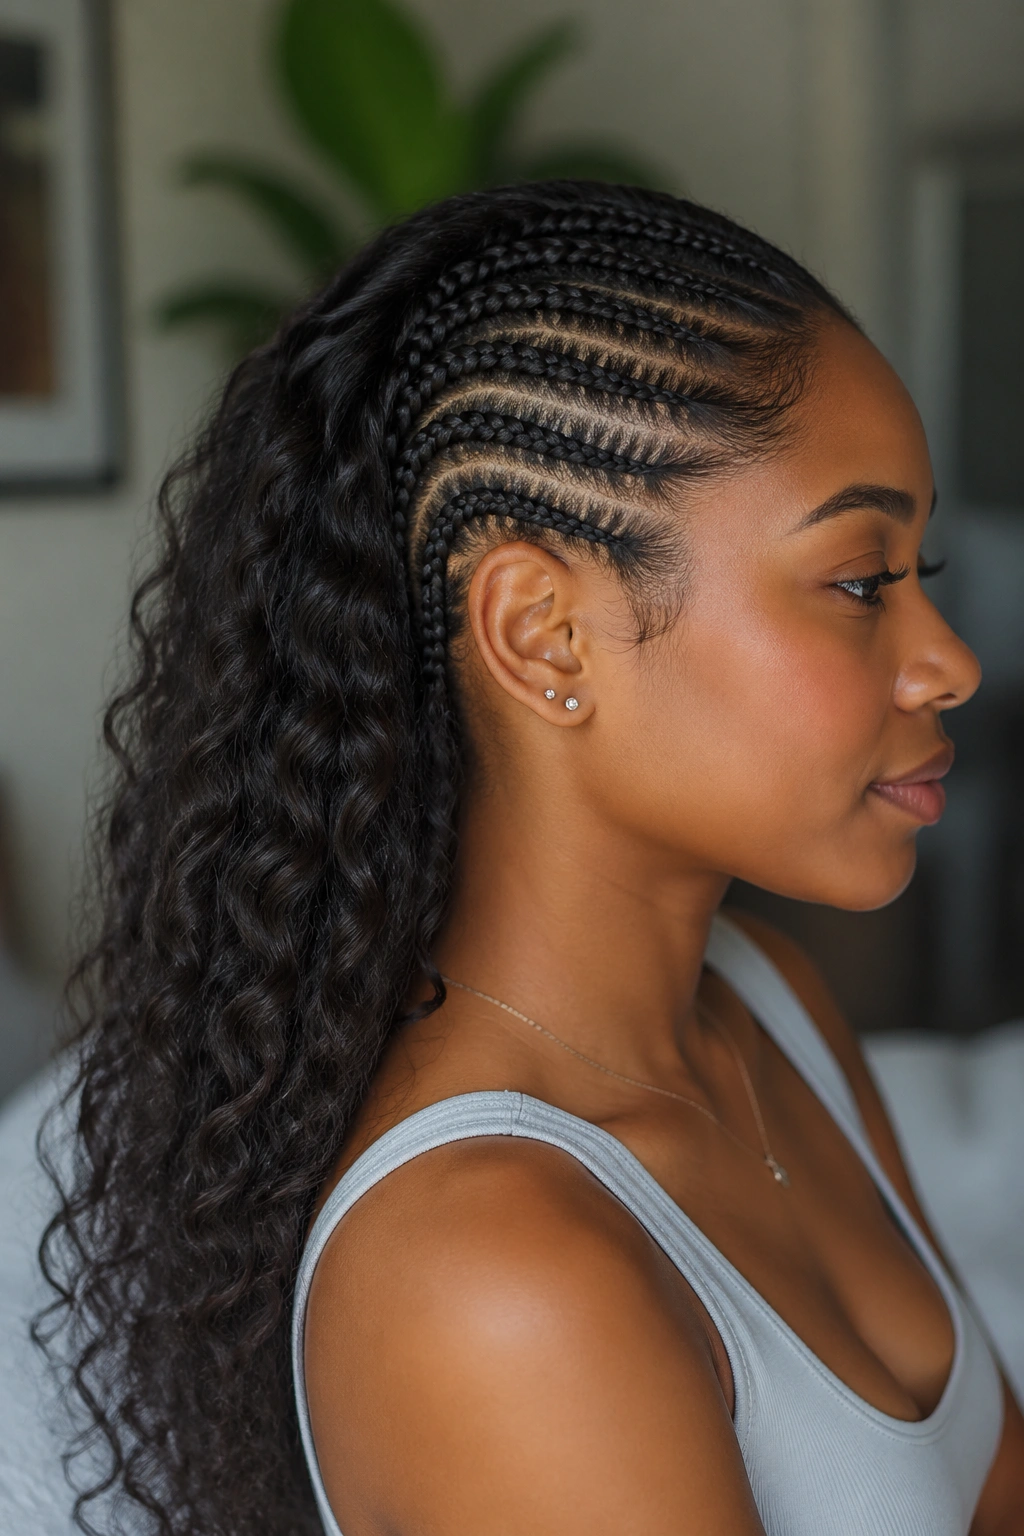
The sides of the head get fully cornrowed while the back section is left loose as a blowout or twist-out. The contrast reads bold and feminine at once. Good for people who love the look of cornrows but want some loose hair for versatility.
The small stitch on the sides has to stay flat for the loose back to sit nicely over the nape. If the side cornrows lift or flare near the ears, the back hair bunches awkwardly.
Use a satin scarf at night to protect both sections. The loose back especially needs the scarf to keep from tangling against the pillow.
18. Diagonal Swoop Pattern
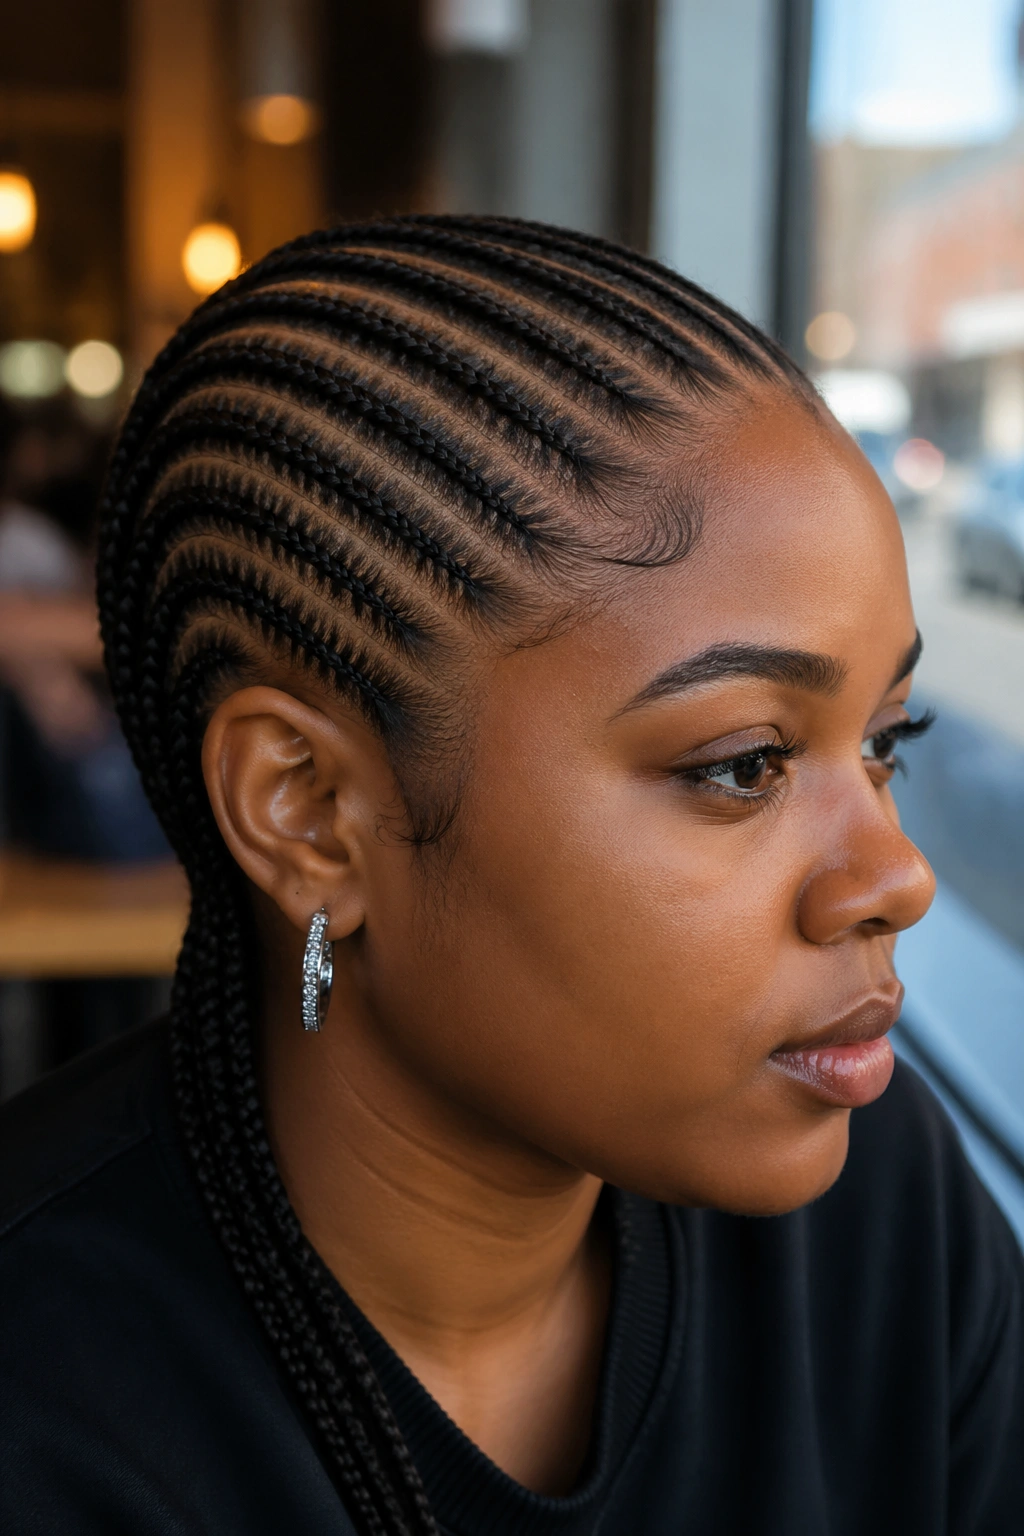
Diagonal cornrows that angle from one corner of the forehead to the opposite nape create a sweep that visually lengthens the face. Small stitch doubles down on the effect because each stitch runs at a slight angle, making the diagonal feel even more dynamic.
The angle should be steep — about 30 to 40 degrees off the horizontal. A shallower angle looks timid. A steeper one starts to fight the head shape.
Ten rows is usually right. Each one parallel to the next, no crossing.
19. Heart Tip Ends
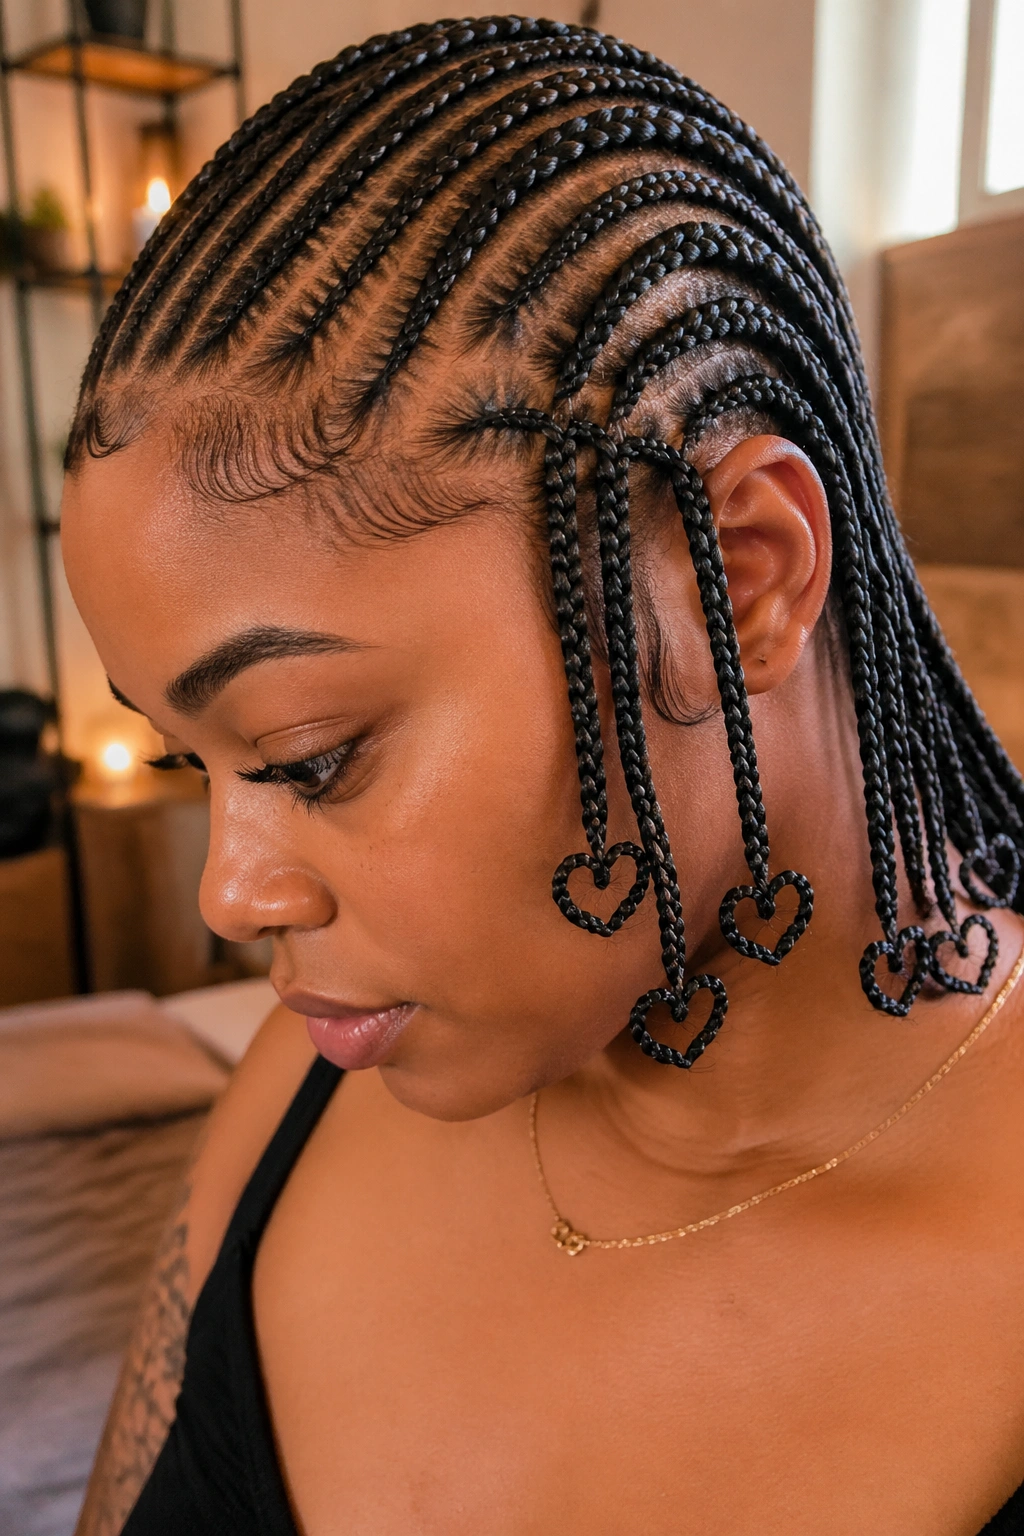
An unusual finish — the ends of each cornrow curl into a small heart shape before hanging loose. This requires a braider willing to shape and set the tips with hot water and wrap pins. The small stitch version of this is rare because the tight stitches carry the shape well.
- Heart tips work best on medium-length braids, 10 to 14 inches
- Set the tips in small rollers for 2 hours after dipping in hot water
- Use a sealing spray to hold the heart shape for 2 to 3 days before it loosens
Tip: Book a touch-up appointment at the 2-week mark to re-shape the tips if they’ve relaxed.
20. Undercut-Style with High Volume Top
An undercut style keeps the sides short or shaved and the top long. For those who don’t want an actual undercut, small stitch cornrows tight against the sides mimic the look. The top gets a high ponytail, bun, or puff.
The side cornrows have to stay flat against the scalp for the illusion to work. If they have any lift, the “undercut” looks like regular cornrows trying too hard.
The top section holds up with more volume than expected. Pair with a headband for an extra polished finish.
21. Small Stitch with Gold Cuffs
Metal cuffs snapped onto select braids elevate a plain install without changing the core style. Small stitch cornrows already have visual texture, so the cuffs become accents rather than the main focus. Three to five cuffs spread across the head is the sweet spot — more starts to clatter.
Gold reads warmer on deeper skin tones. Silver gives a cooler contrast. Rose gold is a middle option that pairs with most natural hair shades.
Position the cuffs roughly 3 to 4 inches down from where each braid begins. Too close to the scalp and they look crowded. Too close to the tip and they slide off.
22. Freestyle Asymmetric Install
Asymmetric styling breaks the symmetry rule on purpose. One side might have 6 cornrows running front-to-back, while the other has 3 wider sections in a different direction. Small stitch on both sides holds the asymmetry together because the texture matches even when the pattern doesn’t.
This works only when the braider plans the imbalance carefully. Random asymmetry reads like a mistake. Deliberate asymmetry reads like art. Show reference photos before starting.
Some people feel uneven when they first see it. Give it two or three days. The asymmetry starts to feel like the point.
Keeping Small Stitch Cornrows Fresh

Maintenance makes the difference between a 2-week style and a 5-week one. Small stitches hold up longer than larger braids, but only with consistent care.
- Spray a water-and-leave-in mixture every other day to keep the scalp and braids moisturized
- Apply a light scalp oil — jojoba or argan — directly to the parts twice a week
- Avoid heavy butters or thick creams, which sit on the braids and turn white as they dry
- Refresh edges with a light gel and a boar-bristle brush every 3 to 4 days
Scalp Care Through a Long Install
Your scalp needs attention even when it’s covered. Itching is usually a sign of dryness or product buildup, not a sign to scratch.
When the itch starts, reach for a dilute witch hazel spray or a dedicated scalp toner. Press gently into the scalp between cornrows with the pad of your finger. A cotton swab dipped in a light oil can target spots that need more attention without disturbing the braids.
Rinse your scalp every 2 to 3 weeks if you’re going for a long install. Dilute shampoo in water, apply with an applicator bottle, massage gently, rinse thoroughly. This stretches the life of the braids without leaving gunk behind.
Taking Down Small Stitch Braids
Takedown takes longer than it does with larger cornrows because each stitch has to be unraveled. Plan for 2 to 4 hours for a full head, depending on the pattern and whether you used feed-in hair.
Work from the ends up. Use your fingers first, not a rat-tail, for the top 2 to 3 inches. Once the tail is loose, spray with water and conditioner, then work up toward the scalp. A wide-tooth comb helps with detangling but shouldn’t touch the cornrow section until it’s fully unwoven.
Shed hair will come out during takedown. This is hair that would have shed naturally during the install period — it’s held there by the braid. Don’t panic. Collect it and move on.
Picking the Right Small Stitch Style for You
Not every pattern suits every head. Face shape, hair density, and lifestyle all matter.
- Round faces suit vertical styles — straight back, center part — that lengthen visually
- Long faces pair well with horizontal or swept patterns that add width at the temples
- Square jawlines soften with curved or cascading patterns
- Heart-shaped faces balance with volume at the nape, so styles with bulkier ends work
If your hair is fine or low-density, lean toward simpler patterns. Complex geometric parting can look sparse when the individual cornrows are thin. Thicker hair supports bolder patterns without looking crowded.
And think about your routine. A style that needs daily edge work doesn’t suit someone who barely has time to shower. A low-maintenance straight-back set fits into most lives. Elaborate patterns with cuffs and shaped ends want more attention than some weeks allow.
Common Mistakes to Avoid
Too tight at the hairline causes traction alopecia over time. If your edges feel painful during the install or the next morning, speak up. A small stitch cornrow should feel snug, not sharp. Re-doing one row is easier than treating hair loss months later.
Skipping maintenance kills a style fast. Small stitch cornrows that go un-moisturized for two weeks look fuzzy and dull even though the underlying pattern is fine. Daily habits keep the install crisp through its full lifespan.
Ignoring the nape is a classic mistake. That section loosens first because it rubs against clothing, pillows, and car headrests. Pin or tuck those ends at night. A silk scarf wrapped around the nape section while sleeping adds a small amount of friction protection that extends the life by days.
Over-styling with hot tools damages the braided hair and the natural hair underneath. Small stitch is already a statement. Adding curls, crimps, or heat styling on top of the install is unnecessary and risky.
Small stitch cornrows reward patience and good care. They look sharper when fresh, hold up longer than most protective styles, and offer a canvas for real personal style — through parting, accessories, or finishing touches. Pick the pattern that fits the shape of your face and your calendar. Then sit down, get comfortable, and let the stitches do their work.