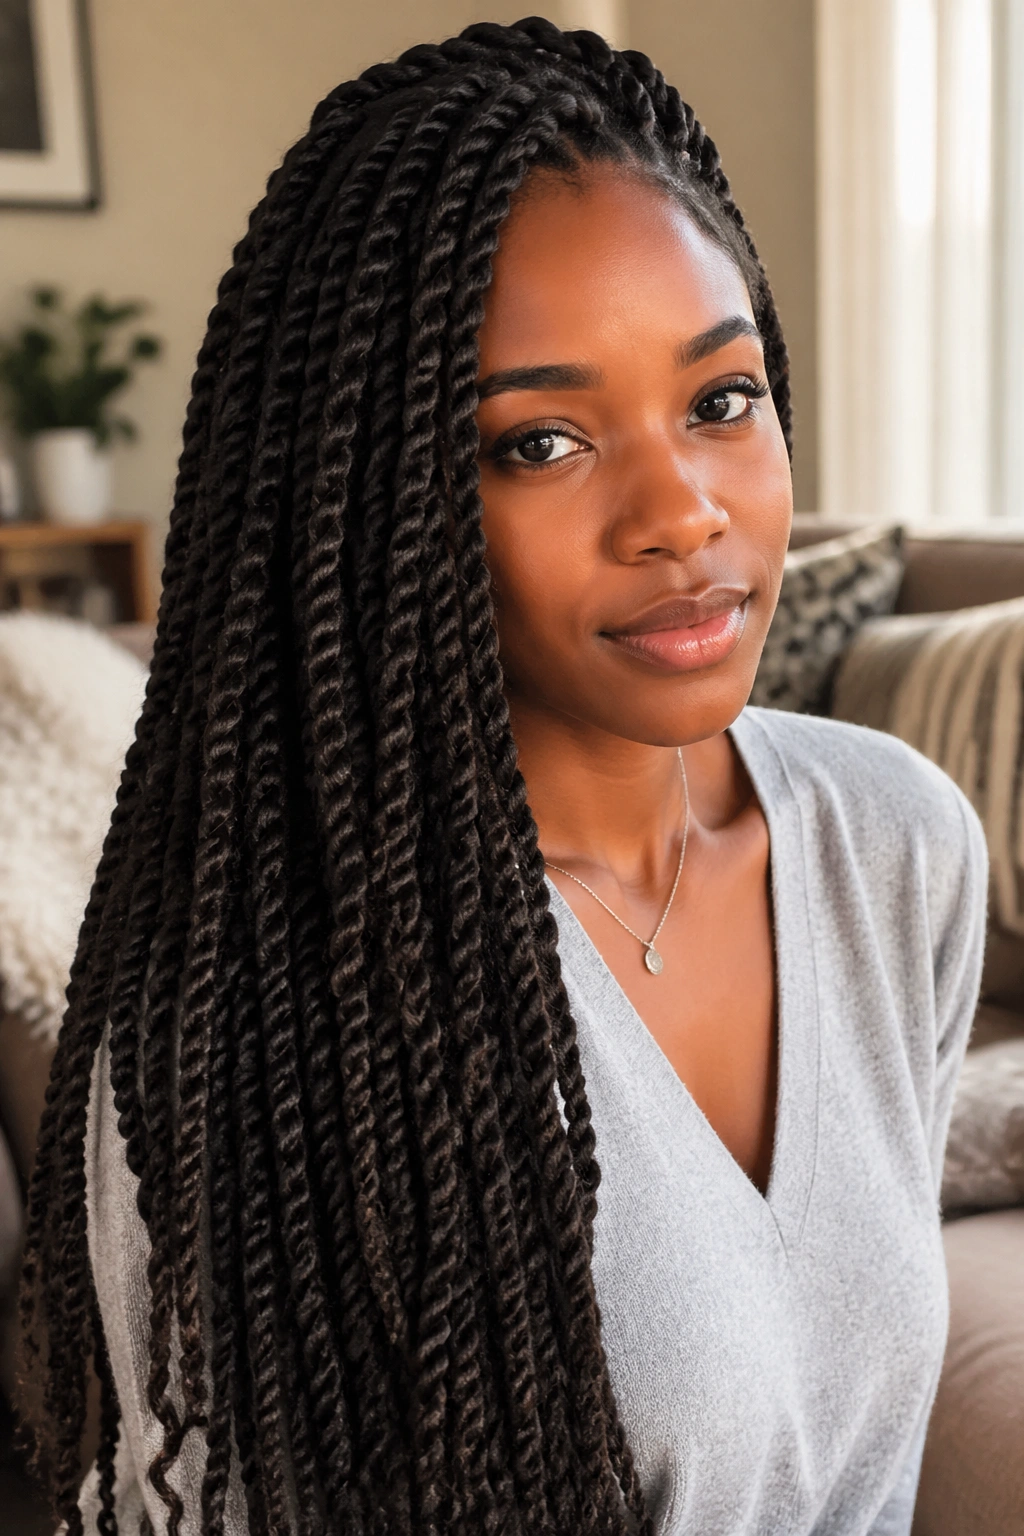
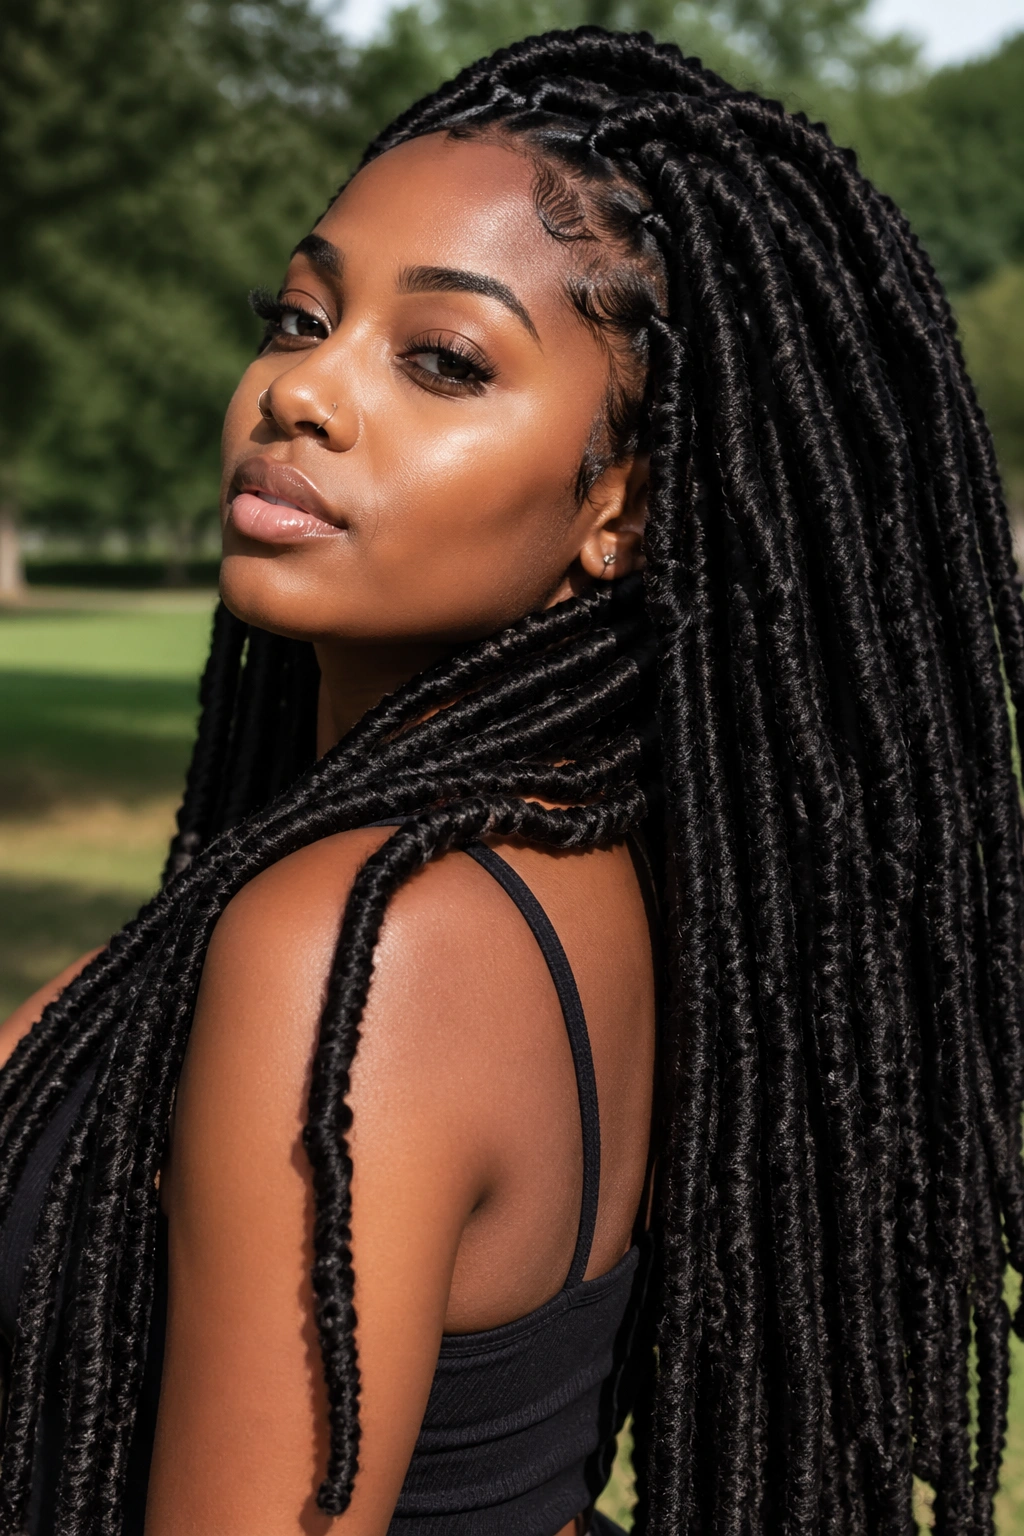
There’s a particular kind of patience required to install long twist braids — the kind you develop once and carry with you forever. Afro twist braid looks for long hair sit at the intersection of protective styling and visual statement, and when they’re done right, they’re genuinely breathtaking. The length amplifies everything: the swing, the weight, the way each individual twist catches light at a slightly different angle.
Twist braids aren’t quite braids and aren’t quite twists. They live in their own category — usually a two-strand or three-strand formation with a texture that falls somewhere between tightly coiled and sleekly defined. For long hair, the technique needs to be consistent from root to tip, because any variation in tension or size becomes more visible over length.
This collection covers 23 genuinely different looks — different textures, different base techniques, different visual outcomes. Some are weekend salon projects. A few are achievable at home in a single long afternoon. All of them work beautifully on long hair, and each has specific practical information worth knowing before you commit.
What “Long” Actually Means for Twist Braids
When the styling community talks about long twist braids, they typically mean anything that hits shoulder length and below. But there’s a real functional difference between shoulder-length and waist-length that goes beyond aesthetics. Shoulder-length twists are manageable as a DIY project. Mid-back twist braids start requiring much more planning and usually more extension hair. Waist-length or longer is a full commitment — in time, in extension quantity, and in scalp care.
The longer the twist, the more critical the root tension becomes. Twists that are too tight at the base with waist-length extensions will cause a constant low-grade headache and, over weeks, traction stress at the follicle. Too loose, and the twist won’t hold for more than a few days before it begins to unravel at the roots. The sweet spot is a firm but not painful tension at the base — you should be able to slide a fingernail under the root section without it lifting entirely.
Extension quantity scales dramatically with length. A shoulder-length set of medium twist braids might use four to five packs of extension hair. A waist-length set of the same thickness will use eight to twelve packs. Plan your purchasing around how long you actually want the finished style, not what the tutorial video suggests.
Extension Hair That Works Best for Long Twist Braids
The extension material you choose has a bigger impact on how long twists look and behave over time than almost any other decision you’ll make.
Marley hair — the matte, coily synthetic fiber — gives the most natural-looking result for people with type 3C to 4C hair. It blends well at the roots, doesn’t pick up shine the way straight synthetics do, and holds a twist structure reliably without slipping. The downside is that at very long lengths, Marley hair becomes harder to keep tangle-free at the ends.
Kanekalon braid hair in a pre-stretched form is the most versatile option. It’s lighter than Marley, available in more colors, and its slight sheen reads as a style choice rather than an artificial look. Pre-stretching before twisting is essential — the process takes about 20 minutes per batch but dramatically reduces the stiff, artificial appearance that comes from un-stretched Kanekalon.
Human hair extensions for twist braids are available but less common. They’re best for styles where you want the option to slightly curl or wave the ends, since heat-styling options are limited with synthetic fibers. For most people, high-quality synthetic is the more practical choice.
Preparing Your Natural Hair for Long Twist Extensions
Any protective style on damaged or unprepared natural hair is going to cause more problems than it solves. Before installing long extensions, your natural hair needs to be in the strongest possible condition.
Protein-moisture balance is the starting point. If your hair snaps easily when dry or feels gummy when wet, that needs to be addressed before installation. A protein treatment — a product containing hydrolyzed keratin or wheat protein — followed by a deep moisturizing conditioner, used a week before your installation appointment, puts the hair in a much better position to handle the weight and tension of long extensions.
Wash, condition, and detangle your hair completely before the installation begins. Installing extensions on hair that has any tangles or shed hair buildup will cause those issues to get worse as your natural hair grows over the weeks you’re wearing the style. Starting clean gives your style the best chance at a full, clean wear.
Trim any split ends. This isn’t optional when going long. Split ends travel up the hair shaft over time, and under the stress of extension weight, they travel faster. Removing half an inch of damage before installation means you’re not losing more during wear.
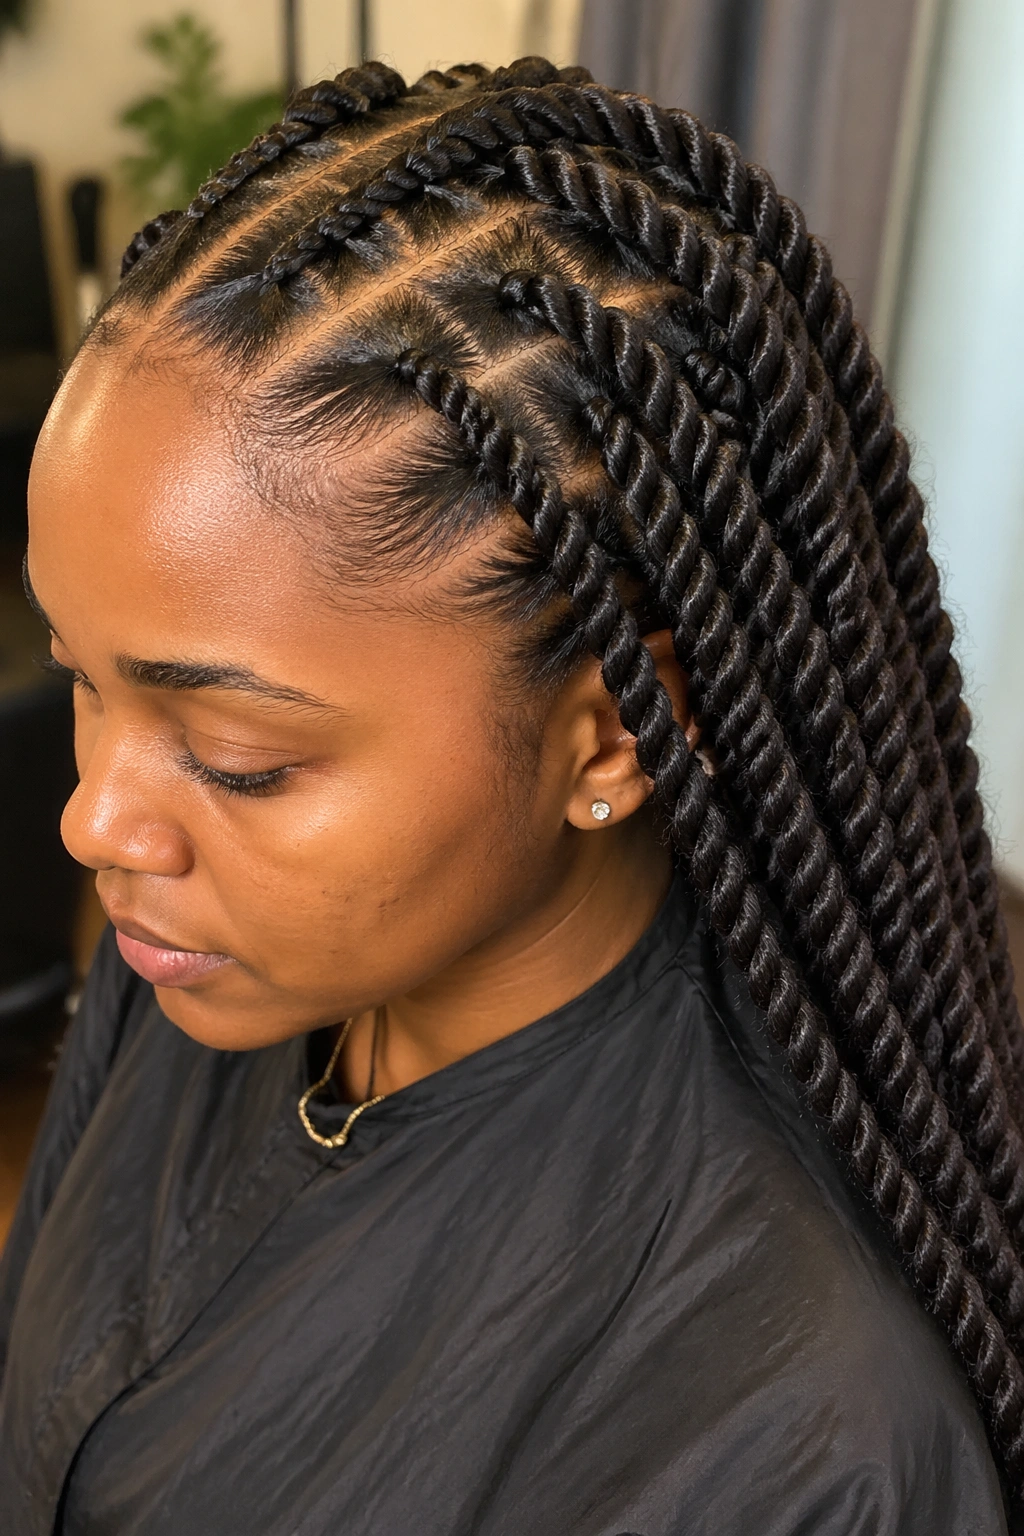
Sectioning and Size: Getting Proportions Right
The size of each twist section at the root determines the finished look more than any other variable. Large sections create jumbo twists with a bold, graphic look. Small sections create thin, delicate individual twists with a finer, more intricate texture. Medium sections — about the width of your thumbnail — are the most common choice and the most balanced.
For long styles, symmetrical sectioning matters more than for shorter ones because any asymmetry is amplified over length. Use a rat-tail comb and take your time with the parts. Square sections create the most uniform look; diamond-shaped sections create a slightly less structured appearance that some people prefer.
Consistent sizing throughout is more important than perfect geometry. A mix of large and small sections at random will look unpolished. If you want size variation — some thicker, some thinner — plan it intentionally, perhaps with a gradient from thicker at the top to thinner toward the front, rather than letting it happen by accident.
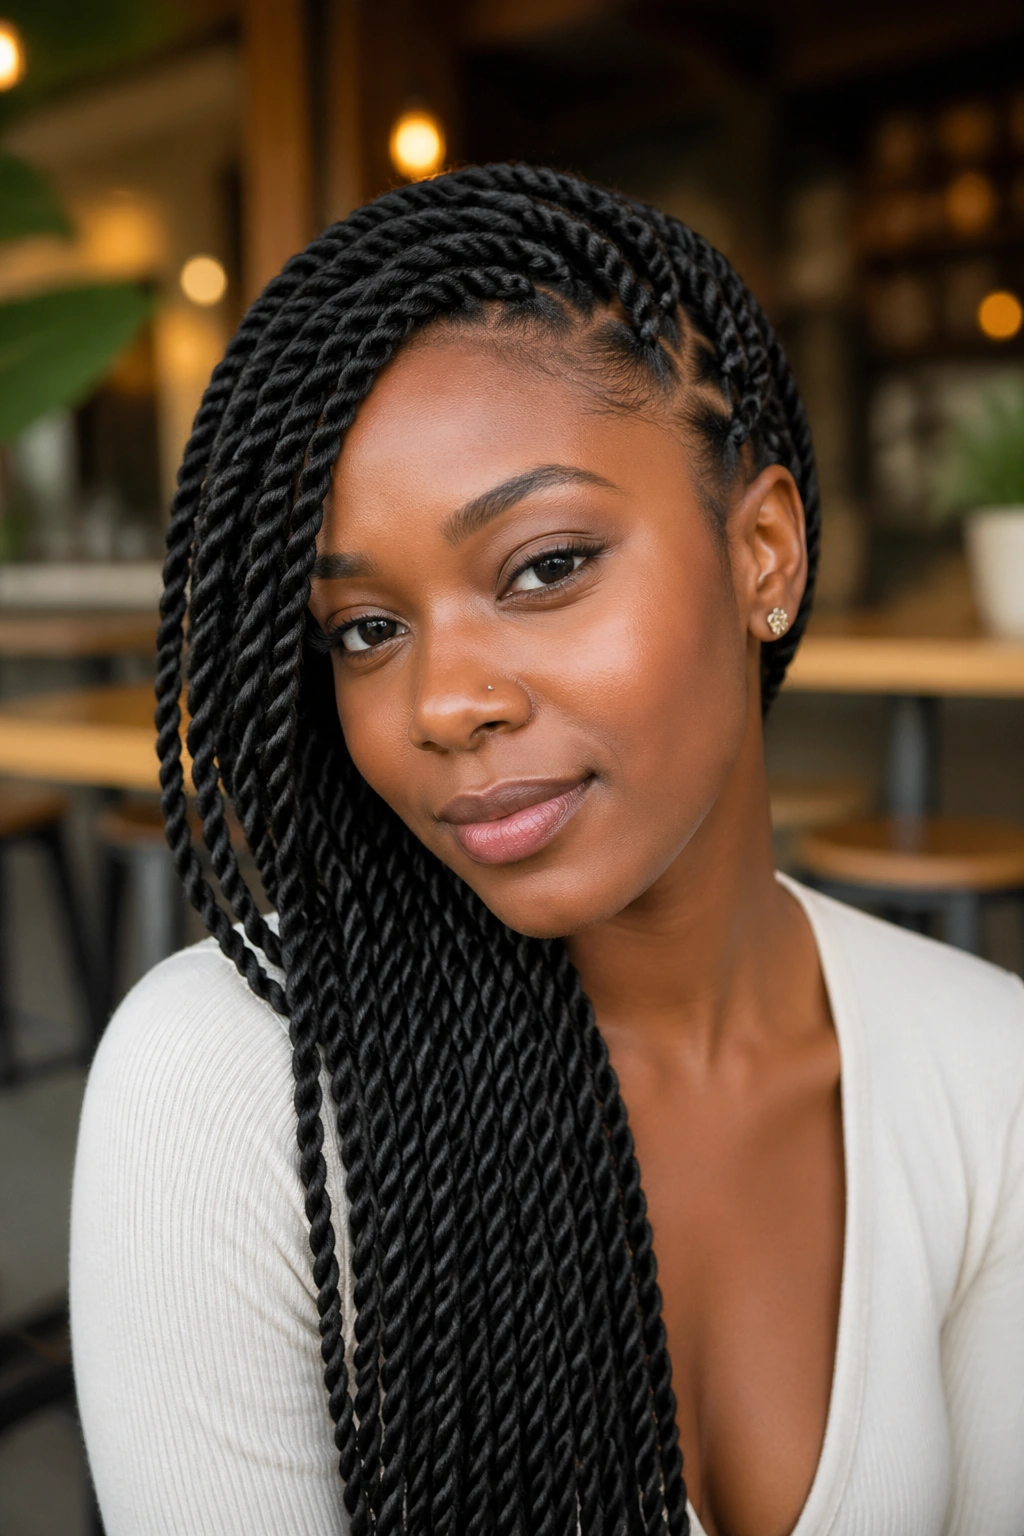
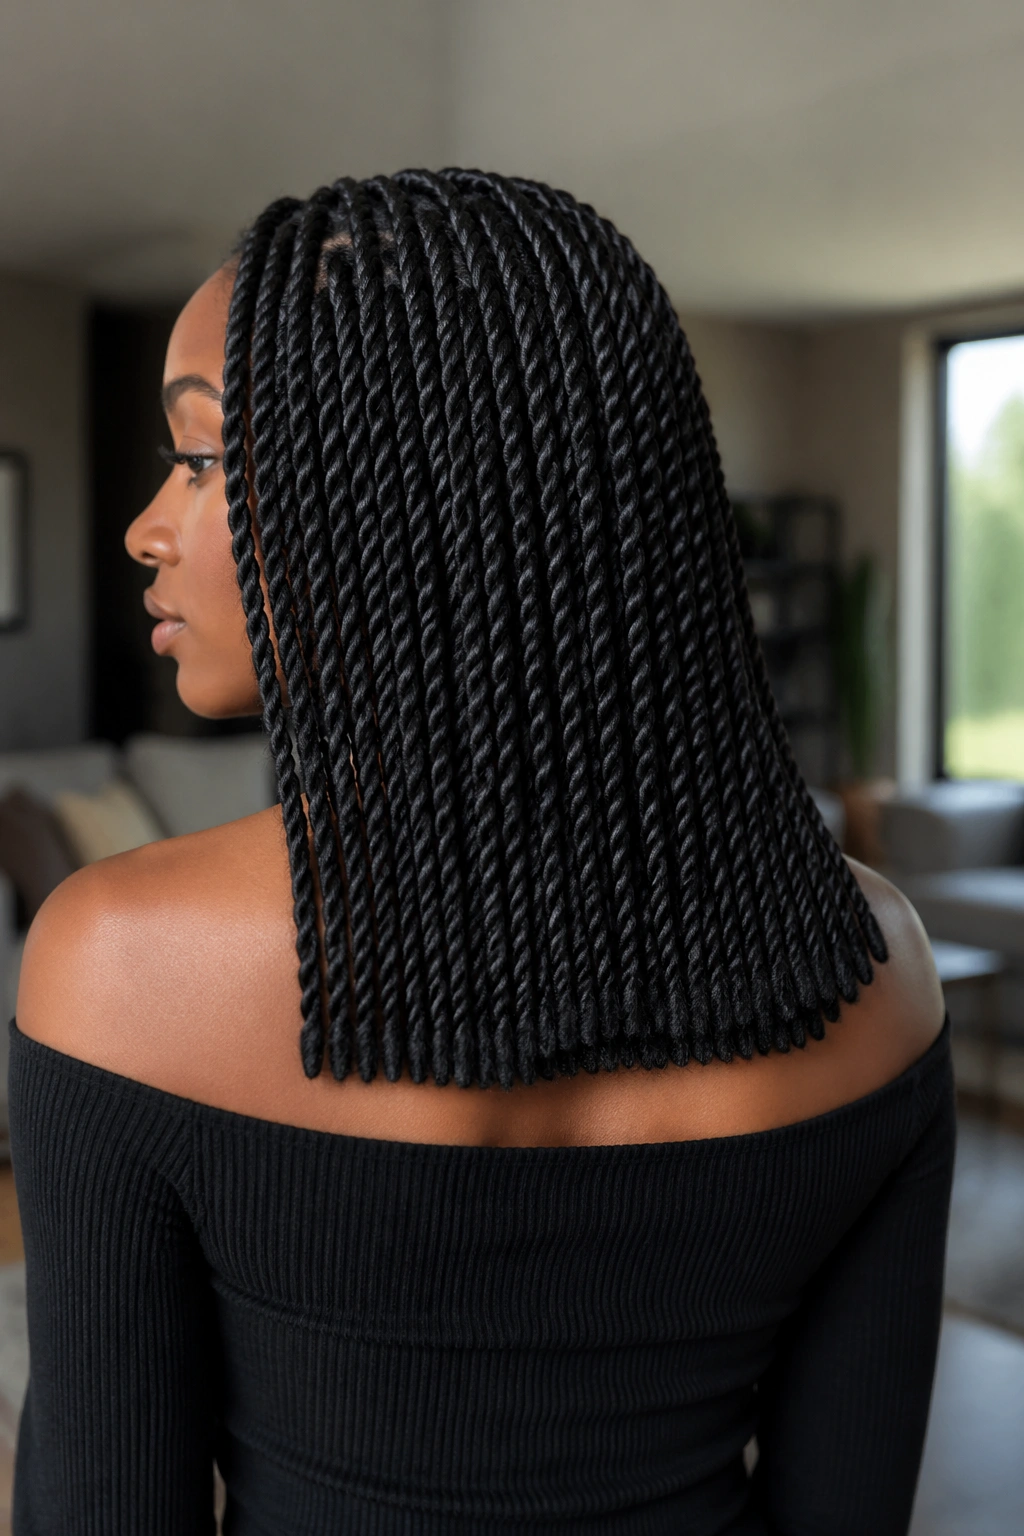
1. Classic Medium Senegalese Twists
The Senegalese twist is the foundation style from which many other twist braids evolved — a tight, smooth, rope-like two-strand twist using silky extension hair. At long lengths, they develop a satisfying weight and a slight swing that’s immediately recognizable.
The technique involves parting your natural hair into sections and rope-twisting two strands of extension hair around each other, incorporating your natural hair at the root and continuing down in a smooth, consistent spiral. The end result is a sleek, cylindrical twist with a slight sheen.
Why It Works
The tight formation means Senegalese twists hold their shape for weeks. Unlike loose two-strand twists that can unravel from the ends inward, a properly executed Senegalese twist locks into its shape almost immediately and stays there. For waist-length styles worn for four or more weeks, this structural integrity is genuinely valuable.
Color is where this style often shines most. The smooth surface of a Senegalese twist catches light uniformly, making ombre coloring — dark at the top, warm brown or honey blonde at the ends — look particularly polished. A well-executed two-tone Senegalese twist set at waist length is one of the most visually impactful styles in this entire list.
Keep the twisting tension consistent. Sections where you twisted harder will look slightly thicker than sections where you were tired at hour three and eased up — and at long lengths, that variation becomes obvious.
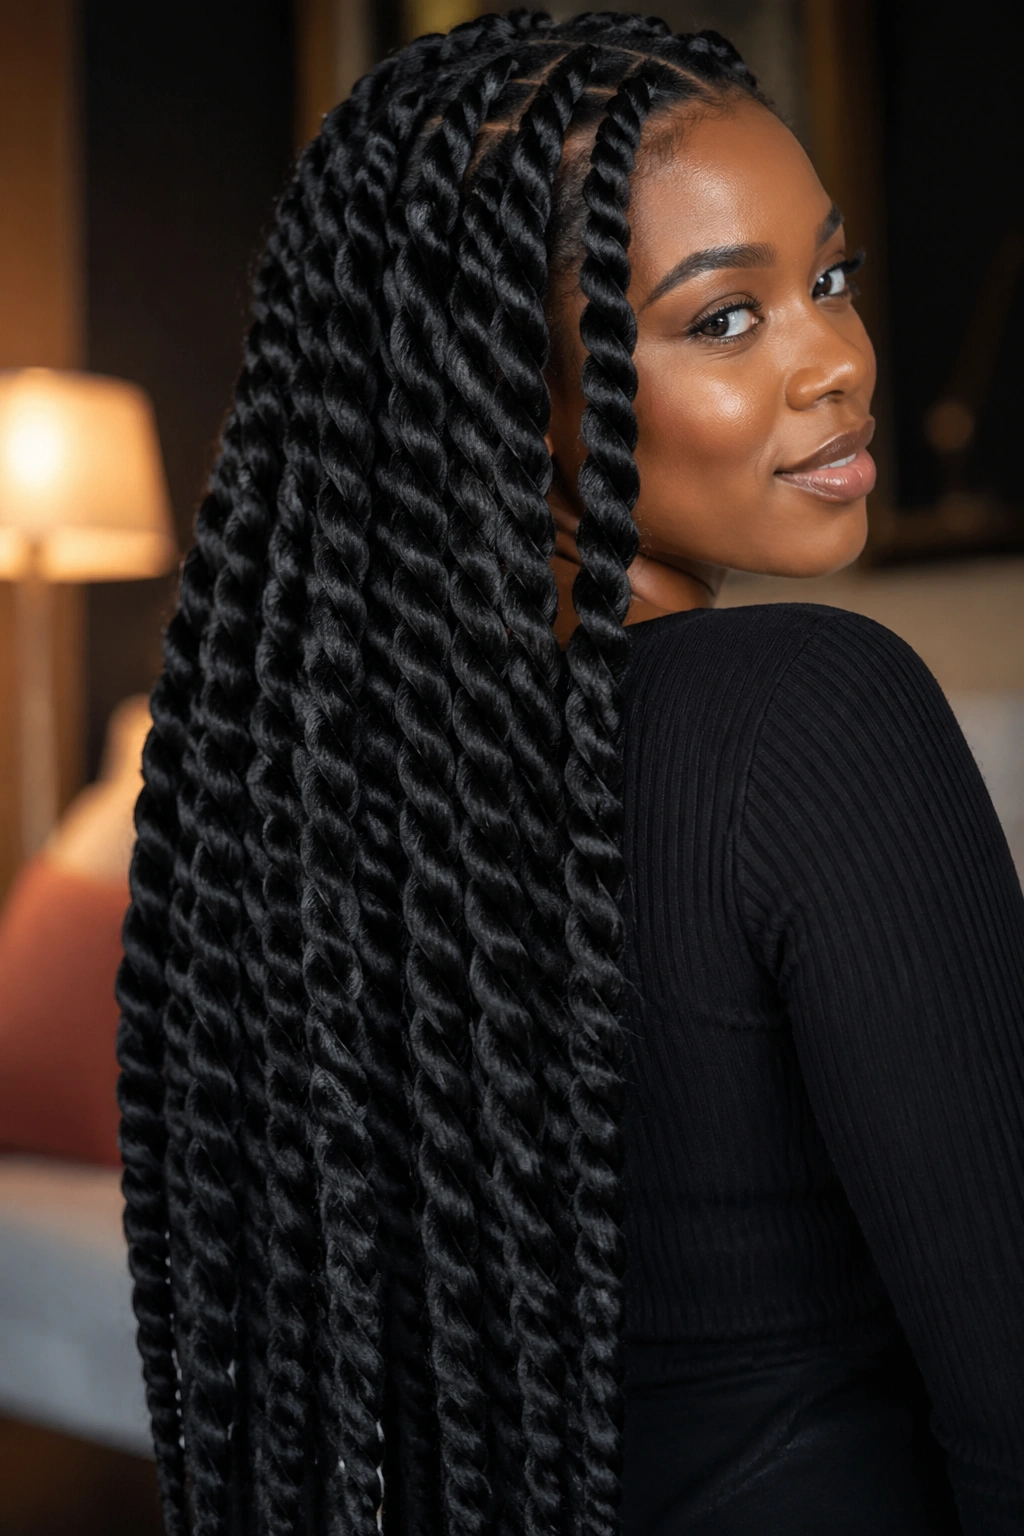
2. Chunky Jumbo Twist Braids
Everything that applies to medium Senegalese twists applies here, but amplified. Jumbo twist braids use much larger sections — sometimes as wide as two fingers — to create thick, statement-making ropes that fall dramatically down the back.
The visual geometry is completely different. Whereas medium twists create texture through quantity — many individual pieces creating a full silhouette — jumbo twists create impact through individual scale. Each twist is a presence on its own. You might have twelve to sixteen total twists for a full waist-length set, and each one is substantial.
Sleeping with jumbo twists requires more planning than sleeping with fine ones. The weight and girth of each twist means they need space, and bunching them randomly under a scarf leads to visible creases and distortion at the roots by morning. Pineapple them loosely at the crown — gather gently, without pulling — and wrap the base of the pineapple in a satin scarf. The individual twists hang freely within the scarf without getting crushed.
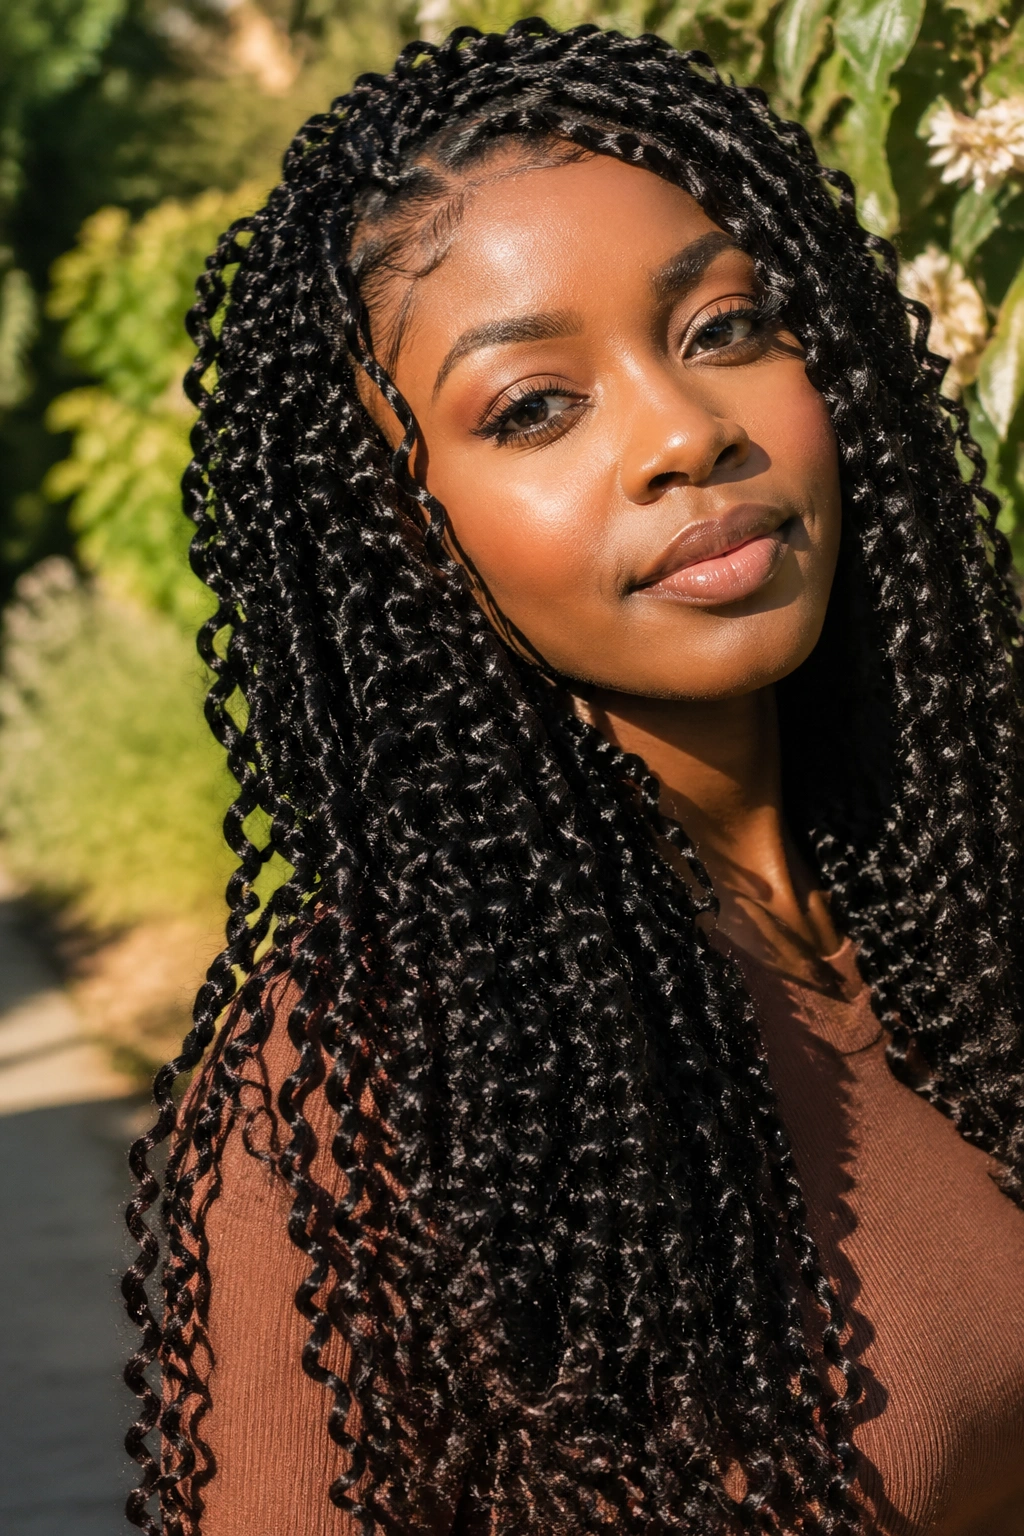
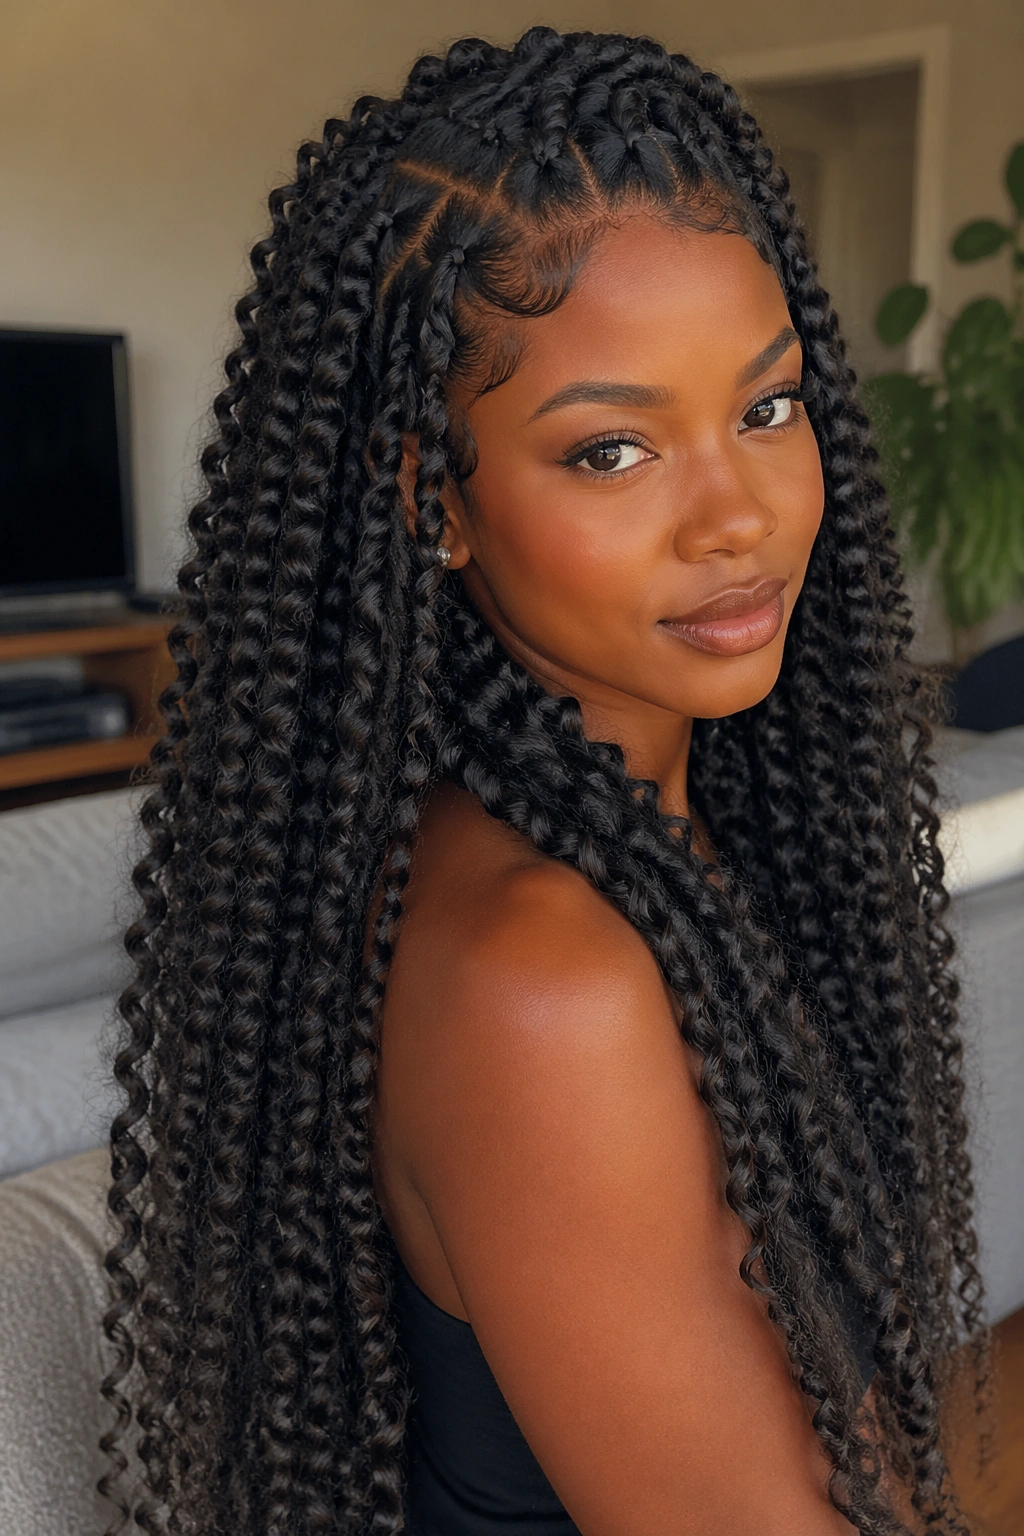
3. Passion Twist Braids
Passion twists are a newer evolution in the twist braid family — made by wrapping water wave extension hair around a two-strand base to create a springy, coiled texture that’s somewhere between a traditional twist and a textured braid. At long lengths, the coiled texture stays distinct and defined without product, giving the whole style a natural, effortless appearance.
The water wave hair wrapping creates texture that catches light in multiple directions. You’ll notice it changes appearance significantly in different lighting — matte and soft-textured in natural light, slightly shinier indoors. That variation is part of what makes passion twists feel alive rather than flat.
The Catch
Passion twists are more labor-intensive to install than standard Senegalese twists. The wrapping step requires consistent technique — wrapping too loosely creates a floppy, uneven texture; too tight makes each twist look stiff and rope-like rather than boho and coiled. Practice the wrapping motion on a few test sections before starting the full set.
For long lengths, the wrapping tension needs to be slightly looser than you might think to account for the additional weight pulling on each twist. Wraps that feel perfect at shoulder length can feel uncomfortably tight at the root once the full weight of waist-length extensions is added.
4. Feed-In Twist Braids
Feed-in technique — adding extension hair gradually as you work down the twist rather than attaching a full bundle at the root — creates a much flatter, more natural-looking root section on every individual twist. At long lengths, where the root section is under the most stress, feed-in attachment reduces tension and creates a smoother junction between your natural hair and the extension.
The resulting twist looks like it’s growing naturally from your scalp, particularly for the first two to three inches. The gradual addition of hair means there’s no visible knot or attachment point at the base, which reads as more seamless than traditional attachment methods.
This technique takes longer. Budget an extra 30% of installation time compared to standard twist braids. For very long styles, that additional time investment is worth it for both the visual result and the scalp comfort over the weeks you’ll be wearing it.
5. Bob-Length Twist Braids With Blunt Ends
Not every long twist braid style needs to be waist-length. Shoulder to mid-back with a clean, blunt cut at the ends creates a sophisticated, intentional silhouette that’s completely different from flowing longer styles. The blunt cut is the detail that makes this style read as sculpted rather than simply long.
Cutting extension twist braids requires sharp shears and a deliberate angle. For the most even blunt cut, gather all the twists and hold them at the end, smoothing them into an even fall before cutting. Cut less than you think you need to — you can always take more off. A clean blunt line at exactly the same level on all twists creates the architectural quality this style is known for.
Who it’s best for: anyone who loves the protective benefits and visual weight of twist braids but finds that very long lengths are too heavy or high-maintenance for daily life.
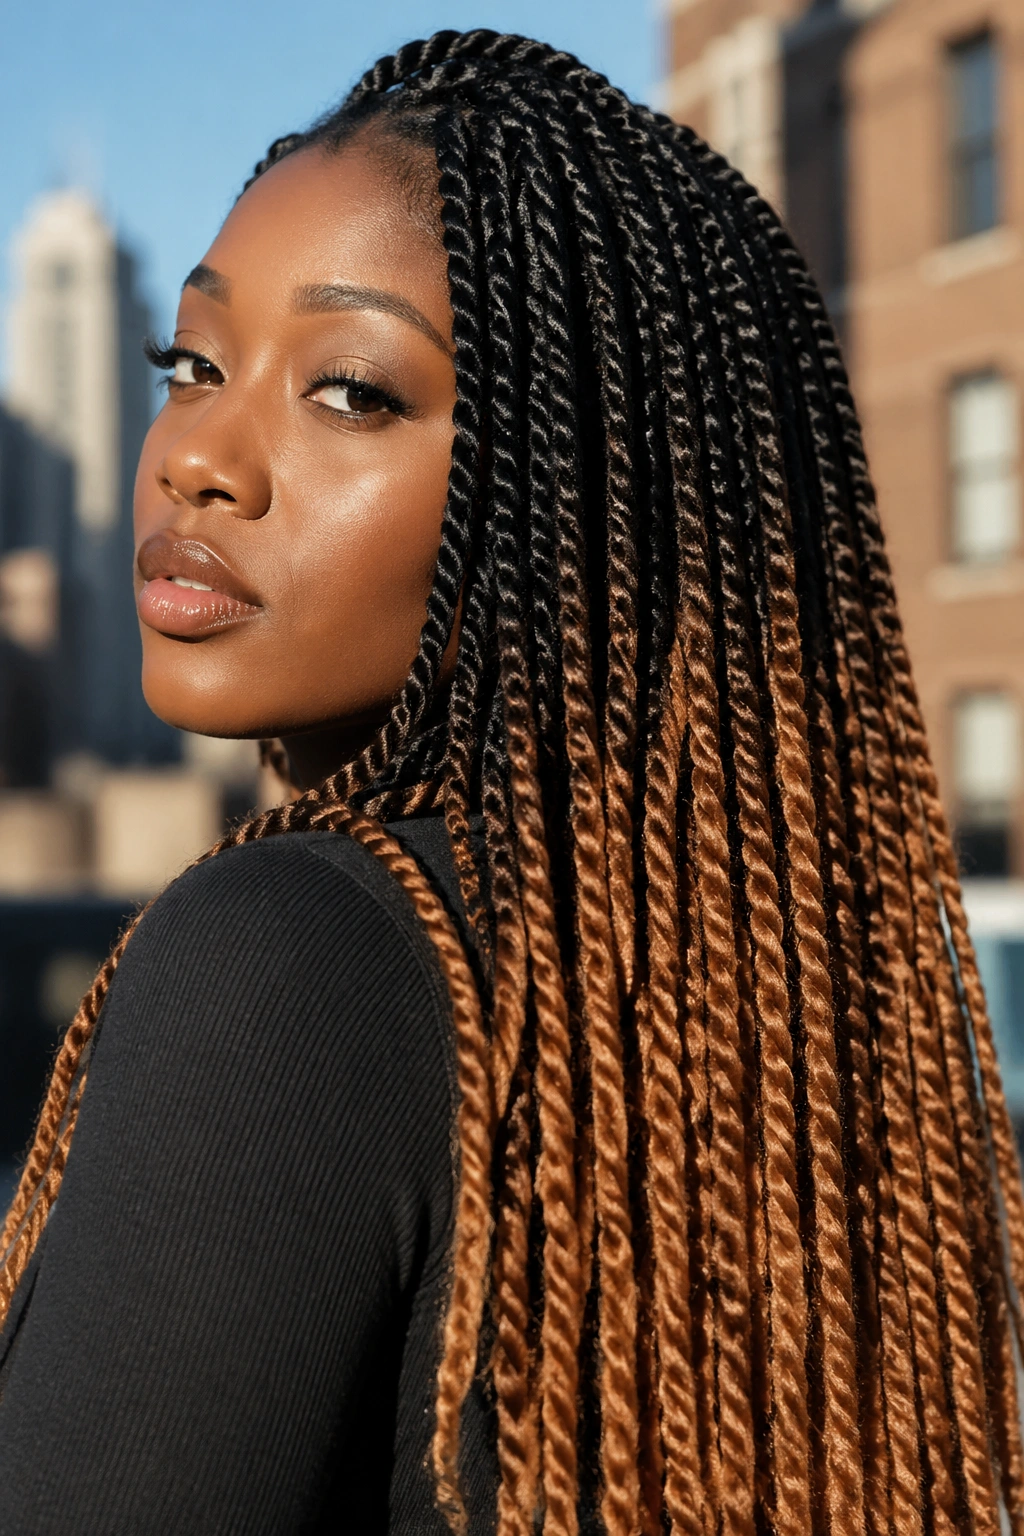
6. Ombre Twist Braids
The ombre in twist braids works slightly differently than in straight hair because the twist structure catches light at multiple angles simultaneously. A dark-to-light ombre — from jet black or deep brown at the root transitioning to caramel, auburn, or blonde at the ends — creates a gradient that reads differently as the style moves.
The key to a clean ombre in twist braids is sourcing extension hair that’s already ombre-dyed rather than trying to blend two separate colors during installation. The transition point between colors in a hand-blended ombre is difficult to control during the twisting process and often looks abrupt rather than gradual.
Pre-colored ombre extension hair eliminates that problem — the gradient is built into the extension itself. Position the color transition at the same point on every twist for visual consistency. Typically, the transition should start at approximately one-third of the way down the twist from the root.
7. Faux Loc Twist Style
Faux locs created with the twist method — wrapping extension hair around a twist base — create a textured, rough-surfaced loc effect that’s quite different from the sleek, smooth look of Senegalese twists. The wrapped exterior looks worn-in and organic, which is precisely the point.
At long lengths, faux loc twist styles have a particular physical presence. They’re heavier than most other extension styles and have a deliberate, unhurried movement. They don’t bounce — they sway. The distinction matters because it affects how the style reads on different body types and in different settings.
The texture requires intentional care. Unlike smooth twists that you can simply re-smooth, faux loc texture needs to be periodically refreshed by gently teasing any matted exterior sections back out with your fingertips. A spray of diluted rosewater keeps the exterior from drying out and becoming visibly brittle over time.
8. Crochet Twist Braids
Crochet attachment — using a latch hook to loop pre-made twists through a cornrow base — is one of the fastest installation methods for any twist braid style. Pre-twisted extensions are looped through the cornrows at the scalp and knotted in place, eliminating the hand-twisting process entirely.
The speed trade-off comes with a visual one. Crochet twist braids sometimes have slightly less natural-looking roots than hand-installed styles, because the attachment point is a loop through a cornrow rather than a section of your own hair being incorporated into the twist. The junction can look slightly bulkier if the crochet isn’t done neatly.
That said, for people who want long twist braids without the four-to-seven-hour installation marathon, crochet is a legitimate approach that produces a solid finished product. Pre-made crochet twist extensions come in virtually every texture and color, including Senegalese, passion twist, and butterfly loc styles.
9. Kinky Twist Braids
Kinky twists use extension hair with a coarser, more nappy texture than the silky Kanekalon used for Senegalese twists. The result is a twist with visible texture throughout its entire length — not smooth and rope-like but fuzzy, matte, and organic-looking.
For 4C natural hair wearers, kinky twists often blend the most naturally of any extension style. The texture at the root — where your natural hair is incorporated into the twist — matches the extension body closely enough that there’s no visual break. The whole length of the twist reads as one consistent texture.
At long lengths, kinky twists do loosen slightly at the ends over time. The texture doesn’t hold as rigidly as a smooth Senegalese twist. This isn’t a structural problem — the twists don’t unravel — but the ends can soften from a tight coil into a looser, more open shape. Some people prefer this natural evolution; others do a light re-twist of the ends every two weeks to maintain tightness.
10. Spring Twist Braids
Spring twists — also called butterfly or bouncy twists in some communities — use a wrapping technique with a looser, more spiraled application that creates a tight coil effect at each individual twist. Unlike passion twists, which wrap uniformly from root to end, spring twists are styled to have more irregular coiling that gives each piece a bouncy, spring-like quality.
They move differently than anything else. At long lengths, each spring twist bounces independently when you move, creating a kinetic energy in the overall style that’s genuinely joyful. The style has a lightness that heavier faux loc or Senegalese styles don’t — even at the same physical length and extension weight.
The spring texture can flatten slightly over time, particularly at the ends where the coils are farthest from the root tension. A light water mist and gentle scrunching motion refreshes the coil shape without requiring re-installation.
11. Side-Swept Twist Braids
This is about positioning rather than technique. Any twist braid style — Senegalese, spring, kinky — can be worn side-swept, with all or most of the twists pulled to one shoulder. The asymmetry changes the entire visual character of the style.
At long lengths, side-swept twists drape over the shoulder and down the chest, which creates a completely different impression than the same twists worn centered down the back. The front-facing length adds a framing element to the face that’s not possible with styles worn behind the head.
How to Get the Most From It
Use a large satin-lined scrunchie at the nape to gather and direct the twists to one side without creating a compression point. Avoid elastic bands without satin lining — they catch on extension hair and cause unnecessary friction. Replace the scrunchie at night with the twists pinned loosely to one side.
The side-swept position does eventually train the style — after a few days of wearing the twists in this direction, they’ll naturally want to fall to that side. You can use this to your advantage by establishing the sweep early in the style’s wear.
12. Goddess Twist Braids

Goddess twists incorporate a curly or wavy element — usually human hair or a high-quality heat-resistant synthetic — at the ends of each twist. The base of the twist is the standard tight, coiled structure, but the final two to three inches open into a loose, flowing curl.
The contrast between the defined structure of the twist and the free-form curl at the end gives these braids a romantic, softer quality than fully structured styles. At long lengths, the curly ends create a visual layering effect at the bottom of the style that’s particularly flattering.
Adding the curly element requires either ending the twist two to three inches before the extension ends, then leaving those ends loose and curling them with a flexi-rod while still installed, or using a combination extension that transitions from braid hair to curly texture mid-length. The combination extension approach produces more consistent results.
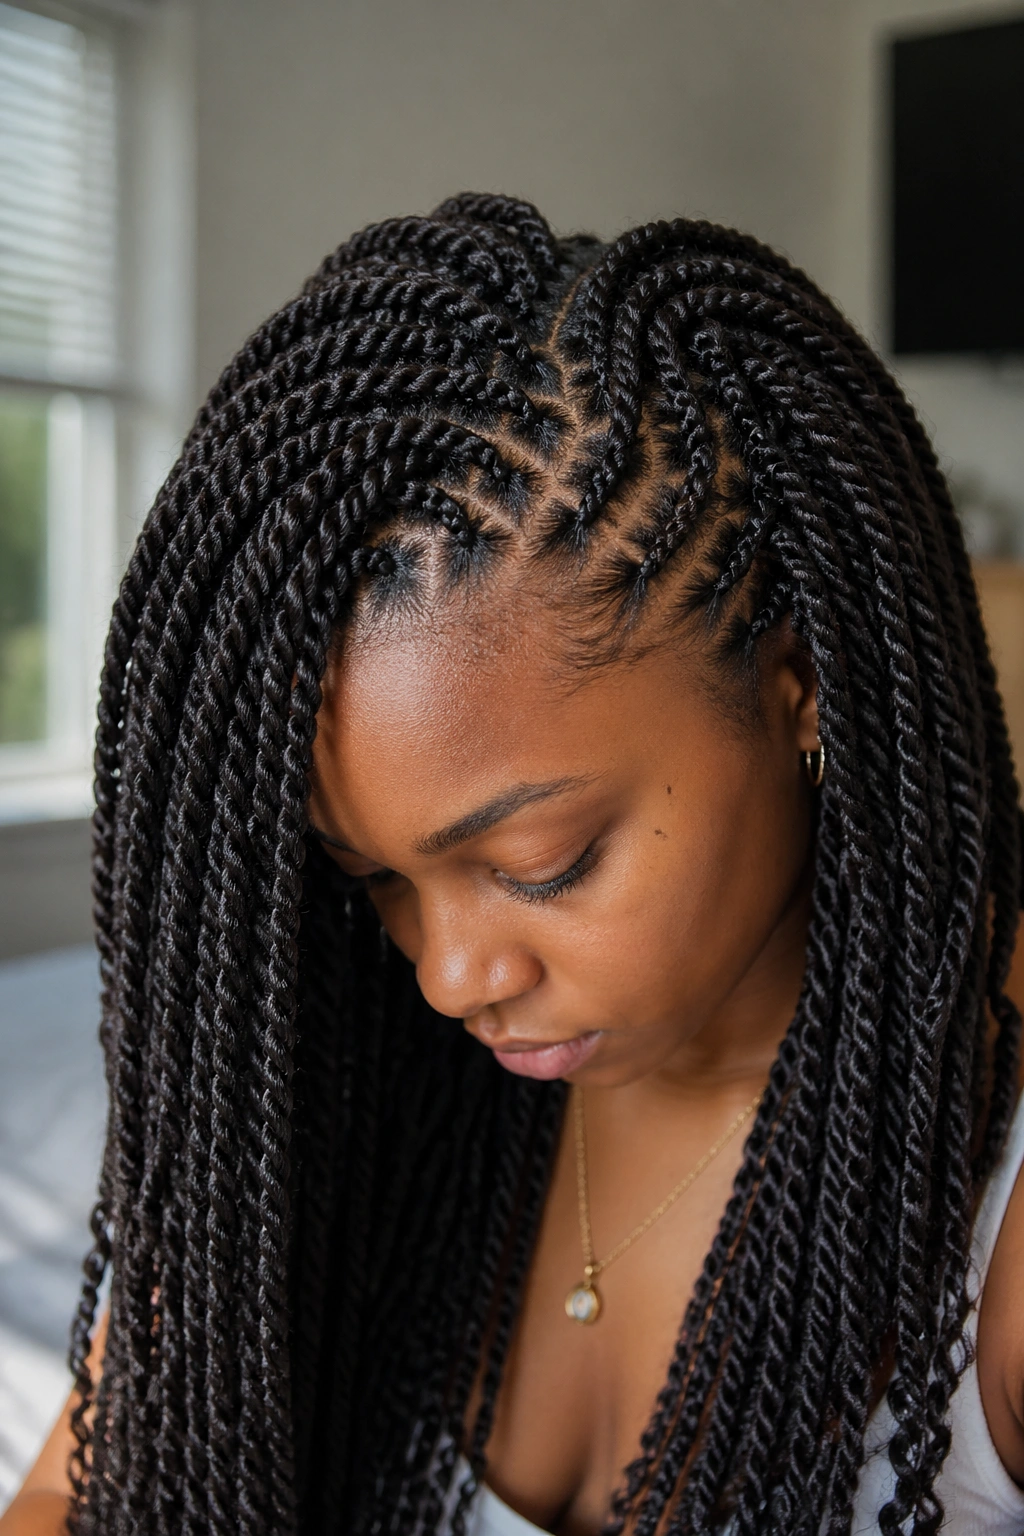
13. Ghana Twist Braids
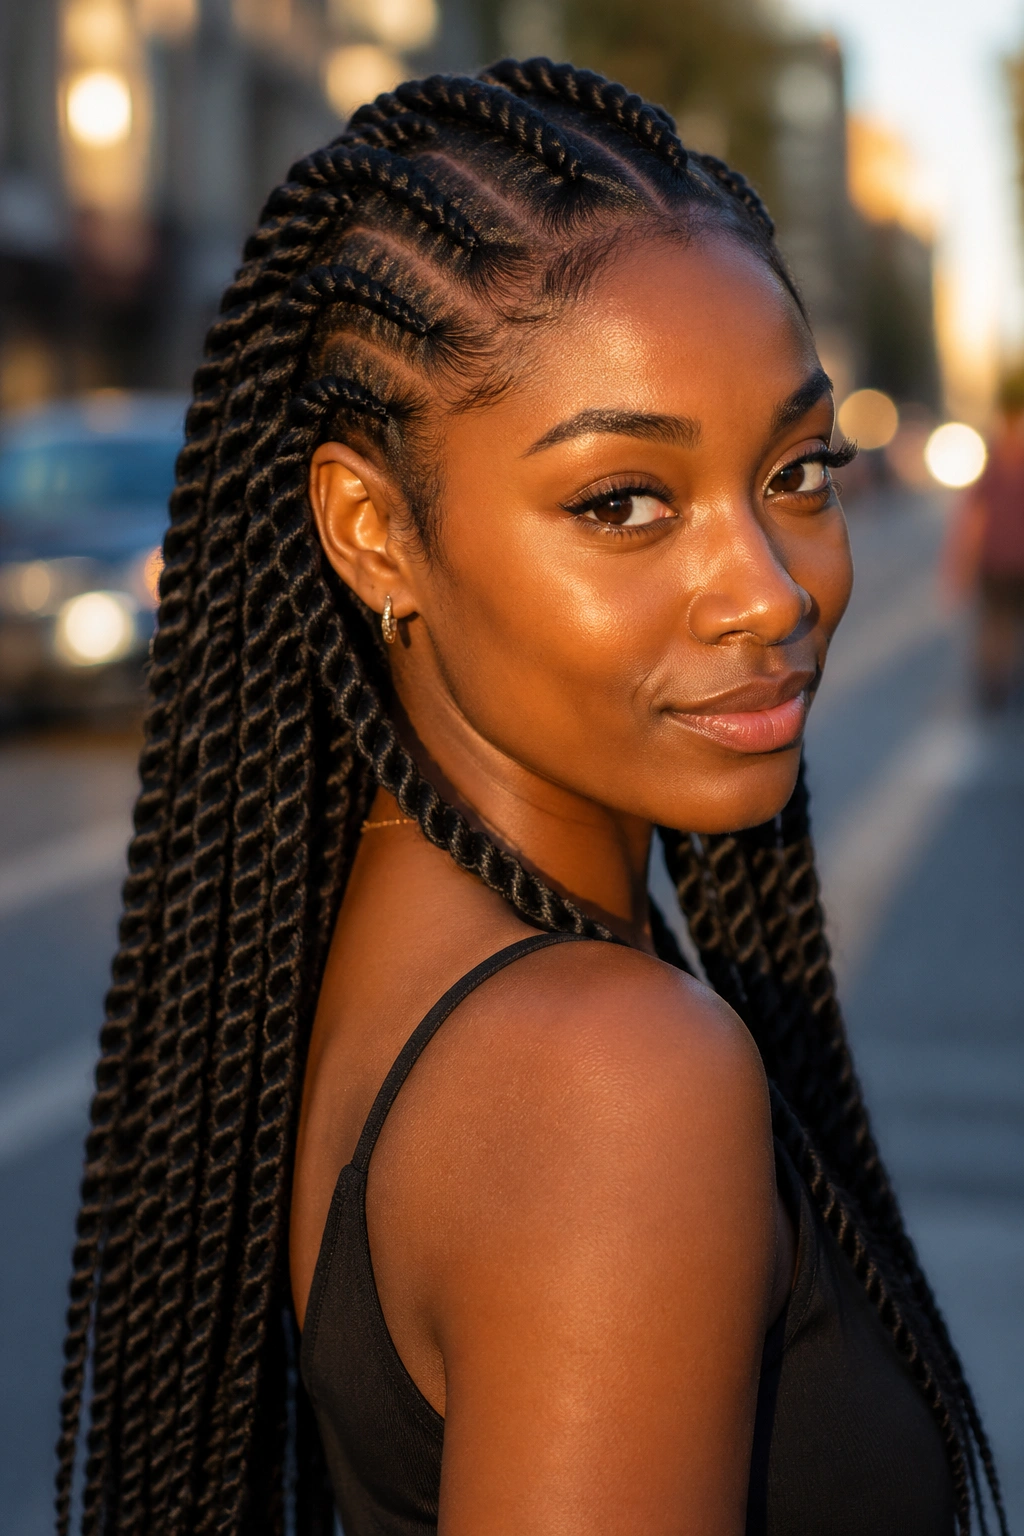
Ghana braids — sometimes called banana cornrows or invisible braids — use the feed-in technique along the scalp before transitioning into an individual twist from the nape. The effect is a style that looks cornrowed at the top but free-hanging twists from mid-head downward.
The on-scalp Ghana section adds an architectural element to the top of the style that standard individual twist braids don’t have. From the front and sides, you see neat, defined cornrow rows converging at the back. From behind, long twists fall from that convergence point.
This style works best when the transition from cornrow to individual twist is seamless — the point where the on-scalp cornrow lifts off the scalp and becomes a hanging twist should be clean and located at a natural convergence point, like the nape. Any earlier and the style looks unresolved.
14. Two-Tone Twist Braids
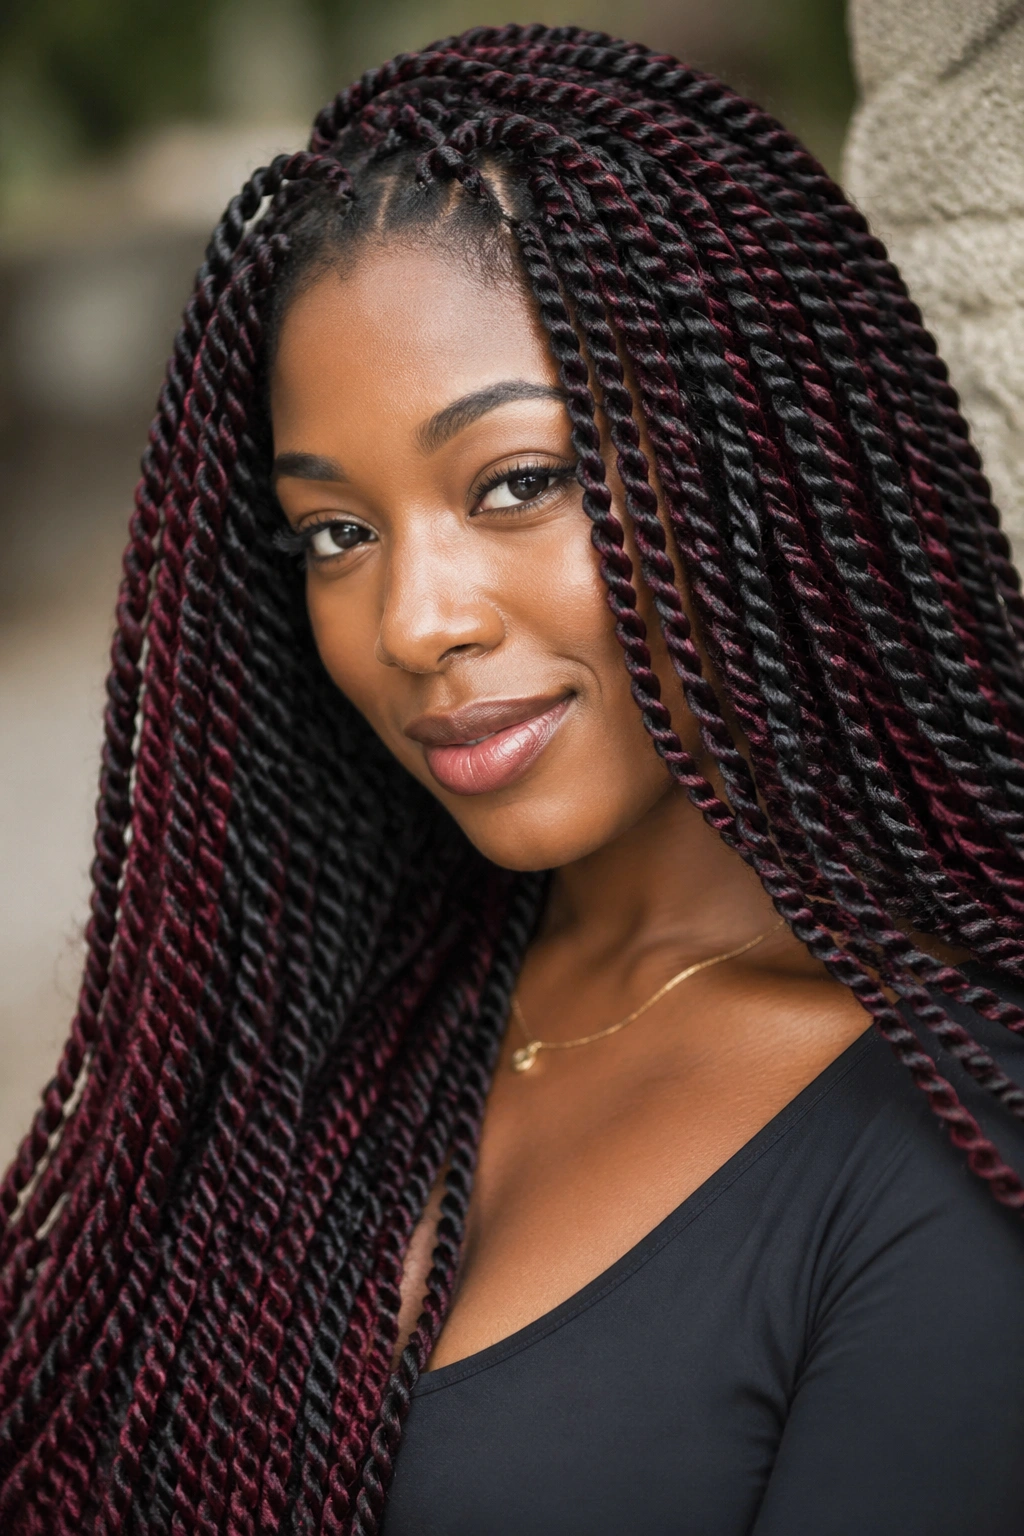
Two-tone twists use two distinct colors within each individual twist — typically achieved by twisting one strand of each color around each other, so both colors are visible at any point along the twist’s length. The twisting motion brings one color forward, then the other, in a continuous spiral.
This is different from ombre, where colors transition from one zone to another. In two-tone twists, both colors coexist throughout the entire length of each twist. The visual effect at distance reads as a blended, complex color; up close, the individual colors separate distinctly.
Common two-tone combinations that work well: black and burgundy, deep brown and caramel, navy blue and natural black. Avoid combinations where one color is significantly lighter than the other — the contrast can make the twist look striped rather than blended.
15. Protective Flat Twist With Length Extension
Rather than individual hanging twists, this style uses flat twists — twists that sit against the scalp like cornrows — as the base, then transitions into hanging extensions from the nape. The flat twist sections give the top of the head a neat, structured appearance while the extensions provide the length and drama.
The flat twist technique requires more skill than individual hanging twists. The twist must stay flat against the scalp throughout, which means keeping constant tension while working the hair back toward the nape. Watch videos demonstrating the flat twist technique specifically — the motion is different from standard cornrowing and takes practice.
For very long extensions attached at the nape transition point, ensure the attachment is secured firmly. A heavy cluster of length attached at a single point along the flat twist can cause the twist to sag or pull loose from the scalp.
16. Bohemian Twist Braids
The bohemian style is deliberately imperfect — loose, freer-textured twists with intentionally fuzzy, opened sections throughout. Think of it as the anti-Senegalese: where Senegalese is sleek and cylindrical, bohemian twists are plump, textured, and slightly disheveled.
Achieving the bohemian look starts with the extension hair preparation. Instead of using smoothed, pre-stretched extension hair, use extension hair that still has some natural frizz or texture to it. During the twisting process, don’t smooth the sections — let small bits of texture and fuzz emerge as you work.
After installation, gently pull apart each finished twist to widen and loosen it slightly. This post-installation pulling is what separates the standard twist from the bohemian version. It takes a practiced hand to pull enough to create the look without pulling so much that the twist loses its structure.
17. Loc Starter Twist Braids
Two-strand twists on natural hair are one of the classic methods for starting dreadlocks. But for people who want the look without the permanent commitment, styling these starter loc-style twists with extension hair creates the same visual effect without any structural change to your natural hair underneath.
The twists are smaller than most other styles on this list — about the thickness of a pencil — and installed more densely. The overall effect is a head full of slim, tightly coiled twists that look remarkably like early-stage locs. The texture is organic and matte rather than polished or shiny.
This style ages beautifully. As the twists loosen slightly over the first week, they develop a character that looks genuinely natural. The intentional imperfection of the slight loosening reads as authenticity rather than deterioration.
18. Havana Twist Braids
Havana twists use thick, chunky Havana or Marley hair extension fiber in a two-strand formation that creates a big, plump twist with a slightly matte, rough surface texture. They’re among the fullest-looking twist styles available, and at long lengths, a set of Havana twists commands serious visual attention.
The Havana extension fiber has a specific texture — coarser than Kanekalon, less silky than straight synthetic — that gives the finished twist its characteristic appearance. The fiber doesn’t blend invisibly with smoother hair types; it has its own presence. This works in the style’s favor for natural hair textures in the 4A-4C range, where the rougher fiber reads as a natural extension of coily hair.
Each Havana twist uses more extension hair than most other styles because the fiber needs to be doubled or tripled to achieve the right fullness. Plan for significantly more extension packs than a Senegalese twist set of equivalent length.
19. Invisible Part Twist Braids

The invisible part technique creates an installation so neat at the root section that it’s difficult to tell where the natural hair ends and the extension begins. Ultra-precise sectioning, feed-in attachment, and a finishing technique that wraps a thin piece of extension hair around the very root point all contribute to roots that look grown-in rather than installed.
This is the style you choose for photographed events or occasions where you need the style to look its most natural. The invisible part technique takes longer than standard attachment — budget an additional hour to ninety minutes for a full set compared to standard twist installation — but the polished result holds for the duration of the style’s wear.
20. Half-Up Twist Braid Style
Half of the twist braids are gathered at the crown and pinned or tied in place, while the remaining half are left to hang freely. The gathered section creates a crown or top-knot effect while the hanging section provides the length drama.
At very long lengths, this style is particularly effective because it separates the visual weight of the full set. The gathered crown section is visible from the front, framing the face; the hanging section falls behind and below. The style reads as deliberately composed in a way that wearing all the braids down can’t achieve.
The gathering doesn’t need to be elaborate — a simple grouping held with a single large satin-lined scrunchie, slightly loosened and pulled to create volume at the crown, looks more sophisticated than an elaborate updo construction.
21. Twist Braids With Gold Cuffs
Accessorizing long twist braids with metallic hair cuffs — small rings or clips that clamp around individual twists — adds a visual detail that reads as intentional styling rather than decoration for decoration’s sake. Gold cuffs against dark brown or black twists have an almost archaeological quality, like something ancient and deliberate.
Positioning matters. Cuffs placed randomly on every other braid look scattered. Cuffs placed strategically — at intervals along specific individual twists, concentrated in the sections that frame the face, or placed only at the ends for a weighted effect — look designed.
Open and close cuffs carefully. Forcing a cuff that’s too small onto a thick twist can deform the ring and cause it to pinch or snag. Size the cuffs to your twist thickness before purchasing.
22. Thick Front, Thin Back Twist Variation
This style plays with size gradients — the twists at the front of the head and hairline are thicker and more substantial, while the twists toward the back and nape are significantly thinner. The variation creates depth and complexity in the overall silhouette.
When worn down, the thicker front twists frame the face more dramatically. The thinner back twists add density and fullness without adding bulk at the front. The graduated size creates a look that’s more dimensional than a uniform-sized set.
The size transition should be gradual rather than abrupt. Moving from jumbo at the very front to micro at the very back in two sections will look jarring. Five to six graduated size steps across the full head creates a smooth visual progression.
23. Boho Goddess Long Twist Braids
The boho goddess variation combines the romantic curly ends of goddess twists with the deliberately imperfect texture of the bohemian approach. The result is the loosest, most organically textured style on this list — big, slightly pulled-apart twists with soft curly ends that drift rather than bounce.
This is the style for women who want long twist braids that feel like an extension of their natural hair rather than an obviously installed style. The deliberate imperfection, the soft ends, the slightly undone look — it requires more restraint than precision to execute, which can feel counterintuitive.
Who This Is For
Women with a more relaxed, artistic aesthetic who find highly polished styles too constrained. The boho goddess twist works in creative, casual, and arts-adjacent professional environments but would likely be underdressed for corporate settings unless your workplace has broad latitude with personal expression.
Length here benefits enormously from the curly ends. A waist-length boho goddess twist set where the final four inches of every twist opens into loose, soft curls is a genuinely arresting visual. The weight of the full length, anchored by the visual softness of the curly ends, creates a contradictory silhouette — heavy and airy at the same time.
Caring for Long Twist Braids Day to Day
Long twist braids need more active daily care than shorter styles because the extension weight is working against you constantly. The length creates tension at the root that shorter styles don’t have, and that tension accumulates over days.
A diluted rosewater spray applied to the scalp every two days keeps the scalp comfortable without making the extensions stiff or wet-looking. Apply it in sections, parting the extensions gently to reach the scalp surface, and massage lightly with your fingertips for thirty seconds per section.
Satin at night is non-negotiable for long twist braids. The friction from cotton pillowcases against extension hair causes frizz at the root within a week, and long extensions catch and snag on cotton fabric constantly throughout the night. A large satin bonnet that accommodates the full volume of long twists — not a small cap that crushes them — is the right tool here. If that’s not available, a satin or silk pillowcase is the backup.
Refreshing the Style at the Two-Week Mark
Most long twist braid styles look best in the first week. By week two, some natural loosening at the roots becomes visible, and any frizz or flyaways that have developed are harder to ignore. A proper two-week refresh extends the style significantly.
Edge touch-ups first — apply a fresh layer of edge control and smooth with a soft brush. For any twists that have unraveled at the tips, apply a tiny amount of mousse to the twist tip and re-coil it between your fingers. Hold for ten seconds while the mousse sets.
For frizz along the body of the twist, a lightly dampened satin cloth drawn gently along the twist from root to tip can smooth flyaways without wetting the extension significantly. Don’t saturate the extensions — you want the surface moisture to help the frizz lie flat, not make the whole twist limp.
Knowing When to Take Them Down
The absolute maximum wear for long twist braid extensions is six weeks, and that’s only if you’ve been consistent with scalp care. Most stylists recommend four weeks as the standard. After four weeks, new growth at the base of each twist begins to tangle with the extension — and at long lengths, removing matted extensions from new growth hair is one of the most common causes of significant breakage.
Remove carefully. Cut any elastic or thread at the base first. Apply a detangling spray or conditioner generously to the base of each twist before attempting to slide it out. Work slowly, separating shed hair from extension fiber with your fingers before pulling. Rushing this step costs more hair than the entire installation period.