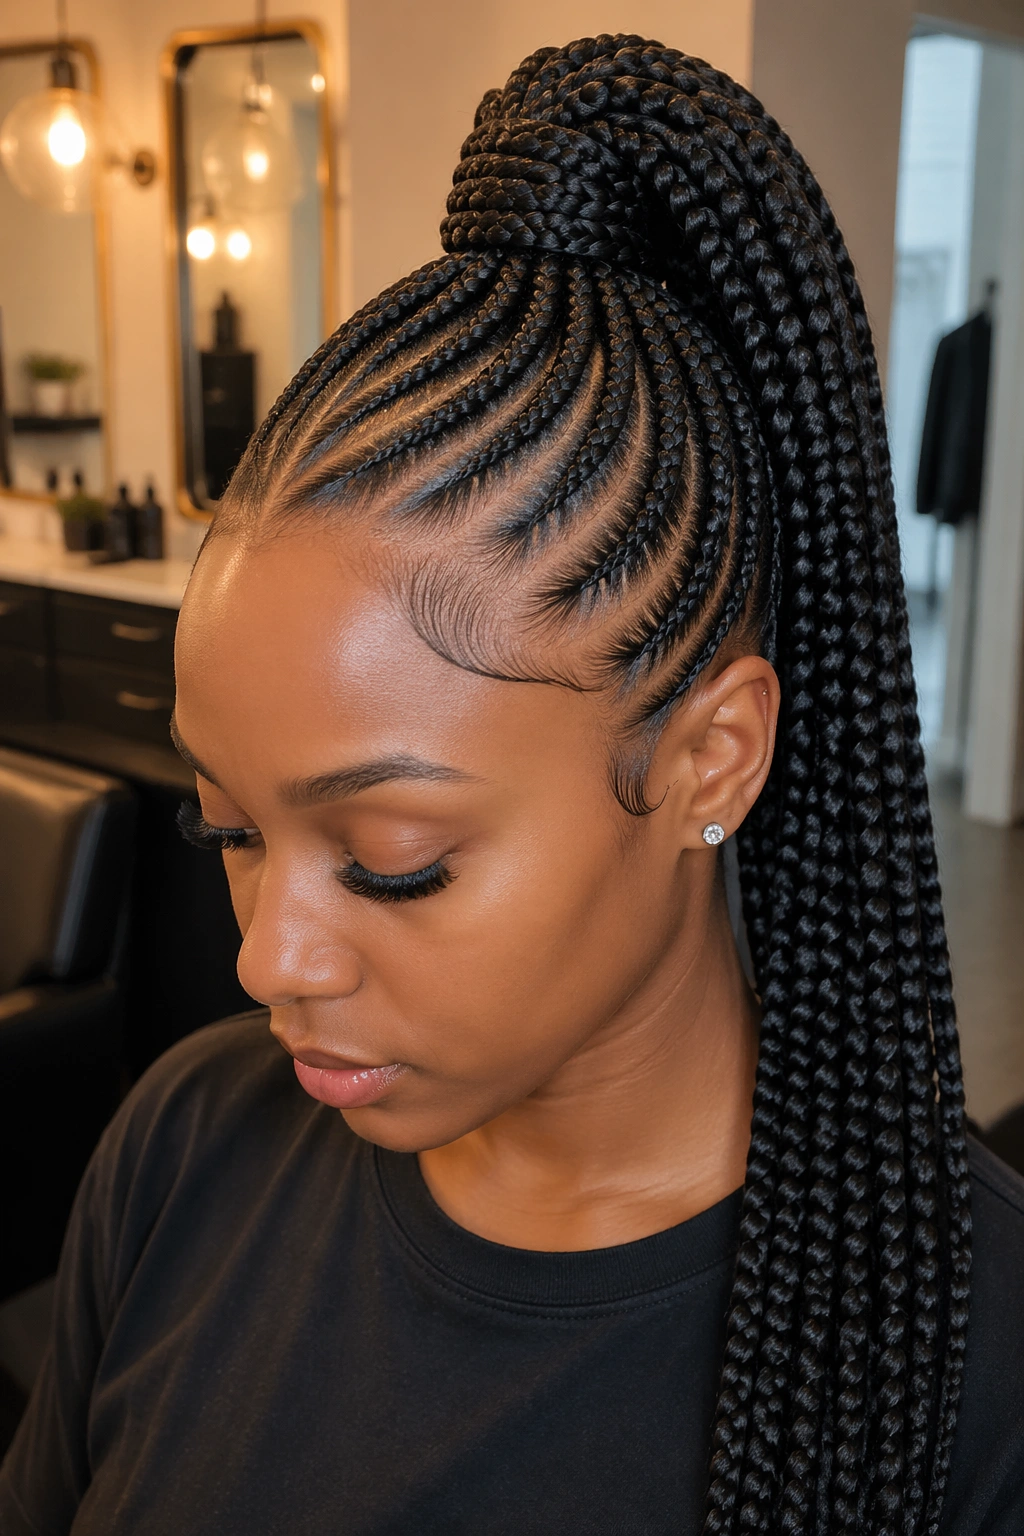
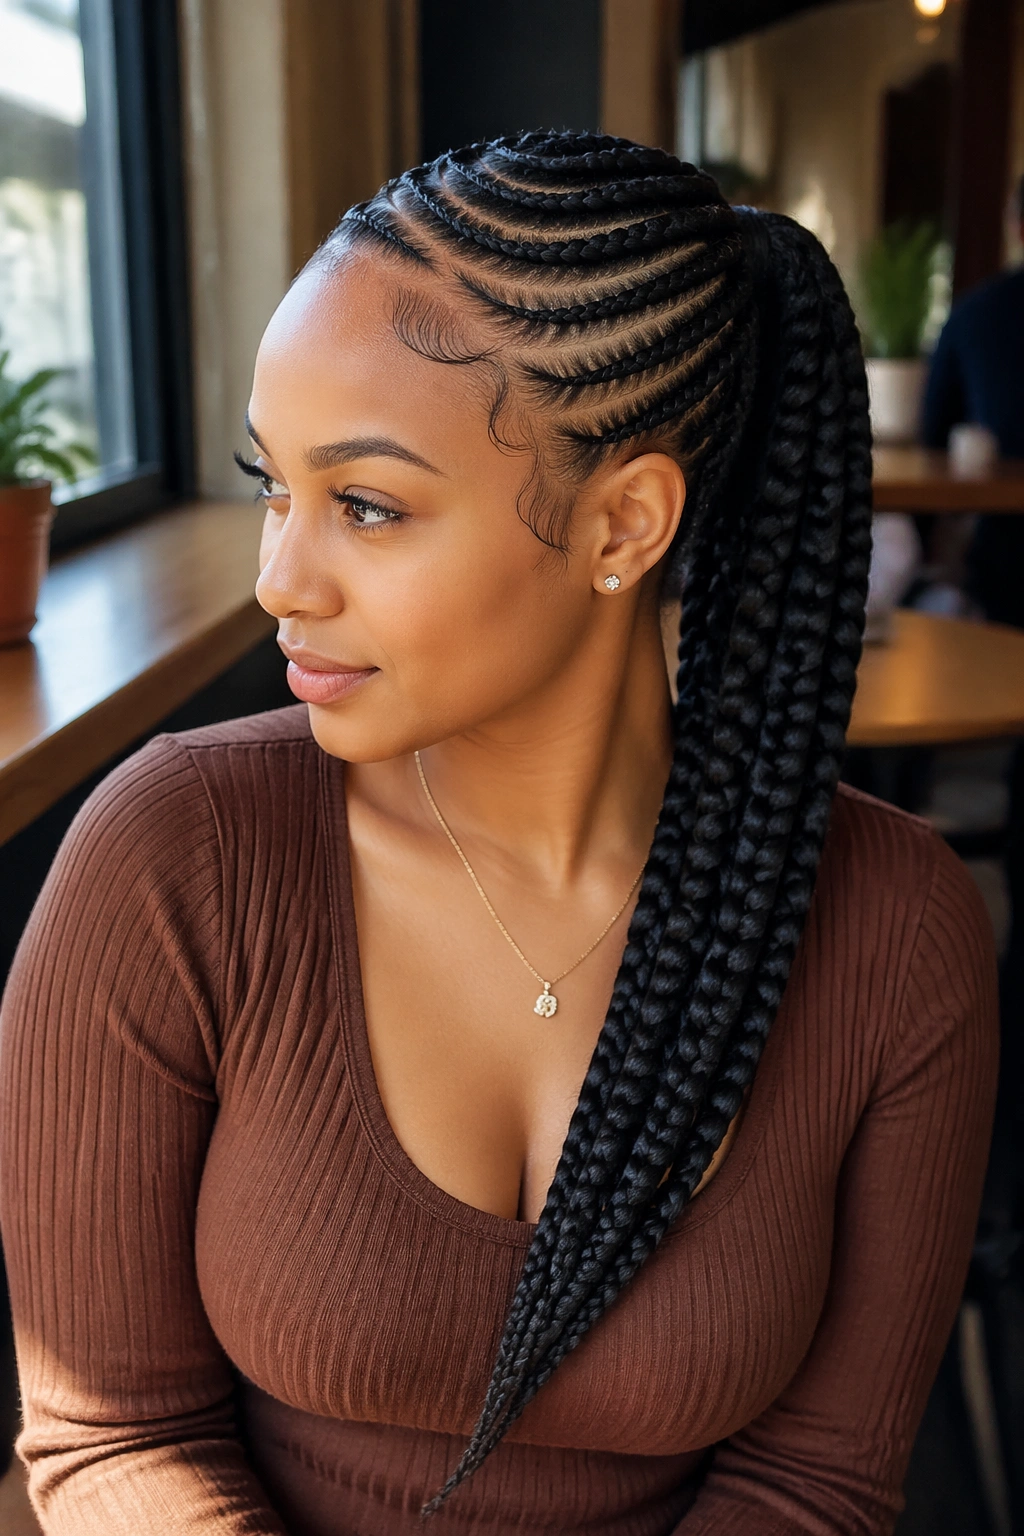
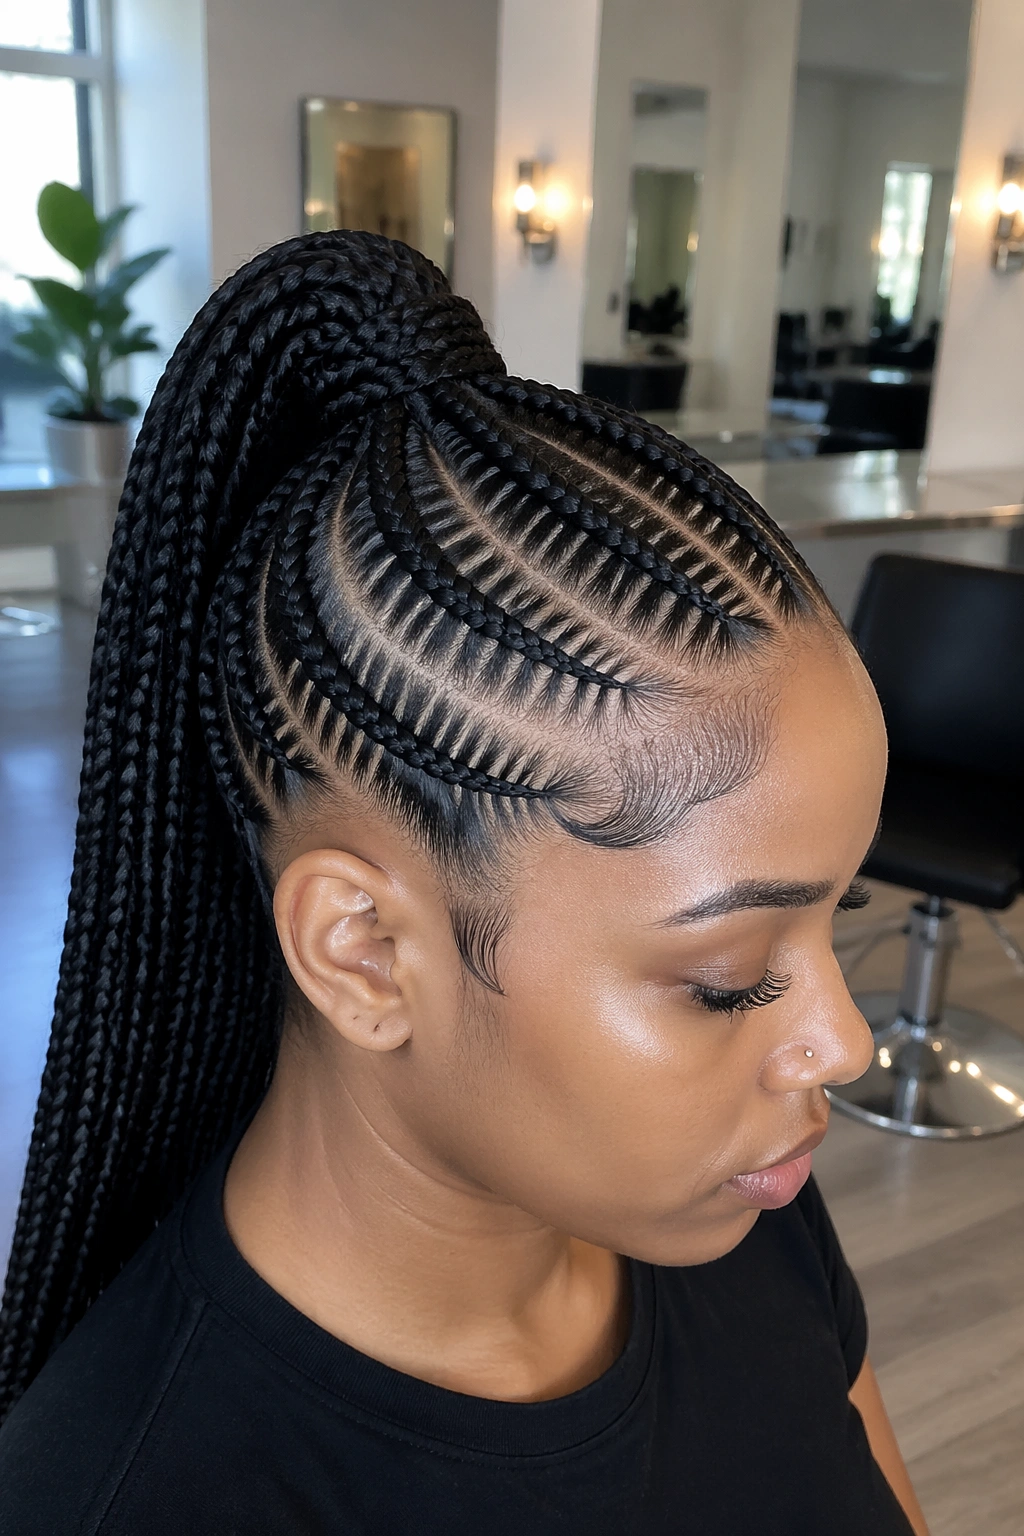
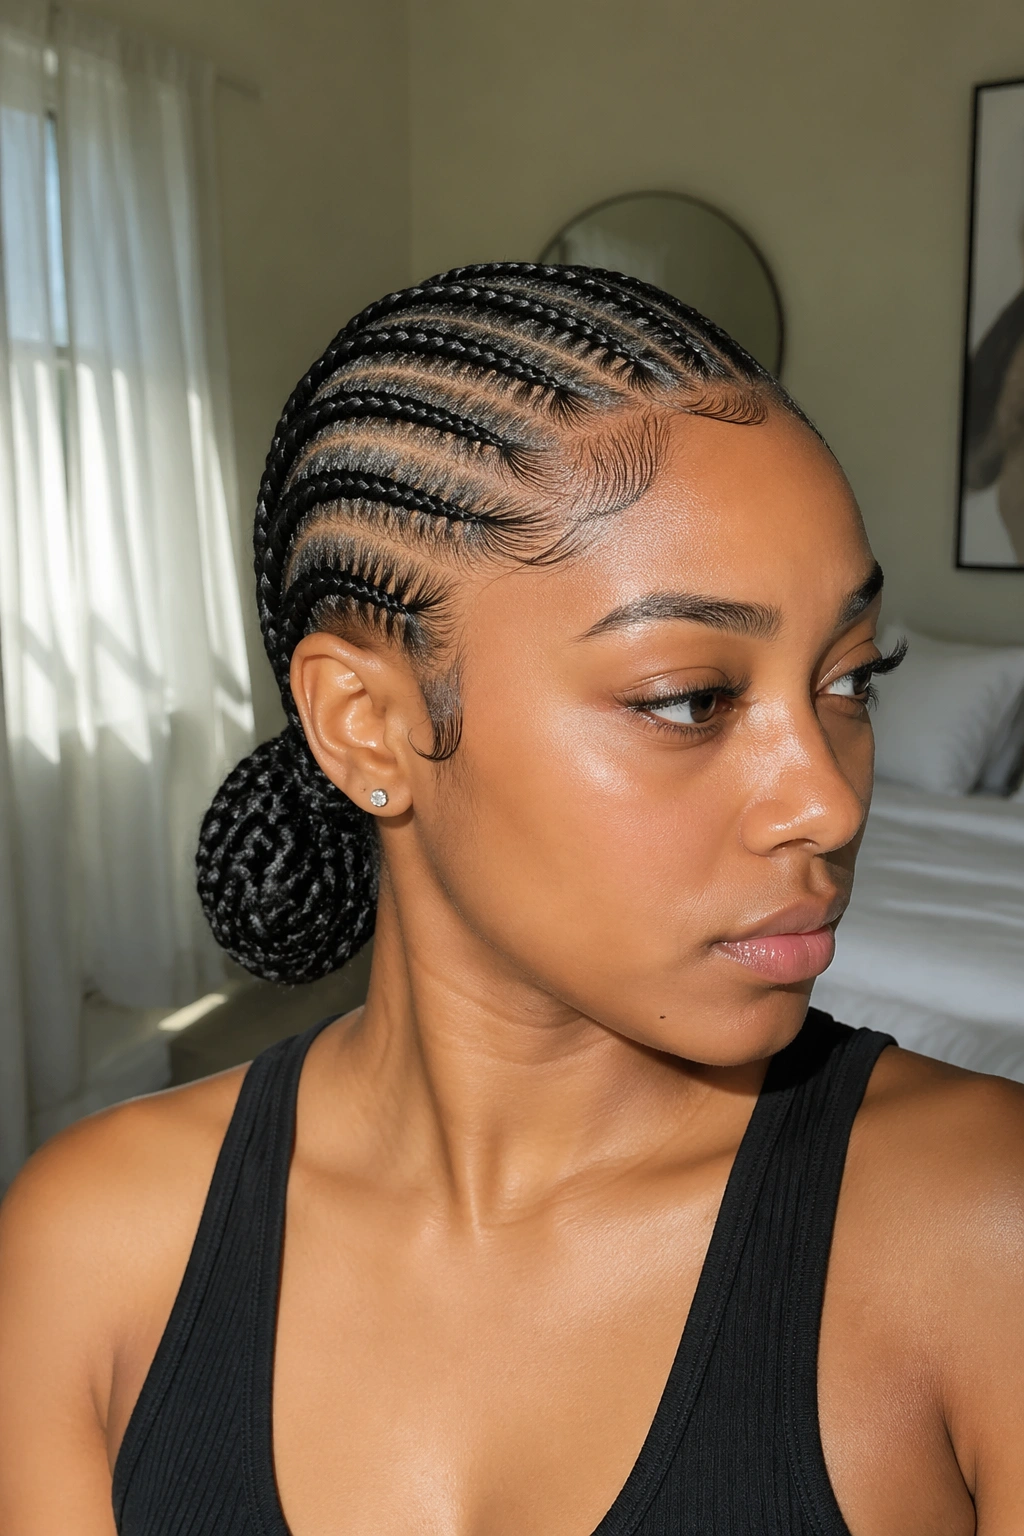
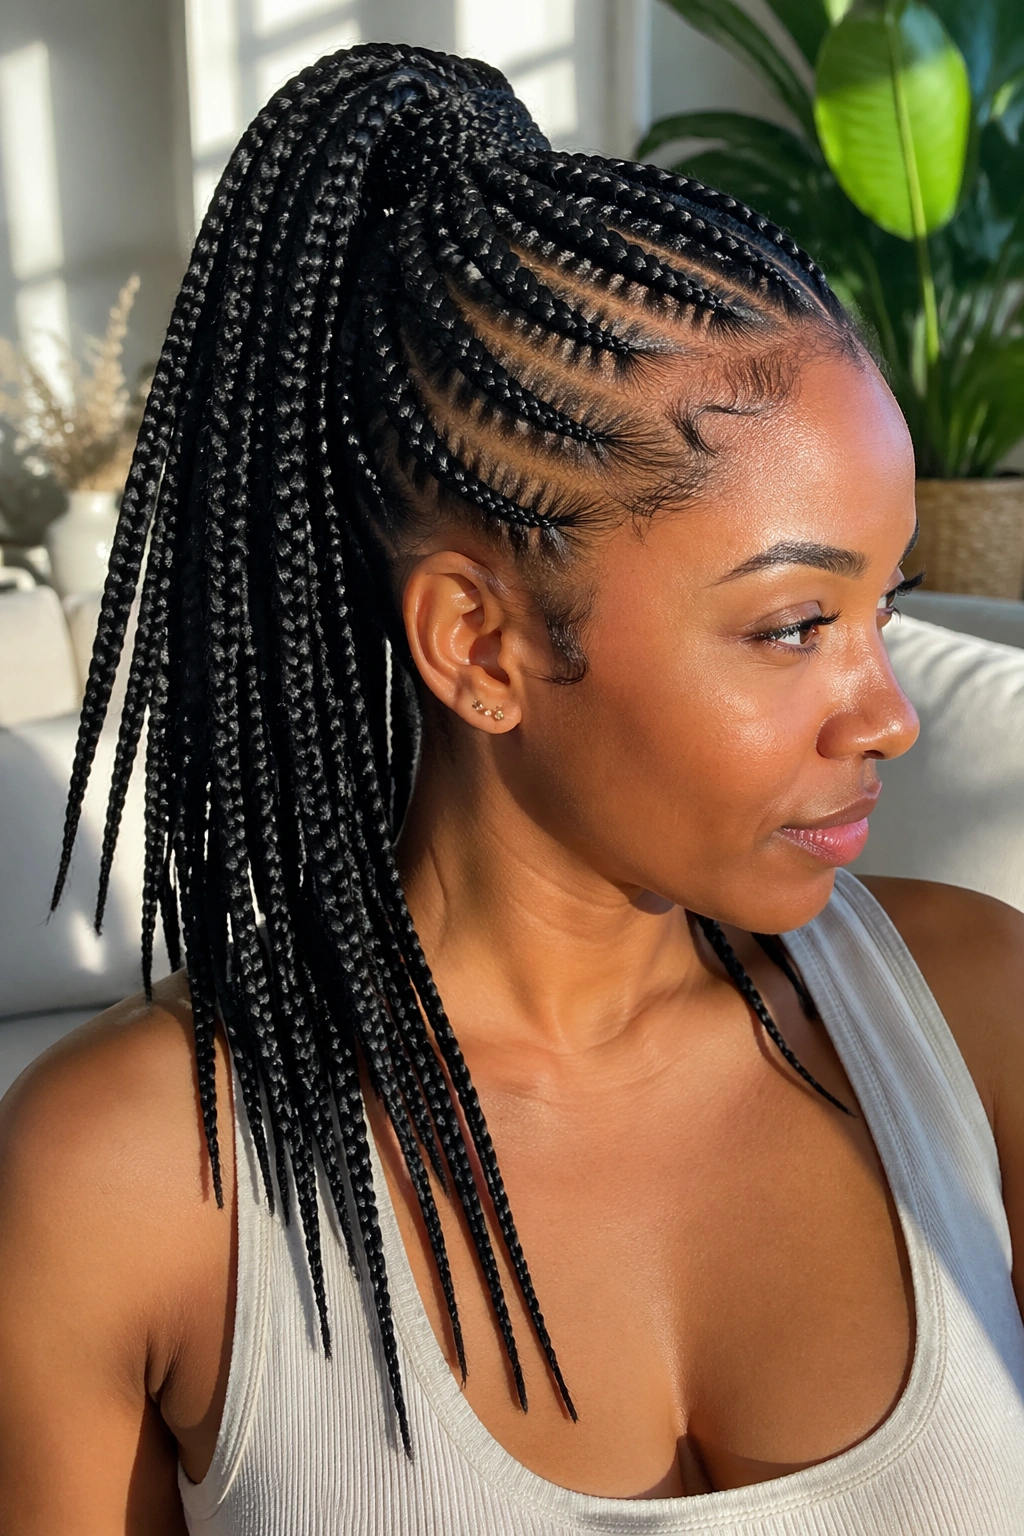
Feed in braid ponytails have a way of making hair look finished even when the rest of the morning was chaos. The cleanest versions do two things at once: they keep the hairline sharp and give the ponytail enough shape to stand up, swing, or fall long without looking bulky.
The best part is that neat edges do not have to mean stiff, glued-down hair. A good feed-in braid ponytail works because the added hair starts small at the front and builds gradually, so the scalp line looks smooth instead of lumpy. That difference matters. A style can be technically neat and still look awkward if the parting is thick, the tension jumps around, or the ponytail base sits in the wrong place.
I like braid ponytails that have a clear plan: where the part starts, how thick the braids are, whether the ponytail sits high or low, and what happens at the ends. Those details matter more than people think. A glossy edge and a messy base will always look off; a simple part with careful tension tends to age better and photograph better, even if you never touch it again after you leave the chair.
Keep a rat-tail comb, a light edge gel, and a soft brush nearby. Bring a photo to your braider and point out the part width, the ponytail height, and whether you want curls, beads, or a wrapped base. The looks below cover the main lanes without turning into copy-paste styles.
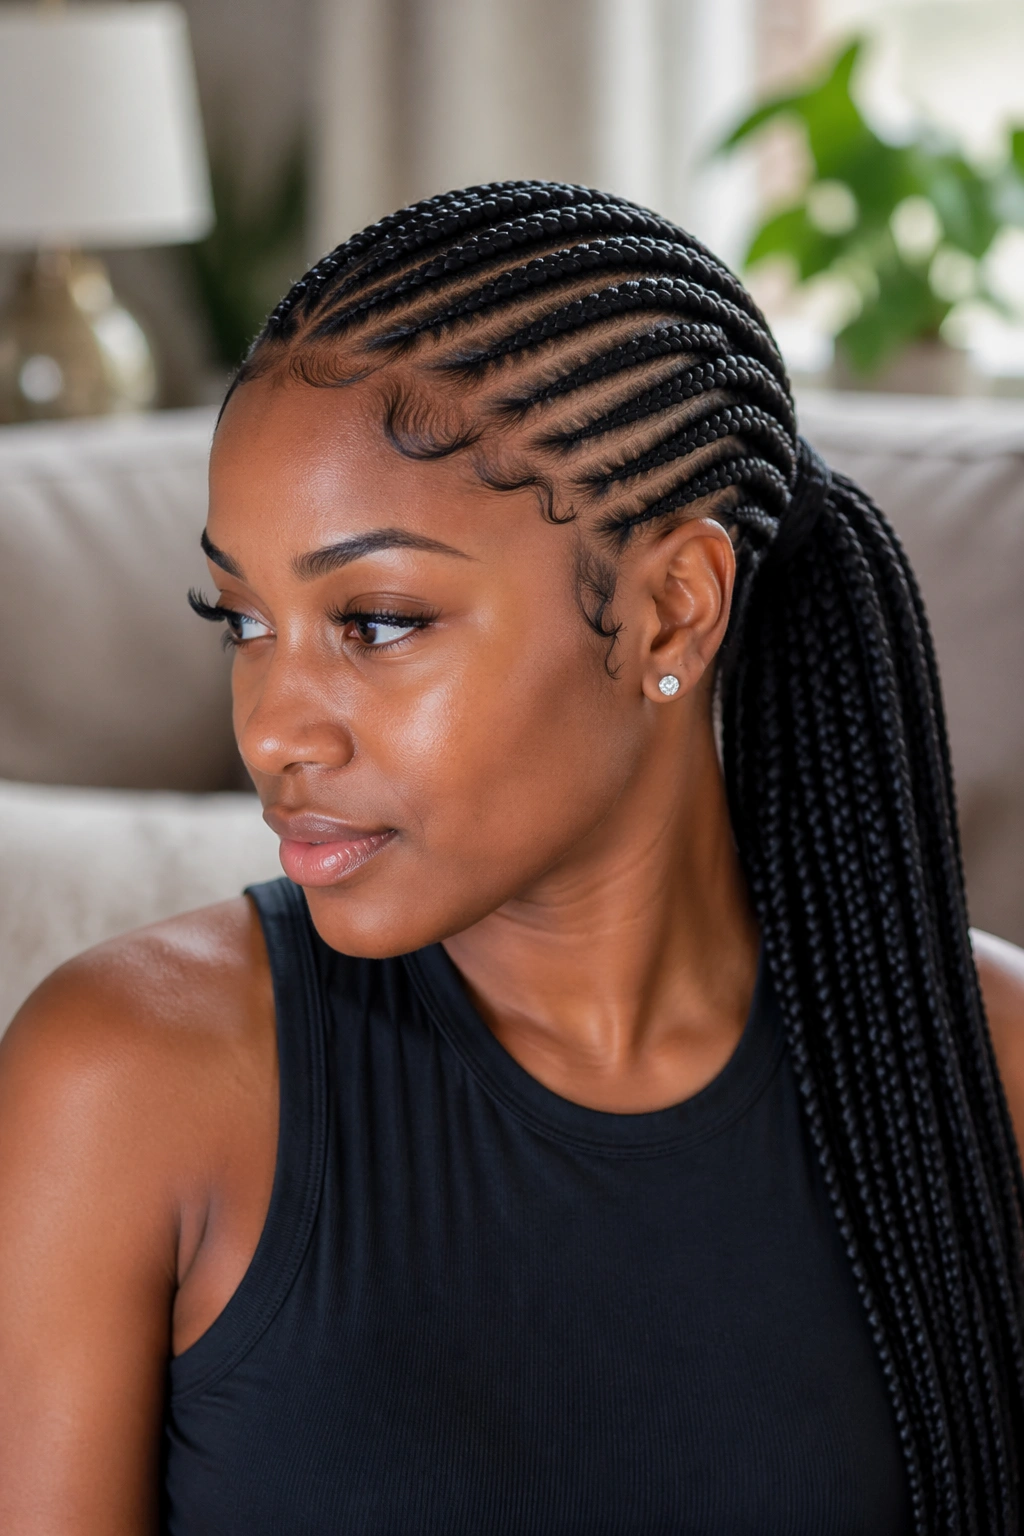
1. Classic Straight-Back Feed-In Ponytail
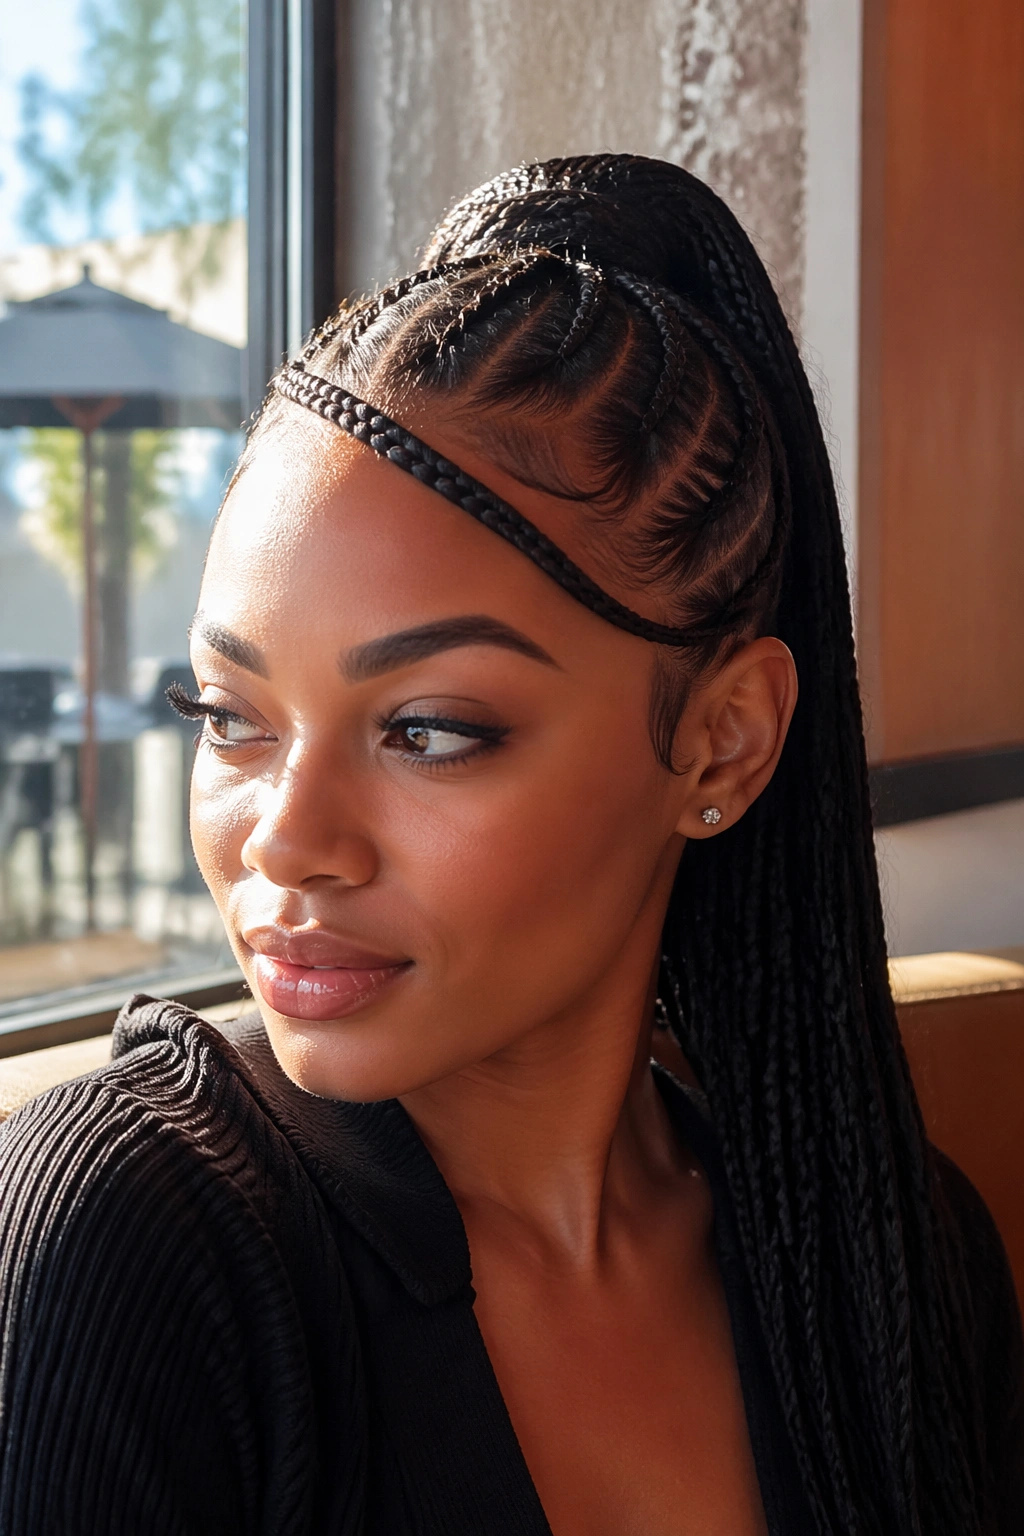
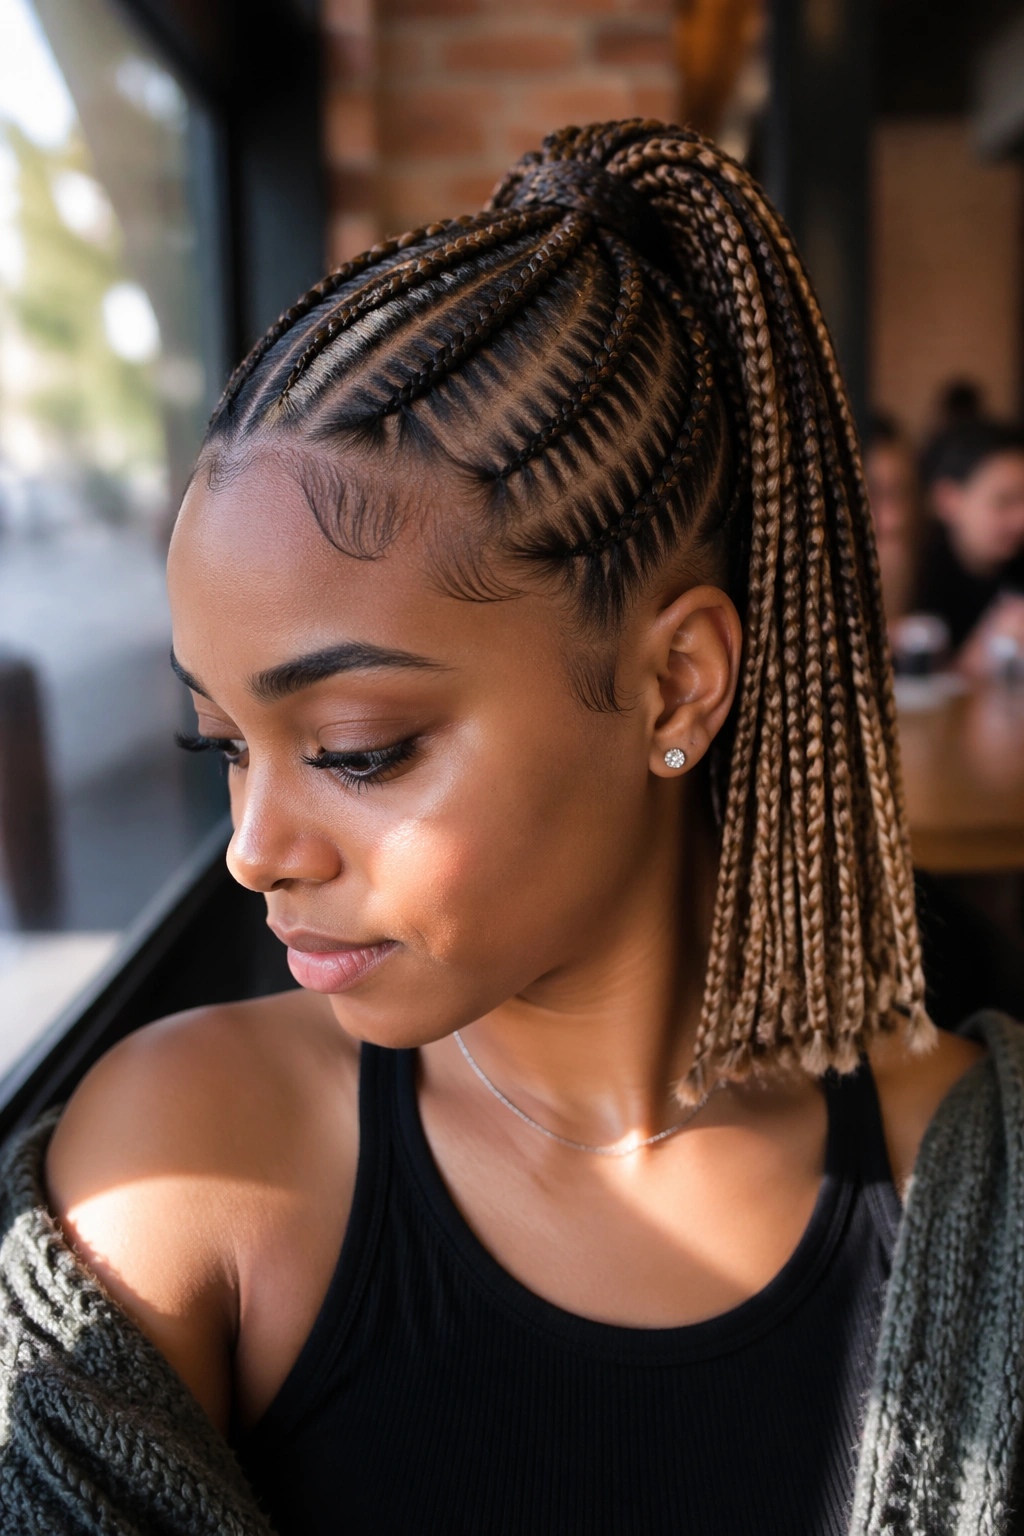
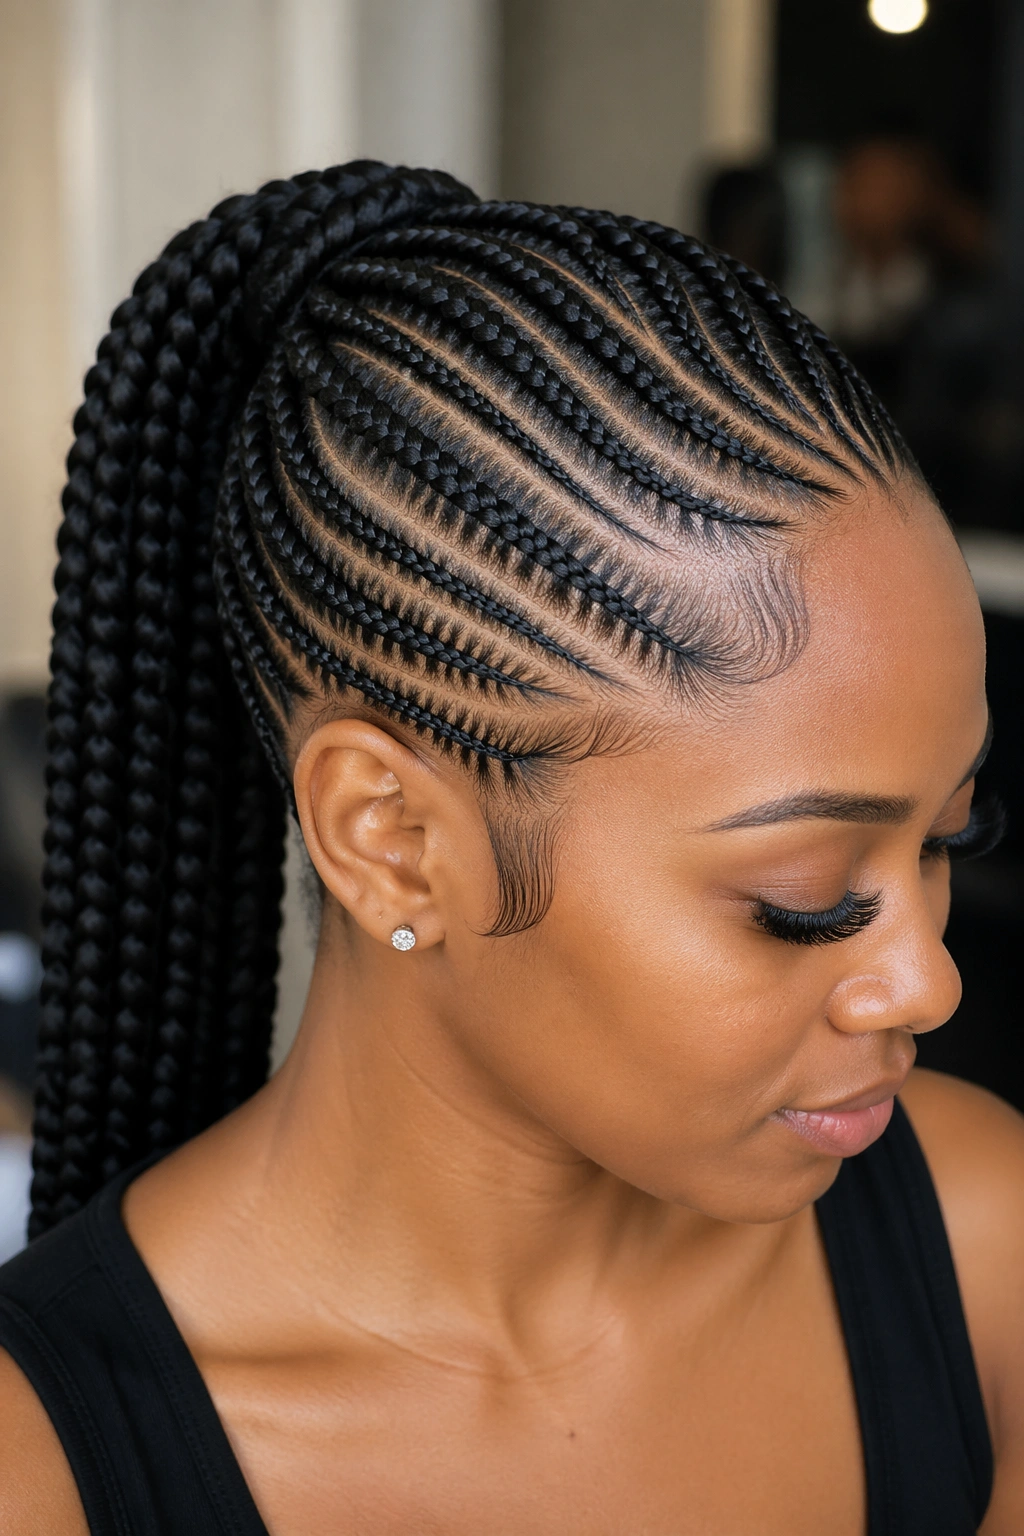
This is the cleanest place to start. Straight-back feed-in braid ponytails are the kind of style that looks calm from the front and disciplined from every other angle, which is exactly why they do so well when you want the edges to stay neat.
Why It Reads So Clean
The straight-back pattern keeps the eye moving toward the ponytail instead of wandering across the scalp. That makes the hairline look tidy, especially if the first few feed-in sections are narrow and even. You do not need thick braids for impact. You need consistency.
Ask for parts that stay the same width from temple to crown, then let the braid size build gradually. If the front braids start too heavy, the whole style gets boxy. If they start too tiny and jump too fast, the base looks patchy.
- Keep the first sections around ¼ to ½ inch wide.
- Lay the edges first, then braid.
- Pull the ponytail tight enough to sit still, not tight enough to leave a headache.
- Finish with a light mousse if you want the surface to stay smooth.
Best tip: the neatest straight-back ponytails are often the simplest ones. Don’t over-design the parting.
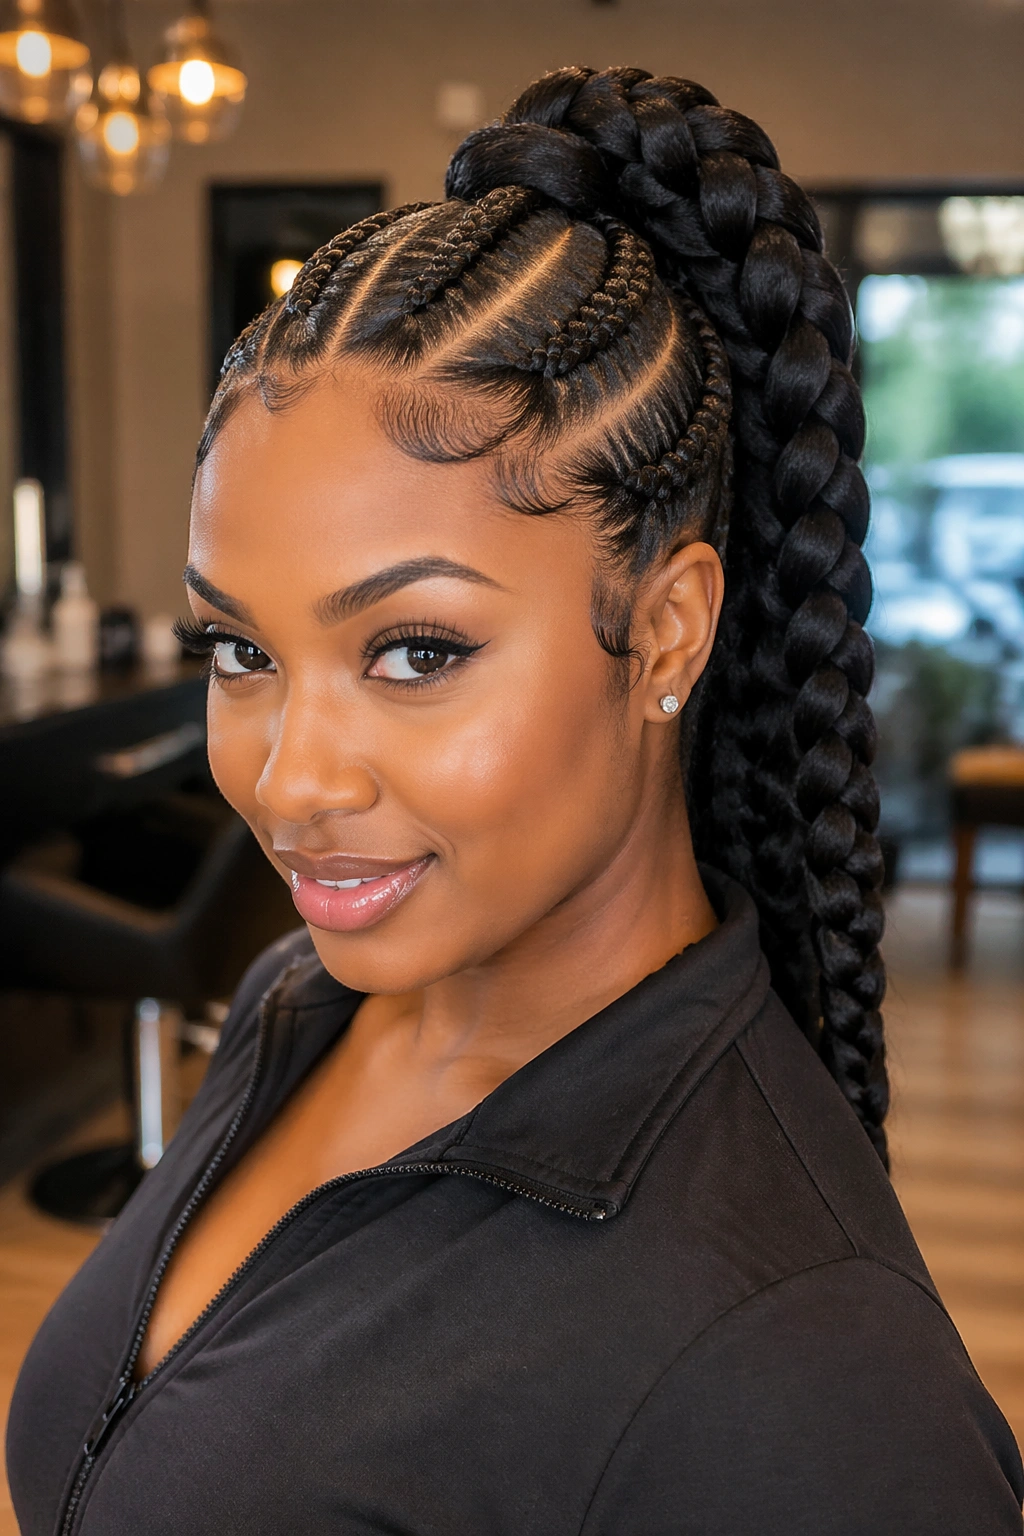
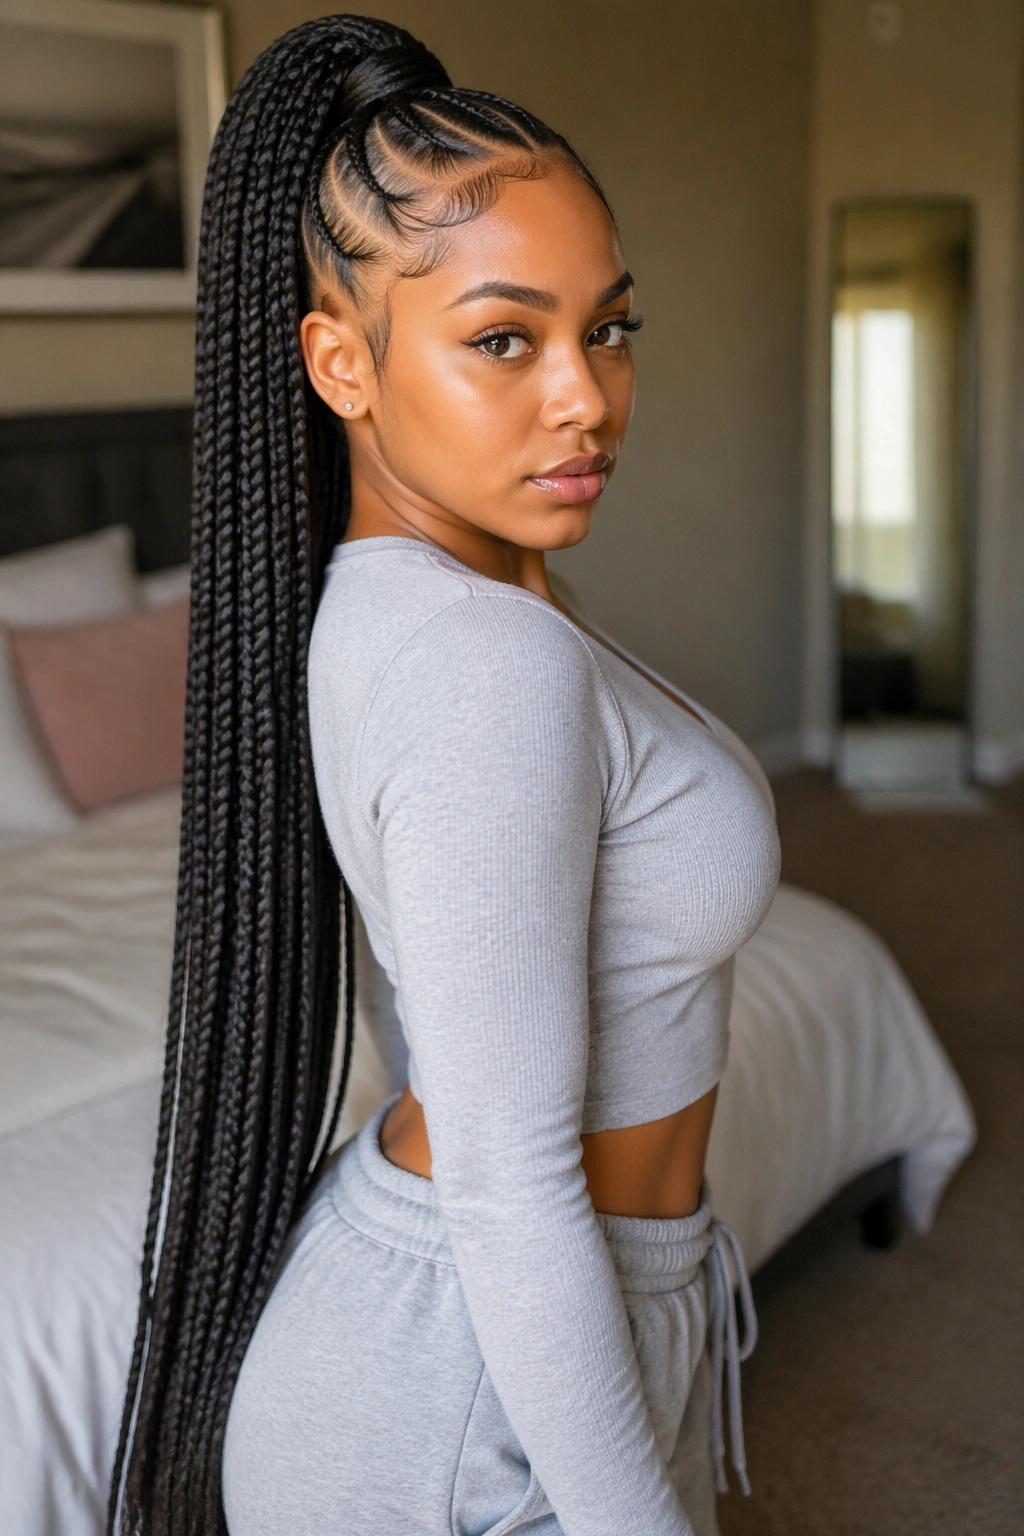
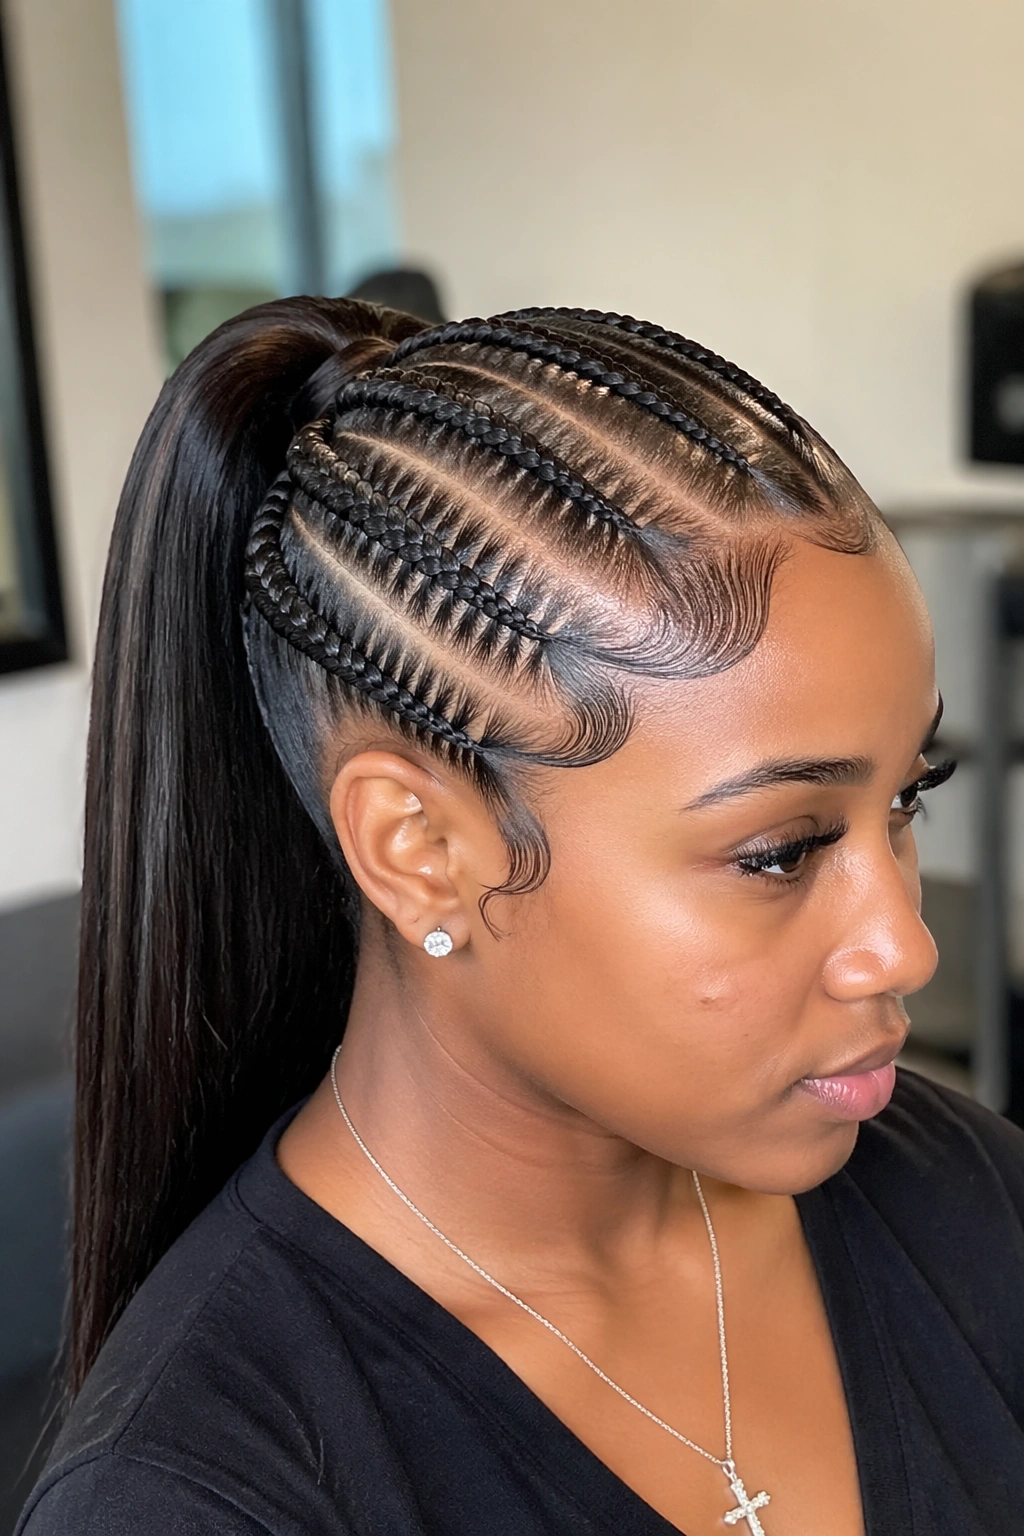
2. High Crown-Lift Feed-In Ponytail
A high feed-in braid ponytail makes the front work harder, and I mean that in a good way. When the ponytail sits near the crown, the edges look more lifted, the face opens up, and the braids give the whole style a sharper line.
The trick is not just height. It’s where the lift begins. A ponytail that starts climbing too far back can make the front look flat. One that lifts early, right around the top of the head, gives a cleaner silhouette and keeps the hairline visible.
If your face shape tends to get swallowed by low styles, this one helps. It also works well when you want the edges to stay the focus instead of getting lost under a heavy ponytail. Keep the baby hairs soft and narrow. Heavy swoops can fight the height.
A high crown ponytail feels bold without being busy. That’s the appeal.
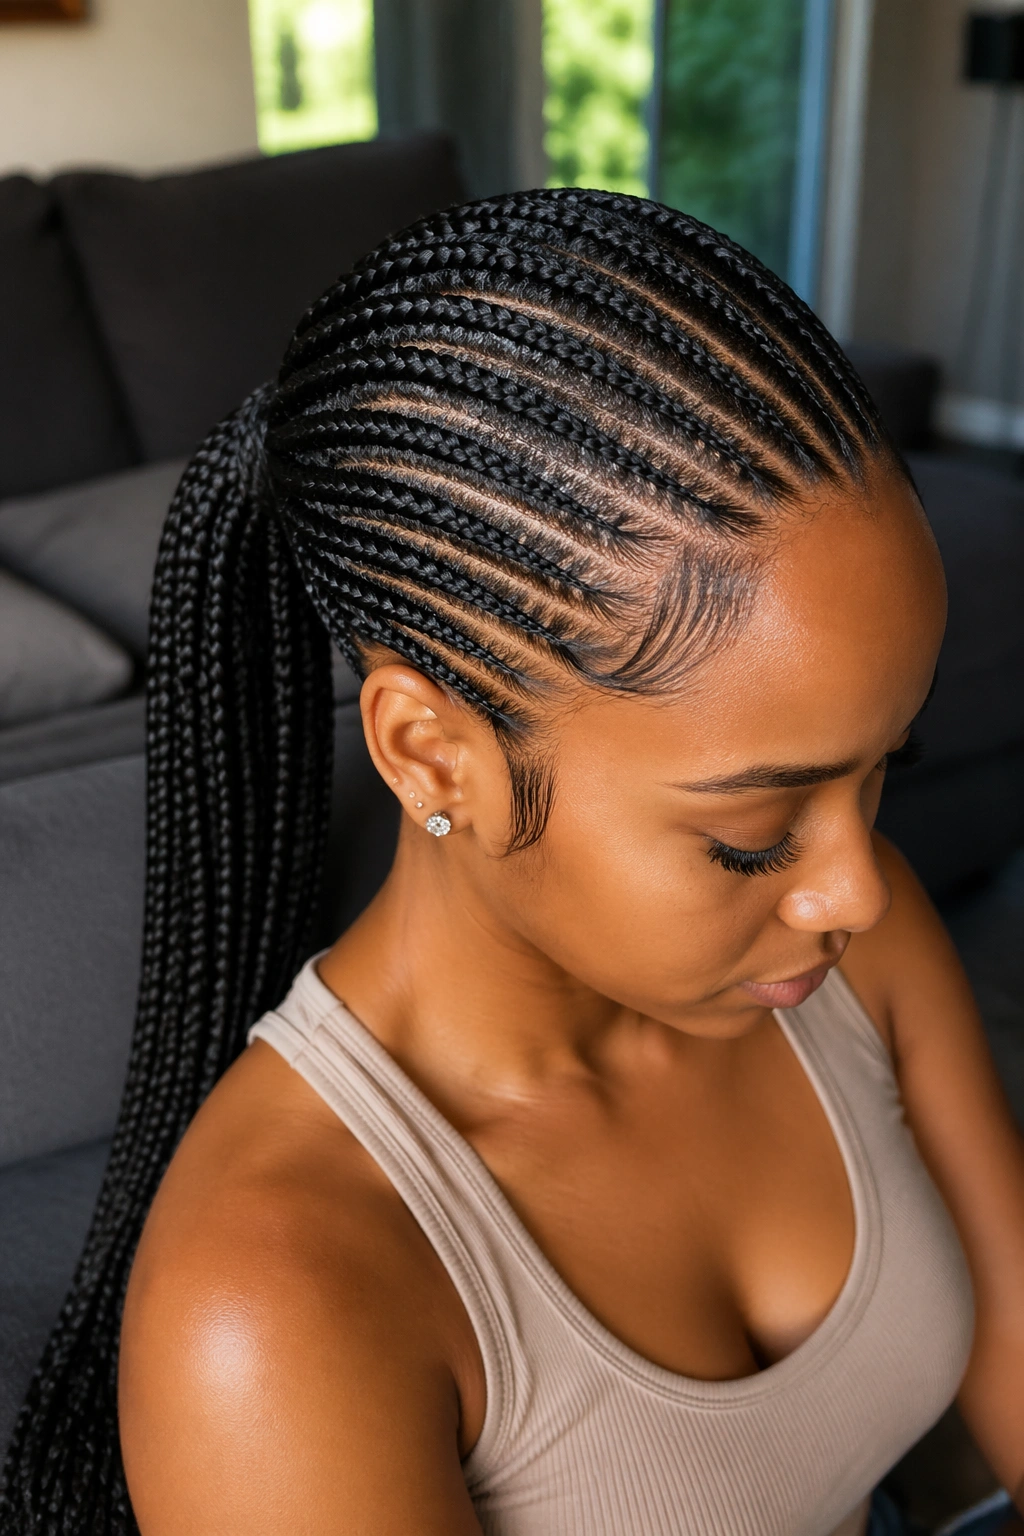
3. Center-Part Feed-In Ponytail With a Long Tail
Want the most balanced look? Go center-part first. A center-part feed-in braid ponytail gives the scalp a tidy, mirror-image finish, and that symmetry is doing a lot of the visual work for you.
How to Keep the Part Crisp
The part has to be straight from forehead to crown. If the line drifts even a little, the ponytail starts to feel off-center, and the clean-edge effect weakens fast. I like a rat-tail comb for this, plus a light mist of water before the braiding starts so the hair lies flat instead of puffing up.
A long tail works well here because the front already feels structured. Let the back do something more dramatic. If you add extension hair, keep the added length smooth and evenly blended so the ponytail swings rather than droops.
- Best for oval, heart, and square face shapes.
- Works well with two to four feed-in braids on each side.
- Looks sharp when the braid thickness stays even on both sides.
- Use a small elastic at the base before wrapping hair around it.
What to watch for: a center part shows everything. Uneven parts, uneven gel, and uneven braid size all stand out.
4. Side-Swept Feed-In Ponytail
A side-swept feed-in braid ponytail brings softness to the front without giving up the neat edge line. The whole style leans in one direction, so the hairline has a little movement instead of that rigid straight-back feel.
This is the version I reach for when someone wants shape more than drama. The side part makes the face look less boxed in, and the ponytail can sit low over one shoulder or mid-height depending on how much swing you want. Keep the side part clean, though. A crooked side part just looks careless.
The braids should follow the angle of the part, not fight it. That means the first feed-in sections near the temple need to curve gently toward the ponytail base. You get a smoother transition and a softer front line. That softness is what makes the edges look intentional rather than overworked.
A side-swept ponytail is a good one for earrings, too. The whole shape leaves room for the face.
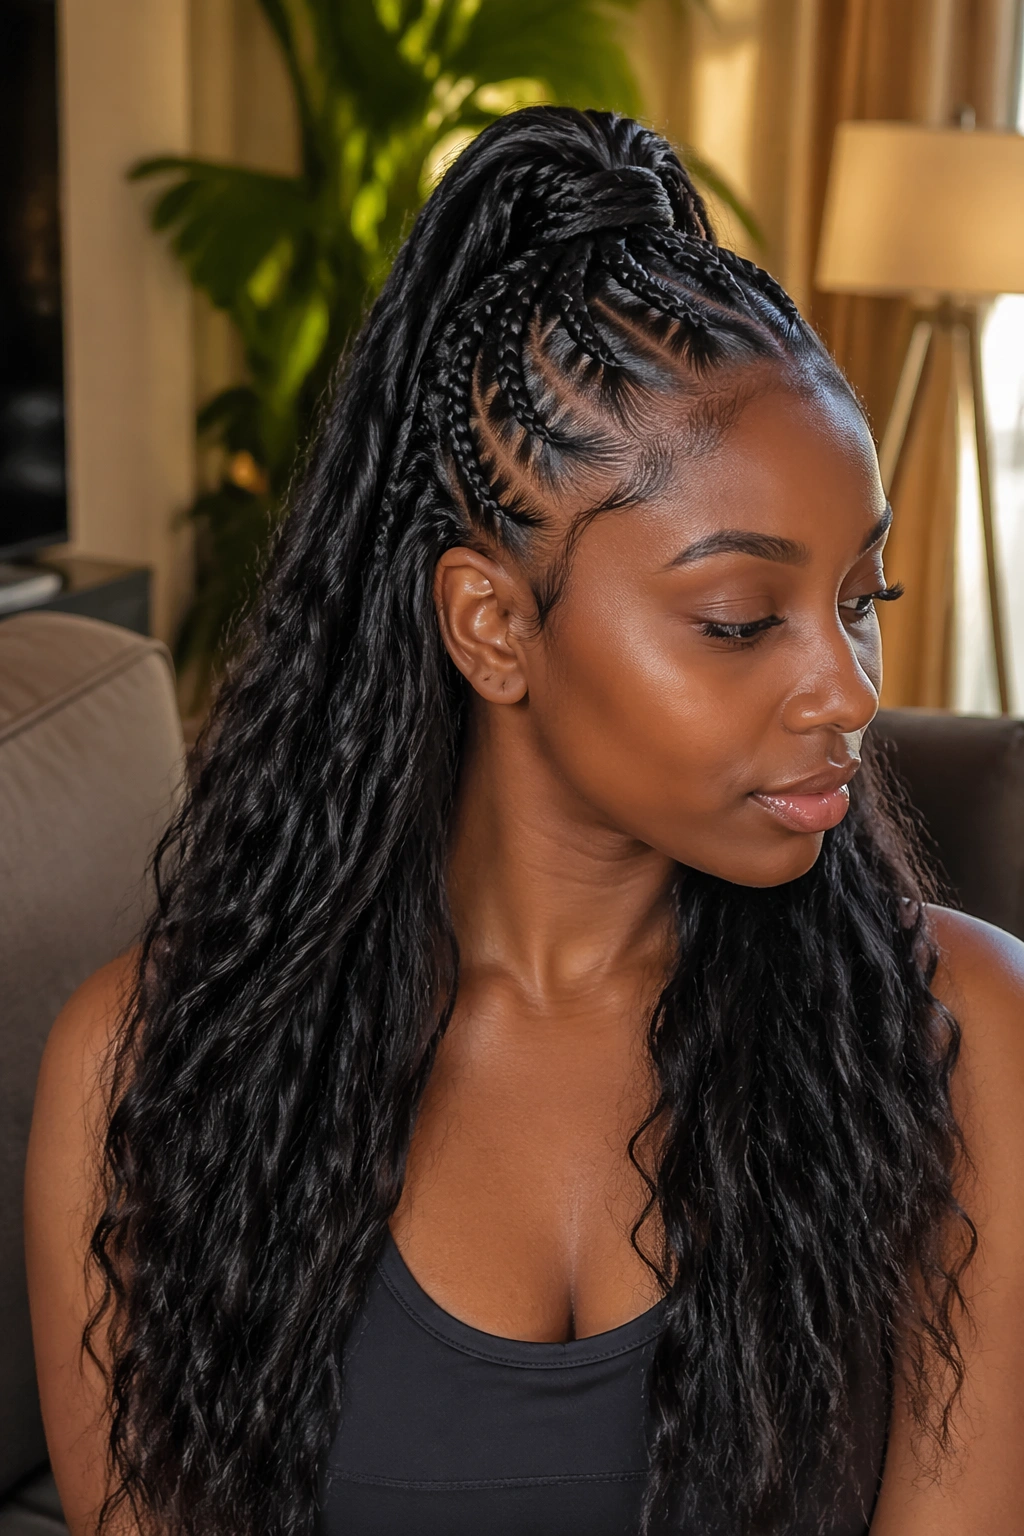
5. Curly-Ended Feed-In Ponytail

Curly ends change everything. The braid can be neat as a pin, but the curl at the bottom keeps the style from feeling too severe. That contrast is the reason this look stays so loved: the top stays controlled while the tail gets movement.
A curly-ended feed-in braid ponytail needs a clean base, because the curls add volume at the bottom and your eye goes straight to the contrast. If the edges are sloppy, the curls won’t save it. If the front is slick and the ends are bouncy, the whole style feels deliberate.
I like medium-to-large curls here, not tiny springy ones that get fuzzy too fast. Rods or perm rods around the lower half of the ponytail usually give a curl that holds shape without looking stiff. Keep the length long enough that the curl pattern can show. A tiny tail with curls just looks unfinished.
The result is polished, but not hard. That’s the sweet spot.
6. Stitch-Braid Feed-In Ponytail
Stitch braids make a feed-in ponytail look sharper because the part lines read like little rails. The scalp pattern becomes part of the design, not just the route to the ponytail.
What Makes the Stitching Pop
The sections need to be narrow and deliberate. Stitch braids depend on visible spacing, so a messy part ruins the whole effect. I like a fine-tooth comb for the initial line, then a tail comb to pick up tiny, even strands as you braid. That small motion creates the little “stitches” across the cornrow.
A stitch-braid ponytail is a good choice when you want the front to look graphic. It can be high, mid, or low. The angle matters less than the line quality. Keep the base neat and the feed-in hair smooth, because any puffiness near the scalp makes the stitched pattern disappear.
If you like styles that read crisp from a distance, this one is hard to beat. It looks clean in motion, too.
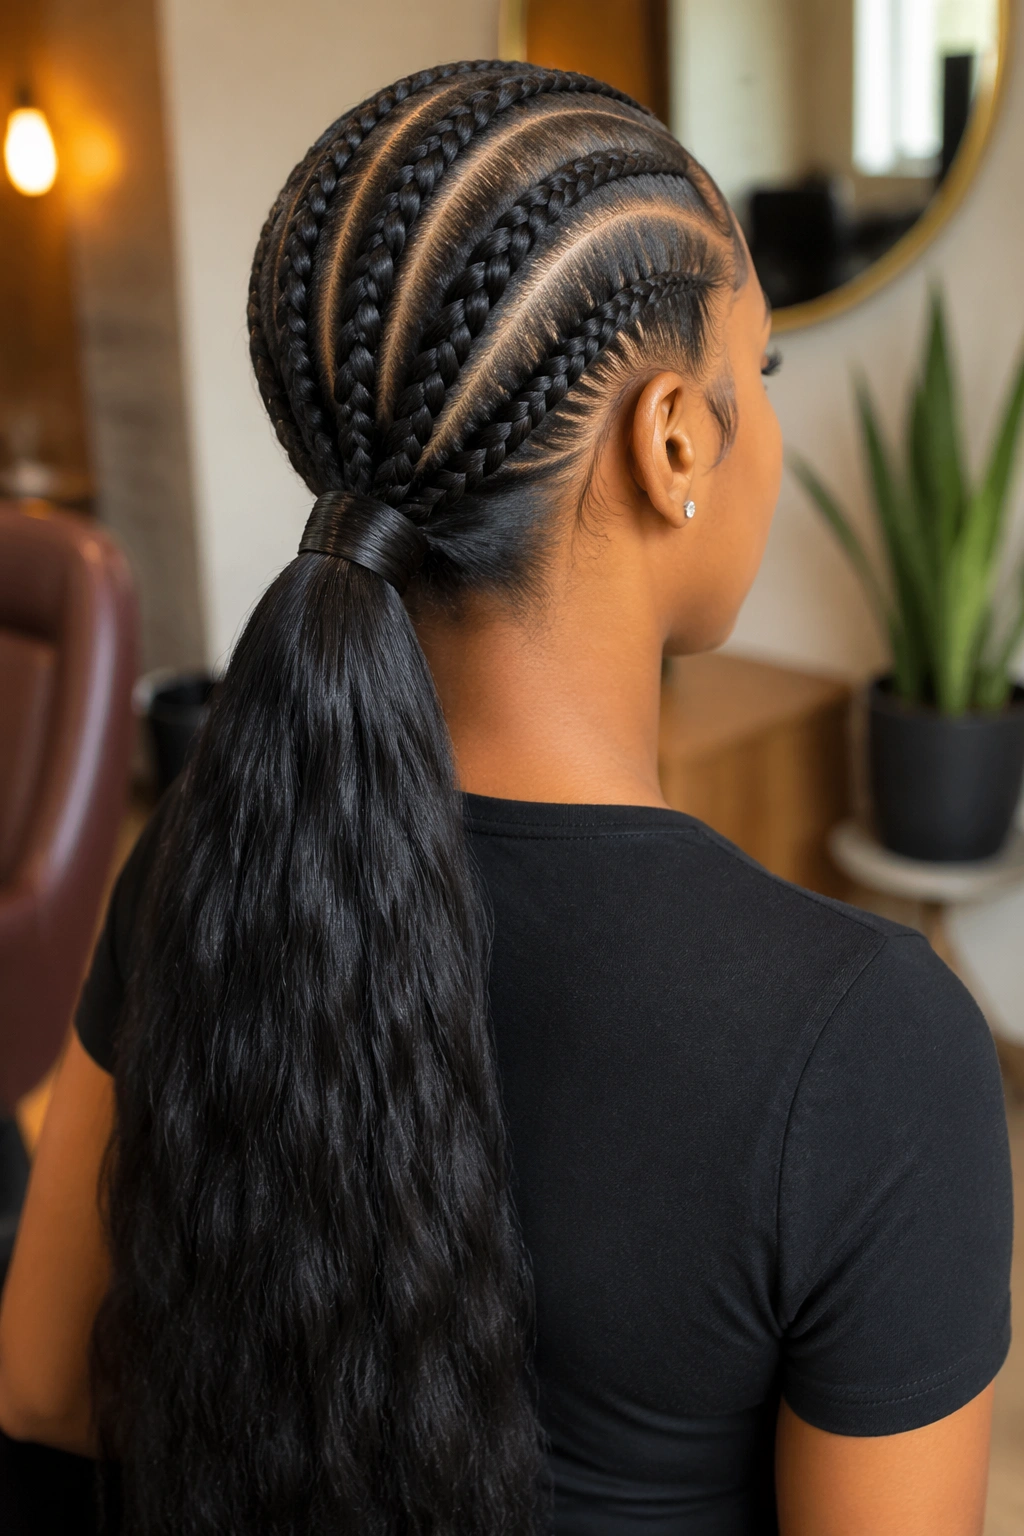
7. Low Nape Feed-In Ponytail
A low nape feed-in braid ponytail feels calmer than a high one, and that calmer shape is exactly why it often looks so polished. The edges can be laid close to the hairline without the pull that comes from lifting everything upward.
It’s the kind of style that works on long days. The weight sits lower, the scalp usually feels less strained, and the ponytail stays tucked in place instead of bouncing around your shoulders. That low placement also makes the braids themselves look neater because the top of the style is less exposed to movement.
- Ask for the ponytail to sit at or just above the nape.
- Keep the first braids close to the head for a smooth top line.
- Use a satin scarf for 10 to 15 minutes after styling.
- Finish with a light oil on the braid surface, not the scalp.
A low ponytail can look quiet, but it rarely looks boring when the parts are clean.
8. Jumbo Feed-In Ponytail
Jumbo feed-in braid ponytails are for people who want presence without spending forever in the chair. The braids are thicker, the style comes together faster, and the ponytail has a strong shape that reads from across the room.
The front still needs care, though. Jumbo does not mean sloppy. If the feed-ins at the hairline start too wide, the style loses that smooth transition from edge to braid. I prefer fewer braids with cleaner parting over a crowded front that feels heavy. One neat line will beat three messy ones every time.
This look is especially good when your hair is dense or your extensions are already thick. The weight of jumbo braids can drag if the base is too small, so the ponytail anchor should be secure. A wrapped base helps here, because it hides the elastic and keeps the finished shape looking tidy.
Big braids, clean parts. That’s the whole deal.
9. Micro Feed-In Ponytail
Micro feed-in braids look refined because the scalp gets more room to breathe visually. The sections are tiny, the parting is detailed, and the whole style feels almost tailored.
How to Keep Tiny Braids From Fuzzing Up
The smaller the braids, the more the front matters. If the edges are fuzzy before the braiding starts, the tiny sections just make the fuzz more obvious. Smooth the hairline first, then work in small, even feed-in additions. The tension should stay consistent from the first braid to the last.
Micro braids are slower, no question. They ask for patience. They also create a lighter-feeling ponytail near the hairline, which some people prefer because it avoids the bulky look that thicker braids can bring.
- Best when you want a very detailed scalp pattern.
- Good for shorter or medium-length natural hair.
- Works well with a sleek, low ponytail base.
- Needs a soft mousse touch-up if the frizz starts early.
The payoff is in the detail. Up close, it’s a gorgeous style.
10. Half-Up Feed-In Ponytail
Half-up feed-in braid ponytails give you the neatness of braids at the top and a little softness underneath. That balance is useful. You keep the front controlled, but you don’t have to braid every inch of hair if you want movement left out.
This is one of those styles that looks a little more relaxed without losing shape. The top section usually starts with clean feed-ins from the temples or crown, then gathers into a ponytail while the rest of the hair falls free. If the top is slick and the parting is sharp, the loose bottom half feels intentional, not unfinished.
I like this when someone wants to show length but still keep the face clear. It also makes the edges easier to highlight because there’s less braid weight around the hairline. The top carries the structure. The rest just follows.
You get polish and softness in one shot.
11. Feed-In Ponytail With a Braided Bang
A braided bang can make a feed-in ponytail look more styled without making it fussy. It’s a good move when the front hairline needs a little framing, not a full curtain of braids.
The bang section usually starts at one side or just off-center, then sweeps across the forehead before feeding into the main ponytail. That curved line softens the forehead area and gives the edges a graceful edge of their own. The rest of the ponytail stays simple so the front braid can do the talking.
If you want this look to stay clean, keep the bang braid narrow and smooth. A bulky front braid can swallow your face shape. A slim braid with a neat finish just skims the hairline and makes the whole style feel sharper.
It’s a small detail. It changes the whole mood.
12. Wrapped-Base Feed-In Ponytail
A wrapped base is one of those details people notice even if they can’t name it. The elastic disappears, the base looks finished, and the ponytail suddenly feels more expensive — not in money, just in effort.
Why the Wrap Matters
A visible hair tie can break the illusion of a seamless feed-in ponytail. Wrapping the base with a strand of braid or extension hair smooths that gap out. It also helps hold the ponytail upright if the style is high or if the hair is heavy.
The wrap should be snug and smooth, with no bumps under it. If you rush this part, the little ridges show. A clean wrap also draws attention to the neat edges because your eye isn’t pulled toward the elastic.
- Use one extra braid or a small piece of extension hair for the wrap.
- Secure the end under the ponytail with a pin or small elastic.
- Keep the wrap the same color as the braid for a seamless finish.
- Light oil on the braid surface helps the wrap lie flat.
A wrapped base is a tiny fix that makes a big difference.
13. Beaded Feed-In Ponytail

Beads bring sound, movement, and personality, but they work best when the braid foundation is already tidy. If the edges are messy, beads just put more attention on the mess. If the base is clean, the beads look like a choice instead of a rescue.
Where to Place the Beads
I prefer beads on the lower half of the ponytail rather than packed close to the scalp. That keeps the hairline visible and avoids crowding the front. A few beads at the ends give rhythm. Too many near the top can make the style feel heavy.
You can keep it simple with clear or wooden beads, or go bolder with color. Either way, the braid sizes should stay even so the bead placement looks balanced. Uneven thickness makes beads tilt, and nobody wants one side dragging harder than the other.
This style has a lively feel, but it still needs discipline. Clean parts first, beads second.
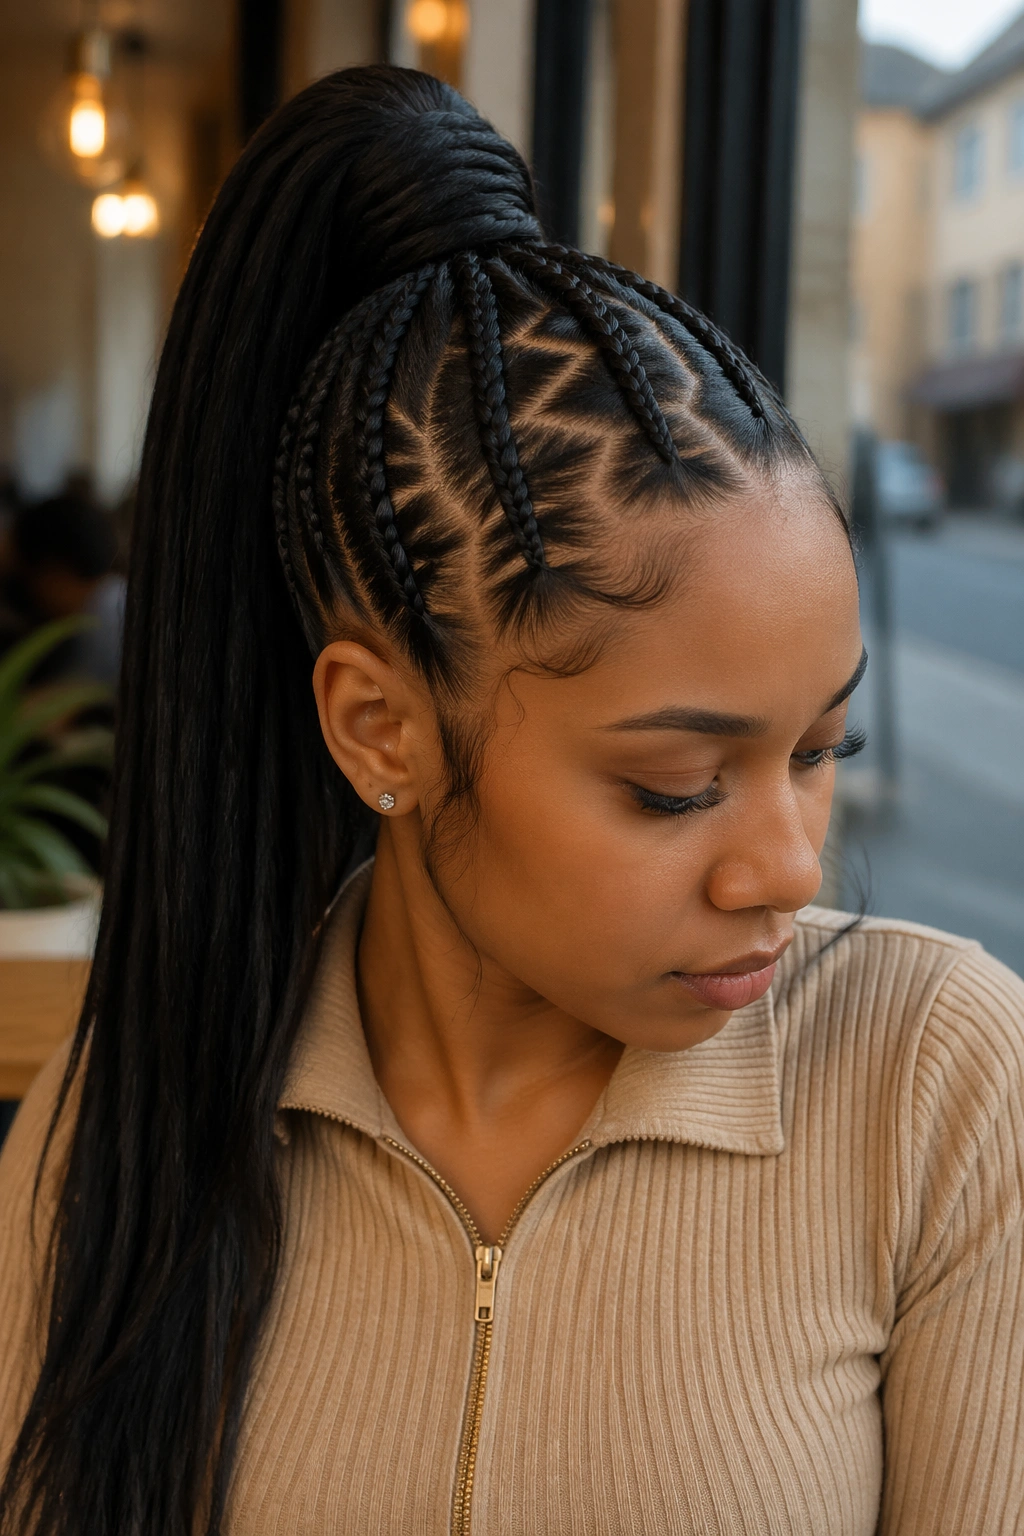
14. Triangle-Part Feed-In Ponytail
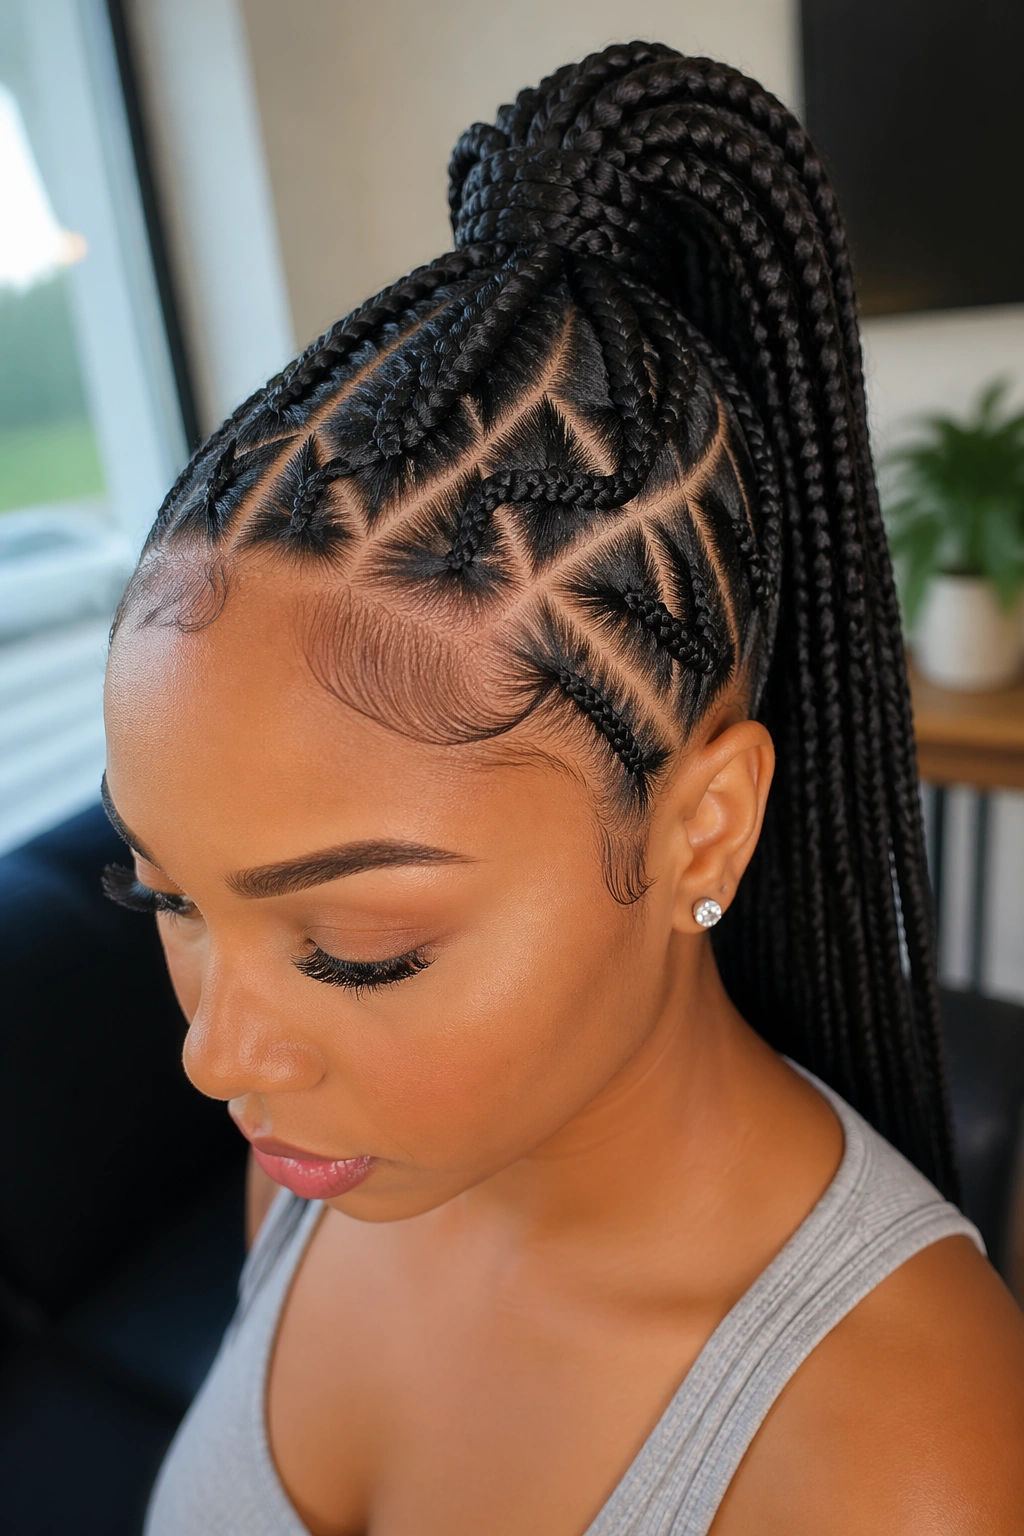
Triangle parts change the whole read of a feed-in braid ponytail. Instead of standard squares, the scalp pattern gets sharper edges, and that little twist makes the style feel more designed.
Do triangle parts matter if the ponytail itself is simple? Yes. They matter a lot. The triangles create a geometric look that catches the eye before the ponytail even enters the picture. The result feels neater because the parting has a clear shape and no wasted space.
How to Ask for the Part Size
Keep the triangles medium-sized if you want the scalp to look clean from a normal distance. Tiny triangles take forever and can crowd the front. Huge triangles lose the point. Somewhere in the middle usually looks best. The first few triangles near the hairline should be especially neat, since that’s where the eye lands first.
A triangle-part ponytail is a good compromise between precision and personality. It’s tidy. It’s not plain.
15. Zigzag-Part Feed-In Ponytail
A zigzag part adds a little motion before the ponytail even begins. It’s playful, sure, but it can still look polished when the lines are crisp and the edges stay smooth.
The best zigzags are medium-sized. Tiny zigzags get lost once the hair grows out a bit. Huge ones can look like you ran out of ideas. A balanced zigzag gives the front a rhythmic shape without turning the whole style into a pattern puzzle.
The braids should follow the zigzag naturally, not fight to straighten it out. That’s where the neat-edge look stays intact. If the part is sharp and the hairline is laid flat, the style reads intentional. If the part is wobbly, the whole thing starts to look like a mistake.
This is a good pick when you want a little attitude without sacrificing cleanliness.
16. Curved Side Feed-In Ponytail
A curved side feed-in ponytail feels more sculpted than a basic side part. The braids arc gently from the front toward one side, and that curve gives the style a softer finish than a straight diagonal line.
The Shape Makes the Style
What I like here is the flow. The braids do not stop and start in obvious places. They bend toward the ponytail base, which makes the edges look streamlined and the face feel framed instead of boxed in. A curved path also helps the ponytail sit lower and more elegant if that’s the goal.
- Best with a medium or low ponytail base.
- Works well when one side has a deeper swoop than the other.
- Looks strongest when the curve starts at the temple, not the ear.
- Use a soft brush to keep the arc smooth while styling.
The curve gives the look a little movement, but it still feels neat. That’s the whole appeal.
17. Heart-Part Feed-In Ponytail
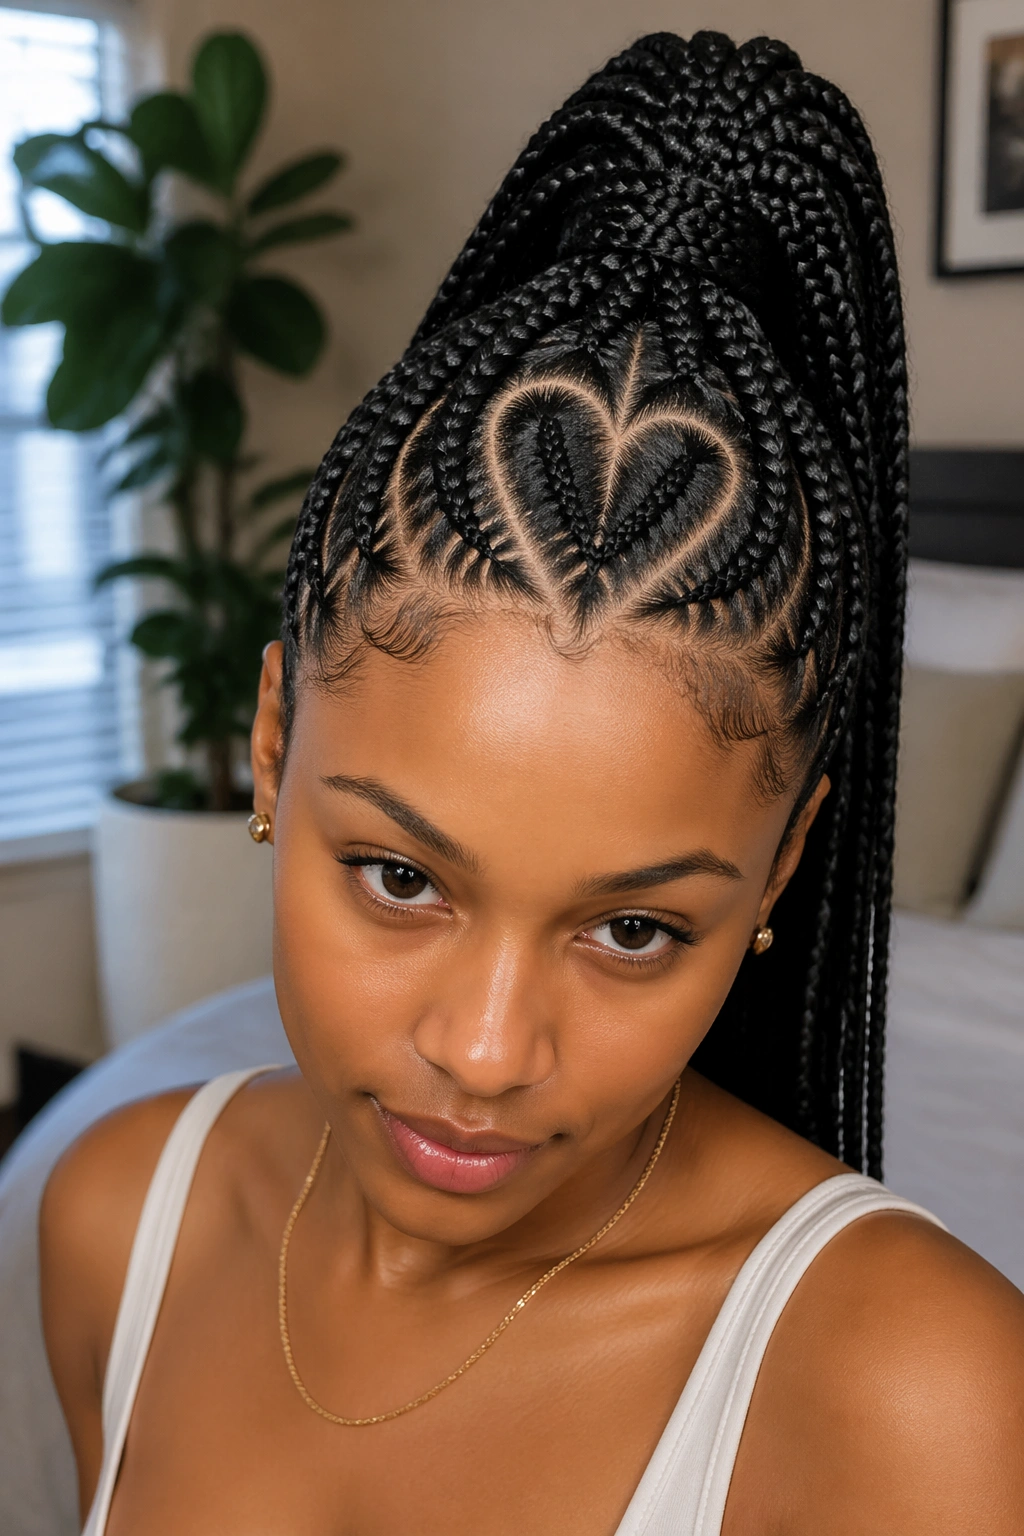
A heart part is not subtle, and that’s the fun of it. It turns the scalp into a design surface, which means the ponytail itself can stay pretty simple while the front does the talking.
This style works best when the heart sits cleanly at the crown and doesn’t get buried under extra braid volume. The hairline around it should stay smooth so the shape reads clearly. If the parting is rough, the heart just looks muddy. Crisp lines make it cute; fuzzy lines make it confusing.
I like this when someone wants the ponytail to feel special without adding beads or curls. The shape itself is the detail. Keep the edges soft but controlled, and let the heart stay the star. It’s a style with personality, no question, and the neatness matters even more because the design is so obvious.
18. Layered-Length Feed-In Ponytail
Layered-length feed-in braids make the ponytail look fuller and more dynamic because not every braid ends at the same point. That staggered finish gives the tail a little dimension, which is useful if you hate the blunt, blocky look some ponytails have.
The top needs to stay neat, since the length variation is already doing enough. Start with even feed-ins around the hairline, then let the braid lengths vary by a few inches. A short front braid with a longer center braid can make the ponytail fall in a nicer curve. Too much variation, though, and the style starts to feel unfinished.
This is a good pick if you like movement but do not want curls. The ends can move naturally, and the shape holds without extra styling tools. A light finish spray on the braid surface keeps the layers from frizzing together.
The ponytail looks fuller because the lengths disagree just a little. That’s the point.
19. Waist-Length Feed-In Ponytail
Waist-length feed-in braid ponytails make a statement the minute they move. The length gives the style drama, but the crown still has to stay neat or the whole look tips into heavy territory.
Balance the Weight
Long ponytails put more pull on the base, which means the front must be anchored well. If the hairline is already tender, this is not the style to force. A secure but comfortable base matters more than a super-tight grip. I’d rather see a well-supported ponytail than a strained one that lasts half a day.
Ask for braids that stay close to the scalp before they gather into the ponytail. That keeps the front clean and helps the long tail fall from a strong base. If you want the length to read clearly, ask for at least 28 to 30 inches of added hair, depending on your height and the look you want.
It’s a lot of hair. That’s the fun part.
20. Short Feed-In Ponytail
Short feed-in braid ponytails deserve more credit than they get. A shoulder-grazing tail can look sharper than a long one because it sits lighter, moves less, and puts the focus on the braid work near the scalp.
The style is especially good if you like a neat finish without the weight of a long extension tail. A shorter ponytail can keep the back of the neck cooler, and it’s easier to manage at night. The front still needs the same care, though. Clean edges matter just as much here, maybe more, because the shorter tail means the scalp pattern is on display.
A short version also lets the parting read more clearly. You can see the lines, the angles, the feed-in sections. Nothing gets hidden under length.
Some styles need drama to look finished. This one just needs accuracy.
21. Twin Feed-In Ponytails
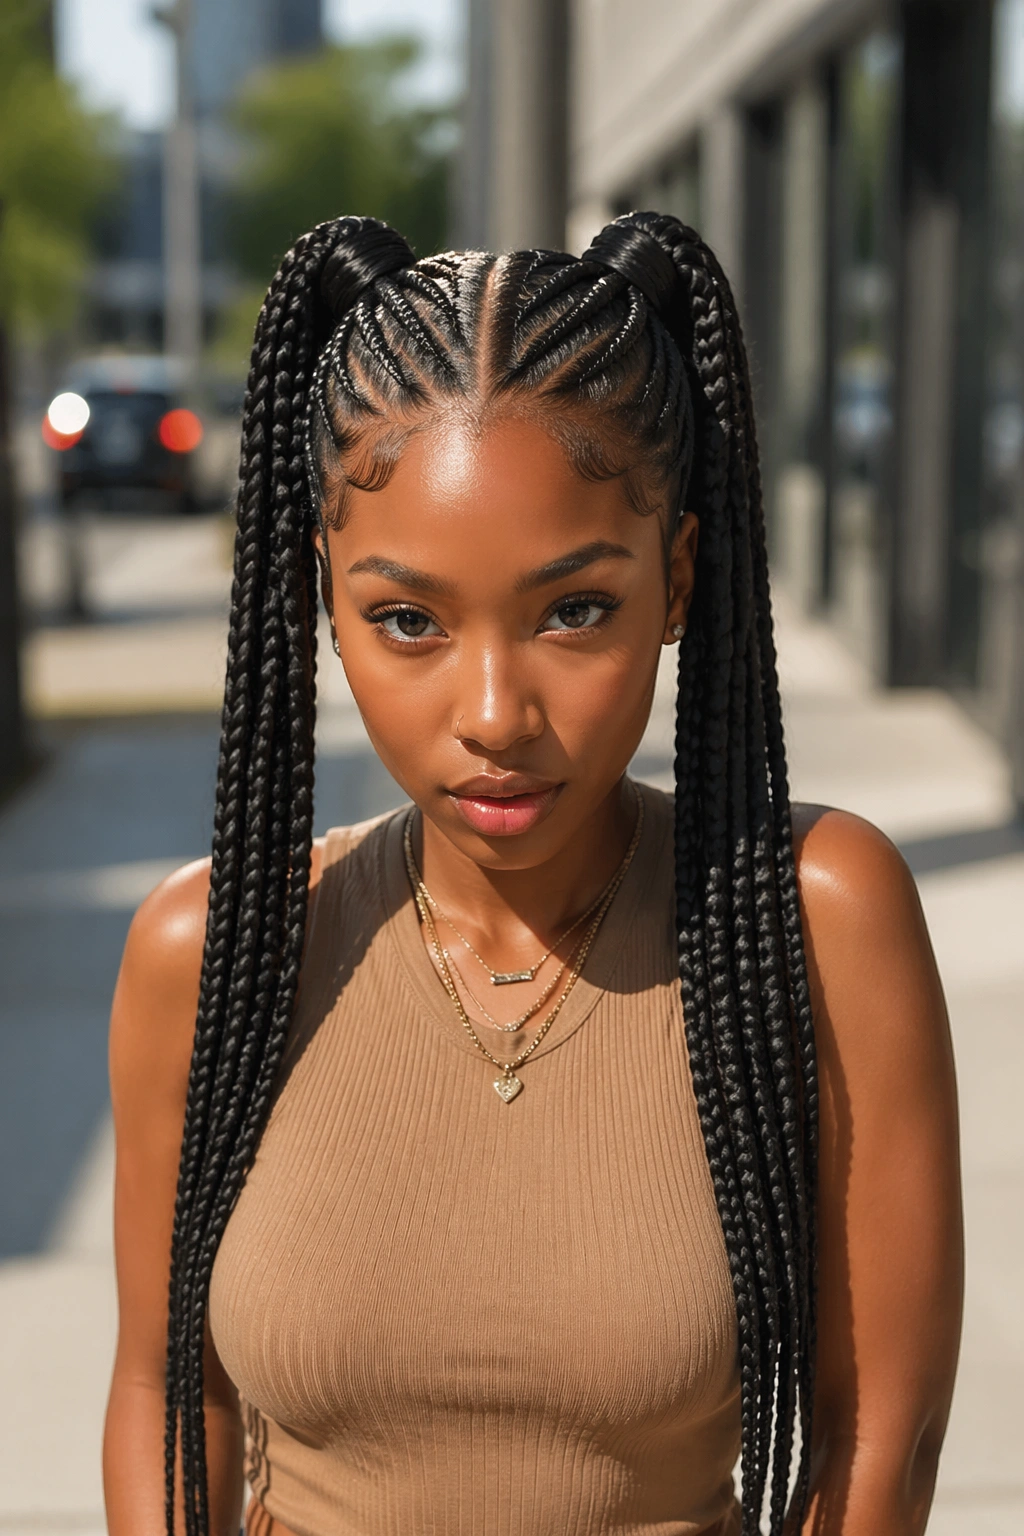
Twin feed-in ponytails can look playful and polished at the same time if the parts are neat and the height is even on both sides. The style only works when symmetry is respected. Uneven pigtails look off fast.
Keeping Both Sides Honest
Start by mapping the center part cleanly. Then decide whether the ponytails should sit high, mid, or low. The most common mistake is making one side slightly heavier than the other. That mismatch shows up immediately, especially near the edges.
If you want the look to stay grown-up rather than schoolgirl, keep the braids slim and the base sleek. Let the parting do the styling, not oversized accessories. A pair of twin ponytails can still feel sharp when the scalp line is neat and the ends are controlled.
- Best with straight middle parts.
- Works with curly ends or plain braid tails.
- Use matching braid sizes on both sides.
- Keep the hairline smooth before splitting the sections.
Even. That’s the word here.
22. Curved Cornrow Feed-In Ponytail
Curved cornrows give the ponytail a little motion from the start, and that motion makes the style look more custom. Instead of straight lines shooting back, the braids arc around the head and guide the eye toward the ponytail base.
The curve can be subtle or strong. A gentle curve keeps the look soft. A deeper curve creates more drama. Either way, the scalp pattern becomes part of the design, which is nice when you want the front to feel thoughtful without piling on extra details.
What to Ask For
Tell your braider whether you want the curves to bend toward the middle or sweep to one side. That one detail changes the whole mood. Curved cornrows also help a ponytail sit more naturally when the head turns, because the lines already have movement built in.
- Great for side or mid-height ponytails.
- Helps the style follow the shape of the head.
- Looks strongest with clean, even feed-ins.
- Pair it with soft edges, not chunky swoops.
The curve makes the edges feel framed, not forced.
23. Event-Ready Feed-In Ponytail With Hair Jewelry
When the occasion calls for something sharper, hair jewelry can turn a feed-in braid ponytail into a full look without crowding the front. Cuffs, rings, and slim threads add shine, but they work best after the edges and parts are already neat.
I like this style when the ponytail itself stays clean and the accessories do the showing off. Too many pieces near the hairline make the style feel busy. A few well-placed cuffs lower on the braid, maybe one accent piece near the ponytail base, usually looks richer than stacking everything at the top.
The base should still be the hero. Clean parting, smooth edges, no bumps under the ponytail. Once that foundation is right, jewelry just gives the braid a little extra flash. The result feels finished enough for a formal outfit, but it still looks like hair, not a costume.
Neat edges. Clean part. One good accent. That combination never gets old.