



Stitch cornrows with beads sit at an intersection most braid styles never reach. You get the sharp, ladder-like lines of stitch braiding (sometimes called Fulani stitch or boxer braids with extra precision) paired with the rhythmic weight of beads clicking against your back. It’s a style that nods to West African tradition while feeling right at home on a Wednesday commute. And once you understand the grip of stitch parting, the beads stop being decoration — they become anchors for the whole look.
A quick truth before we go further. Stitch cornrows with beads aren’t a starter braid style. The parting is mathematical. The tension has to be even from root to tip or the stitches look wobbly. But the payoff is real: two to three weeks of clean, sculpted rows that age gracefully, plus the satisfaction of beads that catch on every turtleneck you own.
What Makes Stitch Cornrows Different From Regular Cornrows
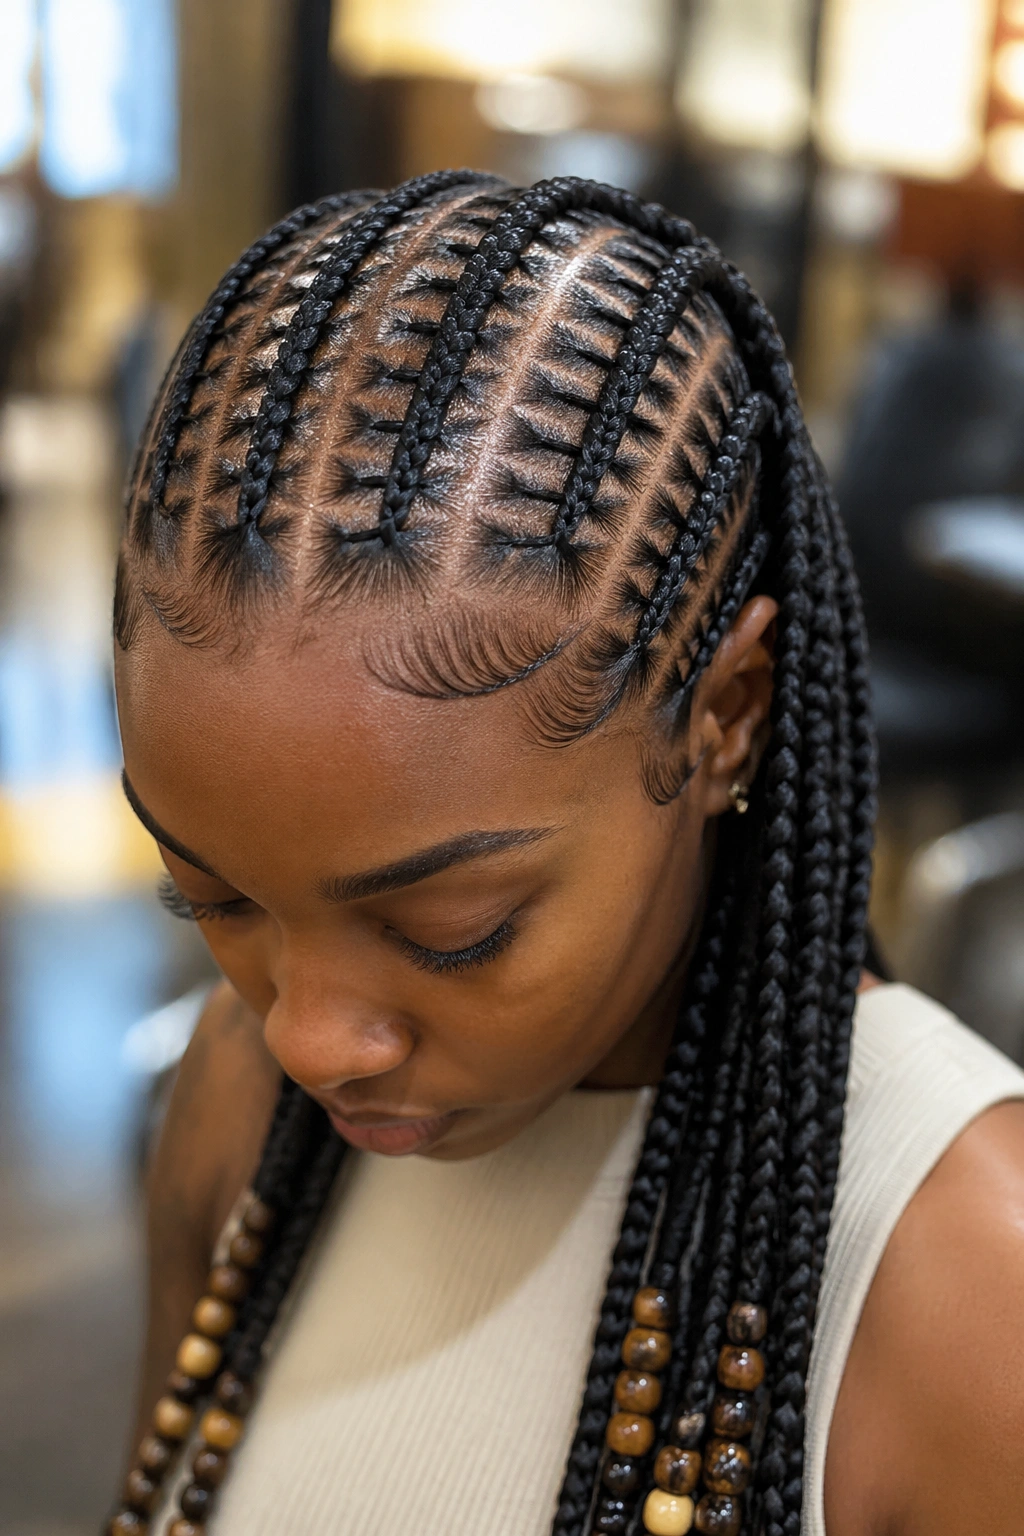
Regular cornrows use a smooth, continuous three-strand plait tight to the scalp. Stitch cornrows add tiny horizontal “stitches” — pinched, raised segments that run perpendicular to the braid. Picture a zipper track running down your part. Those horizontal bumps give the style its name, and they’re what separates a stitch braid from a standard cornrow in about two seconds of visual inspection.
The technique requires pulling small sections of loose hair across the braid itself before each new stitch. Most braiders do this with the pinky and ring finger of the dominant hand while the other fingers keep the main strands tight. It sounds like a small adjustment. It changes the entire look.
A good stitch cornrow has visible “rungs” about every quarter-inch to half-inch down the length of the braid. Spacing too wide looks sparse. Spacing too tight looks crowded and can trap scalp oils between rungs — more on that when we get to maintenance.
Tools and Supplies You’ll Want Before Sitting Down
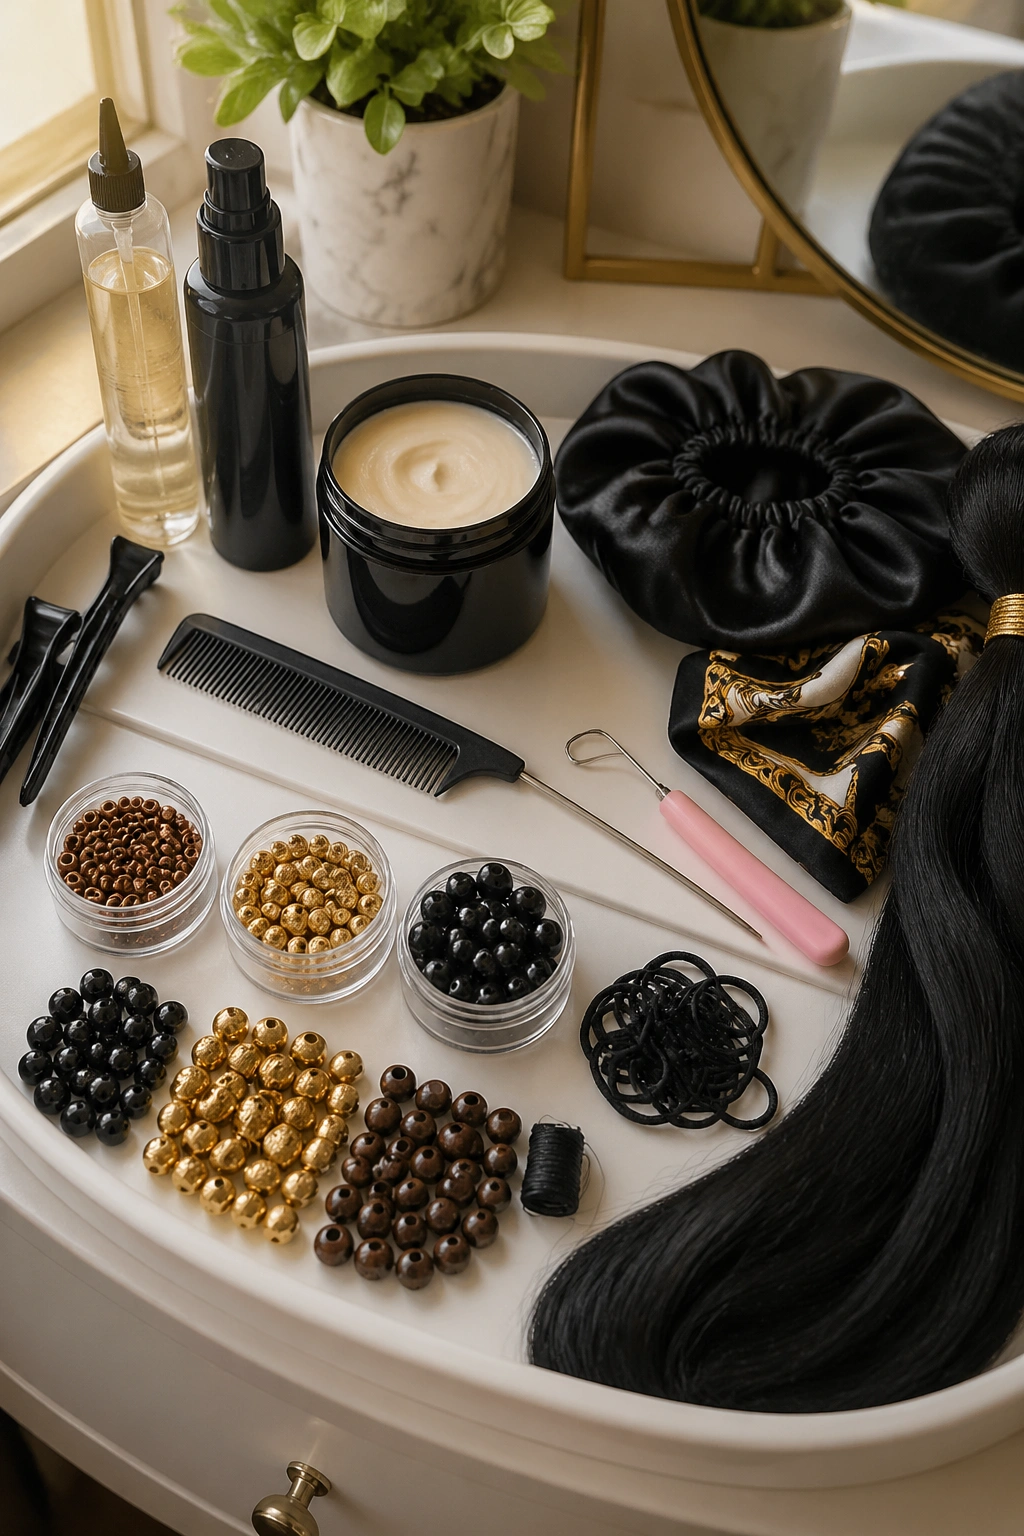
Nothing derails a six-hour braid session faster than realizing you’re out of edge control halfway through row seven. Lay everything out before your braider arrives or before you start on yourself.
- Rat-tail comb — the thin metal tail is non-negotiable for straight stitch parts
- Edge control gel — a thick hold, the kind that stands up in the jar when you flip it upside down
- Mousse or foam — keeps flyaways down without making hair slick enough to slip out of the braid
- Kanekalon extensions if you want thicker rows or length — about 2 packs for a full head
- Beads in three sizes — small (6-8mm), medium (10-12mm), large (14-16mm) for visual rhythm
- Elastic bands — clear silicone or small black rubber to hold bead clusters
- A bead threader or pony bead loop — skip this and you’ll cry at row four
- Oil — jojoba or argan for scalp and braid shine
- Shower cap and silk scarf — for rinsing and overnight
Pro tip: If your bead hole is tight, use a dental floss threader as a backup. Cheap, disposable, works every time.
Prepping Your Hair So the Stitches Actually Hold
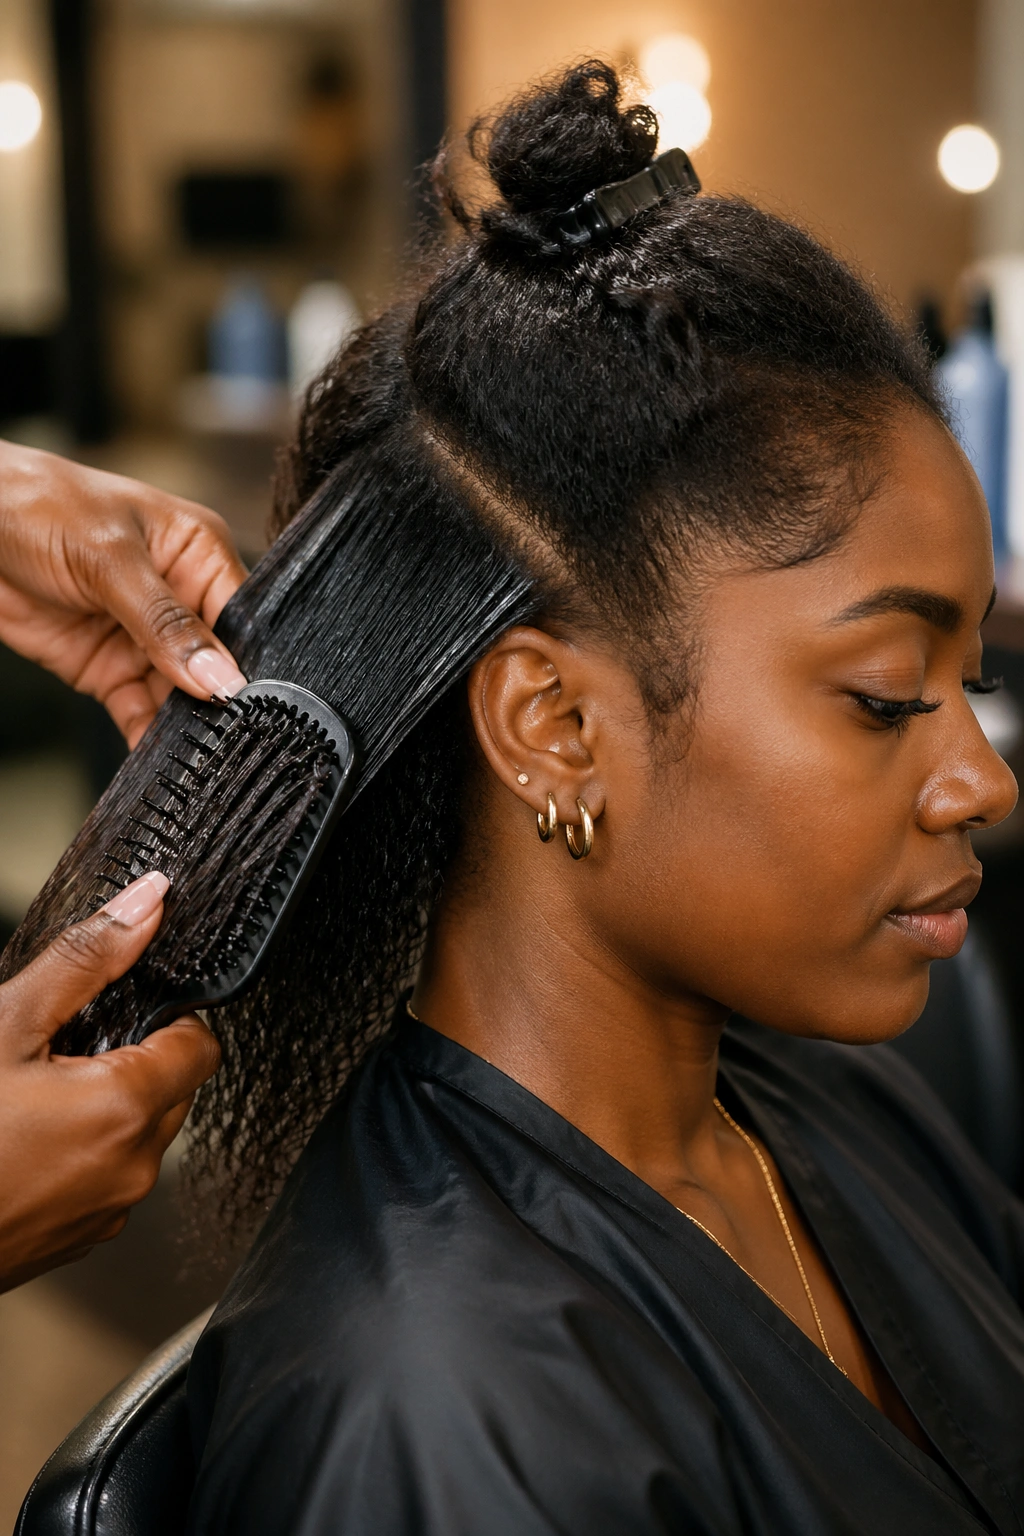
Day-of wash is the wrong move. Freshly washed hair is slippery, and slippery hair won’t hold a crisp stitch. Wash two to three days before your appointment. Deep condition. Blow dry on cool-medium with a detangling brush. You want hair that’s stretched, not limp.
If you’re installing extensions, rip the kanekalon ends first so they blend instead of ending in a blunt chunk. Most braiders rub the ends between their palms until they feather out. Takes ten minutes. Worth it.
Edges need prep too. Clean them with a damp cotton round if you’ve been using heavy products, then apply a light layer of edge gel along the hairline. Save the heavier edge work for after the braids are in — you’ll be pulling on the hairline a lot during installation, and overdoing the gel beforehand makes everything gummy.
How Beads Change the Weight and Movement
Beads don’t just look different. They feel different. A bead-free cornrow swings loose and floats when you turn your head. Add even a single small wooden bead at the tip of each braid, and suddenly there’s inertia. The braid drops. It sways on a slight delay.
This matters more than people expect. Heavy beads on thin braids will stress the root over time. You’ll feel it — a low, dull ache at the nape by day three if the beads are wrong for your braid size.
Balance the load. Thin braid, small bead. Medium braid, medium bead. Thick feed-in braid, go as big as you want. A cluster of three medium beads weighs roughly the same as one large ceramic, so if you like the layered look, spread the weight across more smaller beads instead of stacking up to a single heavy one.
A Short History of Beads in Cornrows
Beads in braided hair predate any trend you’ve seen in the last century. Fulani women in West Africa — the namesake of “Fulani braids” — have worn cornrows with cowrie shells, silver coins, and amber beads for generations, each type carrying specific meaning about marriage status, wealth, or tribal affiliation. Himba women in Namibia coat their braids in red ochre and bead the tips. Zulu women wore specific bead patterns to signal readiness for marriage.
The point is that beads have never been just decoration. They’ve carried information. When you add beads to stitch cornrows, you’re pulling from a tradition that’s older than most written languages, even if your version is just three wooden beads and a silicone elastic.
1. Center-Parted Double Stitch With Wooden Bead Clusters
Six stitch cornrows fall on each side of a bone-straight center part, with wooden bead clusters weighing down the ends. The look reads clean and symmetrical without being precious about it.
Why It Works
The center part forces symmetry, which makes small imperfections in the stitch spacing less noticeable. Wooden beads sit quieter than metal or ceramic — they absorb light instead of reflecting it, so the braidwork itself gets the attention.
- Best bead size: 12mm natural wood
- Cluster count: 3-4 beads per braid tip
- Install time: about 3.5 hours for someone experienced
Pro tip: If your hairline tends to lift, skip the very first stitch within an inch of the edge. Start the stitching pattern deeper and let the smooth portion cover the sensitive zone.
2. Diagonal Stitch Rows With Silver Metallic Beads
A diagonal parting pattern runs from the top-left hairline down to the right nape, creating rows that cut across the scalp instead of going straight back.
The diagonal angle does something weird and wonderful. It elongates the face. Round-faced wearers tend to look slimmer, and anyone with a shorter neck appears to have a longer one. Silver metallic beads — the small hollow ones, not the heavy solid ceramic — sit at the tips and catch every overhead light source.
There’s a trade-off. Diagonal parts are harder to execute evenly, and if the diagonal drifts on one side, your head looks lopsided in photos. Have your braider measure the parting angle at the front hairline and check it again at the nape before starting the stitches.
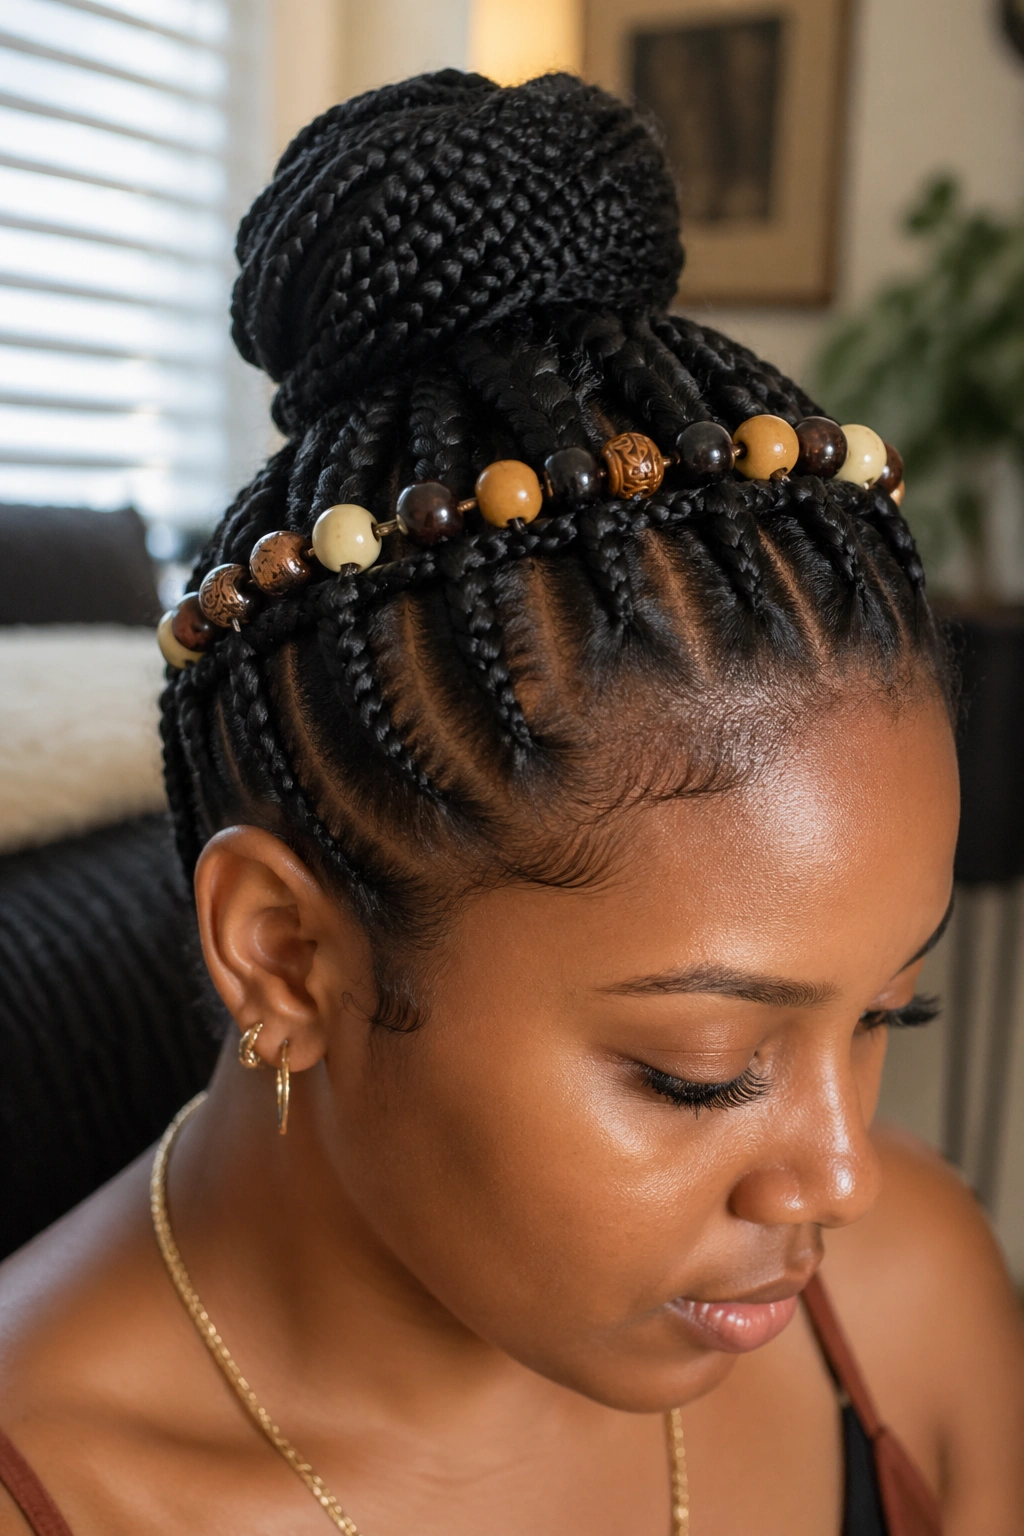
3. Halo Stitch Around a Top Bun With Mixed Beads
What if the stitches only wrap the outside of the head, leaving the crown free for a loose top bun? That’s the halo variation — a ring of 8 to 10 stitch cornrows around the perimeter, with the rest of the hair pulled up and out of the way.
The halo works especially well for thicker hair that doesn’t all fit flat against the scalp in a standard braid. You braid what you can, bun the rest. Mix bead colors — cream, copper, and dark brown together — and you get a textured, slightly bohemian finish without it tipping into costume.
How to Style It
- Pull the crown into a high bun BEFORE starting the stitch rows so the bun position is set
- Use a silk scrunchie to avoid indentation
- Braid the halo rows one at a time, letting each finish about 3 inches below the earlobe
- Bead the ends in alternating color patterns — not matched
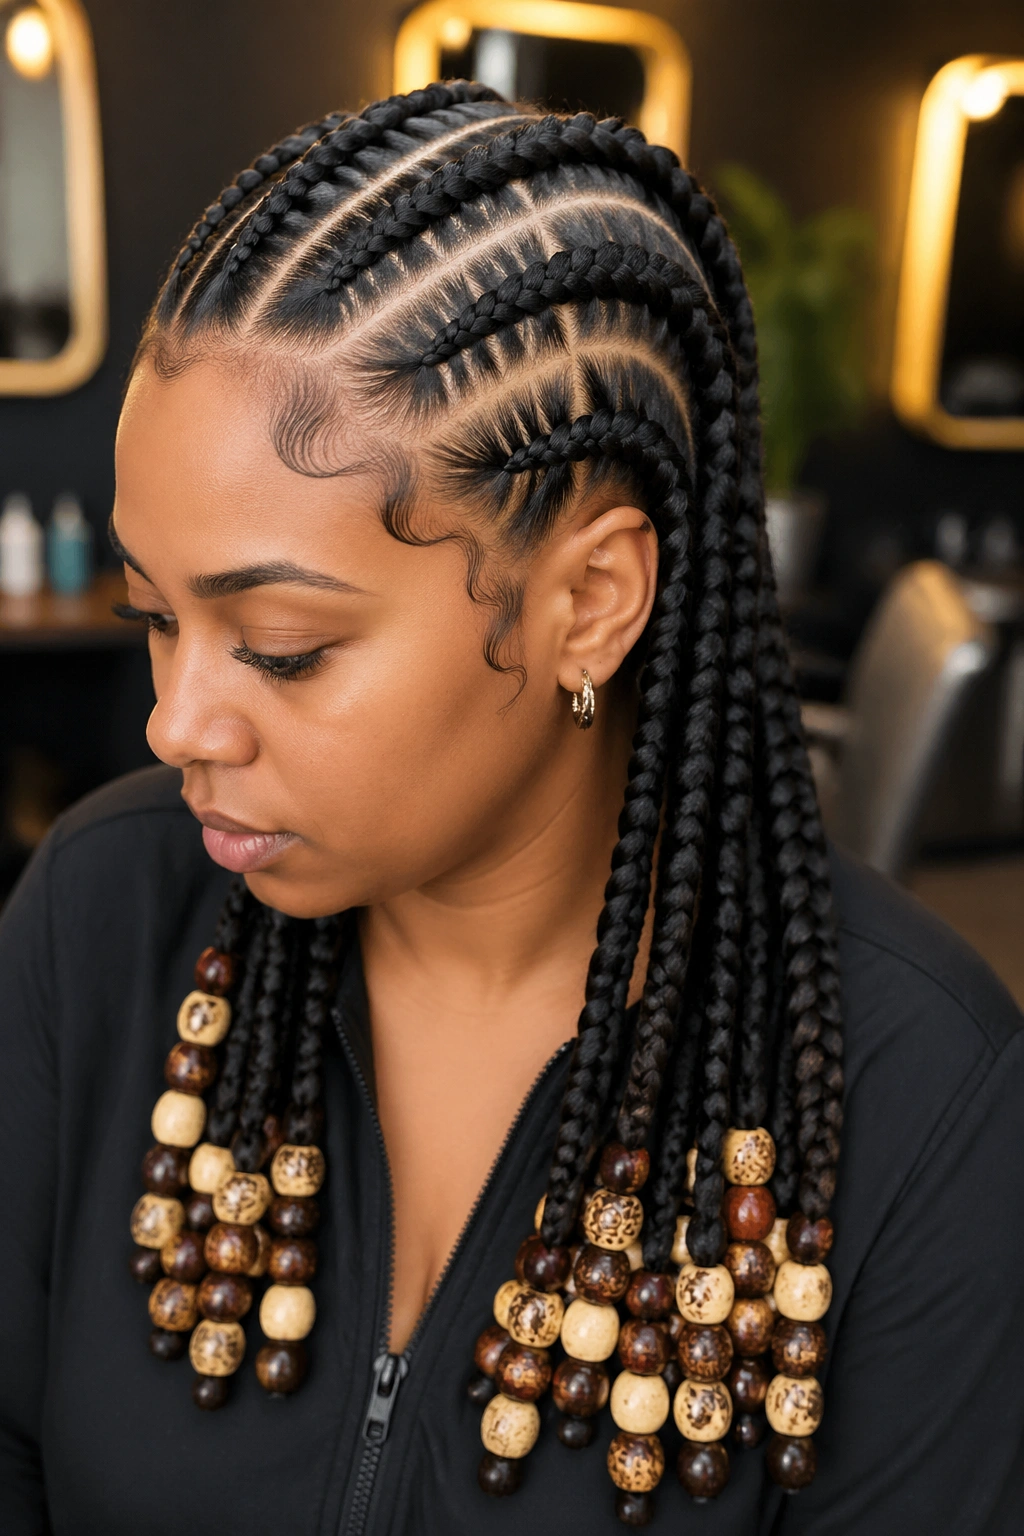
4. Chunky Feed-In Stitches With Large Ceramic Beads
Feed-in extensions make the base of each cornrow thicker than the natural hair would allow, and the stitches on a feed-in cornrow look bolder because there’s more hair to pinch between rungs. Pair with 16mm ceramic beads and you get a statement version of the style — the kind that photographs from across a room.
Ceramic beads come in hand-painted patterns: dot work, geometric lines, terracotta-fired natural finishes. Pick two or three that share a color family but aren’t identical. Matching every bead looks stiff. Coordinating without matching looks considered.
The downside is weight. Ceramic beads are heavy. For a full head of thick feed-in cornrows with a large ceramic bead at each tip, you’re adding real ounces to your neck load. Sleep on a silk pillowcase, position the beads away from your ear, and take the beads out before any workout that involves jumping.
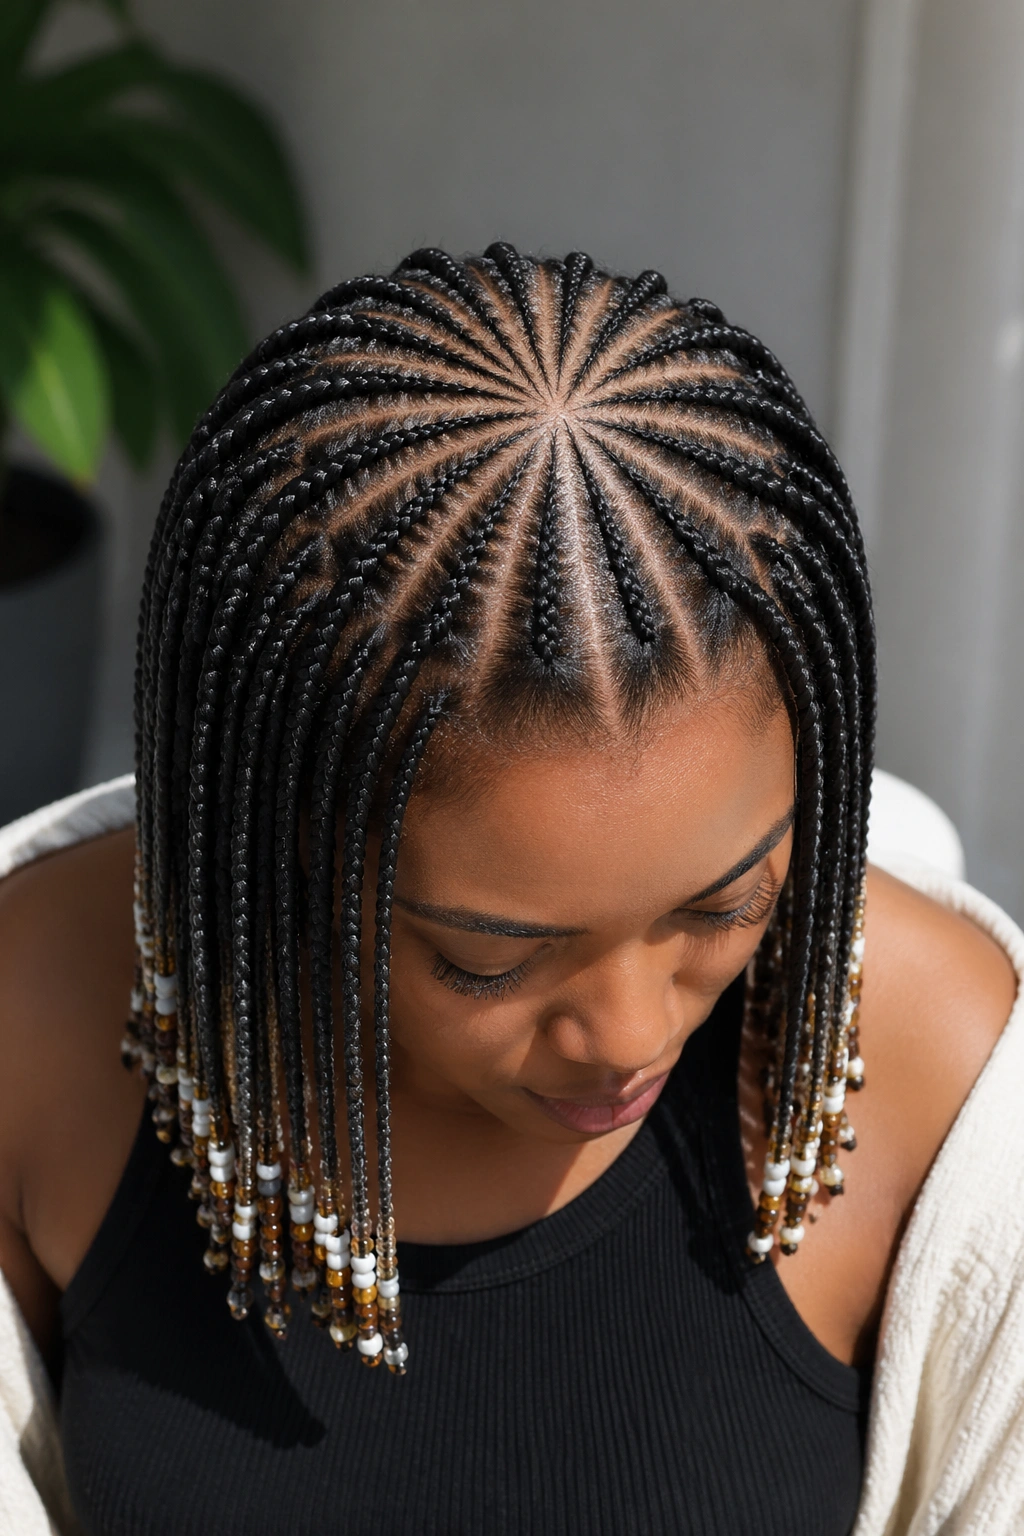
5. Sunburst Stitch From the Crown With Tiny Seed Beads
A sunburst pattern starts at a single point on the crown and radiates outward, with 12 to 16 stitch cornrows fanning in every direction before dropping down.
This is geometry you can feel. The parting at the crown point needs to be surgical — any wobble shows. Tiny seed beads (the kind used in beading jewelry, 4-6mm) thread into the last two inches of each braid in tight clusters. Because the braids fan in all directions, the beaded ends sit at different angles around the head, creating a kind of starburst silhouette when you stand still.
Pro tip: Seed beads need a beading needle or a threader — standard pony bead loops are too thick. Buy the needle before you sit down.
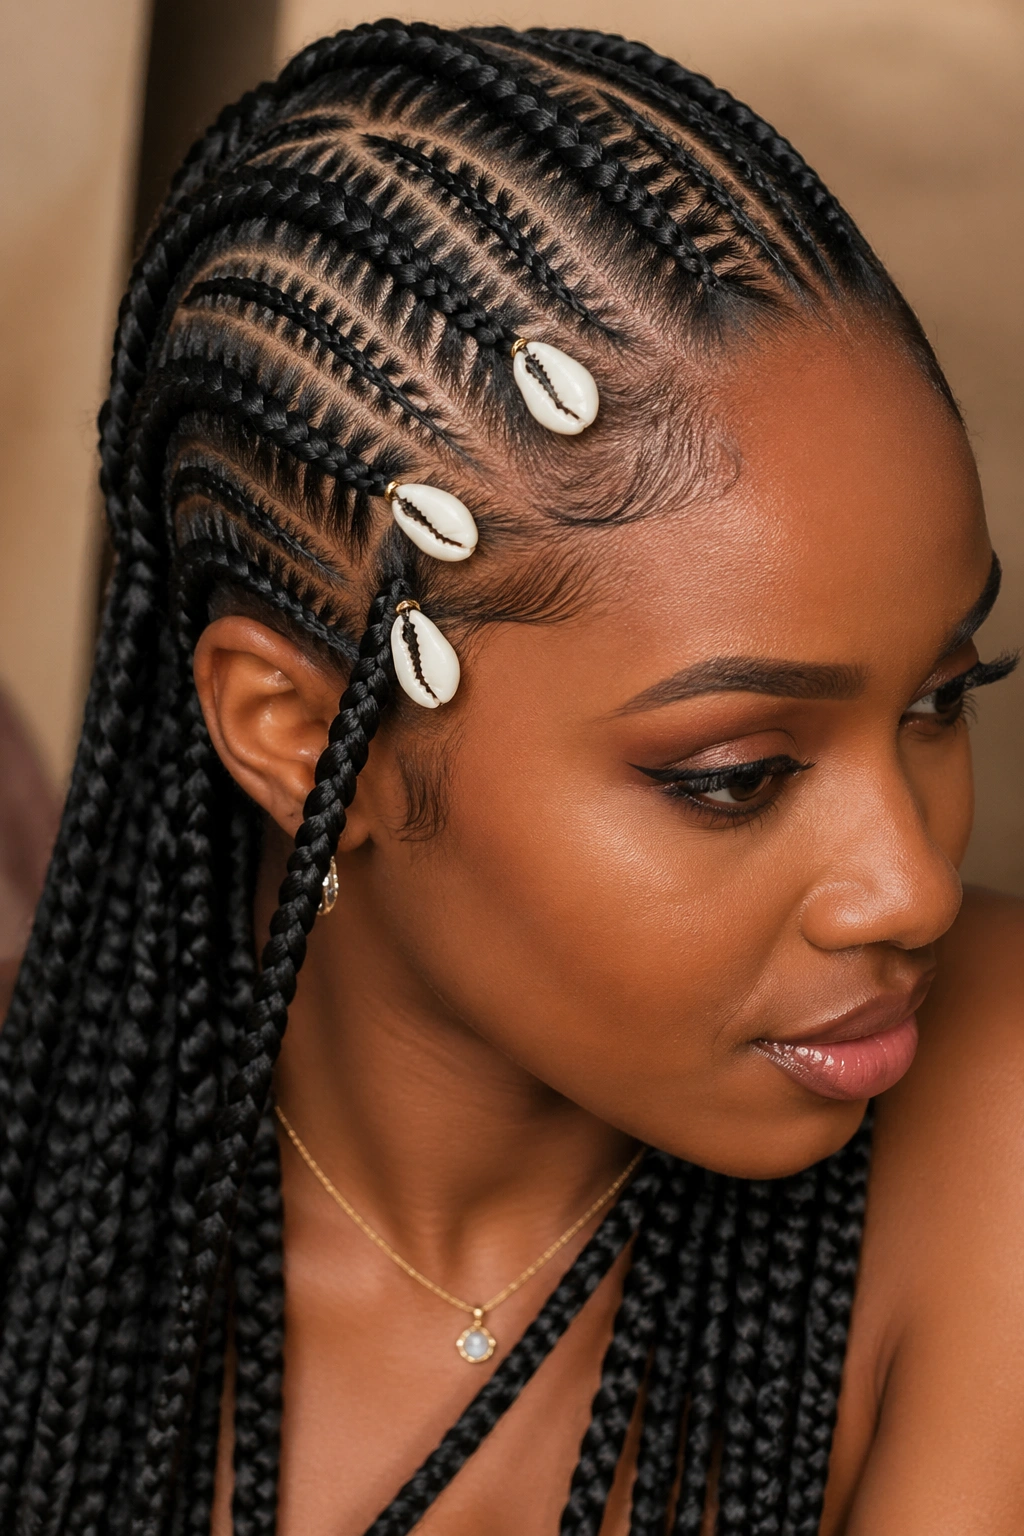
6. Stitch Cornrows With Cowrie Shell Accents
Three to four stitch cornrows framing each temple carry cowrie shells instead of round beads. The rest of the head is regular smooth cornrows.
Cowrie shells are the oldest bead-equivalent in African braiding. They’re flat on one side and rounded on the other, which means they sit differently against the scalp than a symmetrical bead — they naturally face outward. Thread them through the pre-drilled hole with waxed thread or elastic, and finish with a tight knot or a small clear silicone band.
Cowries do chip. Don’t slam car doors on them. Don’t scrub them in the shower. Treat them like the ceremonial objects they technically are.
7. Undulating Stitch Waves With Ombre Beads
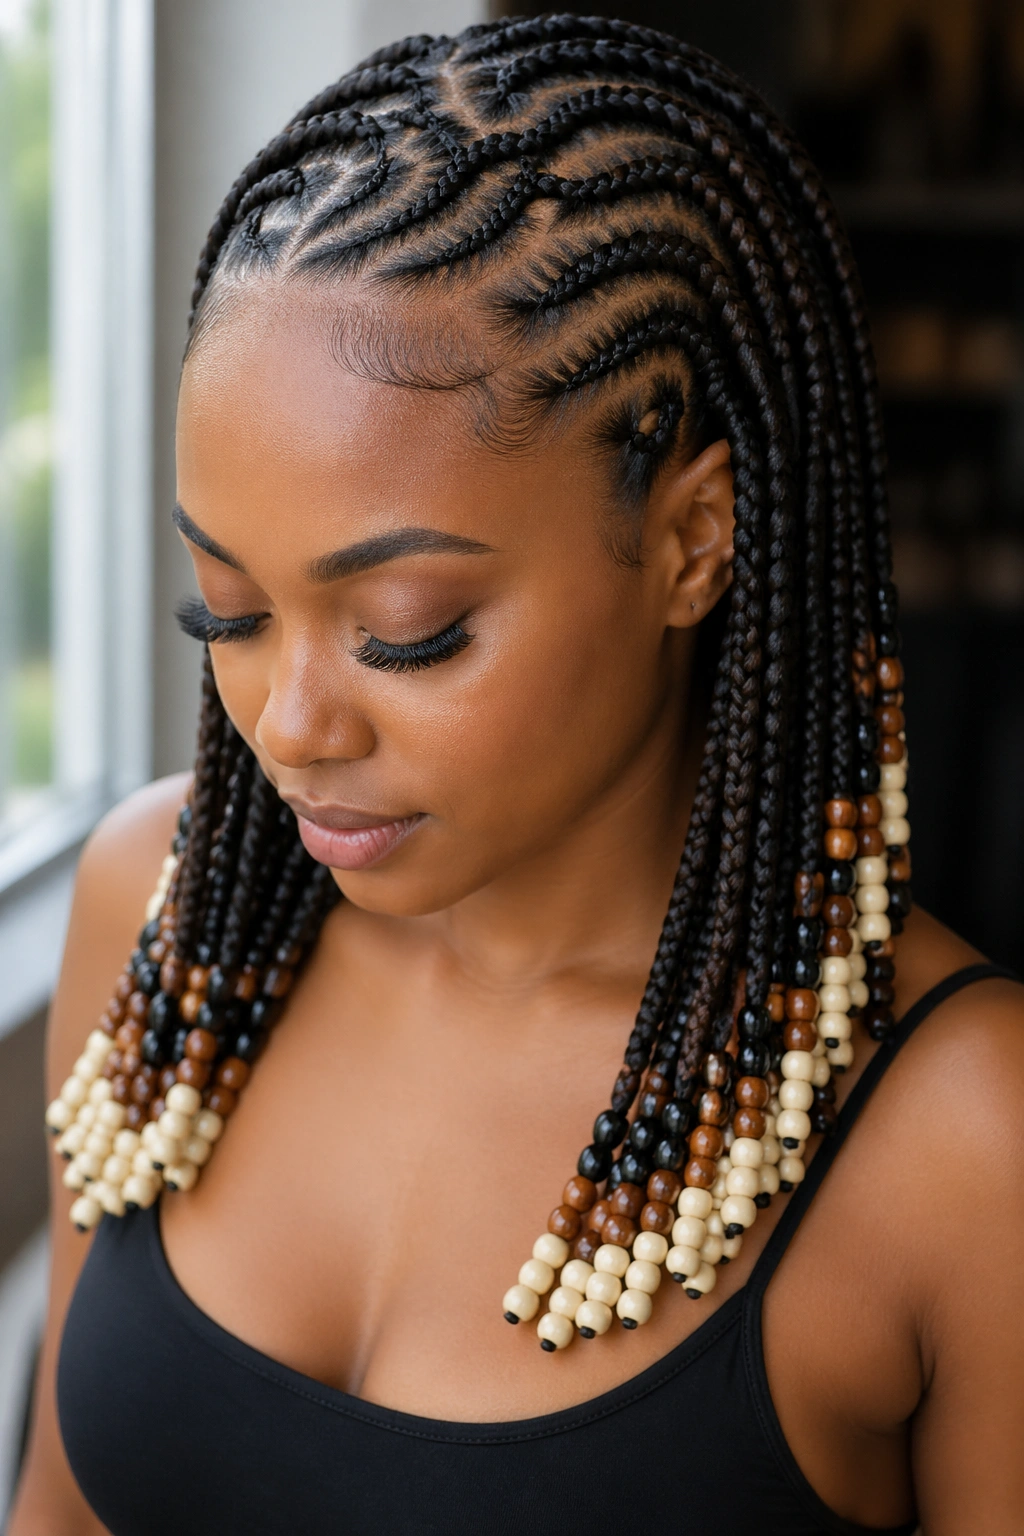
Instead of straight stitch rows, the parts curve in gentle S-shapes from front to back, and the beads transition from dark at the root to light at the tip.
The wavy parting changes the whole read of the style. Straight stitch looks sharp and architectural. Wavy stitch looks softer, more organic, more like flowing water than a ladder. Matching the bead ombre to the wave — dark cherry wood near the crown, sandy natural at the ends — amplifies the movement.
Who This Is For
Anyone who finds straight-back styles too severe but still wants the stitch definition. The waves are flattering on long face shapes because they break up vertical lines. On round faces, keep the waves shallow — deep curves can make the face look wider.
8. Micro-Stitch Braids With Mini Bead Clusters
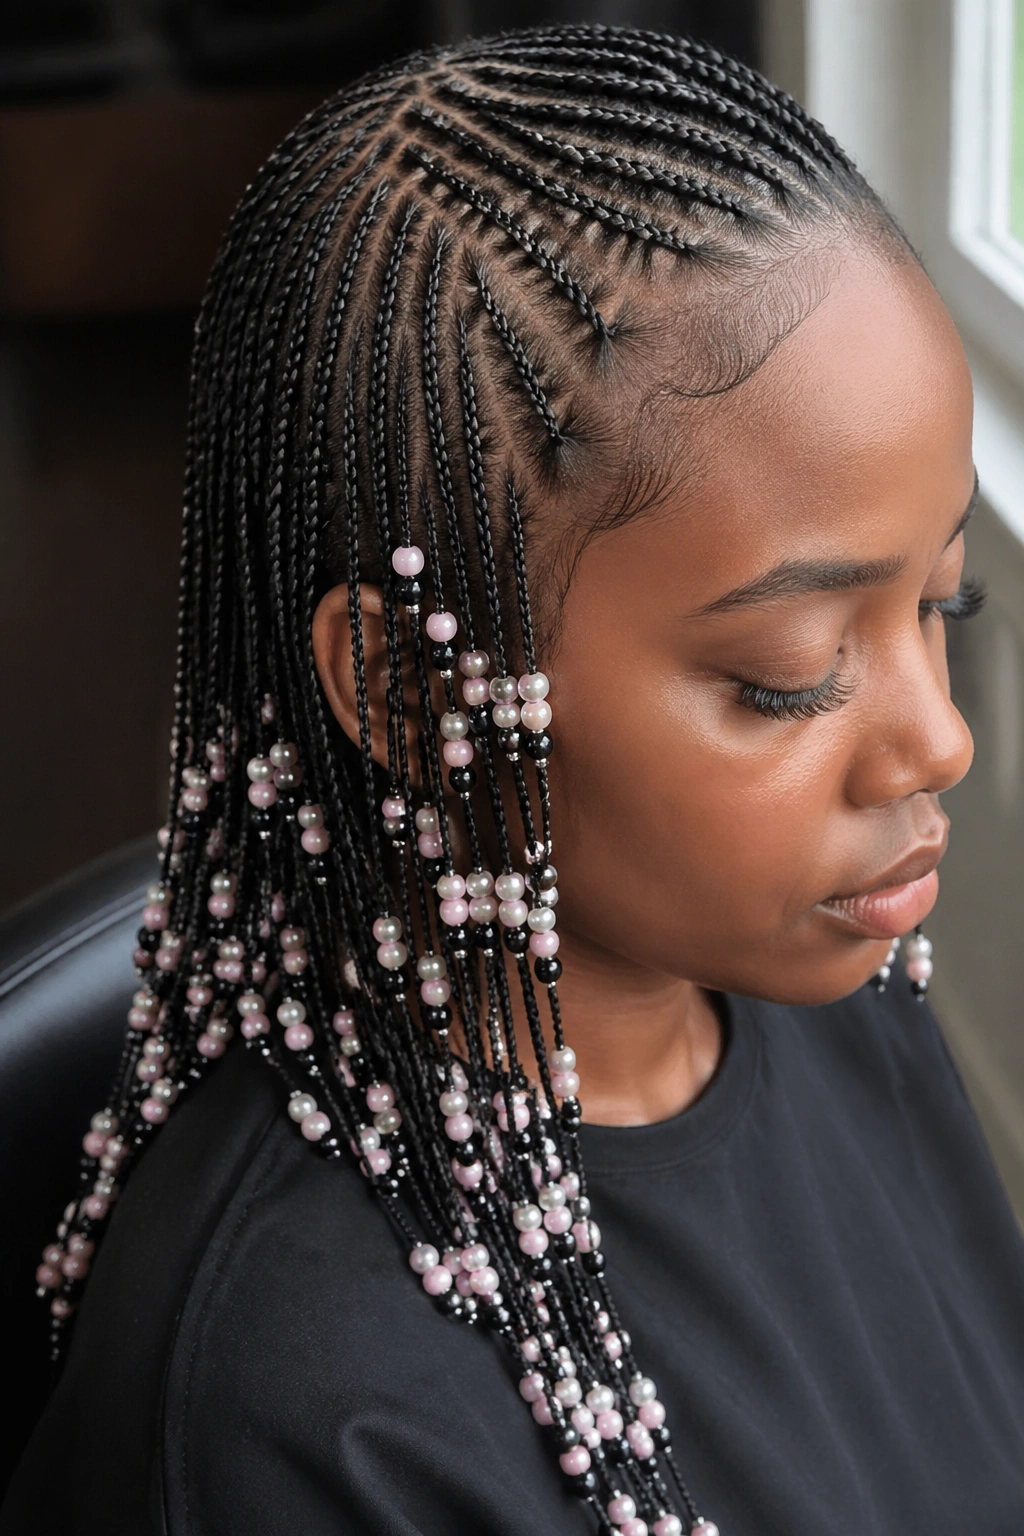
Shrink everything down. Small stitch rungs — maybe 30-40 per braid — on thin cornrows the width of a shoelace, finished with clusters of 4mm beads in tight groups of six or seven.
Micro-stitch takes forever. Five hours of braider time, sometimes six. The payoff is a dense, detailed look that’s closer to jewelry than hairstyle. People will lean in to look at your scalp. That’s a feature, not a bug.
Keep the bead clusters subtle. At this scale, a single large bead would dwarf the braid and look silly. Stick to clusters of small matched beads — pale pink, mother-of-pearl, or tiny black onyx all photograph well.
9. Two-Tone Stitch Pattern With Color-Blocked Beads
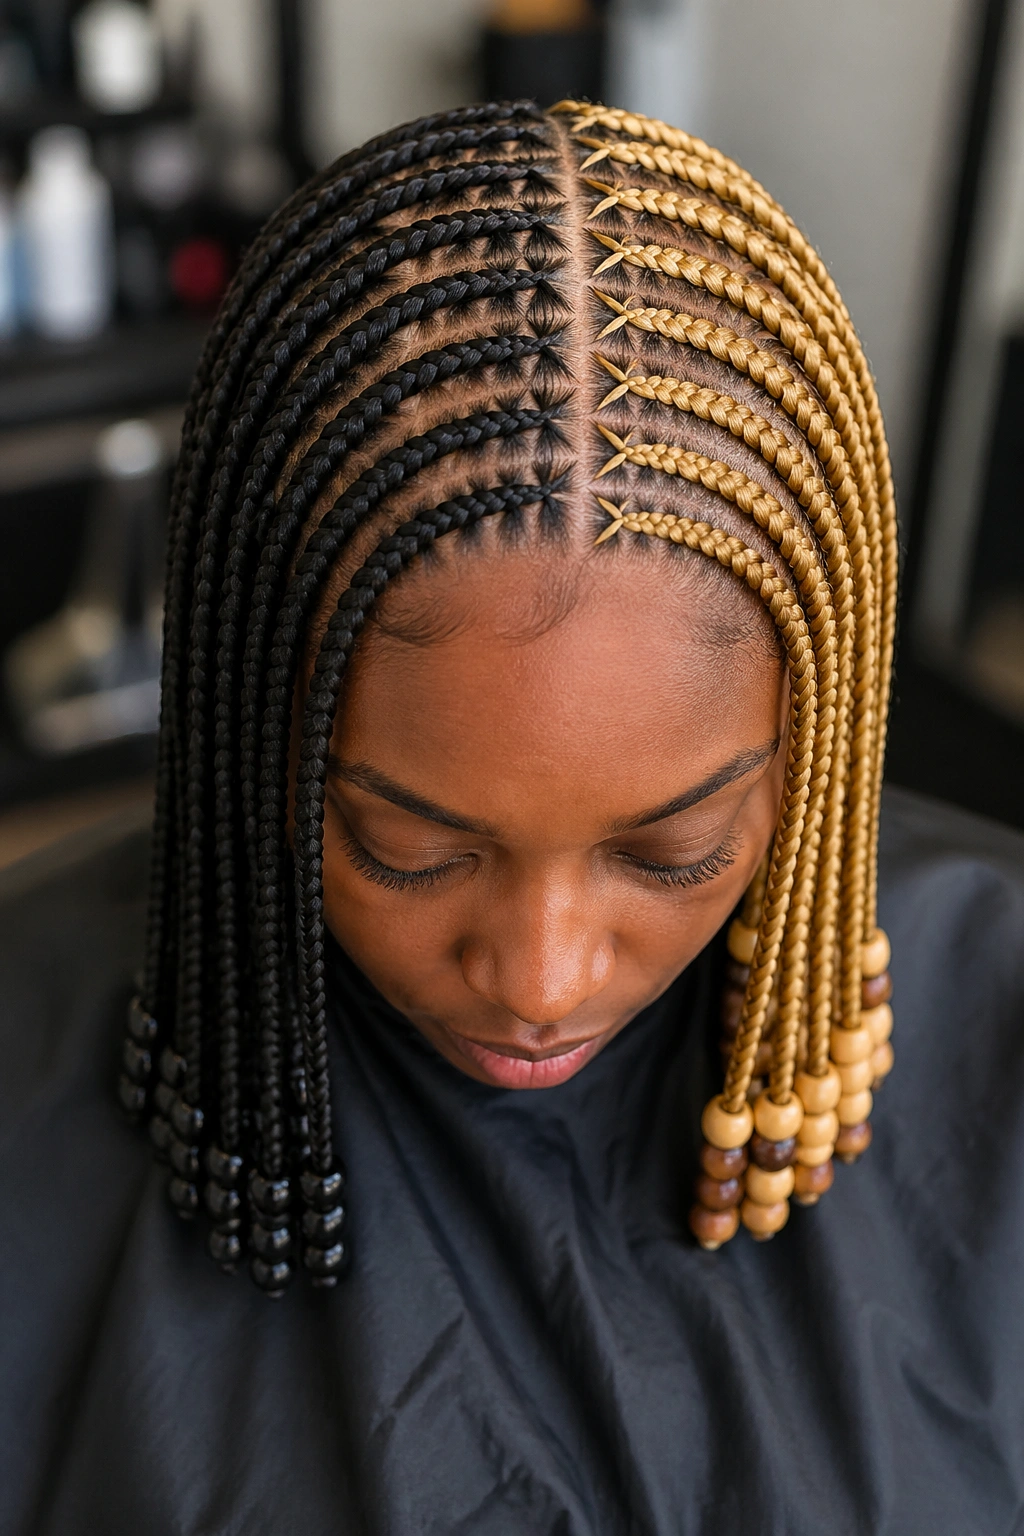
Divide the head into two color zones — say, the left half in natural black, the right half with honey-blonde kanekalon — and match the bead colors to each zone. Dark wood on the left, cream and gold on the right.
This is bold. Not for first-time stitch wearers. The color line down the center has to be clean, which means your braider either has to have done this specific style before or be comfortable working with two packs of kanekalon at the same time without cross-contamination.
One thing people get wrong: the dividing line doesn’t have to be dead center. A line that sits off-center — say, three inches left of center — often looks more intentional than a perfectly bisected head, because asymmetry reads as “styled” rather than “split.”
10. Classic Stitch With Beaded Barrettes at the Crown
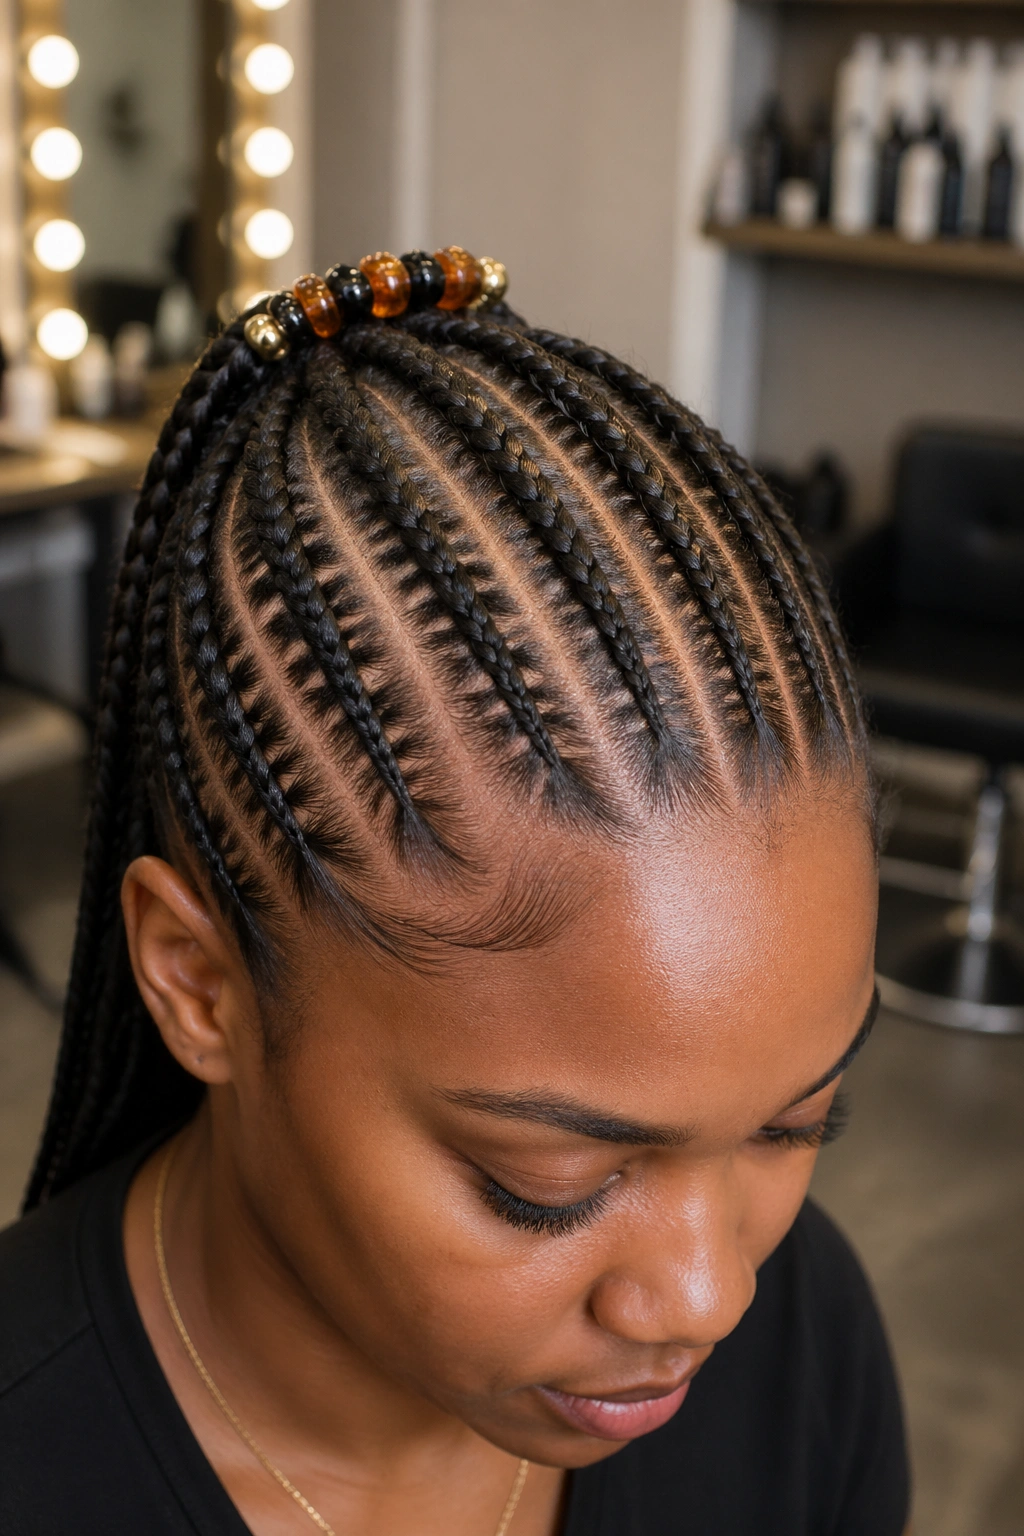
Straight-back stitch cornrows, no fancy parting, but with ornamental beaded barrettes clipped at the crown where the braids begin.
Barrettes have been doing the heavy lifting on braided styles since the ’90s, and they’re due for another long run. Look for snap-closure barrettes with beaded fringe (the kind that dangles) or solid metal barrettes with inset enamel patterns. Clip them after the braids are finished, positioning each one where two or three cornrows converge.
The genius of this version is flexibility. Finish the stitch install first, then swap barrettes depending on outfit. One silver barrette for work. Three rainbow barrettes for a birthday dinner. The braids stay the same — the accessory carries the mood.
11. Long Stitch Cornrows With Bead-Weighted Tails
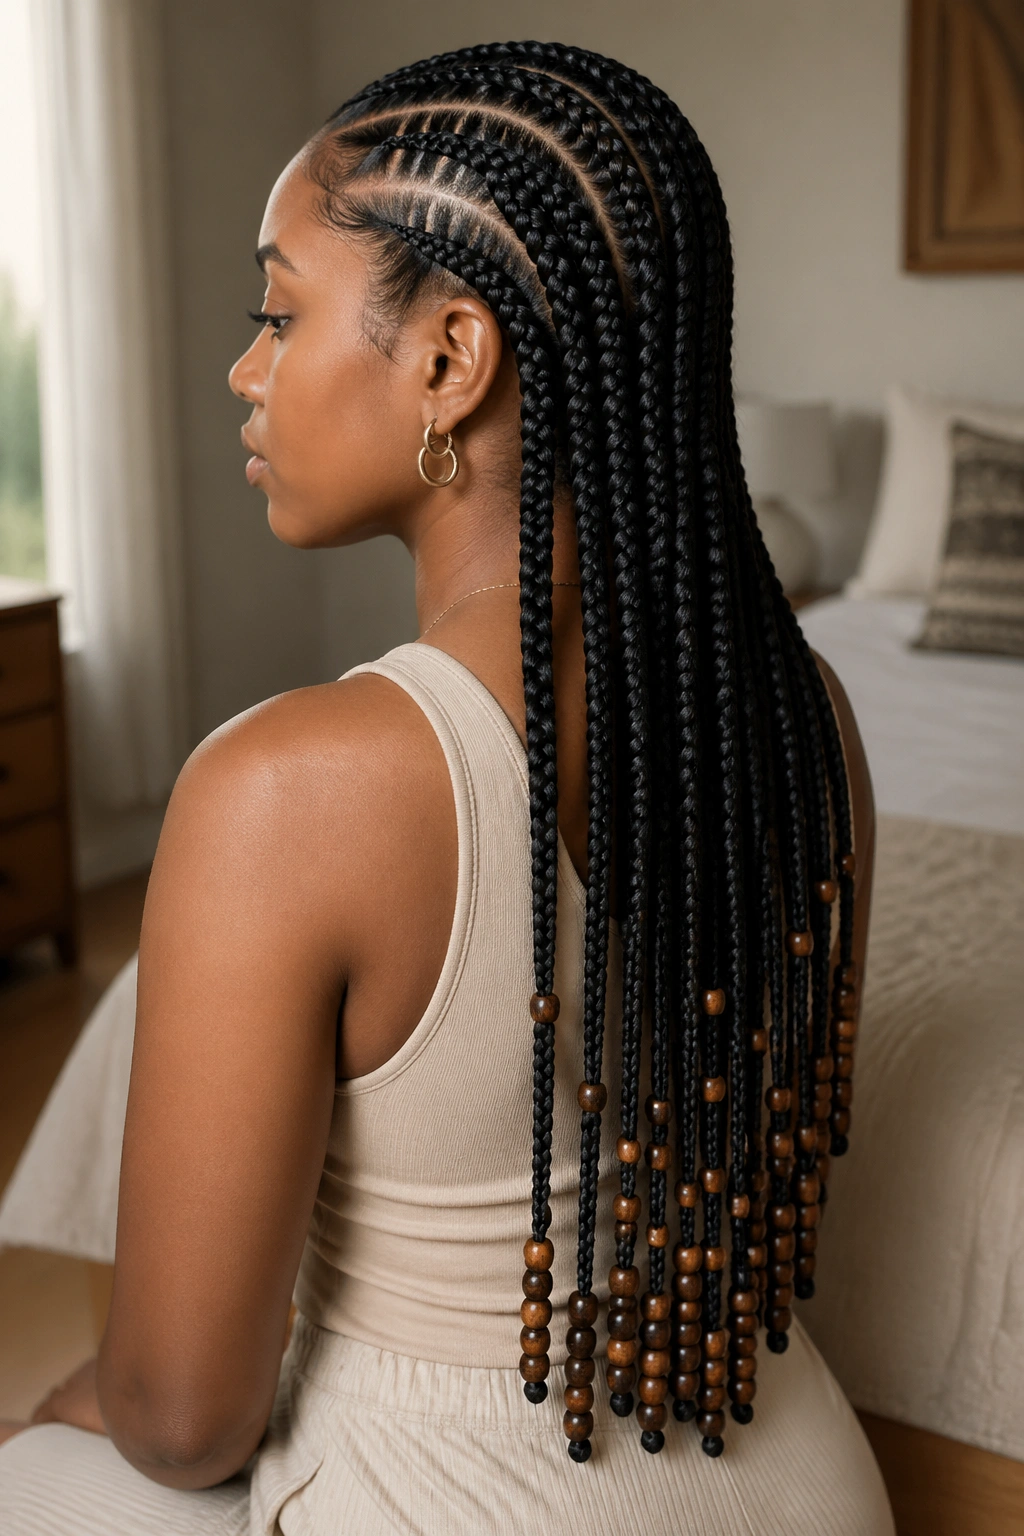
Extensions take the stitch cornrows down to mid-back length, and each tail carries 8-12 medium wood beads spaced evenly along the last 10 inches.
The spaced-bead pattern is different from a cluster. Clusters sit at the tip. Spaced beads run up the length of the braid like pearls on a string, with about an inch and a half between each one. The effect is closer to jewelry than decoration — long, deliberate, almost meditative.
Threading beads at intervals takes patience. You’ll need to lock each bead with a small silicone band so they don’t slide, and the bands have to be tiny or they ruin the line. Keep a magnifier near the mirror if your eyesight isn’t 20/20.
12. Stitch Mohawk With Bead Cascades Down the Sides
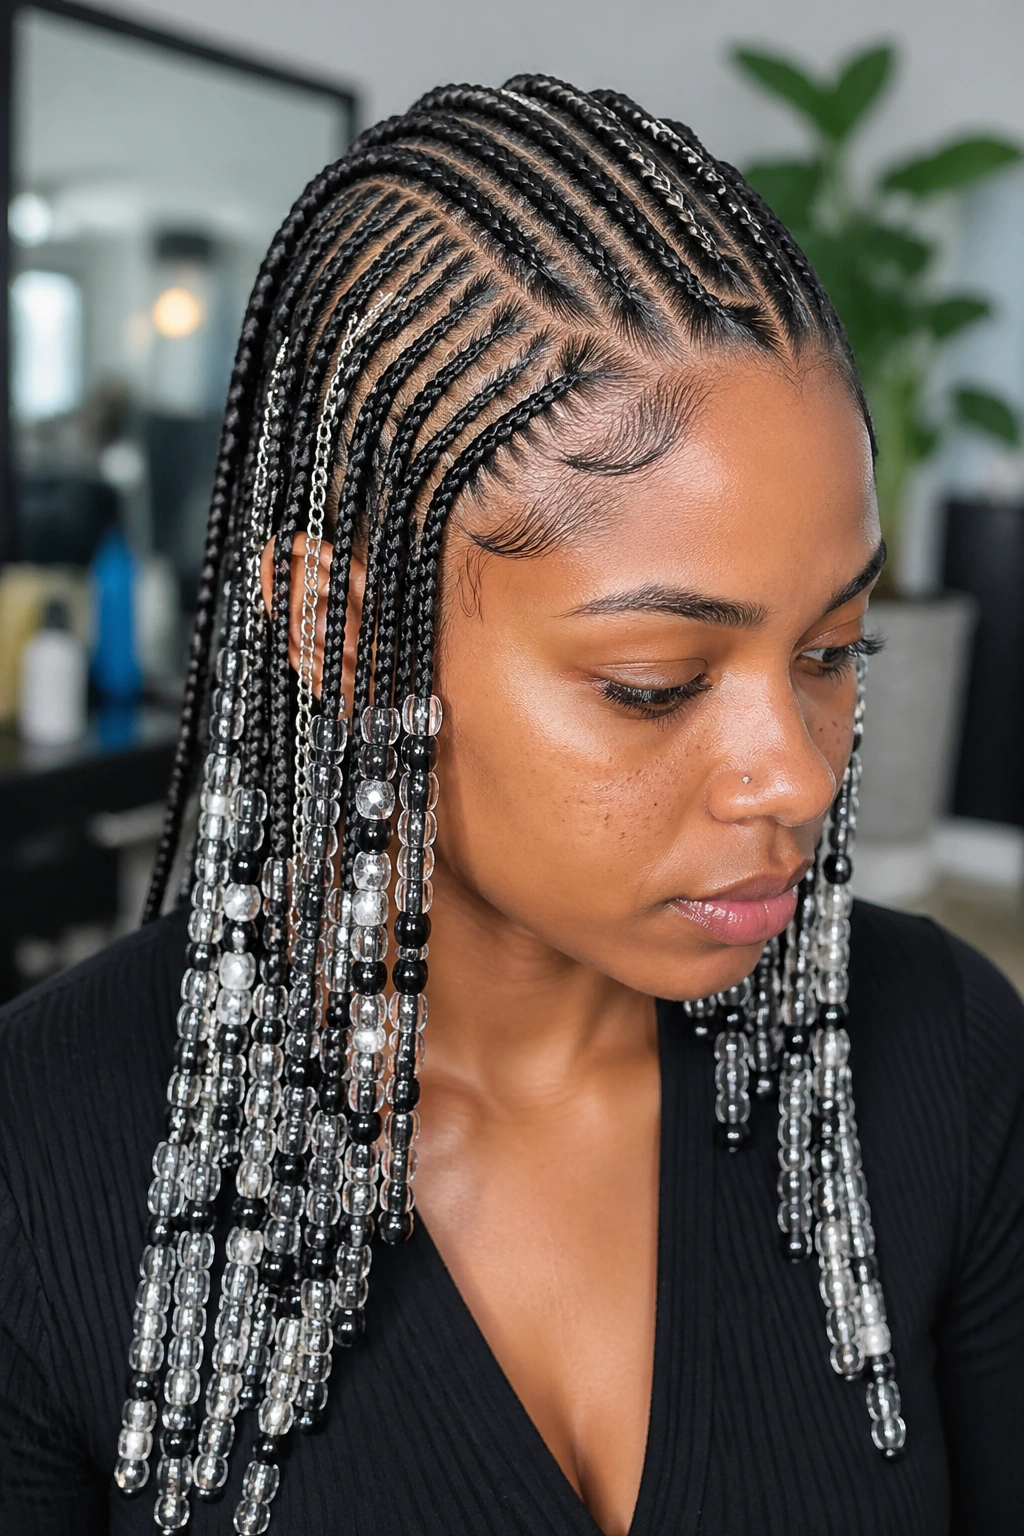
The center section is stitch cornrows running straight back from the hairline to the nape, while the sides are cornrowed flat against the scalp and cascade beads down the temples.
A stitch mohawk only works if you have enough hair at the center to sustain at least five or six stitch rows. Thin hair in the middle and thick hair on the sides creates a mohawk that looks unfinished. If the proportions are wrong, swap — thick center, thin sides.
Styling Tips
- Use cascading beads on the sides, not the top — the top needs to stay flat for the silhouette to read
- Let the side bead cascades fall past the jawline for the best effect
- Keep the top stitch rows free of heavy beads; a small tip bead is plenty
13. Zig-Zag Stitch Parts With Ladder Beads
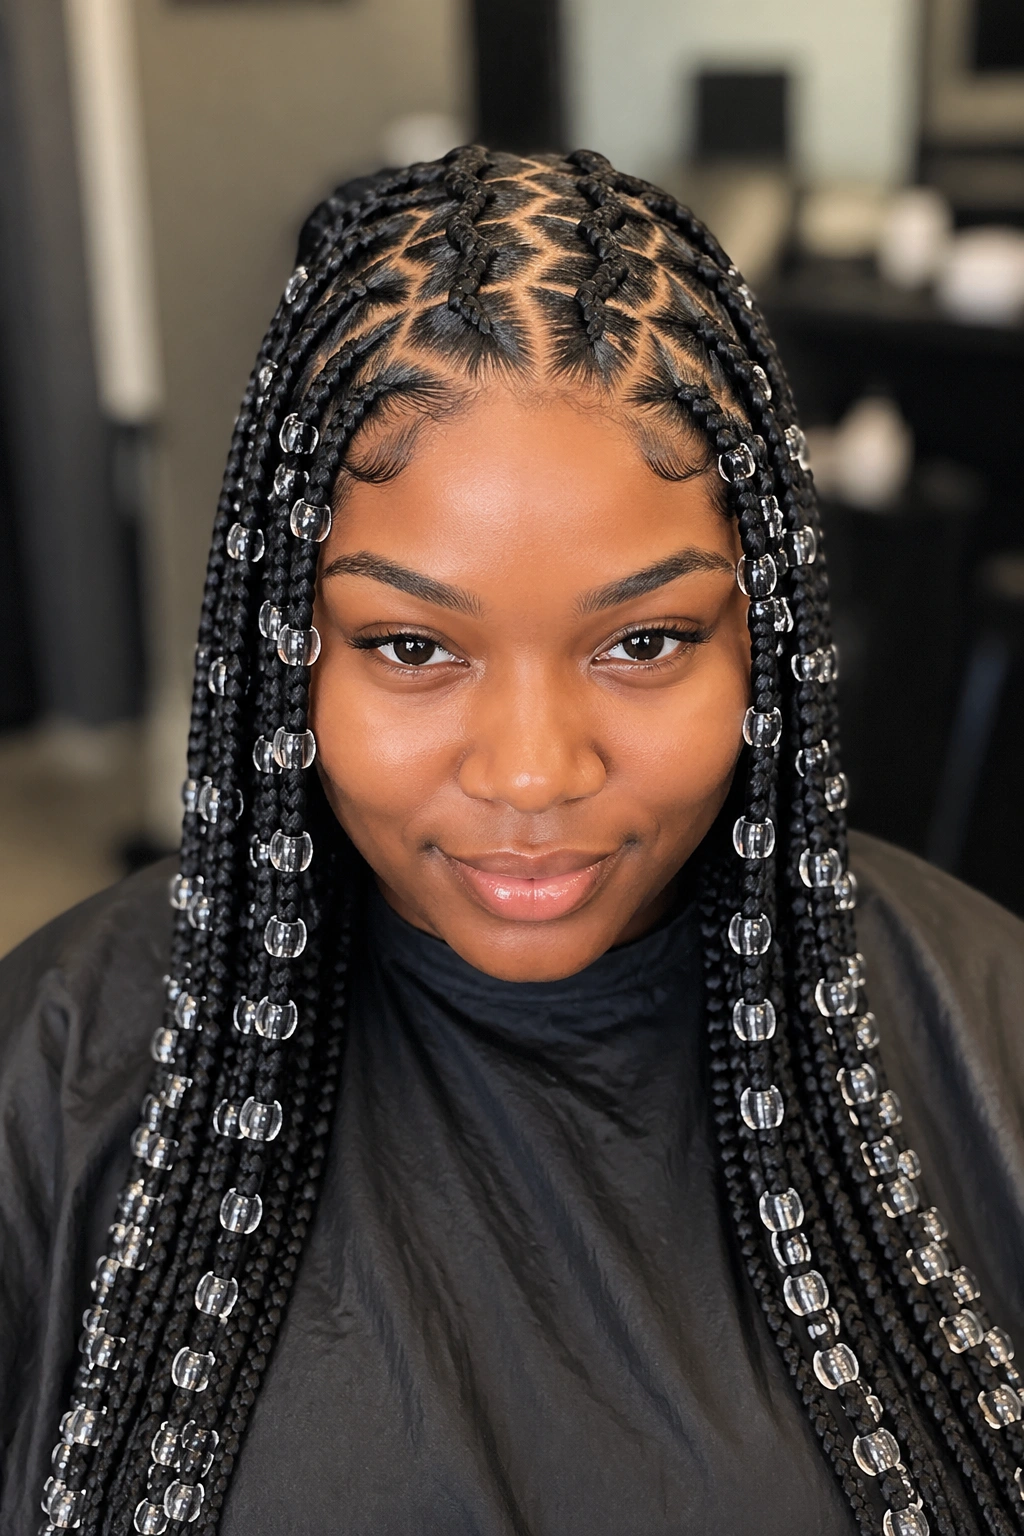
Parting zigs left, then right, then left again, creating a lightning-bolt pattern between stitch rows. Beads thread along each braid in a ladder formation — one bead on each side of each braid at matched intervals.
Zig-zag parts are polarizing. Some people love the movement; others find them busy. The ladder bead treatment calms them down because the beads create horizontal lines that counterbalance the zig-zag vertical chaos.
The key to zig-zag parts that don’t look accidental is symmetry. If the left side zigs at three points, the right side should zig at three points at the same relative positions. A three-point zig on one side and a five-point zig on the other looks like a mistake.
14. Stitch Cornrows With Metal Ring Accents
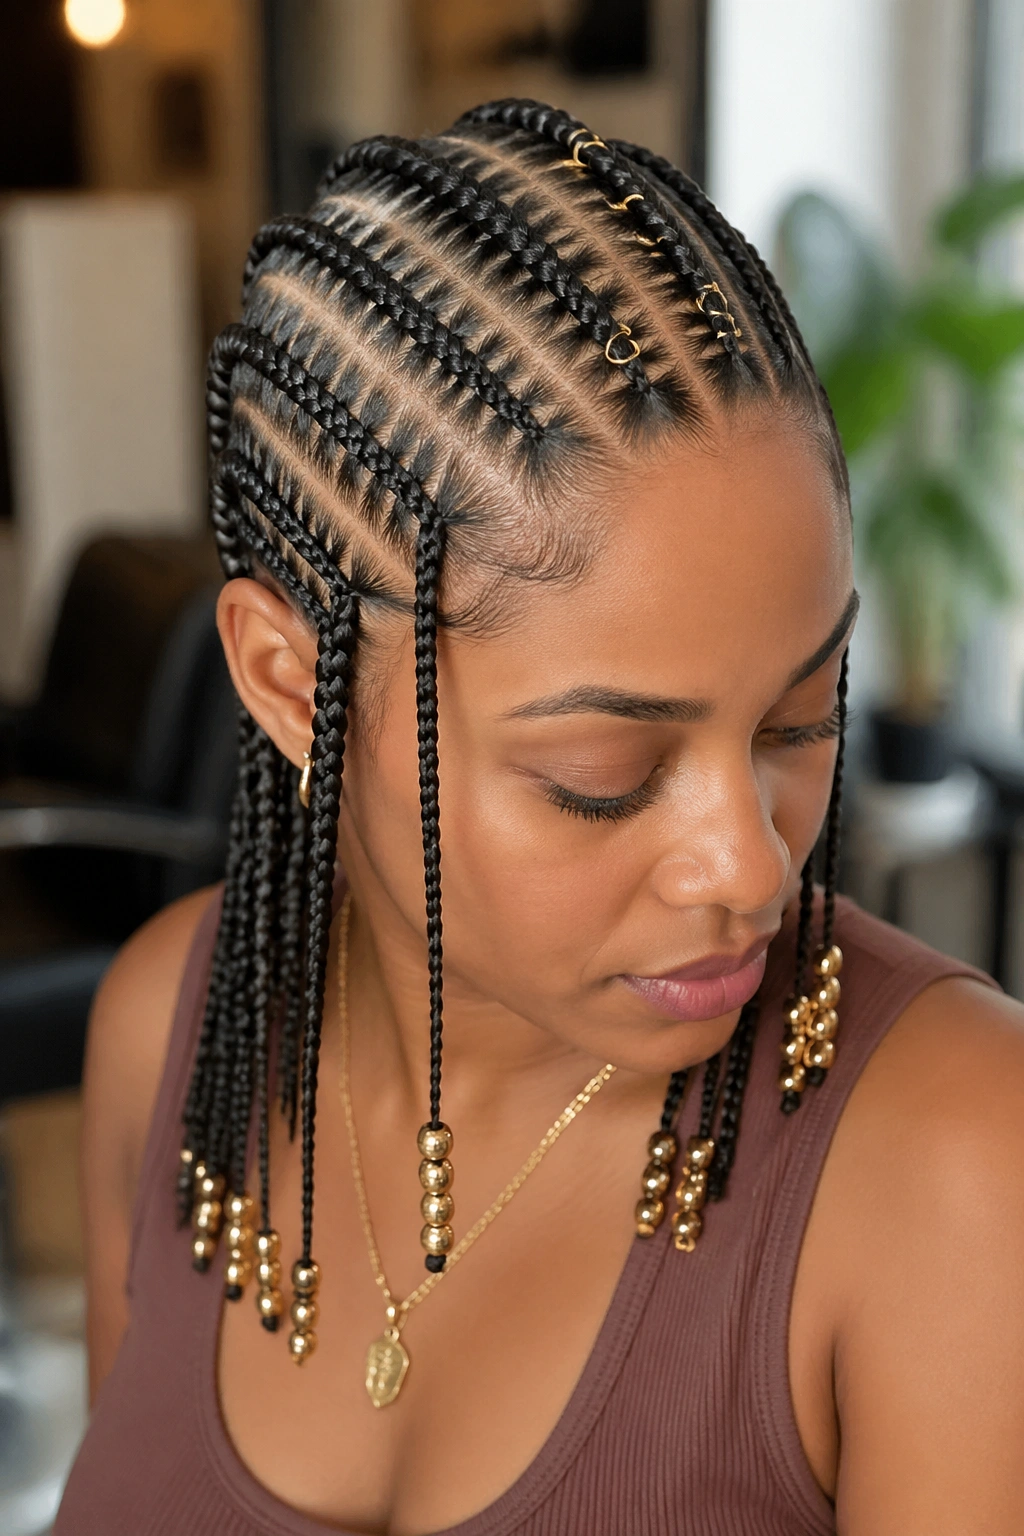
Instead of beads, slip thin metal rings (the kind sold for braid jewelry in gold, silver, or copper) onto the braid at intervals, then add a few matching beads at the tips.
Metal rings sit differently than beads. They have less weight, they lie flat, and they catch light at edges rather than all over. A line of six gold rings spaced down a single braid looks deliberate and modern in a way that’s hard to describe until you see it in person.
You can squeeze rings on after the braid is finished — most come slightly open and clamp shut with a gentle pinch. Use a pair of flat-nose jewelry pliers to close them fully. Fingernails alone leave gaps that catch on scarves.
15. Curved Stitch Frame Around a Face-Framing Bang
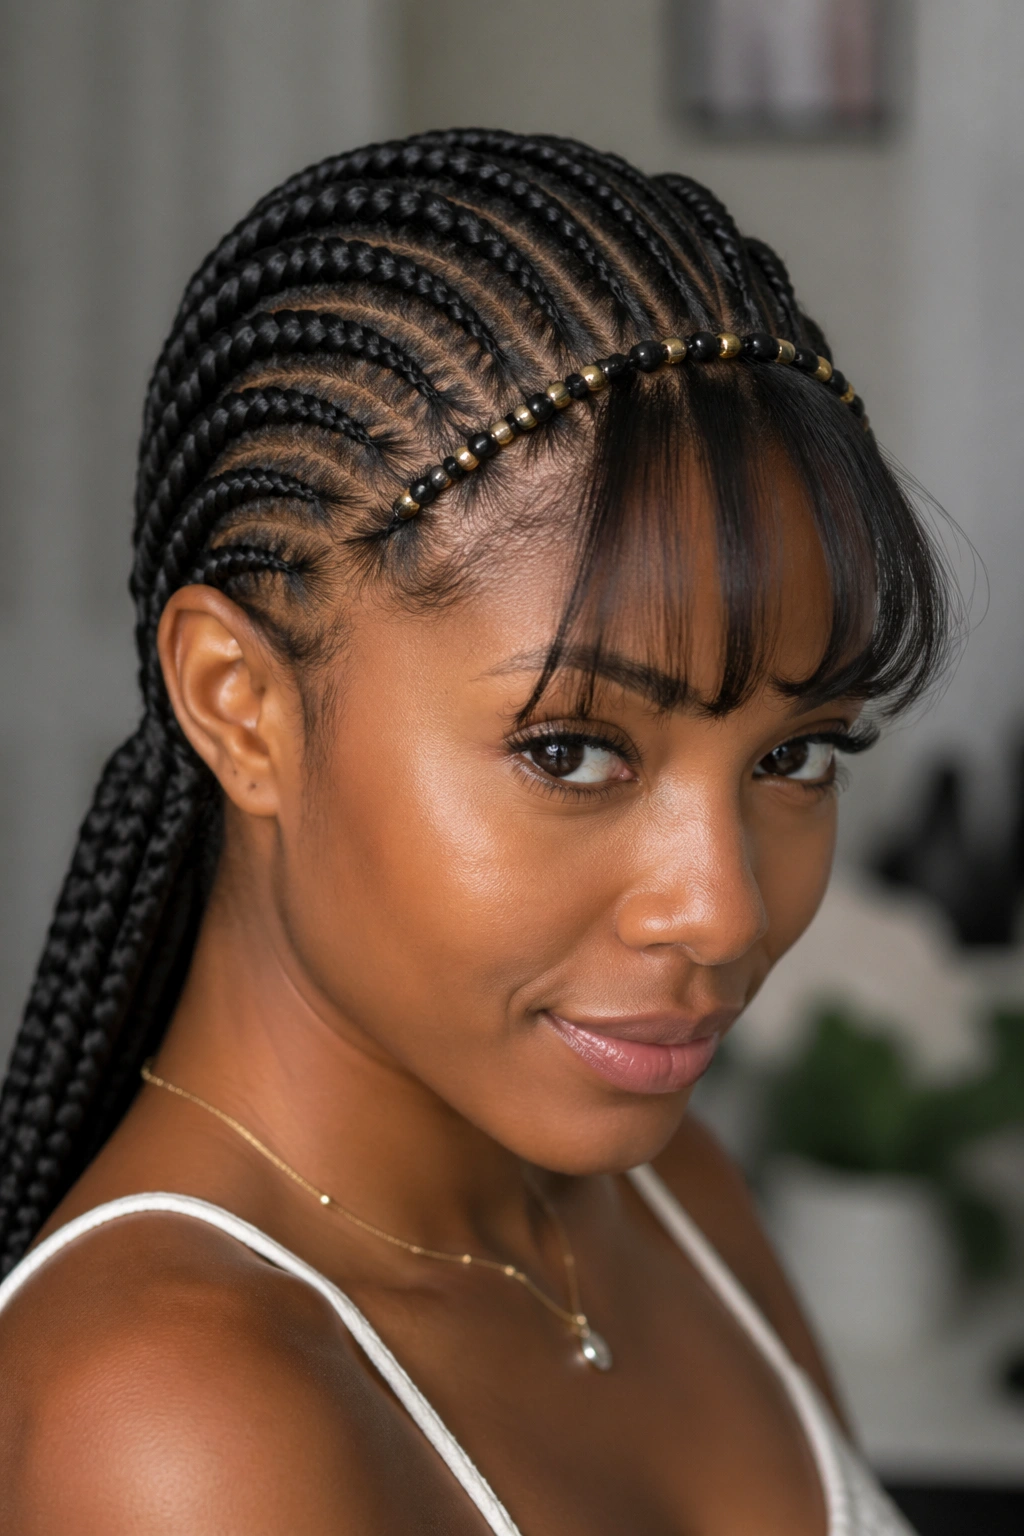
Stitch rows curve gently from the crown outward, framing the face with braids that arc like a proscenium. A small section at the front is left loose or freshly trimmed as a bang, with tiny beads in the first row behind the bang.
The face-framing arc flatters oval and heart-shaped faces. On square faces, the curve visually softens jawline angles. This is one of the few stitch variations that works well with loose hair in the mix.
Keep the bang trim sharp. A long, scraggly bang next to precise stitch cornrows looks unfinished. If you’re not committing to a bang cut, skip this version and go with pulled-back styles instead.
16. Stitch Cornrows With Side-Swept Ponytail of Beads
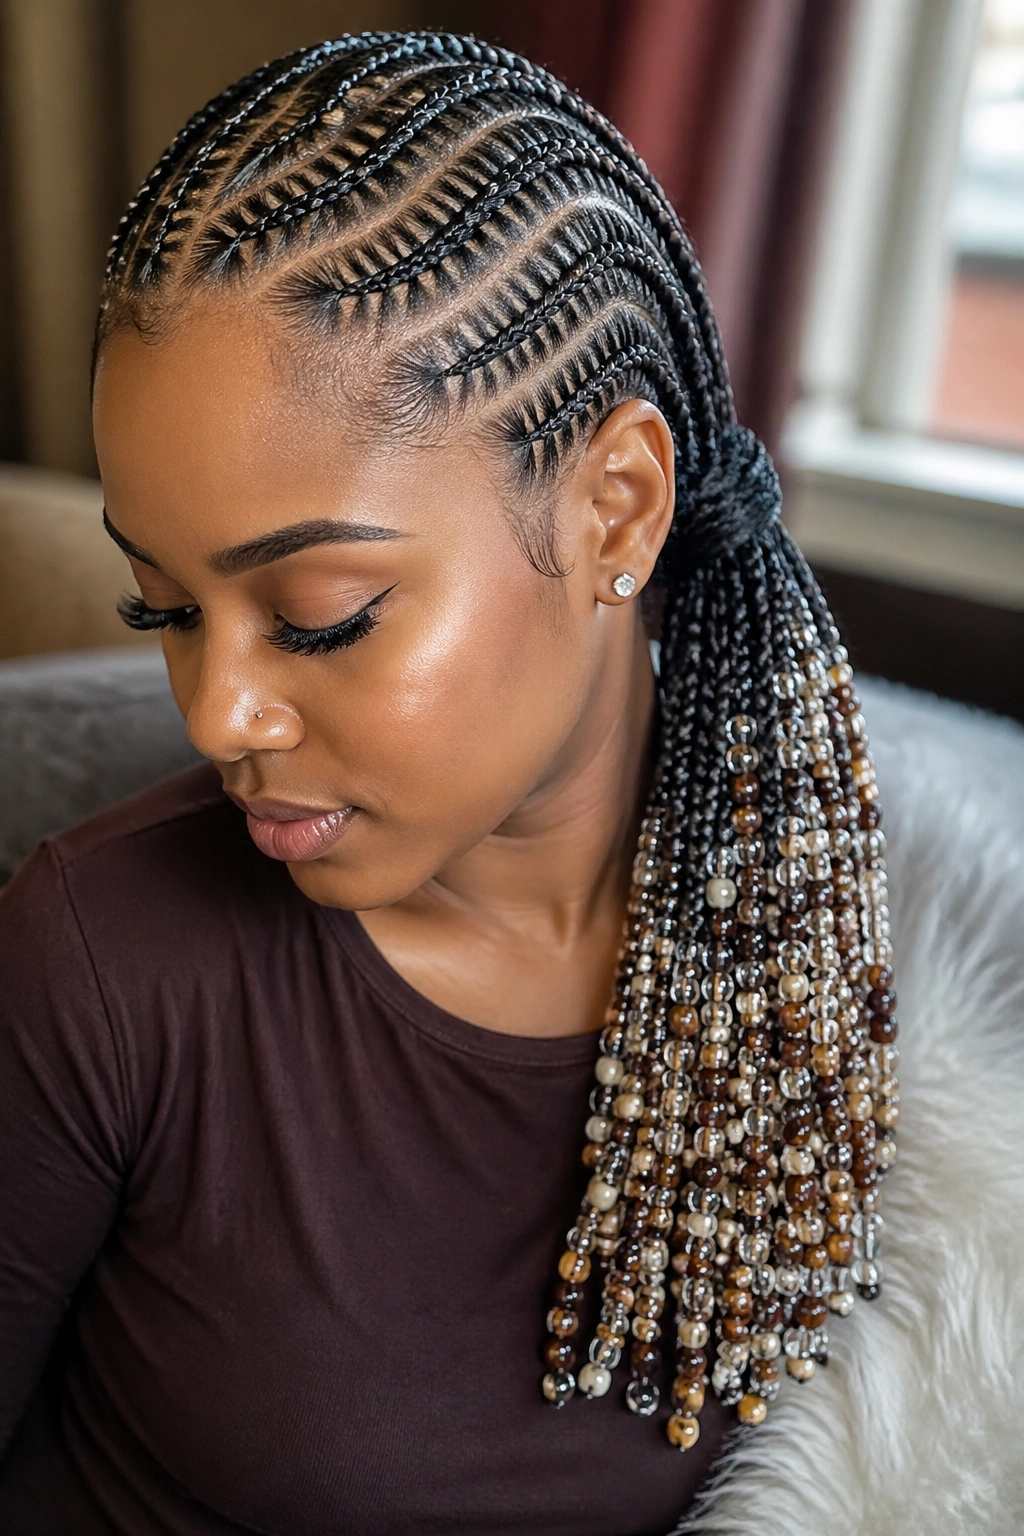
All braids pull to one side, gathered into a low side ponytail, and the ponytail itself is loaded with beads — dozens of small ones running down the length.
A side ponytail of beaded cornrows is heavier than people expect. If you’ve already got 25 cornrows, and you drop 30 beads into the side pony, the weight drags toward one shoulder and the braids start to lift from the opposite side of the scalp within a few days.
Fix: use a second elastic mid-pony to anchor the beads away from the gathering point, distributing the weight. Or reduce bead count — 12-15 beads gathered in a single cluster weighs less than 30 spread along the length, and sometimes looks more intentional.
17. Alternating Thick-and-Thin Stitch Rows With Contrasting Beads
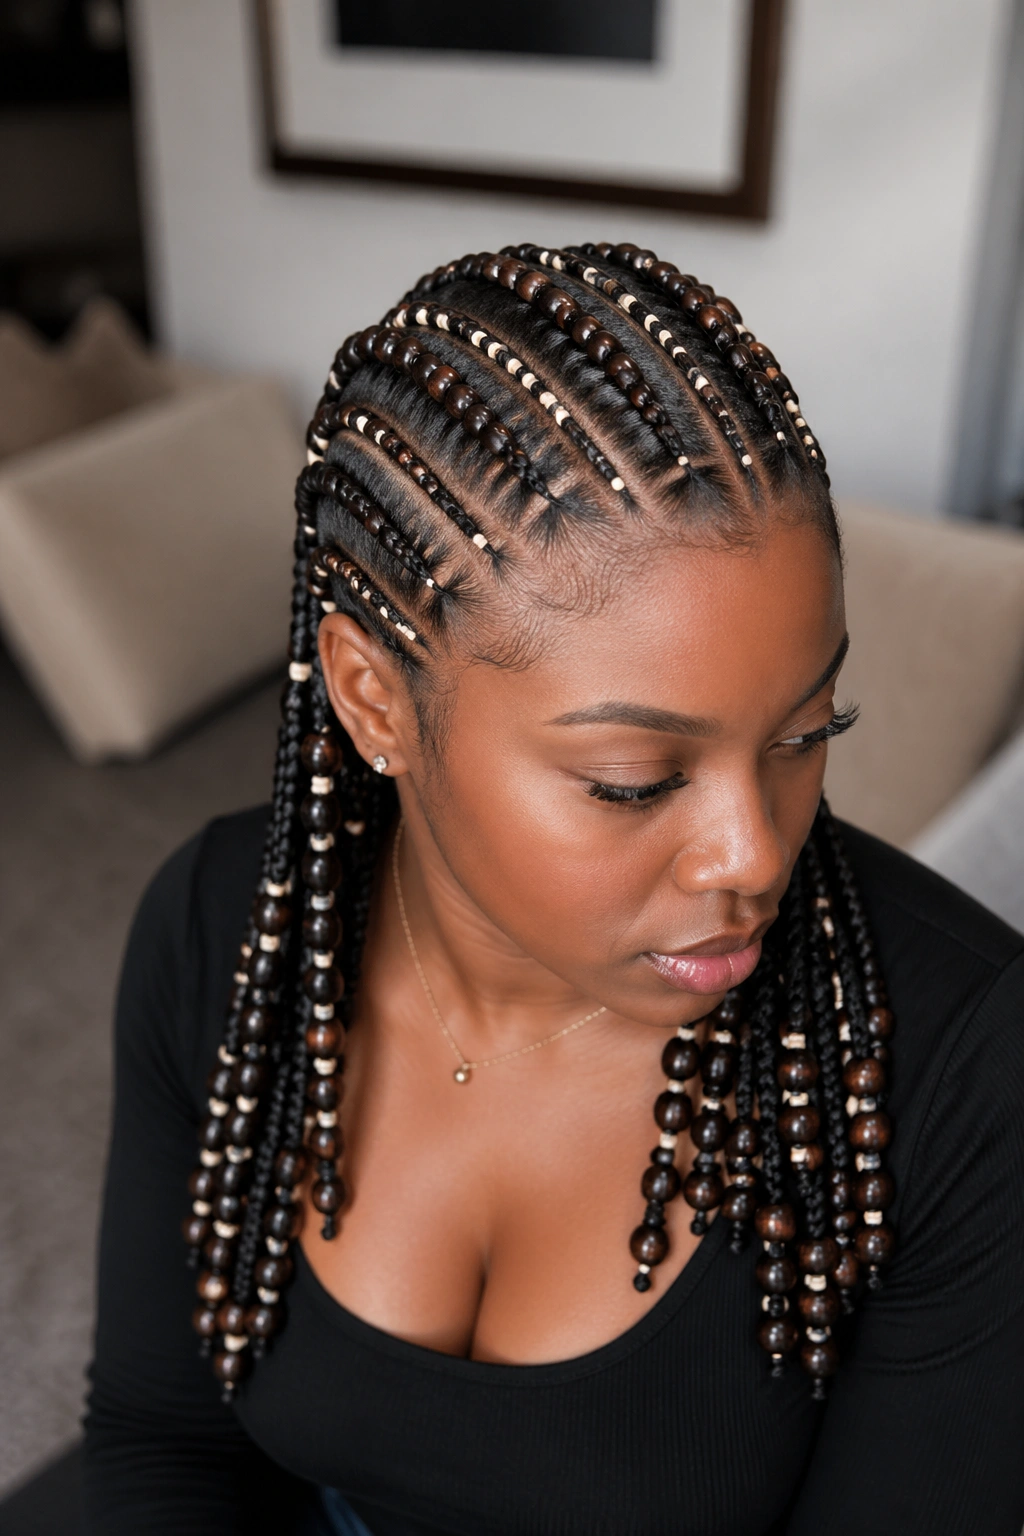
Every other row is a feed-in thick cornrow, and the rows between are natural-hair thin cornrows. Thick rows carry large beads, thin rows carry tiny beads.
This variation plays with scale in a way straight stitch styles can’t. The eye reads the alternating thicknesses as deliberate texture rather than inconsistent braiding. Matching the bead sizes to the braid widths completes the visual logic — big braids carry big beads, small braids carry small beads.
Pro tip: Don’t install the feed-in and natural rows in alternating order from start to finish. Install all feed-ins first, then come back for the natural rows. Switching constantly between thick and thin braiding wears out your hands (or your braider’s).
18. Stitch Cornrows With a Beaded Headband Accent
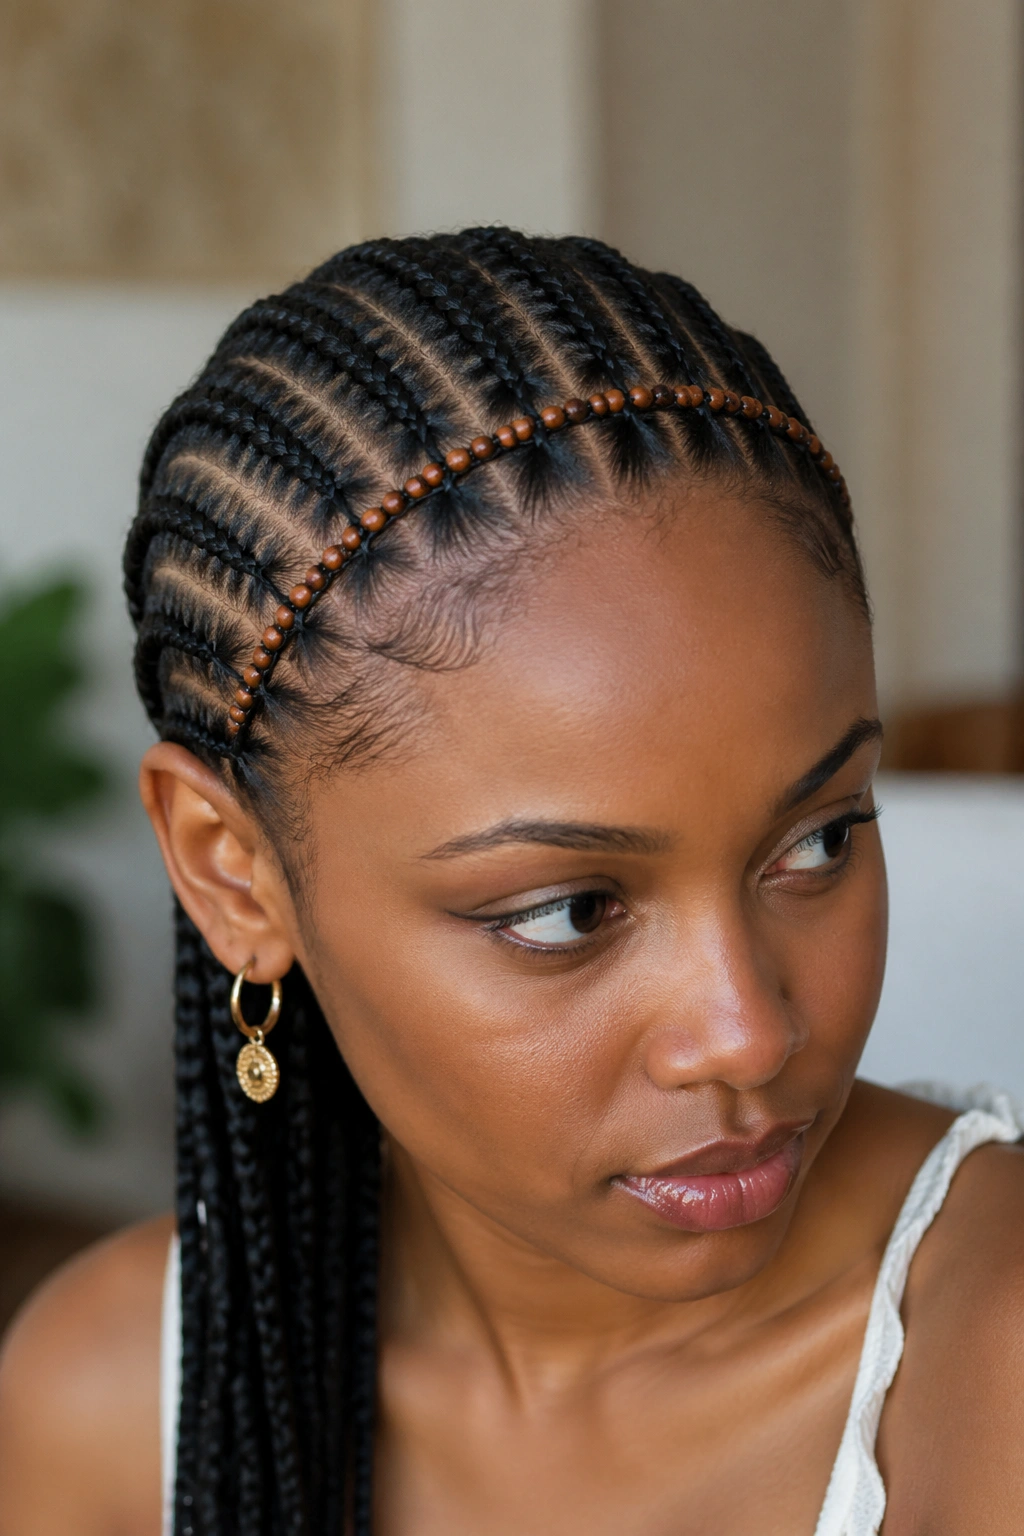
A thin band of small beads sits at the crown, woven into the front row of stitches where they meet the forehead, mimicking a jeweled headband without actual hardware.
The woven-in beaded headband is subtle and dressy at once. It reads as polished for work, and it’s the kind of detail that earns compliments from people who don’t know they’re reacting to bead placement specifically.
Use small, matched beads in a single color. Rose gold, copper, or pearl all photograph well. Avoid strongly contrasting colors — the band should enhance the hairline, not compete with your face.
19. Freeform Stitch With Scattered Bead Placement
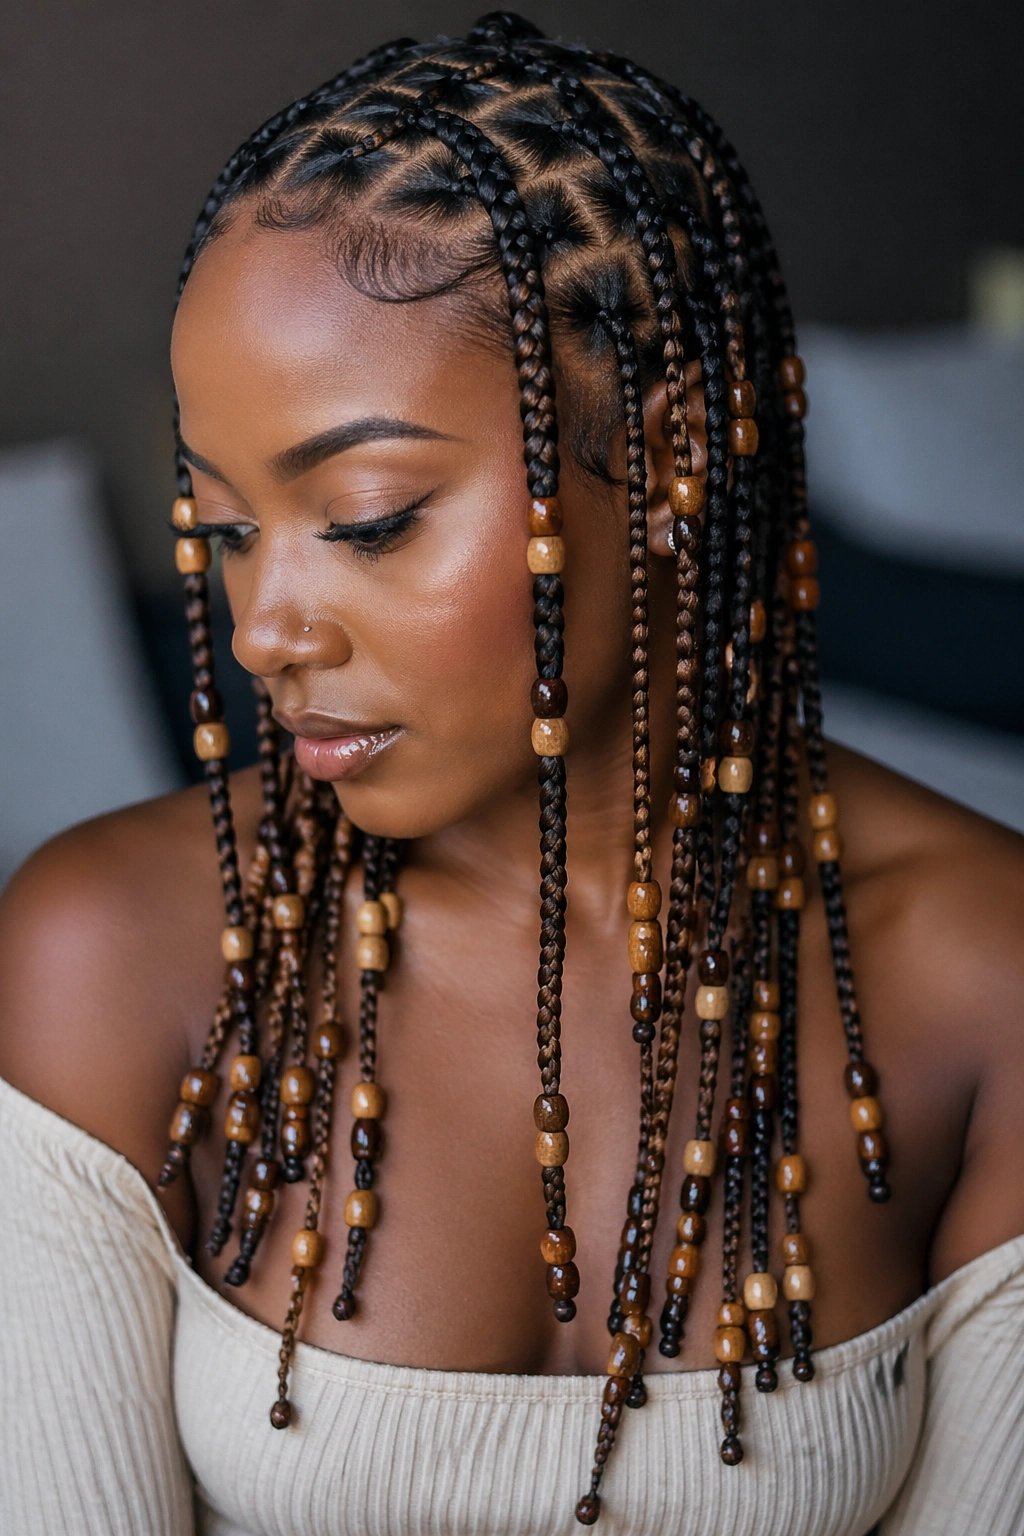
Instead of all beads at the tips or at matched intervals, beads are scattered up and down each braid at random positions, and different braids carry different quantities.
Scattered beadwork is the hardest to pull off because it can tip into looking accidental if the scatter isn’t considered. The trick: scatter within a rule. Every braid gets between 3 and 6 beads. Every bead sits at a quarter-inch, half-inch, or one-inch interval from the previous one — no arbitrary gaps. The result looks organic but intentional.
What to Watch For
- Don’t let two braids right next to each other have identical bead counts — stagger them
- Mix bead sizes within each braid, but stick to the same color family
- Lock each bead with a clear silicone band; an invisible anchor is better than no anchor
20. Stitch Cornrows With Bead-Wrapped Segments
Every 2-3 inches along each braid, a section of about an inch is wrapped with a strand of beads — not threaded through, but wound around the braid and secured at each end.
Bead-wrapping is a different technique than threading. It requires a long strand of small beads strung on waxed thread, which you wrap around the braid snake-like and tie off. It takes practice to get the tension right; too tight and the braid kinks, too loose and the beads shift.
Because it’s a technique rather than a single bead placement, bead-wrapping reads as more elaborate than simple threaded beads. Wear it to events where you actually want people to ask about the hair.
21. Stitch Cornrows With Pull-Through Bead Tassels
At the very tips of the braids, a “tassel” of 6-10 beads hangs off by a short thread loop — like a charm dangling off a bracelet rather than beads threaded onto the braid itself.
Bead tassels are easier to swap than threaded beads. You can buy pre-made tassels from bead supply stores and attach them to finished cornrows with a small jewelry jump ring and a dab of clear nail polish on the knot. Done in ten minutes for the entire head.
Tassel variety matters here. Use 4-5 different tassel designs across the head rather than identical ones on every braid. The differences register subconsciously as craftsmanship.
22. Stitch Cornrows With Gemstone Beads at Strategic Points
Most of the beads are natural wood or simple acrylic, but every fifth or sixth braid carries a single gemstone bead — turquoise, carnelian, amethyst, or tiger’s eye — at the tip.
The gemstone placement rule: only a few, only at points that catch light on your face. If every braid gets a gemstone, they lose their impact and the whole head starts looking like a craft project. Restraint is the difference between “elegant” and “overdone.”
Pick the gemstone to match your skin’s undertone. Warm-toned skin looks best with carnelian, amber, and tiger’s eye. Cool-toned skin looks best with amethyst, lapis, and moonstone. Neutral skin can wear anything, but turquoise is the universally flattering option.
23. Stitch Cornrows With Beaded Pony Tubes Mid-Braid
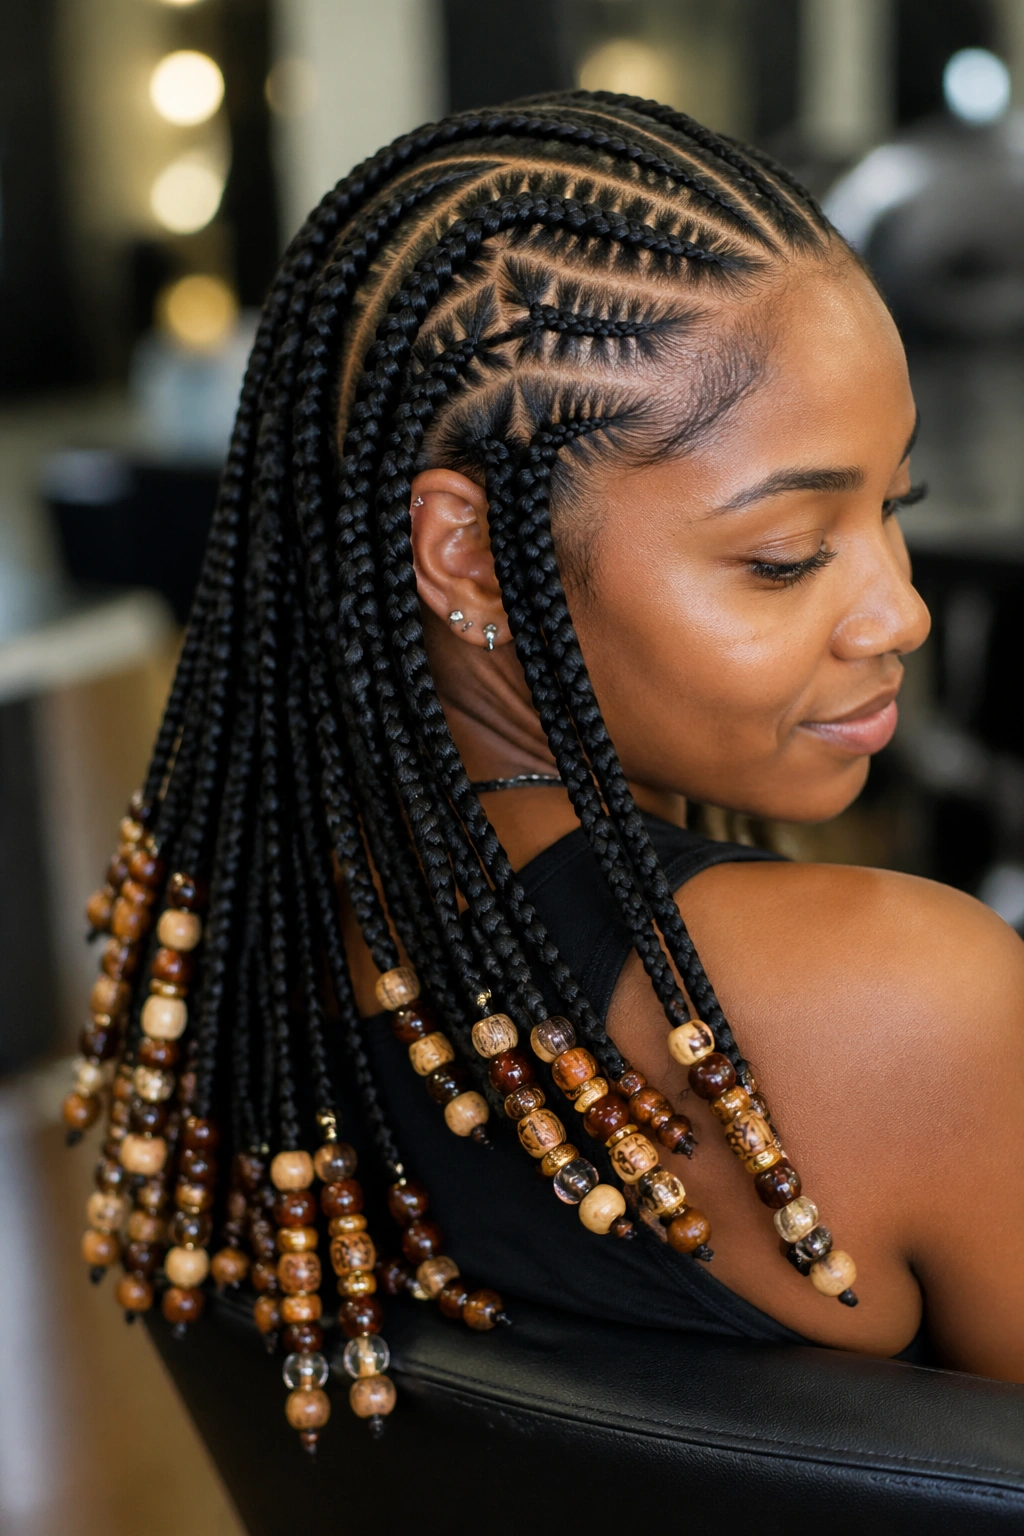
Pony tubes — the hollow plastic tubes sold for bead installation — slide over sections of the braid and are decorated with small beads glued or wrapped around their exterior. Mid-braid, not at the tip.
The tube adds length and visual weight to the braid without adding real weight. It’s a lightweight way to create bead-heavy styles without stressing the scalp. Pony tubes come in clear, gold, silver, and metallic finishes, and specialty shops sell pre-decorated versions.
One caveat: pony tubes can cut tiny nicks into the braid fiber over time if they shift against the hair. Check the inside edge of each tube for roughness before sliding it on. A quick pass with a nail file on the inner rim prevents wear.
24. Stitch Cornrows With Beaded Spirals Down the Back
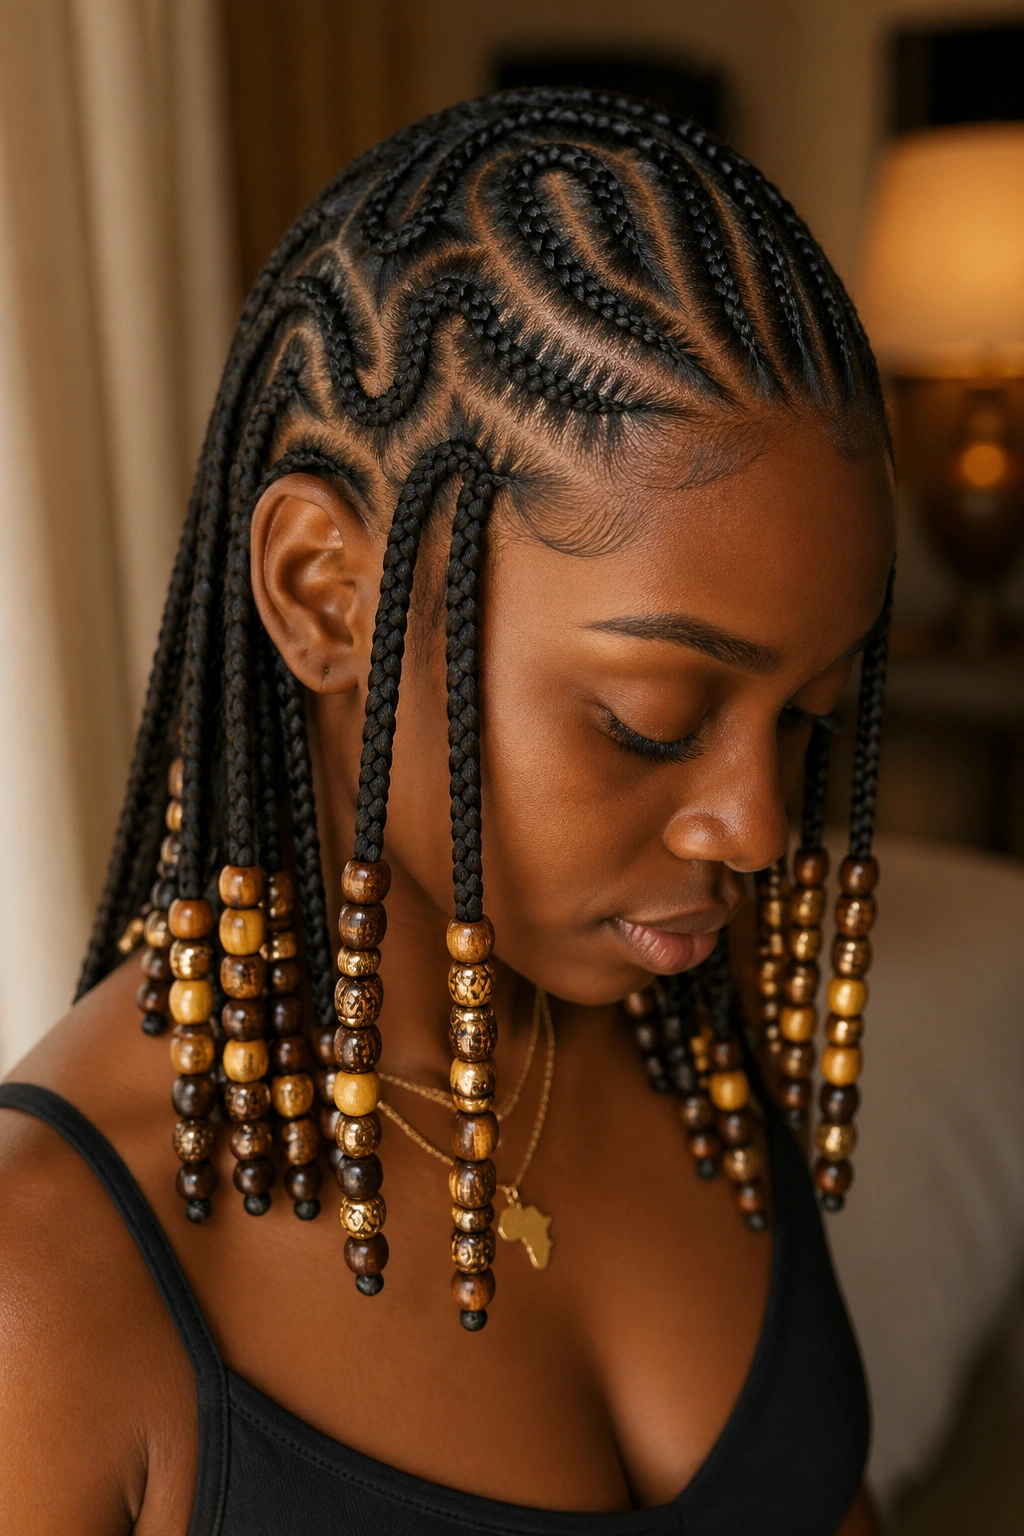
Three or four central braids run longer than the rest and spiral into bead-wrapped coils at the nape, creating a focal point at the back of the neck.
Spirals read from behind in a way straight braids don’t. When you turn away, the back of your head becomes the interesting view — good for photos, good for walking away from a conversation dramatically, and good for events where seating arrangements put your back to the room.
The spiral is made by coiling the bottom 6-8 inches of each braid into a flat disc and securing the disc with a bead-threaded pin or a beaded barrette. Practice the spiral on a single braid before committing the whole back row.
25. Stitch Cornrows With Bead-Accented Edges
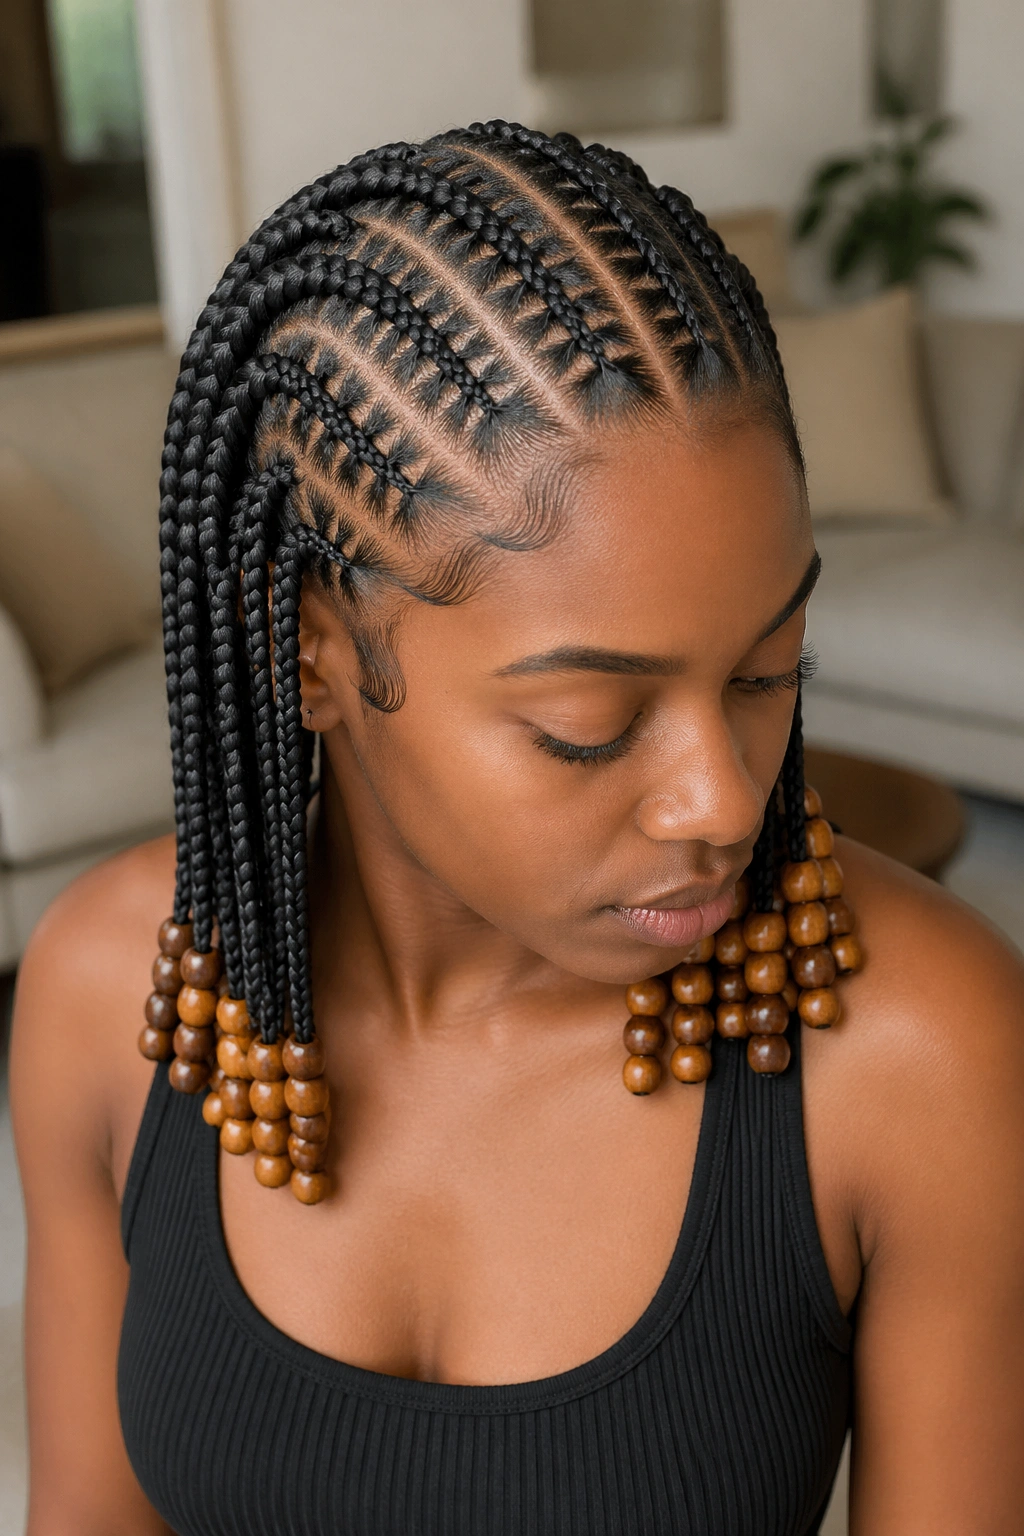
The stitch braids themselves carry minimal beads, but the baby hairs at the hairline are decorated with tiny beads slicked down with edge gel — a “beaded edge” technique.
This is subtle. So subtle that half the people who see it won’t consciously register what they’re looking at, only that something unusual is happening around your face. The tiny beads — 3mm or smaller — press flat into the slicked baby hairs and create a jeweled frame along the hairline.
You’ll only get a day or two of this look before the beads work loose. It’s an event technique, not a daily wear. Plan it for a specific photo or occasion and accept that it’s ephemeral.
Maintenance That Keeps the Stitches Sharp
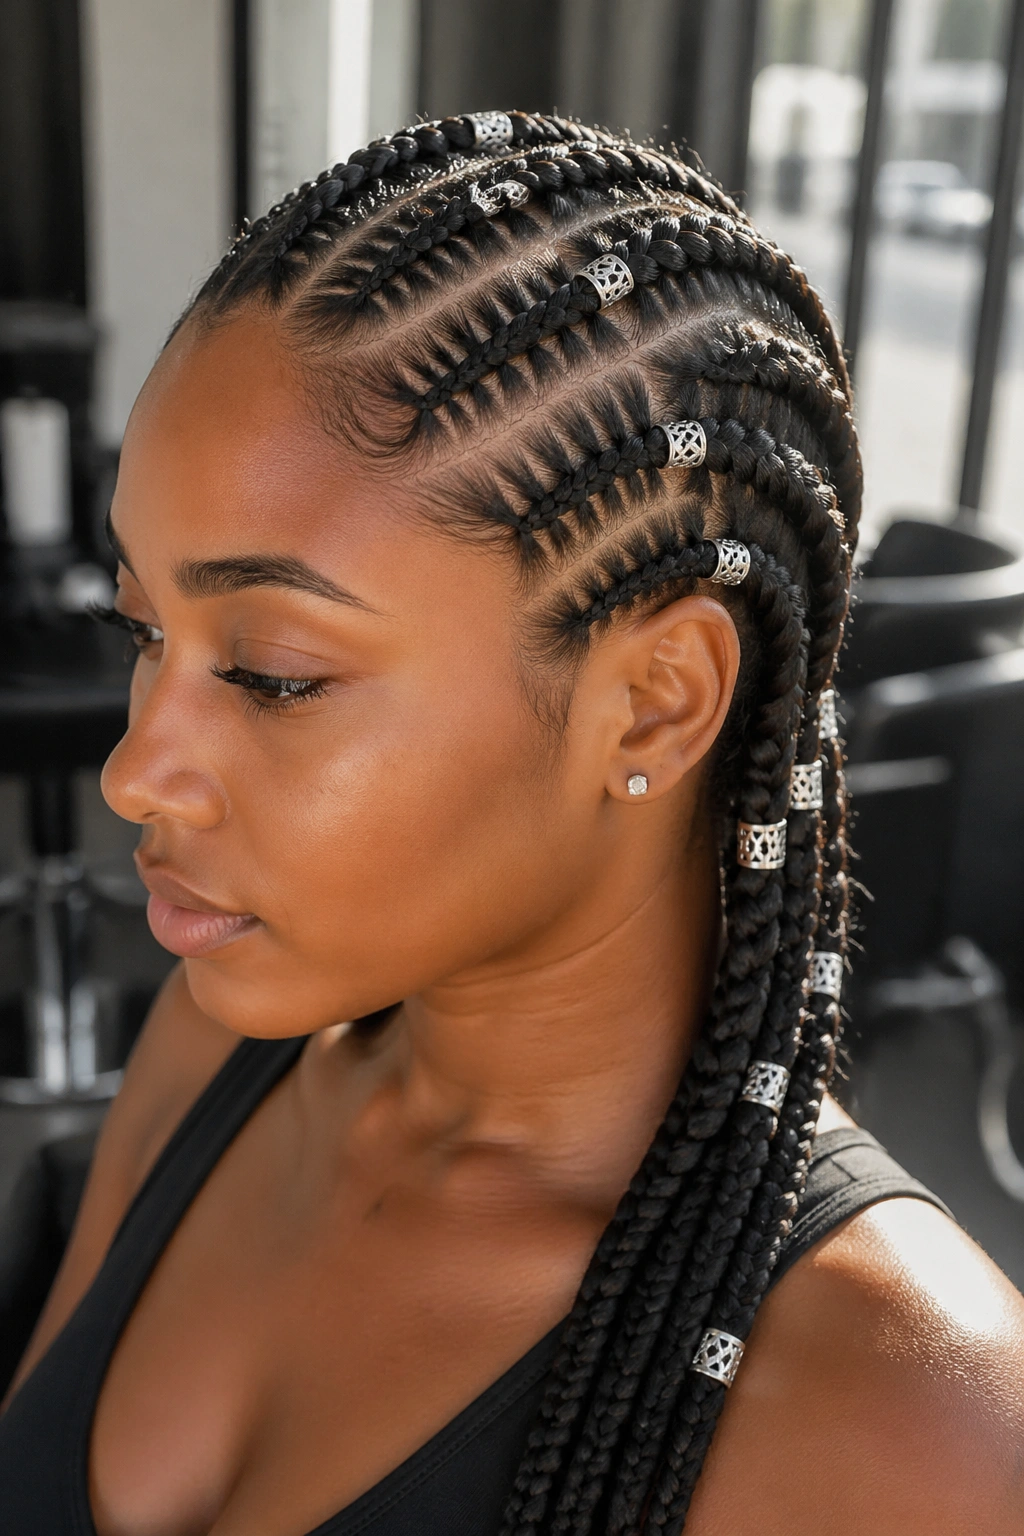
The stitches are the first thing to lose definition. By day four or five, tiny hairs escape between the rungs and the crisp ladder look softens into something fuzzier. You can extend the life by:
- Sleeping on a silk or satin pillowcase — cotton pulls hairs loose overnight
- Wrapping your hair in a silk scarf before sleep if the pillowcase isn’t enough
- Using a mousse or edge refresher every 2-3 days, applied sparingly with a fine-bristle toothbrush along the braid line
- Avoiding heavy leave-in conditioners that build up between stitches
Do NOT run water over stitch cornrows to refresh them. Water softens the gel holding the stitches in place, and unless you can sit under a dryer right after, the rungs will frizz as they air-dry. Save washing for once a week at most, and always dry fully before sleep.
Scalp Care Between Washes
A locked-in scalp gets itchy fast. Apply a light oil — jojoba, argan, or a scalp-specific blend — along the parts every three days using a pointed-tip applicator bottle. A little goes far; saturating the scalp weighs down the braids.
If you feel itching that won’t quit, resist the urge to scratch through the braids. Scratching breaks hairs at the root and creates the frizz you were trying to avoid. Use the tip of a rat-tail comb to gently scratch THROUGH the part rather than under the braid.
Tea tree oil mixed with jojoba (1 drop tea tree per teaspoon jojoba) handles most itch problems. Don’t use more tea tree than that — it’s strong, and it burns irritated scalp.
Taking the Style Down Safely
Three weeks is the outer edge for stitch cornrows. After that, new growth at the roots makes the stitches look distorted and the tension at the scalp increases. Plan your takedown before you hit week four.
Start at the tips. Remove beads first — unbutton silicone bands, slide off beads, untwist elastic caps. Then work up each braid with the pointed end of a rat-tail comb, easing the braid open instead of pulling. Spray each braid with a detangling spray or diluted conditioner as you go. The hair will have shed naturally during wear, and that shed hair will tangle if you dry-untangle.
Plan on two hours minimum for takedown. Watch something you like. Don’t rush.
Picking the Right Stitch Cornrow Style for You
Face shape, hair density, and how much time you have both daily and at the salon all matter more than the picture you saw online. A 25-row style with scattered beads might look incredible on someone else, but if you commute 90 minutes each way on a crowded train, the bead noise will make you miserable by day three. Match the style to your actual life, not the aspirational one.
Ask your braider honestly how long they’ve been doing stitch work. Stitch is a technique, not a cornrow style, and not every skilled cornrow braider does stitch well. Look at their portfolio. Specifically look at the stitch definition on the second and third week photos, not just the fresh install.
Common Mistakes and How to Avoid Them
The three biggest mistakes people make with stitch cornrows and beads are: too many beads, wrong bead weight for the braid size, and failing to plan for sleep. Too many beads makes the head heavy and the style look costume-y. Wrong weight pulls at roots. No sleep plan means week two looks shredded.
Start with fewer beads than you think you want. Add more if you decide the style looks too plain — it’s much easier to add than subtract. And buy the silk pillowcase BEFORE the appointment, not after, because you’ll be too tired that night to shop.
One more thing. If your scalp hurts for more than 24 hours after the install, the braids are too tight. Don’t tough it out. A good braider will redo any row that causes sustained pain — braids should feel snug, not painful, and persistent tension at the roots can cause traction alopecia over months. Speak up the first night, not the fifth.
