Braids have never been just a hairstyle. For Black women with afro hair, braids are a cultural lineage — a technique passed down through hands and homes, documented across centuries and continents, and still being refined and reimagined every single day in salons, kitchens, and YouTube tutorials. Braid styles for afro hair women occupy a space that’s simultaneously ancient and constantly new, protective and artistic, practical and deeply personal.
What makes braids particularly suited to afro hair types is the structure. Type 4 hair — whether 4A, 4B, or 4C — has a natural coil and texture that grips braiding patterns with a hold that smoother hair types simply can’t achieve. Your hair is working with the technique, not against it. The crimp and coil give braids body, help them hold longer, and create textures in the finished style that add dimension you’d never get from straight or wavy extensions.
This list covers the full range: large and small, close to the scalp and hanging free, classic and creative, one-color and multi-toned. There’s a braid style for every length of natural hair, every occasion, and every aesthetic preference — and if you’ve only worn one or two styles from this list, there’s a lot of ground left to cover.
Why Protective Braiding Is So Effective for Afro Hair
Length retention is the main reason people turn to braided protective styles. Natural afro hair, especially 4C, shrinks dramatically — sometimes 75% or more of its actual grown length. This shrinkage is a sign of healthy elasticity, not a problem. But it also means that length gains can be hard to see and hard to protect.
Braids tuck the ends of your natural hair away from friction. Every time your hair rubs against a cotton pillowcase, a shirt collar, a seatbelt, or even your own hands, there’s mechanical friction happening at the most fragile part of the strand — the end, where no natural oil has ever reached. Braids keep those ends enclosed for weeks at a time, reducing friction contact dramatically and allowing length to accumulate.
Braided styles also reduce the frequency of manipulation. Combing, detangling, and restyling natural afro hair introduces stress on the strand each time it happens. Spending four to eight weeks in a braided protective style means your hair goes through four to eight fewer weeks of daily manipulation — and that adds up to real retained length over months and years.
Before You Braid: Preparing Afro Hair for Best Results
Healthy hair starts every protective style. If you go into a braid installation with dry, brittle, or breakage-prone hair, the protective benefits of braids are partially undone by the state you’re starting from.
Wash thoroughly with a clarifying shampoo at least once before installing — especially if you’ve been using heavy butters or oils recently. Product buildup on the hair shaft prevents moisture from penetrating and makes the hair feel coated rather than soft. A clarifying wash strips all of that and lets you start clean.
Follow with a deep conditioning treatment. A protein-moisture balance conditioner — something like ApHogee Two-Step Protein Treatment followed by a moisture mask — will significantly strengthen the hair before a long protective period. Apply to damp hair, cover with a plastic cap, leave for 30 minutes, then rinse.
Stretch the hair slightly before installing, either by banding (placing soft elastics at intervals along the length) or by braiding sections loosely while the hair is damp and letting them dry. Stretching makes the natural hair easier to work with for the braider and reduces tangling during installation.
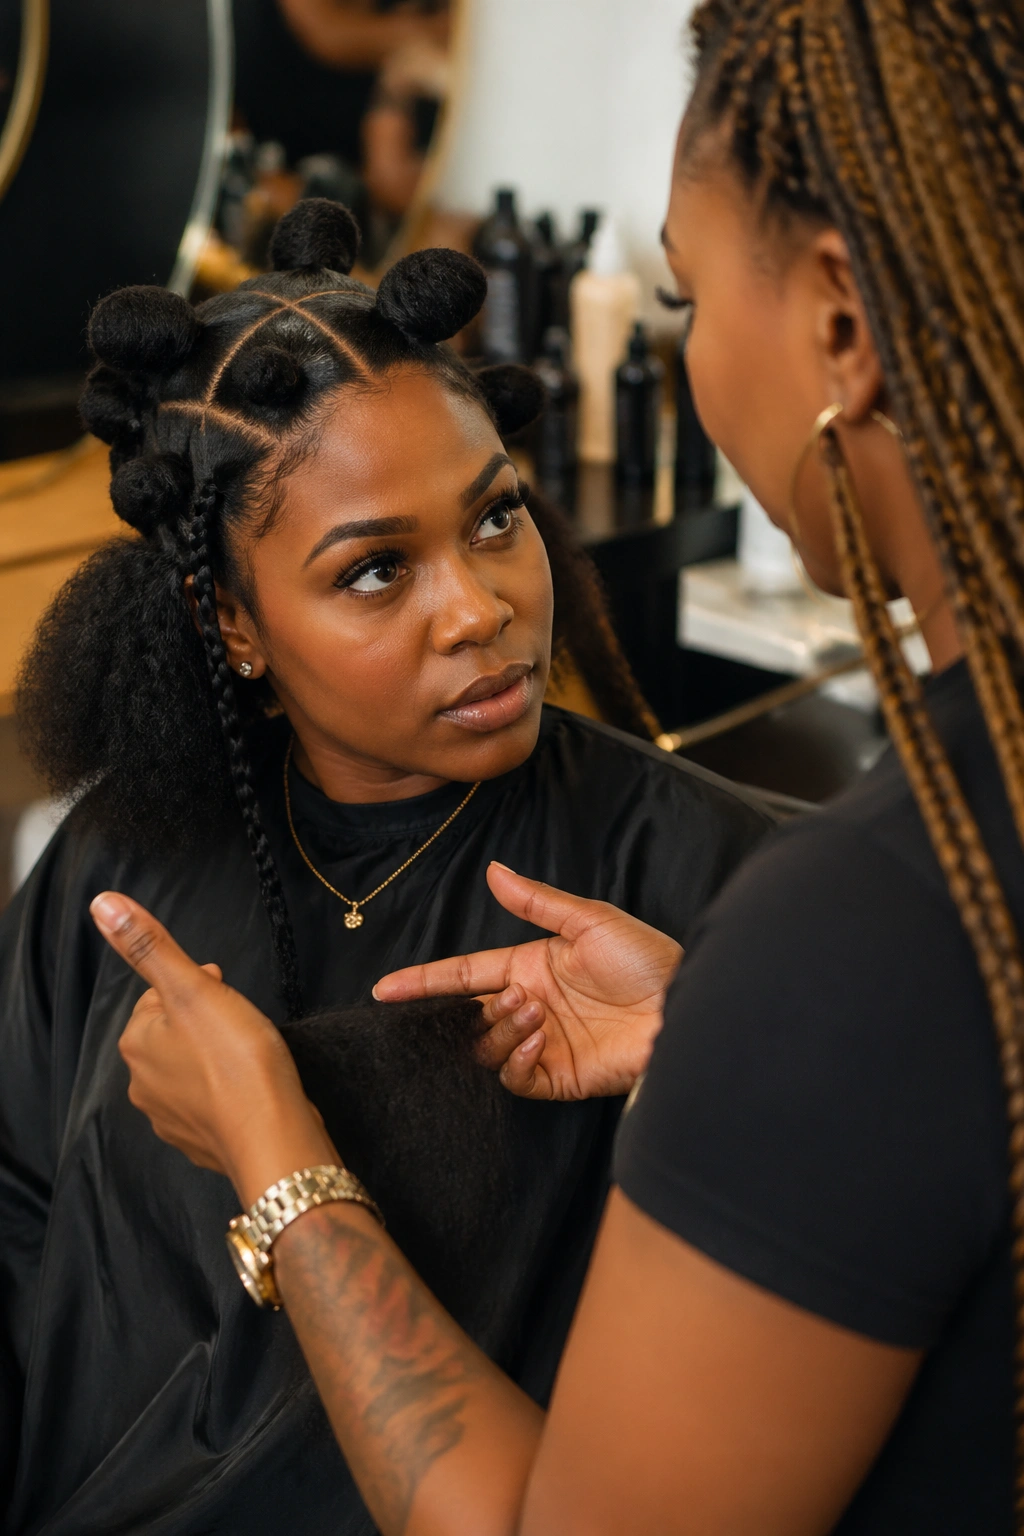
What to Tell Your Braider Before Installation
Communication is where protective styles go wrong most often. Knowing what to ask for makes the difference between a style that thrives for six weeks and one you’re taking down after two.
Tell them specifically: no tight tension at the roots. This seems obvious but is worth stating explicitly. Some braiders habit tightly because clients have historically requested it — assuming tighter means neater, longer-lasting. The truth is that tight tension is the primary cause of traction alopecia, which is a real, permanent form of hair loss along the hairline and temples.
Discuss the size of the sections before you start. Smaller sections create more individual braids, a denser-looking style, and a longer installation time. Larger sections create fewer braids, a bolder look, and a faster install. Neither is wrong — you just need to agree on which before the first section is parted.
Ask about the finish. Do you want the ends sealed with hot water dipping? Left natural? Crimped? Knowing the answer before the last braid is done means you don’t lose an hour to redos.
Length and Thickness: How to Choose What Works for You
Braid length is partly an aesthetic decision and partly a practical one. Very long braids — waist-length and beyond — look dramatic and turn heads. They also have real weight, especially with extension hair, and can cause scalp tension over the course of a long day. Medium length — armpit to bra strap — gives you the visual impact of braids with significantly less physical weight.
Short braids — chin-length or shoulder-length — are underrated. They move freely, they’re lighter, they’re easier to sleep in, and they can be styled into updos just as easily as long braids can.
Thickness is about aesthetic preference as much as practicality. Very thin micro braids take many hours and last the longest. Jumbo braids take two to three hours and have a different kind of impact. Medium box braids — the classic choice — fall in the middle on both time and longevity.
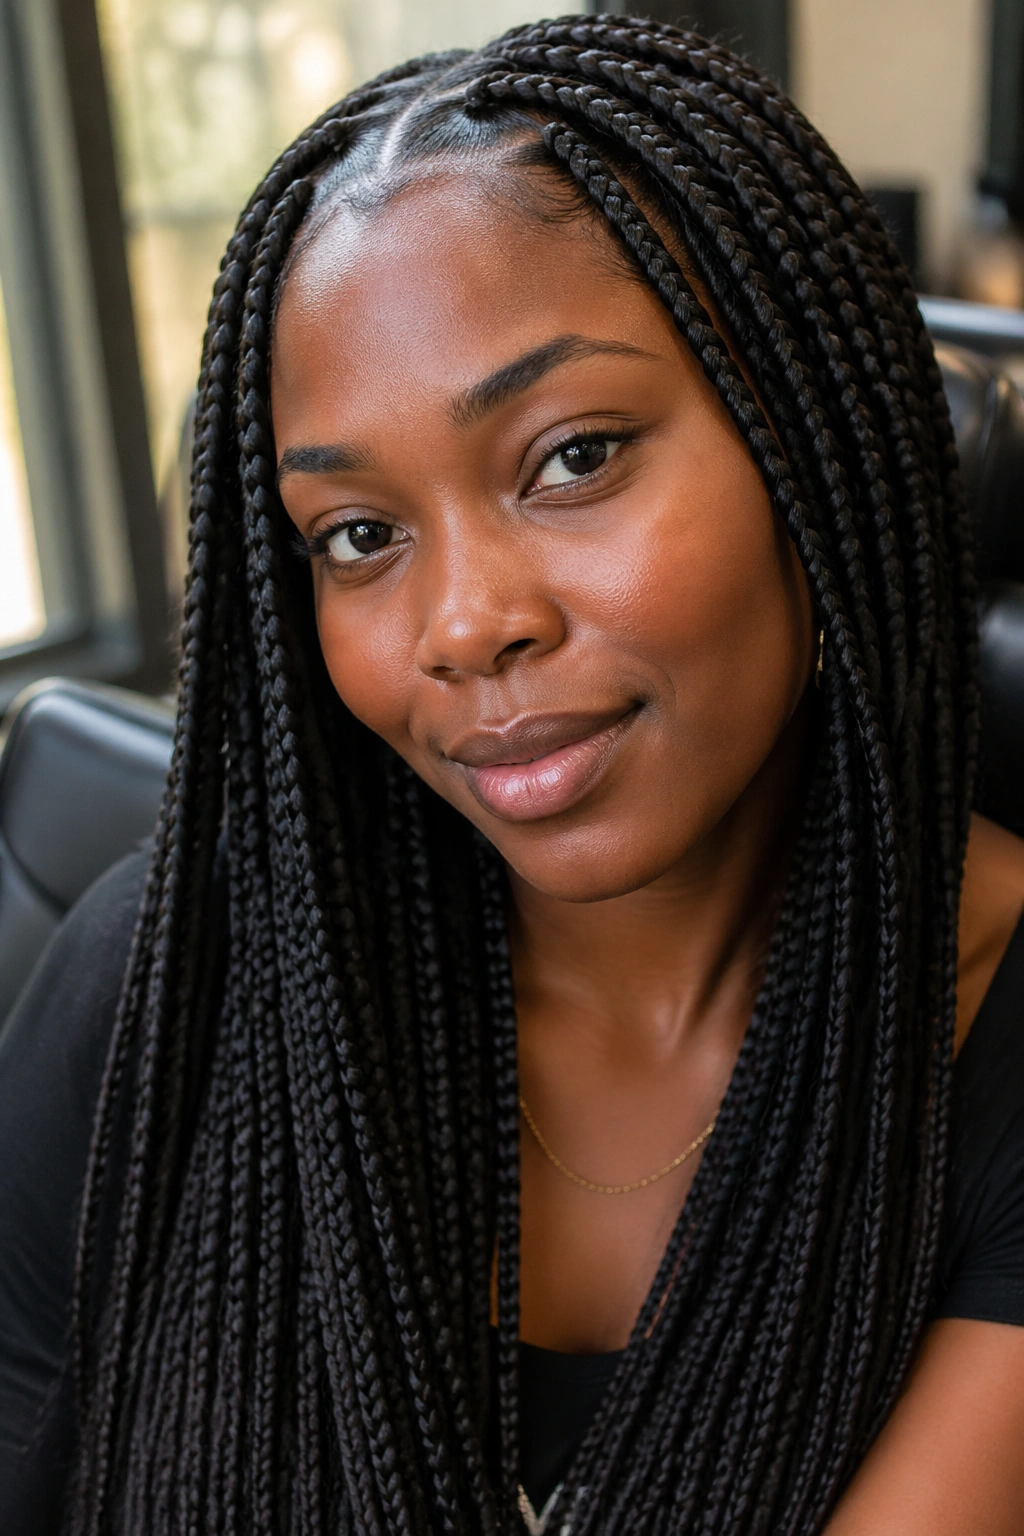
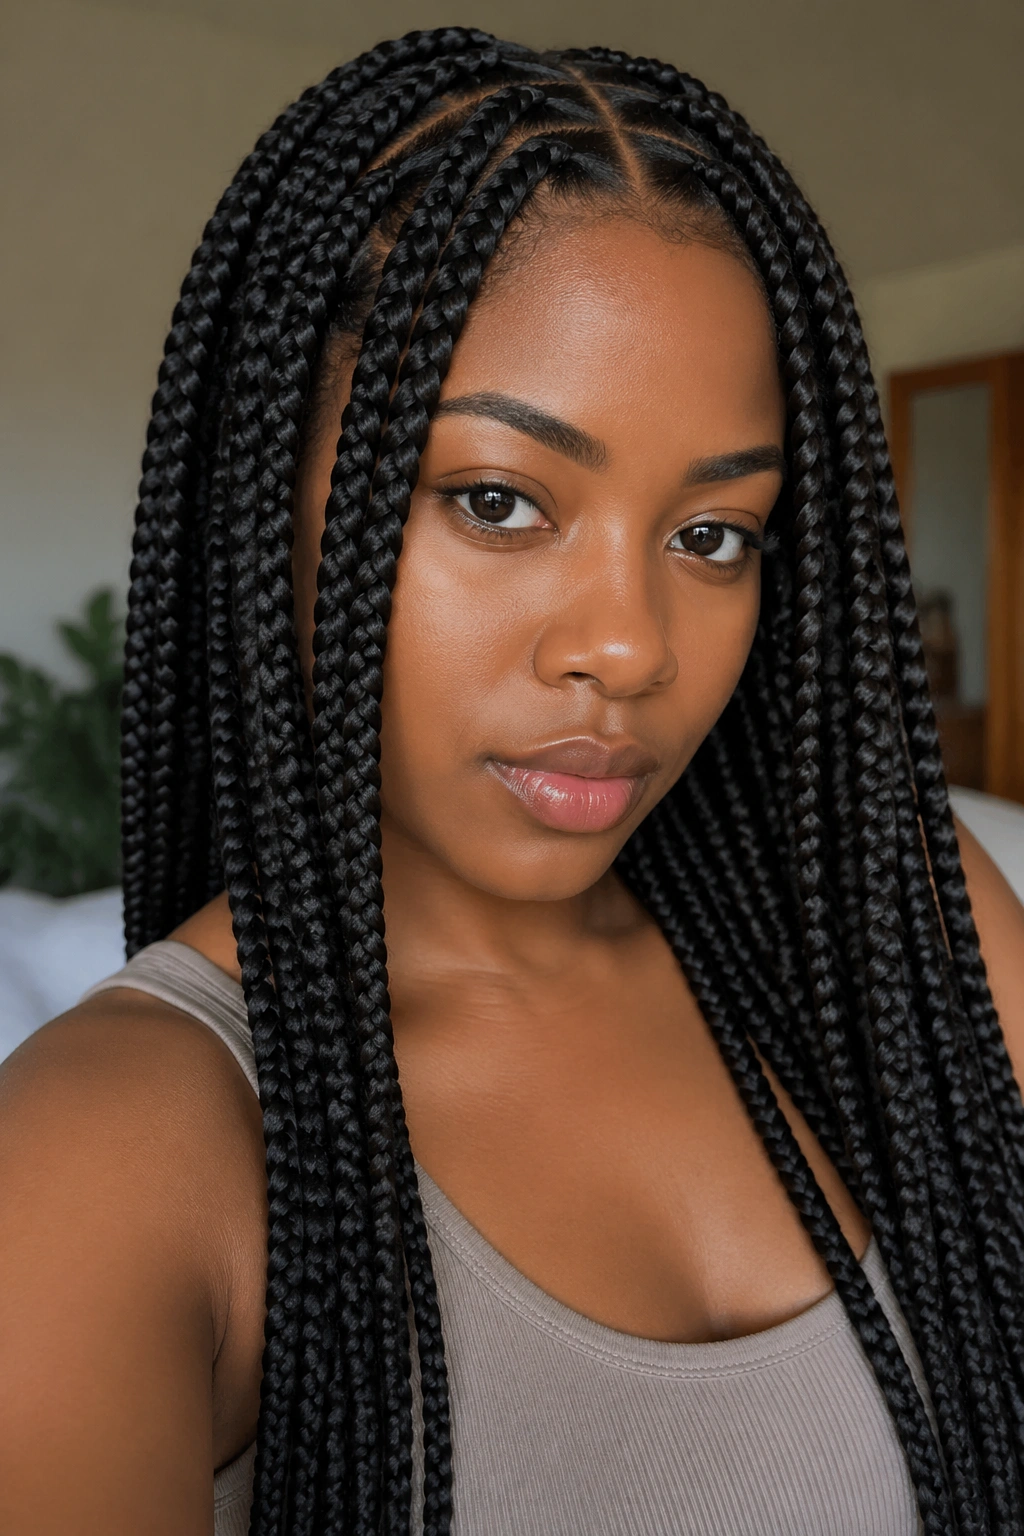
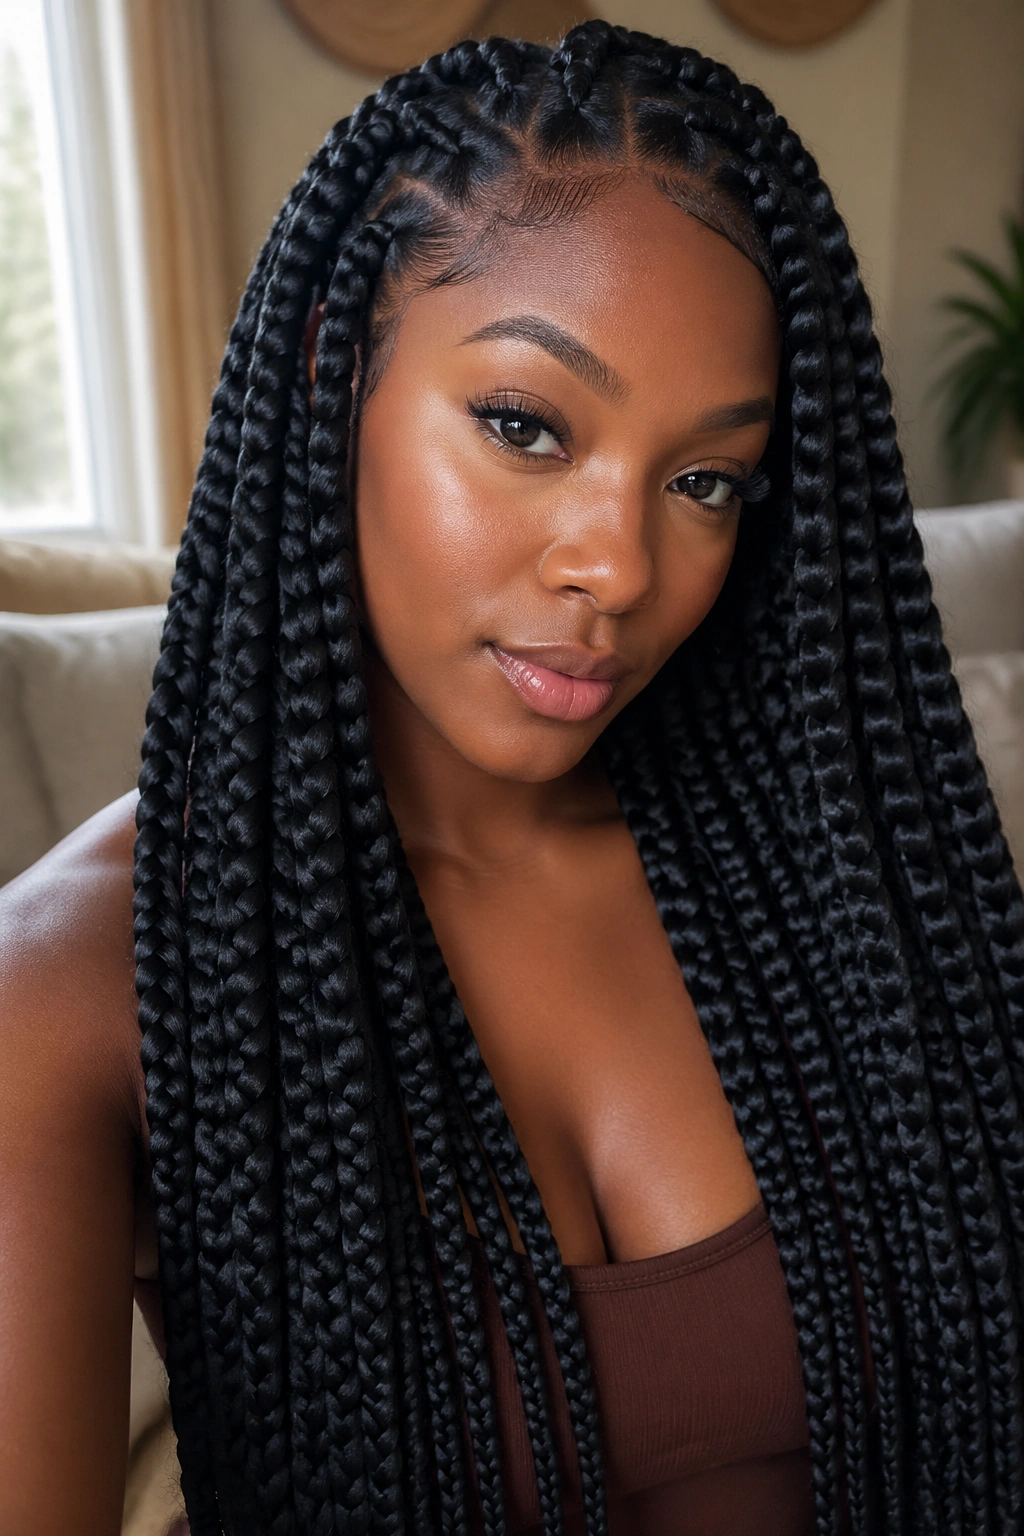
1. Classic Box Braids
The benchmark. Box braids use clean, square-shaped parting sections — hence the name — and a three-strand braid technique that adds extension hair from the roots to create length and thickness beyond what grows naturally. Each individual braid is uniform: same thickness, same tension, same technique throughout.
Classic box braids are medium-sized, typically installed in 6 to 8 hours by an experienced braider, and last 4 to 6 weeks with proper care. They’re the reference point against which every other braid style is measured.
Why It Works
The simplicity of the technique is the strength. Box braids have no gimmick. They sit clean, they hang straight, they photograph well in every lighting condition, and they suit every face shape. They’re also the most forgiving braid style to maintain — frizz blends in rather than looking out of place, and new growth at the roots is expected and normal.
Tip: Use rat-tail end clips to seal box braid ends if you’re in a humid climate. The sealed ends resist frizzing and splitting much better than unsealed natural ends.
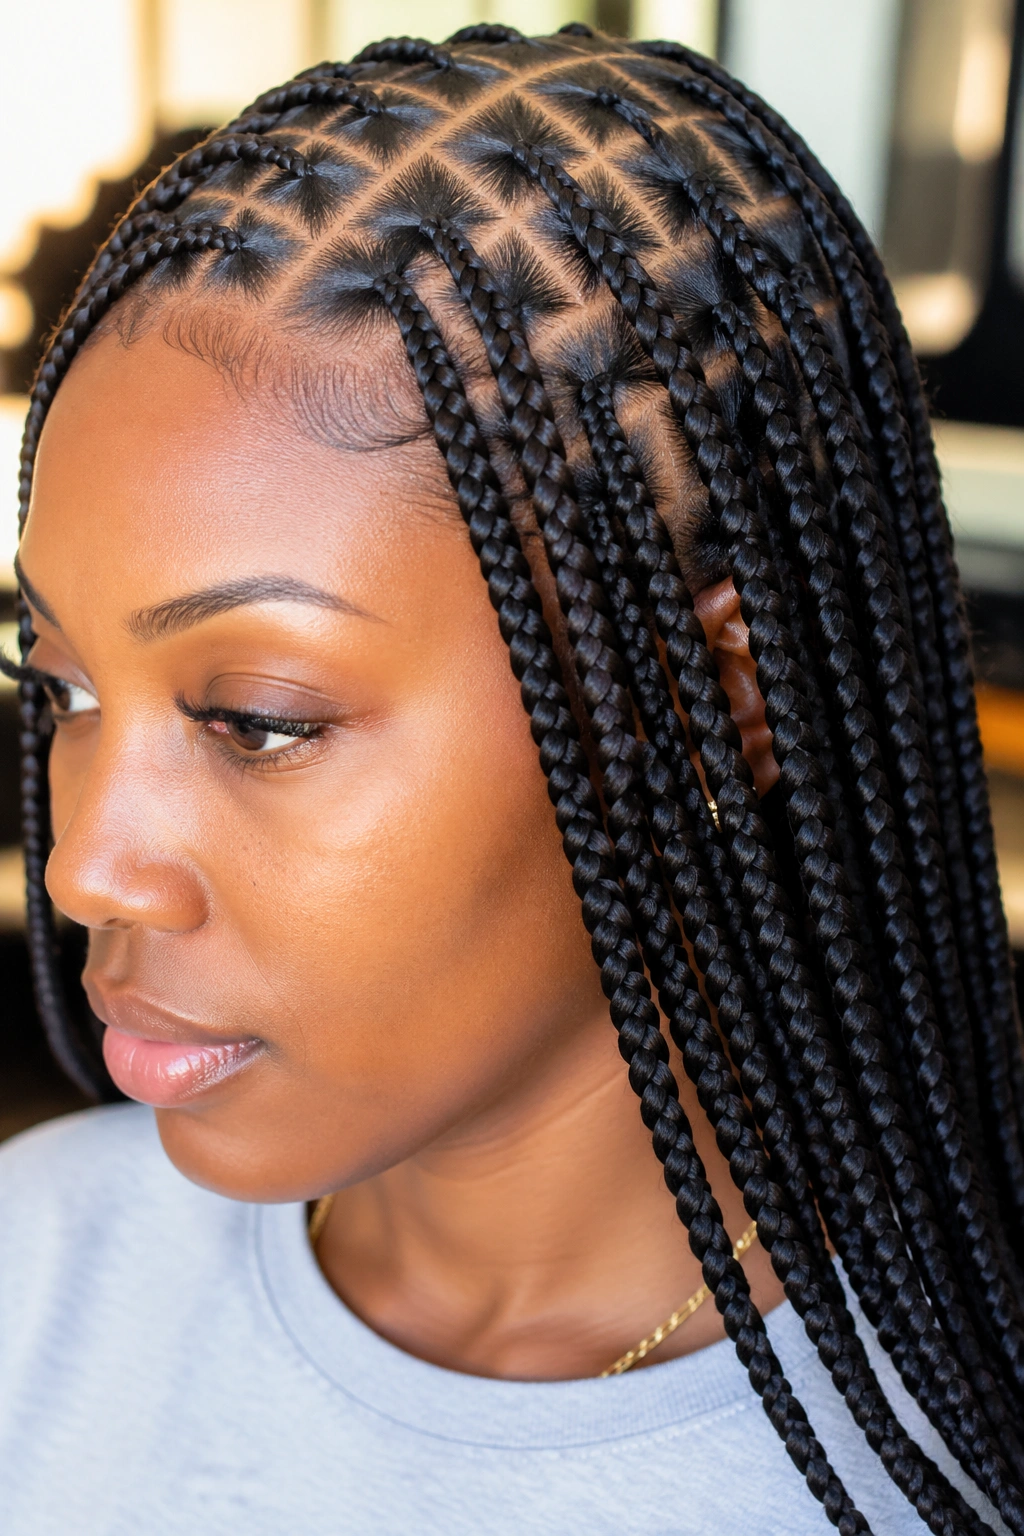
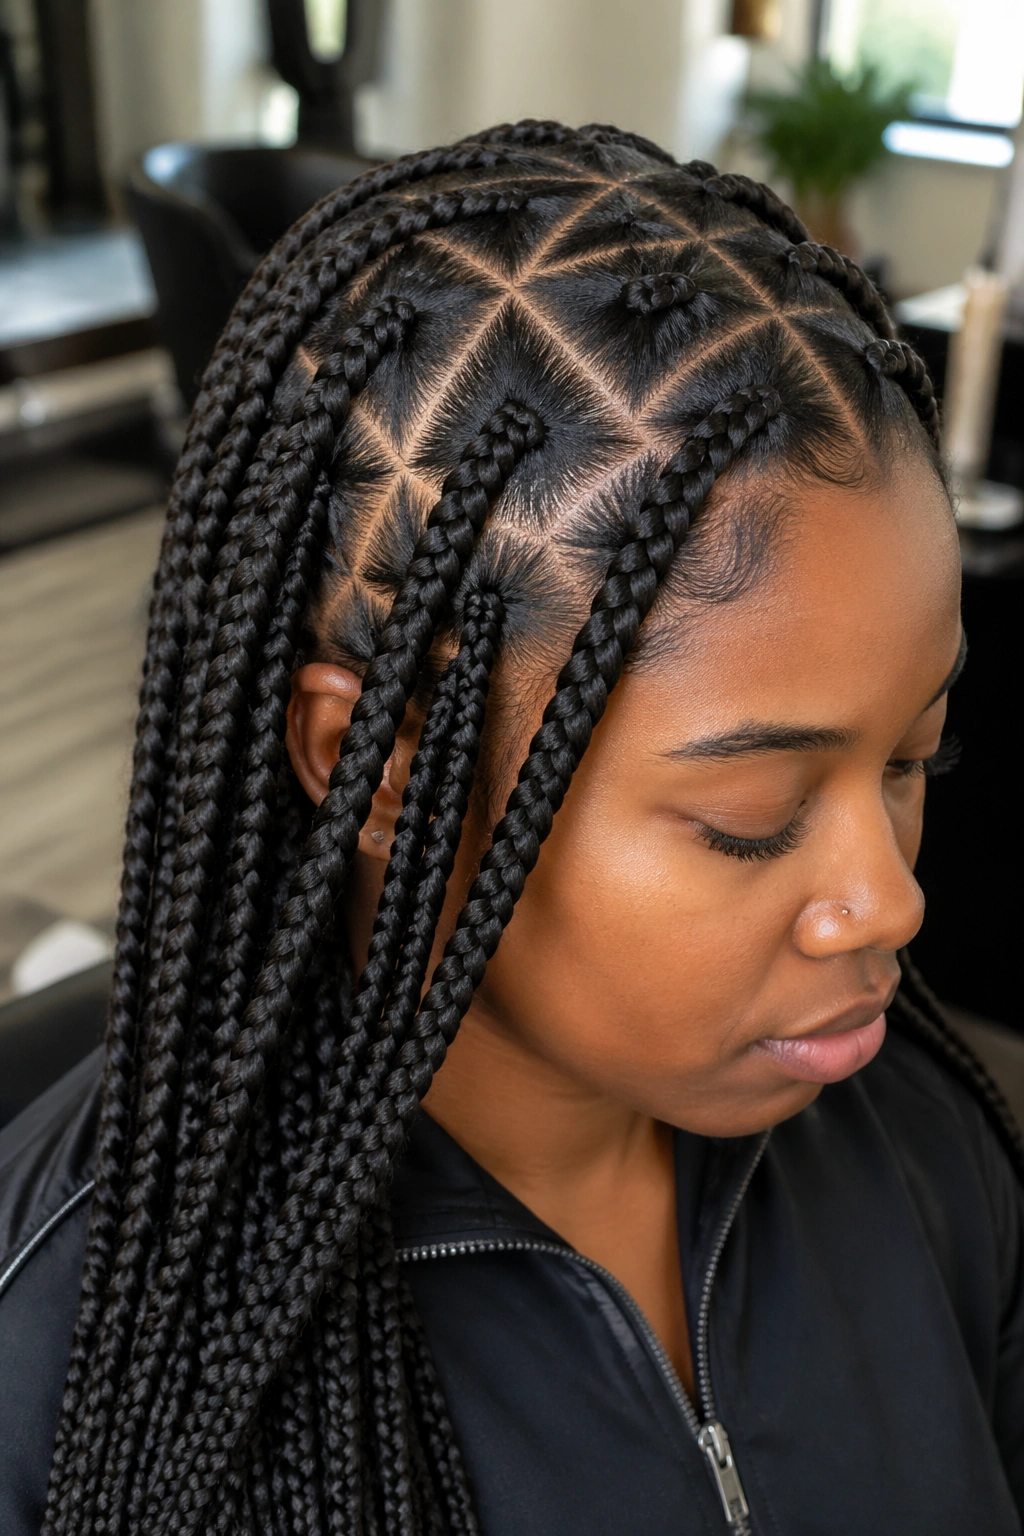
2. Knotless Box Braids
Knotless braids have become one of the most widely requested styles in the last several years, and for good reason. Traditional box braids start with a knot — the extension hair is looped and pulled through the natural hair at the very base of each section, creating a small, tight knot directly at the scalp. Knotless braids start with just your natural hair for the first two to three stitches, then gradually feed in the extension hair as you work down the section.
The practical difference is significant. Knotless braids lie much flatter at the scalp. They have no knot bump at the base, which means no raised tension point pulling on the follicle. For women with sensitive scalps or a history of traction alopecia, knotless braids are the better choice structurally.
The finished look is nearly identical to traditional box braids — same clean parting, same uniform length, same braid texture. The difference is at the root line, which is smoother and lighter.
3. Jumbo Box Braids
Jumbo braids use larger sections and significantly more extension hair per braid, creating each individual braid at roughly thumb-width or wider. A full head of jumbo braids uses far fewer individual braids — sometimes as few as 20 to 30 — which is part of the appeal.
The install time drops dramatically: a skilled braider can complete jumbo box braids in two to three hours. The look is bold, sculptural, and unmistakably intentional. Long jumbo braids swing with a weight that medium braids don’t have, and that movement is genuinely striking.
The tradeoff is that very long jumbo braids are heavy at the scalp by evening. Keeping the length at shoulder or armpit level reduces that load without giving up the visual impact.
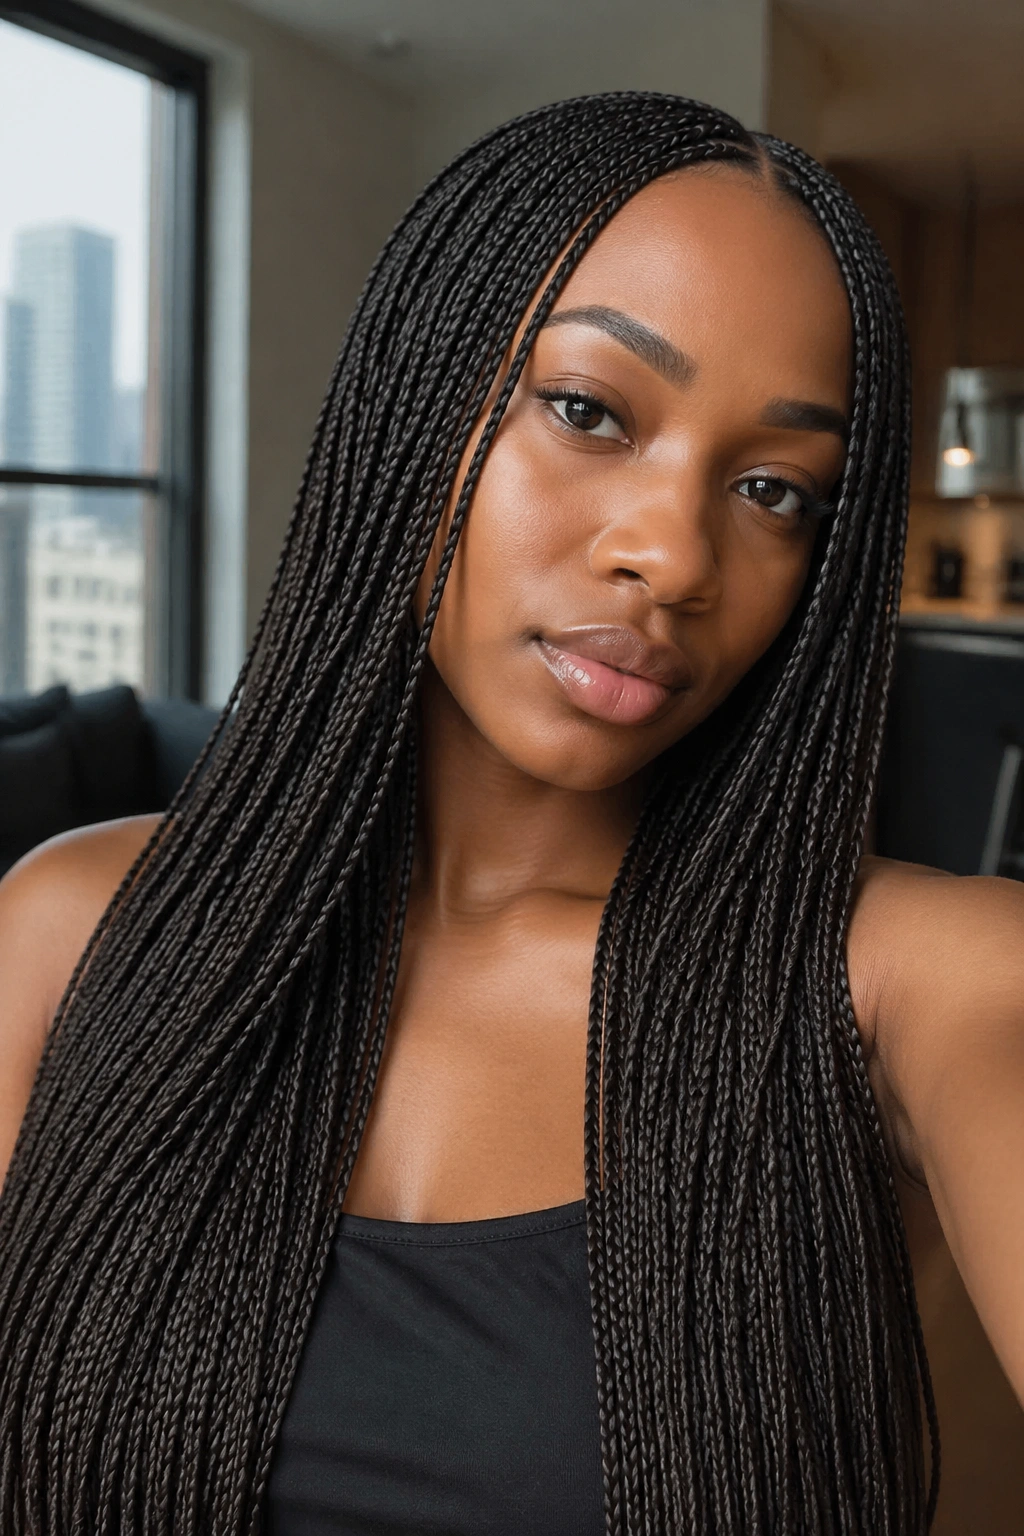
4. Micro Box Braids
At the opposite extreme, micro braids are extremely thin — pencil-thin or thinner — and require many more of them for a full head. Expect eight to twelve hours or more for a complete micro braid installation. That time investment is the barrier. But the result is a style that looks and moves remarkably like natural hair.
Micro braids can be styled like natural hair — pulled into a ponytail, gathered into a bun, worn loose, partially pinned. They flow rather than swing, which gives them a versatility that thicker braids don’t always have.
They also last longer than medium or jumbo braids — 8 to 12 weeks is achievable with proper care — which somewhat justifies the installation time investment.
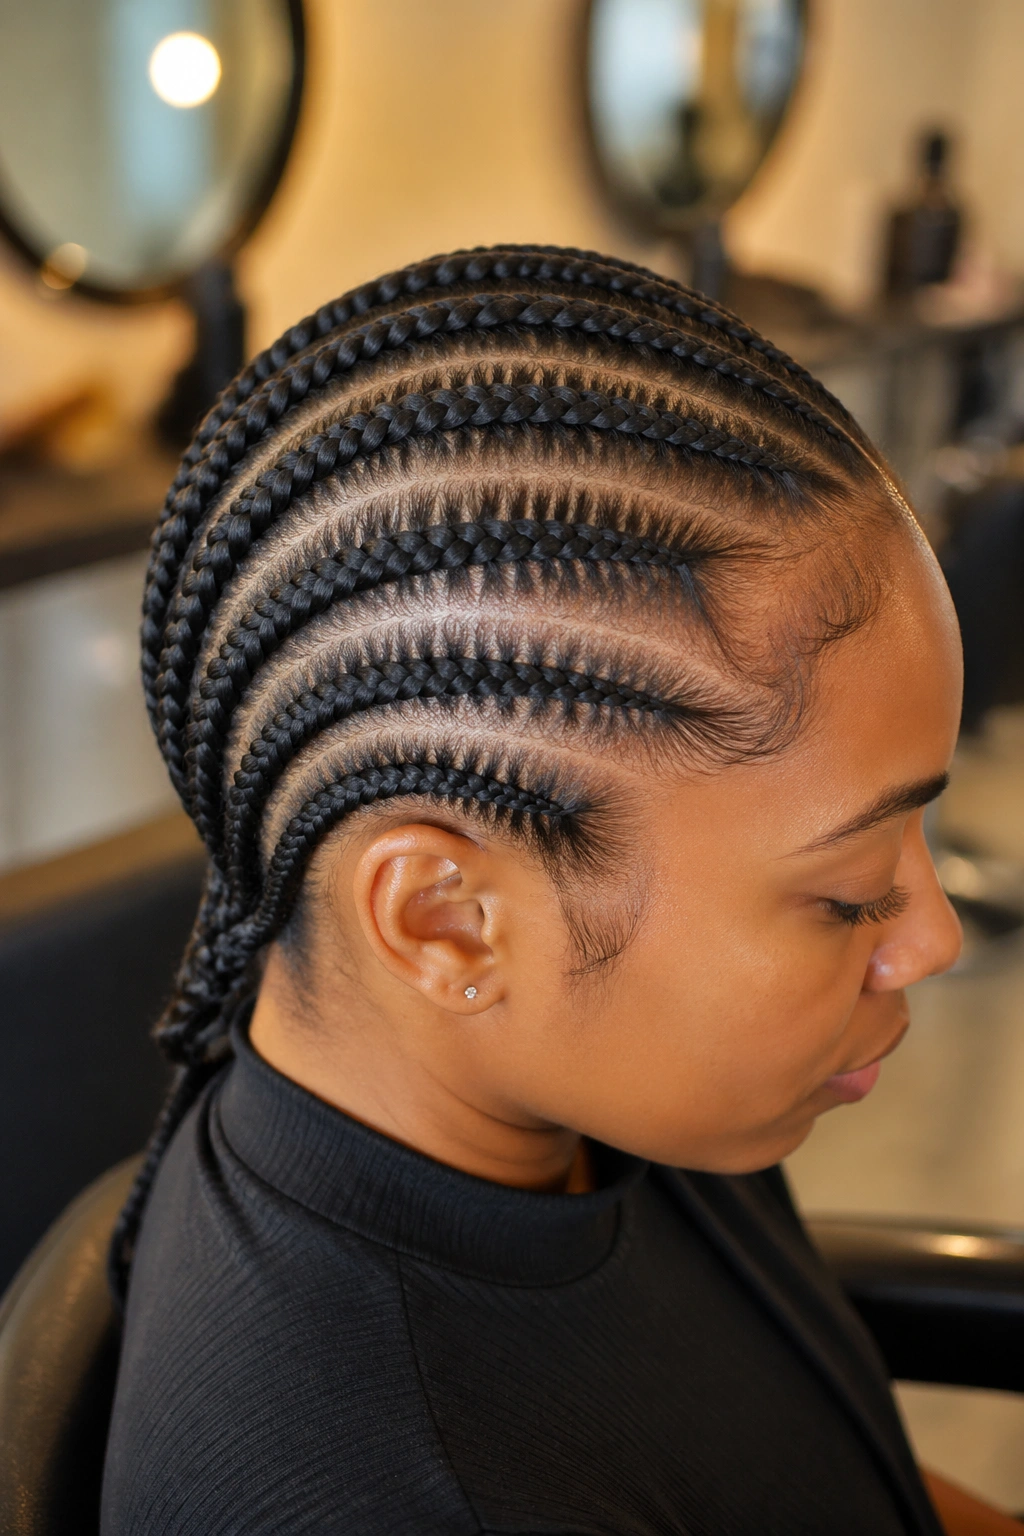
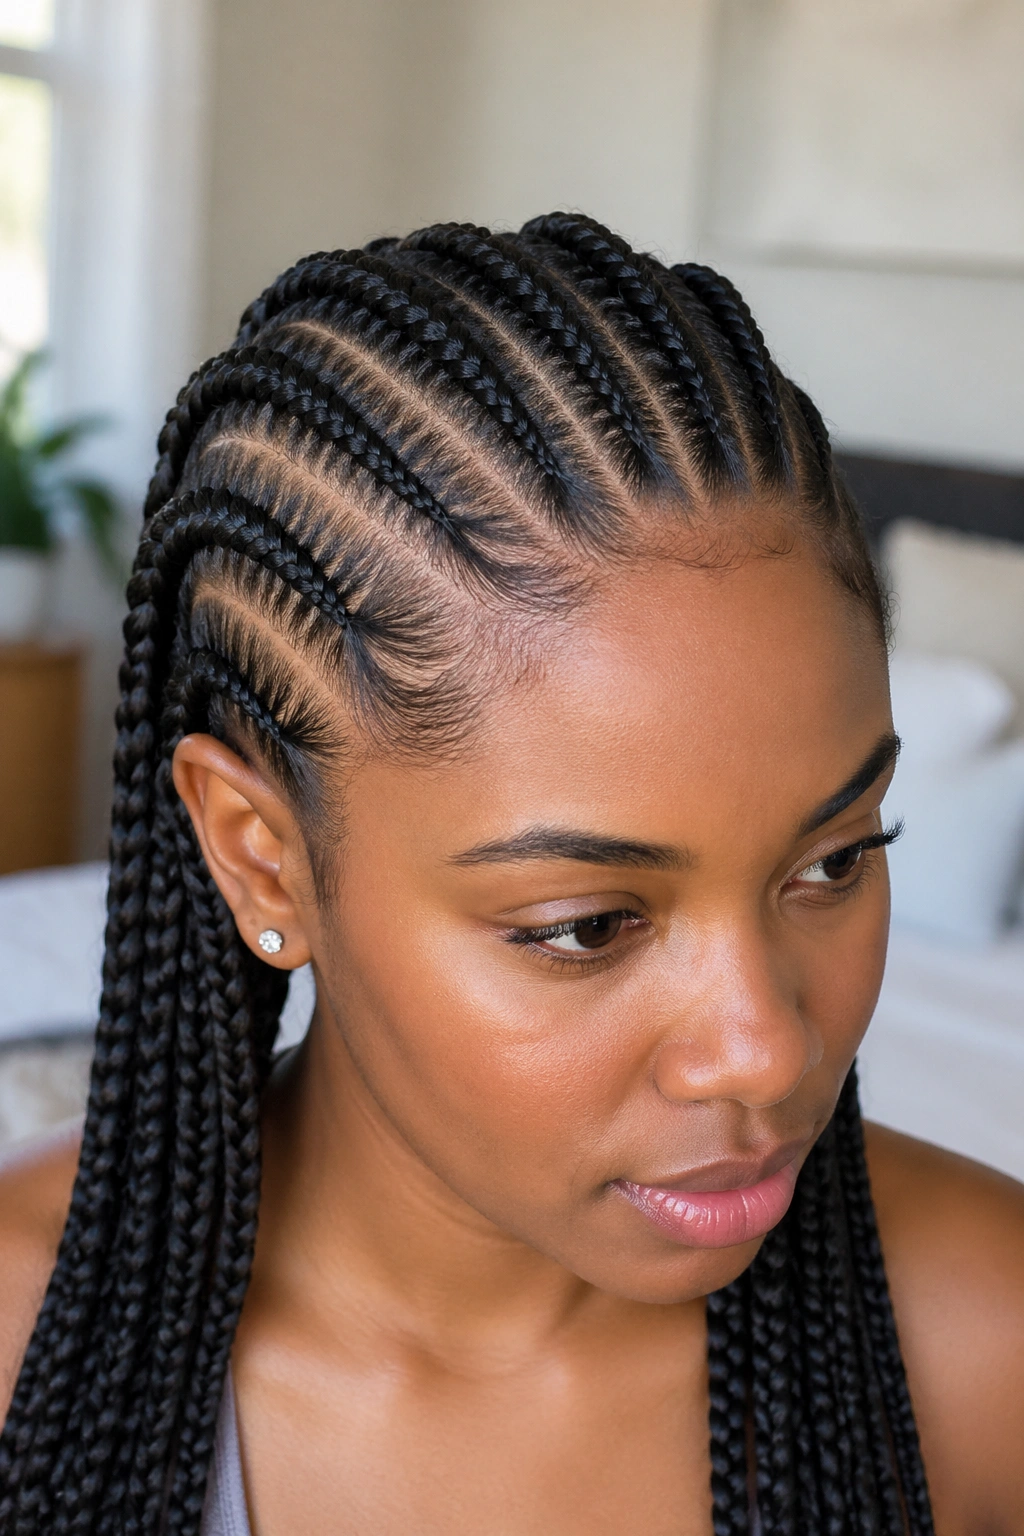
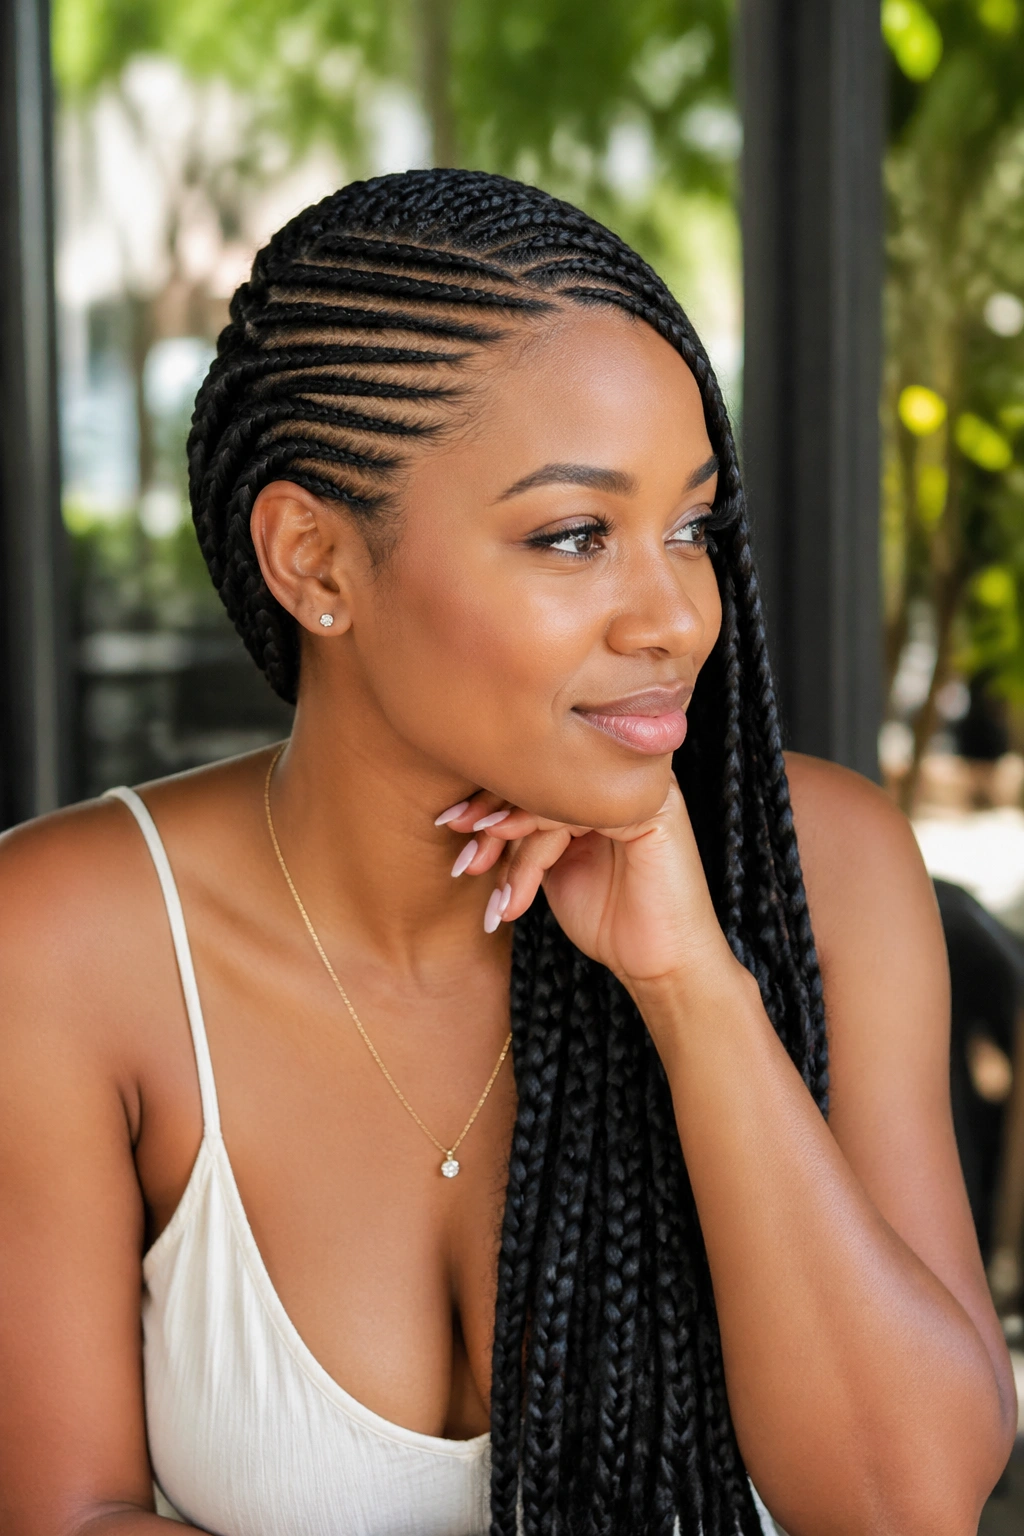
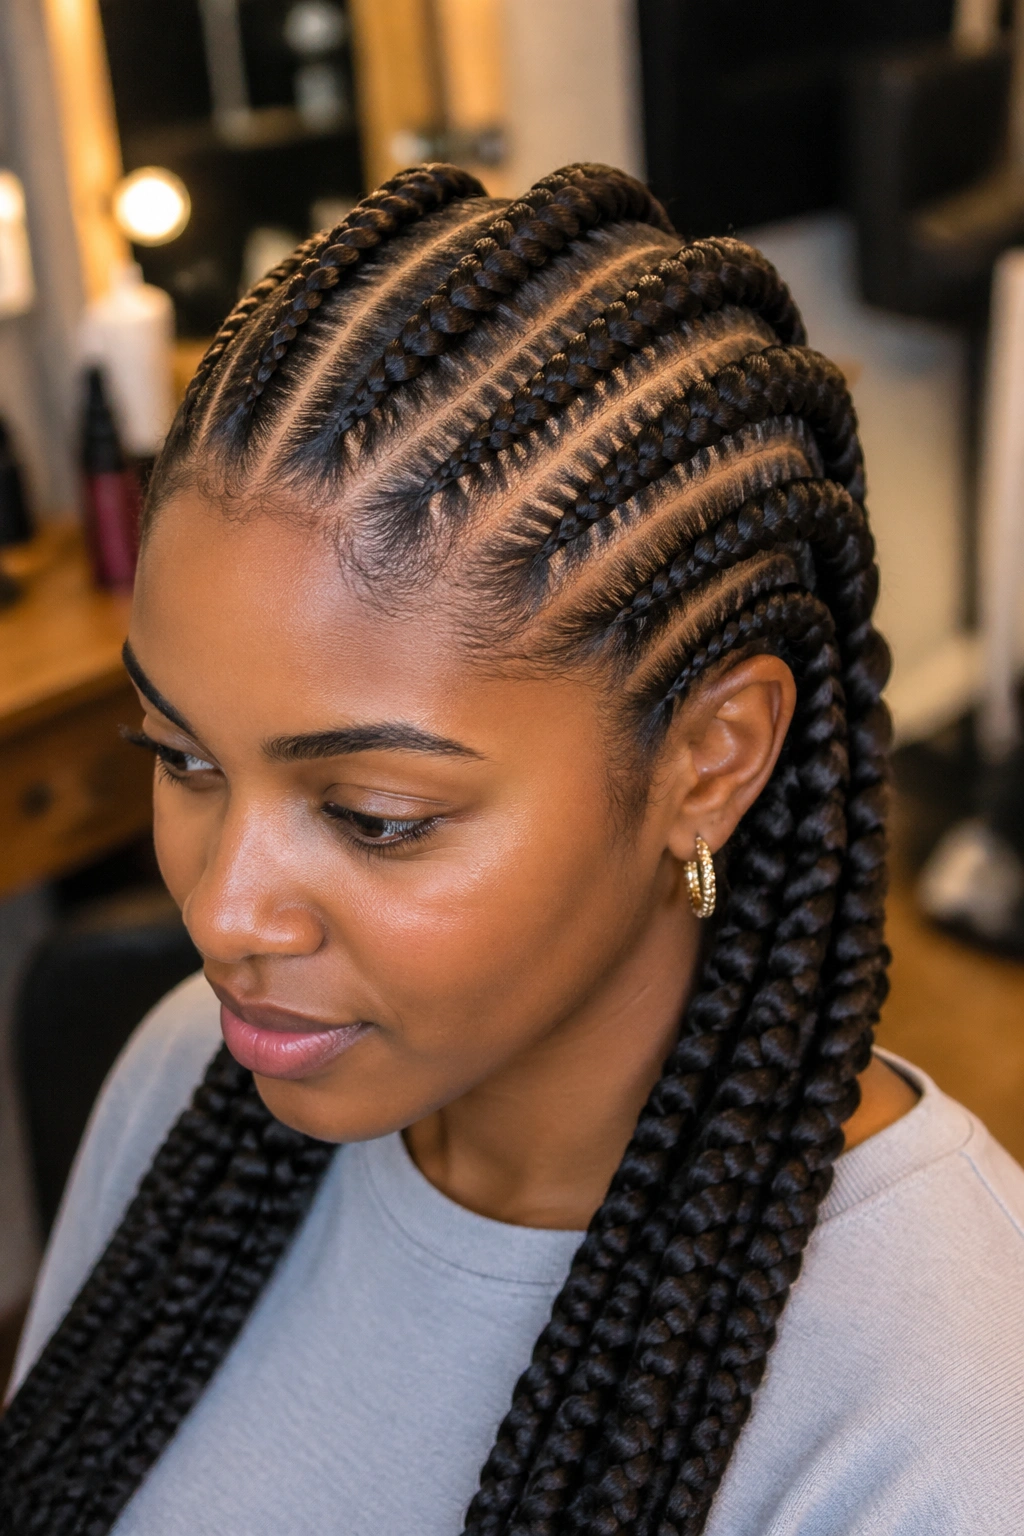
5. Cornrows (Straight Back)
Straight-back cornrows are braids laid flat against the scalp, running from the front hairline straight to the nape, using the three-strand underhand technique that creates the characteristic raised ridge along each row. They’re the foundation technique for dozens of other styles and one of the oldest braiding traditions in recorded history.
Done simply, straight-back cornrows install in 30 minutes to two hours depending on the number of rows and the thickness of each one. They’re comfortable, practical, and clean-looking.
6. Cornrow Geometric Patterns
Beyond straight rows, cornrows can be laid in curves, fans, angles, spirals, and any pattern the braider can create. Geometric patterns — concentric circles, angled lines meeting at a point, star shapes, diamond grids — turn the cornrow into an art form visible from any distance.
The technique is the same as straight cornrows. The difference is the parting and direction. A skilled braider can create extremely complex geometric patterns in two to four hours.
These styles are particularly striking against shorter afro hair, where the scalp pattern is the primary visual element rather than hanging length.
7. Feed-In Cornrows
Feed-in braiding uses a technique that gradually adds extension hair to the cornrow as you work back from the front hairline, rather than introducing all the extension hair at once at the beginning of the braid. The result is a cornrow that appears to grow naturally out of the hairline — thin and flat at the very front, gradually thickening as it moves back.
This technique creates a much more natural-looking root than traditional cornrows where the extension hair is added all at once and creates a visible bulk at the hairline.
8. Lemonade Braids
Lemonade braids are cornrows swept to the side — all the rows running parallel, all angled in the same direction, all ending on the same side of the head. The look is directional and graphic: every row points toward the left or right, and the finished style has a strong horizontal line that runs across the head.
The technique is standard cornrow braiding. The distinctive element is entirely the direction and the unified sweep of all the rows together.
Lemonade braids look sharp at any length — with shorter ends or with long extensions that fall past the shoulder.
9. Ghana Braids
Ghana braids — also called Cherokee braids — are a specific cornrow style characterized by larger rows than standard cornrows, a slightly raised, pronounced ridge, and often with very geometric, architectural parting. The rows are usually wider and fewer in number than typical cornrows, giving each individual row a stronger visual presence.
Extension hair is almost always used to create thickness and definition in each row. The traditional look uses dark colors and clean, symmetrical parting. More expressive versions use color, unconventional parting angles, and varied sizing between rows.
10. Triangle Part Box Braids
Instead of square-shaped sections, triangle part box braids use — as the name says — triangular sections. The parting grid across the scalp is made up of triangles rather than squares or rectangles. The visual effect at the root is a pattern of triangular points rather than box edges.
The braid technique itself is identical to standard box braids. The only difference is the section shape, which creates a distinctly different look at the scalp line. Some people find the triangle parts more visually interesting; others prefer the classic box. Both are equally valid.
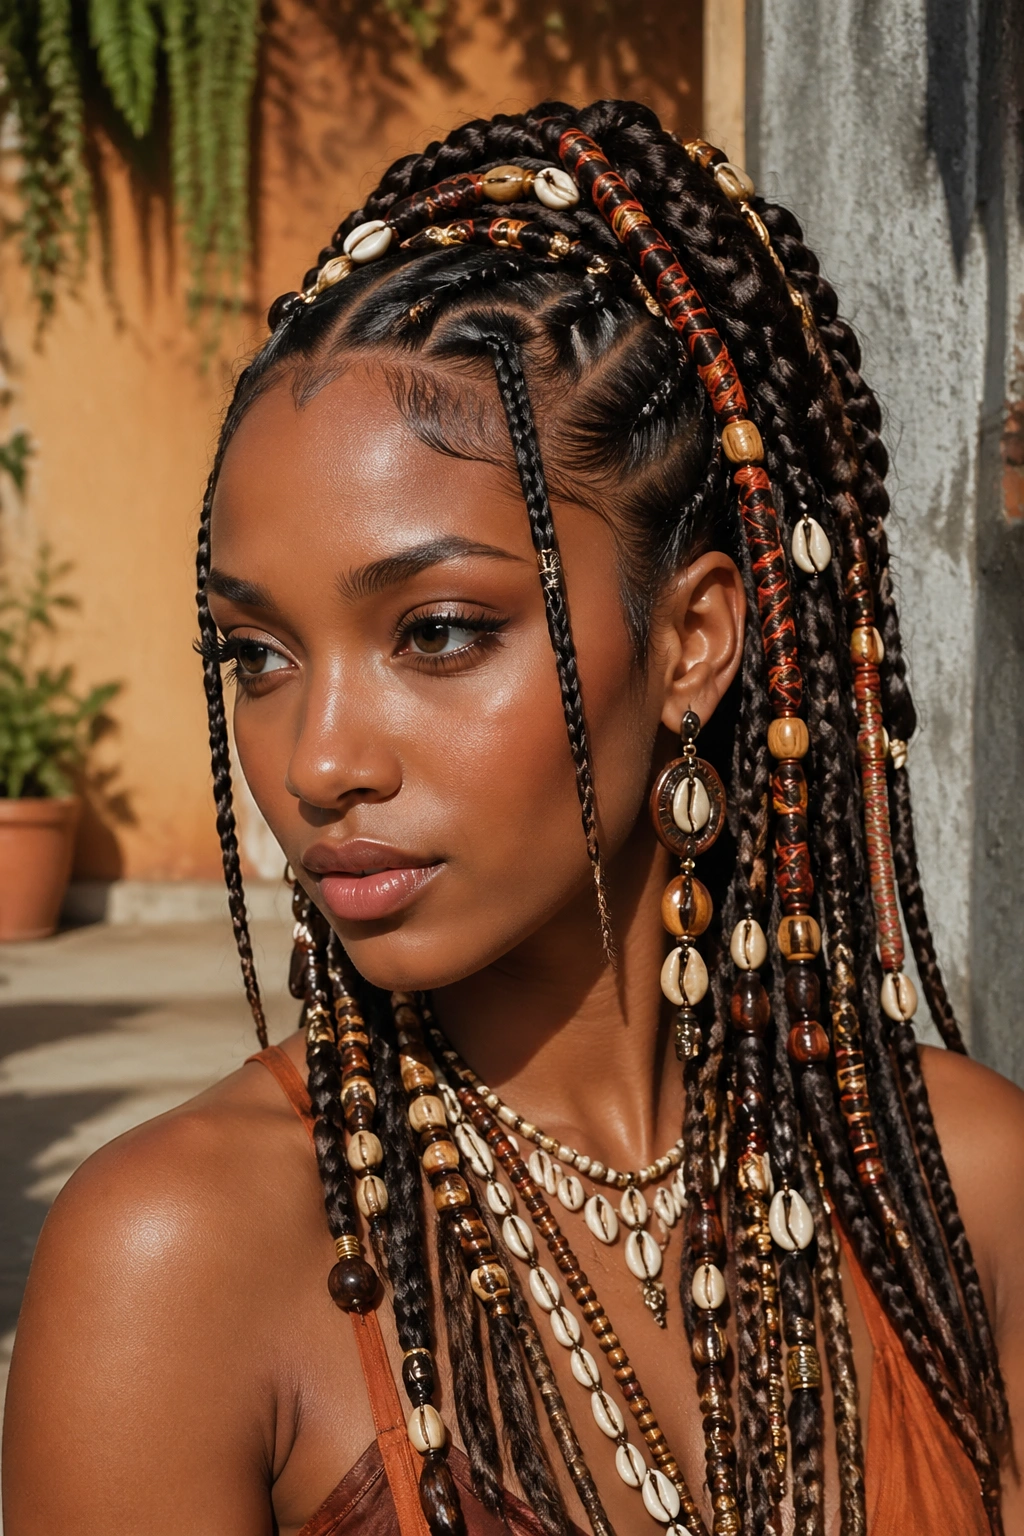
11. Fulani Braids
Fulani braids draw from a specific traditional style — thin cornrows along the sides running toward the back or crown, with one or two braids across the center of the hairline, and often incorporating decorative hair jewelry at intervals along the braids. The overall silhouette has a distinctive crown line created by the central braids crossing the front of the head.
This is both a cultural reference and a genuinely beautiful style in its own right. When done with gold cuffs, cowrie shells, or beads woven into the braids, the style is elaborate and elegant.
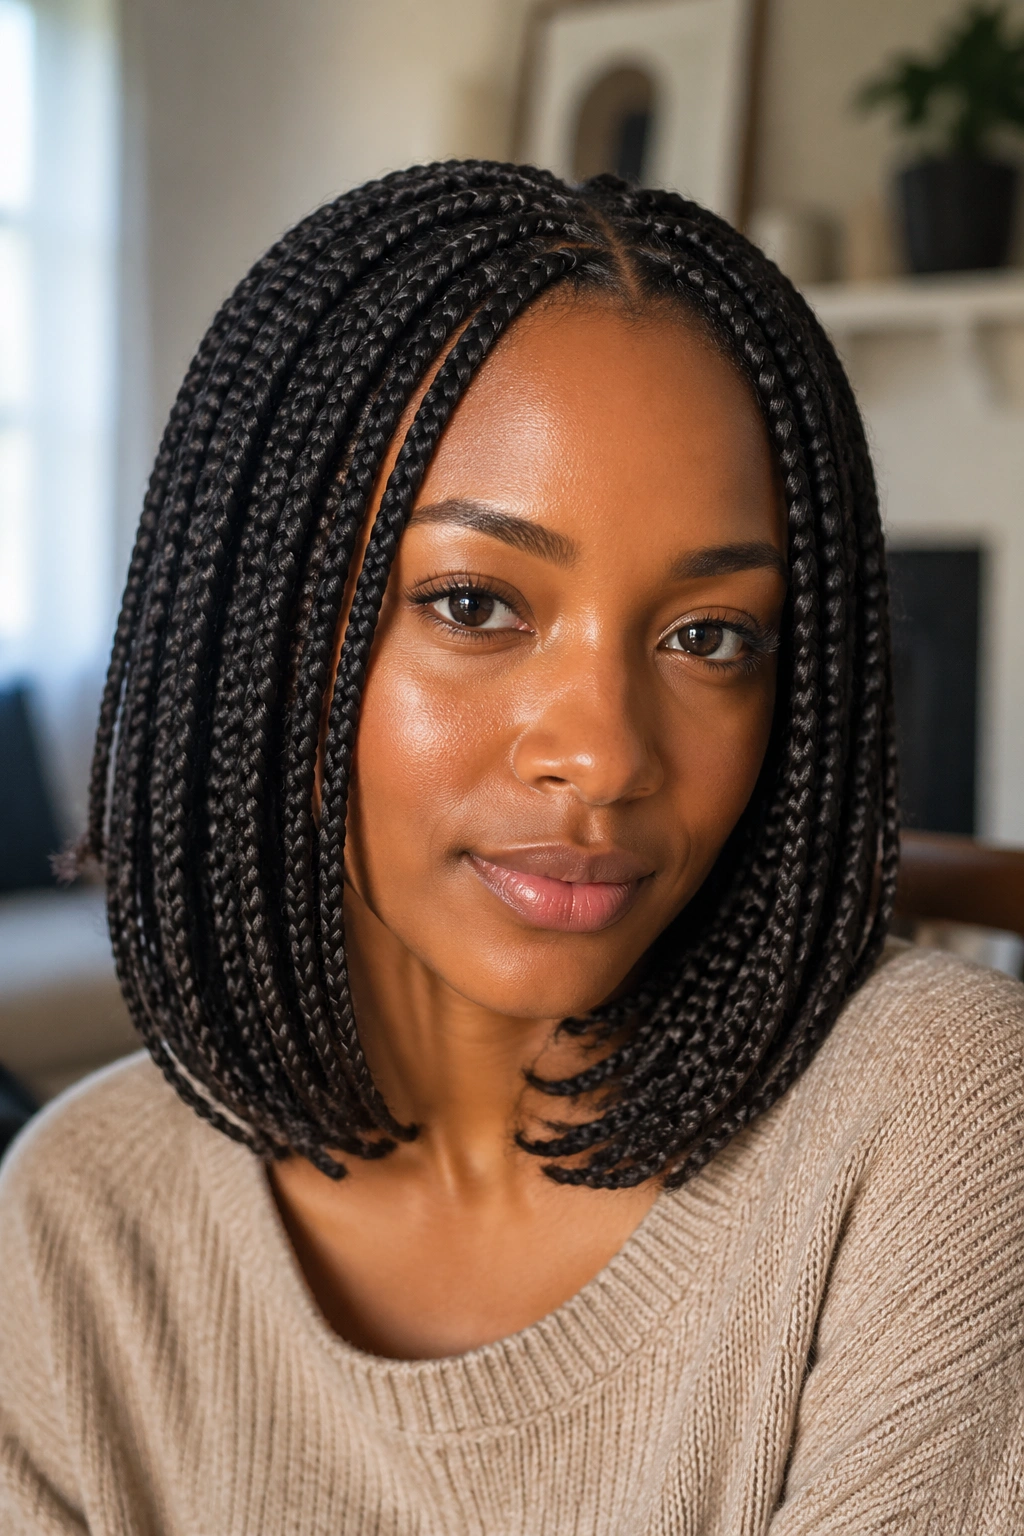
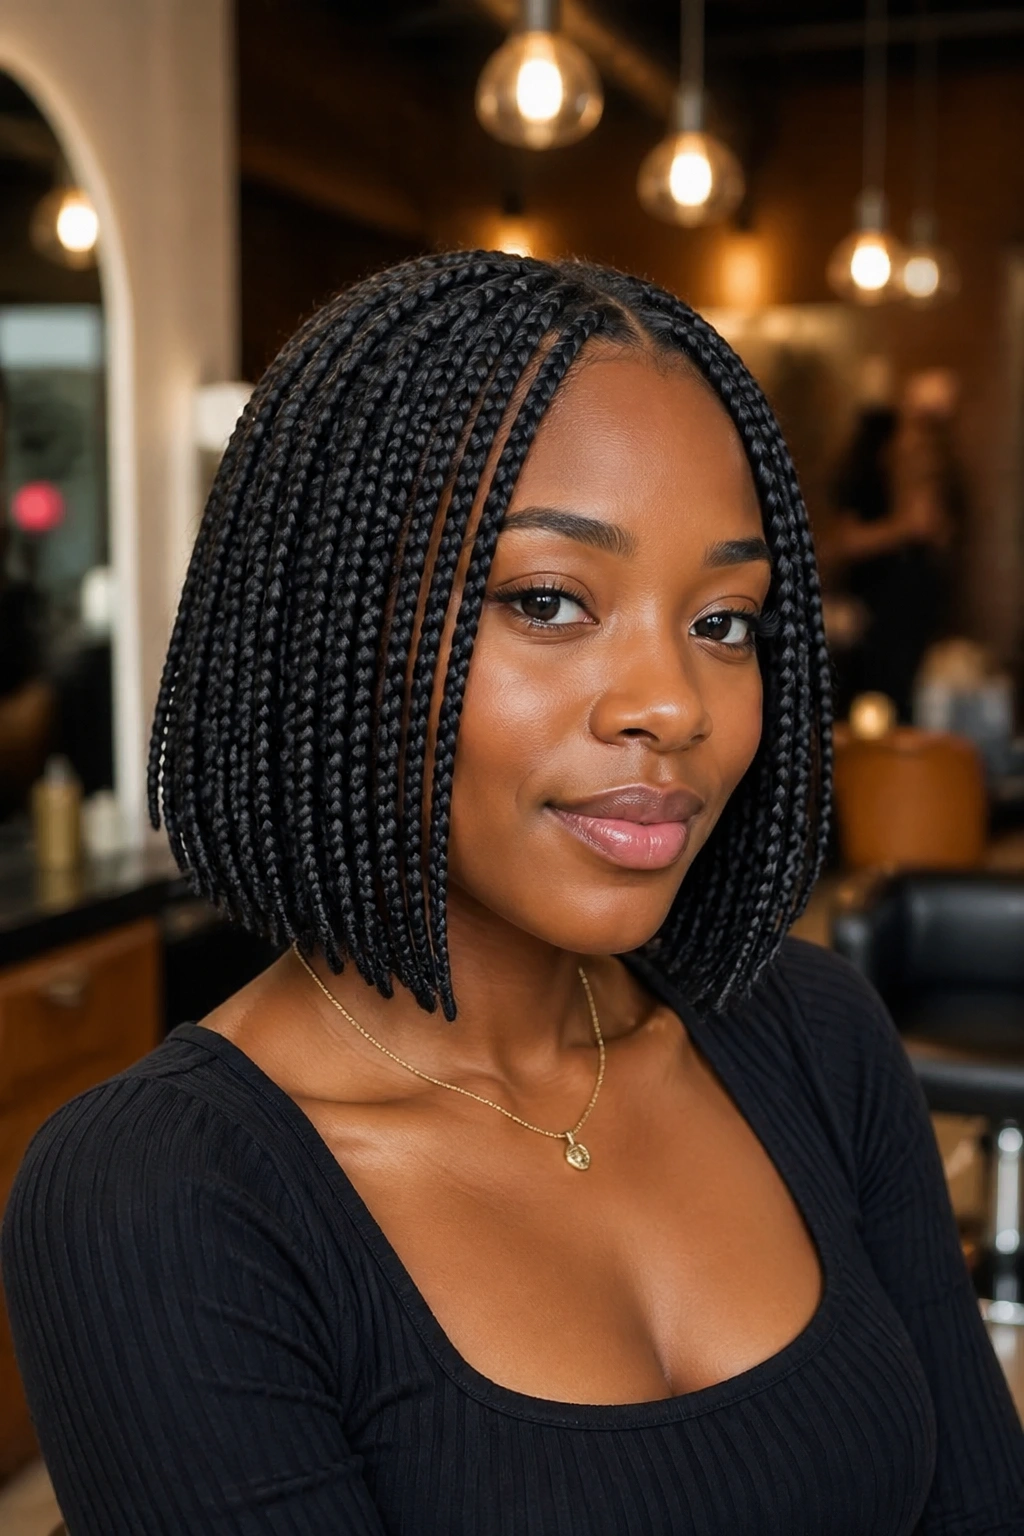
12. Bob Braids
Box braids cut or installed to a bob length — chin to jaw — have a completely different energy from long braids. The bob length swings with every head movement. It frames the face rather than hanging past it. And because there’s less weight and length, box bob braids are significantly more comfortable on the scalp and easier to sleep in.
Use blunt-ended braids for a classic bob line. Slightly shorter braids layered at the front with longer pieces in the back create a stacked bob effect.
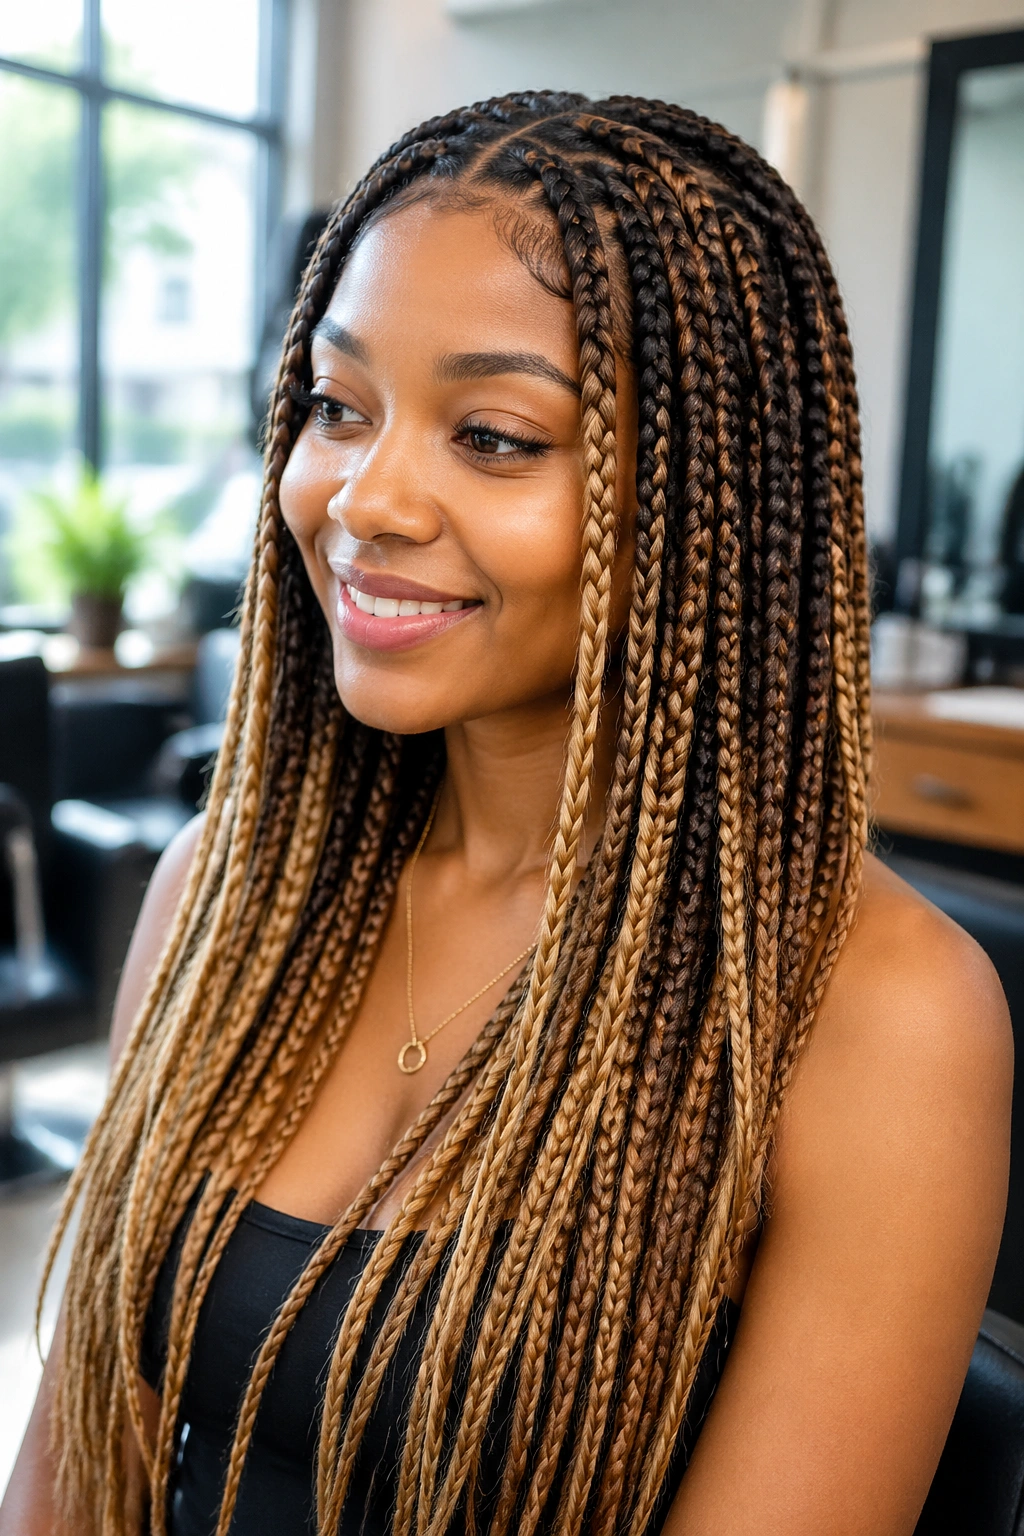
13. Color Braids — Ombre and Highlights
Braiding hair comes in every color, and mixing colors in a single install creates dimension and visual interest that single-tone braids don’t have. An ombre effect uses darker extension hair for the first portion of each braid and lighter color for the remaining length. The color transition happens at whatever point you switch the fiber.
A highlight approach mixes light and dark extension hair strands within the same braid, using both together from the start so the color variation runs throughout, not just at the ends.
Both techniques use the same braiding method — the only difference is how the extension fiber is prepared before installation.
14. Tribal Braids
Tribal braids combine multiple elements: braids, twists, and braided accessories like cuffs, beads, or threads all integrated into a single style. The result is a layered, maximalist look that has a distinctly editorial quality. No two tribal braid installations look exactly the same.
The specific elements vary widely. Some tribal braids incorporate large feed-in cornrows at the top transitioning to individual hanging braids below. Some use color mixing throughout. Some add shells and cuffs at strategic points. The common thread is that the style has multiple technique elements working together rather than one uniform technique throughout.
15. Half-Up Braided Style
Install individual box braids or knotless braids throughout, then gather the top half into a high ponytail, bun, or knot while leaving the lower half to hang loose. The contrast between the gathered section and the loose hanging braids below creates dimension and a style variation that requires no additional installation effort.
This also gives you two looks from one install: wear it half-up for one occasion, wear it fully down for another. The gathered bun can be a sleek, polished knot or a more casual stacked shape depending on the occasion.
16. Braided Crown Halo
Gather existing braids from around the sides and back of the head, wrap them up and around in a circular path, and pin them at the crown. The result is a halo or crown of braids that encircles the top of the head. Any remaining hanging braids fall down below the halo line.
The halo braid is one of the most elegant natural hair updo options available — it’s structured, it stays in place all day, and it works equally well at casual and formal events.
17. Stitch Braids
Stitch braids are a cornrow variation where the parting along the scalp is done in horizontal “stitch” lines rather than a continuous diagonal part. The result is a cornrow where you can see a series of clean horizontal cuts through the braid as it runs along the scalp — these cuts look like stitches or ladder rungs viewed from above.
The technique produces a distinctly geometric aesthetic at the scalp that standard cornrows don’t have. The finished look is sharper and more architectural.
18. French Braid Protective Style
A French braid adds hair to the braid from the sides as it progresses from front to back — picking up new sections with each stitch — so the finished braid sits flat against the scalp all the way down, incorporating all of the hair on the head into one or two large braids. With extension hair added for thickness and length, a French braid on afro hair creates a voluminous, sculptural braid that’s wider and more pronounced than a French braid on straight hair.
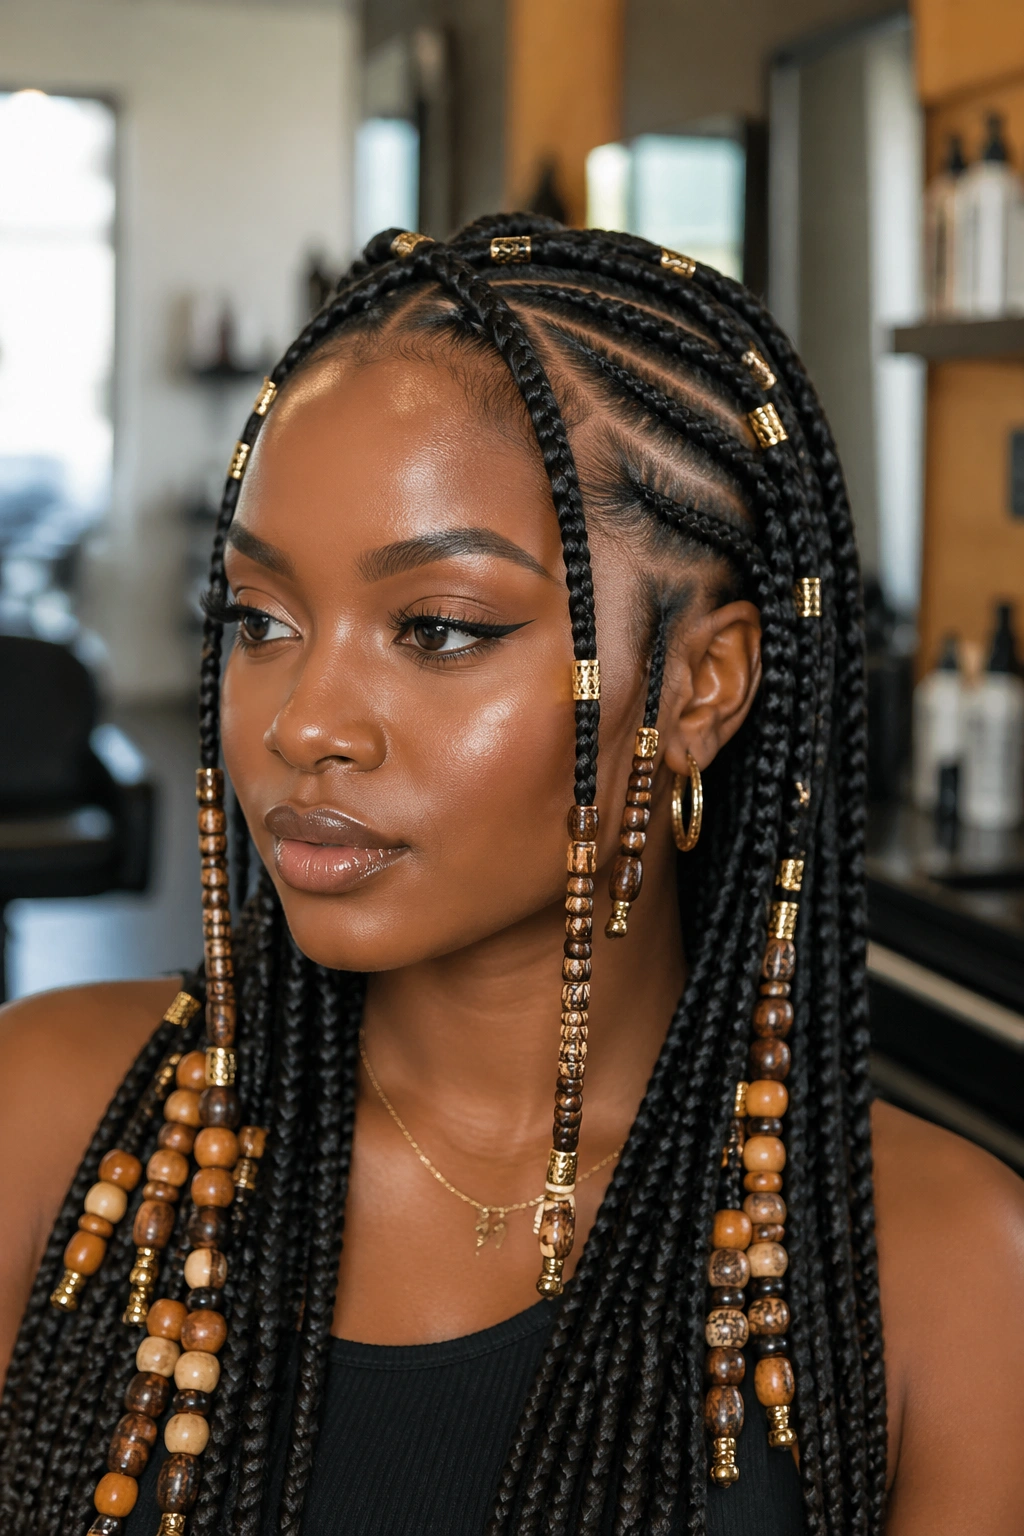
19. Braids with Cuffs and Beads
The braids themselves are standard — box braids, knotless, or cornrows — but the styling detail is the accessories. Gold cuffs slid onto individual braids at intervals. Cowrie shells knotted into the ends. Wooden beads threaded onto sections. The additions transform a simple braid installation into something more intentional and personal.
Beads and cuffs do add weight, so choose light, hollow cuffs rather than solid metal ones if you have a lot of them. For the ends of braids, thread beads on before dipping in hot water to seal — the bead seals in place and looks deliberate.
20. Invisible Braids
Invisible braids use a technique where the parting and base sections are hidden by the braids above them, so the finished style shows only the braid texture with no visible scalp between rows. This is achieved through careful section sizing and offset parting — each row of braids slightly covers the part of the row below it.
The result is a style that looks exceptionally full from root to end, with no scalp showing even at the front hairline. It’s a more technically demanding installation but the visual payoff is worth it.
21. Marley Braid Protective Style
Marley hair — a coarse, kinky synthetic fiber — can be used for individual braids rather than twists. Each braid uses Marley fiber as the extension material instead of the standard kanekalon, and the finished braid has a distinctly matte, kinky texture that blends with natural 4B and 4C hair much better than smooth kanekalon does.
The root line with Marley braids is significantly more seamless for tight curl patterns — there’s no sheen contrast between the natural hair at the base and the extension fiber below it.
22. Tree Braids
Tree braids are a cornrow technique where the extension hair is added to the cornrow in a specific way so that portions of the extension hair are left loose and hanging off the sides of the row, mimicking the branches of a tree. The cornrow itself is the trunk; the extension pieces that weren’t incorporated into the braid are the branches.
The practical result is a style that looks like a combination of braids and loose hair — you have the flat rows of cornrows along the scalp with flowing loose extension hair hanging from each row. The loose hair can be curly, straight, or kinky depending on the extension fiber used.
23. Criss-Cross Cornrow Pattern
Instead of parallel rows, criss-cross cornrows interlock — rows from one side of the head cross over rows from the opposite side, meeting in an X pattern at the crown or along the center. The pattern creates a woven, grid-like appearance at the scalp.
This style requires an experienced braider who can maintain consistent tension while working in crossing directions. The finished pattern is genuinely striking and unlike any simple parallel-row cornrow style.
24. Low Braided Ponytail

All braids gathered at the nape into a single low ponytail — either tied together with a hair-matching tie or with one braid wrapped around the base. The gathered bundle hangs down the back or to one side. This is a clean, elegant look that suits formal settings where a full head of loose hanging braids might feel like too much.
The low ponytail also keeps the braids from shifting during sleep if you tie them loosely before bed. Less movement overnight means less frizz at the roots.
25. Scalp Braids with Loose Ends
Cornrows or straight-back braids run along the scalp in the standard flat pattern, but instead of continuing the braid all the way to the ends, the braiding stops a few inches from the scalp and the remaining length — natural hair or extension hair — is left loose and unbraided. The loose ends fan out from each braided section, creating a mix of structured scalp braids and free flowing ends.
The style plays with the tension between order and freedom. The scalp section is precise and flat; the ends are soft and loose. It’s an interesting visual contrast that suits people who want a style that doesn’t read as entirely polished.
26. Braided Updo with Cascading Ends
Install medium-length box braids or knotless braids throughout, then gather and pin them into a complex updo — a twisted chignon, a high gathered knot, or a stacked crown shape — but leave a deliberate cascade of loose braids hanging down from the pinned section, either at the nape or off to one side.
The cascading ends break up the updo’s formality and give the style a romantic, editorial quality. Pin the updo securely but leave the hanging section completely free.
After the Install: Keeping Braids Fresh for the Full Wear Period
Braids need regular scalp care throughout the wear period. Apply a light scalp oil — jojoba, tea tree diluted in a carrier, or a dedicated braid spray — along each part line every two to three days. The scalp still produces sebum, and if that sebum isn’t moved along the part lines, it builds up and causes itching.
Dilute apple cider vinegar — about two tablespoons per cup of water — can be applied to the scalp every week or two for a mild antimicrobial cleanse. Spray it along the parts, let it sit for five minutes, then rinse over the sink with warm water. Pat the braids dry with a microfiber towel rather than rubbing.
Every night: wrap your braids in a satin scarf. Every morning: your braids look the same as they did the night before. This single habit extends the neat period of any braid style by two to three weeks.
Removing Braids Without Breaking Your Hair
Take your time. Rushing removal causes most of the breakage associated with braided styles. Start at the very ends of each braid and gently unravel the extension from the natural hair, working upward section by section. Apply a detangling spray as you work — it reduces friction and makes the separation feel smooth rather than grabby.
Once all the extension hair is out, you’ll notice shed hairs that accumulated during the wear period tangled into the natural hair. This is normal — hair sheds every day at a rate of about 50 to 100 strands, and when it’s in braids, it has nowhere to go. Gently detangle with your fingers first, then follow with a wide-tooth comb starting at the ends.
Protecting Your Edges During Long-Term Braid Wear
Edge health during braid styles is non-negotiable. The front hairline is the most fragile section of hair on most heads — the finest strands, the most exposed to tension. For braid styles, this means making sure the front rows are never installed too tight and that any face-framing braids aren’t pulling toward the temples.
Massage the edges with a light, non-greasy oil — castor oil mixed with a lighter carrier like sweet almond is a classic combination — twice a week. The massage increases blood flow to the follicles along the hairline and the castor oil supports follicle health. Apply a pea-sized amount to the hairline, massage in small circles for about two minutes, and let it absorb.
If you ever notice your edges feeling tender or seeing them thinning at the corners, that’s your signal to take the style down early and give your hairline a rest.
How to Keep Braids Looking Fresh at Week Four and Beyond
The first two weeks of any braid style look sharp. By week four, the roots show new growth, the parting lines are less crisp, and some frizz appears at the braids’ surface. This is completely normal and doesn’t mean the style is failing — it means your hair is growing.
To manage the in-between phase, apply a very small amount of edge gel — a fingertip amount, not a glob — directly to the part lines and smooth them down with a boar bristle or soft toothbrush. This isn’t about flattening everything, just refreshing the visible lines where the scalp shows.
For surface frizz on the body of each braid, a light mist of water and a few drops of argan oil — shaken together in a spray bottle — applied to the braids and smoothed with your hands will calm down most frizz. Let the braids air dry after misting rather than covering them immediately. Trapping moisture against the braid creates the musty smell some people associate with extended braid wear.
The back section usually stays neater longer than the front because it gets less friction. The nape and side sections frizz first because of collar and pillow contact. Pay extra attention to those areas during your midpoint maintenance routine.
Braid Hair Care — What Happens to Your Natural Hair Underneath
Your natural hair doesn’t stop growing during a braided protective style. It grows at its usual rate — roughly half an inch per month — and that growth accumulates at the root, which is what causes the visible new growth you see after week three or four.
This new growth needs moisture too, even though it’s technically inside the braid. The scalp oil you apply along the part lines actually serves this purpose — the oil travels down the part and reaches the roots. The sebum your scalp produces also continues coating the root section. The combination is usually sufficient for maintaining moisture at the new growth for a braid wear period of four to eight weeks.
What you need to watch is tangles. Where your natural hair meets the extension at the base, the two textures can mat together over time. This is accelerated if you don’t maintain the scalp regularly, if you use heavy products that create buildup, or if you wear the style past the eight-week mark without any maintenance. When you remove the braids, matting at the root is the number one cause of post-style breakage — not the removal itself, but the accumulated tangling that happened while the braids were in.
Choosing the Right Extension Hair for Your Braid Style
The extension hair you use matters significantly for both the finished look and the longevity of the style. Not all braiding hair is the same, and understanding the differences helps you choose the right product before you spend hours on an installation.
Kanekalon is the standard fiber for braiding hair. It’s lightweight, relatively tangle-free, and heat-responsive — meaning you can dip the braid ends in hot water to seal and smooth them. It’s the choice for standard box braids, cornrows with extensions, and most medium-sized styles. The slight sheen of kanekalon can look different from natural 4C hair at the root line, which is worth knowing if seamless blending is your priority.
Marley hair braid fiber — a coarser, matte version — blends better with tighter curl patterns. If you have 4B or 4C hair, Marley fiber at the root line looks far more seamless than standard kanekalon.
Expression braiding hair is known for being especially long — packs often come at 82 inches of fiber, giving maximum length options. Freetress Equal hair is often used for jumbo braids because of its particularly even distribution across the pack.
For all braiding hair, it’s worth doing a quick flame test on a single strand before buying the full supply you need. Genuinely synthetic fiber — kanekalon and similar — should curl slightly when held near a flame and smell plasticky. Hair that burns with a sharp, acrid smell and produces black ash is a different composition and may not behave the way kanekalon does.
Natural Hair Length and What Braiding Can Actually Achieve
There’s a persistent idea that braided protective styles will cause dramatic hair growth, and the reality is more nuanced than that. Braids don’t make your hair grow faster. Hair growth is primarily determined by genetics and scalp health. What braids do is help you retain the length your hair is already growing.
Here’s the practical difference. If your hair grows half an inch per month — which is the average — but you’re also losing half an inch per month to breakage from daily manipulation, heat, friction, and environmental stress, your length appears to stay the same even though hair is technically growing. Braided protective styles reduce the breakage, so the growth actually accumulates.
Over a sustained protective style regimen — alternating between braided styles and recovery weeks throughout the year — many women with afro hair find that they retain noticeably more length over time than when they were styling their hair loosely every day. The change isn’t dramatic in a single month. Over a year or two, it becomes visible.
The protective benefit also applies to the ends of your hair, which are the oldest and most fragile part of each strand. Tucking the ends into braids or inside extension fiber keeps them away from friction surfaces and preserves their integrity.
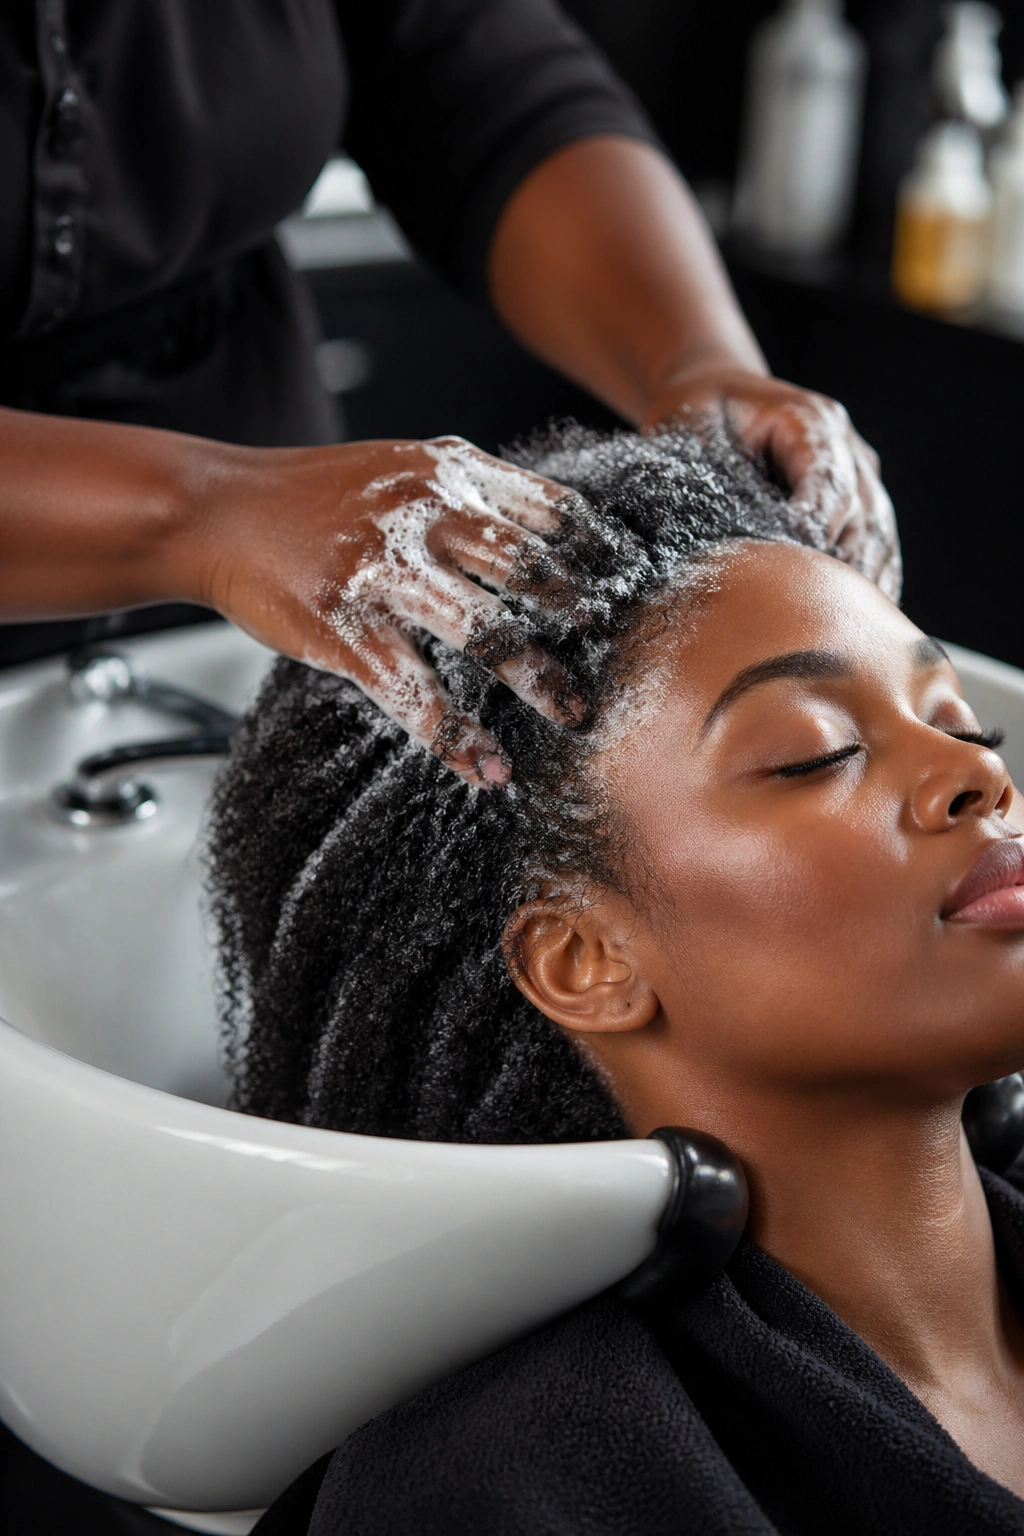
Post-Braid Wash Day: The Full Reset
After removing a long-term braid style, wash day is non-negotiable. Your scalp has accumulated weeks of sebum, product residue, and environmental debris along the part lines. Your natural hair has collected shed hairs in the root zone. And the general state of your hair needs to be assessed after weeks of being enclosed.
Start with a pre-shampoo detangling session on dry hair. Work in sections — four to six large sections is manageable — and detangle each section starting from the ends and working upward with your fingers. Remove as much shed hair as you can before adding water, which makes wet detangling faster and less damaging.
Clarifying shampoo is appropriate here even if you don’t typically use one. The scalp buildup after six or eight weeks in braids is more significant than what accumulates in a week or two of loose styling. Use the clarifying shampoo at the scalp only, and follow with a moisturizing shampoo on the length to avoid stripping the strands.
Deep conditioning is the most important step. A thirty-minute deep conditioning session — under a plastic cap, with heat if possible — restores moisture and flexibility to hair that’s been in a relatively low-moisture state for several weeks. Don’t rush this step. The condition of your hair going into your next style depends largely on how well you care for it during this reset period.