Beads turn cornrows into something else entirely. A plain set of straight-backs becomes jewelry. A half-up freehand turns into a sculpture. And the sound — that soft click when beads knock against each other as you walk — is hard to beat.
This piece walks through 30 different cornrow styles with beads, from tiny crystal accents on the ends to full wooden bead curtains down the back. Each one solves a different problem or shows off a different part of the braid. Some are loud. Some are quiet. A few sit somewhere in the middle, which is often where the best styles live.
Beaded cornrows work on pretty much every hair length, every age, and every face shape. The trick is matching bead weight to braid size so the style doesn’t pull on the scalp or look cluttered. That, and knowing where to stop adding.
Why Beads Still Dominate Cornrow Styling
Beads on cornrows aren’t a trend that fades. They’re a tradition rooted in West African hair practices that pre-date written history, and they carry meaning far beyond decoration. In many cultures, specific bead colors marked age, marital status, clan, or spiritual role. The practice traveled with the diaspora and stayed alive through every generation.
What’s kept beads relevant isn’t nostalgia, though. It’s the math. A simple cornrow with no embellishment reads as utilitarian — nice, clean, done. The same cornrow with six wooden beads at the tip reads as intentional. You made a choice. That choice tells the world something.
Beads also solve a real styling problem: what to do with the ends. Cornrow ends tend to look stringy or blunt unless you rubber-band them, dip them in hot water, or burn the synthetic tips. Beads cover all that up. They give the braid a finished weight, literally and visually. Without them, the eye runs off the end of the style into nothing.
And beads move. A braid by itself is static — it sits where you put it. Add even three beads and the whole style gains rhythm. Walk, turn your head, laugh, and the beads shift. That motion is half the appeal.
Types of Beads You’ll Actually Use
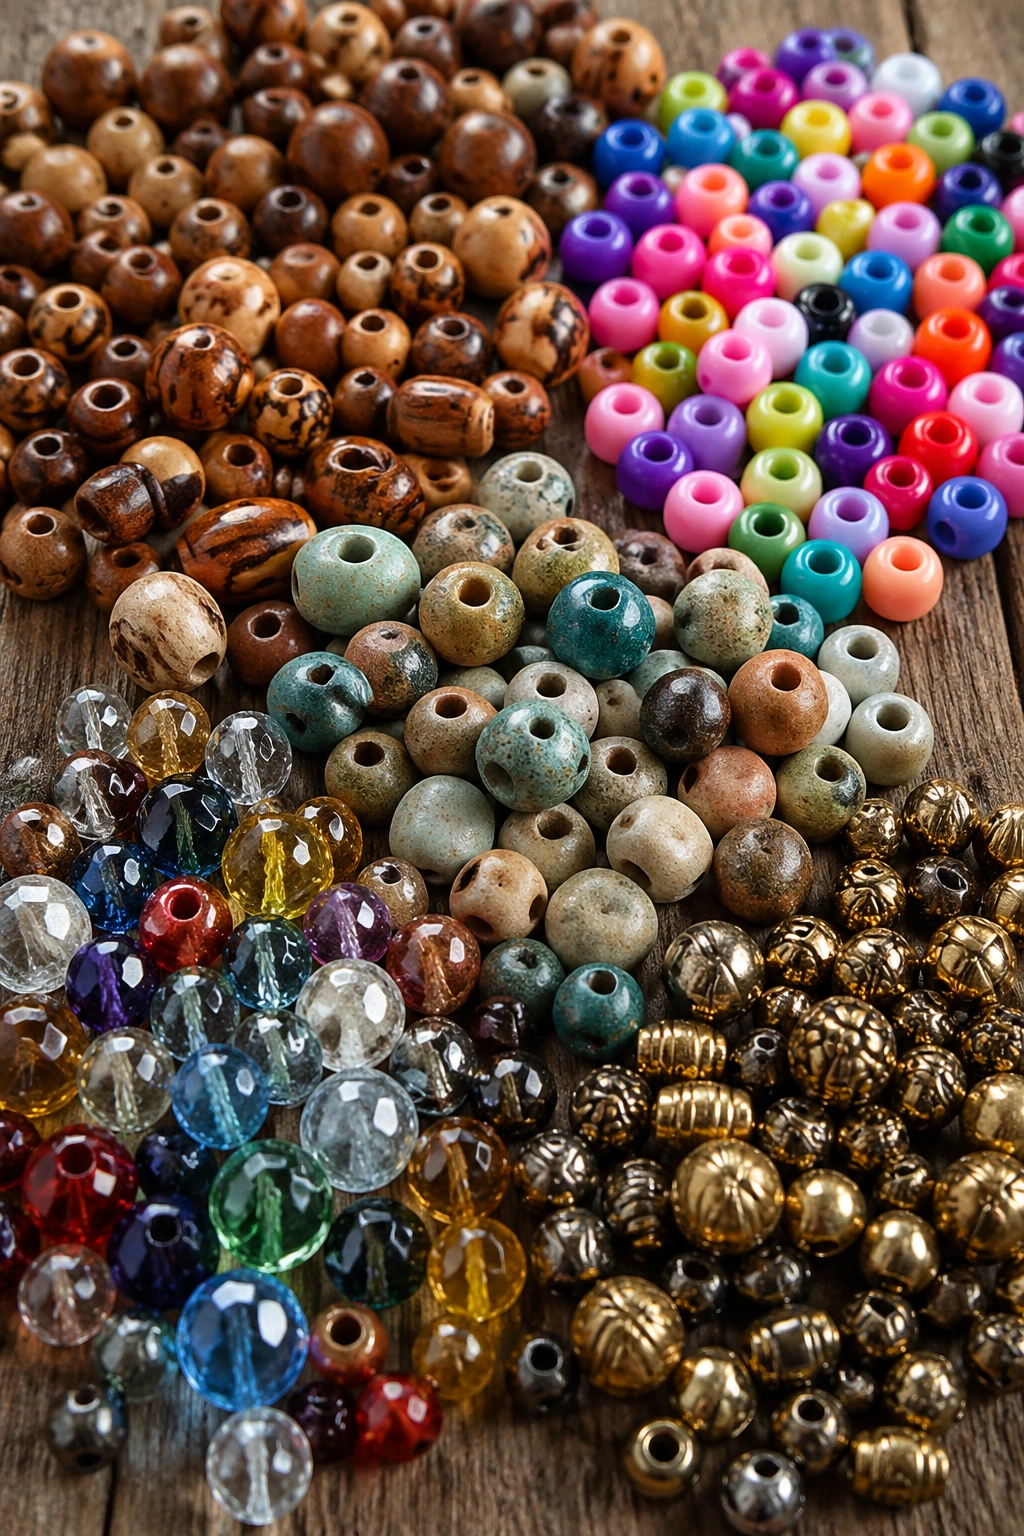
Wooden beads are the foundation of most traditional styling. They come in dozens of shapes — round, barrel, disc, tube — and colors range from pale birch to dark ebony. They’re light enough for small braids and warm-toned enough to flatter most skin tones. A 10mm wooden round is the workhorse bead.
Acrylic beads show up in every color imaginable, including translucent jewel tones and pastels. They’re cheap, forgiving, and great for kids because they don’t weigh the braid down. The downside? Cheap acrylic can split when you clamp a hair bead cuff over it, and bright colors can look plastic under harsh lighting.
Clay beads — hand-rolled, often with painted patterns — bring a crafted, earthy feel. They’re pricier but unforgettable on a simple cornrow set.
Glass beads catch light the way no other material can. Small glass seed beads threaded onto single braid strands create a beaded curtain effect that’s hard to match. They’re fragile, though, so don’t sleep with them in.
Metal beads add weight and sheen. Brass, copper, and silver-tone beads pull a style toward bold and structured. Gold tones warm up warm-undertone skin. Silver tones feel cooler and more graphic.
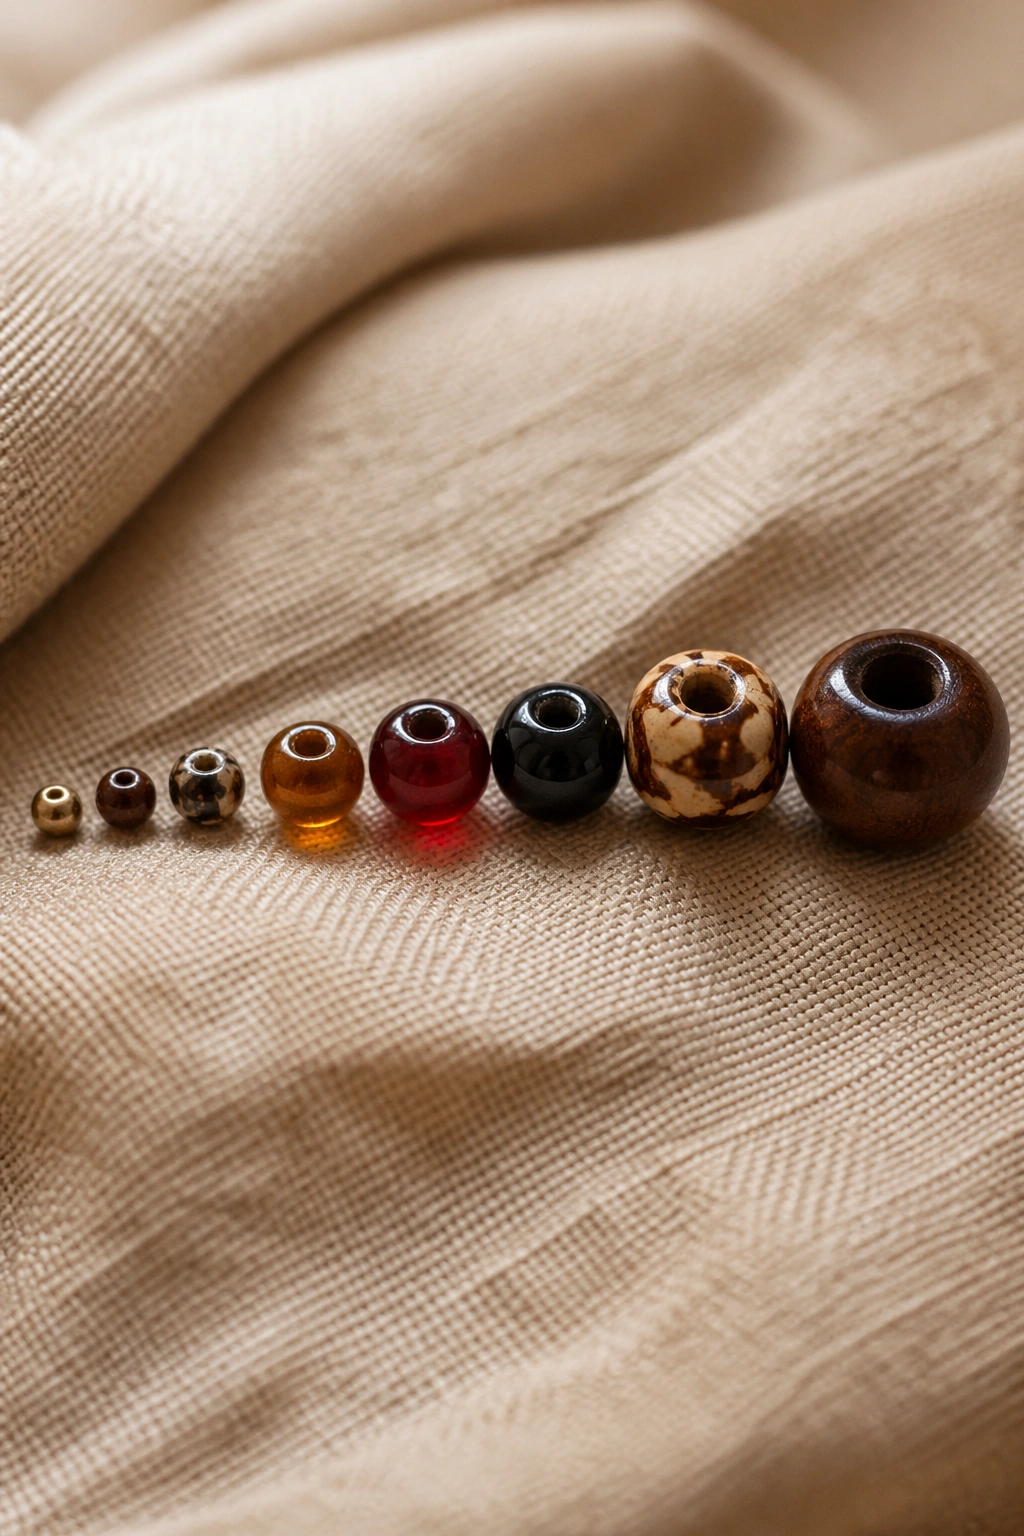
Picking the Right Bead Size
Bead hole diameter matters more than bead size does. You need a hole wide enough to slide over the braid plus the threading tool — usually a looped elastic or a beading needle. For standard feed-in cornrows, look for a hole of at least 5-6mm. Smaller holes will frustrate you.
Bead weight needs to match braid density. A thin cornrow no thicker than a pencil can’t support a heavy 15mm wooden bead without dragging on the scalp. You’ll feel the pull at the root within an hour, and it’ll lift the braid. Match thin braids to 6-8mm beads, medium braids to 10-12mm, and thick braids to 15mm+.
Here’s a quick guide:
- Micro cornrows: 4-6mm beads, max 3 per braid tip
- Small cornrows: 6-8mm beads, 3-5 per braid tip
- Medium cornrows: 10-12mm beads, 4-8 per braid tip
- Jumbo cornrows: 14-18mm beads, 5-10 per braid tip
Tip: If you’re mixing bead sizes on one braid, stack large-to-small moving outward. The heaviest bead sits closest to the braid base for balance.
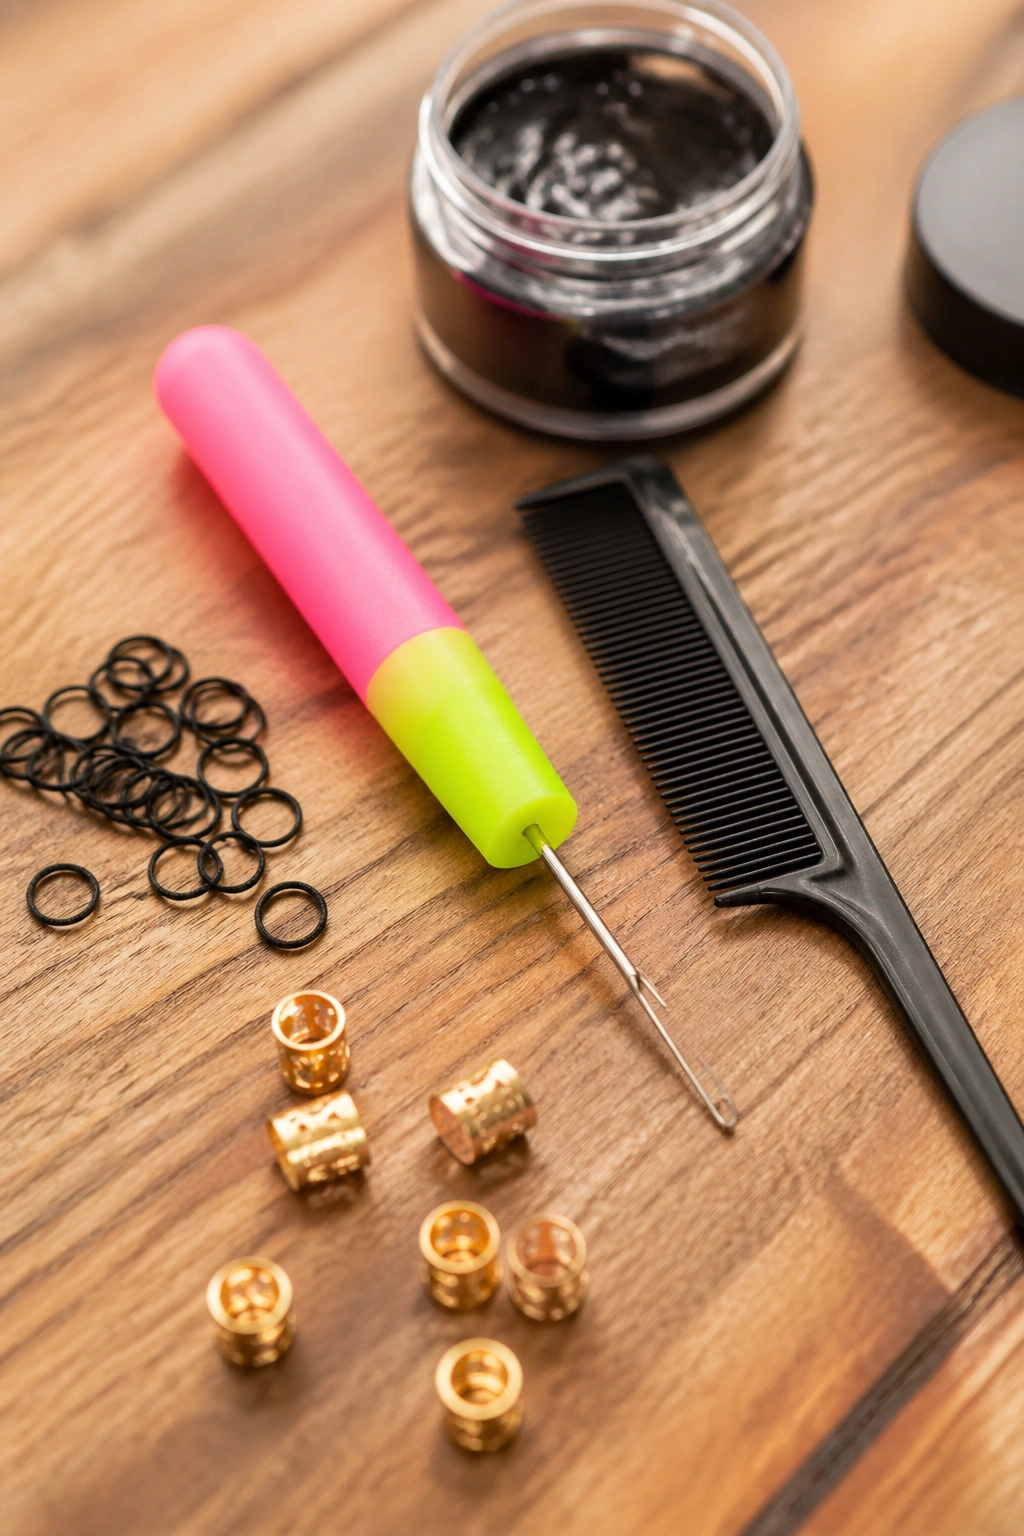
Tools You Need Before You Start
A proper beading setup isn’t complicated, but missing any one piece will slow you down. Keep these within arm’s reach before you sit down to style.
A rat-tail comb with a sharp metal tip creates clean parts. Plastic tips bend on thick hair and leave crooked lines.
Small rubber bands — not hair ties, actual elastic threading loops — are what you’ll use to pull hair through bead holes. Buy them by the hundred on any beauty supply site.
A beading tool looks like a long wire with a hook on one end. You thread the loop through the bead first, catch the braid with the hook, and slide the bead up. It takes twenty seconds once you get it.
Snap-on hair cuffs in metal or plastic lock beads in place at the end of the braid. Without them, beads slide off the second you unbraid for washing.
Edge gel, a spray bottle of water, and a silk scarf round out the kit.
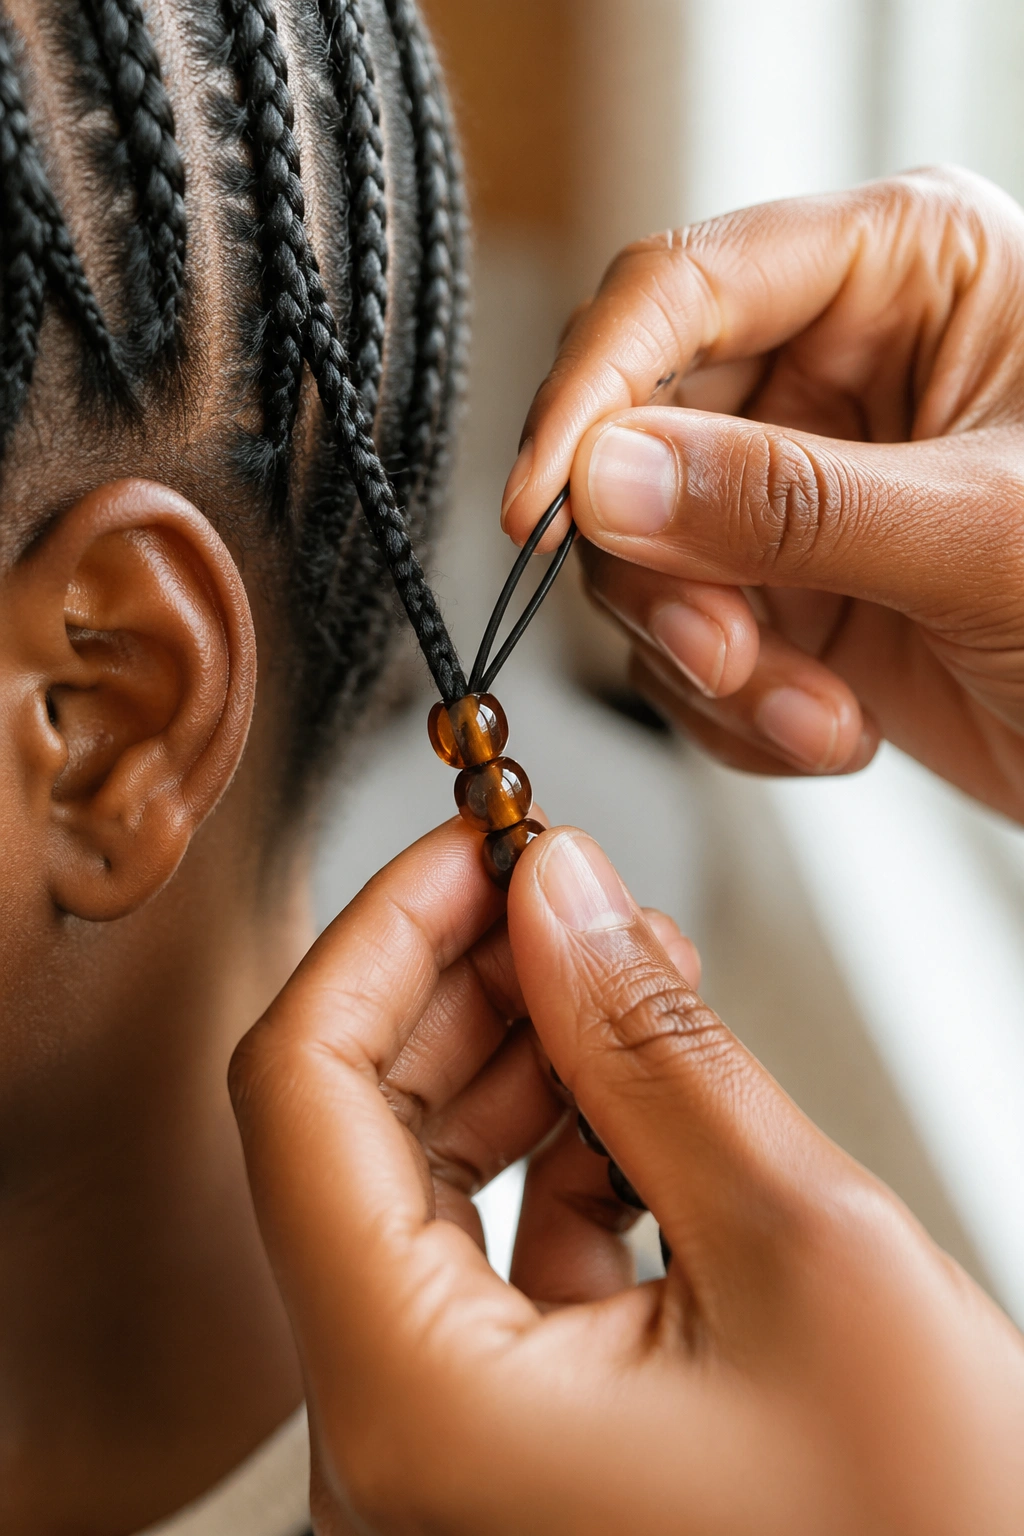
How to Thread Beads Without Damage
Threading beads wrong is how you get breakage at the ends. The two mistakes: pulling too hard when the bead catches, and forcing a bead that’s genuinely too small. Both snap hair.
Start with damp braid tips. Dry synthetic hair grips more and fights the bead. Slightly damp hair slides clean. Thread the rubber band loop through the bead first, pinch a small section of the braid tail through the loop, then slide the bead over the loop and onto the braid. Push the bead up to where you want it, add the next, and so on.
Once you’ve got your stack, snap a metal cuff just below the last bead. The cuff crushes the braid slightly so beads don’t slide down. Cut any excess braid beyond the cuff with sharp scissors.
Don’t over-tighten cuffs — if you can see the braid squished flat, you’ve crushed it. Cuffs should hold, not mangle.
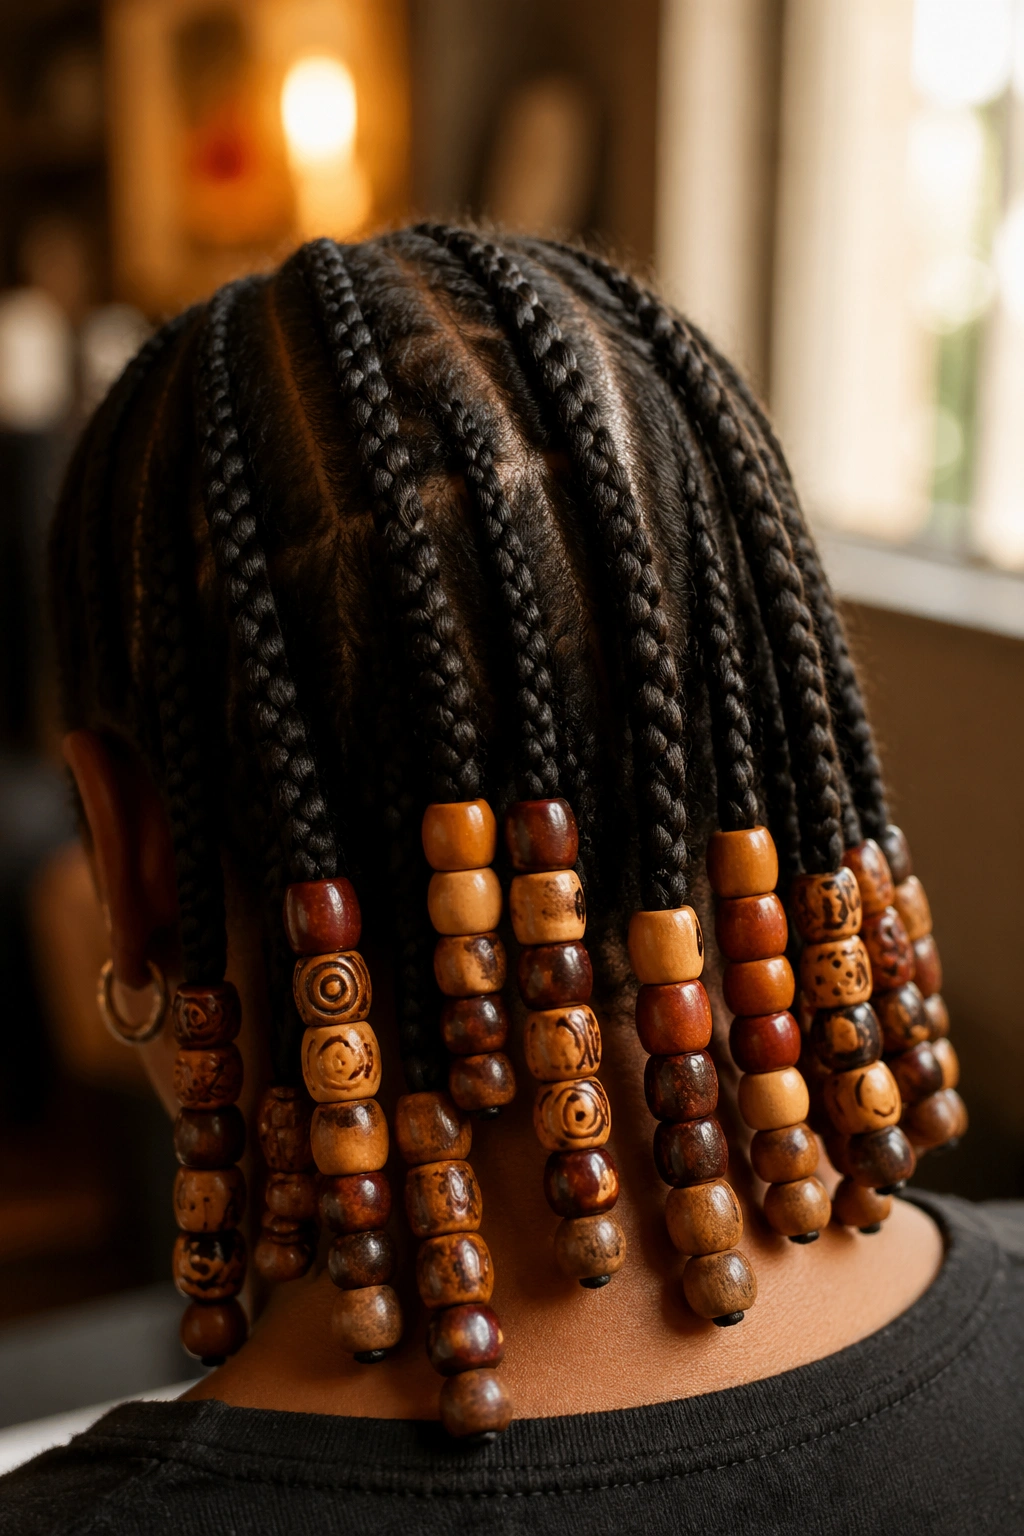
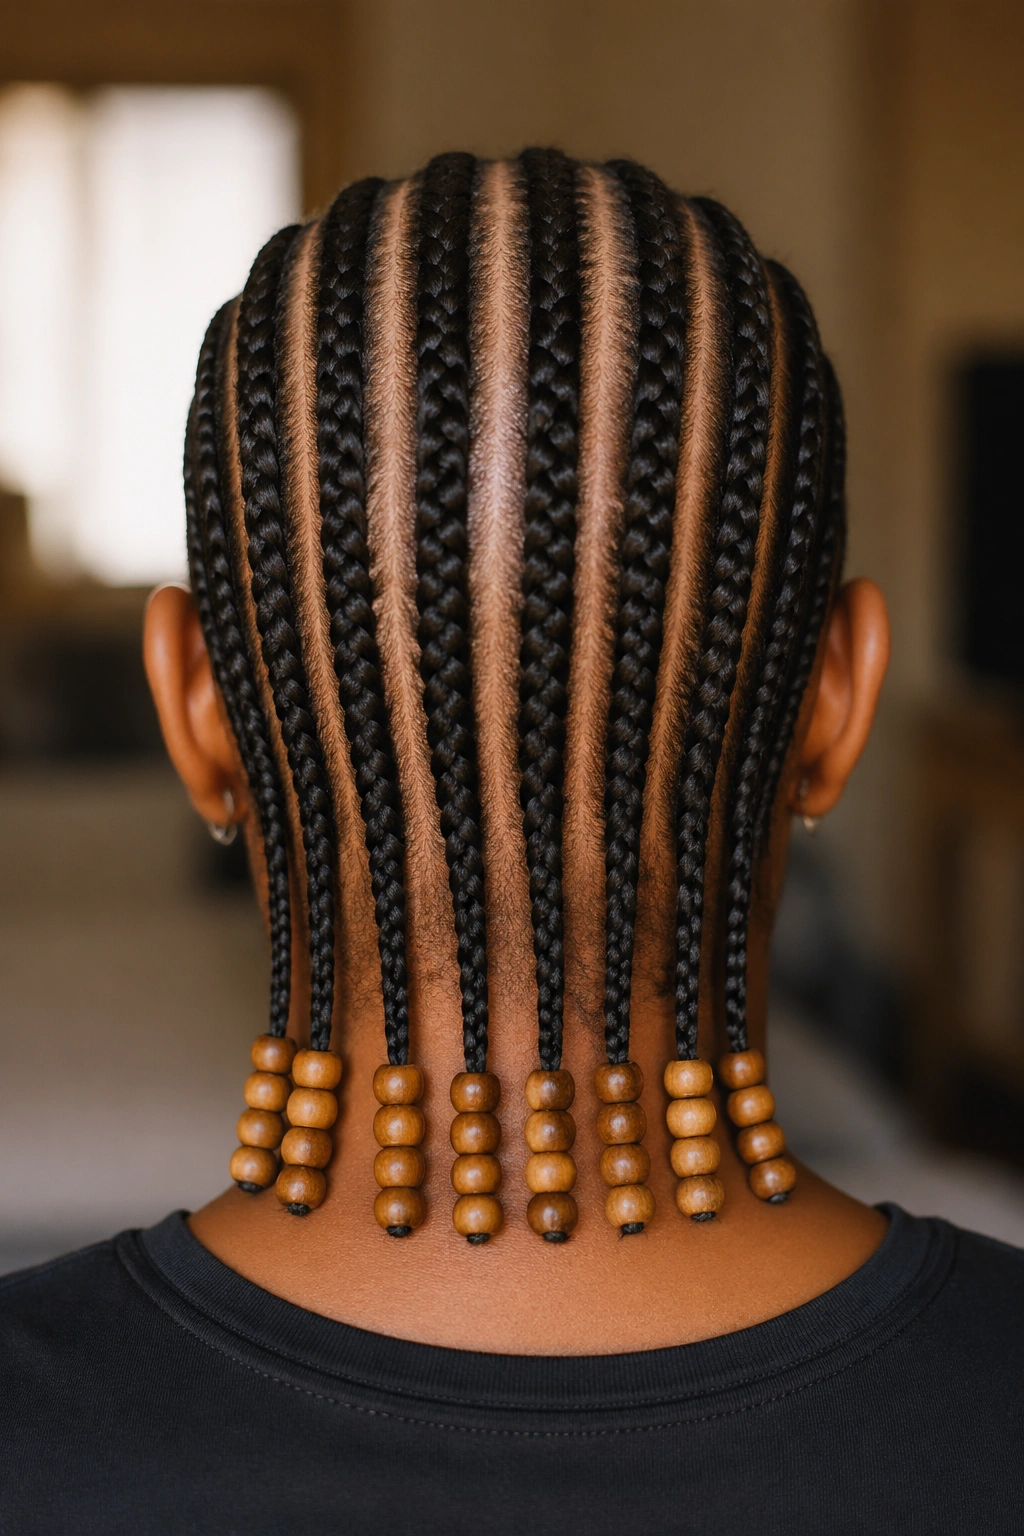
1. Classic Straight-Back Cornrows With Wooden Tip Beads
Ten straight-back cornrows running from hairline to nape, each tipped with a stack of five round wooden beads in natural tones. The simplicity is the point. No curves, no designs, no stopping halfway — just ten clean lines ending in ten clean beaded columns.
Why It Works
- The even spacing creates a rhythm that’s almost hypnotic when you walk
- Wooden beads are light enough to sit all day without scalp pull
- Natural bead tones pair with any outfit, any occasion
- Takes about 2 hours to do a full head if your braider’s fast
Tip: Ask for beads in three slightly different brown shades rather than one flat color. The subtle variation reads richer than ten identical beads.
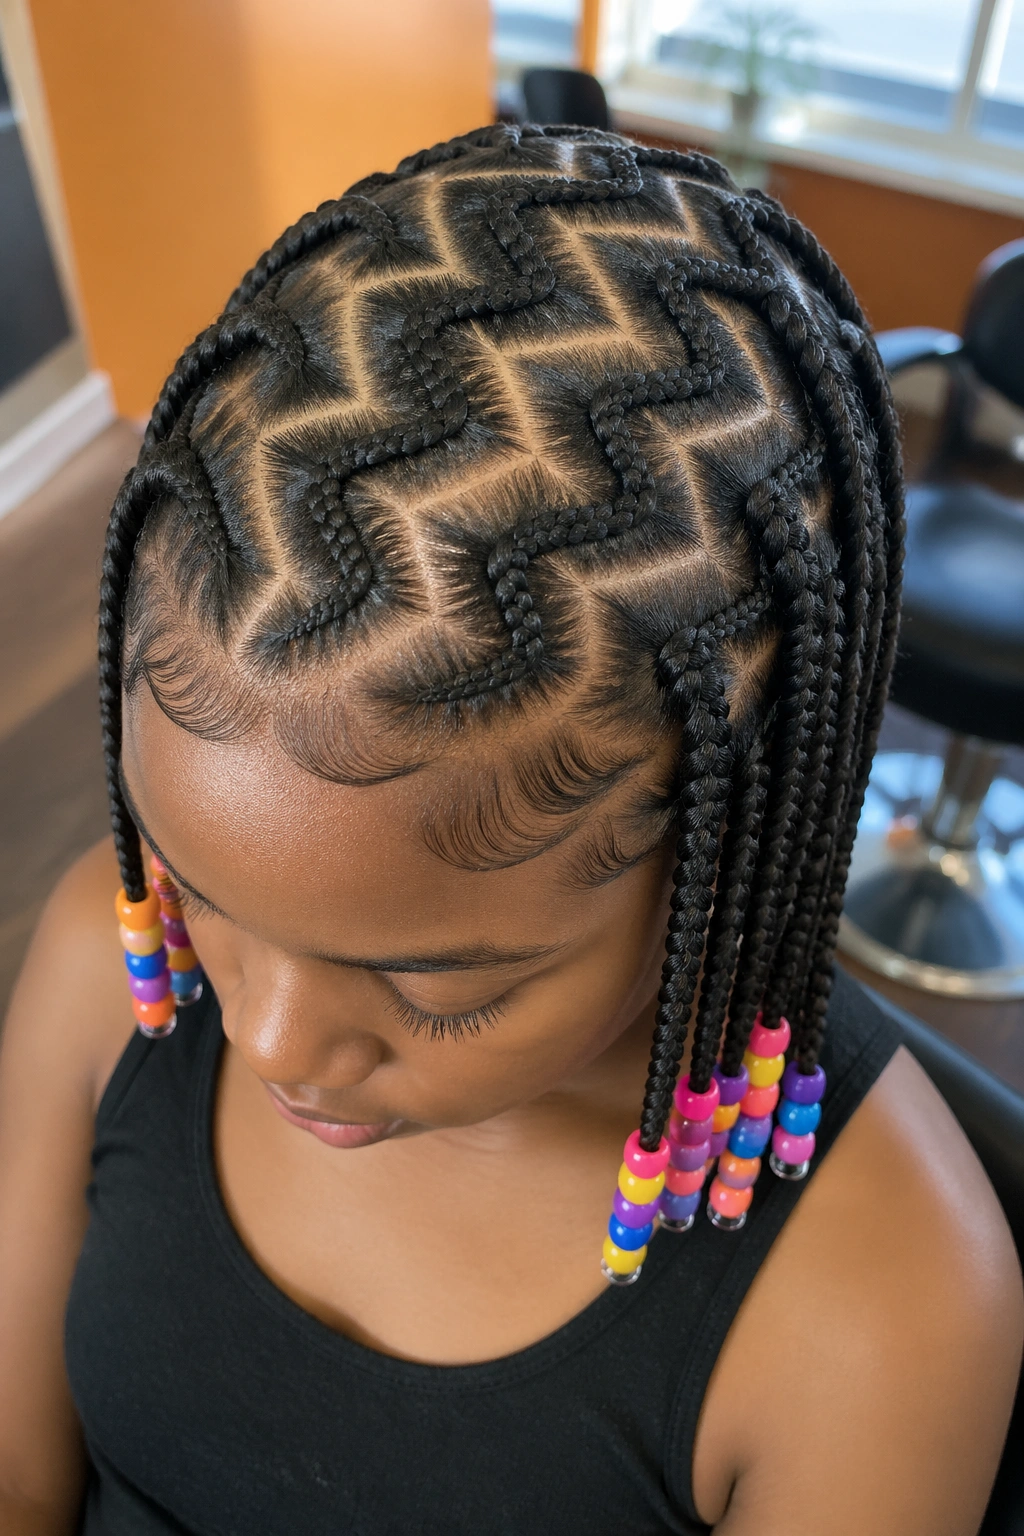
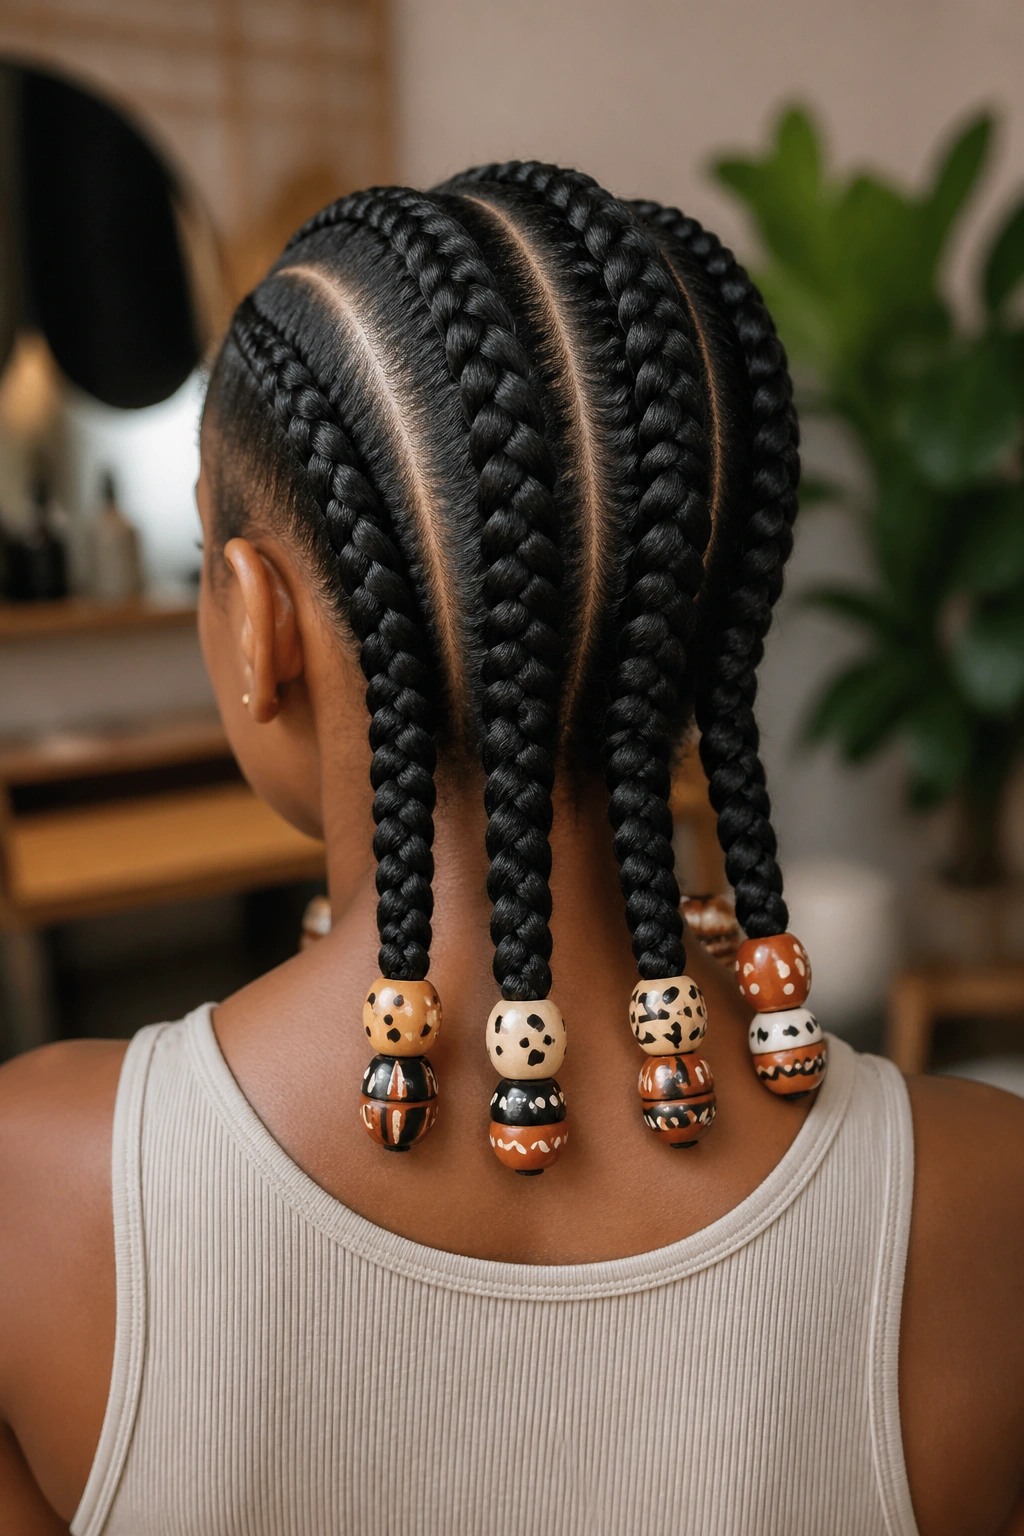
2. Zig-Zag Partings With Colorful Acrylic Beads
Forget straight parts. This style uses zig-zag partings across the crown to create eight cornrows that twist and turn across the head before running straight down the back. At the ends, each braid gets a mixed stack of acrylic beads — maybe four colors rotated.
The zig-zag adds motion even before you walk. From above, your head looks like a braided maze. The bright beads pull the eye to the ends, balancing the visual complexity of the parts with a playful finish.
Kids love this one. Adults who want something more fun without going full festival love it too. It photographs well because the lines have genuine movement baked in.
One thing to know: zig-zag parts take longer to make clean. A skilled braider uses the rat-tail comb end to draw the zig-zag first, then braids over the guide line. Expect 30-45 minutes more than a straight-back set.
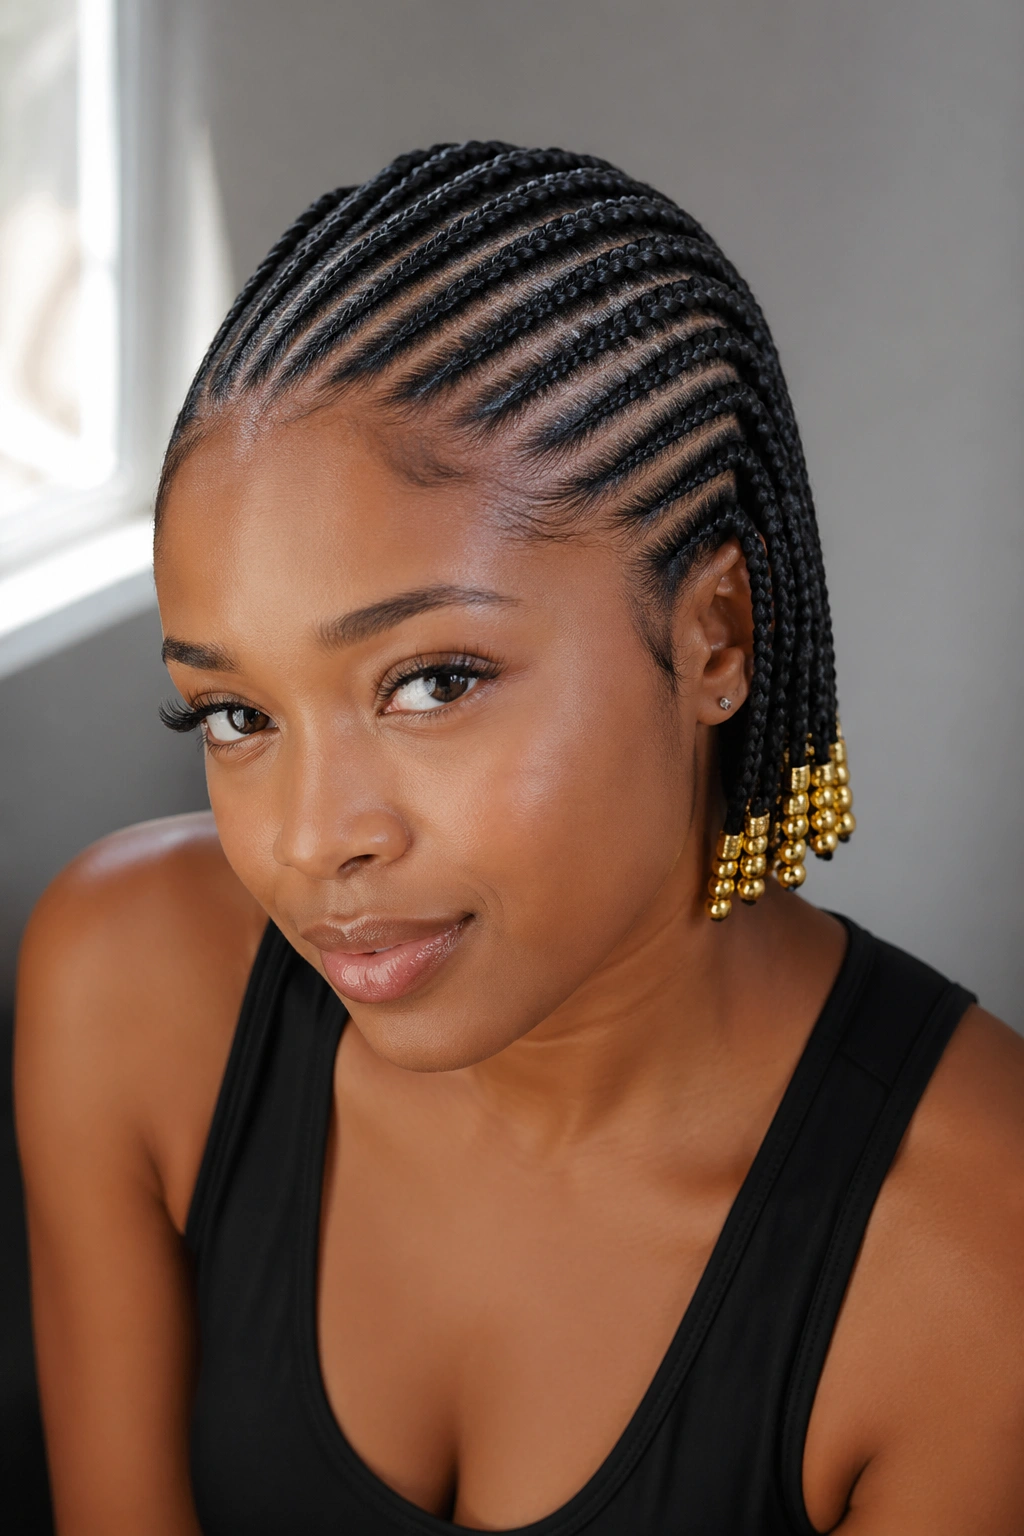
3. Lemonade Cornrows With Gold Metal Beads
Made famous by Beyoncé, the lemonade braid runs diagonally across the scalp — typically right-to-left — and ends somewhere past the shoulder. Add gold metal beads at the tips and the style goes from recognizable to statement.
Gold beads work specifically with this layout because the diagonal creates a sweeping line that the beads anchor. It’s like ending a sentence with punctuation you actually care about.
How to Style It
- Use 3-4 gold beads per braid, not more — gold is heavy
- Pick satin-finish gold rather than shiny chrome for a richer look
- Ask your braider to do feed-in from the front so the side-part is crisp
- Sleep in a satin-lined bonnet; metal beads can snag cotton pillowcases
Tip: If gold is too much, bronze or rose gold reads softer while still catching light the same way.
4. Jumbo Cornrows With Large Clay Beads
Four to six jumbo cornrows straight back, each one thick as a finger, topped off with two to three hand-painted clay beads at the tip. Clay beads have texture you can feel — slight bumps, uneven glaze, real hand-made warmth.
These beads run expensive, often $3-5 each, so two or three per braid is the move. They’re heavy enough that you don’t want more on a jumbo braid.
Who is this for? Someone who wants a bold, quick style that lasts 3-4 weeks with almost no effort. Jumbo braids are forgiving, clay beads are conversation-starters, and the combo takes maybe 90 minutes total to install.
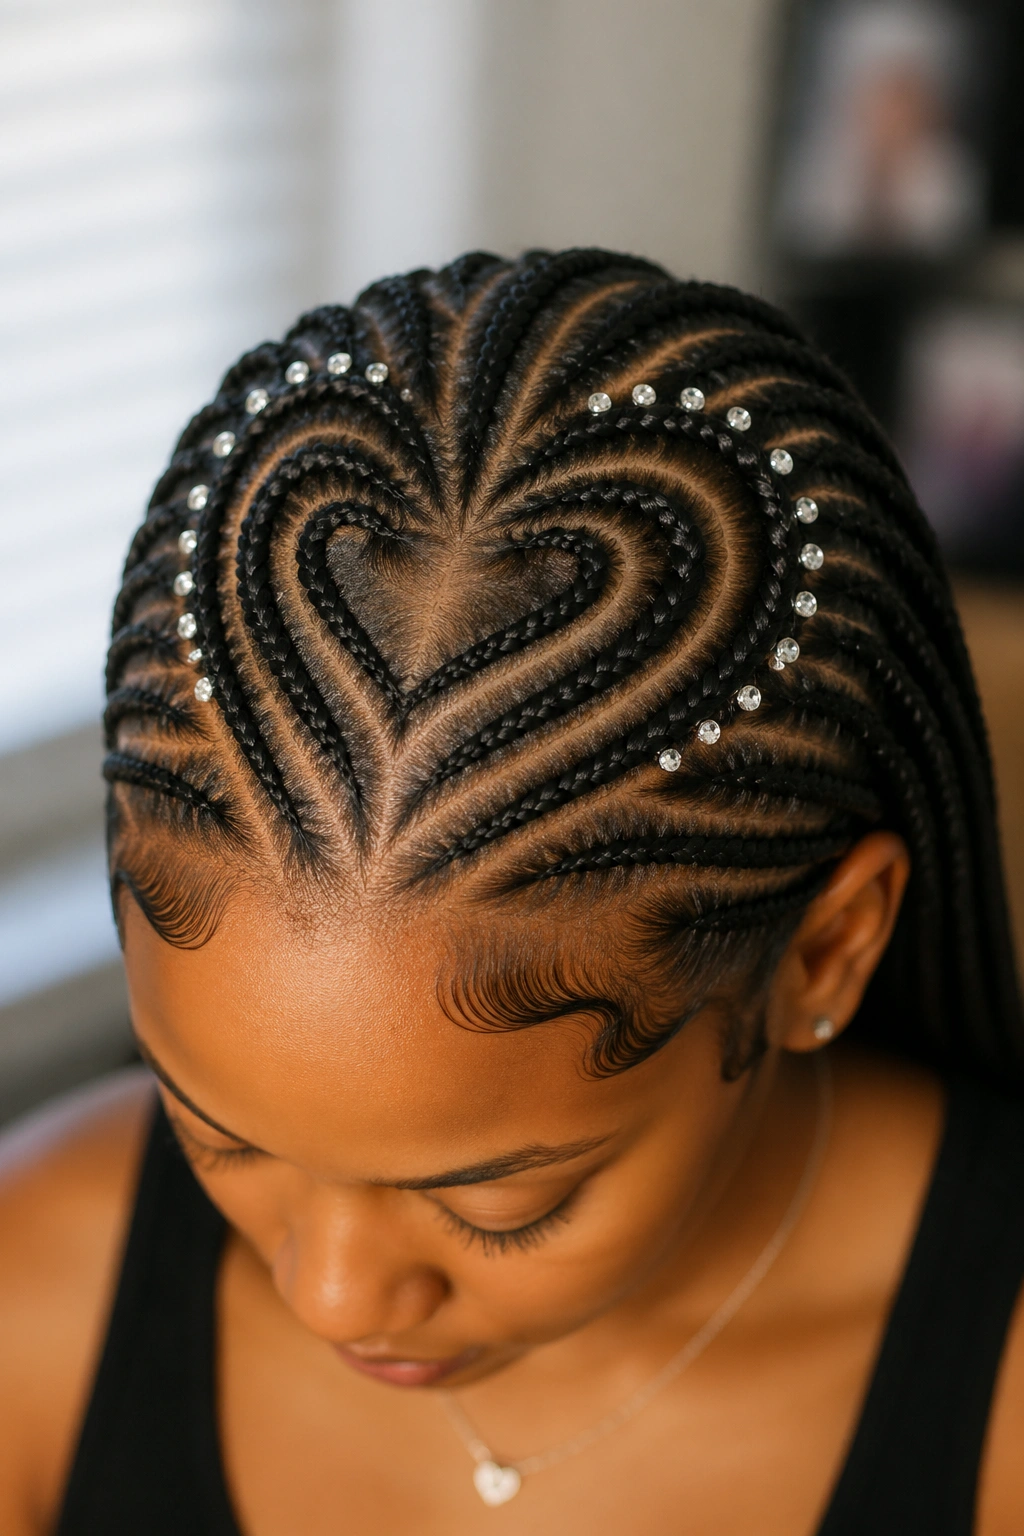
5. Heart-Shaped Cornrow Design With Mini Crystal Beads
A centered heart shape is freehand-braided into the crown, with the rest of the hair braided straight back around it. The heart outline gets mini 4mm crystal beads threaded along its curves.
The beads serve as accents along the design line, not as end-stacks. Each bead is placed maybe every inch along the heart’s perimeter, glued or secured with a small cuff.
This is for special occasions — birthdays, recitals, photo shoots. It’s not a daily style. But for a single event, it photographs beautifully and turns heads in person.
Installation runs 3+ hours because the heart freehand work is intricate. Budget accordingly.
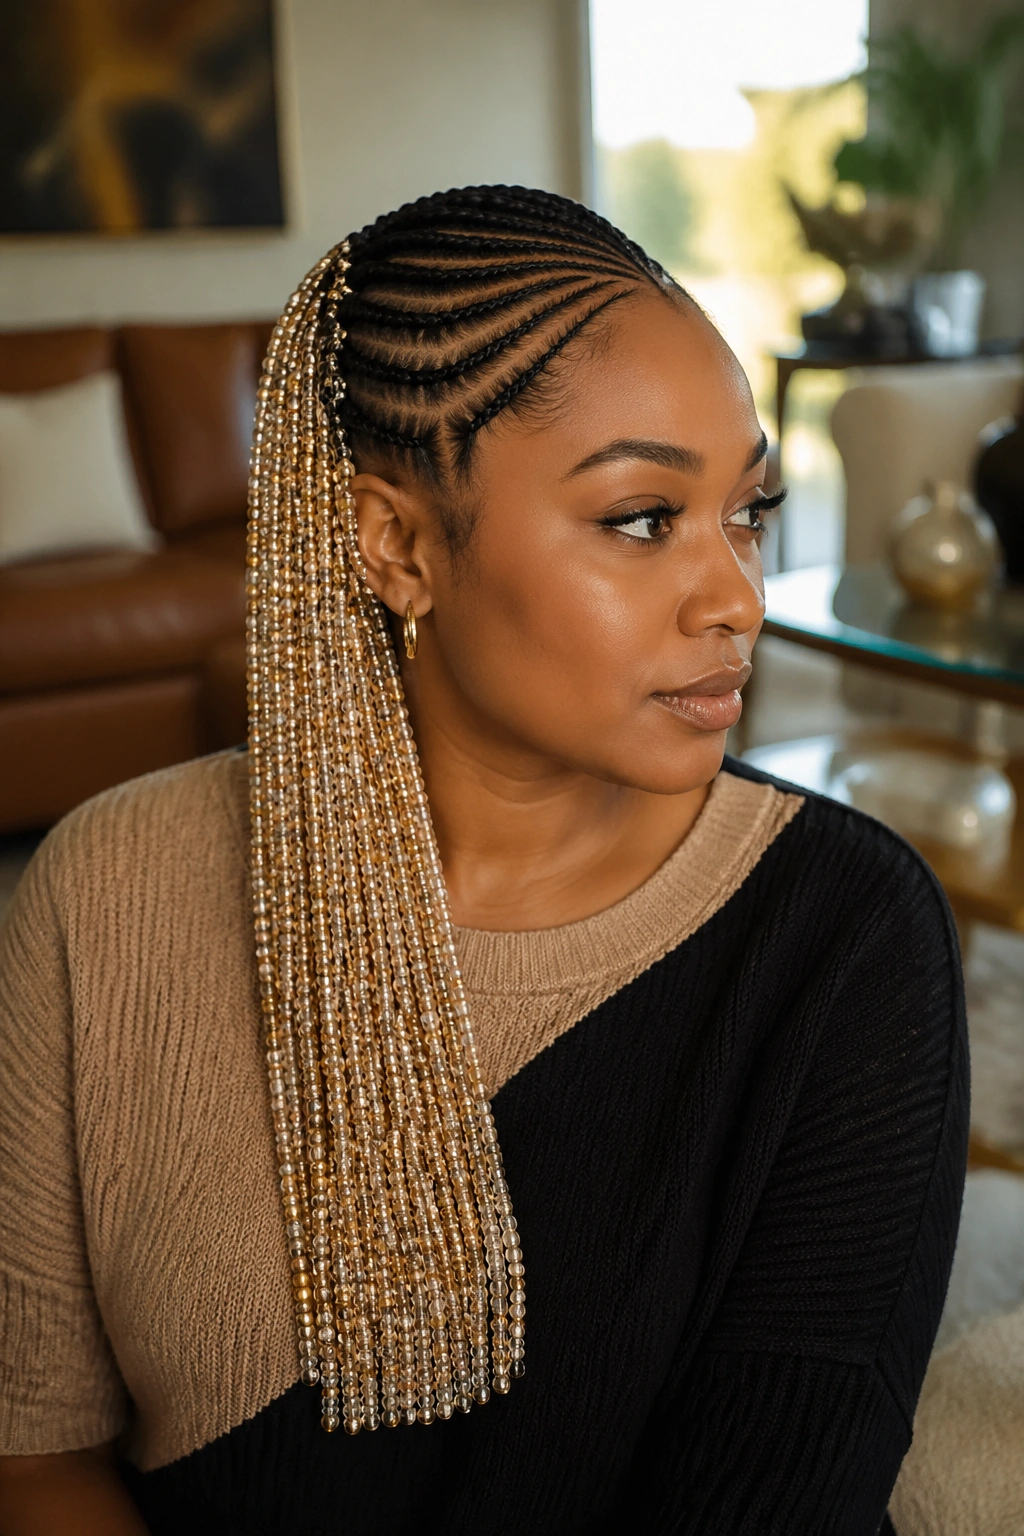
6. Side-Swept Cornrows With Glass Seed Bead Curtain
Cornrows start at the right temple, sweep diagonally across the head, and gather on the left side. From the bundled tail, a curtain of tiny glass seed beads hangs — hundreds of them on single strands, creating a sheet effect.
The seed bead curtain is the showpiece. It moves like liquid when you turn your head. Light passes through it. The effect is honestly theatrical in the best way.
What to Watch For
- Seed beads are fragile — don’t sleep with the curtain in
- Expect 4-5 hours for a full install
- The curtain needs to be removed and re-threaded for each wash
Tip: Use three different seed bead colors in alternating strands for depth. Solid color curtains read flat in photos.
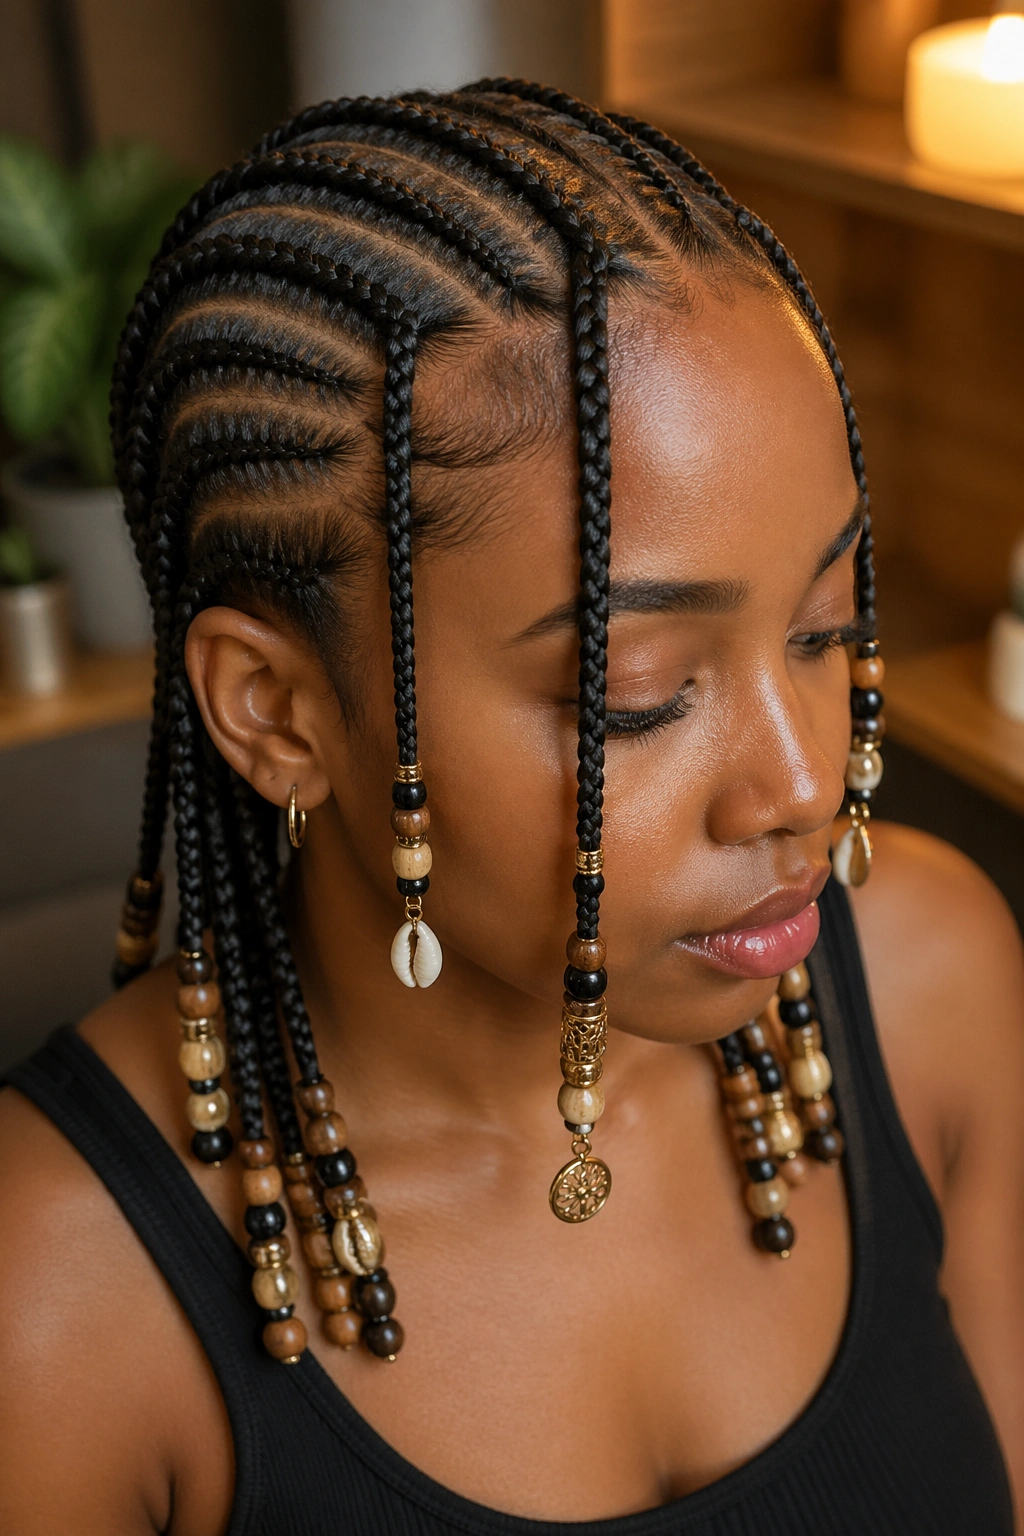
7. Cornrows With Beaded Hair Jewelry Charms
Not all beads are round. Hair jewelry — tiny charms, coins, cowrie shells, filigree rings — can be threaded alongside regular beads for a mixed-media finish. A few medium wooden beads punctuated by a single gold filigree ring per braid tip.
This pulls the style toward cultural reverence. Cowrie shells especially have deep significance in West African traditions, where they’ve been used as currency, spiritual objects, and status markers for thousands of years.
The look isn’t subtle, and it isn’t meant to be. It’s ceremonial, rooted, and intentional.
Balance is key — don’t load every braid with charms. One or two braids per section get charms, the rest stick to regular beads. Over-loading turns ceremony into clutter.
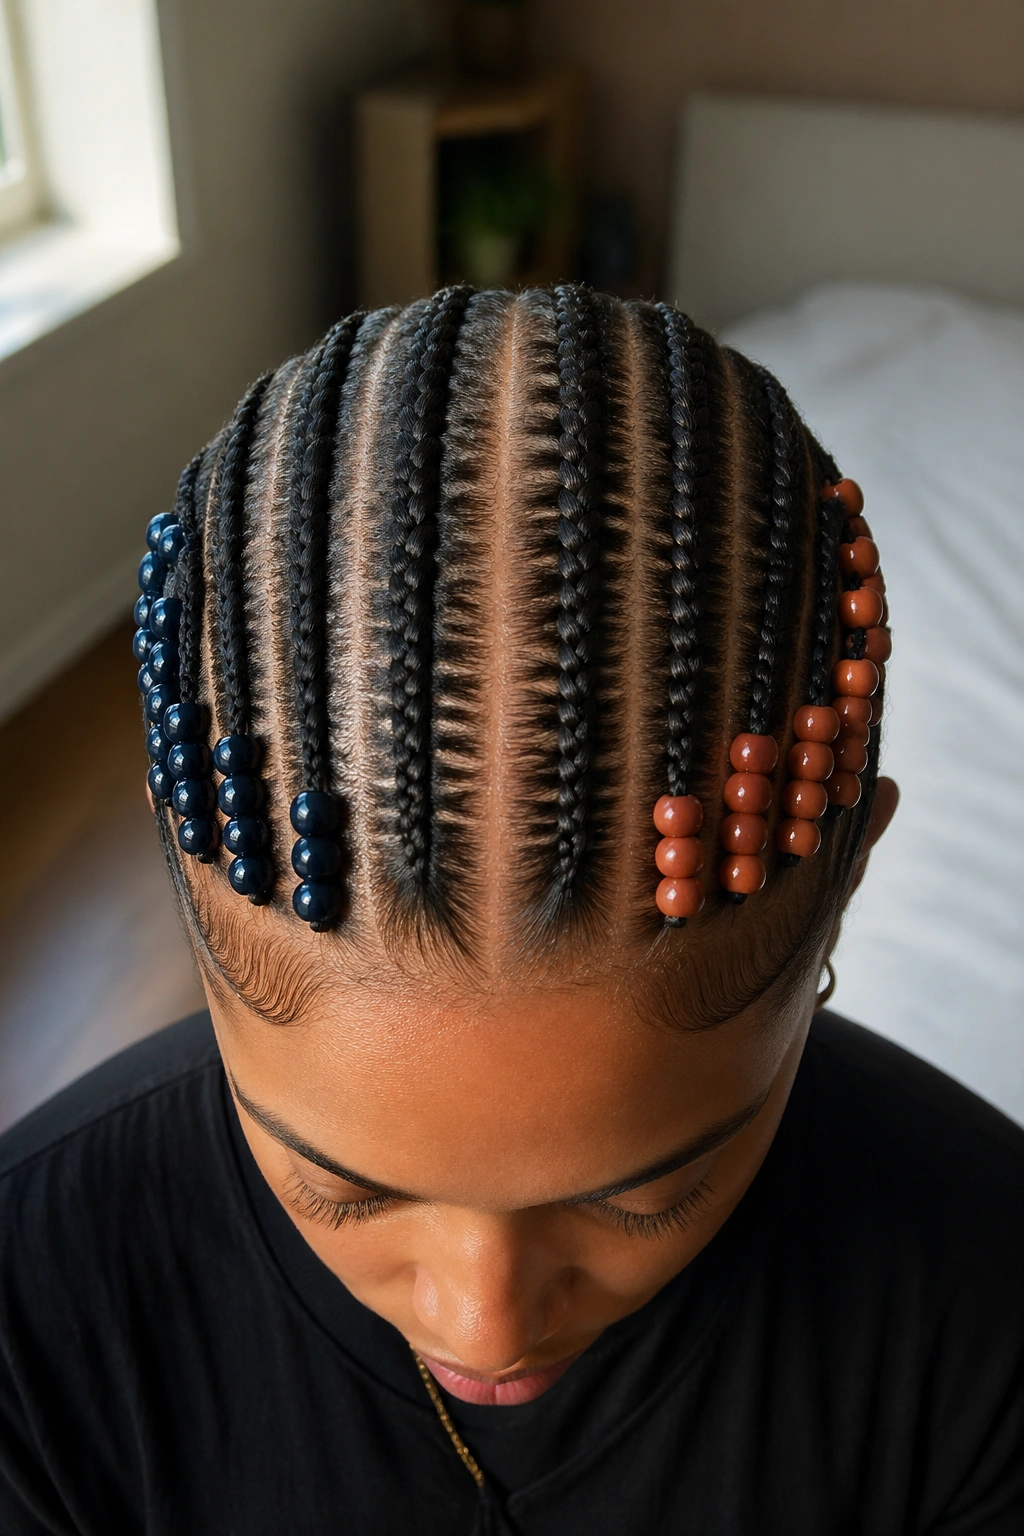
8. Middle-Part Cornrows With Matching Bead Colors Per Side
Eight cornrows total: four on each side of a dead-center middle part. Here’s the twist — each side gets a different bead color. Say navy blue on the left, burnt orange on the right.
Asymmetric color choices sound risky but work surprisingly well because the middle part makes the division deliberate. It’s not mismatched; it’s intentional contrast.
Works best with complementary or triadic color pairs. Red-and-green reads Christmas-y unless you pick specific shades. Blue-and-orange, purple-and-yellow, teal-and-coral — all reliable combos.
Worth the extra five minutes of color planning before you start braiding.
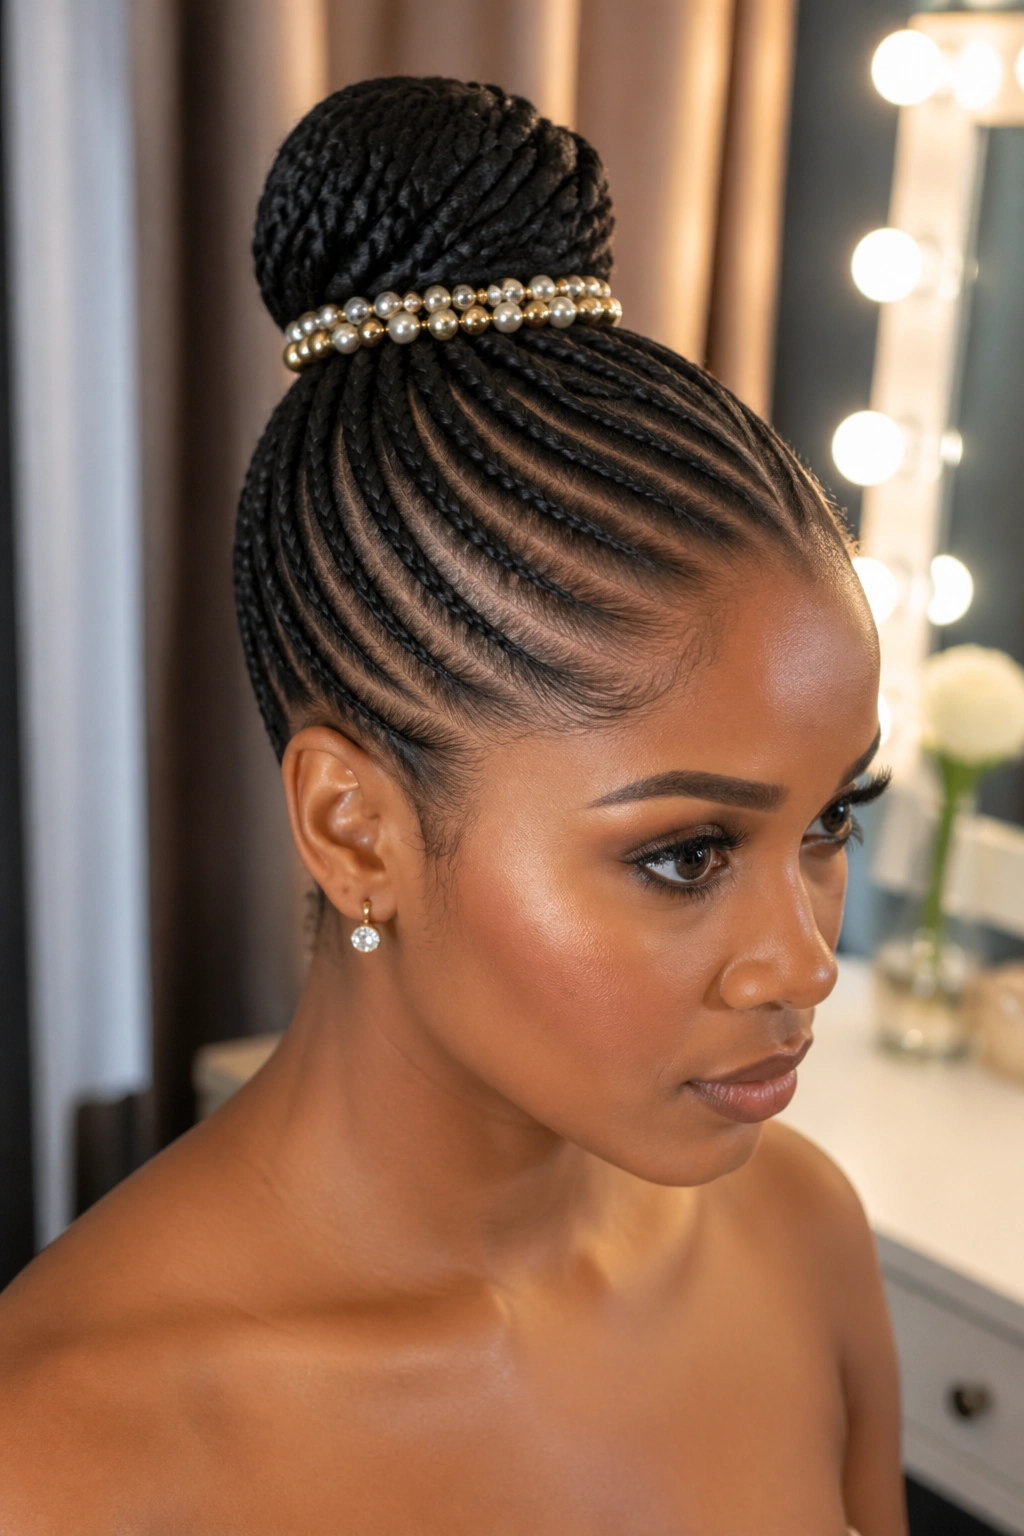
9. Cornrow Bun Updo With Beads Around the Base
Every cornrow feeds into a high bun at the crown. The trick is beads ring the base of the bun — maybe twelve to sixteen of them, all the same size, forming a crown-like circle where the braids tuck in.
Nothing hanging. Nothing dangling. Just a tidy circle of beads that reads almost like a tiara.
This is office-appropriate, wedding-guest-appropriate, and formal-event-ready in a way that dangling beaded styles sometimes aren’t. It’s also comfortable — no beads knocking the shoulders, no weight pulling at the nape.
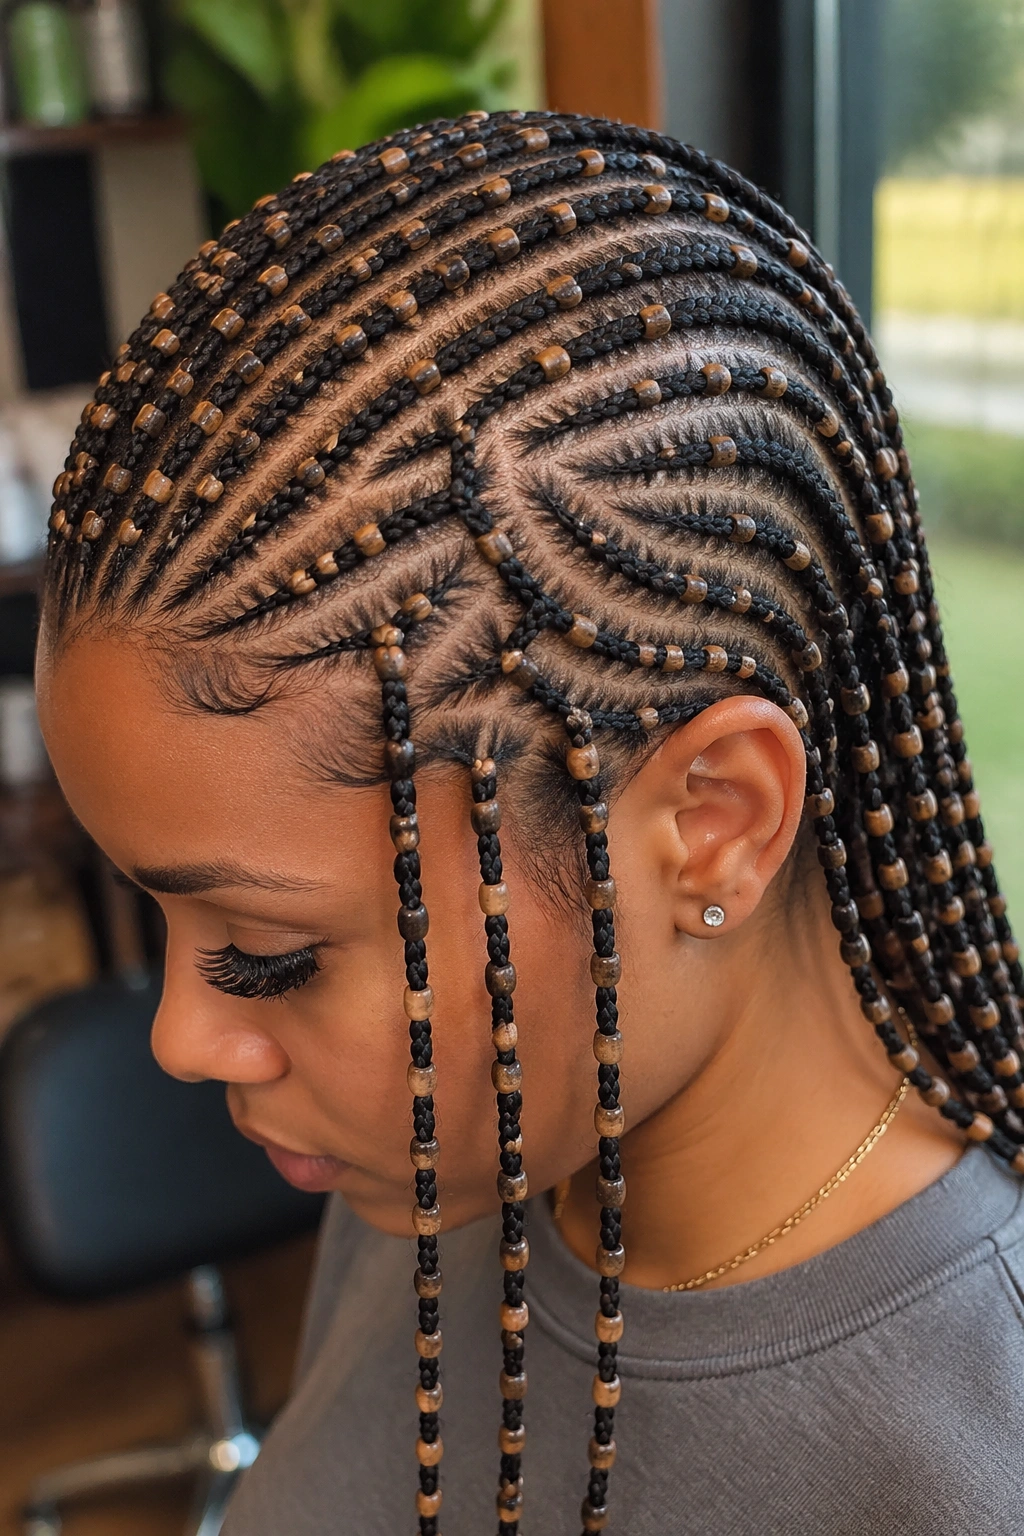
10. Tribal Cornrows With Small Wooden Beads Throughout
Tribal cornrows stack thin and thick braids together — usually a thick center braid flanked by two to three thinner ones on each side. Small 6mm wooden beads go throughout, not just at the tips. A bead every half inch along every braid.
The effect is dense. The whole head has this textured, ornamental quality where light hits wood from every angle. It’s earthy and rich and not trying to be shiny.
Install time is long — usually 4+ hours for a full head — because each bead has to be individually threaded and secured in place. Cuffs above and below each bead keep them from sliding.
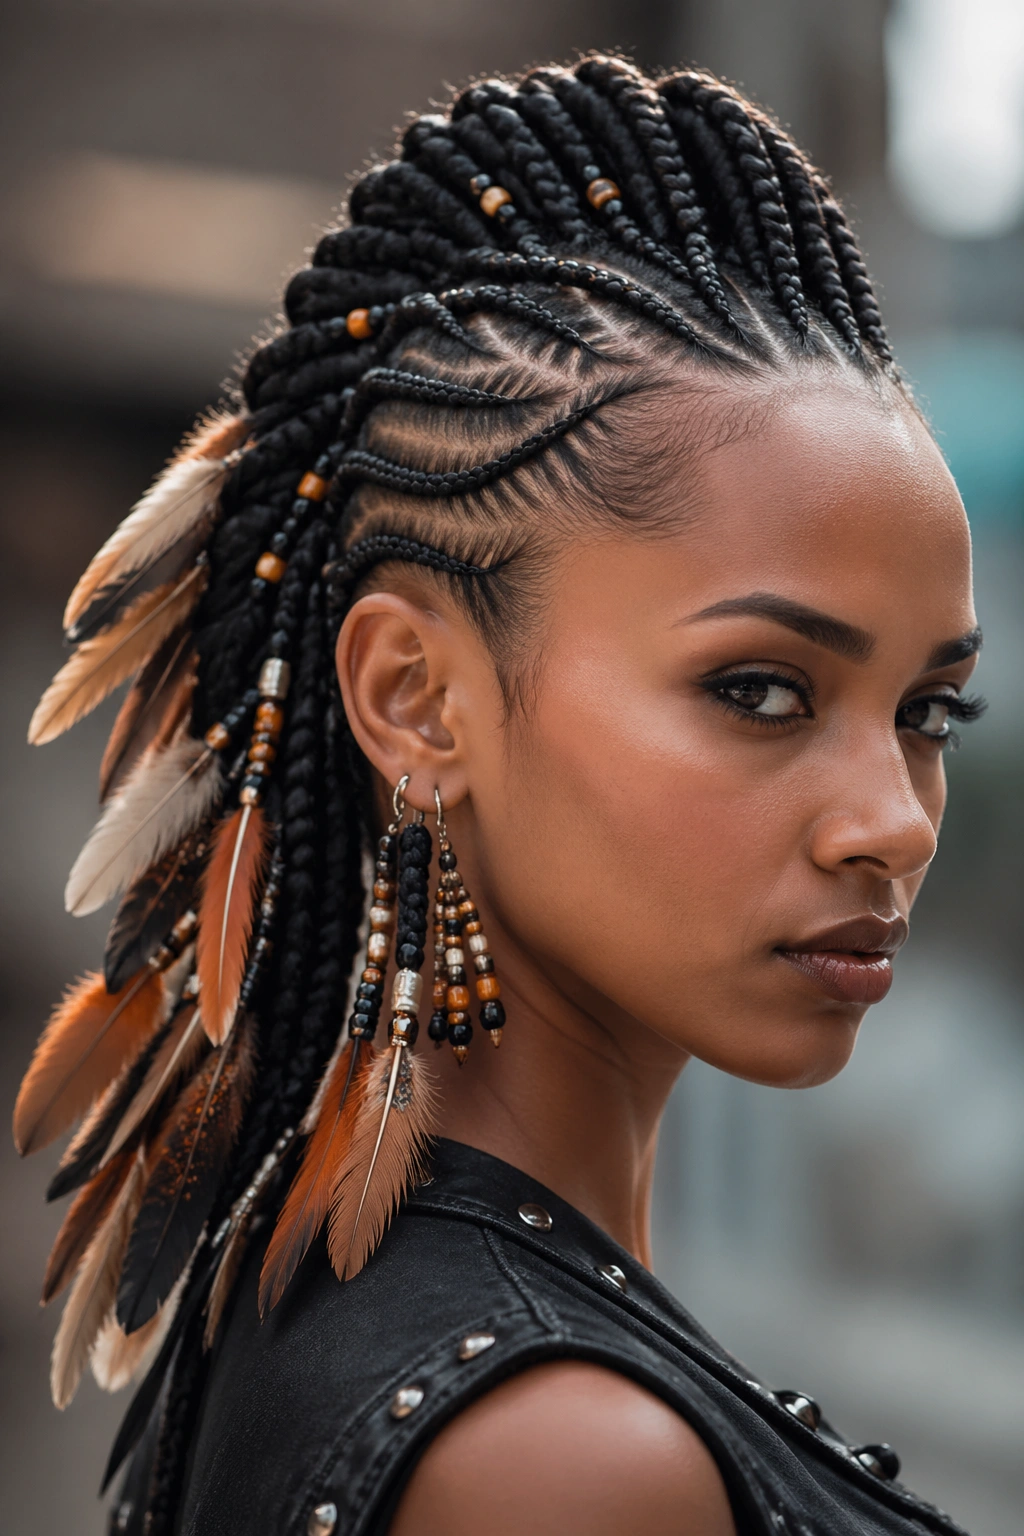
11. Cornrow Mohawk With Feather and Bead Accents
A mohawk-style cornrow layout: hair braided close to the scalp on both sides, leaving a raised ridge of braids running down the center. Add a couple of hanging feather strands and a few beaded tips, and you’ve got a style that leans rock-and-roll without abandoning the craft.
Feather extensions clip in at the end of select braids. Pick colors that contrast with your bead choice — pale feathers with dark beads, or vice versa.
Not for everyone. But for someone who wants cornrows with attitude, this delivers.
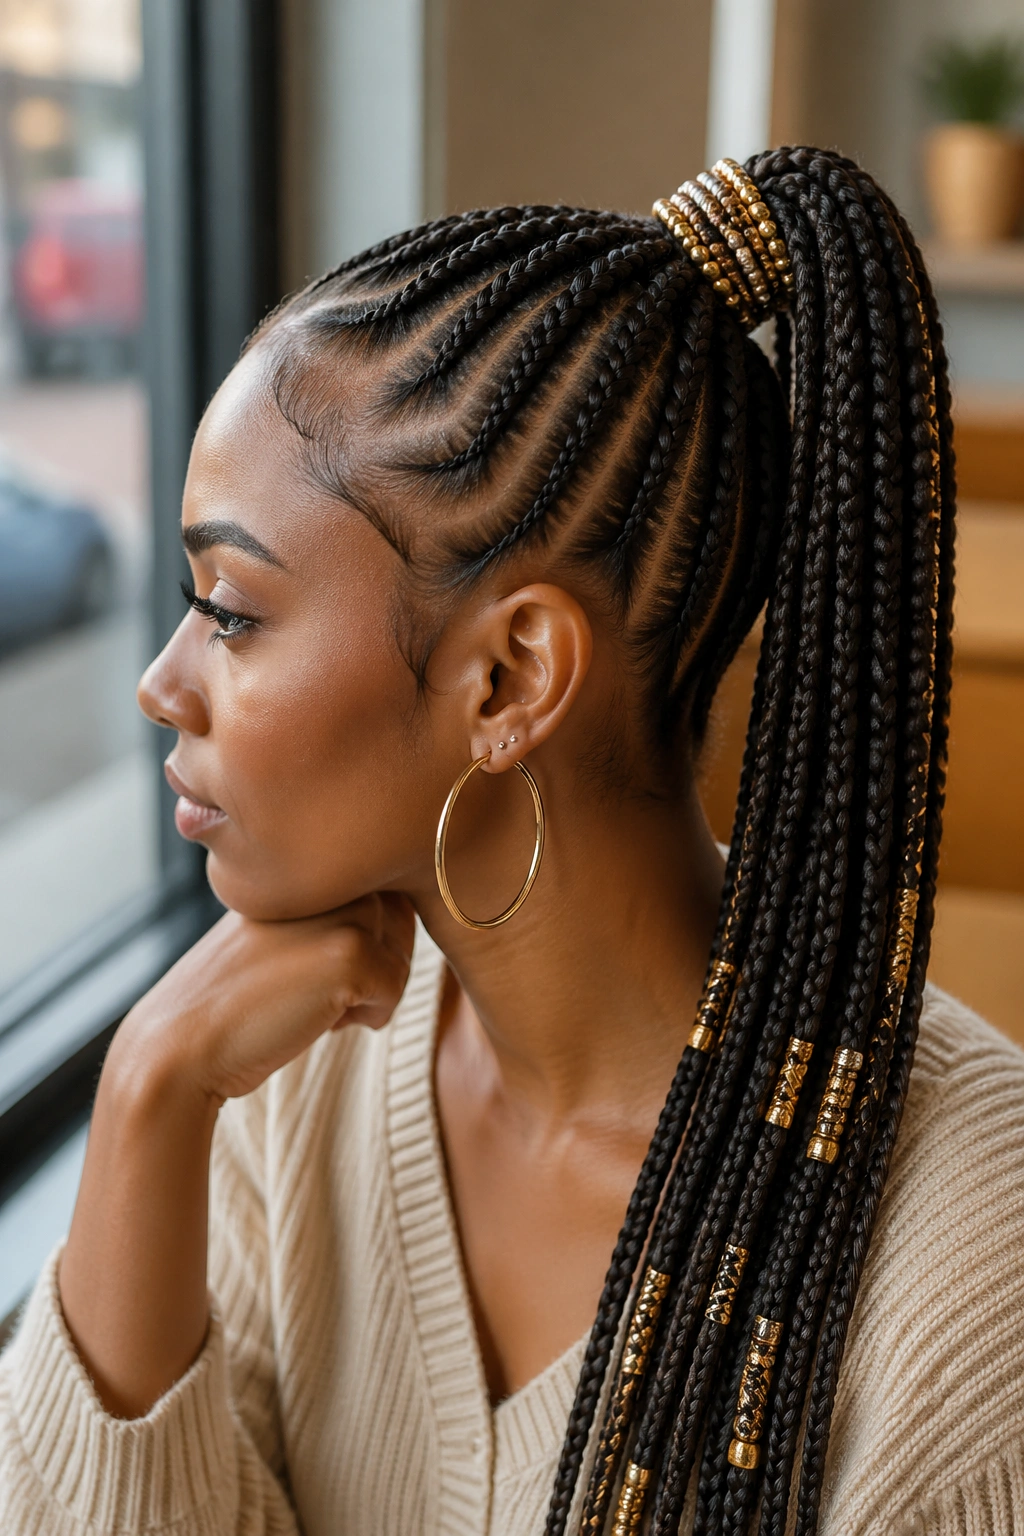
12. Cornrow Ponytail With Beaded Wrap
Forty cornrows all braided into a single thick ponytail at the crown or nape. The base of the ponytail gets wrapped with a length of braided hair threaded with small beads — maybe one bead per inch of the wrap.
The beaded wrap looks like a ribbon — almost belt-like — snaking around the ponytail base. It hides any rubber band or tie, replacing it with decoration.
Who This Is For
Women who want a professional look with a hidden bit of craft. The wrap is subtle from across the room; up close, it’s detailed and striking.
Low maintenance too — swap the wrap when it frays without redoing the whole style.
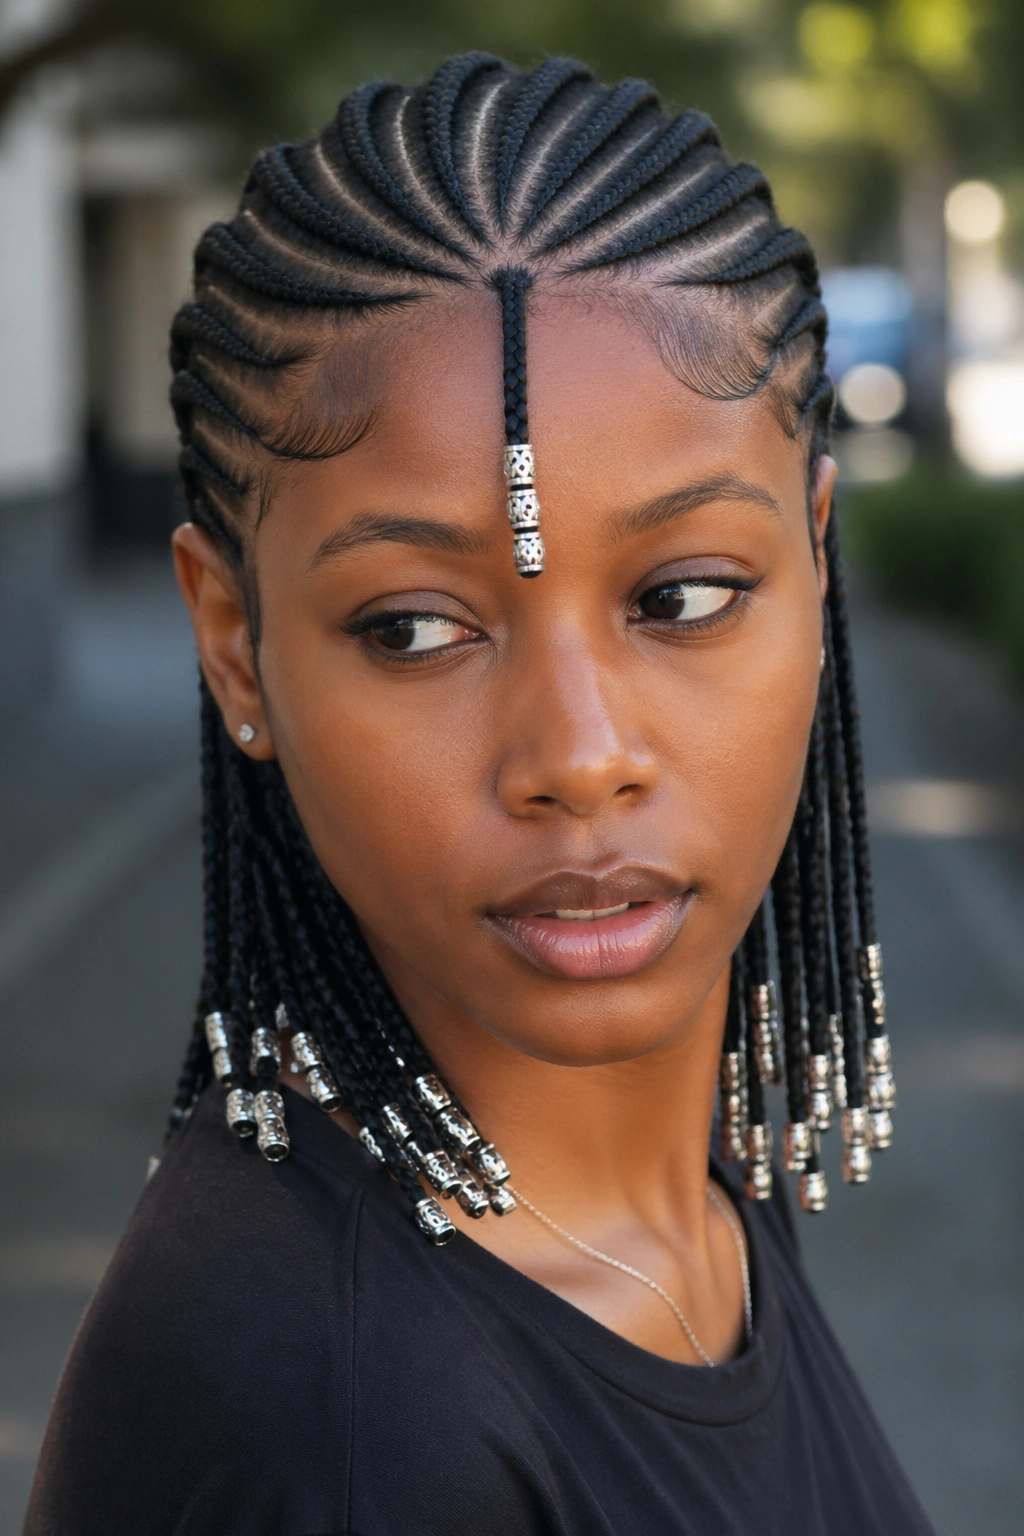
13. Fulani-Inspired Cornrows With Silver Accent Beads
Fulani braids combine cornrows along the crown with a single braid down the center forehead — and typically include beaded accents in silver tone. It’s a distinct cultural style from the Fulani people of West Africa.
Silver beads keep it classic. A single center braid with five silver beads along its length. Cornrows running back from the hairline, each ending in a silver-capped tip. Maybe hoops or rings in a few strategic places.
This is a style with history. It deserves respect, and Fulani-inspired cornrows look best when you lean into the tradition rather than borrowing pieces of it. A braider who understands the cultural roots will do right by the style.
14. Cornrows With Beaded Headband Integration
Braid a beaded headband into the front cornrows — literally. Instead of wearing a headband over the braids, your braider weaves a thin beaded strand into the top two cornrows so it forms a visible band across the forehead.
This reads architectural. The headband isn’t an accessory; it’s structural.
Use a pre-strung bead strand from a craft store — the cheap plastic ones work fine because the beads are small and subtle. Braid the strand into the cornrow starting at one temple, across the hairline, and anchor at the other temple.
The illusion is wild. People can’t tell how the headband is staying on. Because there is no headband — just braid.
15. Double-Layer Cornrows With Beads at Crossover Points
Cornrows cross over each other in an X-pattern at the crown before running down the back. At each crossover point, a single large bead sits like a button holding the X together.
This is geometry made visible. Four to six beads across the head, each marking a node where two braids intersect.
It photographs well from above — drone-shot wedding photographers ask for styles like this. And it’s genuinely fun to look at because your brain tries to trace which braid leads where.
More complex to install, obviously. Find a braider who’s done cross-pattern work before, or you’ll get crooked intersections.
16. Cornrows Into Beaded Braids With Color Blocking
Cornrows start at the hairline in solid black, then transition to a specific color halfway down — maybe deep burgundy or navy. At the color transition point, two large beads mark the change. At the tips, more beads in the new color.
Color blocking is straightforward to do — kanekalon or braiding hair in two colors gets fed in at the right moment during braiding. What makes it work is the bead placement marking the transition rather than letting it just fade.
Tip: Pick a color transition that actually contrasts. Black-to-dark-brown looks unintentional. Black-to-burgundy reads purposeful.
17. Scalp-Close Cornrows With Beads Embedded Every Inch
Braids sit tight to the scalp, no raised parts. Small 4mm beads are embedded every inch along the braid, not just at the tips.
The embedded beads create a dotted-line effect running from hairline to nape. It’s understated. It’s also incredibly specific — most people won’t notice the beads unless they’re close, but from close up, the detail is striking.
Good for professional environments where flashy hair isn’t the vibe but you still want craft.
Expect 5+ hours install time. Each bead is individually threaded and cuffed into place.
18. Cornrows With Beaded End Cap Fringe
Cornrows end in a dense cluster of beads — not stacked vertically like normal, but fanning out in a small fringe of 15-20 beads per braid tip.
You get the fringe by threading multiple short strands of beads onto hair cuffs, which attach to the end of each braid. It looks like tassels.
The movement is the selling point. Every step sends the fringe swaying in all directions. It makes a soft rustling sound too.
Not for work. Not for yoga. For nights out, concerts, and photo ops, this is hard to beat.
19. Front-Facing Cornrow Crown With Beaded Center
A crown of cornrows circles the head, meeting at the front — almost like a halo. Where they meet, three to five beads sit prominently, like the centerpiece of the halo.
This is a halo braid reimagined with cornrow structure. The base braids run sideways across the scalp instead of vertically down the back.
Crown braids generally flatter round and heart-shaped faces because they add vertical length. With the bead cluster at the front, there’s an intentional focal point above the forehead.
Tip: Pick a bead cluster that matches your skin undertone. Warm tones get warm bead colors, cool tones get cool. The beads sit close to your face, so they’ll pull color either way.
20. Cornrows With Pearl Beads for Bridal Styling
Small freshwater pearls — real or faux — scattered through a clean cornrow set. Not at the tips; throughout. Five or six pearls per braid, placed at different heights.
This is the go-to for bridal cornrows, formal events, and moments where you want beads without reading as playful. Pearls bring a softer, more elegant register.
Faux pearls run cheap and look indistinguishable from real pearls in photos. Real pearls cost more but have a different weight and luster in person.
Pair with a pearl drop earring and call it done.
21. Cornrows With Beaded Braid Extensions at the Nape
Cornrows stop at the nape, then feed into long loose braided extensions that drape down the back. The extensions are heavily beaded — maybe fifteen beads per braid, spaced evenly along the length.
The cornrow portion is clean and close to the scalp. The extensions turn into a beaded curtain down the back. It’s two styles in one.
Works especially well with ankle-length or waist-length extensions because the beads run the full length of the drape. From the back, it looks like you’re wearing beaded drapes.
Weight adds up fast — a full head of beaded extensions can reach five pounds. Your neck will feel it by hour eight.
22. Cornrow Mohawk With Beaded Brow Accents
Similar to the feather mohawk mentioned earlier, but swap the feathers for beaded fringe that falls forward over the forehead. The fringe hangs from the front-most cornrow and sways across the brow.
Bangs made of beads. That’s the short version.
The fringe shouldn’t hang below the eyes — that’s annoying and gets caught in eyelashes. Keep it above the brow bone. Short and choppy works better than long and sweeping for this specific look.
23. Cornrows With Geometric Bead Patterns
Beads arranged in specific patterns across multiple braid tips — maybe a diamond pattern, or a chevron, or a concentric circle. It’s a multi-braid coordinated design.
This takes serious planning. Your braider maps out which bead goes on which braid before starting. When it’s done, the geometric pattern reads across the back of your head like a mosaic.
Diamond patterns work best because they have a clear center point. Chevrons need perfectly even braid spacing to look right. Circles are hardest.
Maintenance Notes
- Don’t toss-and-turn in your sleep — patterns shift
- Take photos immediately after install in case a bead falls out
- Budget 5-6 hours for install
24. Cornrow Side Part With Triangle Beaded Tips
Hair’s parted on a sharp side part — often starting from a peak above one eye — with cornrows running back from the part. At the tips, small triangle-shaped beads replace round ones. The geometric tip shape adds angles to a style that’s otherwise soft.
Triangle beads (also called pyramid beads or cone beads) are less common but easy to find on craft supply sites. They come in wood, metal, and acrylic.
Best on women with strong jawlines because the triangular beads echo the jaw angle. Softer faces can still pull it off with rounder-shaped triangles.
25. Half-Up Cornrow With Beads at the Gather Point
Cornrows from the front of the head pull back and gather at the crown, leaving hair at the back loose or extension-added. At the gather point, a wrap of beads encircles the base — like a jeweled scrunchie.
This is weekend-brunch-meets-wedding-guest territory. Polished but not overly formal. The loose hair in the back gives it a softer silhouette than a full cornrow set.
The Catch
- Takes about 90 minutes to install
- The gather point is a pressure spot; expect some scalp tenderness
- Loose back hair needs its own care (detangle nightly, oil the ends)
Tip: Use a velvet-wrapped scrunchie under the beaded wrap if you’re worried about scalp pressure at the gather point.
26. Micro Cornrows With Tiny Seed Beads
Forty to fifty ultra-thin cornrows across the head, each ending with three to five tiny 3mm seed beads. The braids are almost hair-thin. The beads are so small they look like grains of sand clinging to the ends.
This is quiet elegance without using the phrase quiet elegance. It reads refined, grown-up, and remarkably delicate.
Installation is grueling — 6-8 hours because of the sheer number of braids. Not a style for the impatient.
The payoff is a head of cornrows that moves like silk. Micro braids drape the scalp tighter than medium braids, so the whole head reads smoother and more flowing.
27. Cornrows With Beaded Braid Loops
Instead of letting each braid hang straight, the ends of select braids are looped back up and secured with beads, forming loops at the base of the head. A cluster of maybe five to seven looped braids at the nape creates a sculpted effect.
This is a cornrow pinup. The loops sit tight at the nape, beaded at the anchor points, and the rest of the cornrows run clean across the crown.
Great for avoiding hair touching the neck in hot weather. Also appropriate for swim days since there’s nothing hanging to get wet.
28. Cornrows With Beads Shaped Like Cowrie Shells
Cowrie shell beads — actual cowrie shells or molded cowrie-shape beads — at the tips of each cornrow. Usually two or three per braid, sometimes mixed with small round beads for spacing.
Cowrie shells have a distinct oval shape with a ridged opening along one side. They’re white or cream and feel smooth as glass. Real cowrie shells have been used in West African adornment for millennia.
This style leans ceremonial. It’s appropriate for cultural events, celebrations, photo shoots, and anyone who wants to carry a piece of the tradition visibly.
Tip: If you can’t source real cowries, molded resin versions are a close second and cost a fraction of the price.
29. Cornrow Twist-Out With Beaded Accents at Crown
Cornrows that are then unraveled after a few hours to create a cornrow twist-out — wavy, textured hair with braid imprints. The crown keeps the cornrows intact and beaded, while the back flows loose and wavy.
You’re basically getting two styles back-to-back from the same setup.
The crown beading anchors the transition between tight braided top and loose textured bottom. Without it, the style looks unfinished.
This is a great option for someone who wants a cornrow look for the weekend but needs loose-hair flexibility for the workweek.
30. Freestyle Cornrows With Scattered Beads in Mixed Sizes
The catch-all: freestyle cornrows running in whatever direction the braider chooses, with beads scattered throughout in multiple sizes, colors, and materials. Nothing is coordinated. Nothing is matched.
This is the style for when you’ve outgrown symmetry. Three wooden beads on one braid, one metal bead on another, five acrylic beads on a third, nothing on a fourth. The whole head looks like a collection assembled over years.
It reads personal. It reads lived-in. It reads like someone who’s been wearing beads long enough to stop following rules.
The secret is deliberate asymmetry — not randomness. Your braider has to plan the chaos so it doesn’t look sloppy. Think curated museum display, not junk drawer.
Maintenance: Making Beaded Cornrows Last
Beaded cornrows can last 4-6 weeks with proper care. The limits are scalp health, frizz control, and bead wear, not the braids themselves.
Wash every 7-10 days using a diluted sulfate-free shampoo applied with a spray bottle to the scalp. Rinse thoroughly. Skip conditioner on the braids — it builds up in the synthetic hair and leaves residue.
Oil the scalp every 3 days. Use a lightweight oil — argan, jojoba, or grapeseed — not thick coconut oil which can clog pores. A few drops massaged into the parts keeps the scalp happy.
Sleep in a satin bonnet or on a satin pillowcase. Cotton grabs at beads, at braids, at edges. Satin lets everything slide.
Retouch the edges weekly with edge gel and an edge brush. Four weeks of grown-out edges turns a sharp style into something sad.
Remove loose beads as soon as they slip. One loose bead tangling in another braid creates knots that are miserable to undo at takedown.
Scalp Care With Beaded Styles
Heavy beads mean heavy tension at the root. That’s not negotiable physics. What you can control is how you minimize the damage.
Drink more water than normal. Hair strength correlates with hydration, and tight styles punish dehydrated hair faster.
Massage your scalp during every wash with firm circular pressure. This increases blood flow to follicles and relieves tension buildup from tight braiding.
Watch for signs of traction alopecia at the hairline — small bumps along the edge, sore spots, or thinning patches. If any of these show up, take the style down early. Hair grows back; follicles that scar don’t.
Tip: If your scalp feels tight within the first 24 hours of a new install, ask your braider to loosen the edges. Most will do a free touch-up within 48 hours.
Taking Beaded Cornrows Down Safely
Remove beads first — cut the cuffs with small scissors carefully, pinching the braid to keep from snipping hair. Save the beads. They’re reusable forever if you handle them gently.
With beads off, dampen the braid tips with detangling spray. Use a seam ripper or the pointed end of a rat-tail comb to unravel each braid from the tip up. Don’t yank.
Once unbraided, finger-detangle section by section. Wash with a clarifying shampoo to strip buildup, then deep condition for at least 30 minutes.
Expect shedding. You’ve been collecting every strand that normally falls out — 80-100 per day — for four to six weeks. That’s 2,400-4,200 strands waiting to release at takedown. It looks like a lot because it is. Your hair isn’t falling out in chunks; it’s simply releasing what was held back.
Common Mistakes With Beaded Cornrow Styles
Overloading beads. More beads does not equal a better style. After a certain point, beads weigh the braid down, lift it off the scalp, and read cluttered.
Mismatched bead sizes on thin braids. A jumbo bead on a pencil-thin braid looks wrong every time. Scale matters.
Ignoring bead hole quality. Cheap beads have rough interior holes that shred synthetic braiding hair. Pay slightly more for beads with smooth, fire-polished holes.
Sleeping in beads on cotton pillowcases. The beads catch, the braids lift, and your hair ends up frizzy by morning. Satin is non-negotiable.
Skipping the scalp oil. Dry scalp under beaded cornrows flakes, itches, and peels. Three minutes every other day prevents weeks of discomfort.
And finally — don’t pick a style from a single photo without knowing your face shape, hair density, and scalp sensitivity. What works on one woman’s Instagram feed might not work for your specific head. Consult your braider. Trust their experience. And when in doubt, start simpler than you think you want. You can always add more beads. Removing them means sitting back down in the chair.